
This guide provides instructions on how to adjust the field of view (FOV) and disable the vignette effect (faded screen edges) using RE Framework.
How to Guide
- Download the latest version of RE Framework from this link.
- Extract the “reframework” folder and the “dinput8.dll” file from the downloaded zip file into your game folder.
- Start the game.
- Wait for the mod’s UI window to appear. If it doesn’t appear on the main menu, press the Insert key on your keyboard.
- Load your saved game or start a new game and wait until you are in the first-person camera view.
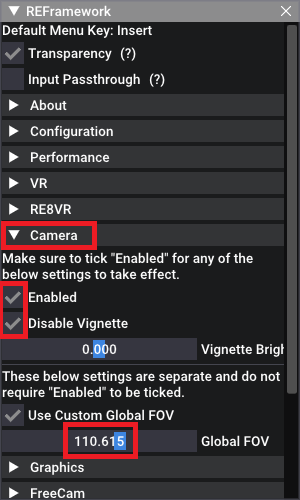
- Expand the “Camera” menu.
- To increase the FOV, drag the “Global FOV” blue box towards the right until you achieve your desired FOV. A value of 110 is recommended for screens with a 16:9 aspect ratio.
- To disable the vignette effect, check the boxes for “Enabled” and “Disable Vignette”.
- Press the Insert key again to close the mod’s UI window.
- Enjoy the game with the adjusted FOV and disabled vignette effect!
Note: RE Framework is compatible with other Resident Evil games such as RE2, RE3, RE4, and RE8. However, you will need to download the specific mod for each game. The provided link will direct you to the respective mod.
This guide about Resident Evil 7 Biohazard was written by
AbdullahMKiral.
You can visit the original publication from this link.
If you have any concerns about this guide, please don't hesitate to reach us here.