هذا ال long و comprehensive guide on how to be the best diver possible all throughout the Great Blue Hole, from a diver that has collected all FishMon and grossed over 6 million gold in sales. It will cover everything that you need to know as Bancho’s favorite diver, some helpful tips to make cash fast, as well as an overview of other game knowledge that is sure to help you land the big ones.
If you want to take these tips and get الماس rated on Cooksta, make sure to check out our Discord where you can find many friendly divers to trade Marinca cards with.
The Basics
Welcome to the Great Blue Hole! I have a feeling you’re going to love it here.
I’ll begin this guide with a very brief subsection about the most important things in my opinion. This is dedicated to things that, if you don’t read anymore than this section of the guide, you’ll have a good footing to have fun and prosper in game.
To start us off, ال #1 thing I have to tell anybody playing the game is to take your time. Don’t ever feel rushed to get through certain parts of the game. The only two things that have a time limit are the Party Events و VIP Events, but you will still have plenty of time to gather all the necessary ingredients for whatever dish(إس) are required.
ال #2 thing is that if you want a no-sweat kind of playthrough, upgrade the Basic Underwater Rifle to the Tranquilizer Rifle as soon as possible. ايضا, for the end game, I have a short list marked as a spoiler below for a very simple 3 weapon loadout that will make your game time painless.
- Upgrade the Red Sniper Rifle to the Red Sniper Rifle III for Boss Fights.
- Upgrade the Hush Dart to the Modified Hush Dart for getting 3 star large fish.
- Upgrade the Small Net Gun to the Steel Net Gun for getting 3 stars on all other fish.
ال #3 thing is you should never be afraid to flee a fight that you don’t want to take. There are only a handful of fish in the game that you won’t be able to simply outrun (assuming you aren’t over your weight limit). This leads us to the next point.
Point #4 is that in the iDiver upgrades, you should prioritize your Storage Box capacity and Salvage Drone unless you are having difficulty with the game. If you do happen to be struggling with the combat, feel free to take extra O2 Tank upgrades as needed.

To cap us off, Point #5 is to use the escape pods to return to the boat faster than swimming back to the top. There is no downside to leaving with the pods, and over the course of the game you’ll save a lot of your valuable time.
أخيراً, if you’re leaving after reading this section, I hope you have a great time with the game! If you plan on reading the rest of the guide, I hope you learn a lot and enjoy your read!
Dave
Now it’s time to talk about our favorite big guy diver!
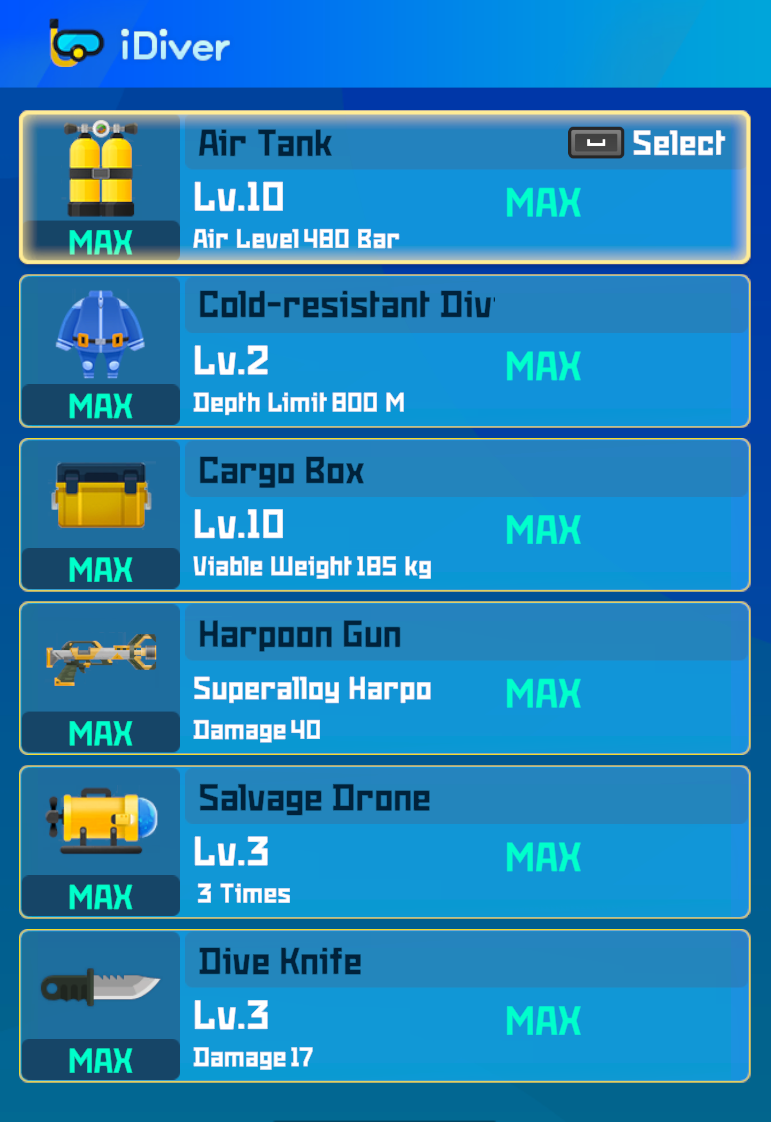
The first and most important set of purchases that you will make is in the iDiver app on your phone. Below is a list of the upgrades that I deem most important to least important from top to bottom.
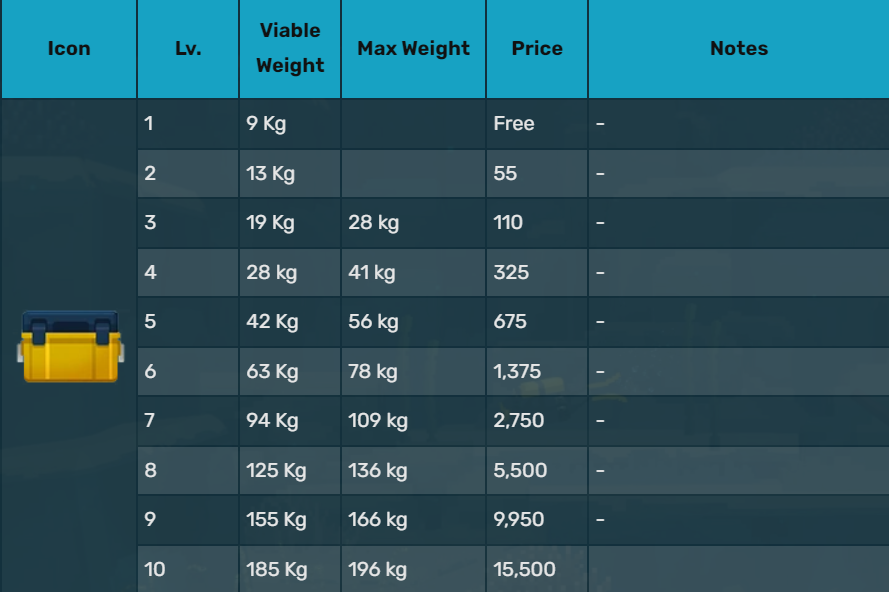
- Storage Box – The collective weight of all items that you can bring back to the boat.
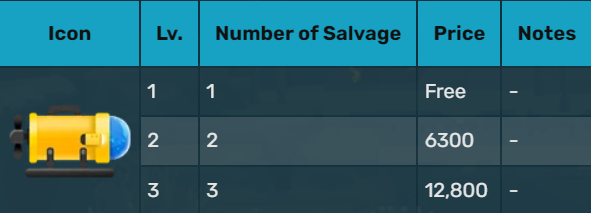
- Salvage Drone – Unlocked later on. The amount of times you can harvest a large fish.
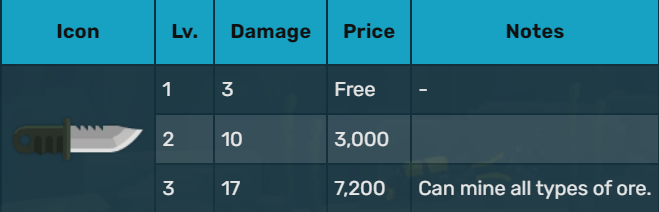
- Dive Knife – Unlocked later on. Let’s you mine gems without a pickaxe and increases damage.
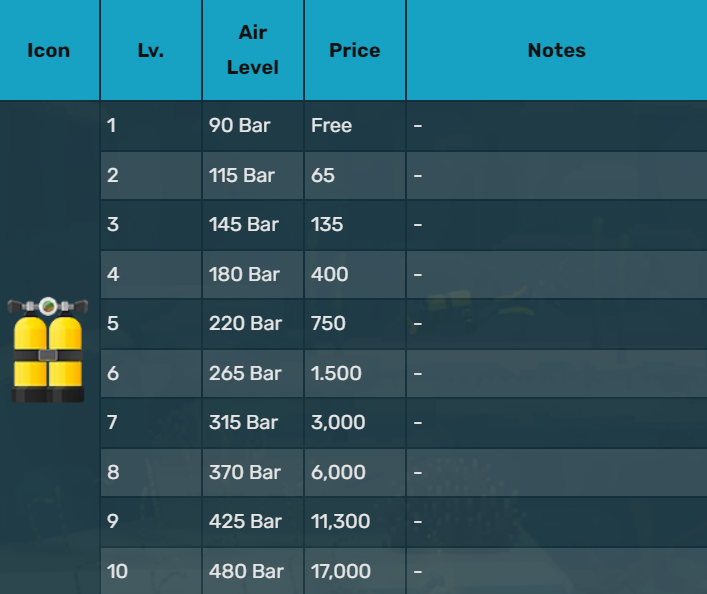
- Air Tank – The amount of oxygen (or life) that you have. Worth upgrading to dash more frequently.
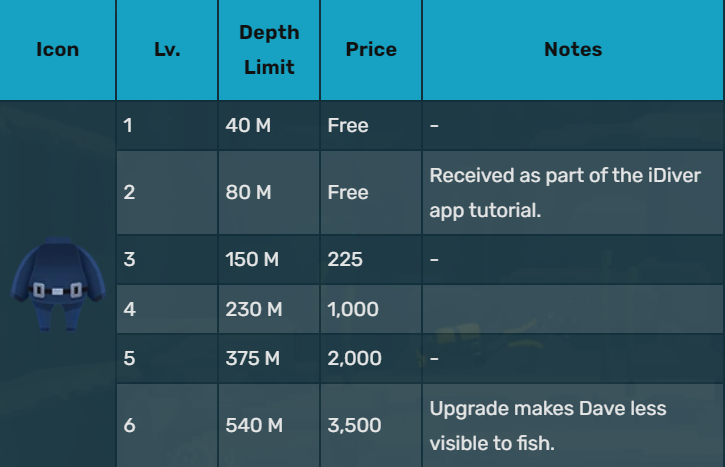
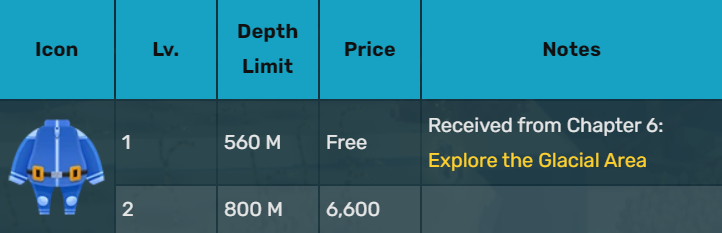
- Dive Suit – Your max depth before you start to quickly lose oxygen. Only upgrade as necessary.
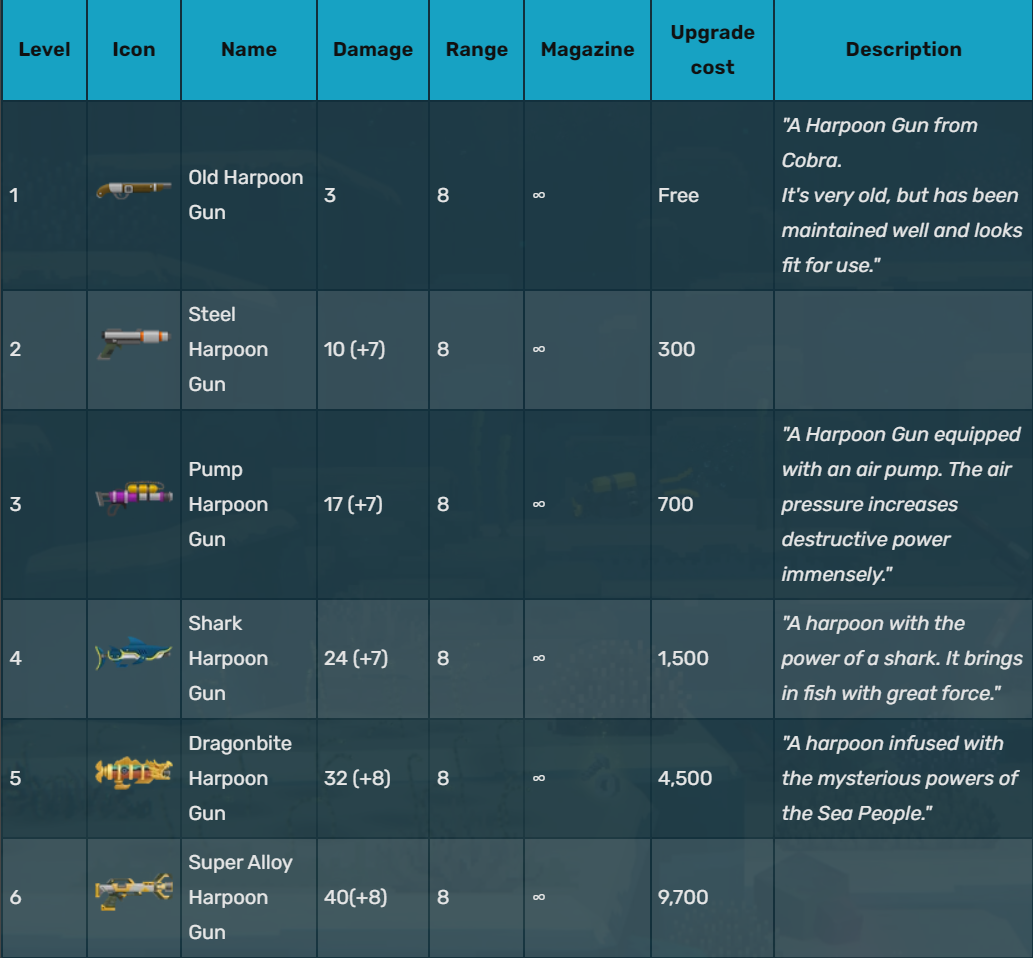
- Harpoon Gun – The damage that your harpoon gun does.
Now of course this list is not set in stone. The truth is that even though the Dive Suit is listed #5, it is a necessary upgrade to complete the game. I list it lower than Storage Box and Salvage Drone because it really doesn’t help you at all until it is absolutely required to proceed. ايضا, ال Air Tank may be more useful to you if you are having difficulty managing your oxygen levels or if you find the combat too challenging. The only listings that I believe to be objective are the Storage Box و ال Harpoon Gun.
ال Storage Box is vital to your game experience as without sufficient upgrades, you will progress much slower due to lack of funds. How are you expected to make money when you can only bring up 3 Blue Tangs و أ Barracuda (نعم, that is actually very close to the default weight limit) each time you dive.
On the opposite end of the list lies the Harpoon Gun. Seemingly it would seem like one of the better upgrades in the entire game. The fault lies in the fact ال Harpoon gun should always be your second option. There is only one situation in the game, so long as you have ammo, that your gun will be a worse option than your harpoon. That singular situation is if you happen to get lucky and find a Tranquilizer Harpoon Tip from a Supply Chest, and you also didn’t bring down your Hush Dart أو Net Gun to capture the fish alive. Having said this, it’s still worth getting the first couple of upgrades as they become cheap very quickly. It’s always nice to have a good second option.
In the section below are a series of helpful tables that I have pulled from the wiki. They detail the equipment item, the relevant stat being upgraded, and the cost of the upgrade itself. Use this to determine which purchases are best for you with the list above in mind.
Cobra’s Shop
Early on in the game, you will unlock access to Cobra’s Shop where you can buy consumable items to help you on your dives. These are the same items that you can find in the Supply Chest’s scattered underwater, but Cobra also carries a few unique items that can only be found in his shop. They will be marked with a “ج” logo just like the image below.

Cobra’s Shop is only open in the morning and afternoon. He will have 3 random items each day. Any items you purchase can only be used during the time period that you bought them in (أي. If you buy an Doll Decoy في الصباح, you will be able to use it during your morning dive only). If you do not use the item during your dive, it will be removed from your inventory when you return to the boat.
Here is a list of the items that are exclusive to Cobra’s Shop.
- Doll Decoy – Distracts aggressive fish for 13 ثواني. No Cobra icon but I have not found them in Supply Chests.
- Ink Bomb – Will make you invisible while in the ink cloud. It lasts 7 ثواني.
- Lure – Will attract fish briefly to the area. Good for setting up net gun shots.
- Oxygen Tank Expansion – Increases maximum O2 by 10% for your dive.
- Sensor Net Trap – Automatically captures up to 5 small fish when it senses movement.
- Steel Net Sensor Trap – Automatically nets up to 2 medium or fish when it senses movement.
- Underwater Cargo Box – Allows you to secure 10 kg worth of items at any point during your dive.
All of the items in the Consumables subsection can be found in Cobra’s Shop as well.
Consumables
The remainder of the consumable items can be found in the Supply Boxes underwater. Of these items which are listed below, ال Oxygen Capsule is probably the most useful. It’s essentially a second life that can save you in risky situations or boss fights.
- Oxygen Capsule – On use, restores 50% of your maximum oxygen capacity instantly.
- Underwater Scooter – Movement speed increased by 70% ل 10 ثواني.
- Long-Distance Underwater Scooter – Movement speed increased by 50% ل 20 ثواني.
- Sensor Bomb Trap – Automatically explodes dealing 40 damage to nearby fish and Dave.
- Trigger Bomb Trap – Explodes when triggered dealing 40 damage to nearby fish and Dave.
- UV Light – Necessary to progress past the tube coral in the Blue Hole Deeps.
A word of note is that the Supply Boxes will also drop melee weapons, but those will be covered in the Weapons section later in the guide. The only melee weapon to be covered here is the pickaxe, which has the utility of letting you mine minerals in the Blue Hole Deeps until you can upgrade your dive knife sufficiently.
Staff
Staff are the second most important set of purchases that you will make in the game. Without staff, you will never be able to make the really good amounts of money possible at Platinum and especially الماس rank. Dave by himself simply can not keep up with the amount of customers.
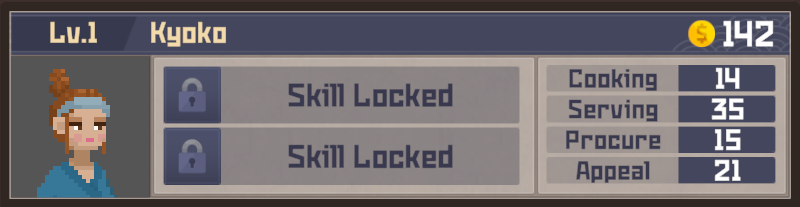
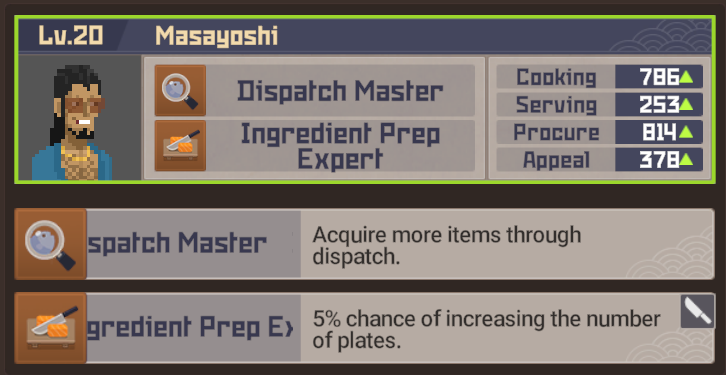
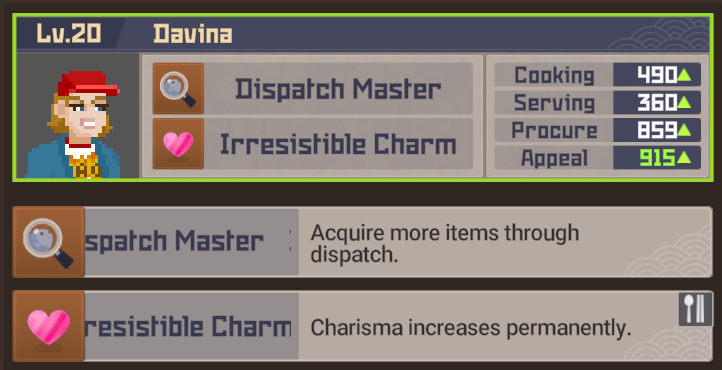
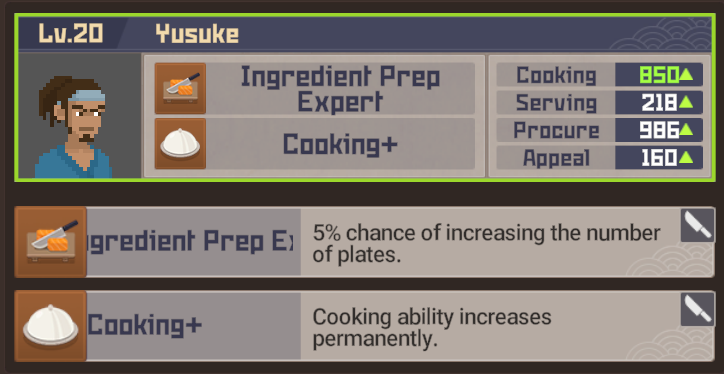
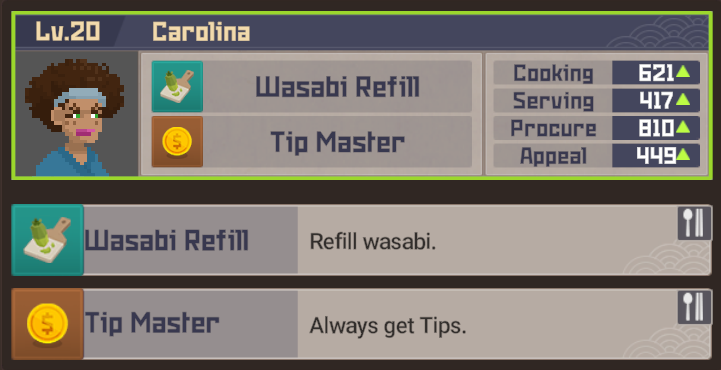
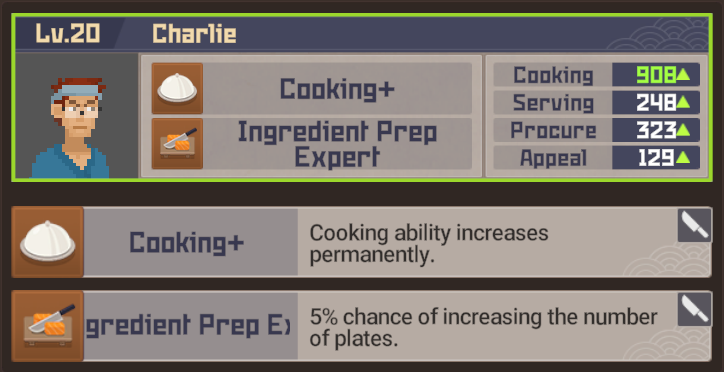
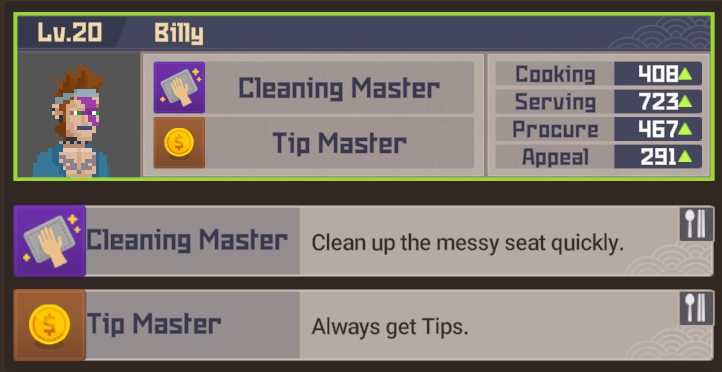
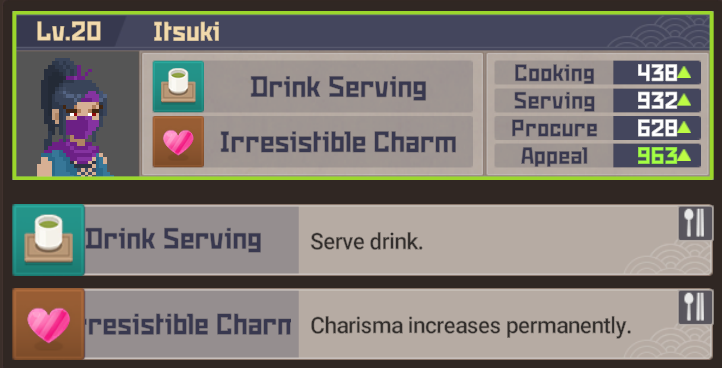
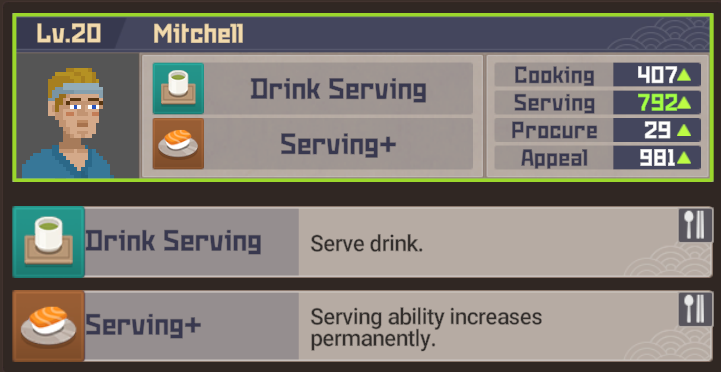
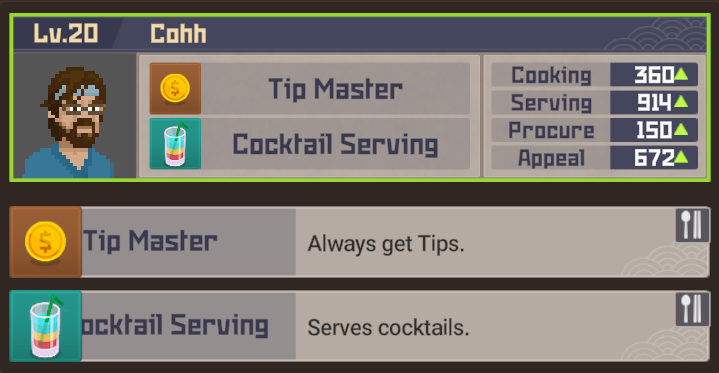
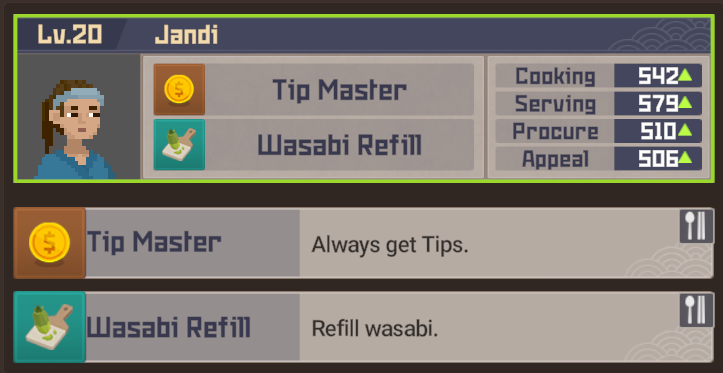
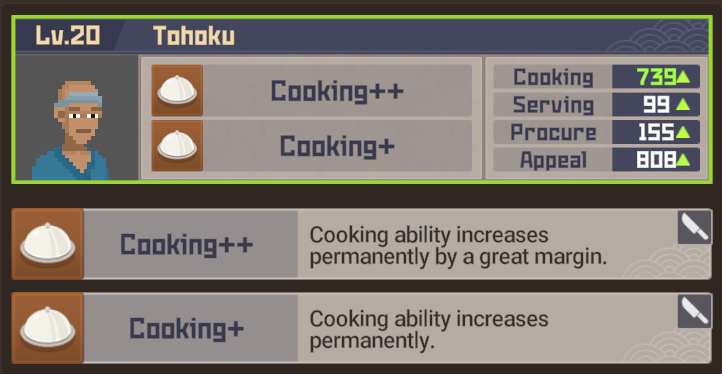
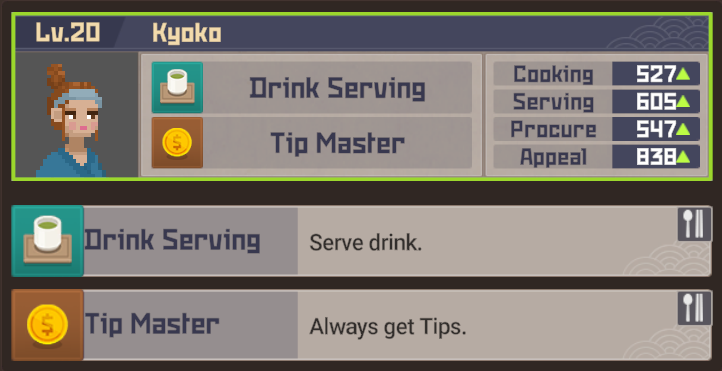
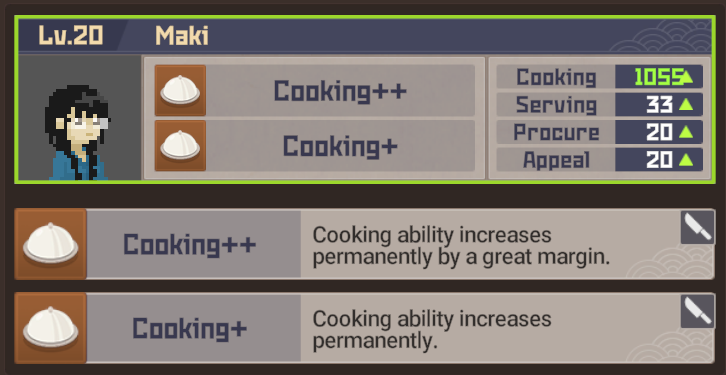
The image above is what you’ll see whenever you hire a new staff member. Along the person’s name, هذا “بطاقة” lists the hiring price, the spaces for their two skills that they will eventually get, and their four starting ability stats.
قدرات
- طبخ – The amount of time it will take to prepare a dish.
- Serving – How fast they will move when serving dishes to customers.
- Procure – Increases the amount of items they will get when using the “Dispatch” mechanic.
- Appeal – Increases the chance of obtaining bonus items (أي. dispatching for Olive Oil and bringing Sesame Seeds as well) when dispatched.

Cooking Skills
- Cooking+ – Cooking ability increases permanently.
- Cooking++ – Cooking ability increases permanently by a great margin.
- Ingredient Prep Expert – 5% chance of making two dishes from one set of ingredients.
- Ingredient Prep Master – 10% chance of making two dishes from one set of ingredients.
- Master Drink Maker – You can sell beverages at a higher price. (+10 gold per drink)

Serving Skills
- Drink Serving – Serve drinks. (Tea & جعة)
- Drinking Serving Master – Serve drinks perfectly and much quicker.
- Cocktail Serving – Serve cocktails. (Cocktails specifically)
- Cleaning – Clean up the messy seats.
- Cleaning Master – Clean up the messy seats more quickly.
- Wasabi Refill – Grinds wasabi when it runs empty.
- Serving+ – Serving ability increases permanently.
- Tip Master – Always get tips.
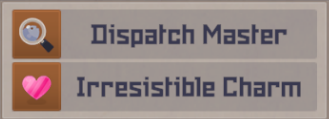
Dispatch Skills
- Dispatch Master – Acquire more items though dispatch.
- Irresistible Charm – Appeal ability increases permanently.
Hiring
With the exception of one staff member (Maki), all candidates can be hired and fired at will with the “Dismiss” mechanic in the staff management menu. Be careful though, as if you fire someone they will lose all of their levels. سوف تفعلها, ومع ذلك, get a pretty insignificant percentage of your sunken training costs back.
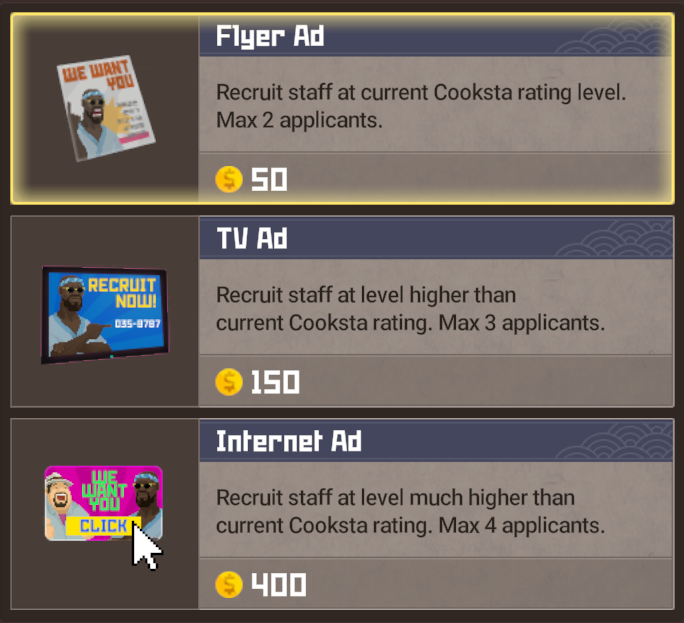
Unless you are desperate to get better staff members, stay away from the higher tier hiring options. Namely the internet ads. They do get you more candidates to choose from, but they are much less cost-effective and in the early game, you likely won’t have the money to spare.
Dispatch
Dispatch is an incredibly easy and useful mechanic that I believe doesn’t get properly introduced. It is quite simply selecting “Dispatch” in the staff management menu and sending out any selected staff members to gather ingredients from the list below. This is to aid you in crafting more complex and expensive dishes.
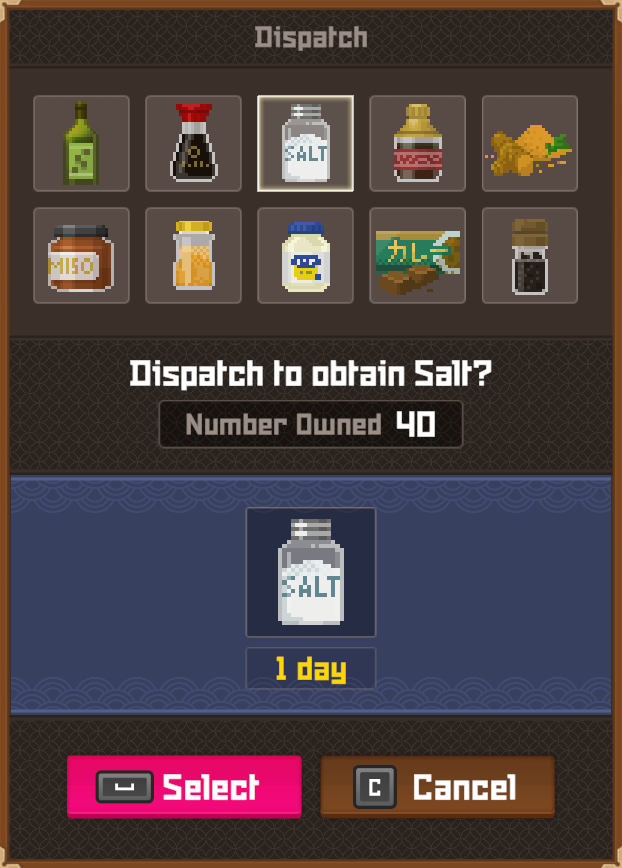
In your staff’s abilities, you will see listings for both “Procure” و “Appeal”. These stats determine how many of the item you choose will be brought back from their trip. You can send whoever, whenever, but there are definitely better options (which are listed in the subsection below).
تمرين
After you hire your new staff members, you will be given the option to train them to increase their ability scores and unlock their respective skills. بالإضافة إلى ذلك, في المستويات 5, 10, و 15, there is a chance that your staff member will unlock a recipe for you to learn in the research tab.
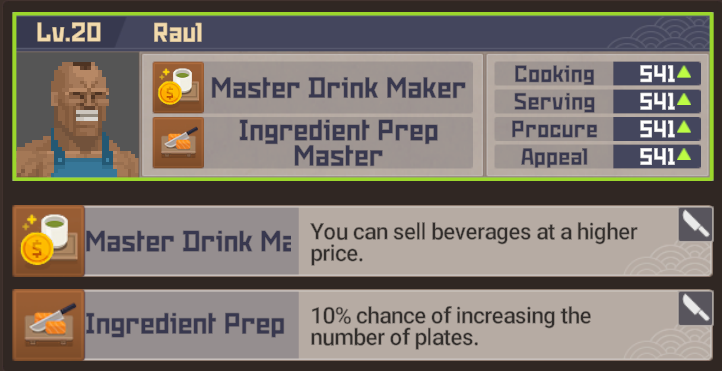
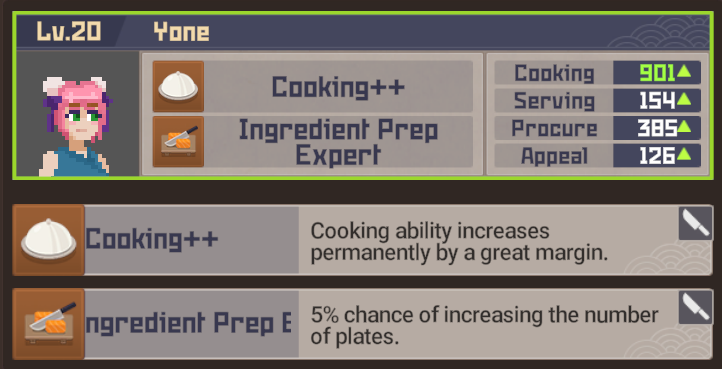
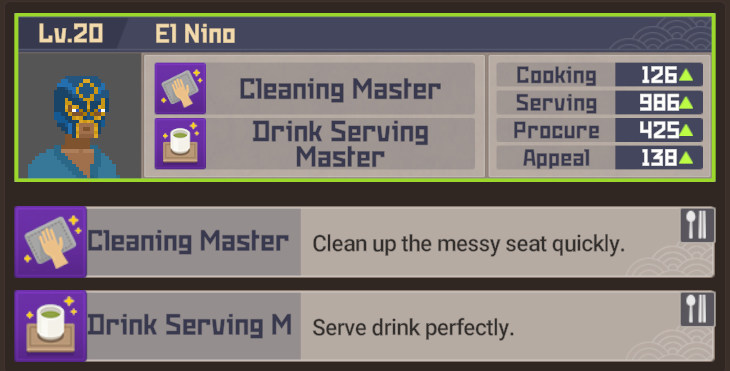
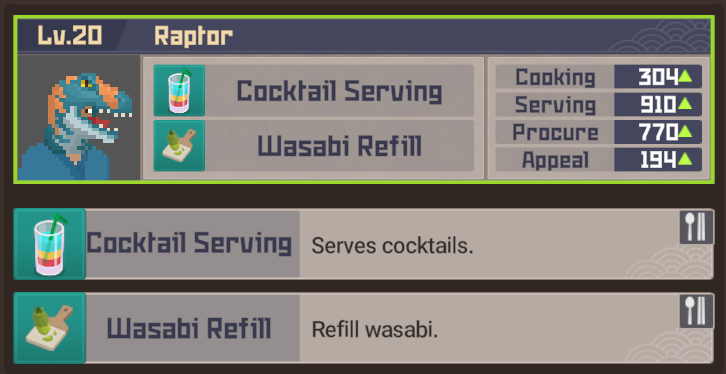
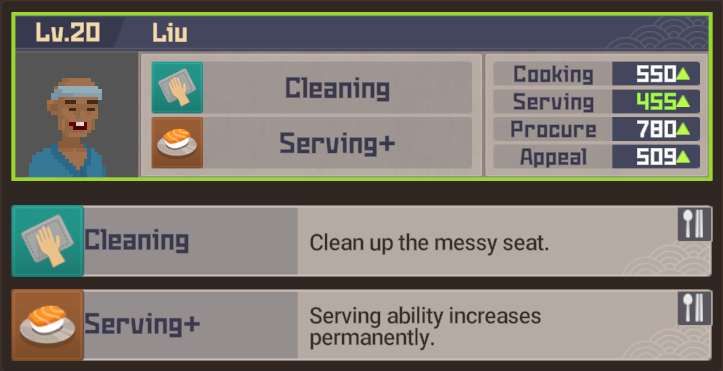
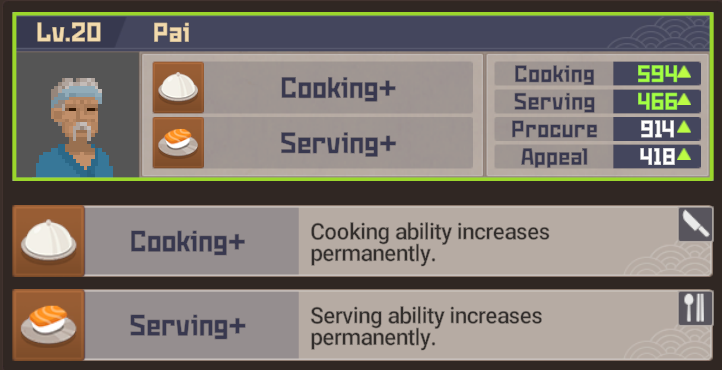
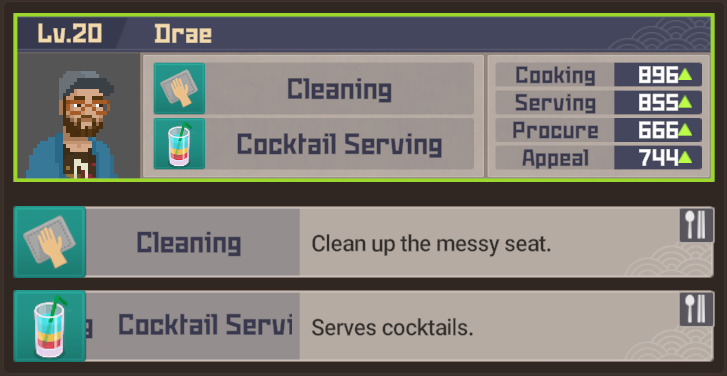
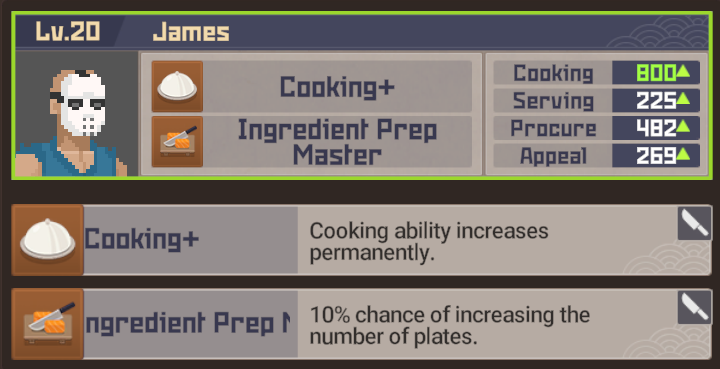
Below is a list of the staff that I employed with great success, ordered left to right by who I think is most valuable. Remember though that this list is almost completely interchangeable with other staff members. The only two that I see as “mandatory” نكون Raptor و El Nino, as having them run your serving section completely automates the process, and if they are high level you will rarely miss any customers, even on Diamond ranking.
- مطبخ – Raul & Yone
- Serving – El Nino & Raptor
- Dispatch – Davina, Masayoshi, Yusuke, Carolina, Liu & Pai
The cost of training your staff increases substantially as their level increases, so I would say that getting all of your staff to level 7 and your serving staff to level 10 will be good enough to carry you into the end game. Assuming you’re also helping out, you may even be able to get away with lower level employees. In total, each employee will cost approximately 300,000 – 350,00 ذهب to reach level 20, the max level in the game. و لهذا, many people that aren’t going for 100% completion won’t even get a single staff member to level 20. لكن, the images below are listed at max level as it is still a good indicator of how the staff members will increase their abilities throughout the levels.
Employees
The first set of employees are the ones that I recommend you use in the restaurant, organized just how I have them in the list above. The second set is all of the staff that I recommend using for dispatch to collect ingredients for the restaurant. The third set is a spoiler for a late game mechanic. Just know they are excellent staff and only hover the next sentence if you are okay with a small spoiler.The third set is my setup for the Branch restaurant that you unlock near the end of the game, مع Drae being the manager. أخيراً, the last set is the leftover staff members that aren’t statistically good enough to replace the ones that i already recommended. لكن, مرة أخرى, feel free to replace any staff with any other if you happen to get them first when hiring or if you just like their abilities and/or skills more.
أسلحة
The majority of this section will be stats and elemental affects to aid you in deciding which weapons will be right for you. Do refer back to my no-sweat loadout at the beginning of the guide if you just want a simple setup that will work for anybody.
البنادق
لتبدأ, you will receive random guns from the Weapon Crates dotted around the map depending on your progression through the story and the location you are in. You can also receive harpoon tips with varying affects. أخيراً, they will sometimes drop Gun Upgrade Kits which will raise the damage of your weapon, decrease the time to sleep a fish in the case of the Hush Dart, and completely reload your weapon. The last one is important as it may be worth it to leave a Gun Upgrade Kit until you expend your current ammunition so you can get a free refill when ammo is scarce.
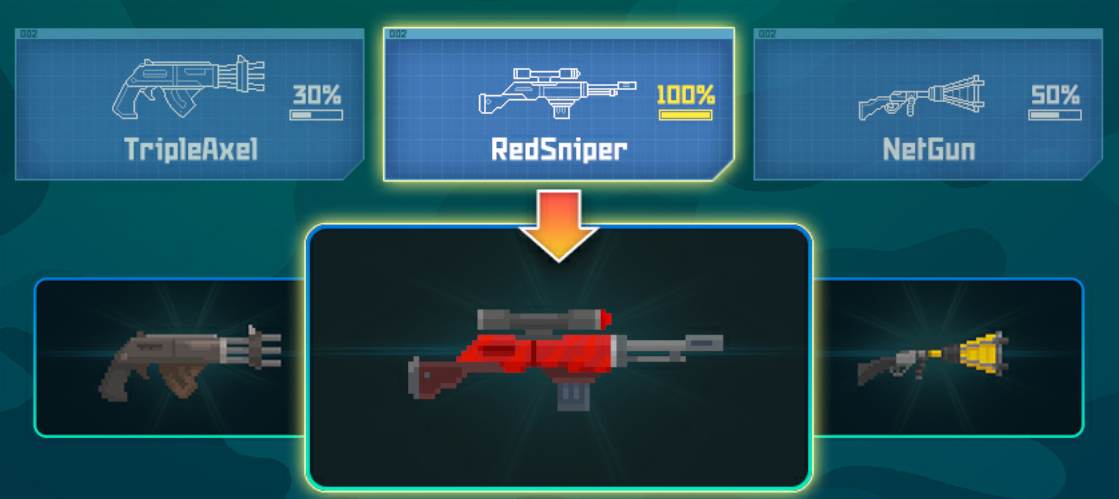
When you pick up a weapon you also receive a portion of the blueprint necessary to craft said weapon. The number varies between 2 و 3 blueprint pieces depending on the weapon, but the exact number will be covered in the table below.
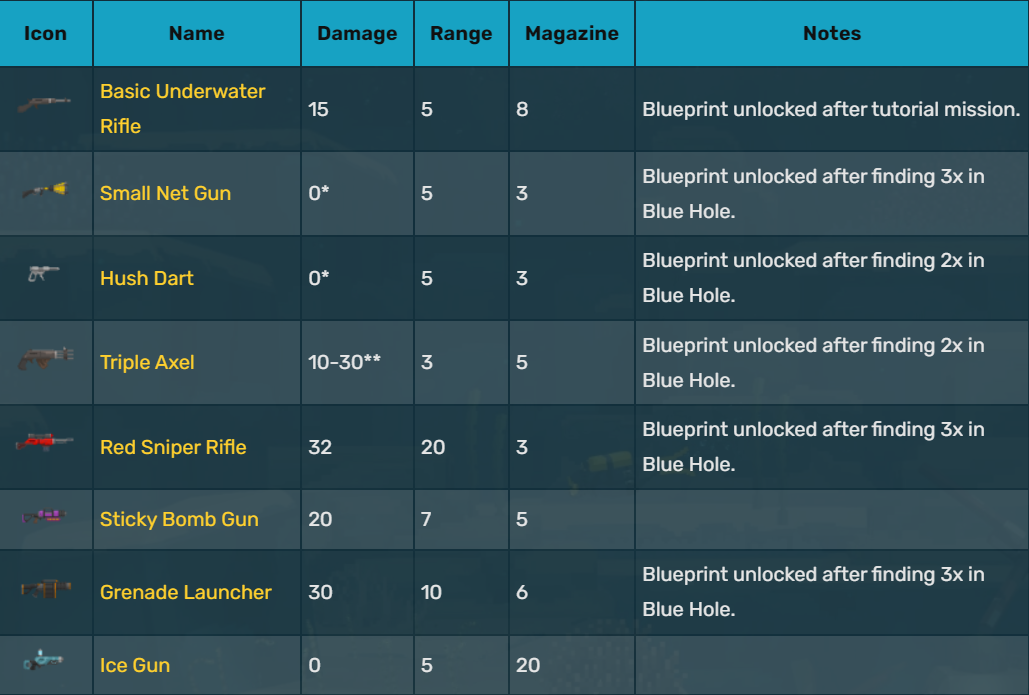
* Alternative way of catching fish. Deals no damage, but ensures 3 star fish when caught.
** Damage varies depending on how many of the 3 projectiles hit. The left most number is the damage done per projectile.
ايضا, ال Sticky Bomb Gun و Ice Gun are both found in the Glacial Area and require 3 blueprint pieces to be able to craft them. بالإضافة إلى ذلك, ال Ice Gun does no damage per bullet, but will do significant damage after you freeze a fish and break them out of the ice.
المشاجرة
There are also a lot of melee weapons to be had from the Supply Crates. To be blunt, these are mostly gimmick weapons that you should generally stay away from. I say this because getting up close and personal with the aggressive fish will almost certainly lead to a premature end to your dive. لكن, there are a couple of genuinely useful and/or fun melee weapons that I recommend everybody try.
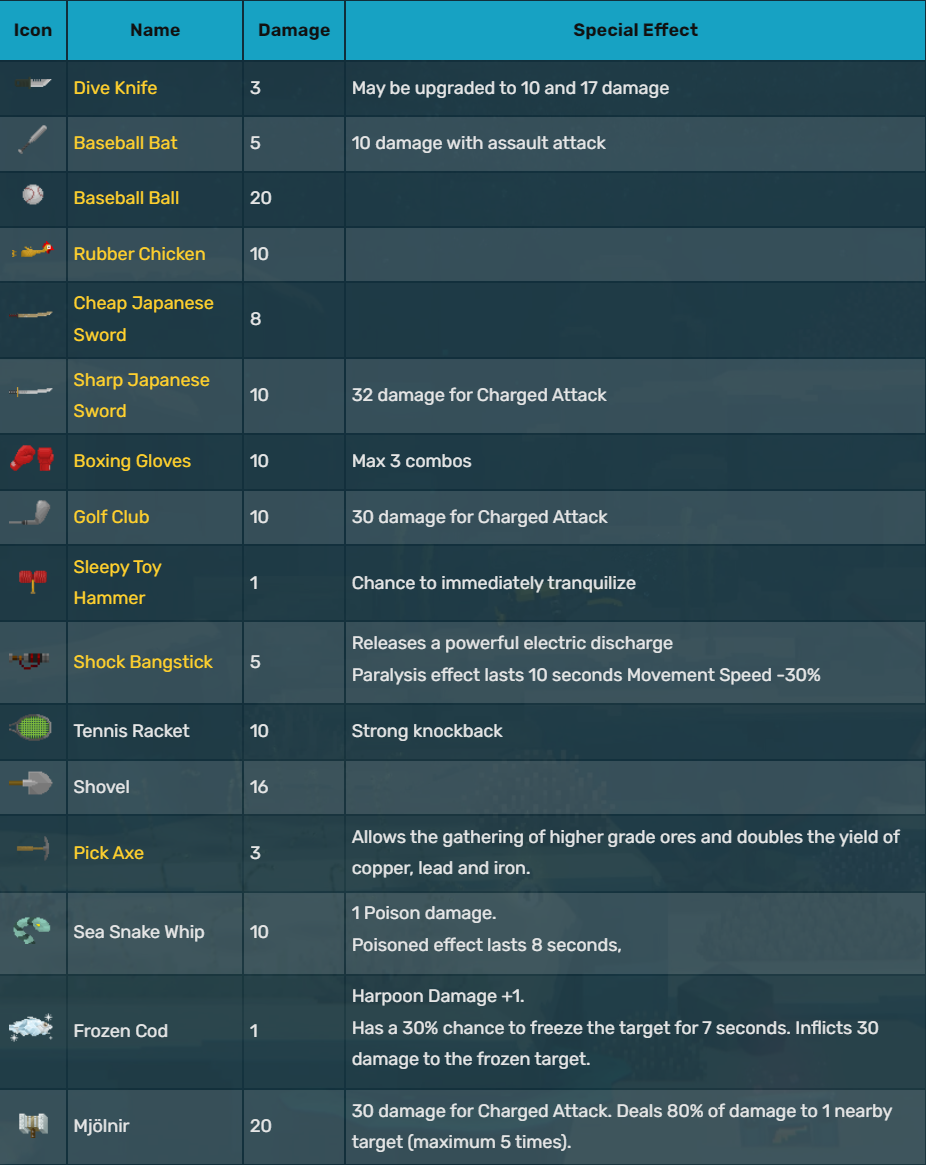
 To begin with the useful or fun melee weapons, we’ll start with the Sleepy Toy Hammer. It may seem useless at first but it has a decent chance to tranquilize any fish when you hit them with it. This is incredibly useful in the early game as you can harvest things like jellyfish before you have the first few harpoon upgrades. It will also guarantee you 3 star quality on whatever you sleep with it.
 Next is the Pick Axe as it has undeniable utility for mining gems that are necessary to upgrade your guns at Duff’s Shop. It is not incredibly useful otherwise as it does very poor damage.

 Then we have the Tennis Racket و ال Shock Bangstick. These both have incredible escape utility. The racket will knock back any fish significantly for you to avoid damage, and the bangstick will inflict paralysis on any fish which will reduce movement speed significantly allowing you to swim away.
 أخيراً, we have the legendary Mjölnir. This is a rare spawn in the Glacial Area that is both incredibly good and fun to use. It does excellent damage, has significant knock back on the levels of the tennis racket, employs the lightning affect which chains damage to other nearby fish, and has a charge attack which allows you to attack from range. Definitely the best and most fun melee weapon in the game. It even has an achievement tied to it!
ترقيات
Once you have picked your favorite gun, it’s time to find out what your favorite upgrade tree is. Most damaging guns follow the same upgrade trees. For the broad group of upgrade affects, I have a list below to familiarize you with them. All of these upgrades will also increase your magazine size at varying times depending on the gun.
- طبيعي – Raw damage upgrade. Upgrades into “موت” variants which have a flat 30% chance to instantly kill any fish other than bosses and Gadon.
- نار – Delivers damage over time. Upgrades into “Explosive” variants which simply do even more fire damage.
- Tranquilizer – Has a flat 40% chance to tranquilize any fish for 9 ثواني.
- سم – Delivers damage over time. Upgrades into “Hell سم” variants which simply do even more poison damage.
- Shock – Has a flat 60% chance to paralyze the target, slowing their movement and occasionally causing them to stutter and stop moving completely. This and برق both upgrade into the “Thunderbolt” variants.
- برق – يلحق 15% of your base damage to a nearby target (يصل إلى 4 مرات). This and Shock both upgrade into the “Thunderbolt” variants.
- Thunderbolt – Combines the benefits of both the برق و Shock variants. يلحق 35% of your base damage to a nearby target (يصل إلى 5 مرات) and will paralyze the target for .35 ثواني. It also increases your movement speed by 35% while in hand.
There are some other unique upgrades that are weapon dependent. The list below covers them.
- Triple Axel – Upgrades into “Quattro Axel” و “Penta Axel“, which fire 4 و 5 projectiles respectively instead of the normal 3. ال “Penta Axel” increases knockback slightly.
- Grenade Launcher – Has multiple unique upgrades. ال “Gravity” launcher will suck nearby fish in before exploding, ensuring maximum damage. ال “سم” و “Gravity” both can upgrade in the “Blackhole” launcher, which combines the suction affect of the “Gravity” launcher and the damage over time of the “سم” launcher.
- Sticky Bomb Launcher – Upgrades into the “Sticky Mine’ launcher which will fire 3 shots simultaneously, making it function like a Triple Axel و Grenade Launcher hybrid.
- Net Gun – Each upgrade increases the size of the net fired. The final upgrade is the “فُولاَذ” net gun which fires a very large steel net that can capture much larger, higher ranking fish.
- Tranquilizer Gun (Hush Dart) – Each upgrade lowers the time it takes for a fish to be tranquilized. Upgrades into the “Modified” hush dart which will sleep normal fish almost instantly, and can tranquilize any fish in the game with just 2 طلقات.
- Ice Gun – Upgrades into the “Ultra” ice gun, but this upgrade simply increases the damage done whenever you damage the fish after they are frozen.
الزراعة
Farming is an incredibly useful mid-late game mechanic that honestly doesn’t get introduced soon enough. With it, you can often double or triple the profits that you would normally get out of your ingredients. The game does a great job of explaining how everything works in the farm, so this section will be relatively brief and be majorly about stats and tips.
When you are first introduced to the farm you will only be able to grow a small amount of rice. Shortly after that, you will unlock the ability to grow up to 6 vegetables in the section to the right of the rice. أخيراً, you will unlock the chicken coop and the ability to harvest chicken eggs.
These farms and their upgrades are very important if you want to make money fast and efficiently. لكن, if you are not trying to make the best money possible, the farm is actually kind of skippable. There is not much on offer other than ways to upgrade and unlock dishes.
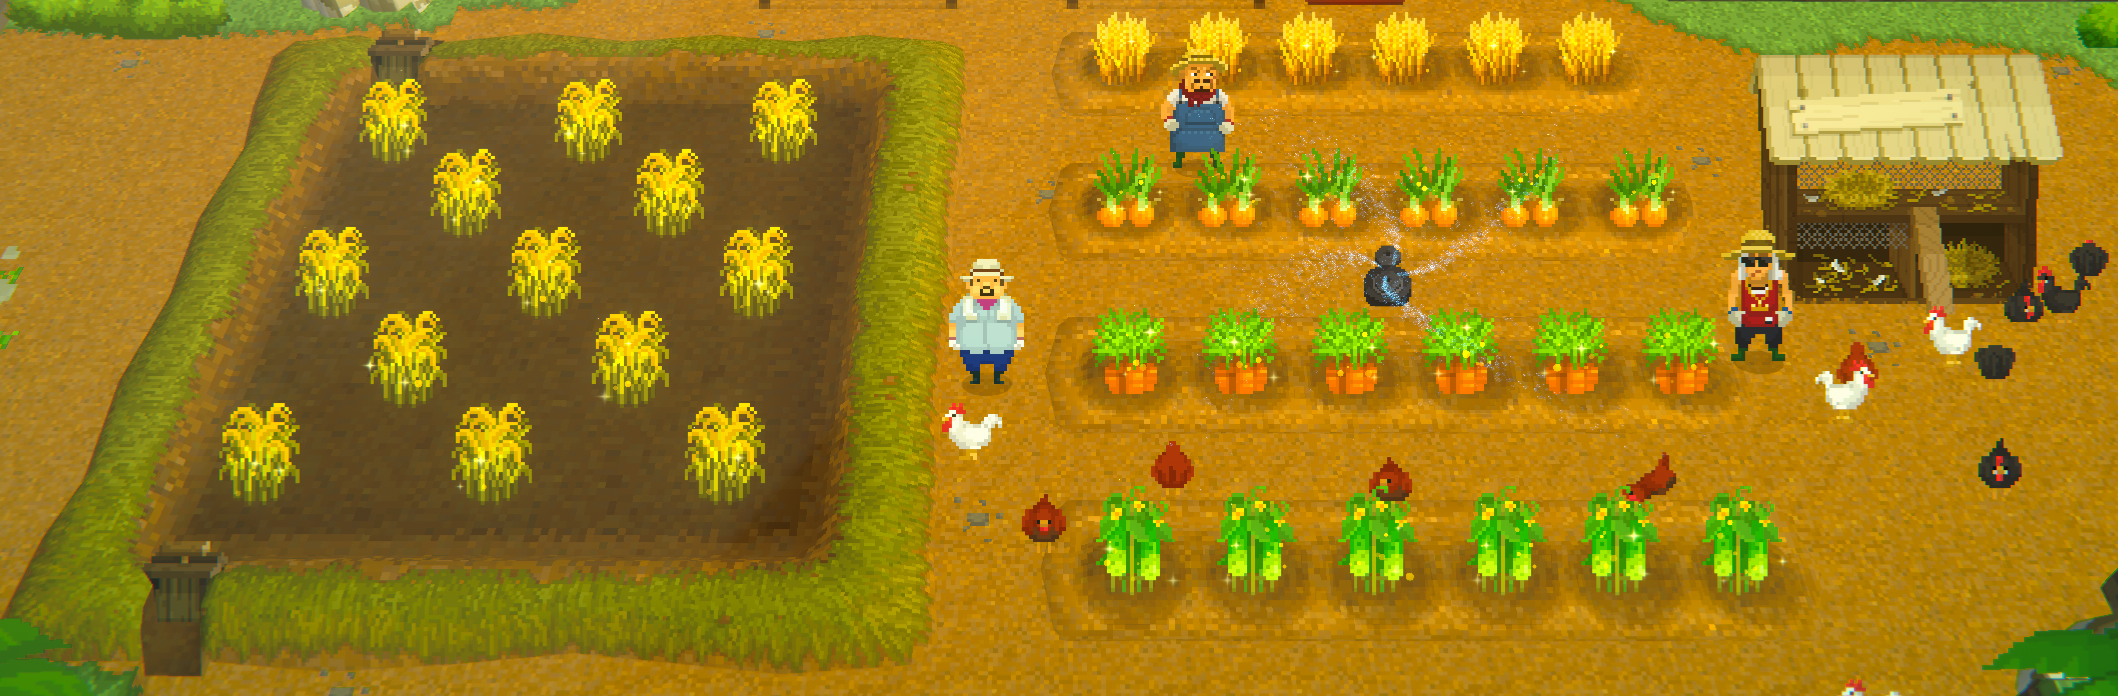
To begin with the Rice Paddy, it is easy to reap the benefits as Otto will plant all of the seeds automatically. It has 3 upgrades that you can purchase from Otto, with each upgrading the size of the Rice Paddy and increasing the amount of rice you can gain per harvest. ال Rice Paddy can also use fertilizers and composts, which will be listed under the vegetables.
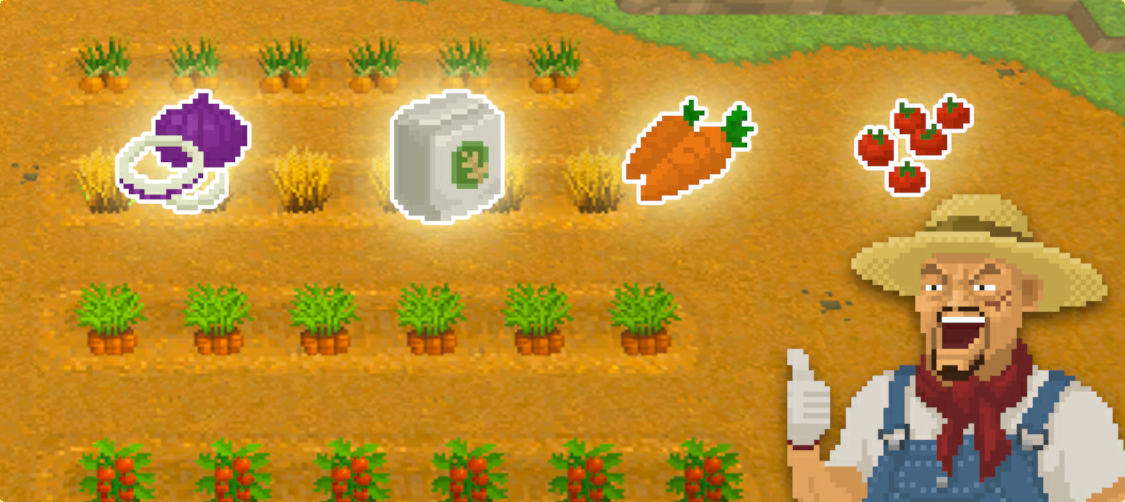
With the Vegetable Field you must plant and maintain all of the crops individually and on your own. Initially you will only have the top row available, allowing a maximum of 6 vegetables to be planted at a time. You will unlock a new row (another 6 vegetables) with each size upgrade that you purchase for Otto. ال Vegetable Field can also use fertilizers and composts. You also have to water each plant manually with your Watering Can, which has it’s own upgrades. الأول 2 upgrades for the Watering Can will increase it’s capacity, allowing you to water more plants before you have to refill the can. The third upgrade will turn it into a Sprinkler that automatically waters all 4 rows of the Vegetable Field. I would say this is a necessary upgrade if you do not like managing the fields so much. ال Vegetable Field can also use fertilizers and composts, which are listed below.
- Growth Fertilizer – Makes your crops grow faster.
- Harvest-Up Fertilizer – Increases the yield of your harvests.
- Pest Fertilizer – Makes your crops more resilient to weeds/pests.
- Nutrient Compost – Enriches the soil with more nutrients.
The final aspect of farming is the Chicken Coop. It isn’t quite as useful as the other two farming mechanics, but still necessary for some VIP Events. Every morning, depending on what type of chicken or chickens your own, you have a percentage chance listed below to gain a normal or Grade A egg.
- White Chicken – 10% chance for a Grade A egg.
- Brown Chicken – 40% chance for a Grade A egg.
- Free-Range Chicken – 70% chance for a Grade A egg.
Fish Farming
Fish farming is also an incredibly useful mechanic, but it doesn’t have many nuances and as such will be covered very briefly in this guide.
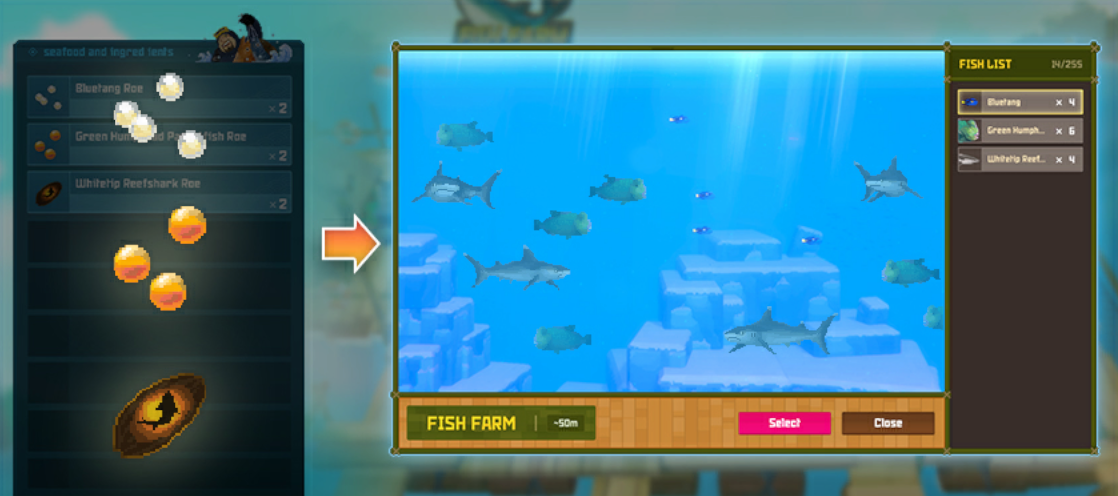
Fish farming is unlocked in the early-mid game and should be used even after you’ve beaten the game. Whenever you harvest any fish, it has a small chance to provide you with roe (بيض) that will automatically be added to your Fish Farm to grow into a full sized fish, just like you would normally find on a dive. This can be any fish in the game besides bosses.
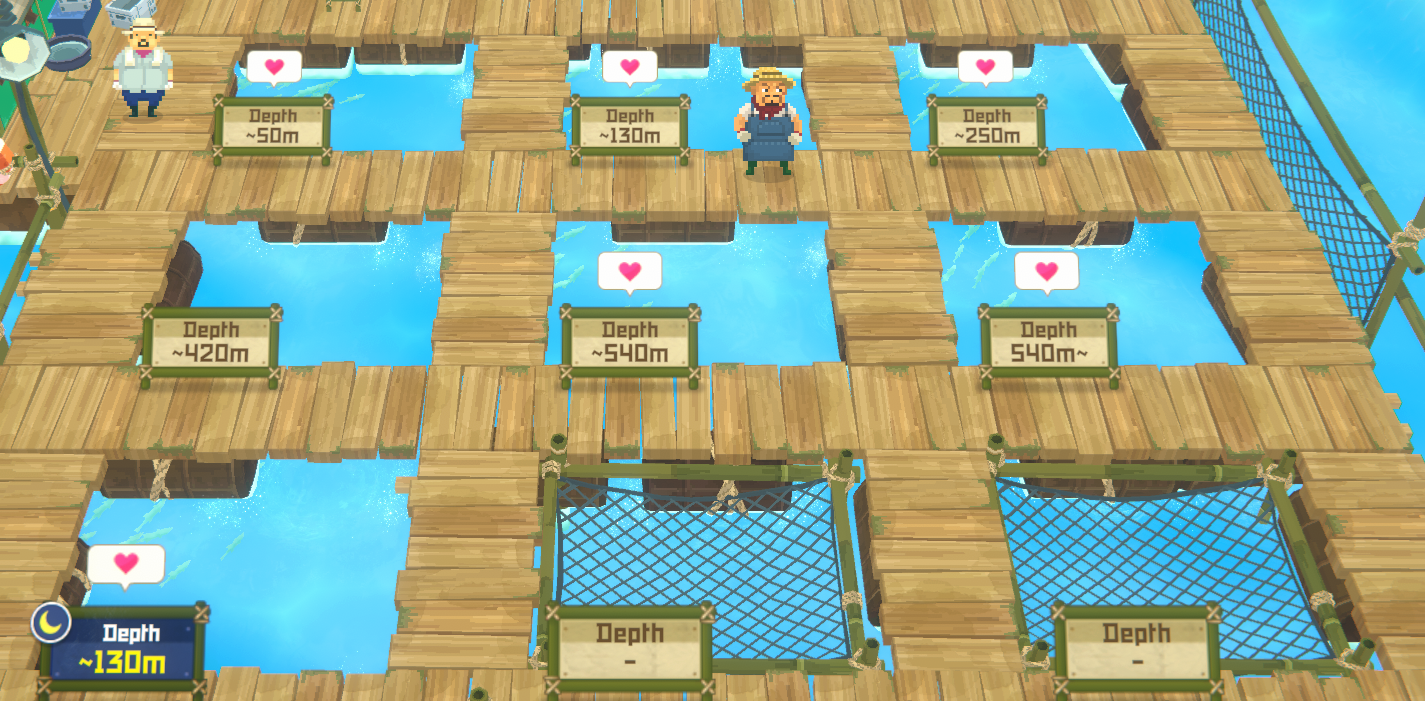
As you can see in the picture above, يوجد 7 different zones that you can use to grow fish from varying locations. بدءًا, you will only have access to the most shallow block (which covers from 50 meters and up). Each block represents a specific depth, with the unique exception being the night time fish farm, which will only grow fish caught during evening dives from any depth. Here is a list of each blocks specific use cases.
- 50 meters to surface.
- 130 meters to 50 أمتار.
- 250 meters to 130 أمتار.
- 420 meters to 150 أمتار.
- 540 meters to 420 أمتار.
- 540 meters and below.
- Night time fish at any depth.
In every one of the blocks, if you have more than 2 of any type of fish, they have a chance every portion of the day to breed and create another fish of that type. Each of these 7 zones can also be upgraded to increase their capacity, allowing you to have more variety of fish or to let your favorites breed more.
Optimally, you would just fill each section with your best profit fish from that region. لكن, some people just use them as virtual fish tanks and fill them with their favorite looking fish. Do whichever one you enjoy more!
Gyao!
Gyao! are a mid-late game mechanic that is introduced after an optional boss. They are basically identical to old Tamagotchi toys and serve as a fun, albeit sometimes tedious, way to grow your own personal pet versions of some of your favorite fish and sealife.
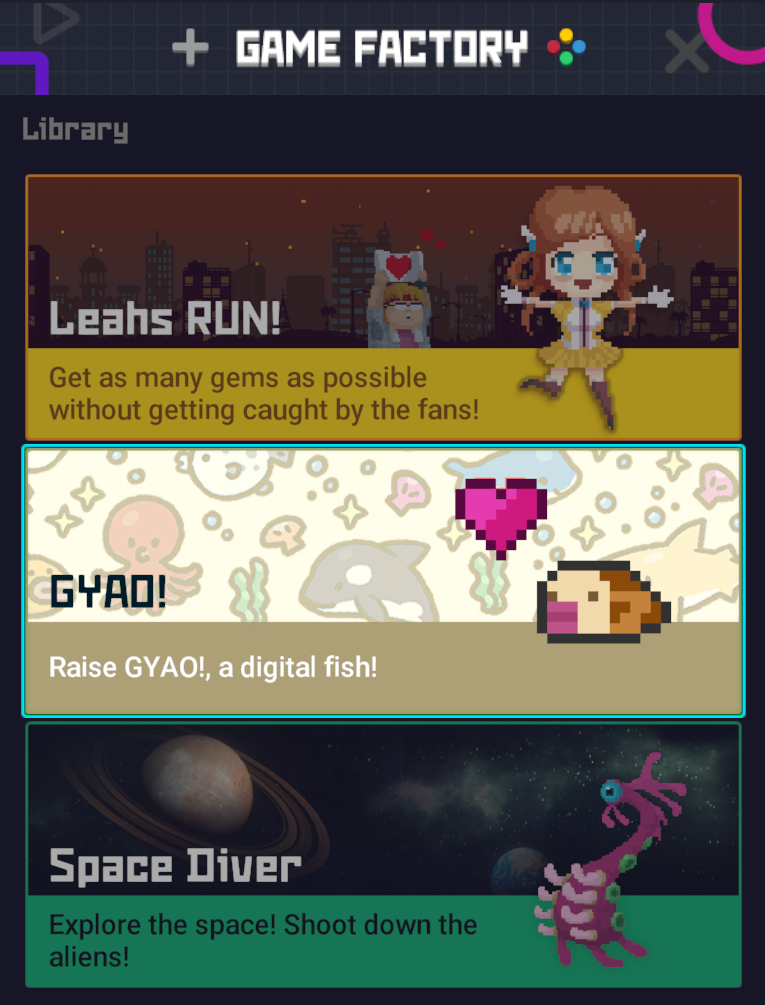
It is one of 3 mini-games that you will unlock throughout the game on your phone. To briefly cover the others, Leah’s Run is a sidescrolling platformer that you unlock after a mission with Duff. The other minigame, Space Diver, is unlocked after beating the game and has an achievement tied to it!
Proper Care
Whenever you are starting out with Gyao!, you should get familiar with the things you have to manage to keep your Gyao! healthy.
Above is the screen you will see when you open the mini-game from your phone. Below is a list of all the options you have to take care of your new best friend.
Top Row
- Shrimp – This is how you feed your Gyao!. The snack option also raises the affection stat. Keep them well fed!
- Light Bulb – Make sure you turn off the lights before you start serving at Bancho’s!
- Beach Ball – This is how you play with your Gyao!. It is necessary to keep it healthy.
- Syringe – Whenever you see a purple skull, you need to heal your Gyao! with this.
- Toilet – Whenever you see a poop icon you need to clean it with this.
Bottom Row
- Shocked Face – Shows you that your Gyao! needs some sort of attention.
- Shouting Face – This is how you train your Gyao!. Only available when everything else is good, but the Shocked Face is still lit up.
- Clipboard – Lists the statistics, including hunger, affection, and training.
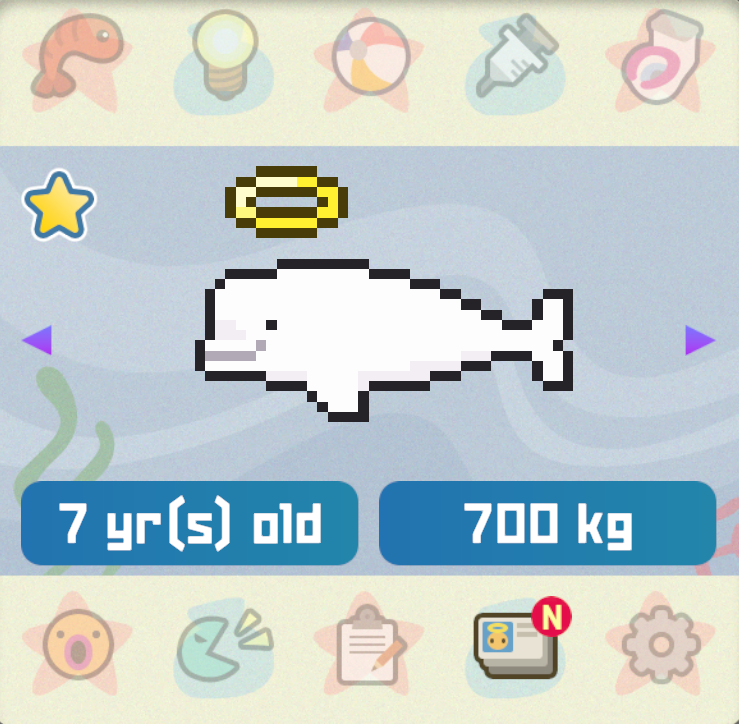
- ID Cards – A history of all your previous Gyao!, showing their age and weight.
- Cog – Settings to turn your notifications on/off.
Raising Different Gyao!
Depending on how you take care of your Gyao!, you may raise very different types of animals.
Whenever you first start raising your pet, it will start in a very small ball. This phase will be very short and won’t require you to care for it at all.
The second phase will be the animal leaving the ball and now requiring your care. This phase is also quite short, but make sure that you take care of your Gyao! depending on which animal you would like.
The third phase will then begin, which shows your current Gyao! growing a little bit. Otherwise this is identical to phase 2, however it is much more vital as your stats for hunger, affection, and training will determine the next phase.
The fourth phase will either show your Gyao! grow into a much larger brown fish, or an angry looking blue fish. It will grow into the brown fish if you are taking good care of your pet, specifically if your affection stat is a 3 أو 4. خلاف ذلك, you will get the angry blue fish. Remember these two options when looking at the image below.
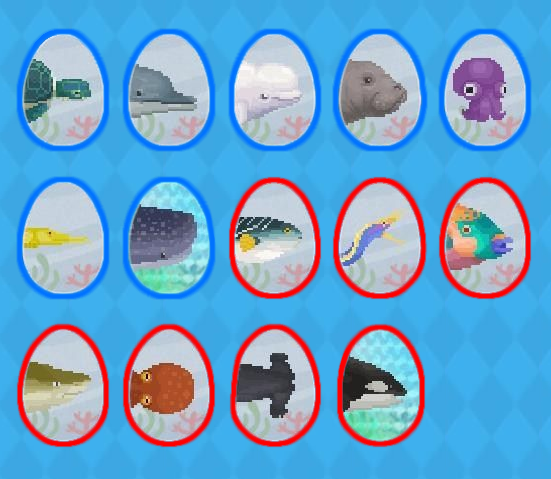
After you reach the fourth phase and see which fish your Gyao! has grown into, you will then be able to tell what your pool of animals are for the final stage. Referring to the image above, the animals with a blue border are the ones available to you if you raised the brown fish. It can turn into any one of the blue bordered animals besides the Whale Shark, والتي سيتم تغطيتها لاحقا.
If you raised the angry blue fish, then your pool will be the animals with the red borders. Like the Whale Shark, you will not be able to raise an Orca unless you follow the proper steps covered in the next subsection.
Rare Gyao!
To raise the two rare Gyao!, you must first have a specific kind of normal Gyao!.
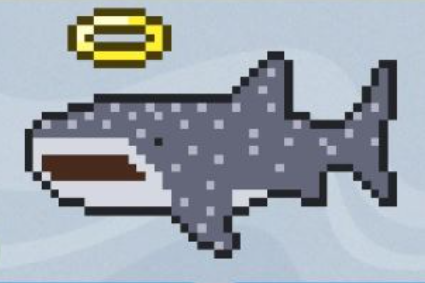
In order to raise the Whale Shark, you must first get the Beluga, and before that you must raise the brown fish. Make sure to keep your affection stat high for the best chance to get the Beluga. After you have one, you must max out it’s training stat as fast as possible. If you don’t max it out fast enough, your Beluga will die and you will have to start over. If you do have it’s training maxed out though, you will be rewarded with the rare Whale Shark!
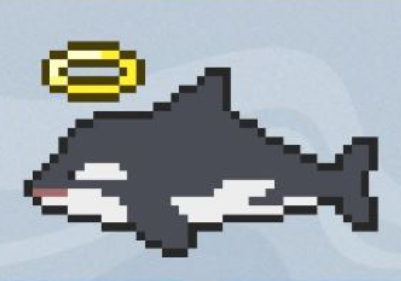
To raise the Orca, you must first get the Lemon Shark, and before that you must raise the angry blue fish. Make sure to keep your affection stat high for the best chance to get the Lemon Shark. After you have one, you again must max out it’s training as fast as possible. You have more time with the Lemon Shark than you do with the Beluga, but there’s still a risk that you might not train it fast enough and have to start over. If you do max out it’s training though, you will be rewarded with the rare Orca!
Fishmon
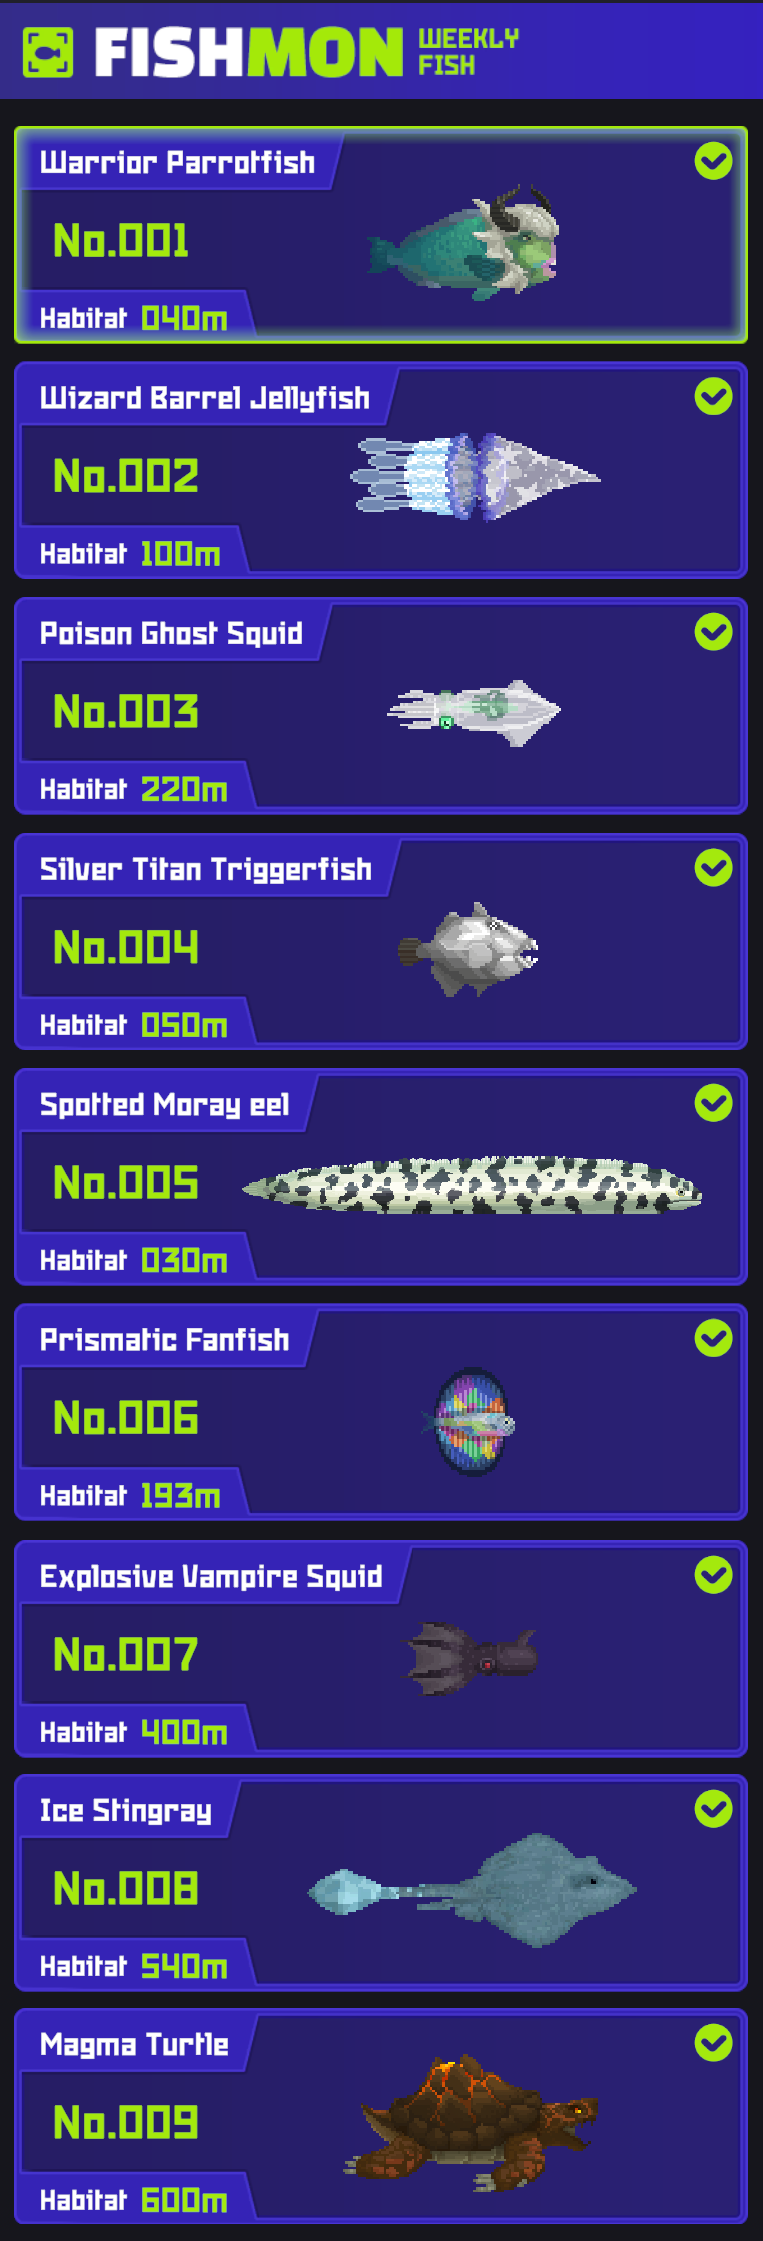
Fishmon are a gameplay mechanic that is introduced near the end of the game depending on how long you take to progress through the main story. They are rare fish that only spawn on the weekends. Once you unlock the mechanic, every Saturday you will get a tip on the newest Fishmon من Udo. He will tell you what the Fishmon هو, where you might be able to find it, and if relevant, a tip or requirement to be able to catch it. Make sure to act somewhat quickly, مثل you will only have until Sunday night to catch the Fishmon before they disappear and you have to wait until next week.
Though they are mostly for the completionists playing the game, they do still give you a nice monetary bonus on Mondays after you catch them. This ranges from 1,000 gold to 2,500 ذهب depending on how far down the list you are.
Please note that since this is an endgame mechanic, nothing in this section will be marked as a spoiler. Do not read ahead if you do not want late game areas and story points spoiled.
How to Catch
This subsection is going to be a short summary of tips and other information that may be pertinent when trying to catch these elusive Fishmon. قبل أن نبدأ, remember that in my testing I have found it impossible to kill any of the Fishmon on the first bullet, لذا I recommend using the highest upgraded sniper you have when applicable. Even the Death Sniper Rifle will work as the instant death ability will still only knock the Fishmon unconscious. Just be careful shooting more than once, as you will kill most of them on the second shot.
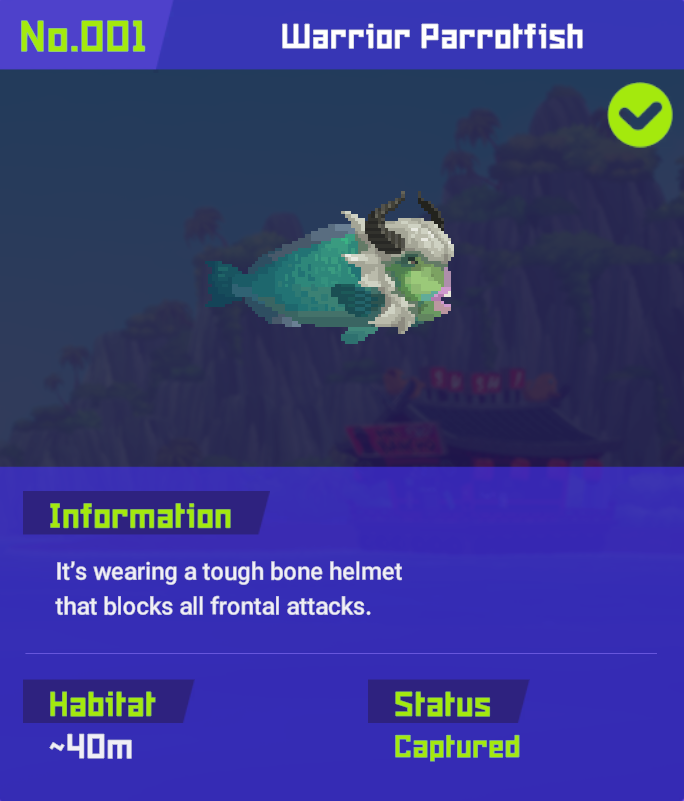
Starting with the very first Fishmon that you’ll catch, لدينا ال Warrior Parrotfish. It resides near the surface with a tendency for the left side of the Blue Hole Shallows. To capture it successfully, you will have to wait for it to charge and shoot it from behind (similar to most other fish in the game) مثل shooting it in the head will negate all damage.

Next is the Wizard Barrel Jellyfish. It will teleport if you get to close to it, so again, make sure you are using your best sniper. It can be found near the Yellow Shipwreck that you visited earlier on in the story.
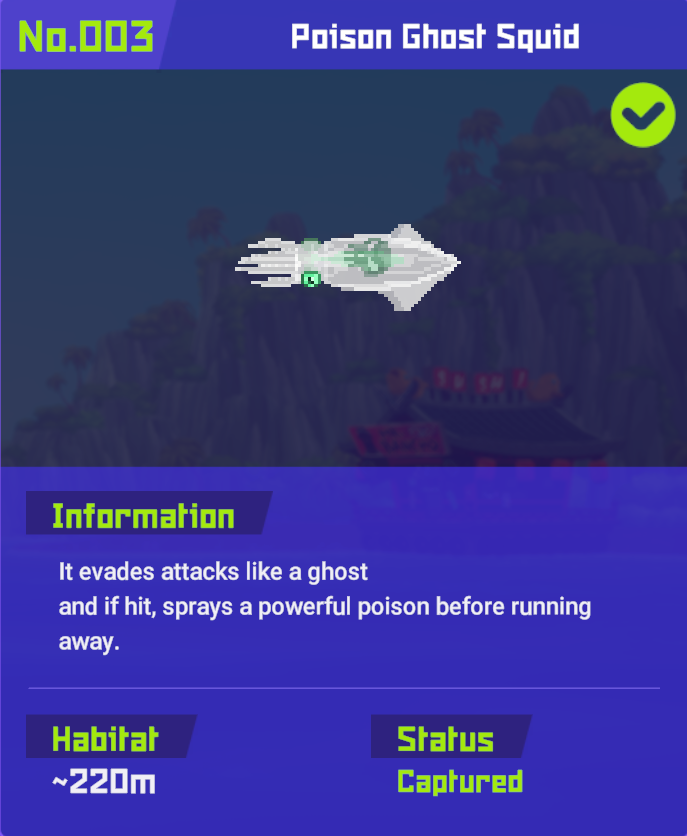
Then we have the Poison Ghost Squid. This can be found in the Blue Hole Deeps و can only be shot once you have shined a UV flashlight on it. I have found a tendency for it to spawn on the right side of the deeps, but I can not confirm.
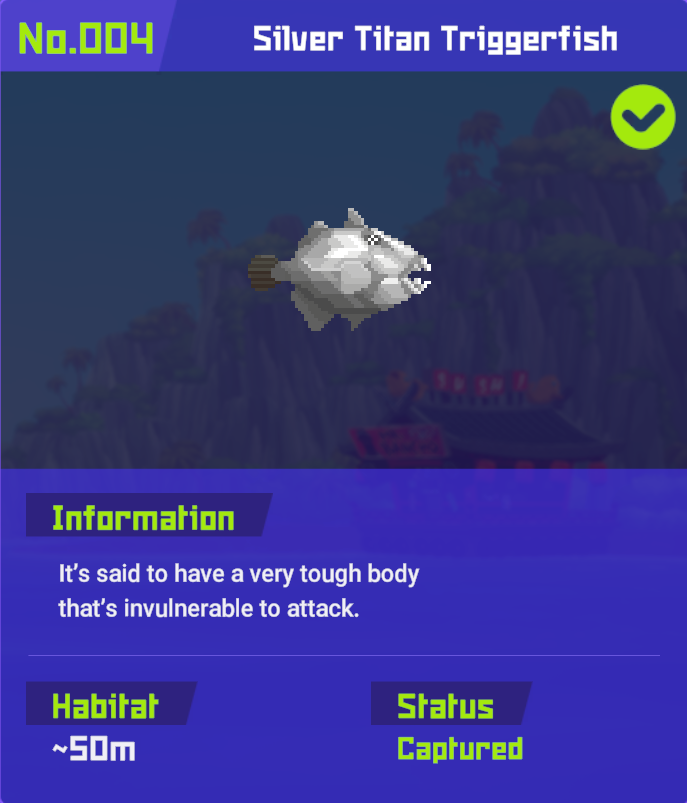
Next we have the Silver Titan Triggerfish. It resides on the edge of the medium depth parts of the blue hole. There have been reports of finding it in a few different areas, but I found mine on the right edge. To capture this shiny Fishmon you will have to bring a برق elemental weapon. Any other form of damage will not work.
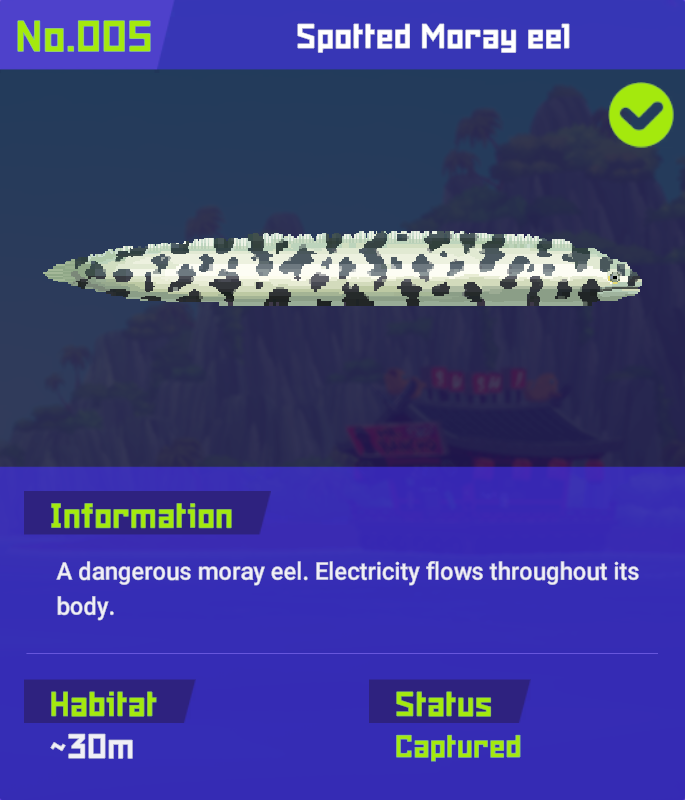
Then comes our one and only night dive Fishmon, ال Spotted Moray Eel. كما ذكر, you have to go on an evening dive to spot it. Luckily though, it is typically found very close to the surface and doesn’t have any special requirements for damaging it. This is the easiest one to catch in my opinion.
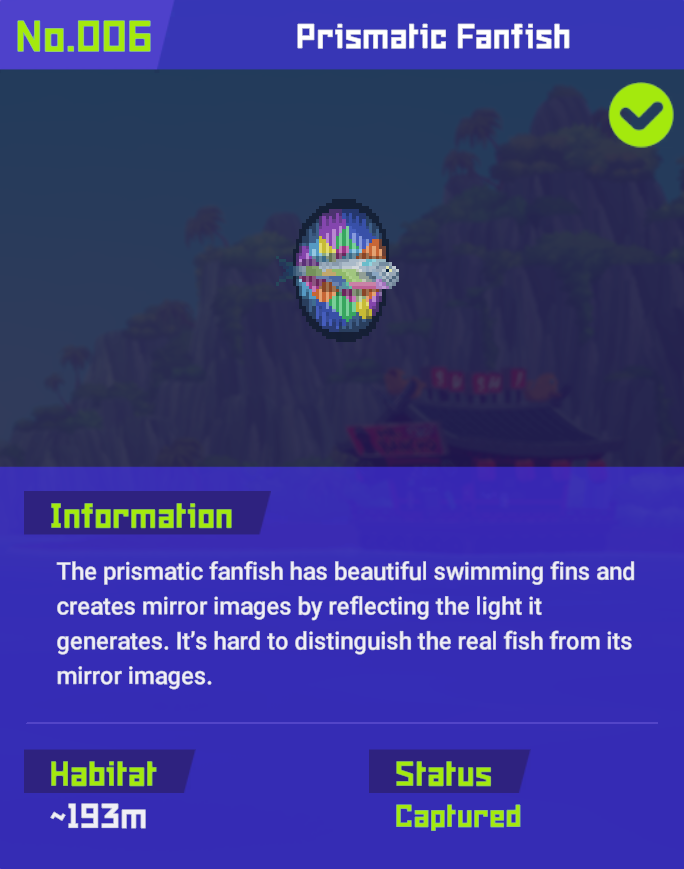
Now we have the Prismatic Fan Fish. It can only be found in the Underwater Lake, which you have probably visited before as part of a side quest for the Sea People. Whenever you find it and damage it, duplicates will spawn and you will have track which one is the real fan fish. They have very low health so just about any damage source will do, but I recommend to bring an upgraded Triple Axel (أو Penta Axel if you have one) as each pellet will destroy a clone.
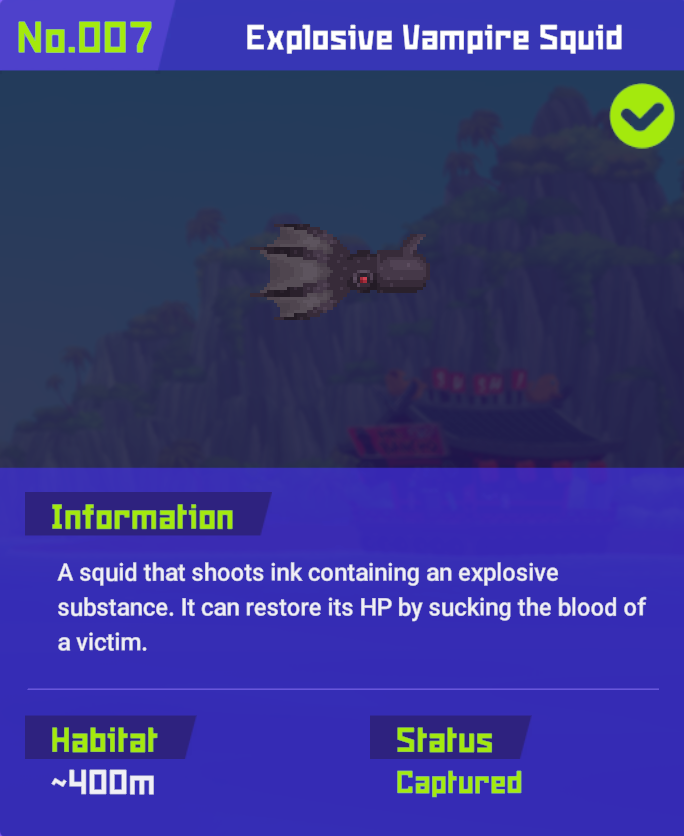
#7 is the Explosive Vampire Squid. This is another easy one similar to the previous moray eel. It can be found in the bottom most section of the Glacial Passage very consistently. ثانية, like the moray eel, it has no damage requirement so a Death Sniper Rifle will make quick work of it.
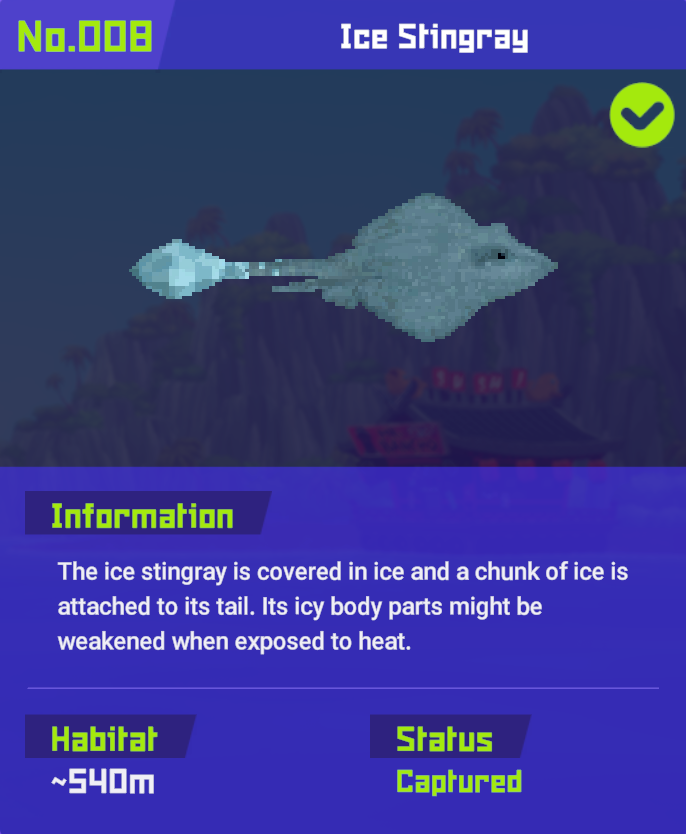
Then we have our penultimate Fishmon, ال Ice Stringray. It can be found on the ceilings of the first puzzle room in the Glacial Area (in the top right corner of the area’s map). Due to it’s icy nature, هو - هي must be damaged with some sort of fire or explosive weapon.
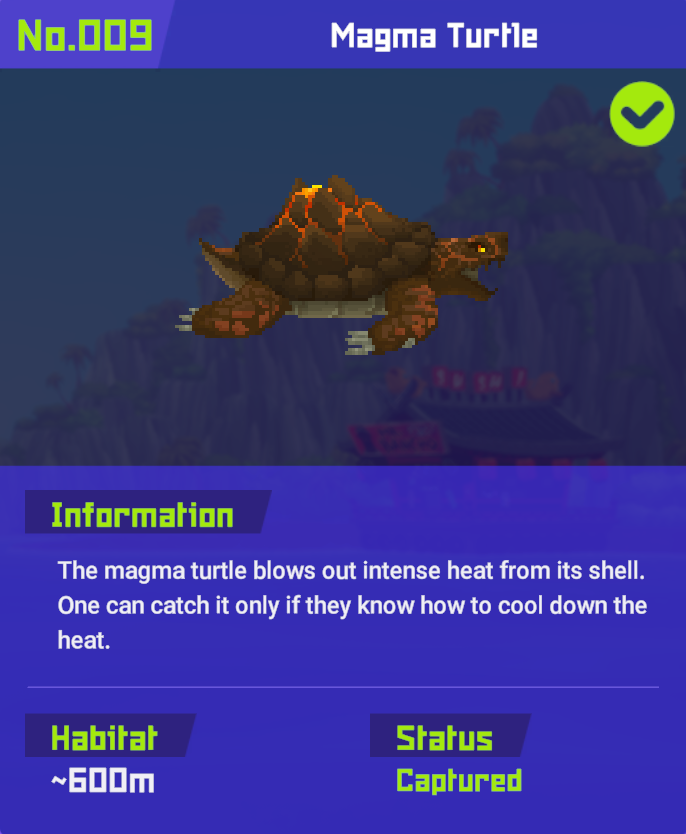
Our final elusive target, #9 on our list, is the Magma Turtle. It can be found in the caves of the Hydrothermal Vents منطقة. The easiest way to access this is to simply swim straight down once you start your dive in the Glacial Area, go through the entrance to the cave, و almost immediately there will be a glowing door on the left side. Living for ages in the world’s harshest environment has toughened the turtle significantly, لذا it can only be damage by ice. I recommend to bring an Ultra Ice Gun, but even the Ice Harpoon Tip will suffice if you can find one.
النصائح والحيل
This is a somewhat conclusory section of the guide where I simply list a bunch of helpful or fun tips and tricks to help you along your journey in the game. These are things that I couldn’t fit into the other sections of the guide, and are in no particular order.
- Don’t Rush Anything – I’ve said it before and I’ll say it again. TAKE YOUR TIME WITH THIS GAME! It is incredibly unique, fun, polished, and deserving of all the time you are willing to give it. There’s no rush, just have fun.
- Pick Up Everything – There are a lot of things that are scattered around the ocean floor (some are even incredibly useful in dishes) and all of them are useful at some point or another during the game. In the early game when you have yet to upgrade your storage box, you should definitely focus on the fish first. لكن, when you do get the storage box upgrades, try and grab everything you can.
- Remember Your Dishes – Whenever you unlock a new dish or even find a new favorite, remember all of the ingredients that you need to make it. Once you develop a good understanding of the map, you can guide yourself towards specific areas where you know that the required ingredients can be frequently found.
- Don’t Be Afraid to Run or Hide – If you find yourself stuck in an area with a lot of aggressive fish, you can often outrun them. If you can’t outrun them, you can certainly hide or sneak around them. If you can’t hide from it, there are a couple of items you can get from Cobra’s Shop to escape from anything in a pinch. Never feel that you have to fight something.
- Remember to Use All Your Menu – As you upgrade through the ranks in your restaurant, remember that you also receive more slots to add dishes to your menu. Always try to use every slot available to you to maximize profits.
- Price Over Taste – Taste as a mechanic is cool in concept, but frankly doesn’t have much impact on the game. The only purpose of taste is to upgrade the rank of the restaurant in Cooksta, but you will likely have the required taste level by the time you receive enough likes anyways. Money on the other hand, is much more useful for many other things.
- Use Auto-Supply – A mechanic that isn’t introduced to you is auto-supply. When you select a dish to go on your menu, pick the minimum amount possible. ثم, you can select it again to open a selection box and enable auto-supply. This will only pull ingredients as necessary to make dishes for your customers. If you don’t do this, you will have to manually assign how many ingredients should be pulled from your stock and they will be consumed whether a customer eats the dish or not.
- Don’t Over Hire – Staff are incredibly helpful and you should absolutely hire them to help you manage the restaurant, but the most that you will really need at any point is 2 for the kitchen and 2 to serve your customers. While the dispatch specific employees are great, they are not required to make good money, and their salaries will eat at your restaurant’s profits.
- Watch for Blue Diamonds – Whenever you have a quest or side-quest up that requires you to collect certain fish and items, those mission objectives will be marked with blue diamonds above the object. Very useful if you have a lot of things on your plate.
- Go for All the Achievements – This isn’t really a tip or trick, but rather a good opportunity to refer you to our DAVE THE DIVER achievements guide which covers all the achievements in the game.
- Collect All the Marinca Cards – ثانية, not really a tip or trick.
استنتاج
Now that you know what you need to be doing as the premier diver of the Great Blue Hole, you have enough knowledge to go out and make millions managing Bancho’s Sushi and save the Sea People! Whatever you decide to do, I know you’ll have a wonderful time playing through this passion project. Spread this knowledge to your friends by either sharing this guide, or just letting them know the key points in bold that are spread throughout.