Der letzte Bosskampf von Resident Evil 3 Der Inferno-Modus war eine der größten Herausforderungen, denen ich bisher beim Spielen gegenüberstand. Glücklicherweise, the fight turns out to be less dependant on luck than you’d think – in this guide I will try my best to present some tips that helped me in my run, as well as explain the patterns that Nemesis usually follows in his attacks.
Inventory Before the Fight
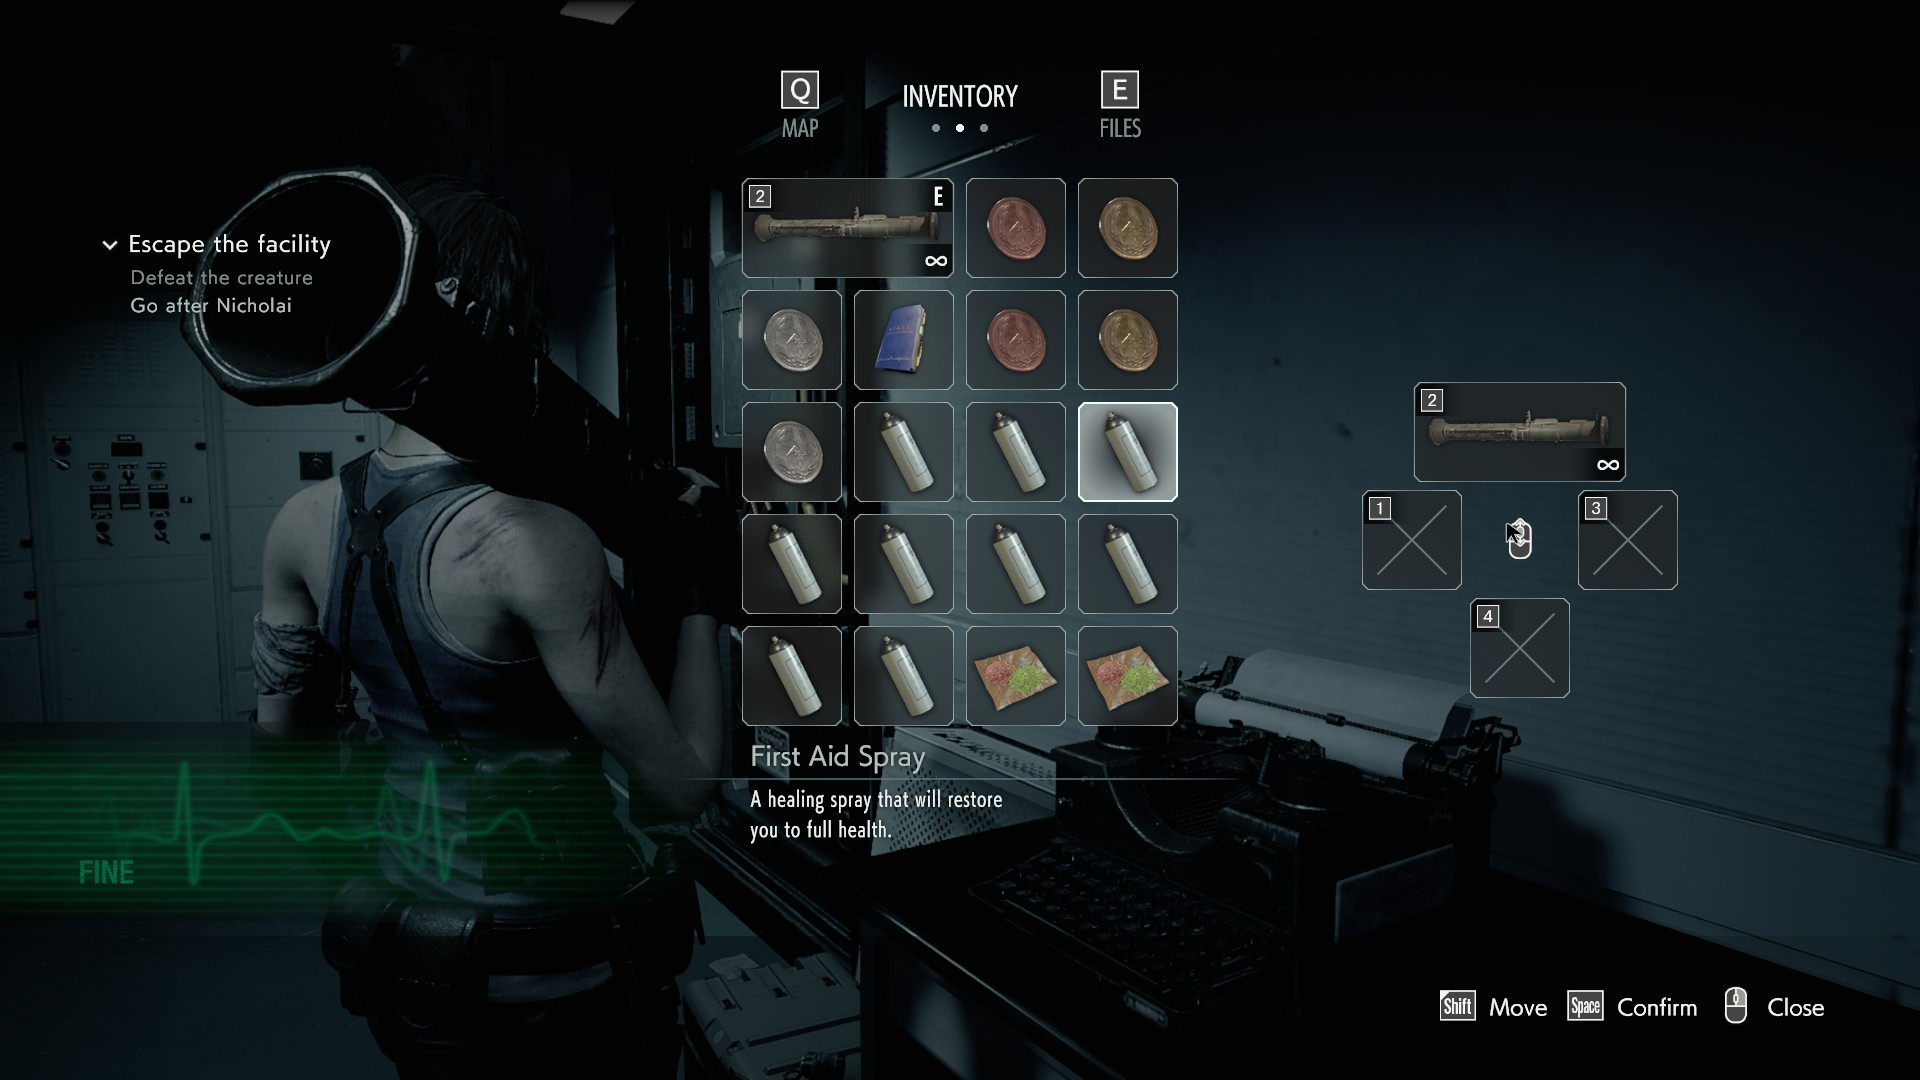
It’s worth noting that in my run, I used every bonus item that I could. Das beinhaltet:
– the infinite rocket launcher
– every coin (assault, Verteidigung, recovery, 2x each)
– the S.T.A.R.S. Handbuch
– both of the bonus hip pouches
I filled the remaining spaces of my inventory with heals that I acquired and saved throughout my run. It is possible to beat the fight with just the handgun, but I do recommend using everything you could to give you an advantage.
Basic Tips and Tricks
One of the most important tips I can offer is to stay in the middle, very close to the gun compartment, but not hugging it, unless Nemesis uses his first attack at the very start of Phase 1 (more about that in a second). This will give you more space to observe Nemesis’ animations, telling you which attack he will perform next and give you more time to react. I don’t recommend hugging the compartment because sometimes Jill’s model will obscure your vision. Another thing that you need to know, is that if you start aiming right after performing a perfect dodge, you will enter “slow motion mode”, making it much easier to aim. zuletzt, you need to remember that sometimes random events can mess you up and unfortunately there’s nothing you can do – sometimes Nemesis will shoot acid or roar, stun-locking you, and then combo and kill you. The important thing is not letting it get to you.
Jetzt, some info about the fight.
I like to divide this bossfight into 3 phases:
1. Phase 1 starts as soon as you open the compartment and shoot Nemesis for the first time. You will have to activate 3 power sources to eventually finish him. With every phase, I follow the same pattern: Erste, shoot his bulbs on your left side, then the bulbs in the middle, and lastly, the ones on the right. This phase is the easiest, because Nemesis almost always follows the exact same attack pattern, making it very easy to learn. I always shoot the bulbs on the right last, Weil the first power source you want to activate is the one located on the right, the furthest away from you.
2. Phase 2 starts after activating the first power source. I will go into more detail in a moment, but for now in short, shoot the bulbs on the left, then in the middle, then on the right and activate the remaining power source located to your right.
3. Phase 3 is similar to phase 2, so if you’re familiar with it, you’re good. After shooting all of the bulbs, activate the last power source on the left and make a mad dash to the gun compartment. An dieser Stelle, you don’t have to worry. As soon as Nemesis falls down, you’ve already won the fight.
Attack patterns used by Nemesis
Nemesis has multiple attacks that he uses throughout the fight, and learning how to counter them is the key to defeating him. In meinem Lauf, I have encountered the following attacks:
Attacke 1. Nemesis uses his fists to slam the ground right in front of him, gradually moving towards you. This attack usually kicks off Phase 1. Countering this is very easy – just stay at the back and hug the gun compartment (this is the only time you want to do this). Dieser Weg, Nemesis won’t hit you and you will have a clear shot at his bulbs.
Attacke 2. Nemesis raises one of his hands and hits you from above. In Inferno mode, he can do that up to 8 mal, and unfortunately the only way to counter it is to dodge. This is the main attack that Nemesis uses throughout the fight, and it’s certainly the most annoying. Leider, in Phases 2-3 the number of hits is random, so you will have to develop very quick reflexes and judge by his animation of raising his hand, when to use the dodge.
Attacke 3. Nemesis swipes either from the right, oder links. He uses this attack when you’re very close to either wall of the room, so this will often be the first attack he uses in Phase 2, since you likely won’t have much time to get to the middle after activating the first power source. Since the first power source I activate is always the one on the right, furthest away, the pattern he always follows is right left right. This is another one of the attacks you just have to dodge 3 mal.
Attacke 4. Nemesis raises both of his hands high, clasps them together and hits you from above. I encountered this attack only a few times, which causes me to believe he has a low chance of performing it. In jedem Fall, you don’t have much to worry about – while this attack is strong, its animation is much longer than other animations of his attacks, making it very easy to spot, and giving you more time to prepare. When the time comes, ausweichen, und es wird dir gut gehen.
Attack 5. Nemesis uses his hands as a plow and grinds against the ground two times. This one is strange, because I only encountered it once, but again the solution is dodging.
Now that we have gone over the tips and attacks, it’s time to explain each individual phase and what you should do to complete them.
Phase 1
Phase 1 starts as soon as you shoot Nemesis for the first time. As soon as the cutscene ends, walk back to the gun compartment, Aber don’t hug it yet. What you want to do now, is pay close attention to Nemesis. In diesem Moment, he can perform either Attack 1 or Attack 2 (although Attack 1 is much more likely to occur). Watch Nemesis and by his animation, judge which attack you will have to counter:
A) If he starts quickly slamming the ground with his fists, that’s the best case scenario – he’s performing Attack 1 and you have plenty of time to take a few steps back and hug the gun compartment. Nemesis won’t even scratch you. While he’s still slamming the ground, start aiming your rocket at the bulbs on your left – as soon as he does the finishing slam and reveals the bulbs, Feuer. Herzlichen Glückwunsch, that’s 1/3 of the work done in this phase! If you’re quick enough, you can also try firing at the bulbs in the middle, but you’ll have to be prepared to start dodging a moment later, because now, he’ll be performing Attack 2 for the rest of the phase, but I highly recommend doing that because it really helps speed up this phase.
B) The other scenario that can happen is Nemesis kicking off the first phase with Attack 2, which you can recognize by the animation of him raising his hand. Leider, you will have little time to react, and at first it will be hard to dodge perfectly, but practice makes perfect and after some time you will know exactly when to press the button.
Jedoch, there is something tricky about Nemesis’ Attacke 2 in this phase.. Meiner Erfahrung nach, it almost always looks like this – he raises his hand and slams the ground, you dodge, it’s all good. But he won’t stop at just one slam. An dieser Stelle, you really don’t want to spam the dodge button – after he slams his hand for the first time, he will raise his hand again and start lowering it slower. If you spam the dodge button, he will hit you with his second, slower slam, and then combo you, which can really mess you up if he decides to be mean and hit you two more times.
So, what should you do in this situation? While he’s performing Attack 2, wait for the right moment to dodge his first hit. Don’t spam the button. Dann, he will perform his slower slam, and again you have to wait for the right moment to dodge. Right after the second hit, Nemesis will go back to normal and will usually hit you one or two more times in normal speed, so you’re free to spam the dodge button now. Erinnern, the slower slam can be a blessing in disguise – if you fail to perfectly dodge his first hit, you will have enough time to recover and immediately start spamming the dodge button, allowing you to evade all his following hits.
To sum up, Phase 1 should look like this:
1. Nemesis attacks for the first time. If he performs Attack 1, start aiming at the bulbs on your left and fire the rocket as soon as he reveals them. If you’re quick enough, fire at the bulbs in the middle and immediately prepare yourself to start dodging Attack 2, but sometimes it’s better to just wait.
If he performs Attack 2 Erste, wait until he stops hitting you and then destroy the bulbs on the left.
2. After destroying the bulbs on the left, stay in the middle and wait – he will perform Attack 2 nochmal, one normal slam, one slowed slam, and one or two more normal slams. Danach, shoot the bulbs in the middle. If at this point you had already destroyed them because Nemesis started with Attack 1, quickly start moving to the right and shoot the last remaining bulbs. As soon as he starts falling to the ground, run to the furthest power source on the right and activate it.
3. His third attack will again be Attack 2. Do the same as before and when he stops, move to the right, shoot the remaining bulbs and activate the power source. Glückwunsch, you just finished Phase 1! Now we’re off to Phase 2.
Phase 2
Leider, Phase 2 is much harder than phase 1, and is less about remembering and more about reacting quickly. Diesmal, instead of using just Attack 1 and 2, he can use every single one, aber dennoch, Attacke 2 is the main one used in this phase.
Nemesis will get up while you’re still activating the first power source, so you have less time to react. Nachdem Sie fertig sind, you can either stick to the wall and prepare to dodge his three swiping attacks, or you can try getting to the middle of the room by sticking to Nemesis. This however can activate Attack 5 (the weird plow one) which is tricky to dodge, but also has a chance of activating Attack 1, which is in comparison very easy to counter, and that way you can eliminate two sets of bulbs in a very short time. Leider, this phase is very random, so there’s no telling for sure how this can go.
This is also where another difference from the first phase comes in. Providing that Nemesis starts with Attack 3, after he is done with the swiping, you can’t start firing at his bulbs immediately, Weil very soon after he will perform Attack 2. As if it wasn’t tricky enough in the first phase, this time it changes again – this phase introduces, what I like to call, “delayed slams”. Let me explain.
A delayed slam is when Nemesis raises his hand again, but instead of slowly lowering it like in the first phase, he keeps it raised for a moment and slams again without any warning. This one is very tricky to dodge, and I remember struggling very much because of it. The good news is, that after a delayed slam Nemesis finally finishes his attack, giving you time to heal if he managed to land a hit on you. This is also great time to use the slow-motion trick, since you know exactly when Nemesis stops attacking you.
After his first two attacks, you can shoot his bulbs. Don’t rush, wait for his next attack (which can really be anything, so be prepared for everything), repeat the process and once Nemesis falls to the ground again, rush to the remaining power source on your right and kick off the last phase. Pay attention to Nemesis’ animations, don’t forget about delayed slams and after some practice you should be able to finish this phase.
Phase 3
Now we’re at the final stretch. There’s not much to say about this phase, because it’s very similar to the one before it – attacks are more or less randomized, so you can really expect anything. Nemesis performs a mix of his attacks, but if you stay in the middle the only one you really have to worry about is Attack 2 (because the remaining ones are easier to dodge, and Attack 1 is basically a free bulb destroy). Both slowed and delayed slams can occur. The difference is that Nemesis might start attacking again while you’re still running to the gun compartment after activating the last power source on the left, but most of the time he will only hit you once and you will have no trouble reaching the gun and finishing the fight.
Finishing touches
Remember that this bossfight is really challenging, but that doesn’t mean it’s impossible. You may have to replay it to the extent of getting absolutely sick of it, but with enough practice and learning I believe that anyone can do it. If I find a way to upload some videos of my runs, I will try to attach them to this guide. Wenn Sie irgendwelche Fragen haben, feel free to ask! I hope that I managed to help at least a little bit.