
This guide will cover the process of setting up a Valheim server with Game Server Manager, which will simplify things and include a host of useful resources and features to make running your server easier.
Please note that this is different from diesen Leitfaden as it will be using the Game Server Manager program. This program automates things for you as a server owner and offers a variety of useful tools and features to make setting up and running your server much easier.
Initial Setup
- Download the Gamer Server Manager from this Verknüpfung.
- Nach dem Herunterladen, extract the files to a location and run the program.
- Download SteamCMD from this Verknüpfung.
Installing Valheim Server Files
Run Game Server Manager (GSM) und geh zu Settings/Tools > Time Restart and Maintenance. Drücke den drei Punkte unter dem Program Location and select the location of the executable file of SteamCMD. This will setup the Game Server Manager and use Steam SteamCMD for updating.
In the command-line parameters box at the bottom of the screen, add the following command:
+login anonymous +force_install_dir "C:\Walheim" +app_update 896660 +quit
You can change the installation folder by simply changing the path of C:\Walheim.
Gehen Sie zum Werkzeug tab and allow SteamCMD to update and automatically install the game for you. If this is the first time that you performed this action on your PC, you may be getting a Steam guard verification.
Port Forwarding and Firewall
You will need to forward the following ports (usually from the admin page of your router) to the computer where you are running the server:
TCP/UDP 2456-2458
These are the ports that are set to default. If you change them, don’t forget to change the port forwarding rules as well.
You will also need to make sure that the Valheim server.exe executable (located in the bin subfolder in your main installation folder) is allowed by any firewalls that you have active.
Setting Up Game Server Manager
We now need to tell GSM some things about the server. Head to Server Details in the settings screen and select your Valheim executable valheim_server.exe. This file will be in the folder you installed the game.
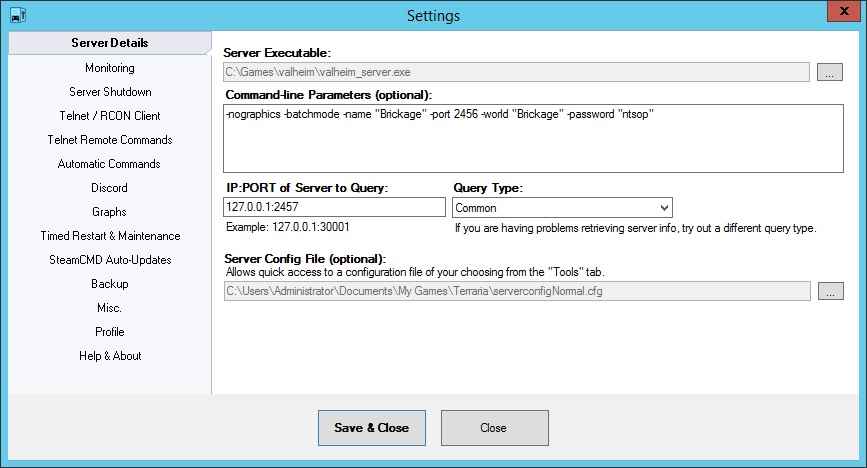
To get the program to correctly query it, enter the IP address of the server and the query port in the relevant field. If you are running your own server this would normally be 127.0.0.1:2457 and select Common as the Query Type. If you have altered the default ports, you may need to do so here as well. The query port is 2457 standardmäßig.
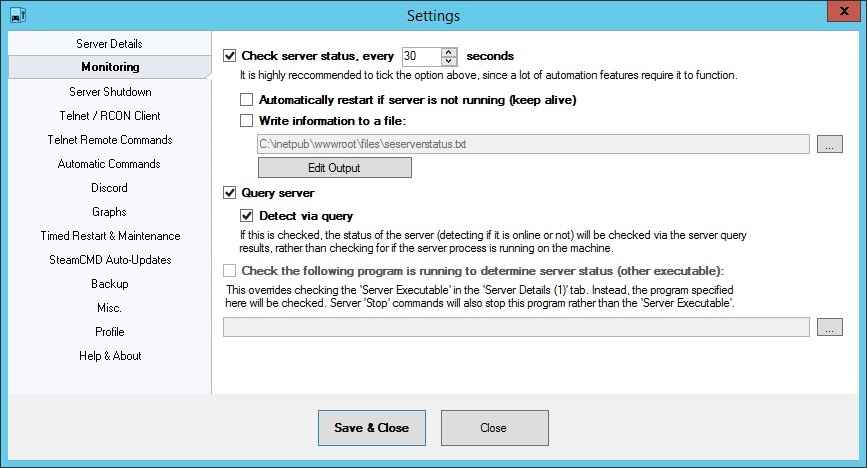
Tick Detect via query im Monitoring tab if you want the status of the server to be detected by a server query, rather than seeing if the program is running.
Monitoring and Restarting
It is recommended that you tick “Check server status, jeden” im “Monitoring” tab under settings. You may want to increase the interval at which the check is performed if your server takes longer to be “bereit“. This actively monitors the server and updates the “Hauptsächlich” und “Players Online” tabs and gives you access to the following:
- Automatically restarting the server if it goes down/crashes
- Players online graph
- Leistung (RAM and CPU) graph
- Network bandwidth graph
- Ability to output the status to a file (to share or embed, Zum Beispiel)
Serverkonfiguration
Zur Zeit, you can set a number of options via the command-line (accessed via the “Server Details” Tab).
Enter the following here, altering as necessary:
-nographics -batchmode -name "YourServerName" -Hafen 2456 -Welt "YourWorldName" -Passwort "YourServerPassword"
Notiz: the contents of the included batch file “start_headless_server.bat” contains these for reference. The next time you start the server, the settings you selected will be directly applied to the server.
General Use
To start the server simply click on “Start Server” auf der “Hauptsächlich” Tab. To stop the server, use the button next to start.
The main screen is split into tabs, showing different information on your server. Here you can see the number of players online, up-time, server status, performance and bandwidth details, graphs and access to various tools and functions.
The Game Server Manager was designed to be highly configurable and there are many things you can do with it. Some of those features are discussed in the sections below.
Backing Up Game Data (Optional)
The program has a built-in incremental backup system for game files. To use this you must set up the locations first. Gehe zu “Settings/Tools” und klicken “Programmeinstellungen“. Navigieren Sie zu “Sicherung” Tab. Click the button to the right of the various “Folder to backup” (“…“) to browse for the folder you wish to backup.
The default folder for game data is:
C:\Benutzer(Your Username)\AppData\LocalLow\IronGate\Valheim\worlds
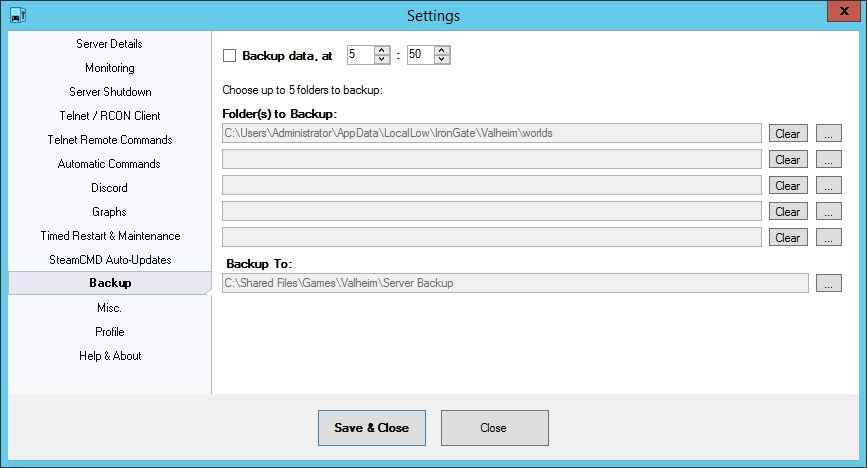
Ensure you select the folders you want to backup in Game Server Manager (you can choose up to 5). Next set the location that you want the backups to be saved to in the box below.
Optional: If you want the program to automatically backup game data daily, you can set the relevant option on this screen. Simply tick “Backup data, bei” and enter a time (24-hour clock). You can then manually perform a backup by clicking “Spieldaten sichern” unter dem “Settings/Tools” Tab.
Updating and Timed Restarts (Optional)
The program has a built-in feature to restart a server at a specific time of day. Dies finden Sie in der “Timed Restart” tab under the program settings.
Set up the time you want this to be performed and tick the “Timed restart, bei” tickbox if you want to do this.
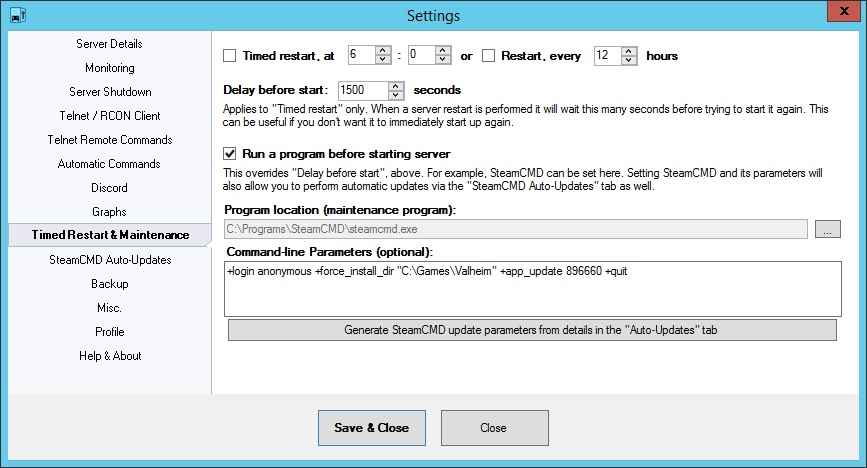
Even if you do not wish to set a timed restart, you can still make use of this screen. By selecting a program and entering any optional command line parameters in the “Run a program before starting server” Sektion, you can enable updating the server – either manually or automatically.
Zum Beispiel, if you use SteamCMD to update your game, select the SteamCMD executable here and enter any command-line details in the relevant box (see Initial Setup section).
Once this is set, you now have the option to perform this action on timed restarts. It will do it all for you! You can then also use “Run Maintenance Program” unter dem “Settings/Tools” tab to run this program manually at any time.
Additional tip: if you have also set a backup location you can use the “Perform Maintenance Now” unter dem “Settings/Tools” tab to perform the following sequence:
- Back up game data
- Stop Server
- Führen Sie das aus “maintenance” Programm
- Start the server back up again
Using SteamCMD to Update the Game (Optional)
Regardless of whether you installed the game via the Steam client or some other method, you can still use SteamCMD to update Valheim. As long as you point SteamCMD to the location of your Valheim installation, it will update it from there.
Gehen Sie zum “Programmeinstellungen” and navigate to “Timed Restart” Tab. Select the SteamCMD executable under “Program Location“. Nächste, you need to tell SteamCMD what game we are updating – and where it is. Um dies zu tun, we can add a number of commands in the command-line parameters field. Here are some of the ones you may need to use (put spaces between separate commands – and omit any < und > shown in the commands):
+Anmeldung <Nutzername> <Passwort>
oder
+anonym anmelden
This will log you into Steam and allow the game to be downloaded.
bitte beachten Sie: The first time it is performed on the machine, you may need to enter a “Steam Guard Code” before being allowed access. This is Steam’s additional security layer where it will send you an e-mail with a code to input. Input it when prompted by SteamCMD.
+force_install_dir "<Weg>"
Tells SteamCMD that the game is located here. Enter the full path of Valheim here.
+app_update 896660
Will tell SteamCMD to go ahead and update Valheim
bestätigen
Validate that the game files are all present and correct. Tag this at the end of the above statement, without a “+” Zeichen.
+quit
Tells SteamCMD to quit – this should always be the last command on your list.
So, an example command-line could be:
+login MySteamUsername MySteamPassword +force_install_dir "C:\MyGameLocation" +app_update 896660 validieren + beenden
Once this has been set up you can use both the “Run Maintenance Program” (simply runs the program) und “Perform Maintenance” (will Back up game data, stop the server, run the “maintenance” Programm, and finally start the server back up again) buttons under the “Settings/Tools” tab to update the game. Darüber hinaus, if you have set a timed restart, it will update the game before starting the server back up!
Enabling Automatic Update
Once you have the above set, you can also tell the program to check for game updates at a regular interval. When an update is found it will automatically stop the server, update it and restart it again.
Um dies zu tun, head to the “SteamCMD Auto-Updates” tab under “Programmeinstellungen” and fill out the details on this screen. You will need to enter your Steam username and password here, along with an “appid” (896660) und “branch” (öffentlich).
Once entered, select a time frame for how often the program should check for updates and tick the “Check for game updates, jeden” Kasten. You are now good to go!
You can even make the program delay an update once found, for a configurable time period, in order to broadcast a message to players on your server, warning them of the impending update.
Remote Commands (Optional)
This will allow you to start, stoppen, backup and run maintenance (aktualisieren) your server remotely (regardless of any built-in features a game has).
Um dies zu tun you will need to have access to the folder that the program is running in via VPN, FTP or some other means. I will not cover how to do that here, since that is really another topic altogether. I will assume that for this guide, you already have access to the folder.
The program periodically looks to see if any of the files listed below are sitting in the folder with it. If it sees any of them it will perform the corresponding actions (and remove the file). So, to perform any of the actions listed below all you have to do is create/copy a file into the Game Server Manager folder with the corresponding name (contents of file makes no difference). The program will see the file and perform the action. So einfach ist das!
Start the server
Datei: start.txt
Stop the server
Datei: stop.txt
Perform a backup
Datei: backup.txt
Full maintenance cycle (Sicherung, stop server, run maintenance program, start server)
Datei: update.txt
Restart the server
Datei: restart.txt
NOTIZ: Ensure you have set a sufficient delay in the “Server Shutdown” tab or else the server may attempt to restart before it has properly shut down.
Restart the server with command-line parameter set #1
Datei: parm1.txt
The command-line parameter for this is set in the “Telnet Commands” Tab. You can also access this feature via the “Quick Tasks” dropdown button on the “Hauptsächlich” Tab.
NOTIZ: Ensure you have set a sufficient delay in the “Server Shutdown” tab or else the server may attempt to restart before it has properly shut down.
Restart the server with command-line parameter set #2
Datei: parm2.txt
The command-line parameter for this is set in the “Telnet Commands” Tab. You can also access this feature via the “Quick Tasks” dropdown button on the “Hauptsächlich” Tab.
NOTIZ: Ensure you have set a sufficient delay in the “Server Shutdown” tab or else the server may attempt to restart before it has properly shut down.
Send command(s) to the server
Datei: telnetsend.txt
The program will read all text in this file and send it to the server console (provided you set this up under “Initial Setup > Setting Up GSM“)
Basic Port Forwarding Guide
You only need to perform port forwarding if your server is going to be accessed over the internet. If you are hosting a LAN game then it is not required.
- Find your hosting machine’s LAN (internal) – displayed on the “Hauptsächlich” tab of GSM.
- Log into your router’s admin page in a web browser. This is variable – but most router’s by standard, have the details written on the device itself somewhere (a sticker). It will be something like 192.168.0.1 or 192.168.0.255… or whatever. You will undoubtedly require a password, which is no doubt also on the sticker. If there is nothing on the router itself then you may have to get in contact with your ISP (if it’s an ISP’s router) or Google for the default login details of your specific router model.
- Once you are into the router’s admin pages, search for something called “port forwarding” amongst the menus. Difficult to say exactly where it would be since all routers are different. Nochmal, Google may be your friend here.
- Set up a “Regel” under the port forwarding screen to direct UDP / TCP traffic from the required ports to the LAN address you found in #1.
- Save the rules and you should be good to go.
Schlussbemerkung: If your hosting machine is set up to dynamically retrieve a LAN address on your network then it is possible that subsequent boots will alter your LAN address and cause port forwards to be pointing to the wrong machine. Wenn das passiert, you can either alter the port forwards again or, even better, change your LAN address to static (and set an address manually). Another Google can help you with this.
Fehlerbehebung
If your friends cannot join the game.
- If you can connect locally but your friends cannot, it is almost always a firewall, AV or port forwarding issue. Ensure all is configured as it should be.
Things to check
- Have you let the server executable through any firewalls you have (Windows, router etc.)? Remember that Windows firewall has 3 different “Profile” (Domain, Private and Public), so ensure you have the correct ones ticked – or tick them all. Ebenfalls, ensure it is allowed through in both directions (incoming and outgoing).
- Have you port forwarded all the required ports to the correct internal IP address of the server?
- Is your server’s local IP static? Wenn nicht, it is liable to change on reboots and mess up your port forwarding rules. You should ideally set it to static to prevent any further changes. In jedem Fall, check to ensure your local IP has not altered and subsequently nullified your port forward rules.
- Do you have any other software (Anti-virus, VPN or VLAN software like Hamachi) that could be interfering with network communication for the server?
Game Server Manager says my server is “Offline” when it is not
- Ensure you have entered the correct IP address and port under Server Details (1) for the IP:Port of the server to query. This should be 127.0.0.1:2457 standardmäßig, but if you have altered ports or are hosting on another IP address then you will need to change this.
I cannot connect to my server from the same machine I host on
- There could be a port conflict. You could try and alter the ports used by the server.