
This guide will show you how to create a mod for Kerbal Space Program 2. Keep in mind that Kerbal Space Program 2 ではない “officially” support modding. 始める前に, install BepInEx + SpaceWarp to get mods working in the game.
Modding Text Assets
Modding the text assets is how we change part stats, add new or edit existing missions, mod the tech tree, 等. Everything listed in a text asset can be changed, and new text assets can be added, using Patch Manager.
To start making a text assets mod, first download and install Patch Manager along with its dependencies.
Then make a new folder inside
../Kerbal Space Program 2/BepInEx/plugins/
using the title of your mod as the folder name.
If you can’t find the Kerbal Space Program 2 フォルダ, right click the game in the steam library, then select Manage -> ローカル ファイルを参照する
A patch file is just a text file renamed to the .patch file extension, so create a new one in the mod folder.
In Windows, you can just right click inside the folder, and select New -> テキストドキュメント
それでおしまい, now we can start customizing the patch.
ゲームを起動します, go to Settings -> Mods and enable Always Invalidate Cache for Patch Manager, so that it updates each time the game is launched.
You can then navigate to
../Kerbal Space Program 2/BepInEx/plugins/PatchManager/cache/
to see all the text assets it has changed, and verify that any patches worked as intended.
The BepInEx log file also contains output from Patch Manager. If there are errors, this may help you understand what went wrong. The log file is
../Kerbal Space Program 2/BepInEx/LogOutput.log
Viewing Text Assets (単純)
The easiest way to view the text assets is to get Patch Manager to generate them in its cache.
For this we will need to write a simple patch, so we can learn the basics of that as well.
:部品 {
	テスト: 1;
}
This patch will go through all the parts, add a test field, and set the value to 1.
It’s a useless patch that does nothing in the game, but Patch Manager likes it, because it makes rocket science easier for noobs.
Save that in the patch file and launch the game. Patch Manager should then run ~400 patches, that’s one for each part. We can then quit the game, go to the cache, and see a list of all the part text assets.
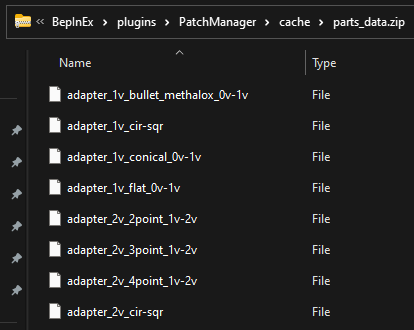
From here we just open the files in a text editor to inspect them.
To generate the cache for the other text asset types, just add the same useless patch for those types.
:ミッション { テスト: 1; }
:science { テスト: 1; }
:資力 { テスト: 1; }
:実験 { テスト: 1; }
Viewing Text Assets (高度)
All game assets – 文章, models, images, 等 – are in Unity Asset Bundles. To inspect the bundles you need a separate program.
One option is Asset Studio, the guide will use this.
Download it from the releases page, then unzip and run the AssetStudioModGUI.exe
From the UI, Select File -> Open Folder, then locate the game assets directory inside
../Kerbal Space Program 2/KSP2_x64_Data/StreamingAssets/aa/StandaloneWindows64/
The assets may take a while to load and use a lot of your PC resources.
Once they are all loaded, select the Asset List tab to browse. You may want to click the Type tab to sort by that, and scroll down to the Text Asset list, as this contains the most commonly sought assets.
Text Asset Type: Parts
Parts are the most common game asset. The text asset for a part defines its stats and modules. These are listed by part name, 例えば lab_2v_science_marine is the water science part.
The text asset firstly shows top level fields like “カテゴリー” which sets the category in the VAB part list.
Scroll down for more fields like “mass” which sets the part mass.
Further down are the part modules. Each part uses modules for unique and optional behaviours. 例えば, engine parts need an engine module to add the engine functionality to that part. Most parts have a color module, which sets their color.
Whether you are making custom parts or editing existing part stats, understanding the part definitions is essential.
Text Asset Type: ミッション
Missions are a simple text asset definition (compared to parts). The mission names begin with KSP2Mission_ – 例えば, KSP2Mission_Main_Kerbin_01 is the first stock mission.
A basic top level field is state, which can be active or inactive. Active means the mission is displayed in Mission Control, while Inactive means it is initially hidden.
Mission definitions then contain a list of stages, at least one for the objective and one for the reward. Objectives can contain multiple conditions that need to be met simultaneously.
Further down are the dialog lists for the briefing and debriefing.
ついに, the submit action can set other missions to active once that mission is completed. This is used to chain missions in sequence, so a mission only displays after the one before it is completed.
Text Asset Type: テック
Tech Nodes are another simple text asset definition. These define each tech in the tech tree. The name begins with tNode_ – 例えば, tNode_1v_start is the start technology.
The top level fields should be self-explanatory, 例えば. RequiredSciencePoints sets the technology cost.
RequiredTechNodeIDs defines any prerequisite technologies that need to be unlocked before this one.
The UnlockedPartsIDs is a list of each part name, the same names that were used in the text asset definitions for parts above.
ついに, position is a simple x,y co-ordinate value for the tech node placement on the R&D screen.
Example Patches
The Patch Manager ウィキ contains a syntax guide and some examples.
Looking at existing mods is usually a faster way to learn how to write patches. KSRe has a lot of patches, covering parts, tech tree, ミッション, もっと.
Some introductory parts patches are shown below.
:部品 {
  #seat_0v_external_crew {
    mass: 1.0;
  }
}
This patch begins with the :parts filter, to select all parts text assets. Then it selects the seat part, using the name from the text asset browser above. ついに, it selects the mass field, and changes it to 1.0.
:部品 {
  @if $$crewCapacity > 0 {
    * > Module_ReactionWheel { @delete; }
  }
}
This patch selects any parts with a crewCapacity field that has the value greater than 0. Then it navigates down to the Reaction Wheel Module, and removes that module from the part.
:部品 {
  ~#probe_* > Module_ReactionWheel > Data_ReactionWheel {
    PitchTorque *: 0.1;
    RollTorque *: 0.1;
    YawTorque *: 0.1;
  }
}
This patch selects all parts where the name doesn’t start with probe_ (anything except the stock probe cores). Then it navigates down to the Reaction Wheel Data, which contains the stats for that module. Then it multiplies the torque values by 0.1, reducing the strength of the reaction wheel.
:部品 {
  #booster_1v* {
    +Module_Gimbal {
      +Data_Gimbal {
        gimbalRange: 0.5;
      }
    }
  }
}
This patch selects all parts with name starting with booster_1v (the larger stock SRBs). Then it adds a Gimbal Module, with the gimbal range field inside the Data module set to 0.5.