A guide to modding armor for Final Fantasy Pixel Remaster, whether modifying existing armor or adding new armor
Introduction
This is a tutorial to mod armor in Final Fantasy Pixel Remaster. (As all of the Pixel Remaster games are built on the same Unity engine, and have many of the same files in common, this will also get you most of the way to being able to add armor into the Pixel Remaster versions of FFII-VI, but this particular guide is focused on the first one.)
First of all, you will need the modding software Memoria by Albeoris; the version of the software for the Pixel Remasters (it was originally created for FFIX) can be found here. Install that using the directions given (or for an even more user-friendly install, use KiameV’s Moogle Mod Manager).
(Note that Memoria is one of the two big methods for modding the Pixel Remasters; the other is called Magicite. In general, I prefer Magicite when I need to add new assets – files – for a mod, and Memoria when I need to edit existing assets. In this case, we will only be editing existing files rather than adding new ones, so I opted for Memoria. If I were adding a weapon or shield, which both use graphical sprites, then unless I were using an existing sprite I would likely use Magicite to incorporate the new assets as well as Memoria to edit the existing files.)
Okay! You’ve installed Memoria. What next?
Step 1: Export game data
First off, you need a copy of the existing game data to work from, both to use as a template and because you will be editing existing game files. Fortunately, Memoria is made for this purpose! Your first step will be to export your game data.
First of all, you will need to edit your Memoria config file to let it know you want to export files. First navigate to wherever you have Steam installed, and under the /steamapps/common/FINAL FANTASY PR directory, there should be a directory called BepinEx (the framework that both Memoria and Magicite use). Inside that directory, there should be a config directory, and within that a Memoria.FFPR directory.
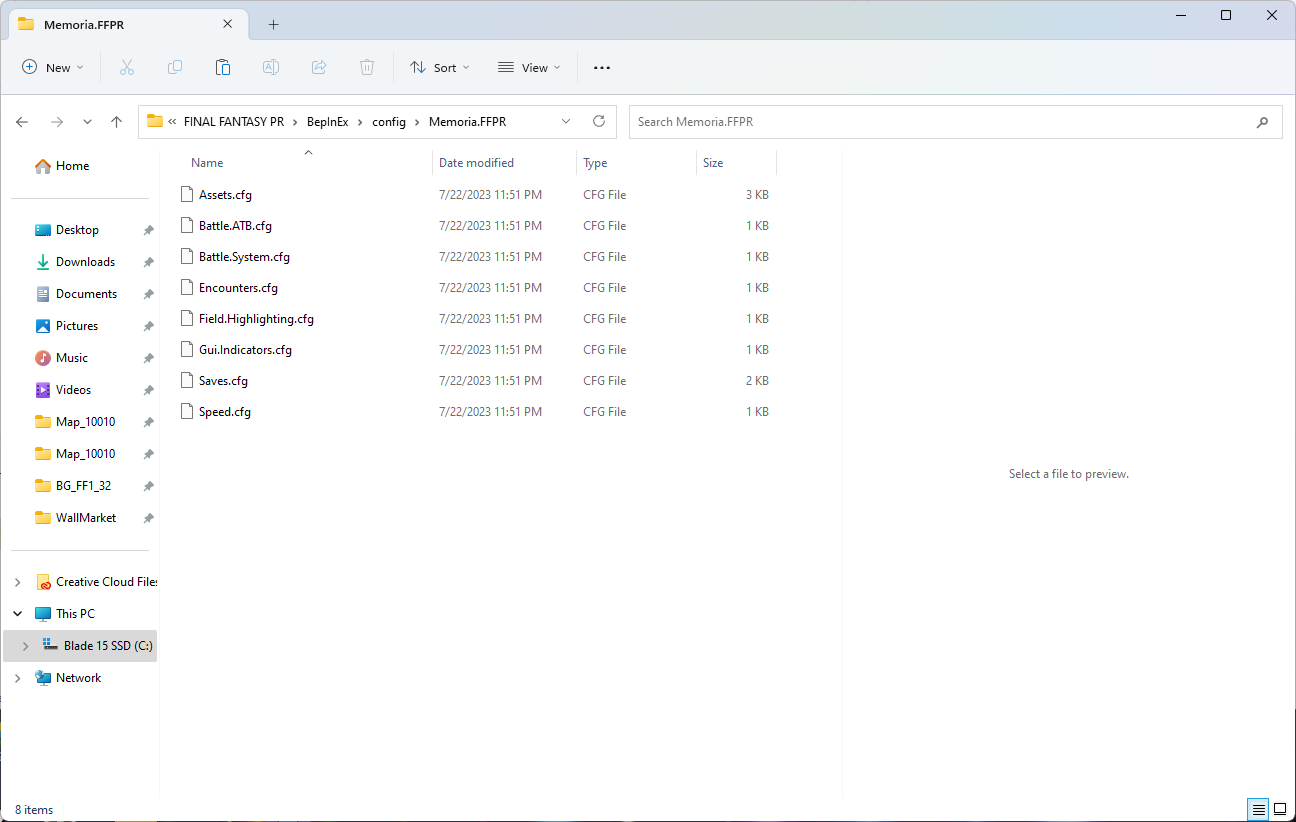
In that directory is a file called Assets.cfg. This is the file you will want to edit. Open it in a text editor (Notepad++ is my preferred editor), and you’ll notice that there’s a bunch of options.
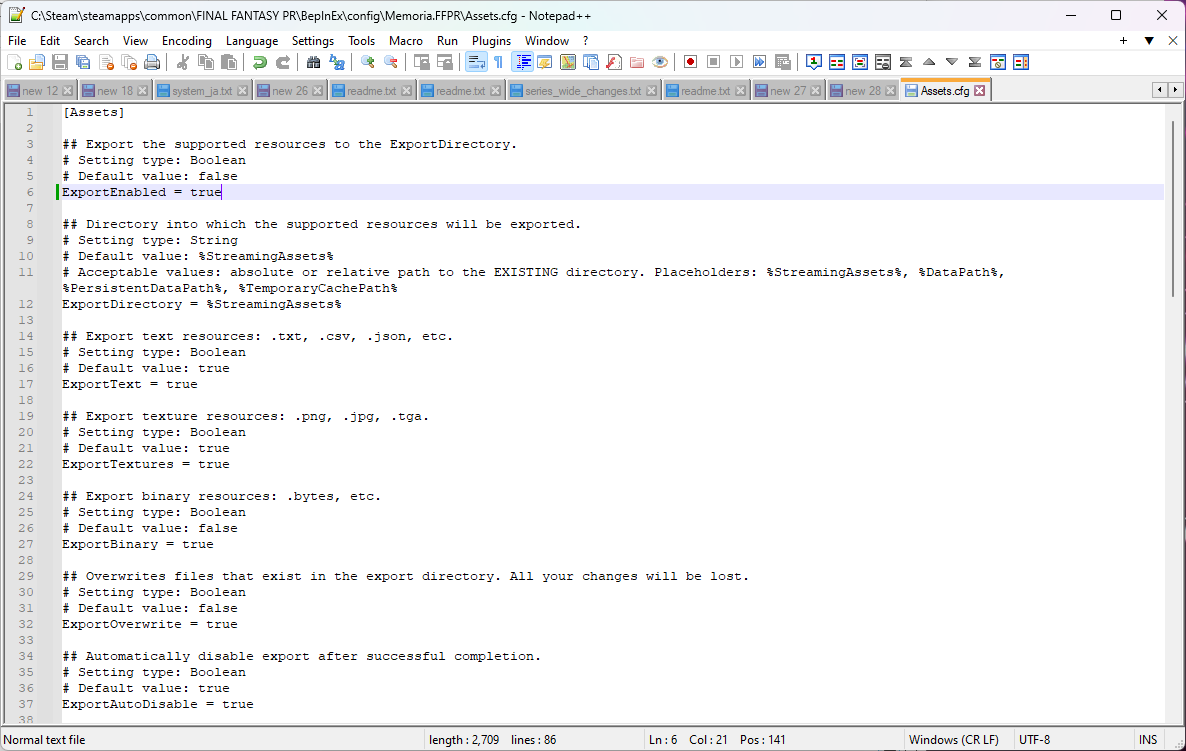
The key settings here to export your game data are ExportEnabled (should be set to “true”), ExportText (should be set to “true”), and ExportAutoDisable (should be set to “true”).
Explanations of these settings:
- ExportEnabled determines whether the game runs the game when you select it or exports game data instead. This is false by default, because you don’t want to export game data every time you play; however, when we do want it to export that data, we need to change it to true.
- ExportText determines whether Memoria exports text resources (mostly in .txt, .csv, and .json formats). We will be editing several game files in .txt and .csv format, so you’ll need this set to true to make sure those get exported.
- ExportAutoDisable sets ExportEnabled to false after a successful export. This way, after it successfully exports your game data, it’ll turn the export back off (so you can, y’know, play the game instead of exporting data) until you turn it back on manually.
You can also turn ExportTextures to true to export game visuals (includes character sprites, weapon/shield sprites, map tiles, etc.) and ExportBinary to true to export binary files (includes music files). Also keep in mind that if ExportOverwrite is set to true, any existing files will be overwritten; you’ll probably want this set to false unless you want to do that (and if you’ve made changes to those files, you probably don’t!).
After making these config changes, run the game. Instead of the game beginning, you should see a progress display showing the export status. Once it hits 100% and successfully exports the data, it will close the program out (and if ExportAutoDisable is set to true, it will turn the exporting back off so you can play the game).
Step 2: Give your armor a name and description
Okay! You’ve now got a shiny new copy of the game data. (Or the text-based parts, at least, depending on what options you selected in the config.) It will be under the FINAL FANTASY PR/FINAL FANTASY_Data/StreamingAssets/Assets folder.
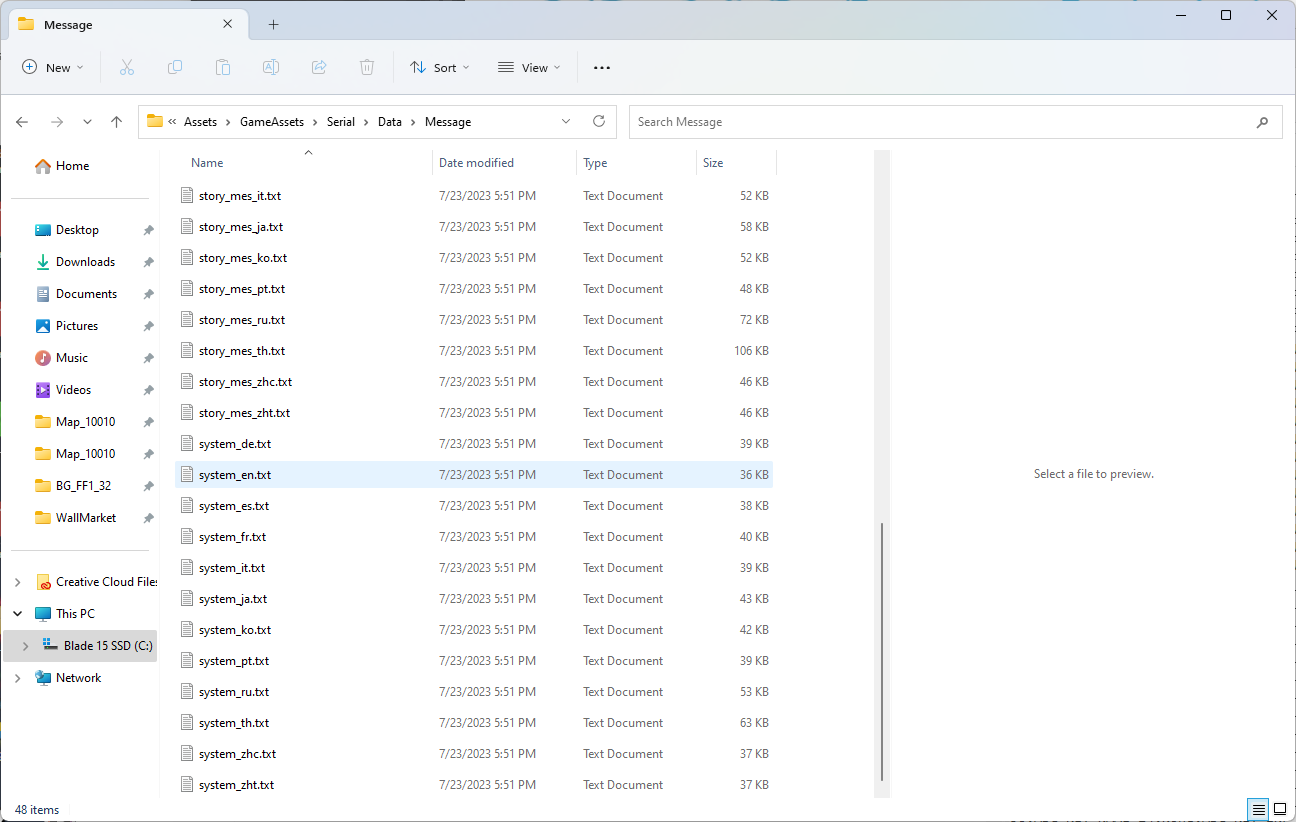
Within that folder, navigate to the GameAssets/Serial/Data/Message directory. There you should find a file called system_en.txt.
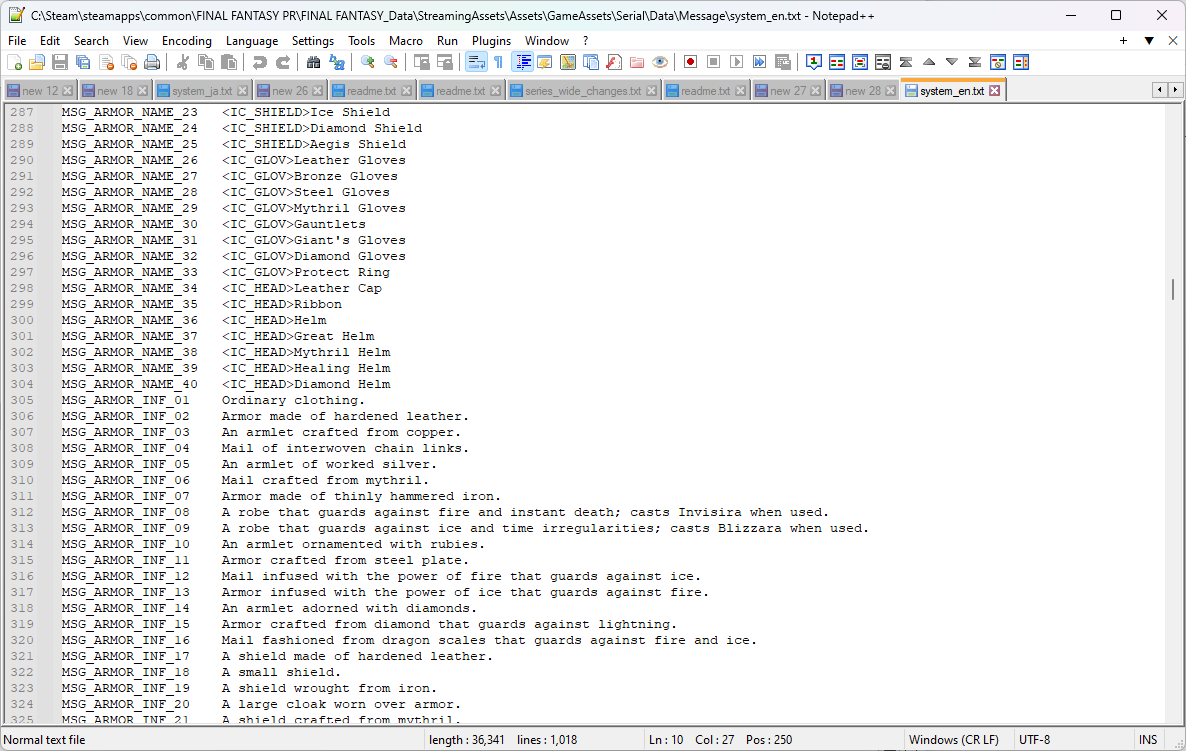
This is the English localization file for things such as names, descriptions, and basically most things except for dialogue, the music player, and the gallery. This is where the game will look for any text involving names or descriptions of armor, and so this is where you’ll want to put the name and description of your new armor.
The standard naming convention for armors is MSG_ARMOR_NAME_XX for the name and MSG_ARMOR_INF_XX for the description, where XX is a unique identifier number for the armor. The base game goes up to 40 for armor names and descriptions.
However, to ensure the maximum compatibility for your mod, you’ll want to give it a number after 75, as I’ve created a mod that restores the cut content from previous versions of the game to the Pixel Remaster, and any number below 76 here will conflict with those. (If you really want to ensure you don’t run into other mods, you can give it an even higher number – say, 100 or 500 – with no issues.)
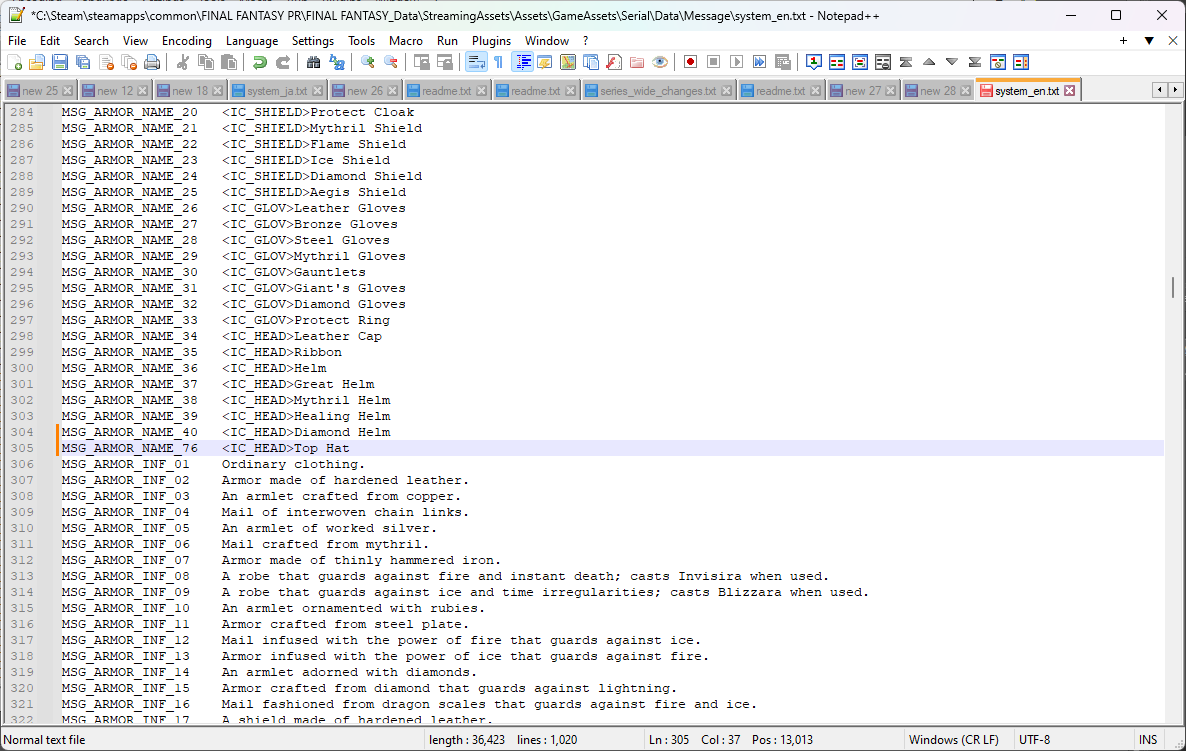
So let’s give our new armor, which we’ll give the number 76, a name. Let’s give our characters a top hat. It’ll be a helmet, of course, and we’ll name it “Top Hat.”
As you can see here, MSG_ARMOR_NAME_76 is what we’re using. You can probably also see that there’s a weird bit before the name that looks like “”…that just signifies that the game should put the headgear icon before its name, just like it does with other in-game headwear, so that players of your mod will know that this is, in fact, a hat.
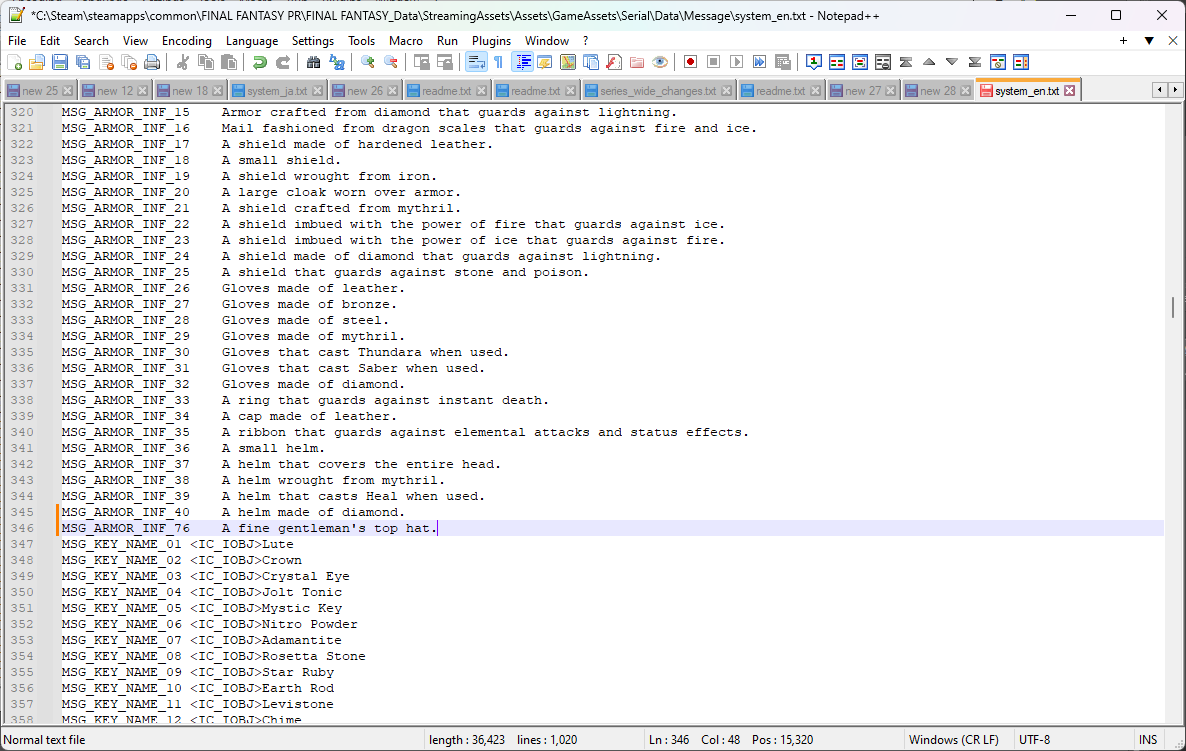
The corresponding description will be MSG_ARMOR_INF_76; here we’ve made that description say “A fine gentleman’s top hat.”
Once you’ve made these edits, save system_en.txt, and we’ll move to the next step!
Step 3: Add your armor to content.csv
For the next few parts, you’ll be working with comma-separated values worksheets, or .CSVs. These can be opened either in a text editor or in a spreadsheet program like Excel.
(Note that I haven’t had much luck editing csv files in Excel and putting them back into the game; theoretically it should be possible, but I do my editing of these files manually using Notepad++.)
I’ve also set up a Google Sheets here where I’ve started uploading some of the game files as spreadsheets with explanations and aids, which should make it easier if (like me) you’re editing using a text editor. It currently includes the vanilla versions of all the files discussed in this tutorial (armor.csv, content.csv, and product.csv), with explanations of some of the less obvious things.
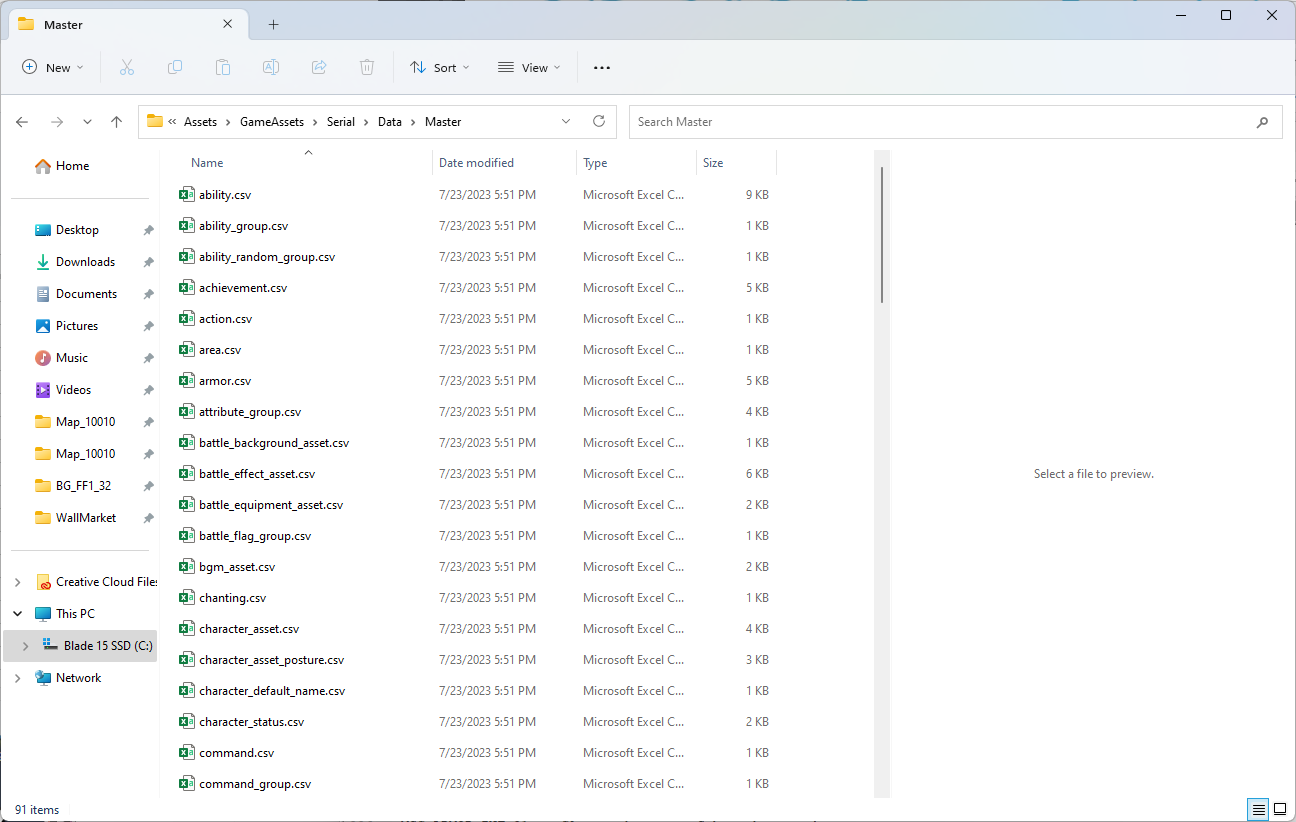
Anyway, the file you’ll want is called content.csv. You can find it if you go into the Master directory instead of the Message directory (where system_en.txt was). The Master directory has various .csv files that govern most of the game’s content. Items, monsters, music, sprites…all of those are changeable using these .csv files.
This particular file – content.csv – is a general file that serves as a repository for several different kinds of content (hence the name). Specifically, it includes consumable items, equipment, and abilities (like spells and monster attacks). It doesn’t have a ton of info on each of these, as there’s very little info they share; it mostly gives each list item a name and description, tells you what kind of content it is, and gives you the specific number within that content.
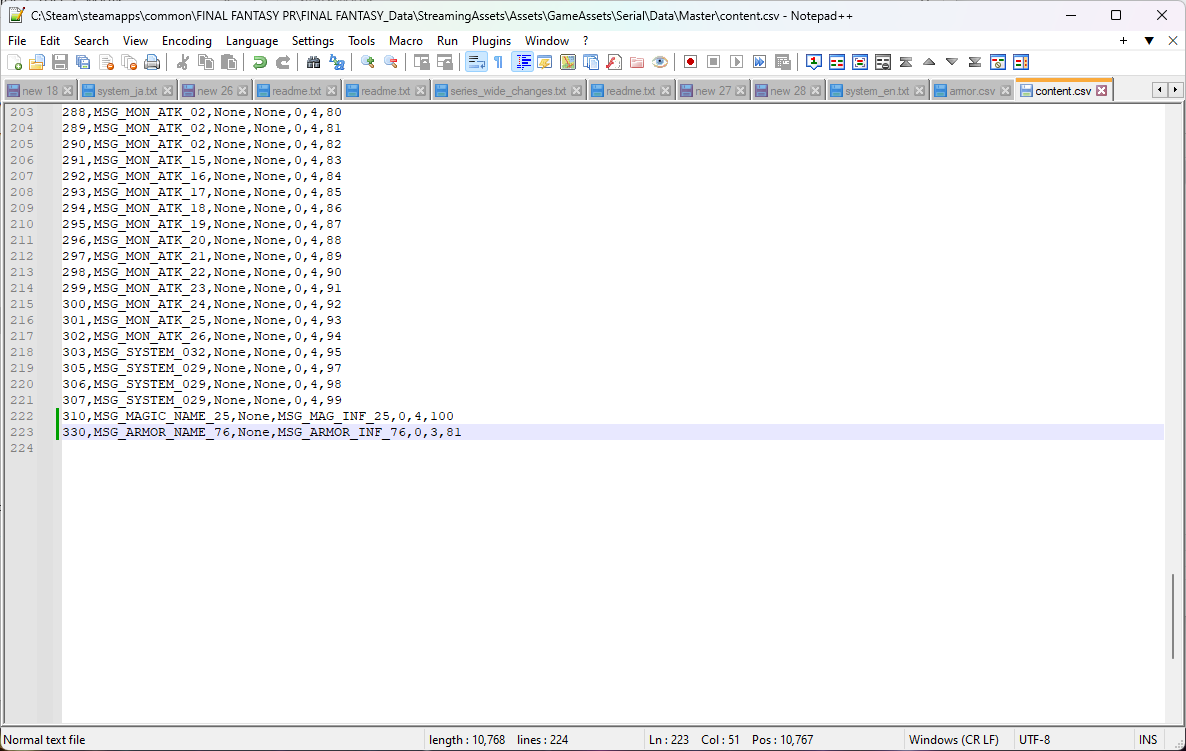
Again, give your new item a high number, as the vanilla game has quite a few items and my content restoration mod fills in many of those numbers and adds a few. Here we’ve decided on 330 for our Top Hat. Add a new line at the end and then we’re ready to input our hat’s data! Each item is separated by a comma (hence “comma-separated values”).
Info in content.csv:
- id: The ID of your piece of content. In this case, we decided on 330.
- mes_id_name: The string in system_en.txt that correlates with your content’s name. In this case, it’s MSG_ARMOR_NAME_76, which correlates with “Top Hat.”
- mes_id_battle: The string in system_en.txt that correlates with some kind of battle-related content (I think perhaps a description in-battle, or if an ability has a special name in-battle?). It must be used by one of the later FF Pixel Remasters, as it’s unused in this one.
- mes_id_description: The string in system_en.txt that correlates with your content’s description. Again, it’s MSG_ARMOR_INF_76, which correlates with “A fine gentleman’s top hat.”
- icon_id: An identifier for the icon your item uses. This is unused in this game, but it may be used in the later PRs.
- type_id: An identifier for what kind of content it is. The identifier for armor is 3, so you’ll want to put a 3 here.
- type_value: An particular identifier within that type of content. It’s armor, and I’ve put it at 81 so it won’t interfere with existing content or content from my restoration mod. So the Top Hat will be armor #81.
Make your changes, then save content.csv.
Step 4: Add your armor to armor.csv
So you’ve got your top hat in content.csv. Unfortunately, as that file is so broad and encompasses different kinds of info, it doesn’t have very specific information on any of that content, and so there’s nothing to tell the game how your hat is functioning as actual armor. Fortunately, the game has another file specifically for that: armor.csv (in the same directory as content.csv).
This file works the same way as content.csv, but it has a lot more information.
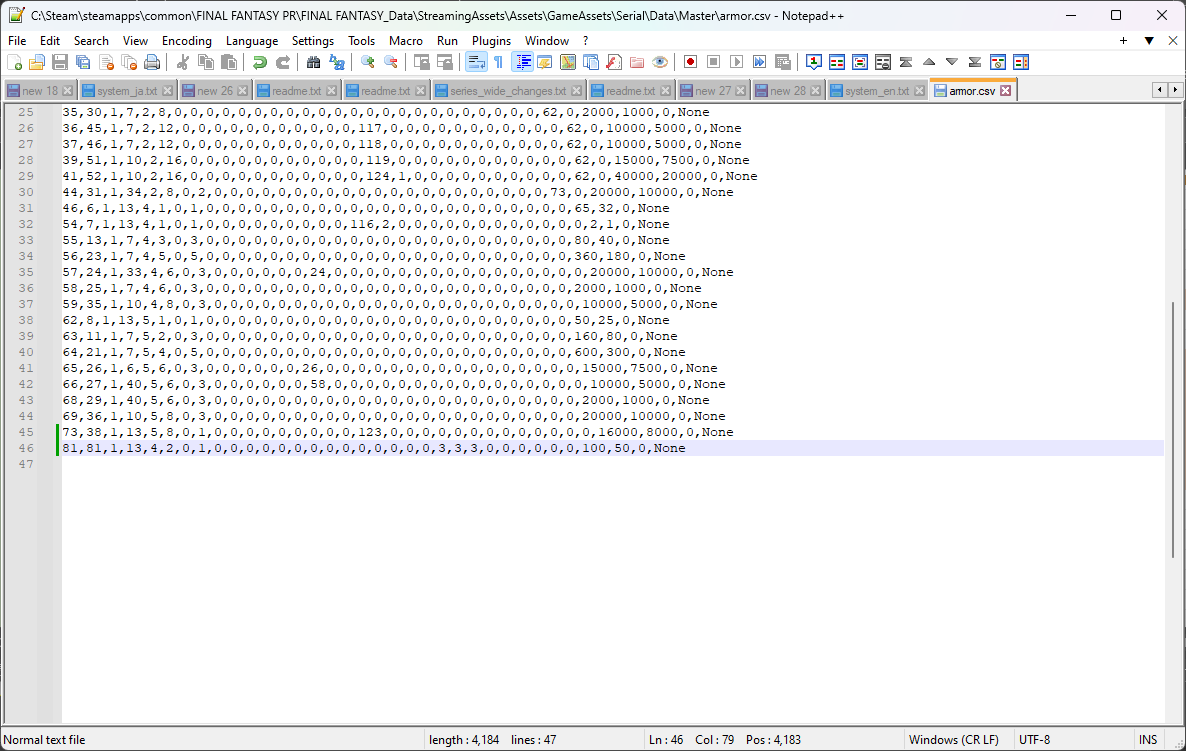
Info in armor.csv:
- id: Again, a unique identifier… in this case, the armor identifier. We assigned it 81 in content.csv, so we’ll keep that the same here to link the two.
- type_id: Type of armor. This has two values: 1 for regular armor and 2 for the “empty” armor it assigns to slots where you have no armor equipped. Keep it at 1.
- equip_job_group_id: What jobs can equip your armor. The possible groups are listed in job_group.csv. Anyone can wear a top hat, so we’ll assign this 13, which corresponds with the group containing all jobs (so any job, from a Warrior to a Black Mage, can equip our Top Hat).
- parts_group_id: What equip slot your armor is equipped to. This should be equipped to the head slot, so we’ll give it a 4 here, like the other helmets.
- defense: As the name suggests, this is the defense provided by the armor. Let’s give it a 2; some defense, but not a ton.
- ability_defense: Presumably defense against magic or abilities in other FF PR games, but it goes unused in this particular game.
- weight: The weight of the item, which affects things like evasion, IIRC. Let’s put it at 1, which is where most of the hat items fall. Some weight, but not enough to make a huge difference like a metal helm might.
- evasion_rate: How does this affect the equipped character’s evasion rate? Note that this can include negative numbers, so a -2 would mean that equipping it lowers the equipper’s evasion by 2.
- ability_evasion_rate: Again, unused here.
- ability_disturbed_rate: Unused.
- destroy_rate: Mostly used for consumable items; how likely is it to be destroyed when used, as a percentile chance. Most consumable items have 100 here, so when you use them they always disappear.
- magnetic_force: Unused (I think this is for whether equipment is magnetic or not in FFIV).
- invalid_reflection: When used as an item, does it bypass Reflect status?
- trigger_ability_id: If this is used as an item, what ability does it have? There are several basegame equipment that cast a spell when used as an item (the White Robe, for example, casts the Invisira spell, and the Healing Helm casts Heal). The number corresponds with an ability in the ability.csv file.
- wear_function_group_id: Unused.
- wear_condition_group_id: Unused.
- resistance_attribute: What attributes does this armor resist? It draws from the attribute_group.csv file.
- resistance_condition: What status conditions does this armor resist? It draws from the condition_group.csv file.
- resistance_species: What type of creatures does this armor resist? Unused in the base game.
- strength: How much the armor increases the wearer’s Strength.
- vitality: How much the armor increases the wearer’s Vitality.
- agility: How much the…you get the picture. Our top hat gives a +3 boost here, because who doesn’t feel more like Fred Astaire when they look more like Fred Astaire?
- intelligence: Again, our top hat gives a +3 here, as who doesn’t look and feel smarter in a freaking top hat?
- spirit: Unused. (I accidentally forgot that Spirit doesn’t exist in the first FF and gave the Top Hat a +3 here as well, so it will have a random +3 for a nonexistent attribute when we do finally see it. Oops!)
- magic: Unused.
- max_hp_up: When worn, the armor will increase the wearer’s HP by this amount. Unused in the base game, but works fine.
- max_mp_up: Presumably the MP equivalent of the previous one, but as this game has a Vancian charge-based magic system rather than an MP-based one, I’m not sure whether this would have an effect.
- battle_effect_asset_id: Not sure what this does; I’m guessing that if you want your armor to have a different effect when used as an item than the base effect of the assigned ability, you can do that here?
- guard_icon: For shields, what graphic will be shown when you block with it. In the basegame, all shields except for the Protect Cloak use the same graphic (what was the Leather Shield in previous versions); my content restoration mod has restored the individual looks of each shield that previous versions had.
- se_asset_id: Presumably something relating to sound effects; not sure what this does, if anything, in this game.
- buy: The cost to buy this from a store, if it’s available at a store.
- sell: The gil you’ll receive when selling this back to a store. Usually half of the buying cost, though not always.
- sales_not_possible: Presumably some setting to make something unable to be sold.
- process_prog: Unused.
Assign your values for your item, save armor.csv, and now our Top Hat is in the game! However, we’ve also got to put some way into the game for us to actually get said hat. This is where our next file comes in, and our final step in modding it in.
Step 5: Add your armor to product.csv
Still in our Master directory, let’s go to our final CSV file, product.csv. This contains a list of stores and their inventory. Let’s add our Top Hat to the Cornelia Armor Shop, so it’s nice and easy for us to access it for testing.
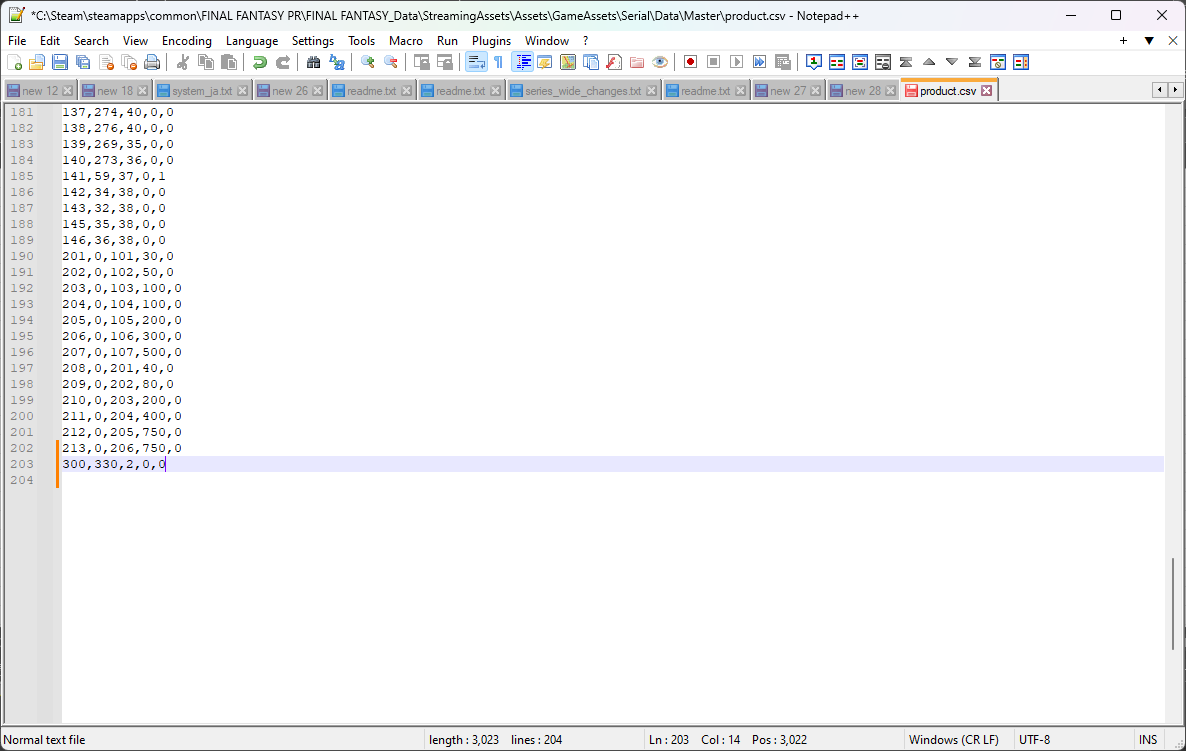
This file has considerably less info than armor.csv, so it’s a much easier addition to make.
Info in product.csv:
- id: Shop ID. As long as each item has a distinct one, this doesn’t really matter, as nothing else uses it that I’m aware of. 300 is what we’re going with here.
- content_id: The Content ID of your item. Remember back in content.csv? We assigned it 330, so we’ll put that here.
- group_id: The ID of your store. 1 is the Cornelia Weapon Shop, 2 is the Cornelia Armor Shop, 3 is the Cornelia Item Shop, and so on until 38 (the Caravan shop after buying the Bottled Faerie). We want the Cornelia Armor Shop, so we’ll assign it a 2.
- coefficient: Used in other games to raise/lower prices, I believe; this game doesn’t really use them.
- purchase limit: A limit on the number you can purchase. The only basegame use of this is the Bottled Faerie, since you can only buy the one.
Again, once you’ve entered your data, save product.csv. You should be done, and now all that’s left is the testing!
Step 6: Purchase your armor in-game!
Time to test it out!
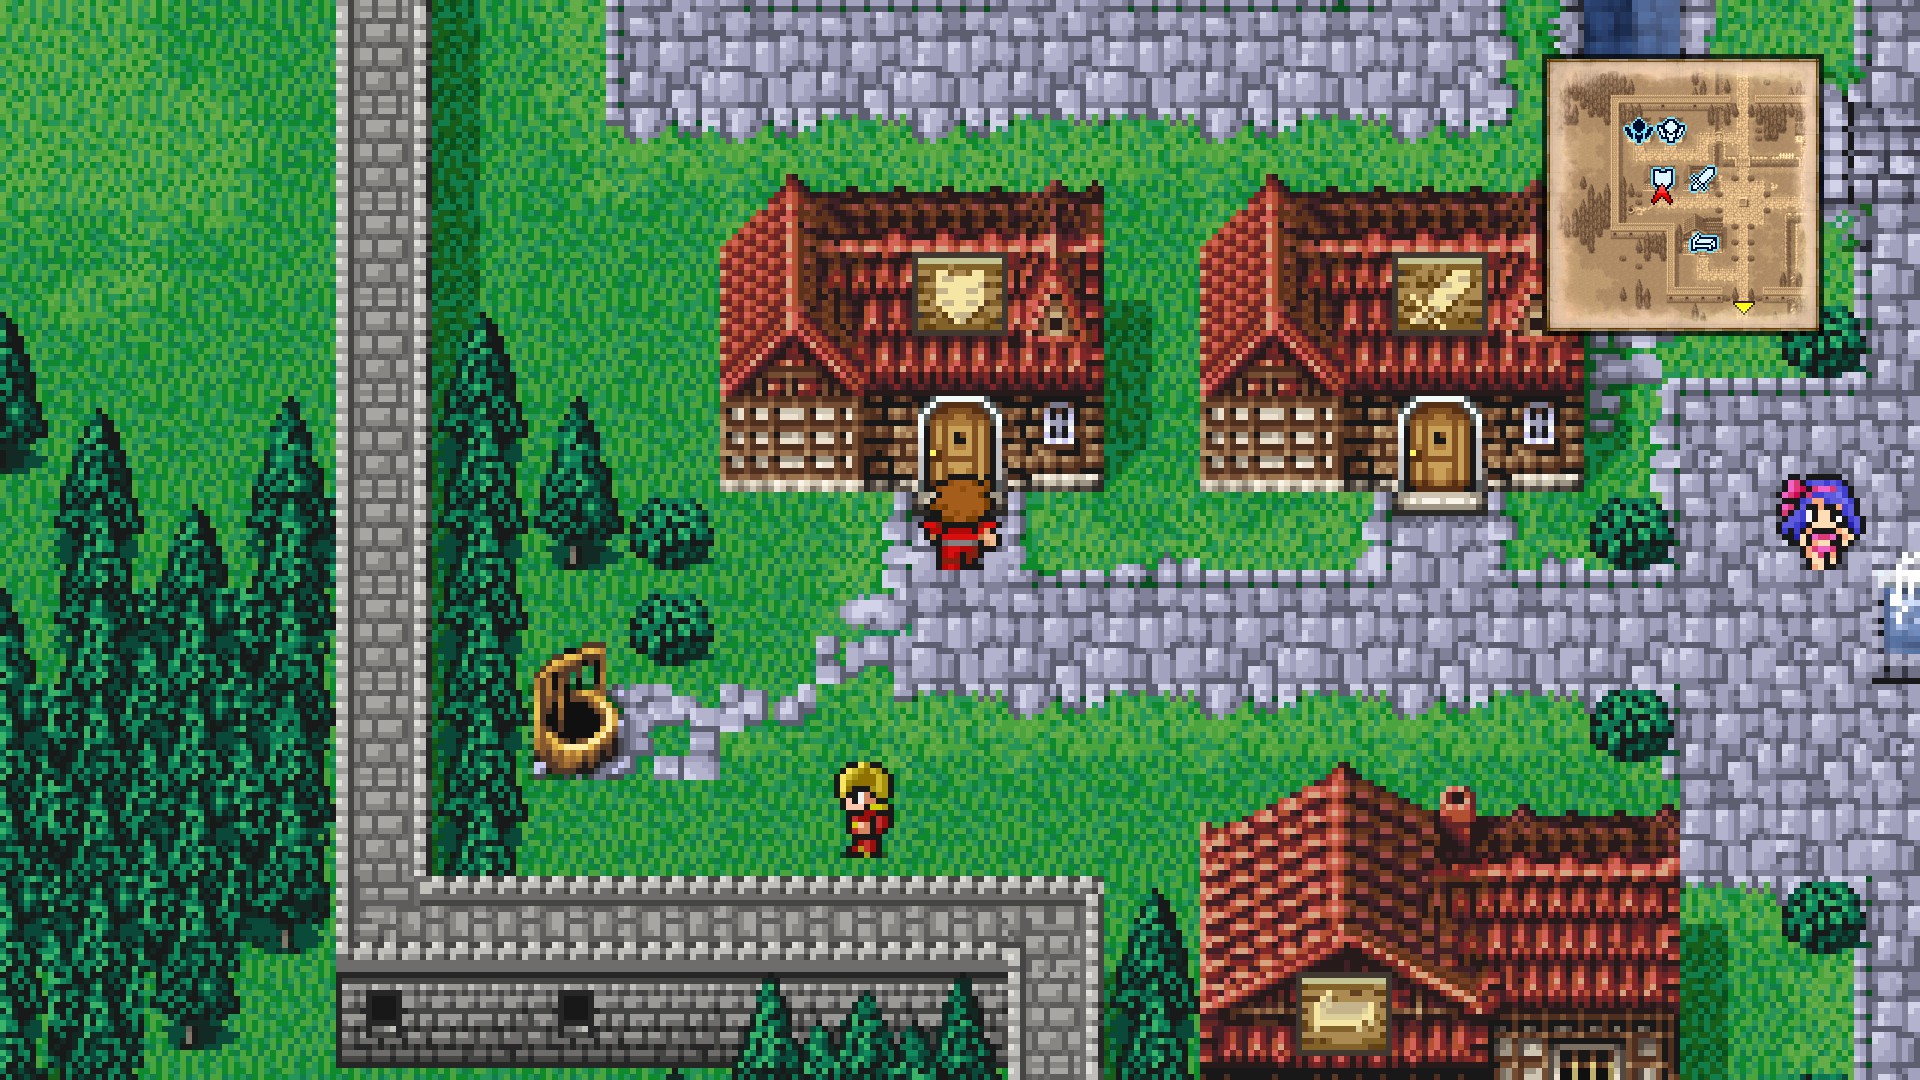

Fire up the game and go to Cornelia’s armor shop.
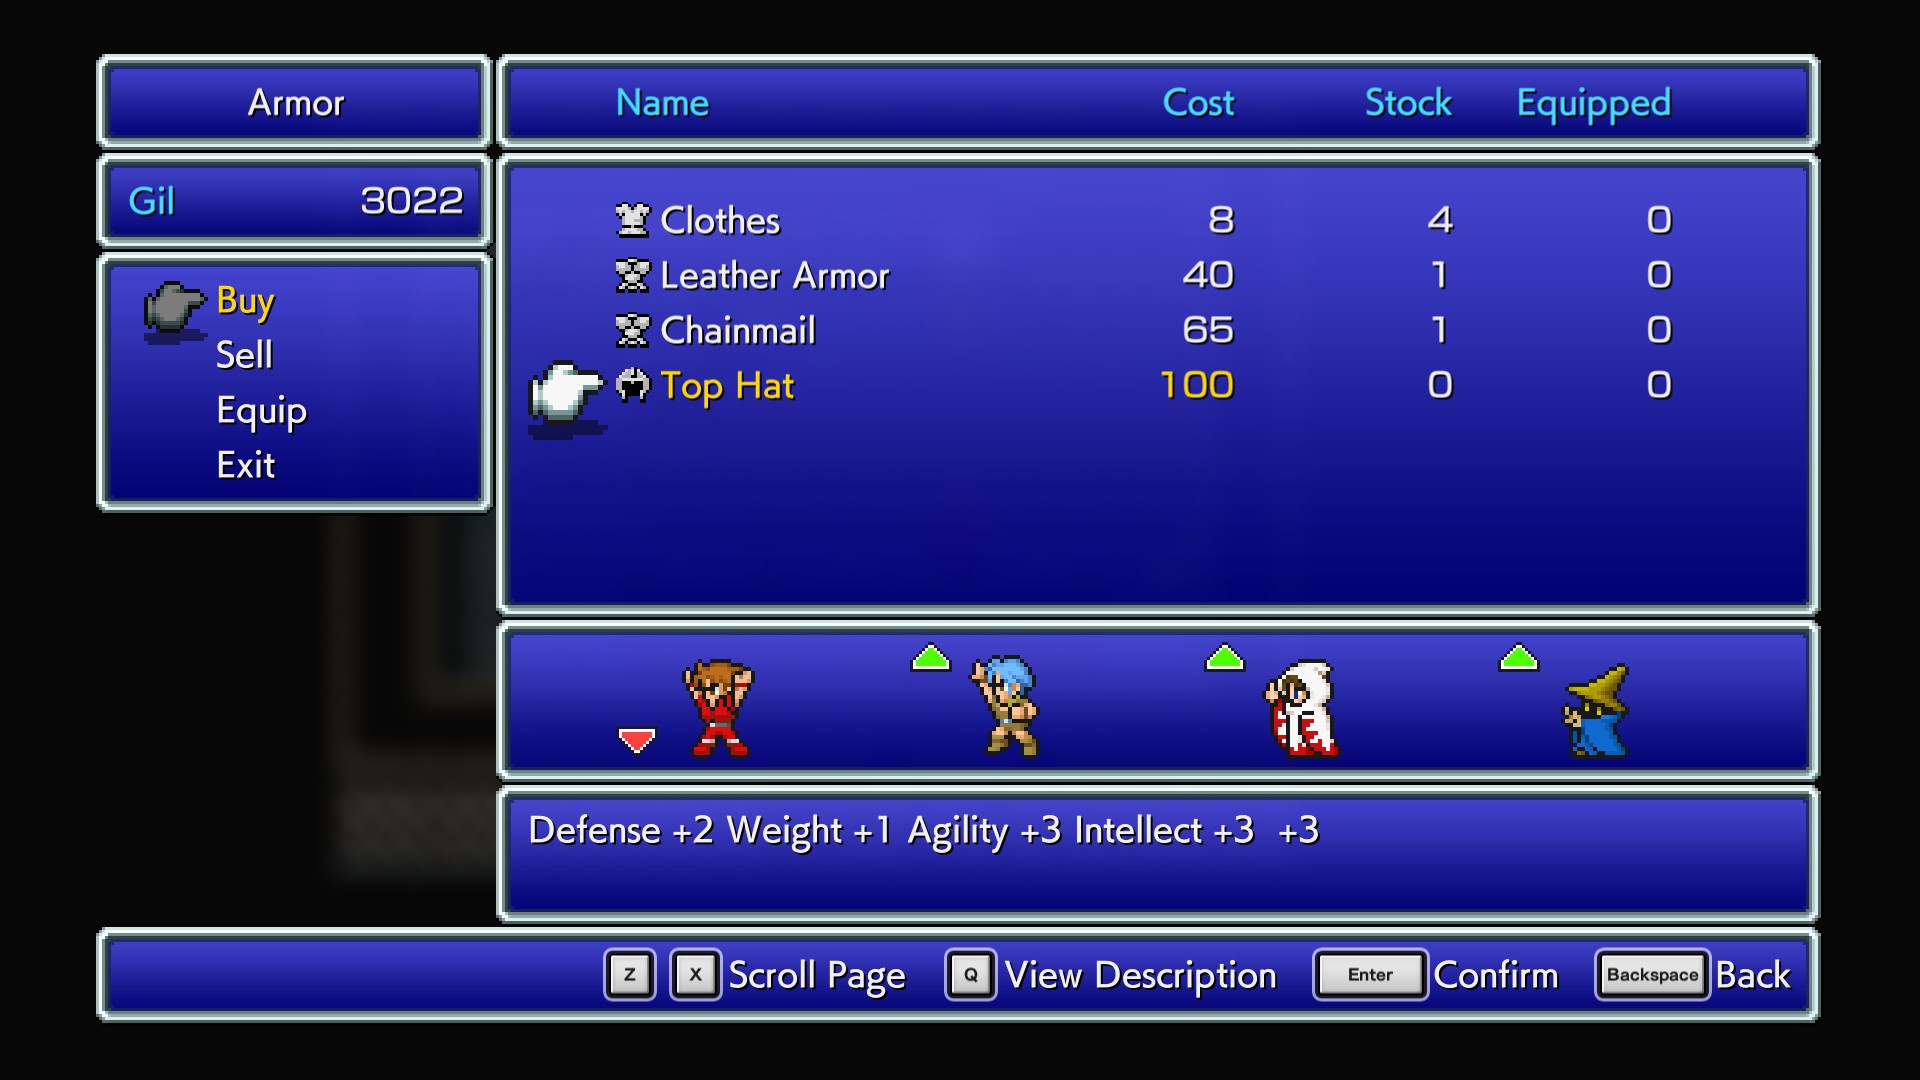
And there it is, the Top Hat helmet! As you can see, it has the stats we assigned to it (including the +3 to the nonexistent Spirit stat, oops!)…
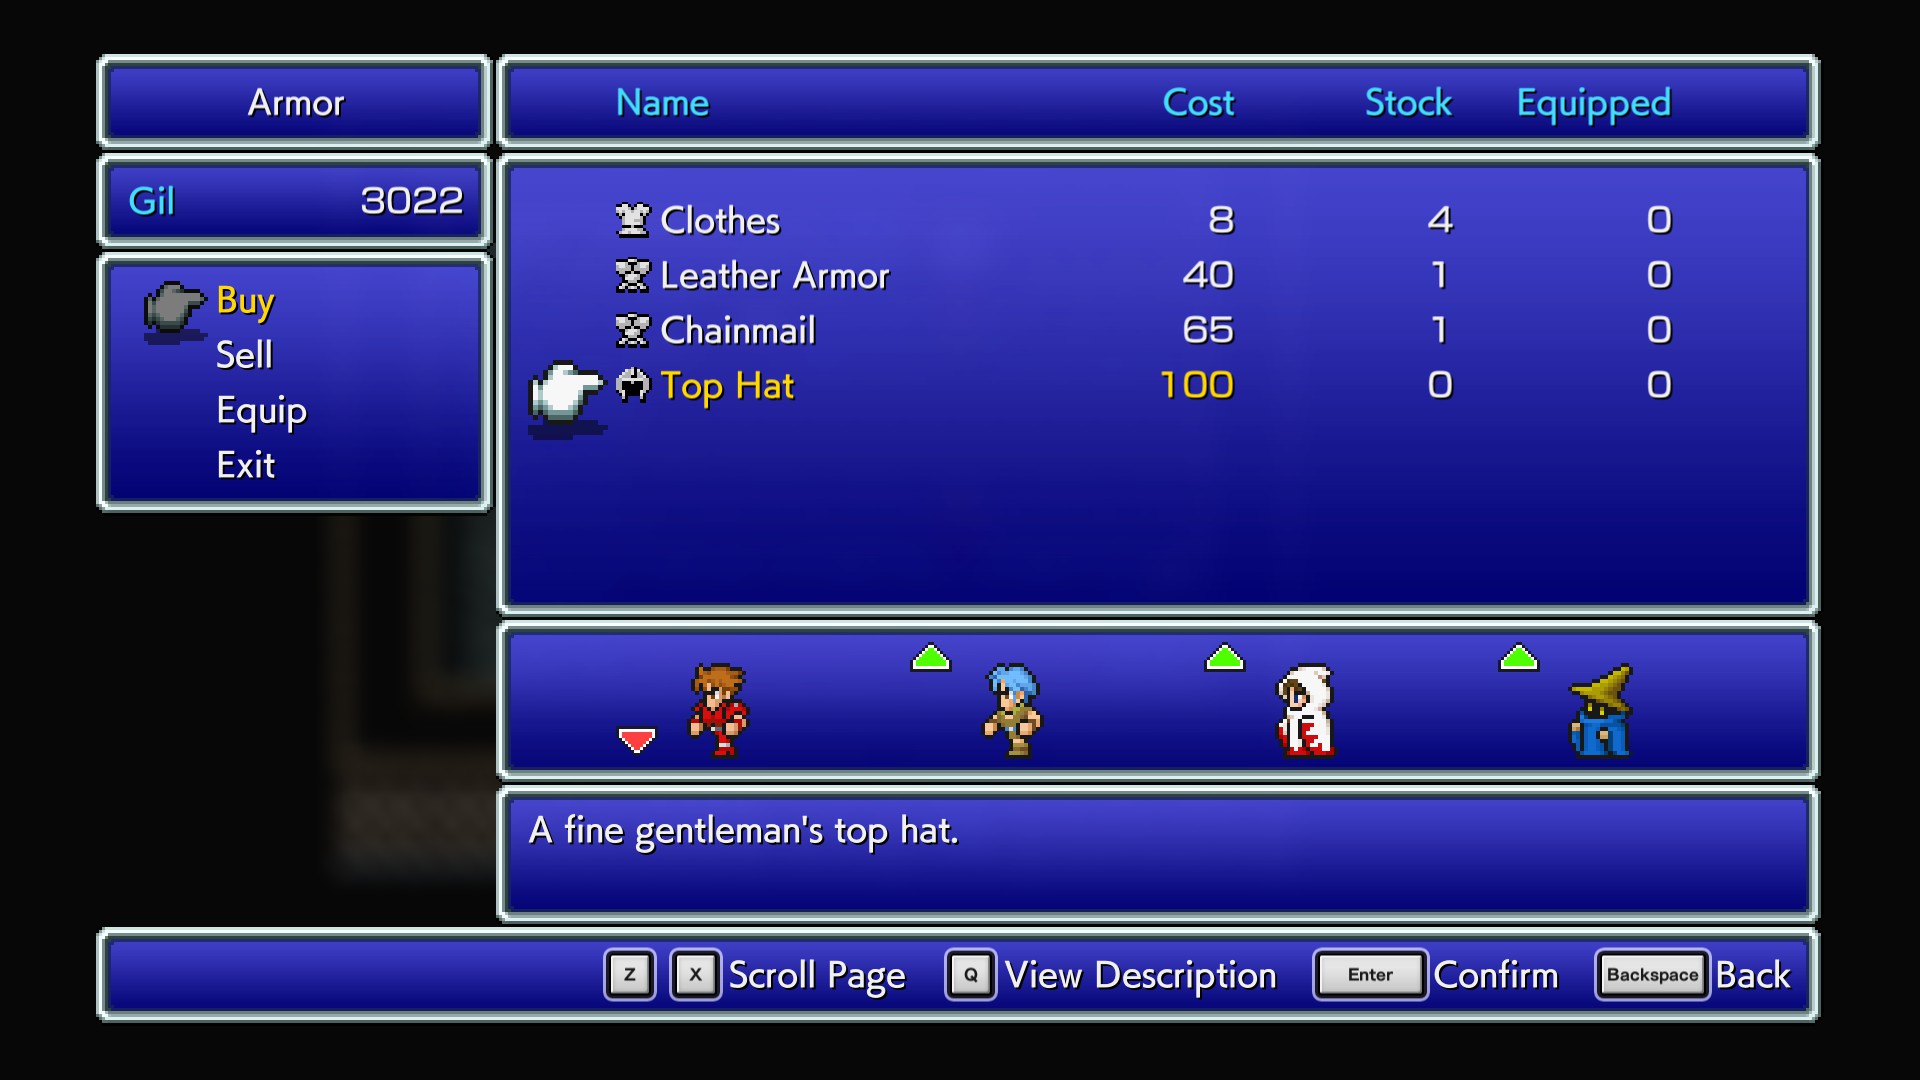
…and the description.
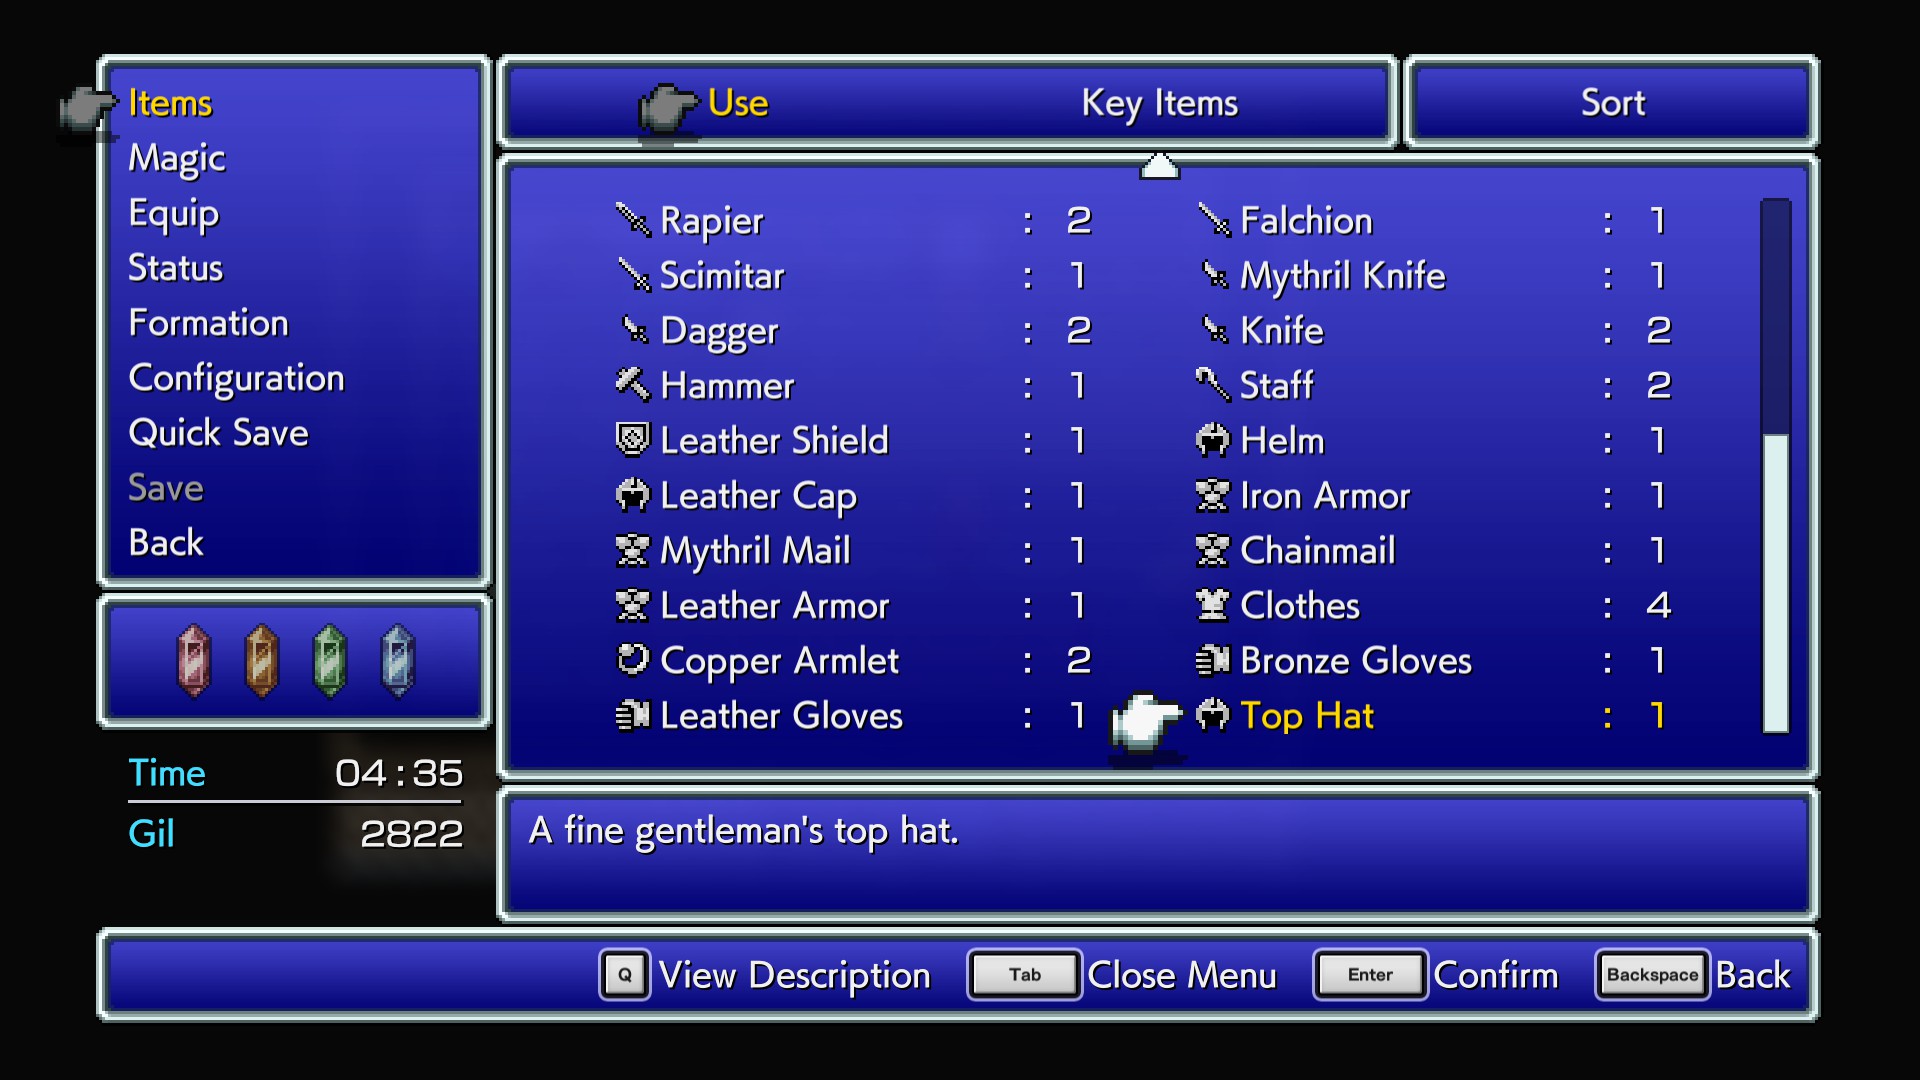
Purchase it, and it now shows up in our inventory. (Keep in mind that it won’t sort properly at the moment; that requires a little more effort than we put in here, and usually requires shuffling basegame equipment around in a way that will definitely reduce compatibility.)
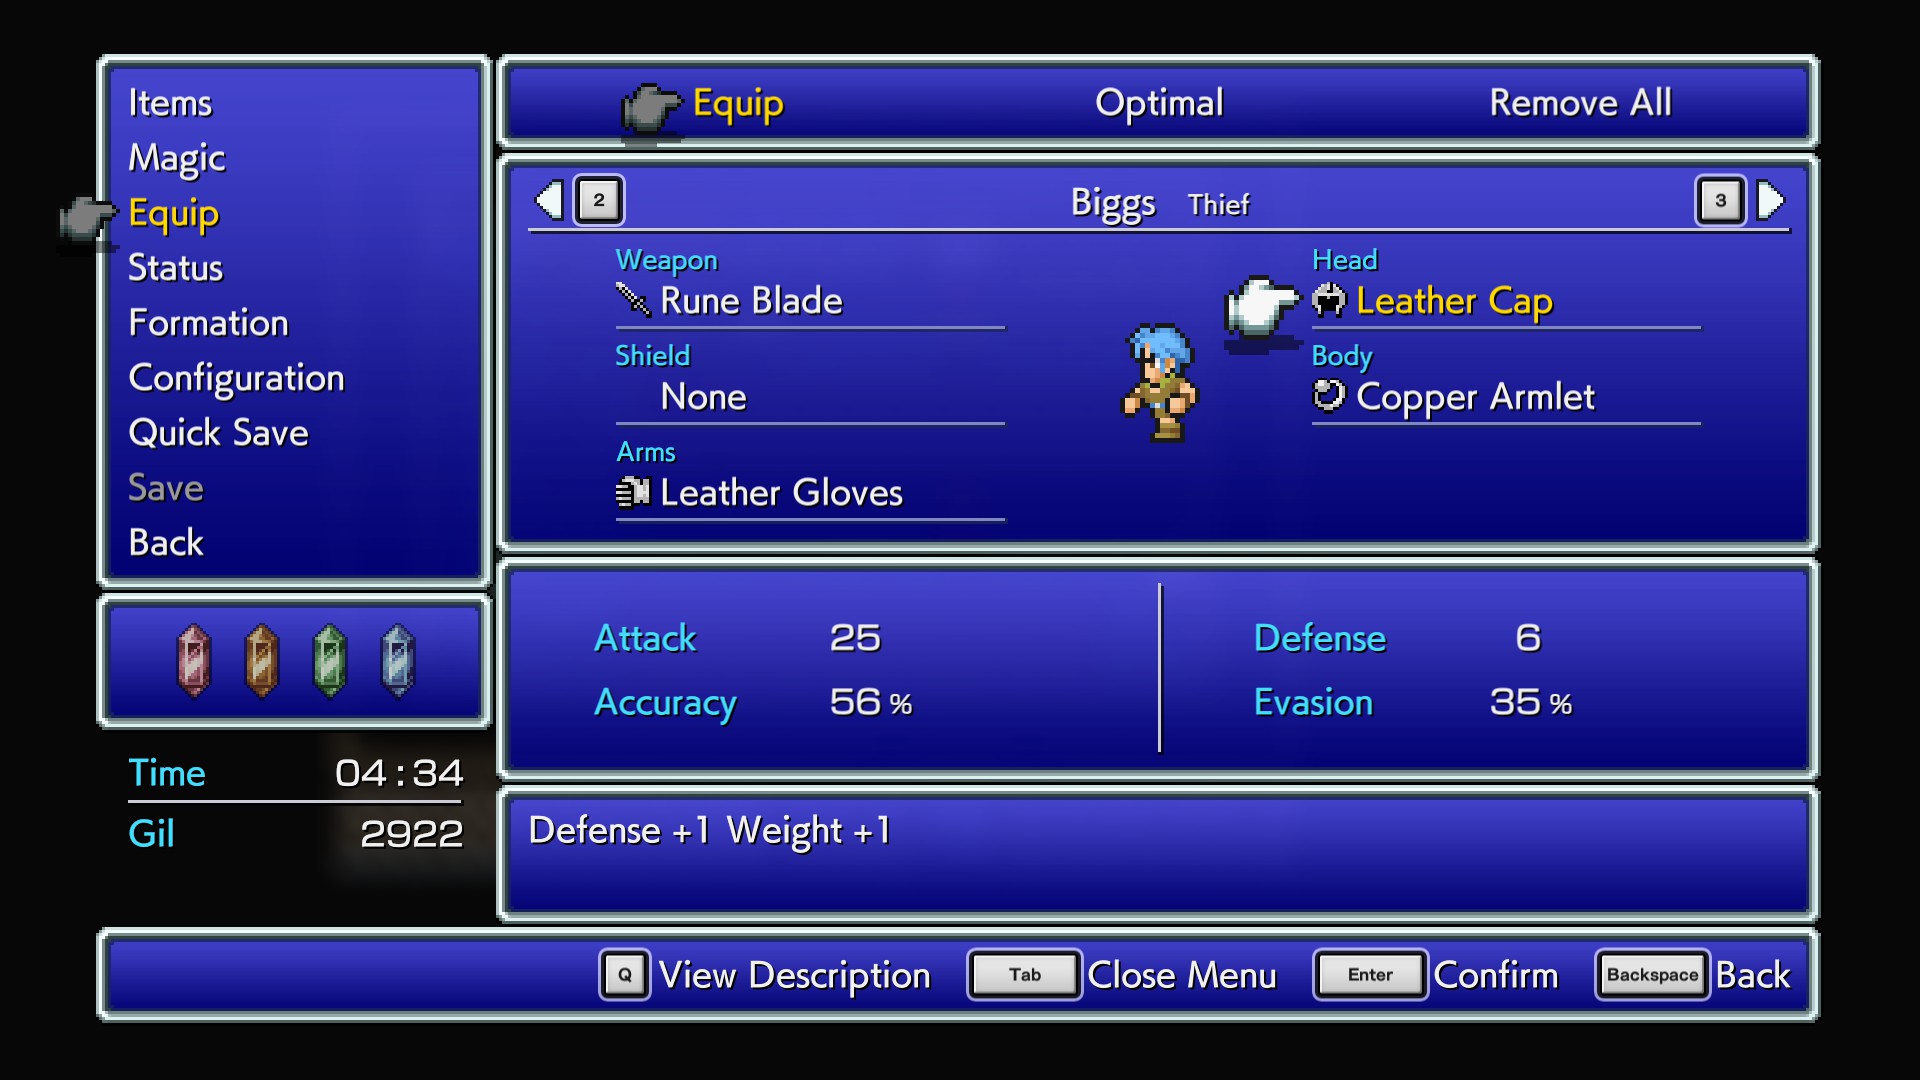
Biggs the Thief is currently sporting a stylish leather cap…
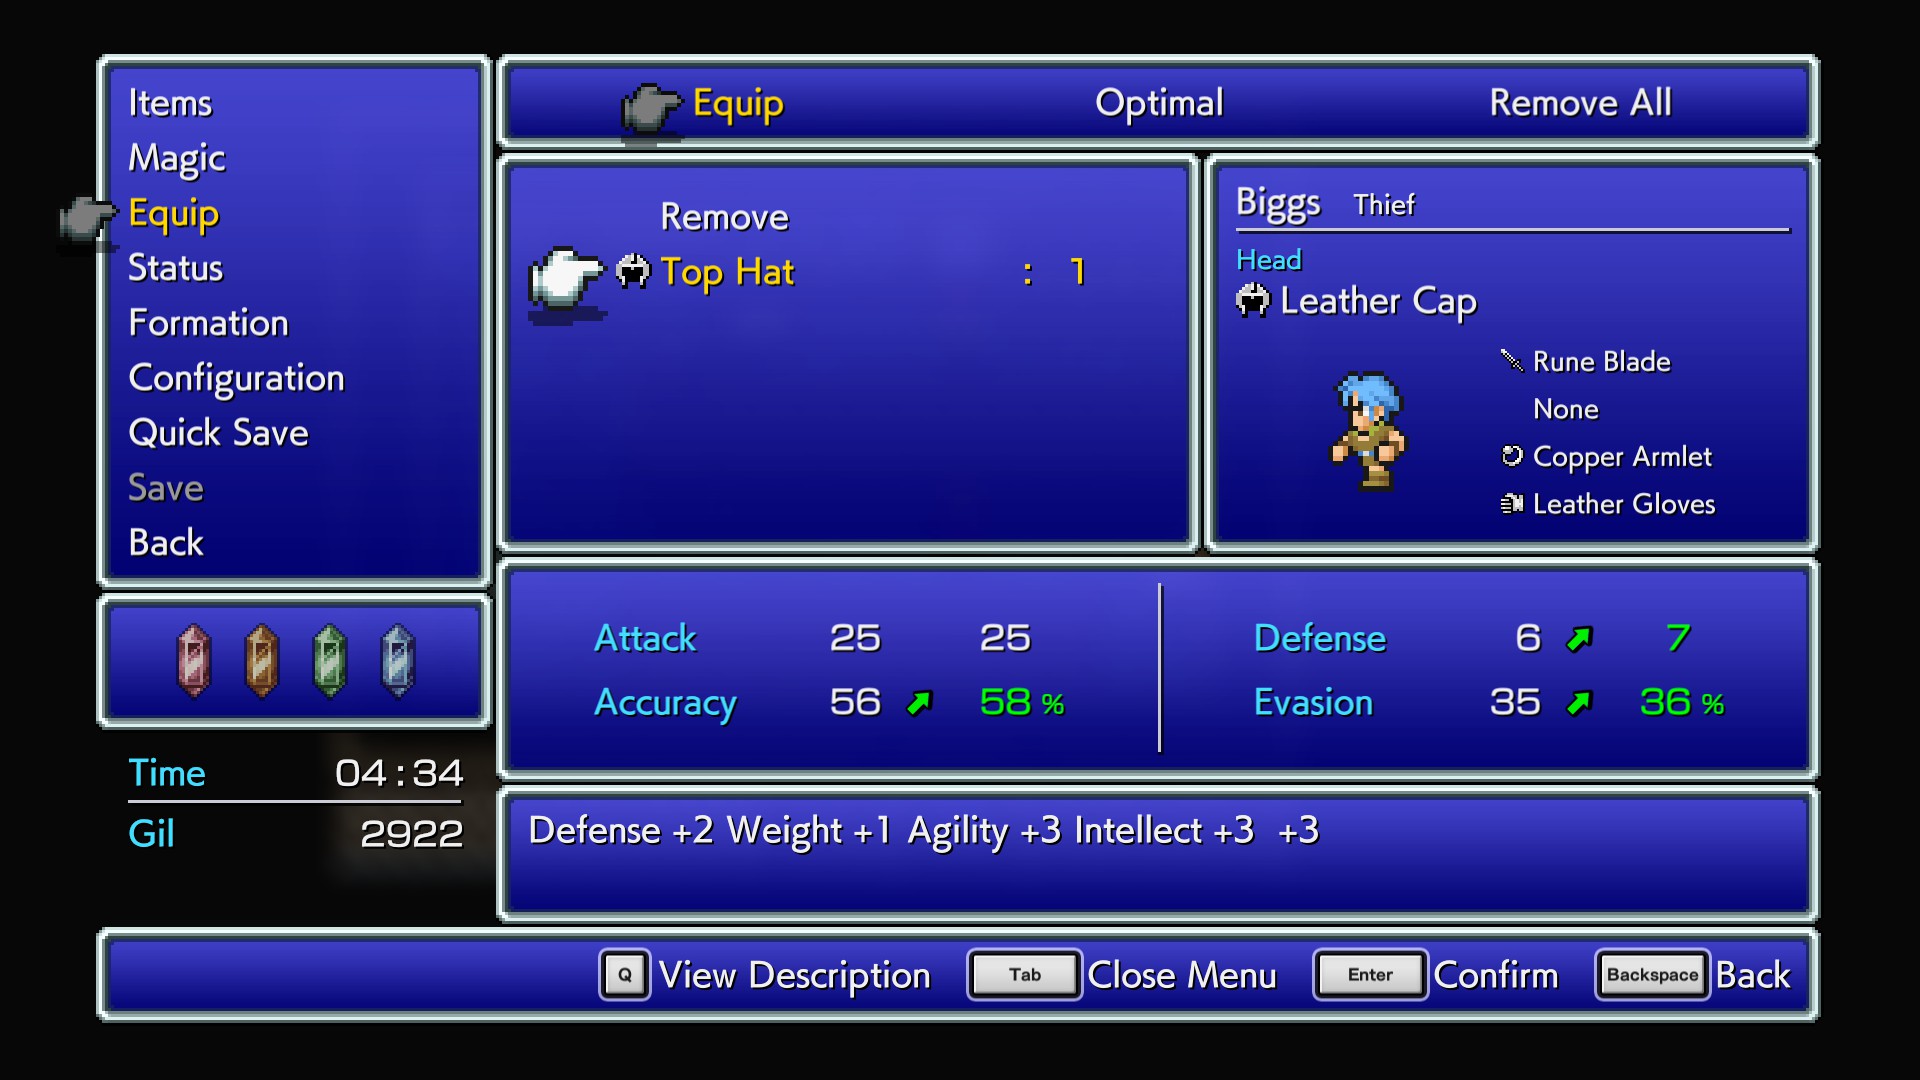
…but maybe he needs something a bit more dapper.
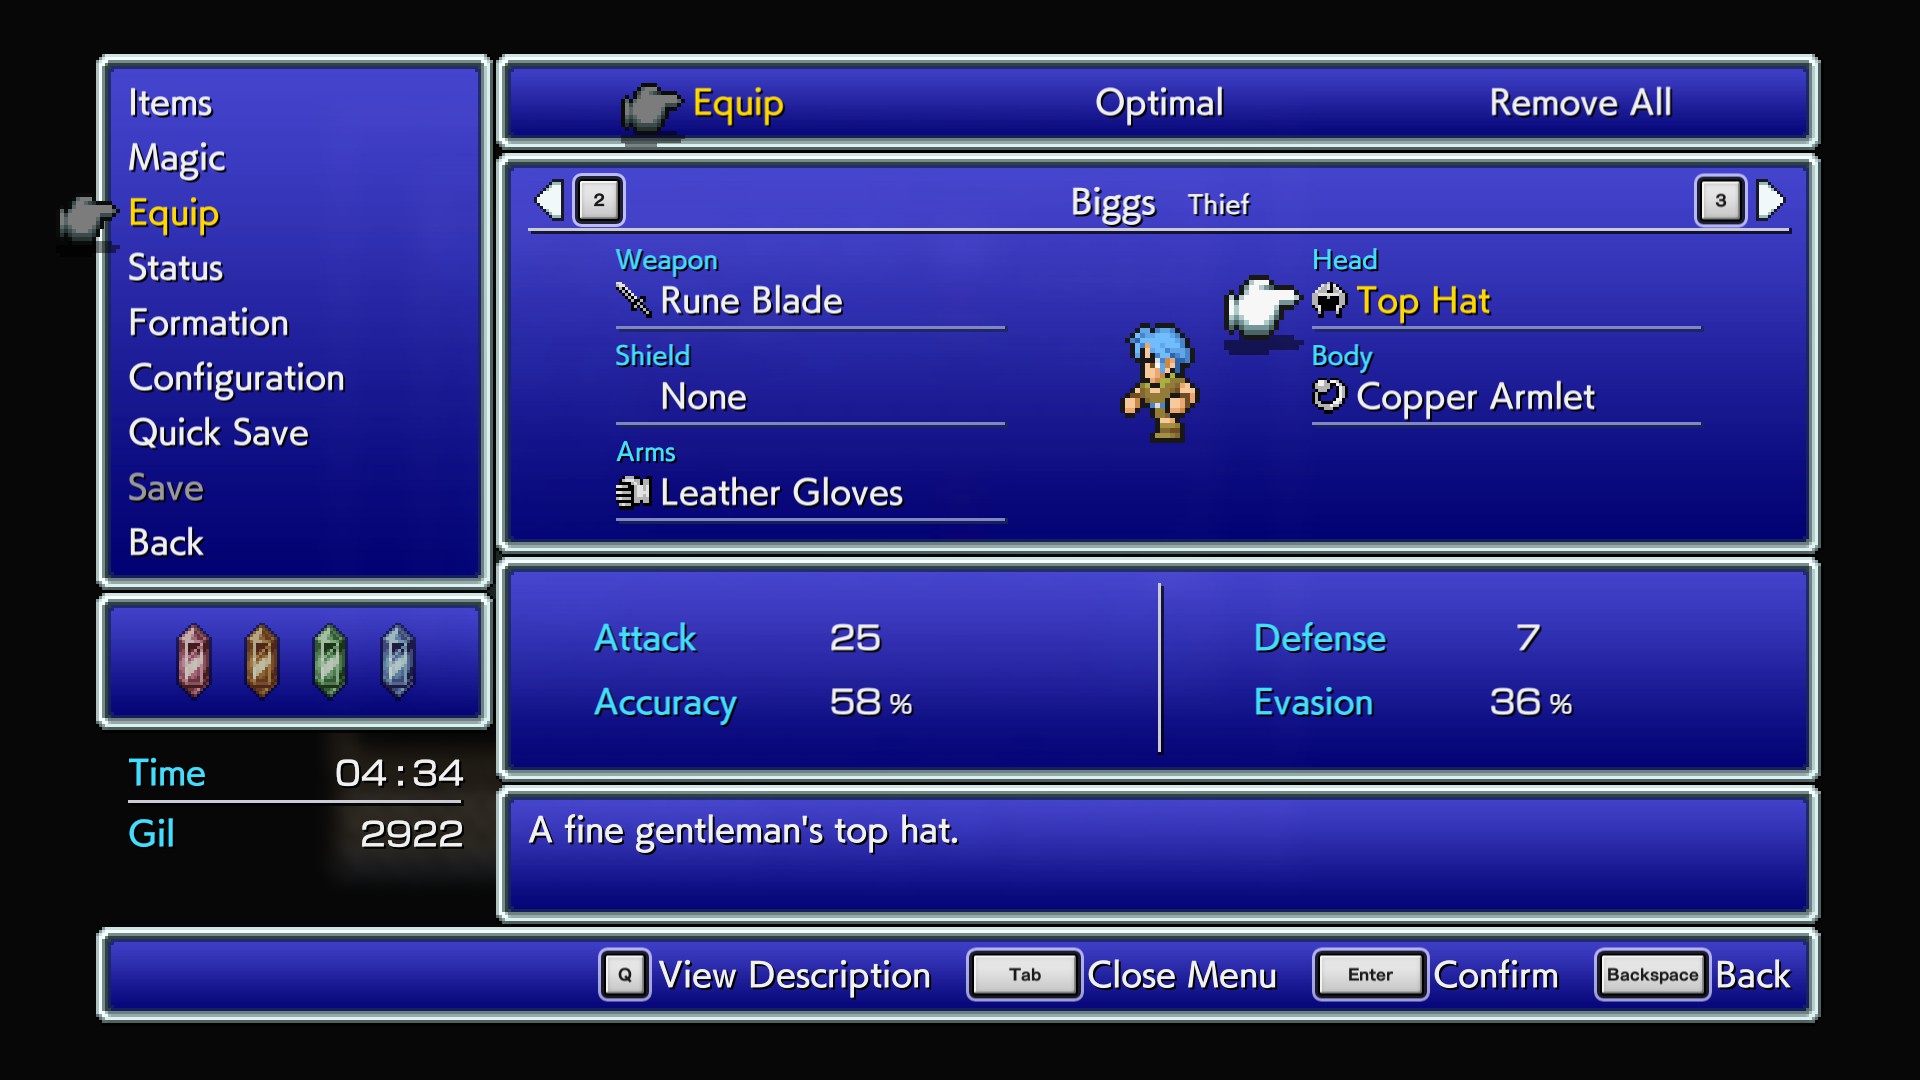
And there we go! A classy top hat for our Thief.
Weapons and shields are a little trickier, since unless you’re using an existing sprite, it will involve using Magicite to add new image files. Also, while this focused on creating a new armor, you can use these same skills to edit the existing basegame armors.
One thing to keep in mind when adding new items: you will want to make sure you keep the mod enabled as you play through any save with the modded items, as in my experience when you remove those changes the mod creates, your save with the modded items will refuse to load until you put the mod back. Be careful, and don’t bork your only save!
Anyway, I hope you found this tutorial useful! I hope to do some more in the future, but this tutorial should have given you some basic modding skills to make quite a few changes. Good luck, and happy modding!