Hey there, Superstar! In this guide, we will be looking at how to modify existing materials in the game, to reskin something. This guide also includes modding textures, as they are an essential aspect of materials.
Getting Started
For those of you who are unfamiliar with game development as a whole, “materials” represent the surface of objects. That is, they are the visual representation of everything 3D you see in a game.
In this guide, we will be modifying the white box truck. Why? Because you can find one immediately on the tutorial level, so it’s easy to test. Here is the Vanilla version of the truck:

And here is how it will become after we are done modifying it!

Setting up your Mod
If this is your first time modding an Unreal Engine game, or HumanitZ in general, please refer to my Unofficial Modding Guide.
You will find all the info you need to setup your modding environment there. Please return here ONLY after your environment is complete.
For the sake of keeping this guide compact, we will be assuming you have already done that!
Requirements
Here is what you will need in order to start making a mod that changes the game’s materials:
- Your mod environment, as mentioned earlier.
- The .uasset files of your materials.
Creating your Material
This, my good friend, is where you meet one of the wonders of working with the Unreal Engine.
You see, Unreal Engine, despite having decades worth of development time, just… cannot import its own files. You read that right!
Since Unreal is incapable of reading the files we have extracted from the game, all that is left to do is for us to manually remake the file.
This is why it’s of utmost importancy that you adhere to the file structure, since, remember, we are only modifying files.
As mentioned earlier, we will be working with the white box truck in this example. That’s because there is no Debug or Cheat modes in the game just yet.
We need a quick and reliable way to check if our mod is working, and you can find this truck within seconds, after creating a new save and selecting to play with the tutorial! Amazing!
Anyways. To prevent this guide from being another gargantuan mass of text, we will only be handling one material, for demonstration.
You can, of course, handle as many as you want, as you will soon learn.
The first step to create your material is to look for its entire folder structure. For this guide, I have picked the file M_BoxTruck_Body.uasset This file is located in this exact path:
- TSSGame\Content\VehicleVarietyPack\Materials\BoxTruck\M_BoxTruck_Body.uasset
Keep in mind that the mod will NOT work if our modded file doesn’t share the same file structure. Remember how we named our project “TSSGame“?
Well, your new, modified material must also be named M_BoxTruck_Body.uasset, and it must also be in the path:
- TSSGame\Content\VehicleVarietyPack\Materials\BoxTruck\M_BoxTruck_Body.uasset
Here is a screenshot demonstrating the material I have made, inside the Unreal Engine project, in the proper directory path:

Keep in mind your material will not look like this initially!
Creating your Texture
If you want your material to have a texture, just follow the same steps I mentioned above for the material.
For instance, the texture for the material above is called
TX_Truck_Box_Diffuse.uasset, and it is located in the path:
- TSSGame\Content\VehicleVarietyPack\Textures\BoxTruck\TX_Truck_Box_Diffuse.uasset
Thankfully, when unpacking the files in UModel, textures are unpacked perfectly, in their actual image state!
This means you don’t need to really create your texture, just copy it over to the exact directory path it must be in, inside your Unreal Engine project.
In case you are making a texture, as far as I know, they are all of the extension type Targa, or .tga
Setting up the Material
Alright. So we have created the material, and imported the texture. They are both in the exact directory they come from in the original game files.
So what now? Double click the material, and you will find a cool window that will let you edit everything in a more… visual manner. Like so!

That’s great… But it’s just a black color. How do we assign the texture to it?
Well… You should really watch a youtube video about this, as there’s a LOT you can do, but just for the sake of making this as inclusive as possible, we will add a simple texture to this material.
To do that, you want to right click anywhere in that grid, and you will see something like this:

Next, write “TextureSampleParameter2D“. I’m no artist.
This is some random shenanigan to translate a texture to 2D or something.
Select it from the dropdown list like so:

You will now have this small window that says “Param“. Drag it closer to the big window with the multiple switches that has the name of your material on it.
In my case, the material name is test:
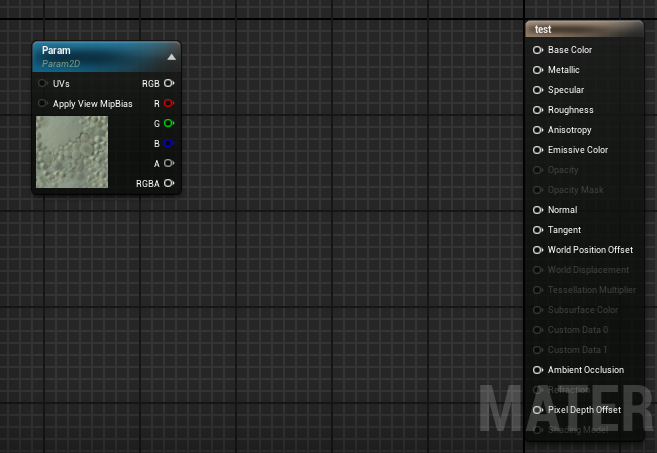
Click over the “RGB” switch at the top right of the “Param” window (The blue one), and drag it over to the “Base Color” switch on the “Your Material Name” window (The beige one) You will now see that the preview updated! Your material now has a texture in it!

The last step is to load YOUR texture. Click over the “Param” window once more, and on the scrollable list on the very left, scroll down to the very bottom.
You will find a category named “Material Expression Texture Base“. There, you will see a small box that contains the sample texture.
Either click the “Default Texture” dropdown button, and browse for your texture, or drag it from the inspector towards the box. Like so!

Finally, at the very top of the window, hit “Apply” and then “Save“. You can now safely close the material window.

Here is my finished, modified version of M_BoxTruck_Body. If you are following this tutorial exactly, make sure yours is the exact same:

Cooking
Jesse. It’s time to cook! No, really. In Unreal you… cook… things. Don’t ask me why.
Head over to the “Content” folder of your project, click the first folder that ultimately leads to your mod’s files.
We are editing M_BoxTruck_Body.uasset, and that file is located in this directory:
- TSSGame\Content\VehicleVarietyPack\Materials\BoxTruck\M_BoxTruck_Body.uasset
This means that the first folder would be VehicleVarietyPack. So select that one.
After doing that, go to the top left of your screen, and select “File” > “Cook Content for Windows“, like so:
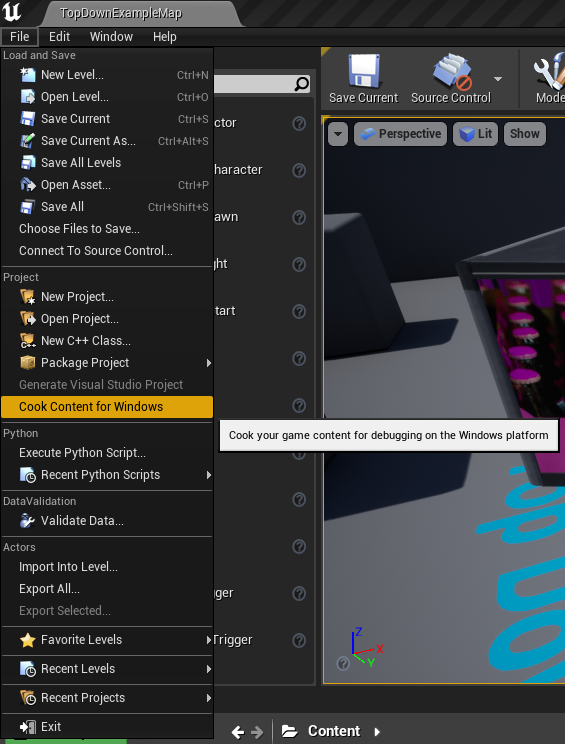
Unreal will take a few seconds to do it.
It has some nice sound effects to let you know when it begins, and when it ends.
After it has finished, you can now safely press CTRL + S to save your project, and close it. If Unreal asks you to save anything extra, do it.
Locating the Cooked files
Your cooked files are saved in a directory inside your project folder. Specifically here:
- […]\Unreal Projects\TSSGame\Saved\Cooked\WindowsNoEditor\TSSGame\Content[/list]
Packaging
That’s it! You’re ready for packaging your mod! Now, without doing anything else, head over to my Unofficial Modding Guide and finish your mod!