This is my unofficial modding guide for HumanitZ, as of the latest game update. During the course of this detailed text guide, you will learn how to make various types of mods, according to what I have learned so far! This guide will be updated as I learn more about modding this game, so stay tuned for updates!
Getting Started
To start modding HumanitZ, you will need the following tools and software:
Unreal Engine 4.27x (Preferably 4.27.2)
Download link: https://www.unrealengine.com/en-US/download
UModel
Download link: https://www.gildor.org/en/projects/umodel#files
Unrealpak
Download link: https://www.fluffyquack.com/tools/
HumanitZ Modding Toolkit
Download link: https://www.nexusmods.com/humanitz/mods/2
I recommend you put all of these tools in a folder, so you can access them in a quicker, more organized manner. I have the game installed in my D: drive, so I put all the tools under a folder named “HumanitZ Modding“.
The Basics
There are a few things you must know about modding Unreal Engine games, and more specifically HumanitZ, before you get to making the actual modding part. Let’s go over them in detail!
We cannot add new files
Currently, we are unable to add new, custom files to the game as part of a mod.
This means that no matter what mod you are working on, the only way to have your mod work is for each individual file to overwrite another file that exists in the game.
Even the file structure must be the same! More on that later.
Unpacking and Packing
You will have to do a lot of both to get a mod going. This is why we will need both UModel, and the Unreal Engine itself.
We need to unpack the game’s base files, and pack our custom mod files.
Adhering to the Rules
I cannot overstate this. Your mod will not work if you do not follow the file structure of the game to a T. I mean it. Pay extreme attention to this! For example, if you unpack a file that is found in:
- […]\HumanitZ\TSSGame\Content\VehicleVarietyPack\Textures
On Unreal Engine, your file must be in:
- […]\YourProjectFolder\Content\VehicleVarietyPack\Textures
Setting up your Unreal Project
Since the game is made in Unreal, your mod will also most likely require an Unreal project so that compatibility is at its best state.
First, create your Unreal Project. Remember that file structure must remain the same! And so, to make things easier, we will also be adhering to this when naming the project itself.
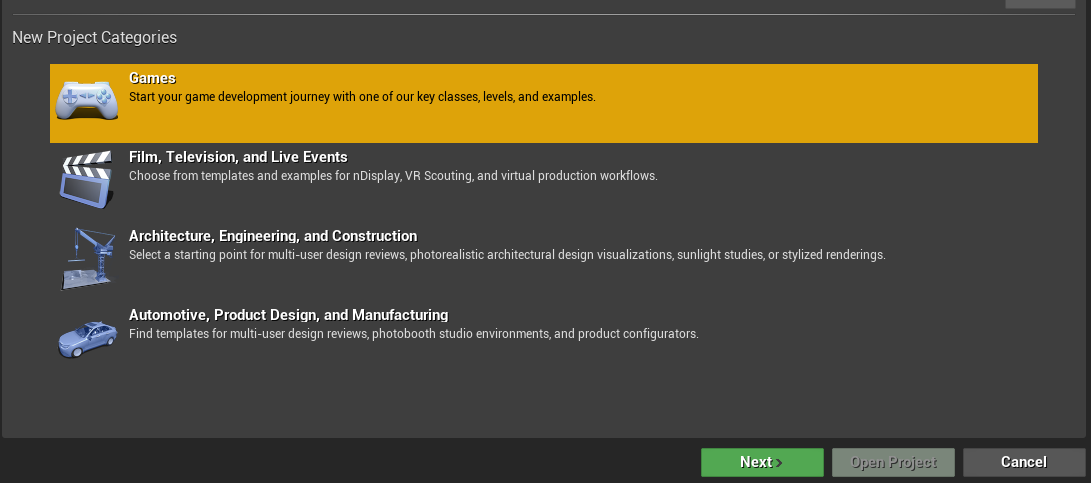
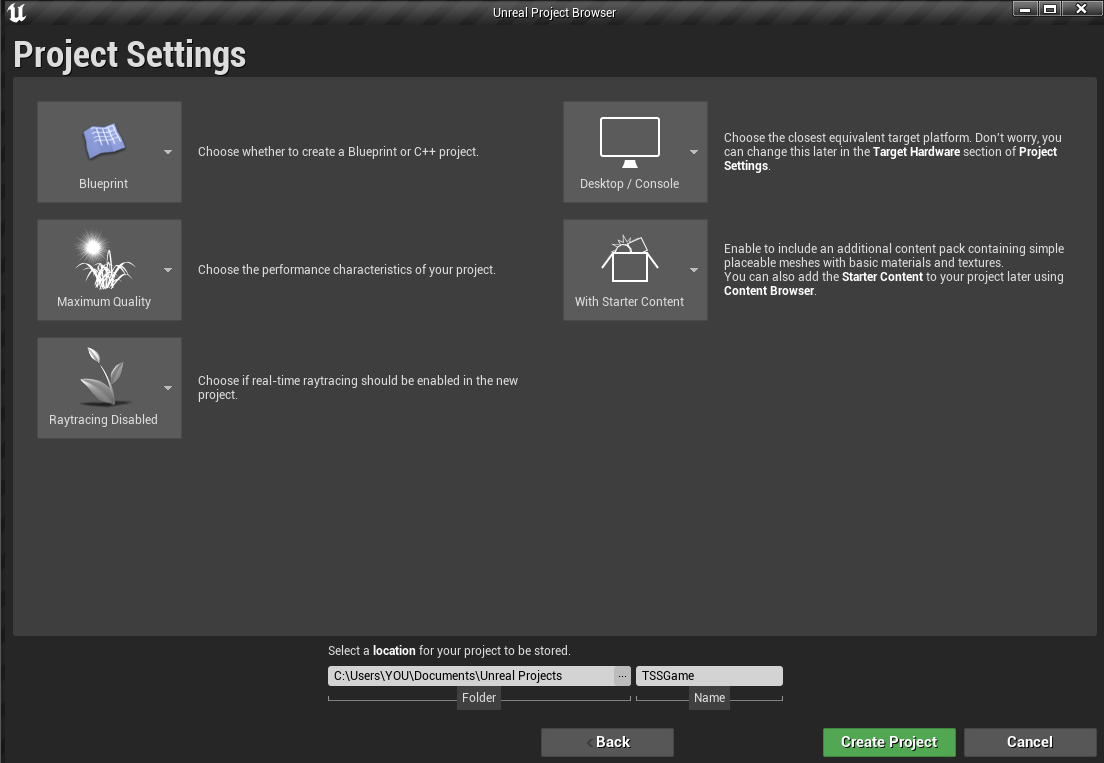
Creating the Project
Let’s create a project called “TSSGame“. That’s the name of the project on the developers’ side.
When creating your project, select “Games” under “New Project Categories“. Like so!
Next, select either a “Blank” template if you prefer organization and have some experience, or, if you are new or don’t mind extra files, I recommend either Third Person or Top Down.
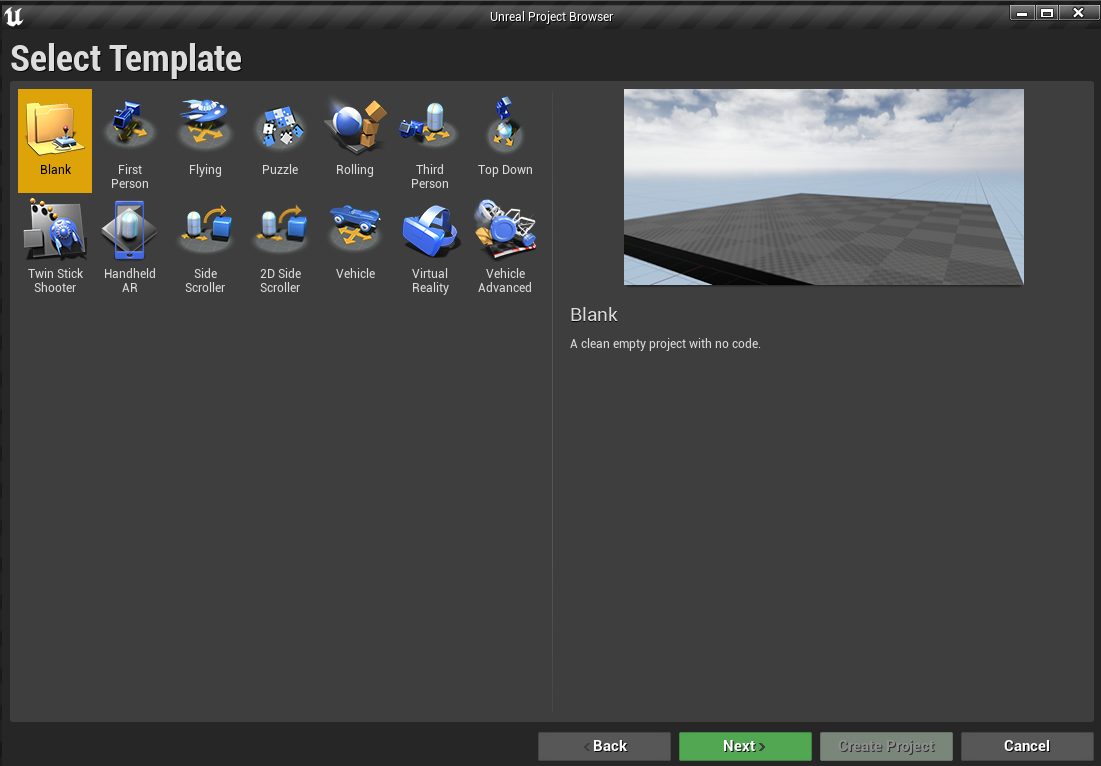
Remember to name the project “TSSGame“! This is important.
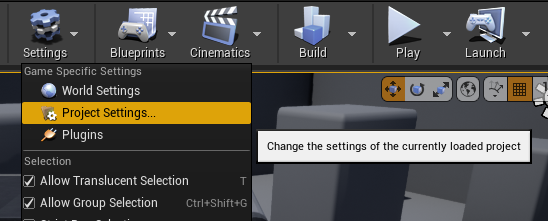
Configuring the Project
Alright! You have successfully created your Unreal Engine project… What now?
The next step is to do some basic configuration! There’s just one little thing you want to change, so don’t panic just yet!
Open your project, and at the center of the top of the screen, you will see a big gear button called “Settings“. Click that.
Next, select “Project Settings“. A new window will popup. You will find a scrollable list of items on the left.
Look for the huge header saying “Project“, and look for a smaller category called “Packaging“. Click it.
Once in the “Packaging” category, scroll all the way to the bottom until you find a tab called “Project“.
You are looking for the second option from top to bottom. It is a dropdown option called “Build Configuration“.
Click it, and select “Shipping“. After this, simply close the window, and your project is good to go!


Unpacking the Game files
Great. Keep your Unreal Project open. What now?
Well, we need the files you want to modify, remember?
I hope you also remember I mentioned we have to unpack them. So how do we do that? Find out below!
The Methods
There are 2 methods to unpack game files. Method #1 will unpack the ENTIRE game in a folder. That should take about ~32.5GB worth of disk space.
If you don’t have enough space, or don’t want to bother unpacking every new update and such, just head to Method #2!
Creating your folder
Remember that folder I recommended you create, to keep all the tools and such? Create a new folder inside it called “Unpacked Files” or whatever you want.
The name is up to you, really. This is where we will store the unpackaged game files!
Method #1 – Unpacking Everything
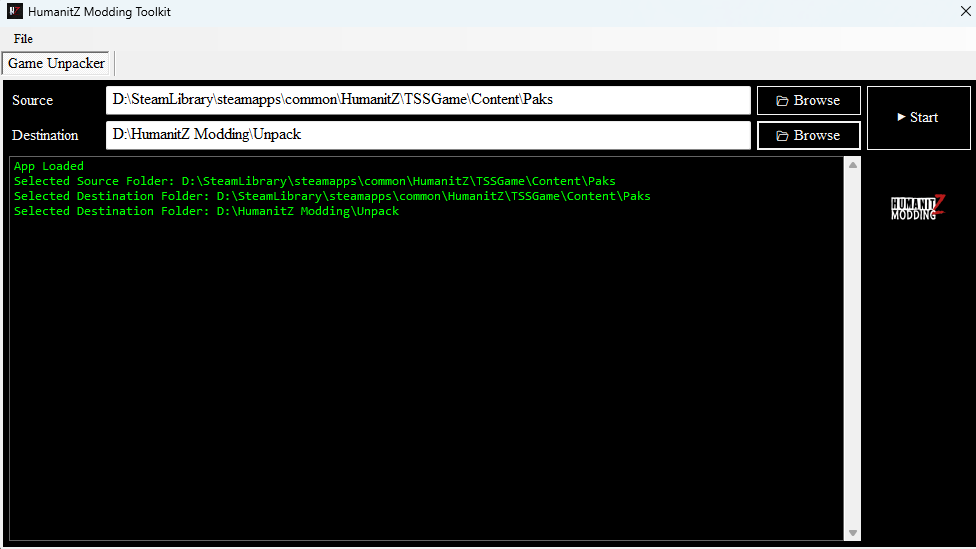
For this method, thankfully, ZGal88 has got us covered! They have developed the amazing Modding Toolkit, which allows you to easily unpack the entire game! Wonderful!
After installing the toolkit, open it, and you will be greeted with a screen that asks for a “Source“, and a “Destination“. Source must be this exact directory:
- […]\HumanitZ\TSSGame\Content\Paks
Destination will be whatever folder you want to store the unpacked files. After selecting both directories, click “Start” and wait for completion!
That’s it! After the process is finished, you will have ALL the game files unpacked in a single folder.
Method #2 – Unpacking Specific Files
For this method, you will need that UModel tool I mentioned earlier!
After installing it, open it, and you will be greated with a screen that asks for a “Path to game files“.
And yes, it will also open a prompt / CMD window. Ignore that. It’s just for showing logs of what’s going on!
Set the path to game files to be this exact directory:
- […]\HumanitZ\TSSGame\Content\Paks

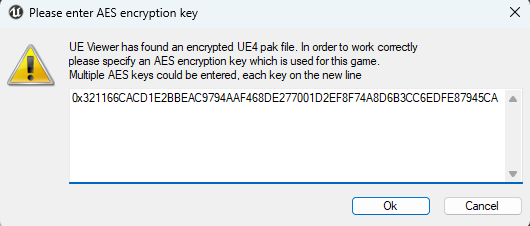
AES Encryption Key
You will get a warning screen that mentions the app has found an encrypted file, and you will require an AES encryption key to view it.
No problem! I have it right here for you, just paste this and hit “Ok“: 0x321166CACD1E2BBEAC9794AAF468DE277001D2EF8F74A8D6B3CC6EDFE87945CA
Exploring the Game Files
You will now be greeted with a screen that contains ALL the game files, ready for unpacking.
It is here that you will select which folder or files you want to unpack.
Please tidy up the mess of the file hierarchy by closing the submenus of each folder so that it looks like this:

You want to head for the Game folder. Want to know something about this folder? DON’T read it as “Game“. That’s just another name for “Content“.
That’s right. The “Game” folder is actually the “Content” folder in both your game directory, and your unreal engine project directory!
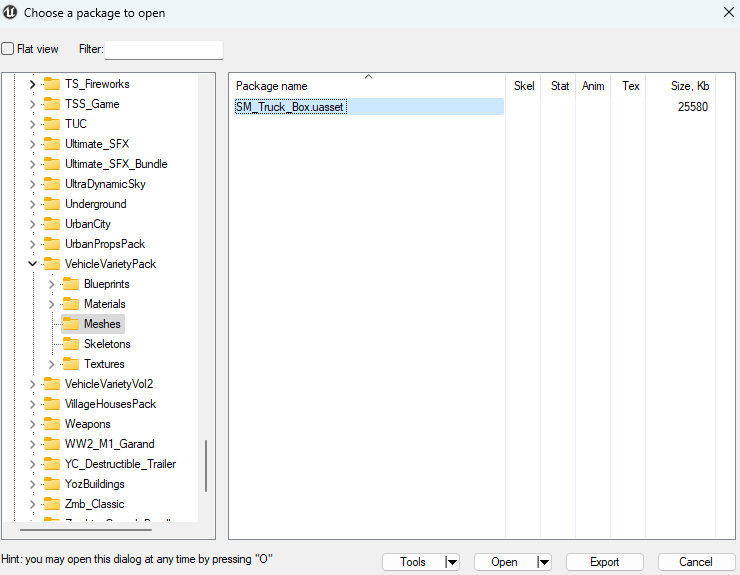
To preview an asset, simply double click it. The app will then attempt to show you a preview of the asset. This works for meshes, materials, textures and animations.
Other stuff isn’t recognized, unfortunately. In the screenshot below I have found the mesh of the white box truck!
Once you have found a file and clicked to preview it, you will be prompted by the app to select the version of the package, because it couldn’t find it on its own.
That’s normal. Select version 4.27 at the very bottom of the list. Like so:


Would you look at that! We are now previewing the truck mesh! Alright, that’s what we want right there! But… how to go back?
That’s easy. On the top left, click “File“, and then “Open Package“. That will return to the window we were before, where you can select which files to handle.

Once you have isolated a file, or many files, or even a folder, just right click it and select “Export“.
You will be prompted to select a folder to put the extracted files in. That’s it! That’s how you unpack specific things instead of everything!
Finally… Modding!
Alright. Let’s take a little break and review what we have done so far, shall we?
You have installed all the necessary tools to mod the game, and made a directory where you placed all the tools.
Another directory you made was one to put all the files you have unpackaged in. Then you either unpackaged the entire game, or just a few specific files.
If you decided to use Method #1 to unpack the game files, and you wish to preview files to know what the hell you are looking at, you can follow Method #2, but open the unpackaged folder instead of the game folder. This means you will directly skip the step of the AES key.
Everything else remains pretty much the same!
Anyway… You have also made an Unreal Project, where you will be working with your mods.
Last but not least, you have gone up these messages and read THE BASICS again 👀
So, how do I actually mod now? WELL. It depends.
This guide is already big enough, so let’s split this up into different guides now, shall we?
Don’t worry. It’ll just be for a moment. Each separate “mini” guide will explain how to mod a specific part of the game. Once you have reached the Packaging section of said guide, return here!
Modifying Materials (Reskins, etc.)
Yes. I said return AFTER reaching the last section of the specific guide for what you want to mod!
Packaging your Mod
Alright. You have made your mod, you have cooked your files, you have found the folder where they are located.
Locate your files there, and copy them over to the directory where you put Unrealpak. In my case, I pasted them here:
- D:\HumanitZ Modding\Tools\Unrealpak
After doing that, I will remind you once more about following file structure to a T. Now. The original .pak file of HumanitZ, the one that contains all the files of the game, is called TSSGame-WindowsNoEditor. Remember that.
Inside your Unrealpak folder, create a new folder called TSSGame-WindowsNoEditor.
Add _P to it. This basically tells Unreal Engine to prioritize loading this directory.
The end result should be a folder named: TSSGame-WindowsNoEditor_P, located in the directory:
- […]\Unrealpak\TSSGame-WindowsNoEditor_P
Open the folder you have just created, and create another folder inside it, called the project name.
That is a folder called TSSGame.
Open this new folder, and make another folder, called Content. If you have been paying attention to the guide, you will notice a pattern here.
Essentially, we are copying the same file structure as the developers have on their end! Neat, huh?
Inside the Content folder, place your cooked files. In our case, it would be our VehicleVarietyPack folder. Make sure the directory is as follows:
- TSSGame-WindowsNoEditor_P
- TSSGame
- Content
- Materials
- BoxTruck
- M_BoxTruck_Body.uasset
- M_BoxTruck_Body.uexp
- Textures
- BoxTruck
- TX_Truck_Box_Diffuse.uasset
- TX_Truck_Box_Diffuse.uexp
- Materials
- Content
- TSSGame

Now return to your Unrealpak folder. Click on your TSSGame-WindowsNoEditor_P, and gently drag it over to UnrealPak-With-Compression.bat.
A prompt / cmd window will appear, and it will convert your folder into a .pak file! Close the prompt.
Now your mod is ready! Yaay! Simply head to where the original .pak file of the game is located. That would be:
- […]\HumanitZ\TSSGame\Content\Paks
And paste your TSSGame-WindowsNoEditor_P file there! Please rename the file to whatever you want, but remember to keep the _P at the end!
That’s it! Boot the game and enjoy your mod! 🥳 💖