Have you ever wanted to try crusading through Rubicon with a 404 speed mech? what about a 4 smgs and blowing out as many bullets as walter’s bank account can buy? oh ho not enough for you how about a mech only equipped with 6 shoulder mounted energy cannons?
Preface
After beating NG++ I have strive to defeat the greatest threats on Rubicon with some of the dumbest ideas I could think of walking the tightrope line of inadvertently making a challenge build that I could still have fun with. In this guide I will show a number of builds I have made and the general thought process that went into them alongside some tactics if some of you crazy bastards want to try it yourself.
Very important but these builds are designed around singleplayer if you bring them to multiplayer I have no idea how well they will perform but you will probably just die.
I should note I heavily advise against reading this guide unless you have AT LEAST beat NG+.Additionally, some body parts can be up to user choice such as the head piece where I usually use Verril, since their impact can be relatively minor unless stated otherwise.
Now, I’ll admit, I haven’t beaten the campaign with each of these builds as there are far too many, however, my testing process goes as follows : Arena Raven fight, Balteus, Spider. After these 3 fights the build gets my seal of approval for being capable of surviving a variety of scenarios, granted the two non-AC bosses i mentioned were recently nerfed but I digress. Lastly, this is mainly to show off builds so a lot of these builds just have some color schemes I like as I didn’t factor funny color schemes into making this guide.
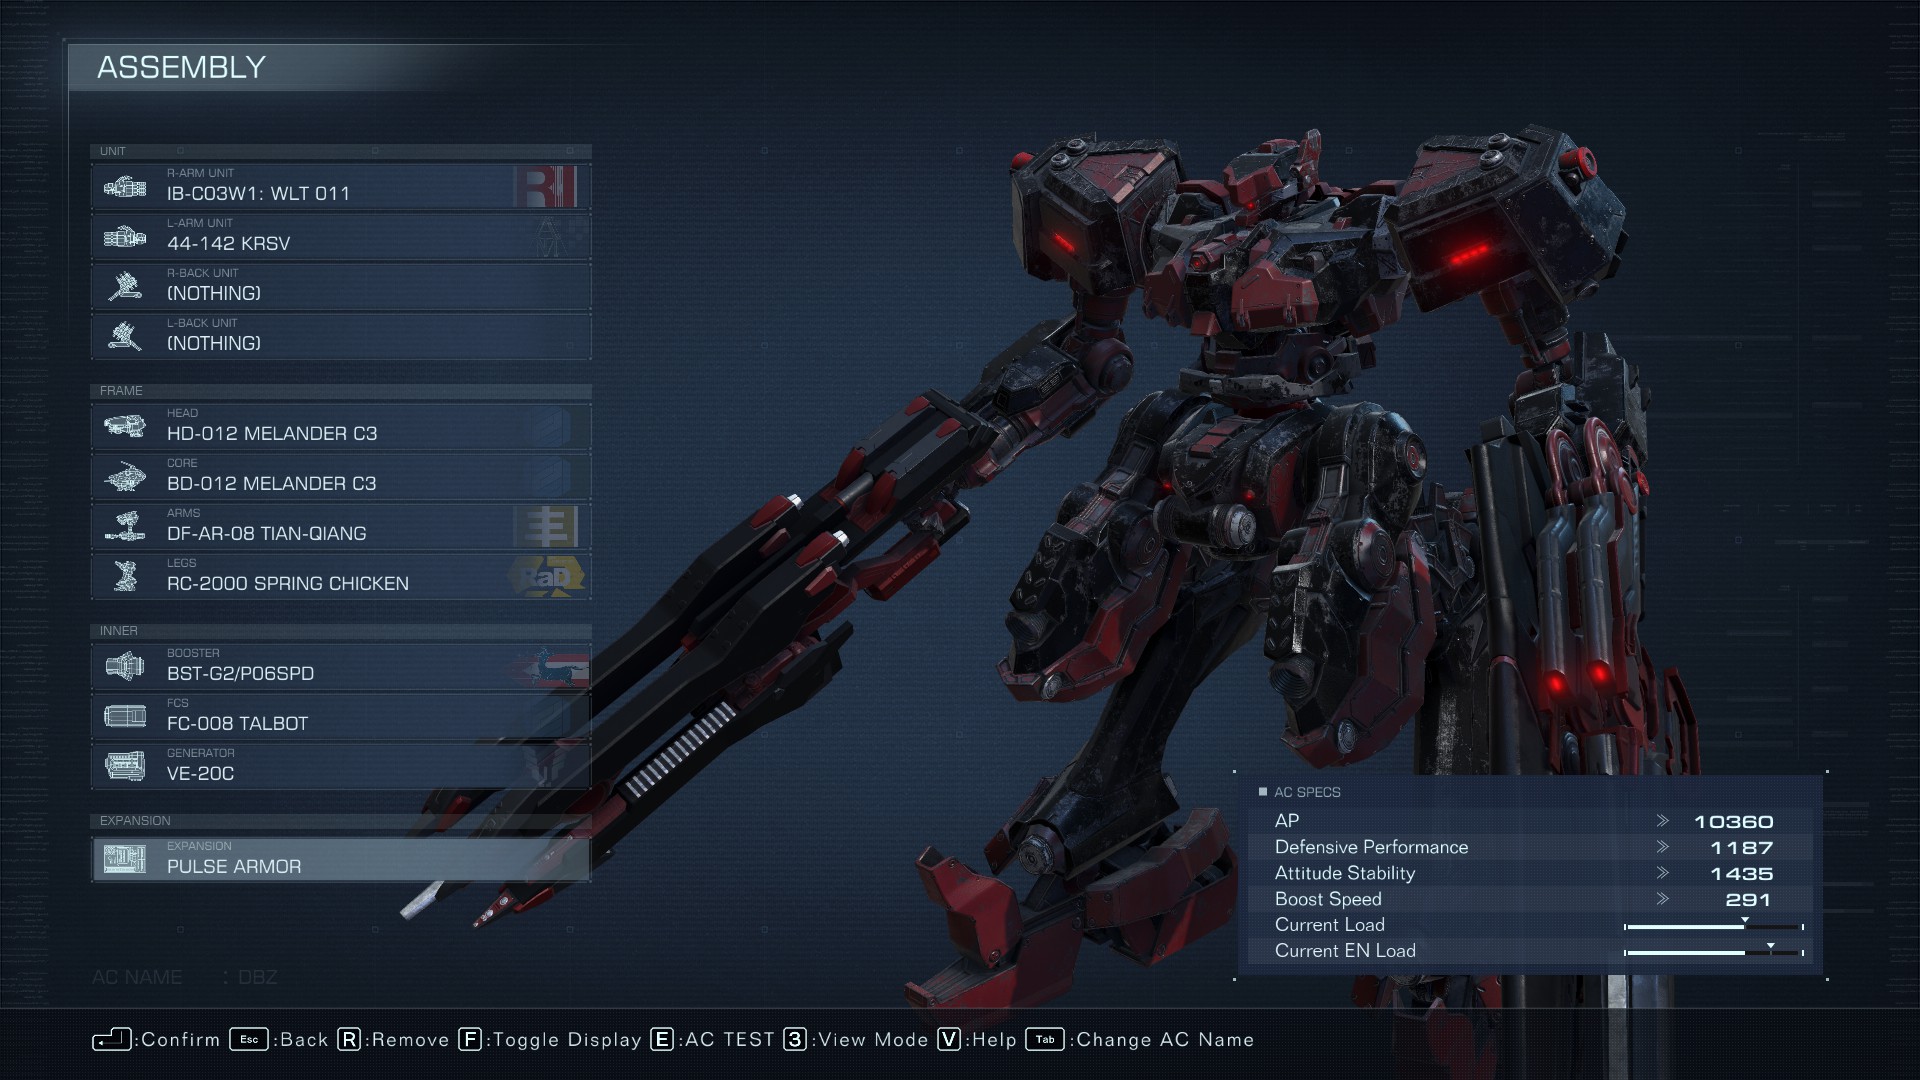
#1 Mach 11
The thought process behind this first build was “what is the highest speed I can achieve while still having an AC capable of combat”. Which lead to the 404 speed abomination you see before you, despite how horrible it looks, it actually functions decently well against common enemies and AC’s primarily struggling against tankier bosses like the Spider but you have tons of speed so “just don’t get hit smh”.
Due to the limited weaponry the tactics are fairly simple, take advantage of your massive speed to dodge the opponents attack, stagger them with the burst gun and melee them when staggered, can kick an enemy if you need an extra bit of stagger.
I should note, if you really want to limit test, you can achieve a maximum of 422 speed as far as I can tell, but you would be left with only your fists, some of the worst parts in existence, and health in the 7000s. If you can call that usable, good on you, but I prefer my fist builds somewhat optimized.

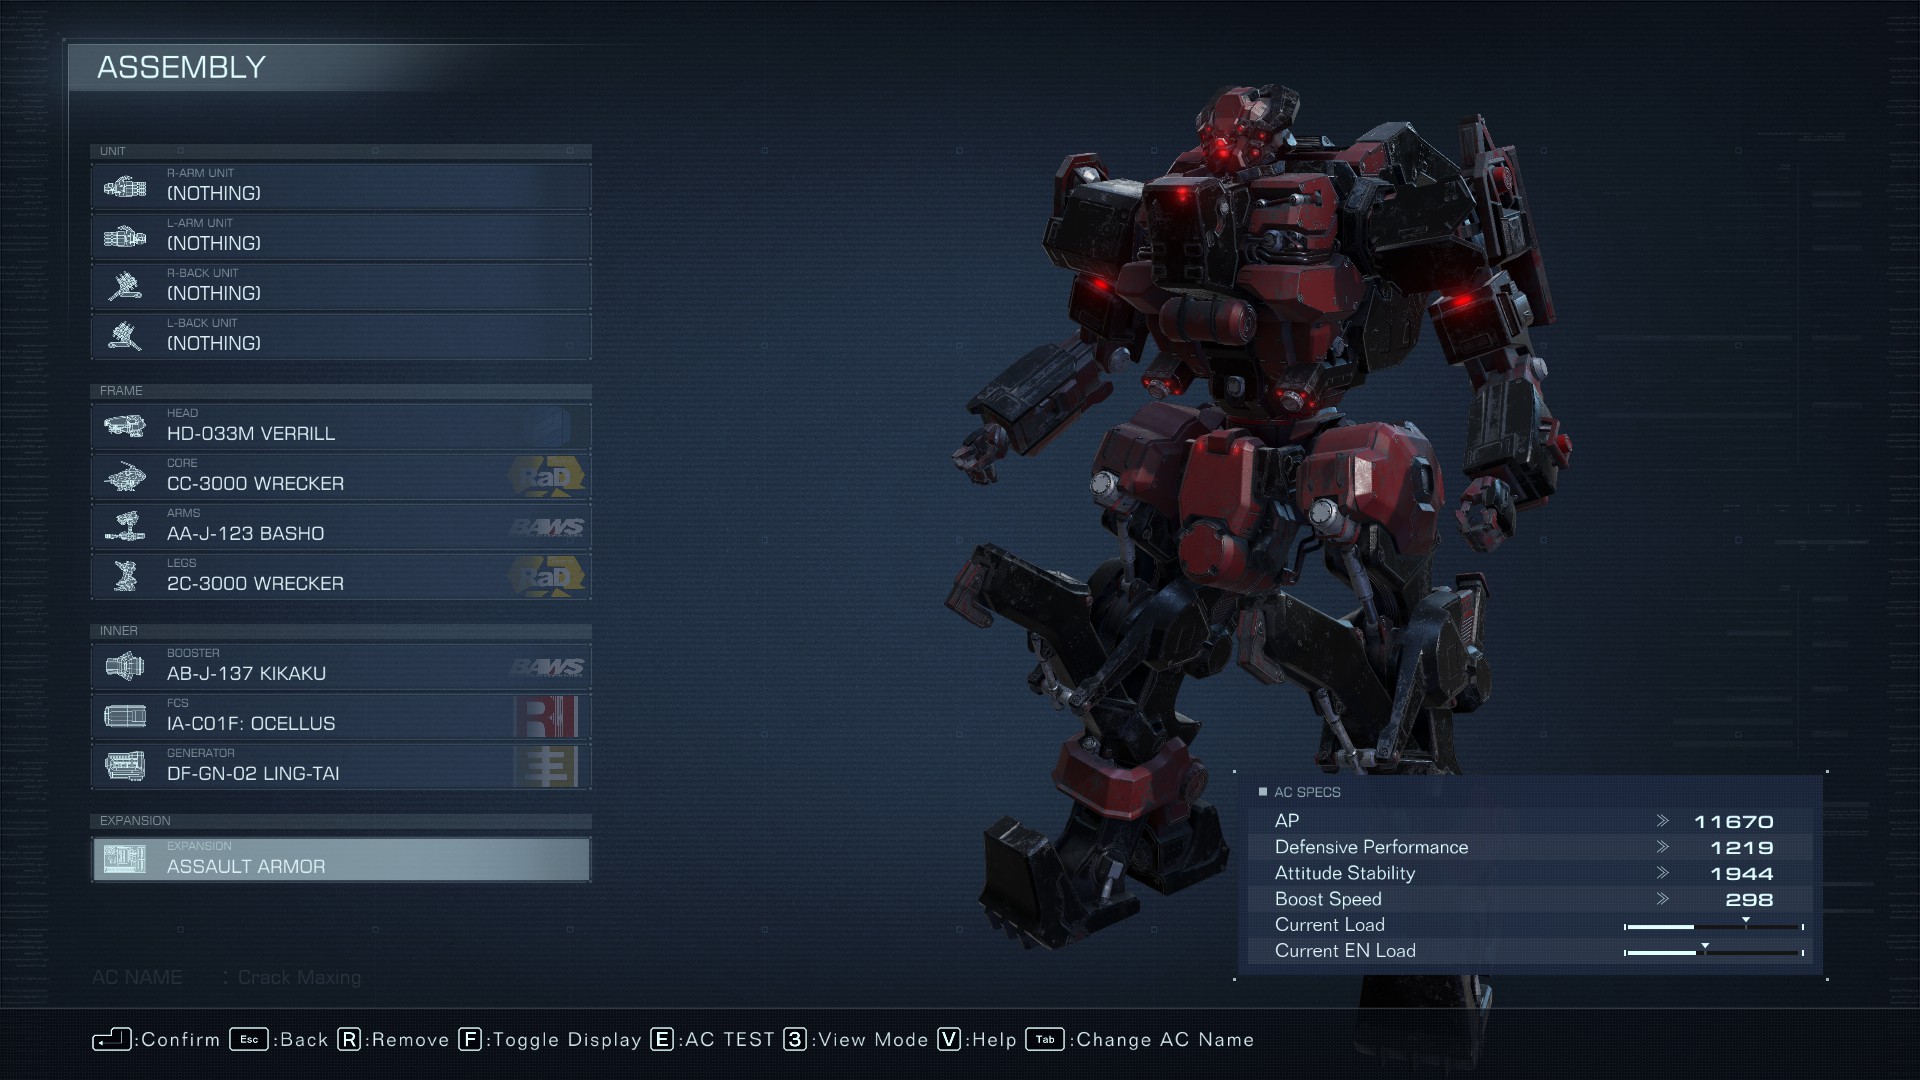
#2 621 on Crack
Talking about fist builds, this is one, now, a fist build might sound crazy, but contrary to public opinion it is actually easier than you would expect if you optimize its usage such as this one. How does one optimize a fist build? Well for starters arms have a melee stat so obviously we pick the one with the highest melee stat. Second boosters have a melee boost stat which dictates how far you lunge forward when you engage in melee so we pick the kikaku boosters since they particularly excel in this. The last step is simply to make sure we have enough stability to not get staggered when lunging towards an enemy.
For tactics the most important thing in my opinion is carefully placing your punches, sometimes it is better to just go crazy and slam the attack button constantly however there are two problems with that. The first is your fists can overheat, so without proper management you will leave yourself vulnerable and unable to attack the enemy. The second is that some enemies, bosses, and ACs have different dodge patterns, so sometimes it is best to wait 1-2 seconds in between their dodge. Additionally for the assault armor you can either use it to clear your stagger bar or a hail mary to stagger the enemy, this is kind of just a judgement call you have to learn how to best utilize.
Lastly, I won’t do this for most of these builds, however, if you plan to complete the entire game with this build be warned the cleaner and a couple other bosses with extremely high resistance outside of their weakspot will be incredibly difficult and I would honestly recommend switching off the build just for them. Sucks to say something like that, but I am trying to prioritize a degree of fun and challenge and for those bosses the challenge far outweighs the fun.
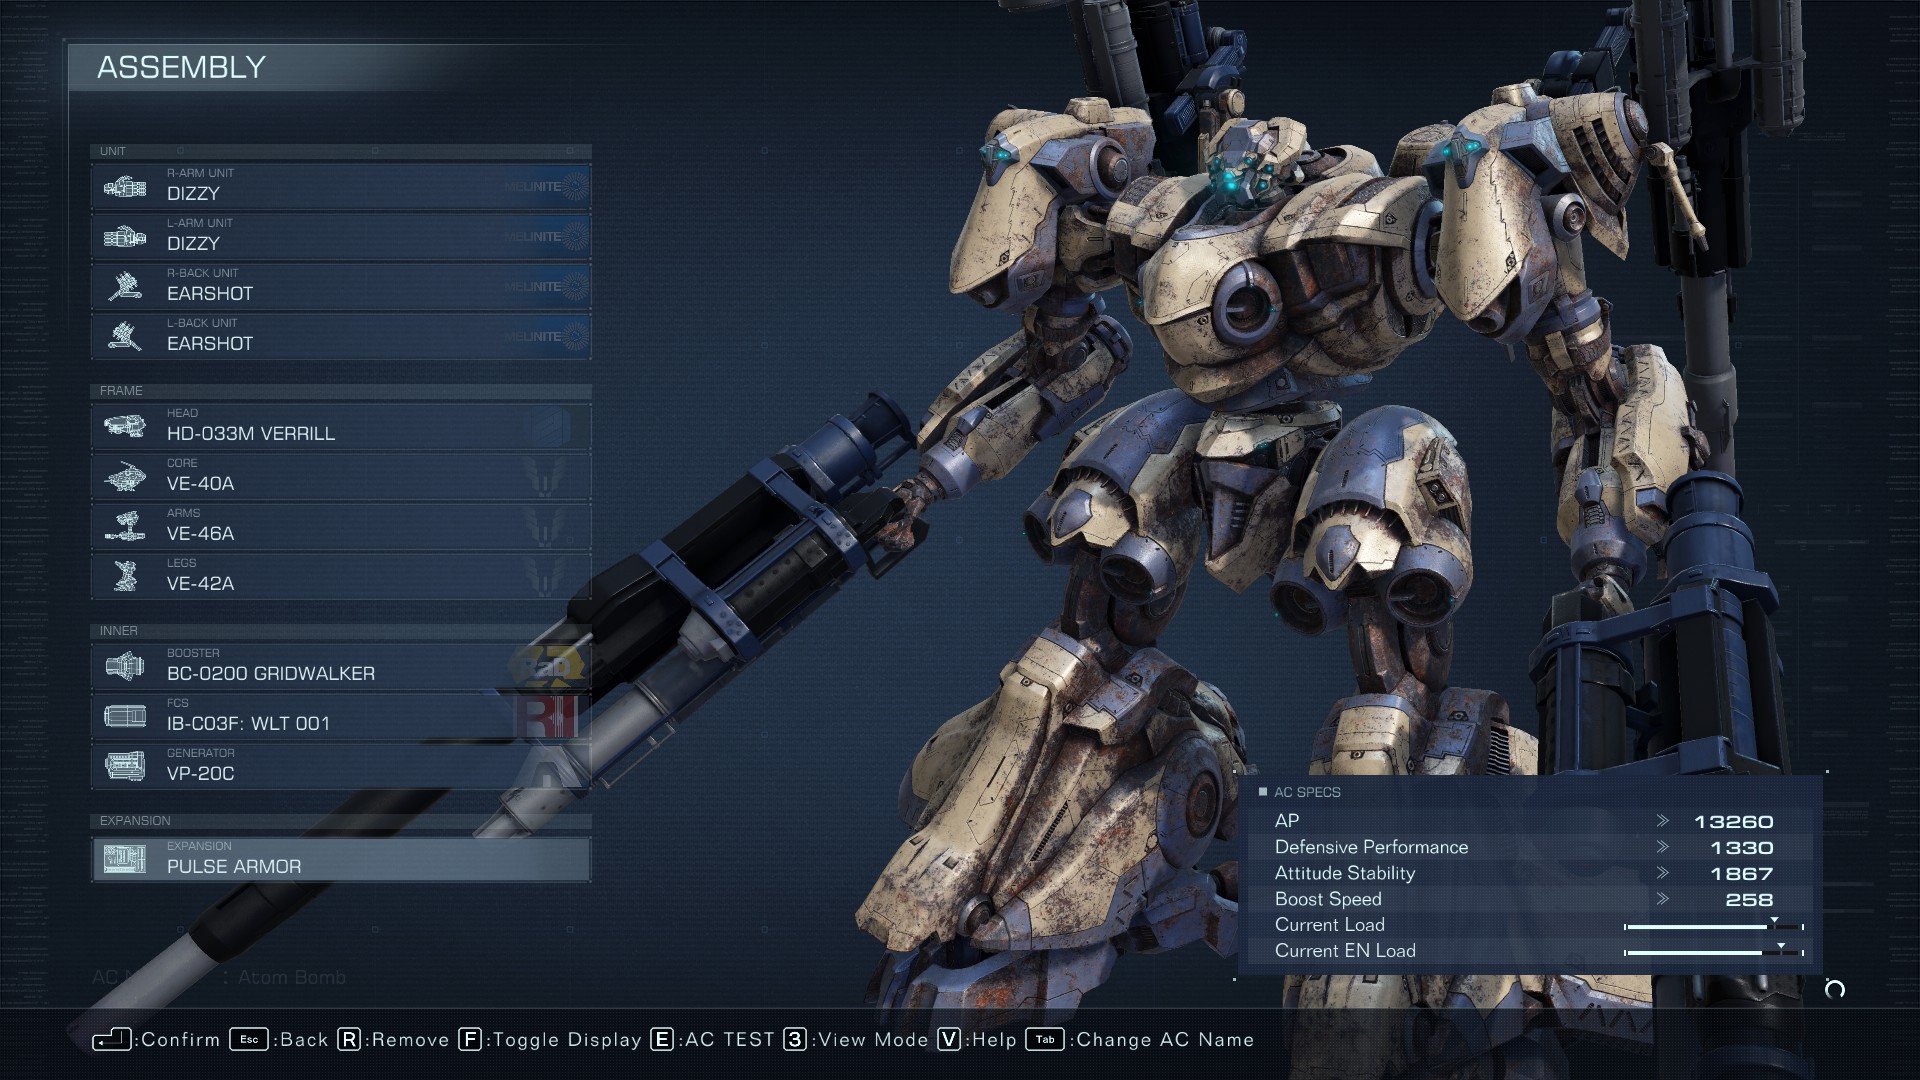
#3 Atom Bomber
Transitioning to something much heavier we have a whole lotta cannons. This build doesn’t need to much explanation its for all you maniacs who get a wave of dopamine when you see thing go big boom. The heavier parts are primarily used in order to actually use these cannons due to the sheer weight.
However, as far as tactics are concerned, there is a fair amount for this one. The first and most important is flying upwards, as even if you miss these cannons have such massive aoe that hitting the ground next to an enemy can almost guarantee a hit, which is why we use the gridwalker boosters. Because of what was mentioned previously, you can handle almost any AC fight with extreme ease outside of being very unlucky. The main difficulty comes from fighting tankier bosses as the long reload time makes it hard to stagger these bosses and as such makes dealing meaningful damage difficult. The best way I can explain to handling this, is take these fights slowly and space out your shots so that the enemy doesn’t lose too much of their stagger bar. Lastly, for those of you who use lighter builds and feel like giving this a try, make note that tanking an oncoming barrage in order to guarantee your own is a valid and recommended strategy.
#4 Two Energy Rifles One AC
Despite being better equipped than some other builds, this one will really test how well you can play the game due to how easily enemies tend to dodge laser projectiles and having no weapon options other than those laser projectiles. Before anything else, why the small energy rifle? well simply put it fits this build the best considering you can only bring two, as these two have a low enough charge time that when charging (which will be your main method of attacking) by the time you finish charging you can already fire the charged shot of the other rifle. Comparatively, the medium energy rifle is close to doing this, but the difference in stats is relatively minimal while making you wait an extra second or so in between firing your charged shots. As for the heavy energy rifle, it overheats after a single charged shot which massively lengthens the time in between shots, as once it finally cools down you then need to wait for the lengthy charge process.
As far as tactics go, I mentioned it previously but your main tactic for bosses should be charging your weapons firing one and then the other in tandem to overwhelm your opponent with firepower. Now if you don’t already know, you can charge a weapon during the animation of another, so as soon as enter your firing animation you can charge your other rifle to be ready for firing by the time you finish the animation. Another aspect of importance is the reverse joint leg, since your generally going to spend a large amount of time standing still due to the animations, I recommend throwing in a dodge here and there utilizing the large boost distance of reverse joint to minimize the potential of being overwhelmed with damage. Lastly, the pulse dome is used due to your relatively long range, you usually want to be around 200 meters or more (up to 260) away from the enemy, which means the pulse dome can be used for heavier hitting bosses to tank a fairly large amount of damage.

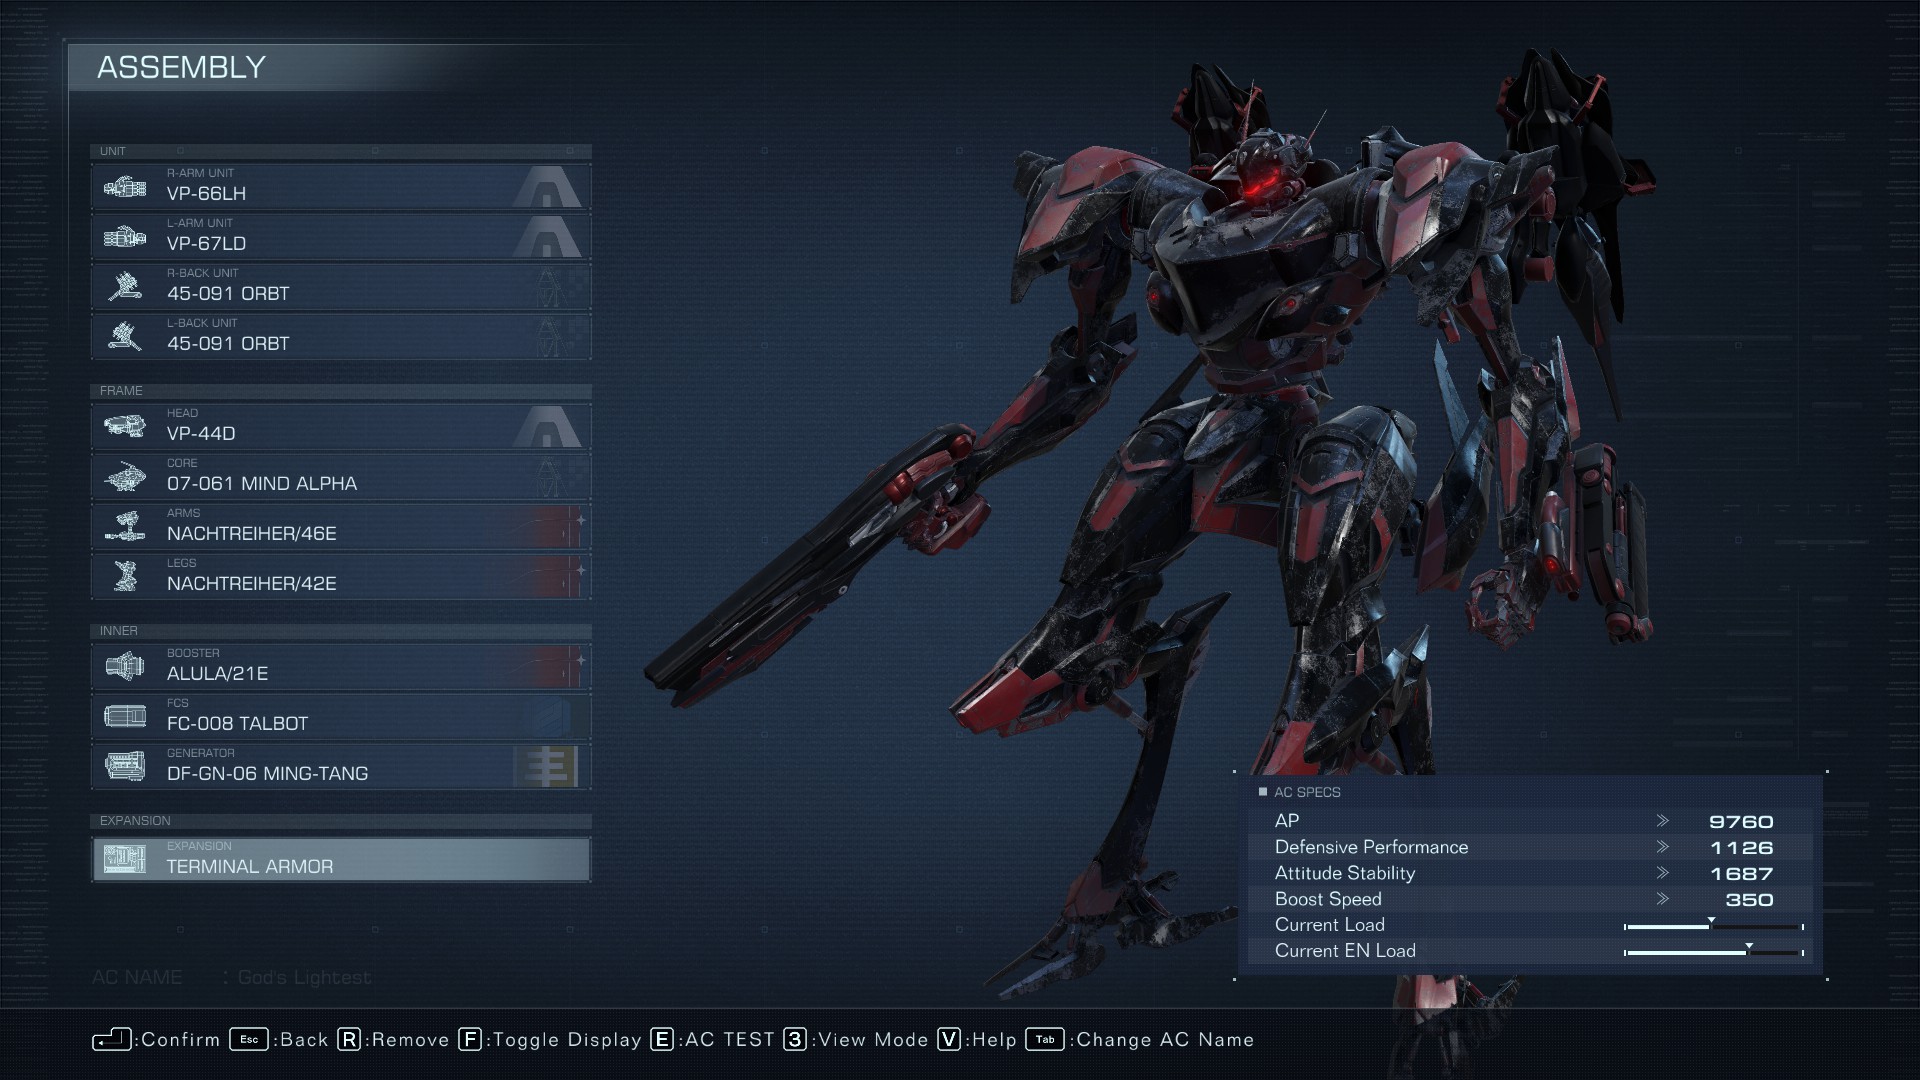
#5 God’s Lightest Energy Build
Contrary to the title this is not the lightest energy build but rather the lightest energy projectile build + the laser dagger. Basically this is the middle ground between the Mach 11 build, and the previous energy rifle build, where the main detriment comes from using laser projectiles and building very light making the user susceptible to instant death. However, as one can see it is also not build as light as the Mach 11 build in terms of parts, which is mostly in order to sustain the build and not have it be terrible.
Generally the tactics of this build are fairly similar to the Mach 11 build but with a couple differences. For one the charged attack of the energy handgun does decent damage and stagger so it is a useful tool for staggering an opponent and opening up an opportunity for melee. The other thing to take note of is the melee drones can be returned early to avoid overheating, it is important to keep this in mind so that they don’t overheat right as you are about to stagger a boss.
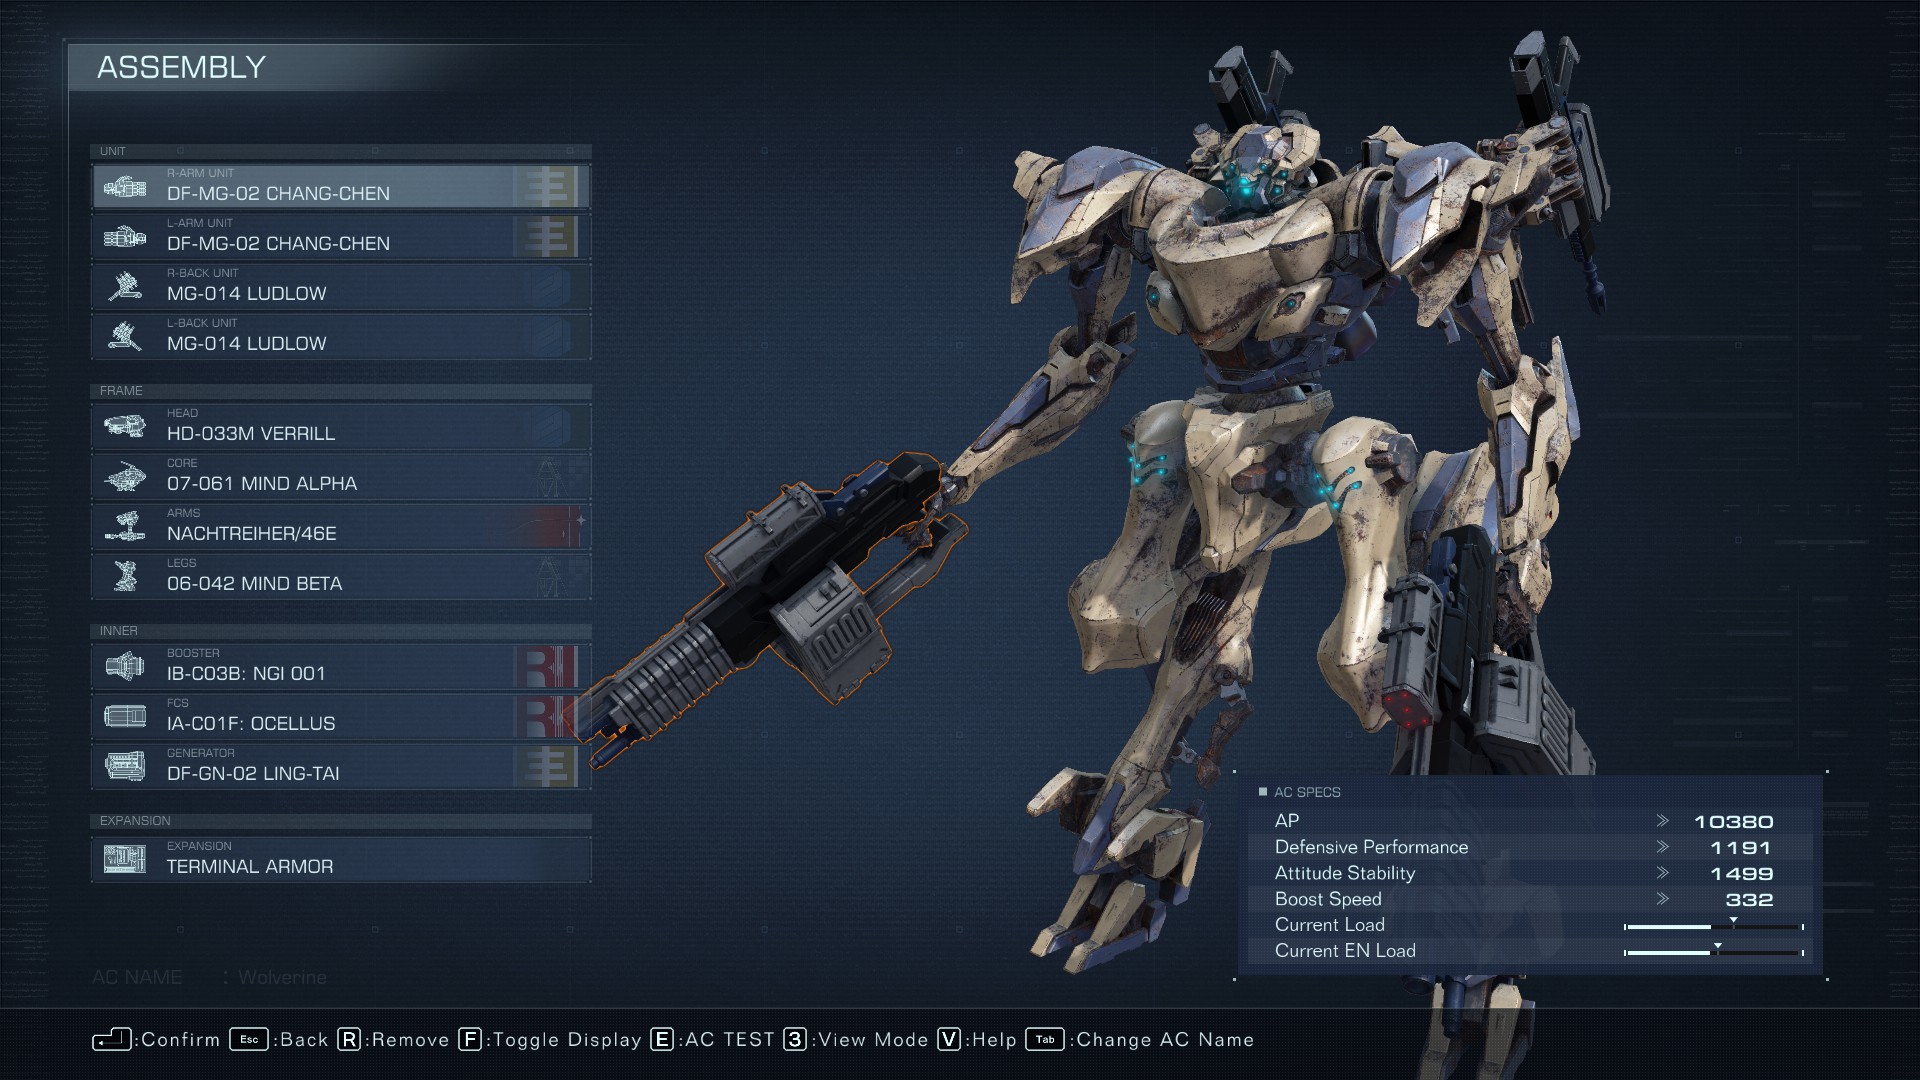
#6 Bulletstorm
One may think to achieve most dakkabullet, they need to use the miniguns BUT YOU WOULD BE WRONG. here we use 4 smg’s which can perfectly alternate the minute you run out of ammo, allowing for spending 99% of fights shooting bullets, compared to the minigun which can overheat.
The tactics for this build are by far the easiest you want to stay very close to the enemy (160 meters and less) and just hold down the trigger, the moment you run out of ammo switch to your next set of smg’s. The only other advice I can think to offer is that in situations where you need to focus on dodging or just can’t damage the enemy for some reason, just reload your weapons, after the recent buff these smg’s actually have a considerable amount of ammo and i have yet to run out on any mission.
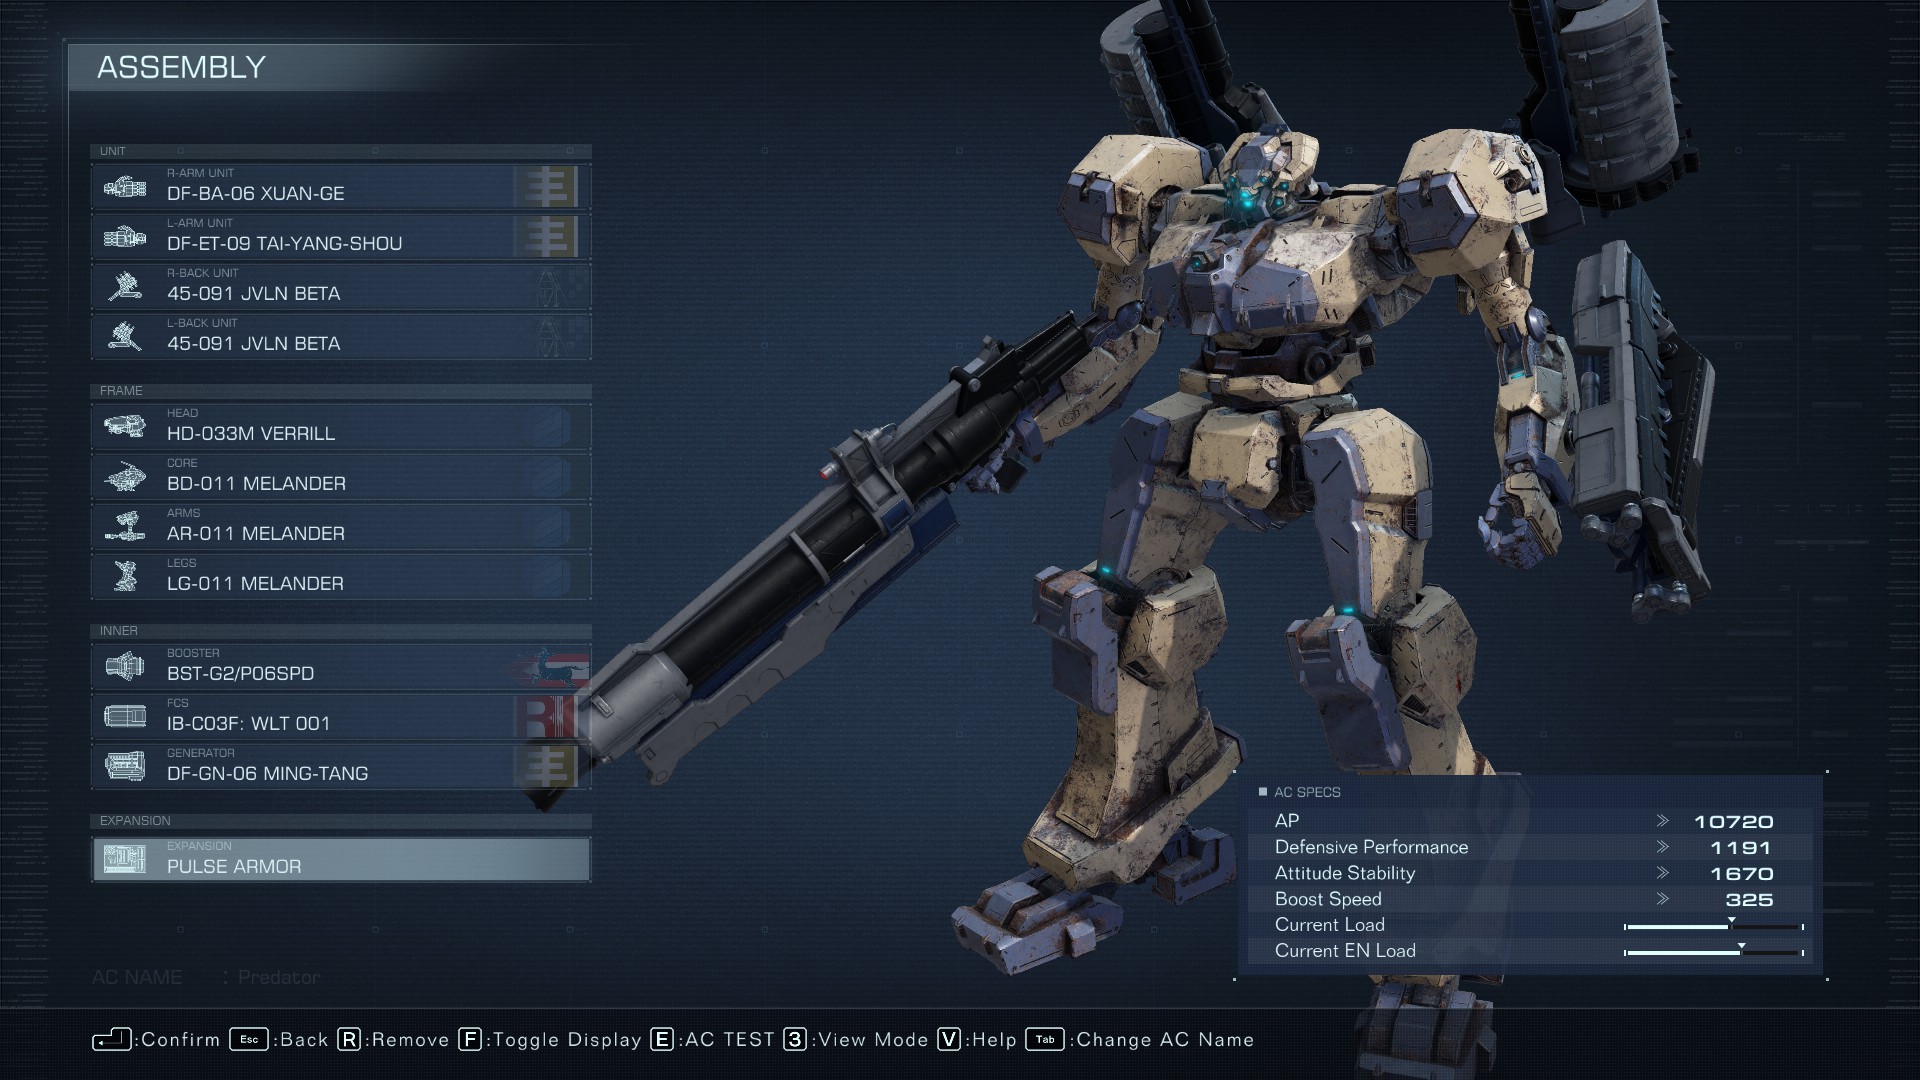
#7 Saturation Bombardment
The little brother of the atom bomber, this build revolves using the explosive weapons with the lowest cooldowns (hence missiles are not used as they do not create a large explosion). Surprisingly, this is actually much better than the Atom bomber, and due to the weapons used it is also exceptionally strong at hitting and staggering ACs.
This build has enough relative strength that tactics does not need to be discussed, basically the “melee” weapon is a good opener due to the very low cooldown and the tiny bazooka is best used when the enemy is staggered due to being the weapon with the worst spread.
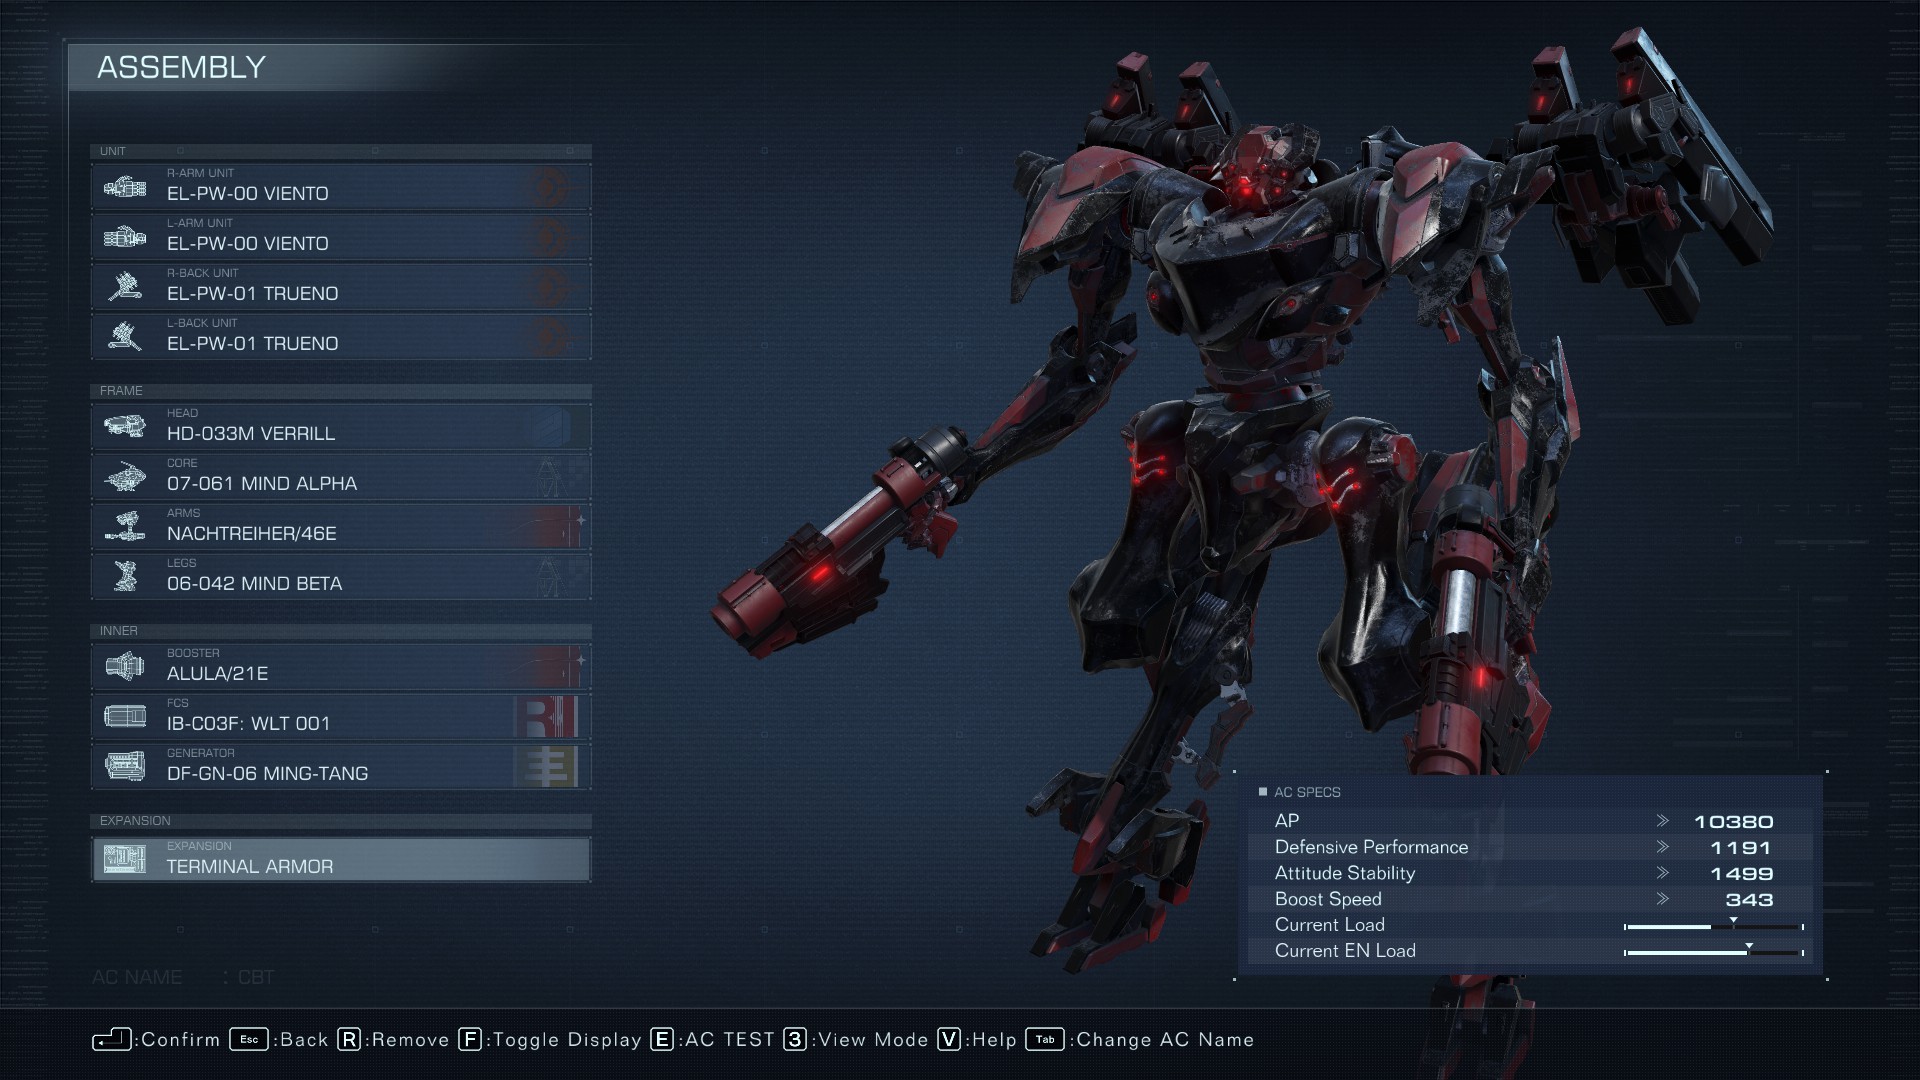
#8 CBT
Personally, this build is the hardest and why it has been awarded the title of the CBT build, because thats what playing this build feels like. This build was created by me trying to discover what gimmick build i could make that poses the highest difficulty but could theoretically fun, so if you want my recommendation, don’t use this build. Nonetheless, it is extremely effective at larger bosses, the problem starts and end with bosses that have the ability to dodge, as the needles are extremely easy to dodge. Thus when fighting fast bosses or ACs it honestly partially comes down to luck and hoping the enemy just decides not to dodge when you shoot them.
There are no tactics there is only CBT.
#9 Broadsides and Fists
This is the raw unadulterated culmination of my madness into creating an extremely stupid build that actually works to a degree. At first originally this build just started as “is it possible to put 6 energy cannons on a bipedal mech?”. However, after creating it, I decided to test it and the raw power of annihilating mechs with a broadside of 6 charged energy cannons had impressed me and decided to see how far I could take this. So since the cannons by themselves take up the majority of possible weight and EN load, the only real choice you have is focusing on a partial fist build hence the arms and booster.
Due the previously mentioned aspects the tactics for this build is centered around using the fist portion to stagger the enemy while keeping the broadside charge until they are staggered. Something I would caution is to watch the charge on the broadside since certain things such as being staggered yourself can cancel your charge for the broadside.

#10 Anime Protagonist
Make your dreams come true by using the coral rifle to unleash a DBZ level beam, or the Karasawa to unleash the mother of all energy attacks (although not as powerful as the 6 cannon broadside). These weapons can be extremely finicky and hard to use properly but it mostly comes down to timing your attacks and avoiding losing the charge.
Expanding upon what was mentioned previously, I recommend almost always charging the Karasawa to its 3rd stage but charging the coral rifle only to its 2nd stage. While you can charge the coral rifle to stage 3 I only would recommend doing so When there are very large opponents that can’t avoid it.