How to defend even the latest game factory assaults without the need for guards.
What Raids are and Why it’s best to defend
Raids are a game mechanic meant to slow factory growth and wealth accumulation. Every few days the police chief of the city will give you an ultimatum requiring you to either pay a fee or reject his demand and defend your factory from a squad of heavily armed police. The issue with this is that they are fairly difficult to defend from, especially in the early game if you wish to keep your money.
Police raid will not only destroy all your equipment and objects placed within your factory (potentially causing fires) but also kill all of your staff they can reach safely. This usually means every staff member will be killed except for those in depressurized labs for Moon Meth. This is a massive headache, especially with medium to large factories as the death of 40+ staff members means an hour of clicking trying to reschedule, re-equip and re-assign your staff. Not to mention the amount of time it will take your newly hired maintenance staff to repair every single thing within your factory.
So why shouldn’t you pay the fee to avoid the raid? They can easily be paid for most of the time, with the first offer after a successful defense (or an absolute massacre) being the lowest offer you could get, totaling usually in the hundreds into the low thousands. This is convenient when rebuilding your factory, and you don’t have proper defenses or guards setup. However every few days when the chief comes back this offer will be much much more expensive. In my playtime it seems like it’s usually about 4 times the price each time, although I’ve never paid for one over 250,000 and only seen one go up to about 960,000. And while you could potentially continue to pay this off in the late game, it will only end with you bankrupt, and with a factory in ruins.
So how to you successfully defend every time ?
Why guards aren’t it and traps are
The only initial way to defend your factory is hiring guards. Guards are a type of employee with no other duty than to guard the are they are assigned too. In the early game you’re limited to only a few melee weapons and armors, while the rest are locked behind the Gun Store and special deliveries. The late game weapons don’t make that much of an additional difference either, only really useful when the number of raiders increases, and still struggle anyway. You can make do within the first hour or two of game play using only a few guards with baseball bats so long as there’s only one entrance to your factory and they’re assigned to it.
Which brings me to my next point, choke points. Having multiple entrances and exits to your factory can be convenient, allowing you to more easily build and manage your factory, however when it comes time to defend it, you’re guaranteed to lose staff and have equipment destroyed no matter what you’re defending with.
Guards aren’t economical either, requiring a salary as well as expensive equipment, where it can cost up to $10K to equip one in the late game. Even with that $10K worth of gear though, they’d still end up dead and you’d need to hire another, equip it, schedule it and re-assign it. This is why guards aren’t practical, and will always end up costing more in the long run.
Traps on the other hand are a one time placement and can be infinetly re-armed for free by one of your maintenance workers (just make sure they don’t accidentally set them off.) Using choke points, like stated earlier, such as long hallways or repeated doors (or both) can help funnel an otherwise scattered crowd of cops into one stack ready to step on a landmine or tripwire. Traps can be expensive though, totaling in the thousands for some of the best such as the shotgun trap or the larger mines, but they will always pay off in the long run.
Hall of Doom/The meatgrinder
This brings us to the main point of this guide, what is the optimal way to defend the factory, not just on it’s own but without the need for guards as well. This not only allows you to defend any raid ever, but to also hire more staff for production or what have you all for a one time investment.
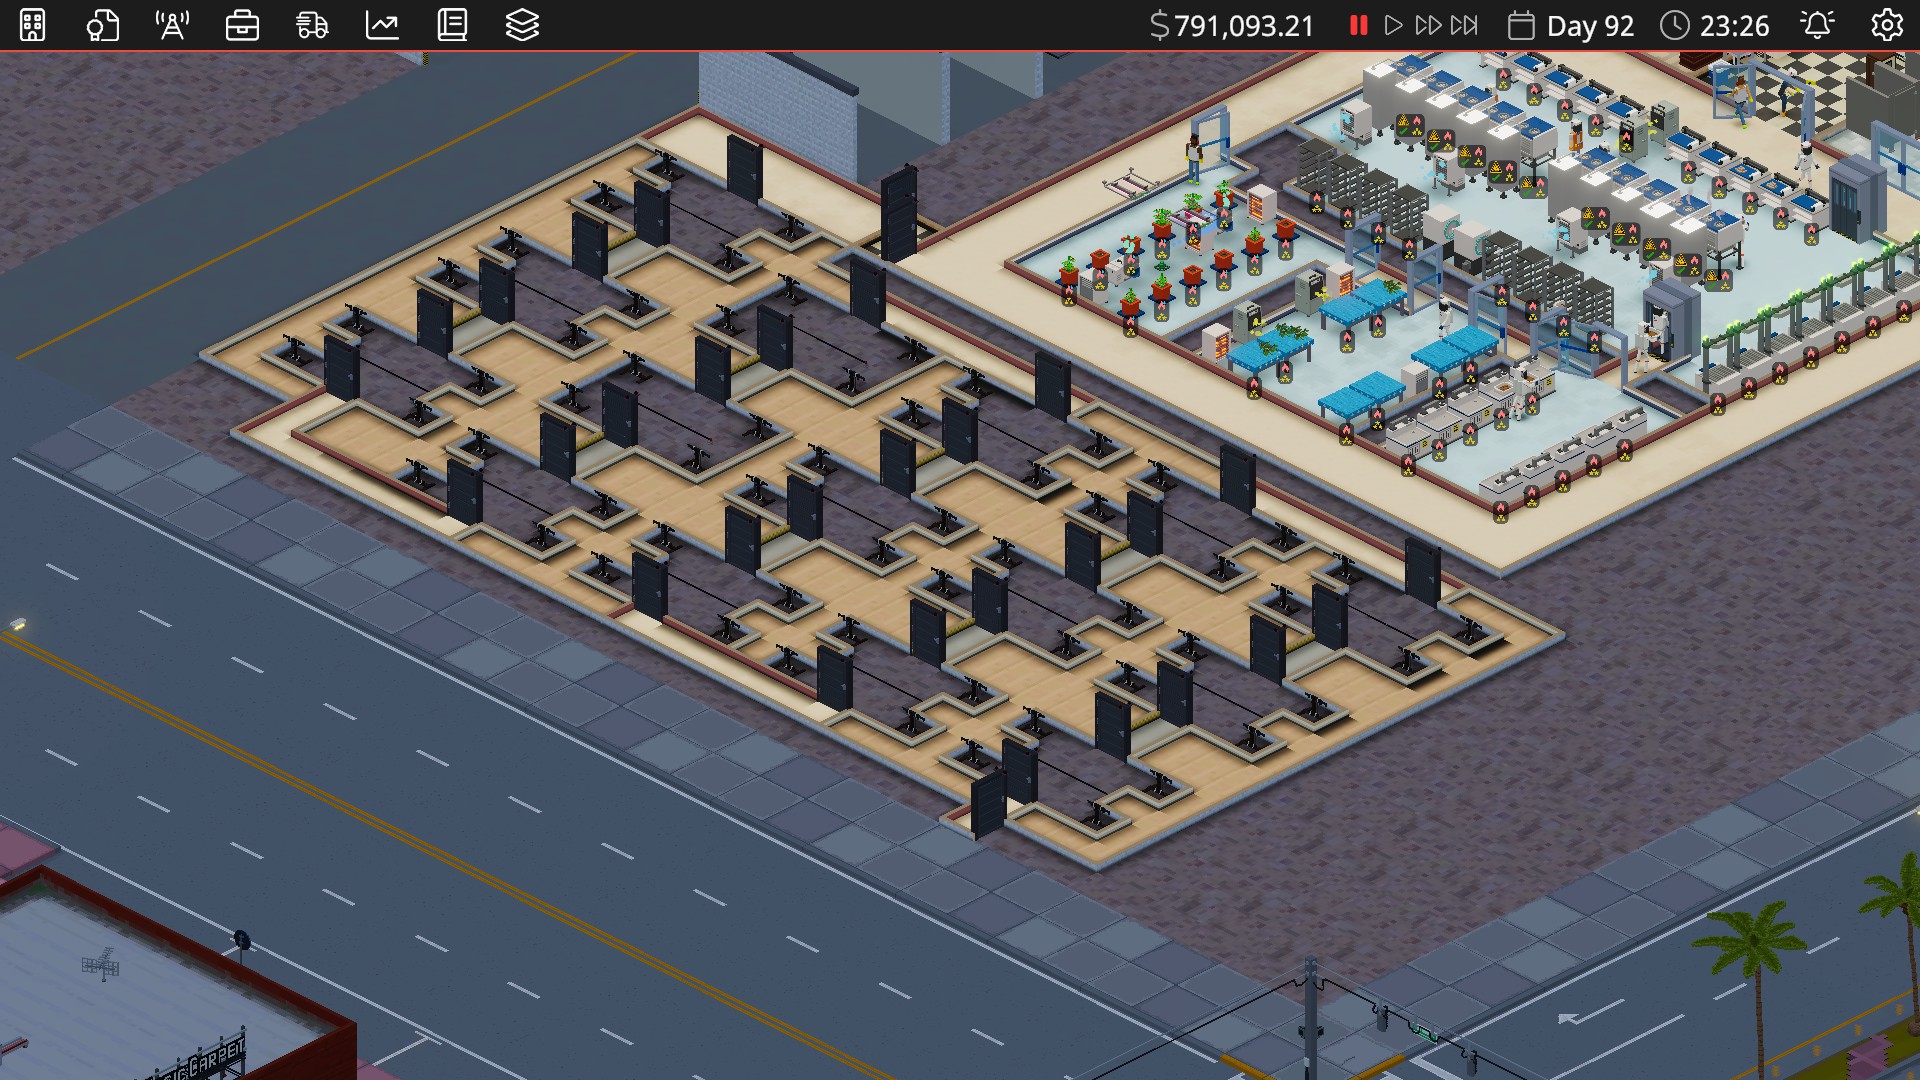
This is what I’ve found to be a fool-proof defense system, with even the largest of raids only getting through two hallways (the rest essentially serve as redundancy if the rest of the traps hadn’t been repaired yet). Each door opens up to a pair of shotguns on each side, usually dropping at least a few cops as they tunnel vision their way through to shoot at the next doors. The tripwires work well in close quarters with each other as they won’t set one another off through the walls like larger mines might. You can substitute with smaller mines, however one tripwire is quicker to rearm and probably cheaper too. The doors serve as a way to keep the cops stacked on top of one another, making the traps extra effective, and reducing wasted shotgun blasts.
This whole setup is pretty expensive, but also gruesome overkill and definitely isn’t the most cost-effective setup you could make but it’s guaranteed me a successful defense. The doors can be replaced with cheaper reinforced doors once you get inside the maze, as the outside doors are really just for the time delay so all the cops stack up. The gun traps can probably also be replaced as they’re a bit janky and miss shots pretty often (why there are so many). A smaller meat grinder with two to five guards waiting at the end would probably be enough for most people, but to avoid using guards as a whole I’d dump some money on a large one like this.
This concept can be used differently too, with the only real original idea here is to use a much longer choke point than others do to remove the need for guards, you can build yours however you like with as many or as few traps as you want as long as it works. The only drawback of this is you need to obtain some items from the gun shop but that shouldn’t take too long. But for the early game you can make a similar setup with bear traps and whatever gun trap you can most easily afford and use guards to mop up the survivors.
Accommodations
A few changes to your factory’s organization need to be made to properly accommodate this sort of defense system without killing every staff member that passes through.
Firstly the room group made for the maintenance workers that repair the traps and doors here needs to be separate from everyone else, and they also need to be equipped with the boots that don’t trigger traps (pretty obvious right). This may seem like a bit of a hassle, but prevents the unnecessary staff death.
Secondly, in between raids if you must hire new staff place a door elsewhere, and remove the first door to the Meatgrinder. This will allow staff to go through unharmed without the need for any type of special boots. Just remember that if the raid prompt shows up, to switch the doors back around. This is especially important when dealing with the colonel too near the end of the story, as you may not have that chance to fix it before you get raided.
Lastly, there should never be ANYONE on the “All Rooms” group. Treat this are like a Moon-Meth lab, only specific staff can be in here or they will die. Cleaners don’t need to come in here since even if it’s filthy it won’t contaminate product, and other maintenance workers shouldn’t need to be in here since there really isn’t that much to be repaired (so you can leave the dedicated trap repairmen to repair the doors as well).
Closing
As long as you don’t treat this like the be all end all guide you shouldn’t have too many issues with this setup. Like I said improvements can be made, and you can definitely re-arrange it so it’s not as horrendously ugly as this. Use whatever suits you best, or try to look for the best cost effective setup or layout. This is just my attempt to get a fool-proof guide that can work for everyone, so people can then spend the time building one they like. Thanks for reading my first guide!