This guide covers how to navigate through all the main game chapters 1-10, and the post-game content associated with them.
Introduction
The guide will follow the following format:
Playthrough
This subsection will guide you through the game, to collect items and navigate through areas.
To make things flow easier, most of the guide will be text-based. However, in some areas that are hard to visualize, screenshots will be used to aid the player.
If an area is to be labeled for easy navigation it will be in Italics.
If a note is to be taken for later it will be underlined, Note N: label.
Some areas need backtracking later and are spread wide. They will be labeled by underlining.
If an item is to be taken from an area, it will be bolded Item.
Some items that are commonly used, such as the Navigator, Connector Pod, Charged Coil, Karmic Water, Karma Stabilizer are referred to with shorthand names that are easy to understand and concise after being bolded once.
Secrets
This subsection will list all secrets if you only wish to complete your collection of secrets, and will follow a list format, and will use spoiler tags. The Playthrough section does not cover secrets to allow the readers to engage in the challenge themselves.
Post-game
This subsection will cover what we will do in this chapter in particular after completing all chapters, with spoiler tags.
The Navigator device will be necessary for post-game content for all chapters up to, but excluding The Exit, and optional tombs. The player must return to the menu and switch to Chapters 8 or 9 to navigate to another layer for Chapters 1-7. The locations are marked with layer information such as: ||o||||, corresponding to layer 3 on the Navigator device. In the guide, both layer text formats will be used to navigate the player.
Chapter 1 – The Basement
Playthrough
This chapter is the iconic Basement, which has been reworked into many different versions over the years (hinted at one of the secret area dialogues, too!).
The game will start in the outdoors, to briefly give an introduction to the controls.
- Click the lighthouse to begin. Open its door, and take the elevator.
- Take the Lever Wheel. Go left twice.
- Use the Lever Wheel on the slot. Keep going left.
- Pull the lever and quickly go inside.
- Go right. Pull the lever.
- Go right, up, and left. Pull the power arm.
- Go right. Take a Note 1: Sigils of the sigils in the area.
- Backtrack towards the entrance, and go down near the first lever. Go right twice to see the Tile Lock.
- From Tile Lock, keep going down. Do the following for each room: Take Note 2a: Numbers of the numbers on the lighthouse portrait, pull the lever, take Note 3: Screws of the screw positions on the top left corner, enter Note 1: Sigils to the console and take Valve.
- Go up and right to the bells. Ring in order 1-4-2 (or any order that raises the cubes) to receive Tile D from the slot.
- Backtrack to the area where you found Note 2a: Numbers. Go left and enter Note 3: Screws on the valves in the area. You can go down to take Ancient Coin.
- Backtrack to Tile Lock. Go right and up. Pull the lever. Go right again and take Note 2b: Numbers.
- Backtrack to where you have taken Note 3: Screws. Go left, and enter the combination of Note 2a: Numbers and Note 2b: Numbers. Take Electrical Fuse.
- Backtrack to the area where you found Note 2a: Numbers. Go right, down and use Electrical Fuse on the fusebox. Go right to find the Radio. Go up to take Tile C.
- Backtrack to Tile Lock. Go left. Insert Valve and turn.
- Backtrack to Radio. Go down, to take Pearl.
- Backtrack to Tile Lock. Use Pearl on the clock. Take Tile B.
- Backtrack to Tile Lock. Go to the rightmost end. Pull the lever. Take Tile A.
- Backtrack to Tile Lock. Use all Tile items. Enter the elevator and push the button.
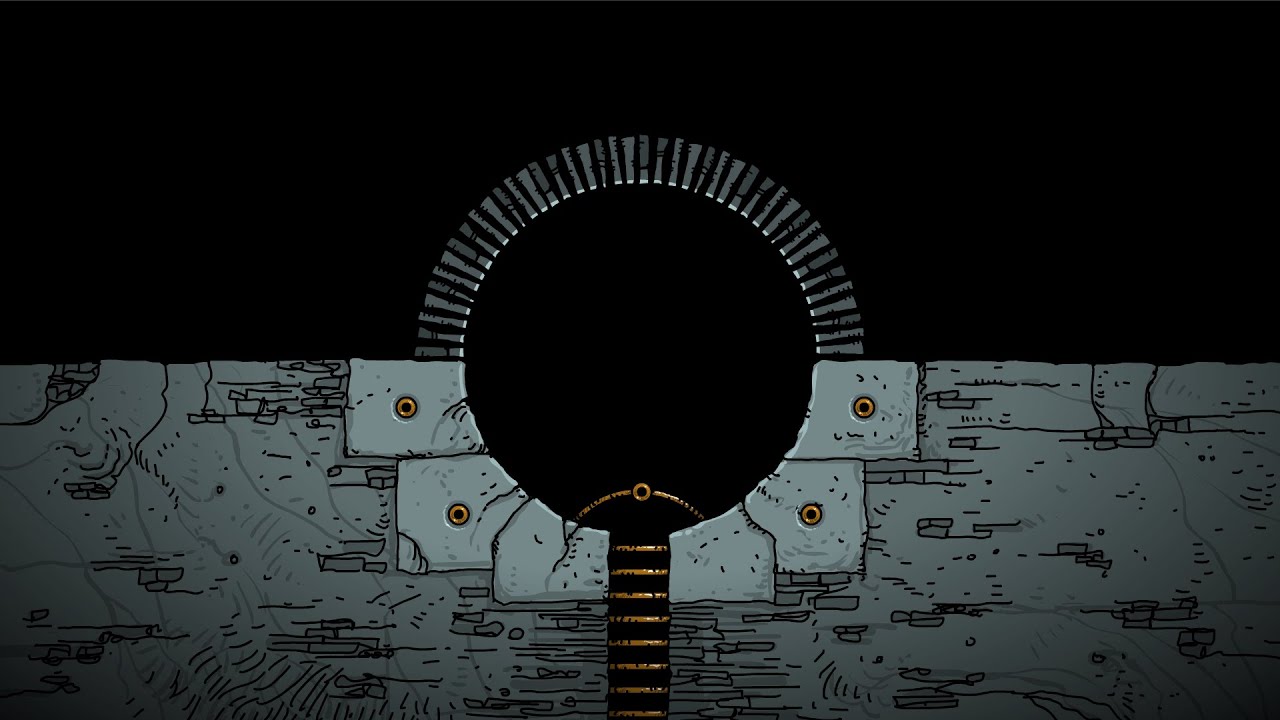
- This is a circular room. You will see many more like these in the following chapters (and cubic rooms and anomalies later). Follow the path into the lighthouse. You will see a lever to move to the next chapter.
Secrets
To get the secret token of this chapter, you will need to complete the chapter. Returning from the main menu, go to the room where you have collected Ancient Coin. Pull the lever. Backtrack to Tile Lock, go right, then up twice. Collect the token.
Post-game
Monolith I – ||||o|| (Layer 5) : Go to Radio and right. Input a token to enable a Karma Portal. Go down, then right along the pipes to reach the Monolith.
Chapter 2 – The Lighthouse
Playthrough
In the original gameplay, you’d end up noticing that you were dreaming about playing a game called Submachine (i.e. chapter 1), yet not wake up from that dream. You would then zoom out from the arcade machine to begin.
Underground
- Click the arcade machine, and its coin slot. Take Energy Crystalline Shard.
- Go left 3 times, and use Energy Crystalline Shard.
- Go left and up, take Cog Wheel.
- Go down, and right until you see the phonograph. Click on it, and use Cog Wheel. Press the button.
- Go left to the ladder, and up. Go right. Take Note 1: c from the label on the bottom right side. Pull all levers.
- Go left and upstairs once. Enter the bottom sewer. Follow it to the end. Pick up Bathroom Key.
- Go back outside. Follow the stairs until you see an entrance to a blue area. Instead, go right and click on the alcove. Take Power Relay.
- Now follow the entrance into the Video Room.
Video Room
- Nothing to do here yet. Go left and follow the path upstairs into the Lower Floor.
Lower Floor
Almost all entrances in this area are labeled. Look around to find these places.
- Find a note in the Library.
- Open the Bathroom with Bathroom Key. Take Sewer Key.
- The Digout is to the far left. We won’t explore it yet.
- To the right from the entrance, you can see the entrance to the Upper Floor. Skip for now.
- Move right twice and take Note 2: Sigils from the portrait. You can also take a brochure.
- Return to Underground through Video Room.
Underground
- Use Sewer Key on the grate. Enter.
- Down, Right. Take 2nd Floor Key.
- Left, Up, Left, Left, Down, Down, Down, Down, Right, Up. Lore here.
- Down, Left, Down, Up. You should see Lever.
- Down, Left, Left, Up. Solve the puzzle by making all the lights go on.
- Backtrack to Lever, take it, go back to puzzle room entrance.
- Up, Right, Up, Up, Left, Left, Down, Right. Take Positive Coil.
- Backtrack to Video Room.
Video Room
- Go upstairs immediately, and right into the hole in the wall. Use Lever at the end of the tunnel. Pull it.
- Enter Upper Floor.
Upper Floor
- Take the Negative Coil from the bottom left spot on the ground.
- Go upstairs, use 2nd Floor Key on the door. Enter.
- Left side, you can find a note in the typewriter, and a Video Memory on the rubble to the left.
- Right side, input Note 2: Sigils into the machine to receive Light Bulb. To the right you can find a note.
- Out and upstairs, take Digout Key.
Lower Level
- Go to Digout. Use Digout Key to enter, follow tunnel. Click on the lightbulb. Take Electrical Fuse.
Video Room
- Use Light Bulb and Video Memory on the slideshow machine and pull its lever. Get ID Card from the slide.
Upper Level
- Go up and use Power Relay on the bare circuit. Pull lever. Go left and enter your solution to e=mc^2 by Note 1: c and Note 3: m. Go right and solve the minigame puzzle.
- Go upstairs twice. Go left to take Note 3: m. Go right to insert Positive Coil and Negative Coil.
- Insert Electrical Coil to the right, and ID Card to the left.
Secrets
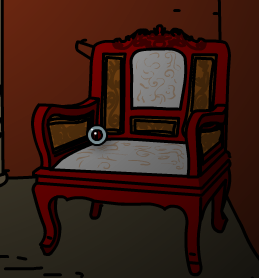
- Underground – Near Cog Wheel . It’s on the chair.
- Video Room – Click on the cracked ceramic tile.
- Lower Floor – Right from the entrance to Upper Floor , on the ceiling light (right side).
- Underground – Sewers, Left, Up, Left, Left, Down. On the right side on the refuse pile.
- Upper Floor – 2nd Floor, right side, to the right there’s a toy that reacts to your movements near the bed. Play its minigame to get 4 tokens.
- Upper Floor – Where you find Note 3: m, go left. It’s on the floor.
- Lower Floor – Digout, move left twice. In the center, on the wooden beam.
Post-game
Monolith II – |||o||| (Layer 4) : Go to Digout to the end of the tunnel. Enter the Karma Portal, go down, left, up. Insert tokens. Enter the Karma Portal, and left. Insert tokens. This is a circular room. Find the Monolith and turn it on.
Chapter 3 – The Loop
Playthrough
The lighthouse was a trap! Now we are stuck in the most horrifying place in the subnet, the loop!
The Loop is formed of distinct puzzles with their own passwords (in the browser version, this was the means of saving progress).
Note: The coordinate system of the Loop ascends in X towards the right, and in Y downwards.
Note: Most solutions follow from the Board at (1,0). Take note of the dots. These are places where you typically need to be.
- Hatta: Just pick up the Loop Navigator to the left, and use the exit valve.
- Linkva: Follow the dots on the board to the valves. Click on all to enable the exit valve.
- Bamita: Follow the dots on the board to any of the valves. Clicking reveals the next valve coordinates. Follow through all to enable the exit valve. Failure in any will reset the puzzle.
- Kalka: Follow the dots on the board to varying panels. Each will have three numbers that can be modified. The remaining number is the correct value for the other panels. Between the panels some valves can be found. Modify all panels to be the same, then use these valves to enable the exit valve.
- Winda: Follow the dots on the board to numbered valves. You need to turn them in ascending order to enable the exit valve.
- Banda: Follow the dots on the board to circular panels. You need to enter the coordinates of the current panel location in alphabetical form (a=1,b=2,…) to enable the exit valve.
- Mjolka: Follow the dots on the board to find screens with numbered glyphs. Take note of all glyphs, and enter them at (-1,0).
- Slitta: The board is broken. Find a lever in (-1,-1), and a projector in (-1,0). Pull the lever to activate the projector. Take note of the diagonals. Move to (-2,1) and start entering these diagonals by pressing buttons. Move towards the right as you enter the code. Move to (0,-1) and turn the valve. The exit valve will then be enabled.
- Flinta: Follow the dots on the board. There are egg-shaped devices, and a controller in (0,1). Enter coordinates into the controller to unlock the eggs and pull the levers inside. The exit valve will then be enabled.
- Anielka: The board is broken. Find code boards on (0,1) and (0,-1). The Roman and Arabic numerals should match each other. When you’re done, press the button in (0,1) to enable the exit valve.
- Botwinka: The dots on the board don’t lead anywhere. Copy its contents to the other board in (-1,0). The exit valve will then be enabled.
- Mimbla: There will be a note on the wall. You can choose to solve the puzzle, or find the Leaf in (-1,-1), and follow the instructions. If you want to solve the puzzle, read the inscription at (-1,0), and the screens in (0,1),(0,-1). Compare and match the numbers with the letters (RYW on (-1,-1), BPG in (1,-1)). Turn the valves in (1,1) and (-1,1) after solving the puzzle. The exit valve will then be enabled. The loop will throw you back to this section if you choose to solve it.
Secrets
There are no secrets in The Loop.
Post-game
Monolith III |o||||| (Layer 2): Mimbla: Solve the puzzle instead of using the leaf. Instead of looping back, move around this zone, refusing to use the exit valve. It is a spatial anomaly, so you will need to randomly move around. You will eventually find the Karma Portal.
Chapter 4 – The Lab
Playthrough
You were stuck in the Loop. Murtaugh left you a note to break out of it, which would get you to the Lab, or somewhere nearby…
Attic
- Go right and take Hammer.
- Go left, down, right. Use Hammer on padlock. Enter.
- Go down into the attic. Check the lab coat’s pocket for Naphthalene. Go right and pick up Rubber Tube from the ceiling next to the fireplace column. Go right and take Chimney Brush.
- Go back on the roof. Use Chimney Brush on the chimney. Down in the attic, take Attic Key from the fireplace.
- Go left, and take Lab Key from the coathanger.
- Go left, take the Gas Handle from behind the front left leg of the table.
- Unlock the attic door with Attic Key. Move into the Middle Floor.
Middle Floor
- Two floors below, go left. Use the computer. You can only send pings to Murtaugh. Keep pinging him until he stops talking. You can speed up the process by right clicking and left clicking back into the computer screen to then ping back.
- Take the coordinates sheet from the printer. You need it for the teleporter, but these coordinates will be also written here.
- Move right to the end. Take Lighter from the windowsill.
- Once floor down, take Empty Beaker from the ground. Go to Lab.
Lab
- There is a note on the table, and another to the left.
- Move right, take CD.
- Move upstairs, take Irontrioxide. Move right. Take the note and read it. Take Screwdriver. Go down.
- Head left into the bathroom. Take Soap and break the pipe cover with Hammer. Put Empty Beaker on the grate on the floor.
- Go back to Attic, and to the roof. Go to the leftmost spot, use Screwdriver on the Valve and pick it up. Backtrack to the bathroom in Lab.
- Use Valve on the pipe, and turn it to fill the beaker. Pick Beaker with Water.
- Go right 3 times, up and right. We will now assemble the burner and prepare the fluid.
- Attach Rubber Tube and Gas Handle to the pipe. Turn the handles on the pipe and the burner. Use Lighter on the burner to start a flame. Place Beaker with Water on the burner. Add in the following order to the beaker: Soap, Irontrioxide, Naphthalene. Take Empty Vial and Acidioxide.
- Go back to the bathroom. Place the Empty Vial on the grate. Fill it up, take Vial with Water.
- Go to the right end.
- Take Funnel and open door with Lab Key.
- Place the Funnel in the gearbox, and pour Acidioxide. Press the button.
- You are now near the teleporter. You can return to the lab with the code 001. We will use it to go to different places.
Ancient Section (104)
- Observe your surroundings. You will find various stone plates with symbols on them.
- From the teleporter, go right and down. You will find a mechanism with symbols on it. Use it to unlock stone plates. From the stone plates, you should receive the following items: Stone Key, Round Key, Tile B, Tile D.
- In the room to the right side of the stone plate mechanism, you can find Knife.
- Go upstairs. Use Round Key and Stone Key to unlock the ladder.
- Go down and push all stone plate buttons in the mechanism downstairs. Go all the way up.
- Use Knife to drop a tile next to the mechanism. Another tile will be revealed on the way here below a stone plate. Grab both Tile A and Tile C.
- Place all tiles in the slots above the cat statue all the way downstairs.
- Go back to the teleporter, and upstairs. Take Empty Coil. We are done here for now.
Looping Traps (690)
Yes, this place is like the Loop from the previous chapter. Now we are in a 3×3 grid room. There is a device on (-1,0) that releases buttons on other rooms. There are 4 rooms that have buttons. Release all buttons and press them to unlock Orb in (-1,1). We are done here for good.
Basement Section (529)
- Go right twice. You can charge your Empty Coil here. Charge it.
- Go left and down from the charger. There are two rooms, to your left and right. Both rooms have machines that need to fully deplete your coil to power up. Power them and your coil, make trips back and forth. Turn the knob on the laser redirector (center room).
- Make sure that you recharge your coil to get Charged Coil. You will need it later.
- Go upstairs. Place CD on the gripper.
- Go right, place Orb on the pedestal. Grab Chest Key. A note will reveal coordinates to Brick Room (551). We are done here for good.
Tomb Trap (770)
- A note will reveal coordinates (043). Enter it to your teleporter.
- Use Vial with Water on bubble. Get Golden Scepter. We are done here for good.
Ancient Section (104)
- Go up to the area you took the Coil from. Insert it to its plug.
- Go left. Turn on the searchlight. Look into the telescope. Take note of the new location (452). We are done here for good.
Brick Room (551)
- Go left. Press the button. We are done here for good.
Lighthouse Digouts (462)
- Go right, use Hammer on padlock. Take Turbine. We are done here for good.
The Ship (800)
- In any dark room, you will need to light a lantern with your Lighter.
- Go right, unscrew the panel with Screwdriver. Cut the wires with Knife.
- Go upstairs twice. Place Turbine in the slot.
- Go downstairs and press the button. Go right, use Chest Key to get Golden Arm.
Statue Room (451)
- Use Golden Arm and Golden Scepter to complete the statue.
Secrets
- Attic (001) – To the right, on the chair. Hard to miss.
- Lighthouse Digouts (462) Need to ring 4 bells in various areas. After doing this, go left from the teleporter to find the token.
- Lab Next to the teleporter.
- Ancient Section (104) Right from the stone plate mechanism.
- Tomb Trap (043) To the far left.
- The Ship (800) Right from the teleporter.
- Ancient Section (104) Below the stone plate mechanism, in the eye of the cat statue.
- Ancient Section (104) Up twice from the stone plate mechanism, below the horse statue. Smash it open with Hammer.
- Looping Traps (690) Lower center room (0,1), on the bolt that holds the light bulb to your upper left.
- Basement Section (529) Right and down from the teleporter, on the floor, next to the laser redirector, on its right. Look at the cables.
- Tomb Trap (043) To the far left. It’s lodged in a crack in a corner on the upper side of the wall.
- The Ship (800) Hard to miss. Next to the wires you cut.
- Middle Floor (001) Go right. Plug in your Charged Coil on the device. Click on its screw to release the token.
- Statue Room (452) On the statue’s head.
Post-game
- Monolith IV – ||o|||| (Layer 3) : Basement Section (529): To your left. Use the Karma Portal and press the door release button. Navigate to the Lab (001). The path to your right is now open. Open the door and the hatch. Use 5 of your tokens. Go right to find the Monolith.
- Monolith V – |||||o| (Layer 6) : Ancient Section (104): Go downstairs. It’s to the right from the cat statue. Use 5 of your tokens. Go right to the Karma Portal. Follow the path down to the Monolith.
Chapter 5 – The Root
Playthrough
You passed… a test? Now you are an Explorer, with their own room. You wake up in your own bed, and are given a task.
Explorer’s Room
- Go down. Turn on the PC. Read all documents. After reading them all, they will be summarized and printed to your left.
- The transporter is to your right and downstairs. We won’t come back here again, but the location is still marked if you wish to come back. Use code (552) to navigate to the Root, or (747) to access the pinnace. You can always read these locations from the note.
The Root (00)
- Go right towards the tunnel. Pick up Lead Casting from the ground before entering.
- When you are inside, unlatch the power cord from the smashed robot. Open the power box by clicking it, then click the power cord. The power is now on.
- Go right,down and right. You will see a device. This is the Binary Teleporter.
- Move to the right end. You will see a coil socket.
- Go up and to the end of the corridor. Go inside, and take Wrench.
- Backtrack to the coil socket, go left, down and right. Unbolt the panel and take the key. Go back upstairs.
- Enter the closer room to your left. Unlock the safe, and get Cipher Plate 1. It isn’t named with a number in this version, but the hole is clear of rust. Remember this distinction for later.
- We are done here for now. Navigate back to the binary teleporter.
- To enter an area code into the binary teleporter, place a Cipher Plate in a slot. If a slot is left empty, it is coded 0. If you have placed Cipher Plate 1 to the right slot now, the area code will be (01). Do so now, to get to Charger Room (01).
Charger Room (01)
- Go down and left to find Cipher Plate 2. It has a distinct rusty hole on its top side. Remember this distinction for later.
- There is a charger downstairs, but we don’t have a coil yet. We are done for now.
Lighthouse Backroom (20)
- To your left, there will be 3 hatches. Enter them all and set their pressures high. Pick up the Empty Coil from the central hatch.
- The valve that triggers steam flow into this room is somewhere else. We are done for now.
Valve Room (02)
- To your left downstairs, there will be 3 monitors. They are not on for now.
- The valve that triggers steam flow into Lighthouse Backroom (20) is here. Turn it. You should hear a hiss. We are done here for now.
Circular Maze (12)
- This section is circular in nature. If you move right, you turn clockwise with respect to the central room.
- Navigate to the central room with the box. Look into the holes surrounding the room. They will show the dials that are connected to the valves behind them. Take note of these positions.
- The dial on the right corresponds to the room to your right. The one on the left, to your left. The one behind, you will need to move twice in any direction to get to.
- Turn the valves surrounding the central room by navigating around.
- When the dial crowns match the hands, the box will lift to reveal Steel Cube. Take it.
- Start turning around the maze. Stop when you see a light bulb without a cage on it. Take Light Bulb from this socket. We are done here for good.
Charger Room (01)
- Charge your coil. We are done here for good.
Vat Room (10)
- Go right and place Steel Cube in the acid bath after zooming in on it. Go back, and use Wrench to let the acid out. Look at the bath again to get Energy Crystalline Shard.
- There is a coil socket here, insert your coil. Head out. We are done here for good, but come back to pick up your coil when you are done with it.
Valve Room (02)
- Take Note 1: Glyphs from the screens. They will be ordered from the left to the right. We are done here for good. You can now take your coil from Vat Room (10).
Ancient Section Digout (21)
- Go right, and up. Press both buttons on both ends of the room. Go back down.
- Plug the Light Bulb into the socket. Go left.
- Enter Note 1: Glyphs to the stele. Turn the dial.
- Go downstairs. Use the Lead Casting on the stones. You will be able to pick it back up twice.
- Go downstairs. Take the Energy Crystalline Shard. We are done here for good.
Lighthouse Backroom (20)
- Enter the lighthouse through the broken brick wall. Take the Energy Crystalline Shard. We are done here for good.
Pinnace (747)
- Go back to The Root (00) . Move back to the first teleporter, and enter (747).
- Go right to the pinnace. Open the door by pulling the switch. Enter.
- Close the door by the opposing switch. Place all Energy Crystalline Shards into the sockets. Pull the lever in the control panel.
Secrets
- The Root (00) – Click on the patch of dirt behind the teleporter. It reveals a set of stairs that lead to the token.
- Charger Room (01) – Go downstairs to the charger, and left. Click the metal sheet to the left of the room. It will reveal a bolted panel behind it. Unbolt it with Wrench. Take the token.
- Valve Room (02) – Behind the valve. Click on the ground behind it to see the token.
- Lighthouse Backroom (20) – After using the coil in The Root (00), click the panel to the left before the brick wall. Take the token.
- Lighthouse Backroom (20) – Go to the place where you received a token back in Chapter 2 – The Lighthouse. It’s to your left and upstairs after you bust into the lighthouse.
Post-game
- Monolith VI – ||||||o (Layer 6) : Pinnace (747): First, go right towards the pinnace launch area. Open the box. Take Emergency Key. Go all the way to the left towards the door behind the rubble. Open it with the key. Use your tokens on the Karma Portal to your left. Enter. The monolith is to your right.
- Monolith VII ||||o|| (Layer 5) : Charger Room (01): You will see a dial on the way to the charger. There is a cat statue in the alcove above, giving a hint on the next location.
Ancient Section Digout (21): Navigate to the area where was once closed off with booby traps (you have used Lead Casting here). The area is now open. Use the Karma Portal to get to the Monolith.
Chapter 6 – The Edge
Playthrough
The pinnace brought you to The Edge, where the security systems of the sentient submachine are located. You are immediately taken away by the interceptor system, and are forced to leave your pinnace.
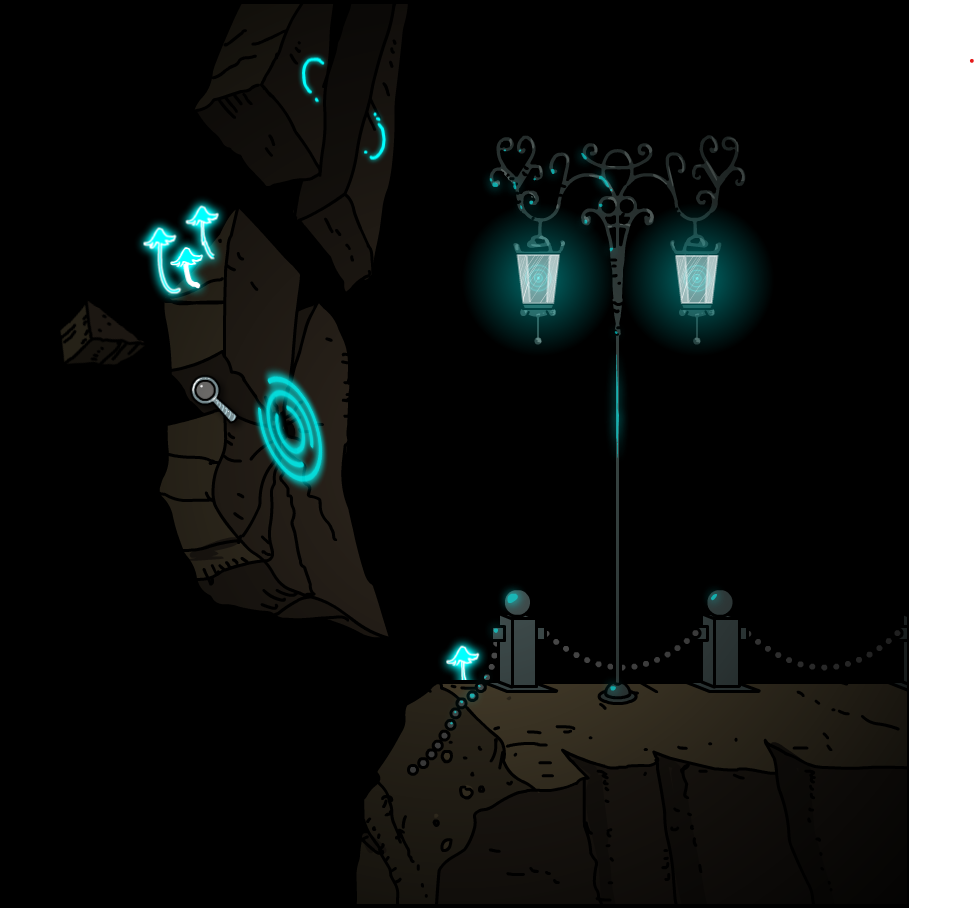
The Cliffs
The outer rim where you begin the game will be referred to as The Cliffs in this guide.
- Leave your pinnace and watch the cutscene.
- Drop off all of your items from the previous chapter into the receptacle in the room to the right.
- Go right. Click the scanner to pass.
- Go right. Start entering numbers on the screen. You will be kicked out and thrown into The Cliffs.
- The elevator will leave. Go left, and wrap around the corner. Go left until you see a single grate cover. Click on it to break in.
- Right, Up, Up. Get the ID Card.
- Down, Left. Turn the wheel, until the dimmed light is on top.
- Right, Right. Push the statue back.
- Left, Down, Right. You will see a hole. Enter it.
- Right, Up, Up. Turn the wheel.
- Down, Right, Down. Pull the handles. Note the new area: Temple of Thoth.
- Backtrack to the wheel, and turn it again. Go in the returning direction, and use the upper path.
- Move up until you see the fork. Go left to see two wheels.
- You will need to turn the wheels until they line up in the top, left, or right directions. Whenever you do so, a passage will unlock in the area to your Right, Up.
- First, unlock the left and right passages. Press the buttons in each passage.
- Then, unlock the central passage by lining the wheels up. Go through.
- Go right, and enter ID Card to the slot. Call the elevator to get to the Vertical Floors.
Vertical Floors
- Go to Floor 2. Look at the screen. Lower the security level to 0.
- Go to Floor 1. Take the Steel Cube.
- Bring the Steel Cube to the Temple of Thoth.
- In the temple area, you can see a stone wheel. When the dark side points down it’s in the “Past”. And when it points up, it’s in the “Future”. Place the Steel Cube on the shrine inside, and turn the wheel to the Future. Take out the rusty bits from the cube in the shrine. Turn the wheel to the Past. Take the Connection Pod from the floor.
- Go back to the Vertical Floors, Floor 2. Insert the pod to the wall on the far left. Enable access. Leave.
- Go to Floor 1, room 5. Use the pod. Enable access. Leave.
- Go to Floor 2, room 8. Go right, until you reach the second pod socket. Use the pod. Go left, enable access. Leave.
- Go to the pod socket to your left. Go right. Disable all protocols. You can now read Murtaugh’s message. Leave.
- Go to the pod socket to your right. Use the pod socket. Go up, call the elevator until it comes next to your location. Leave. You can now get to the Horizontal Floors.
Horizontal Floors
- Go to Floor 1 (from the left).
- Go left and immediately up. Use the pod socket. Go left, disarm the turret. Go back, make it go offline. Leave. The light above should now be red.
- Go down, left, and up. Use the pod socket. There should be two warnings regarding the turret: one requiring a reset, one requiring a chain servicing. Go left (not right), and reset the chain. While the chain is being reset, cancel the operation. This will cause a secondary DS failure. Leave.
- Get to Floor 2, and upstairs to the mainframe. Use the pod socket. This is a point of no return. If you have unfinished business, do so now.
- Press the button inside the mainframe.
- You are now presented with 4 nodes, with a central connector. Click the connector to move to different rooms. To the left, turn off the turrets that are online (all must be 0).
- Go right, and up. Click the button. Go down, and right. Click the button. Go back to the center.
- There is some lore in the lower section if you want to learn more about the Post-game section by yourself.
- Go up, and across. Click the node to get to a new crossroads.
- Lower left, click the button. Lower right, turn all 1s to 0s. Upper left, click all disks to turn them off. Upper right, reset the pattern. Go up, and across.
- Press the button and confirm the dialogue. Watch the cutscene.
- You will be forcefully ejected from the mainframe, and in an area of no return. Go down, and pick up your pod. Go left, and open up the ventilation shaft. Follow it up.
- To your left is a strange contraption, with a code on it.
- To your right is a teleporter. Use the pod socket and click the switch.
Secrets
- The Cliffs: After pressing the buttons that let you through towards the Vertical Floors, you can line the wheels downwards. Doing so will unlock a new area towards the beginning of the sewers. There you can find a token.
- The Cliffs: Turn the stone wheel to the state of Future in Temple of Thoth to unlock an area to the left of the sewer entrance. There is a token here, and this area is also related to the post-game.
- The Cliffs: After the sewer section, go to the very left edge. You will see a token here.
- The Cliffs: From the previous token location, go right. There will be a user ID pattern attached to the sewer entrance. Enter it to the place you received the pod in Vertical Floors to unlock the area, and take the token.
- Horizontal Floors: Right next to the mainframe, on the floor, to your lower right.
Post-game
- Monolith VIII – ||||||o (Layer 2) : Horizontal Floors: You are in the ending zone when you begin. There is a teleporter to the left enabled only in Layer 2, leading to the Thoth secret area. From there, navigate to the rest of the game, starting from… The Cliffs. You will see a Karma Portal below the Thoth inscription. It will take you to the next Monolith area.
- Monolith IX – |o||||| (Layer 2) : The Cliffs: After navigating to the Thoth inscription, you need to unlock the secret area by disabling Protocol 54-5. Get to the rusty teleporter that is located at the very beginning of this zone. If Protocol 54-1 is enabled, you will be able to open up the secret area. If it is disabled, go back to Vertical Floors to disable it. To get to the secret area, you need to go near the elevator to the Vertical Floors section, press the button again to let it go up. Then move across to the other side and down to the secret area. You can use your tokens here. The Karma Portal will lead you to the Monolith.
Chapter 7 – The Core
Playthrough
You are teleported to The Core after hacking into the security mainframe at The Edge, with no clear plan, and an apparent abandonment by Murtaugh.
- Go right. Collect Steel Tube.
- Go right again. Take off the wooden planks on the bottom left side of the screen to reveal a Key Stone. Take it.
- Go right again. Take the Code Card and note pages: Gate Order, Stone Grid. Note the safe box on the center left side of the screen.
- Go left until you see a forcefield. Insert Code Card. Take the Light Bulb from the projector.
- Use Steel Tube on the force field, to break the lightbulb on the projector.
- Go left. Take the Safe Box Key from the center column’s base.
- Go back to the safe box and unlock it. Look inside, and take Energy Crystalline Shard.
- Go back where you have found Safe Box Key. Move left twice.
- Take the Gong Stick from next to the statue.
- Go left twice, and check the flowerpot on the right. Take Key Stone.
- Go left. This is the gate to the South Garden. Go left again.
- Hit the gong with the Gong Stick.
- Behind the gong, there are flowerpots. Check the center one to get a note: Stone Grid.
- Go all the way left. In the palm of the statue, there is a Key Stone. Take it.
- Now, place Energy Crystalline Shard in the socket in the gate to the South Garden, and assemble the Key Stones on the gate controls, using the Gate Order note.
- Press the button, and go through the gate.
South Garden
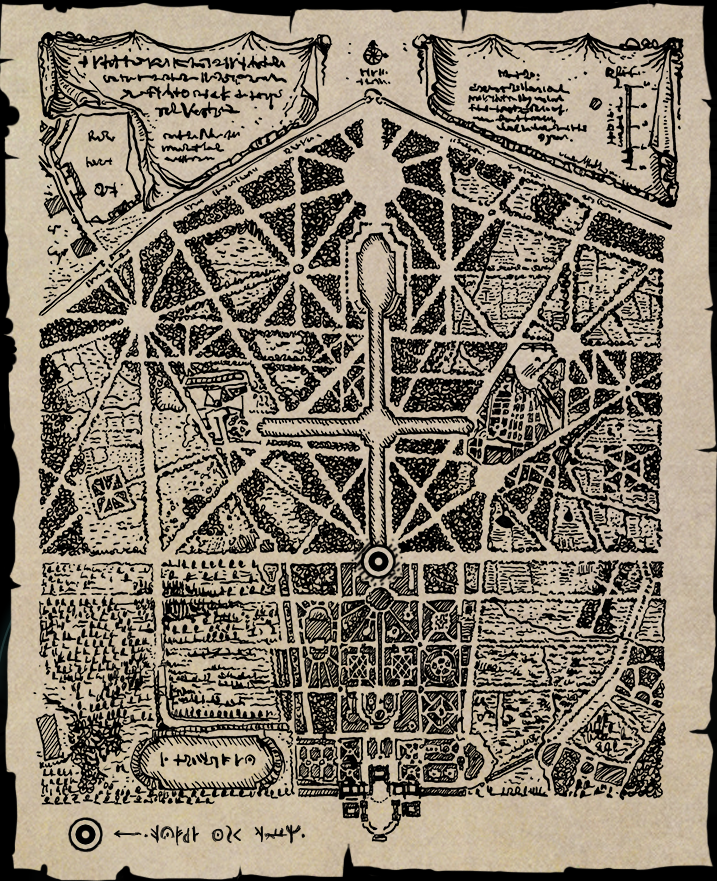
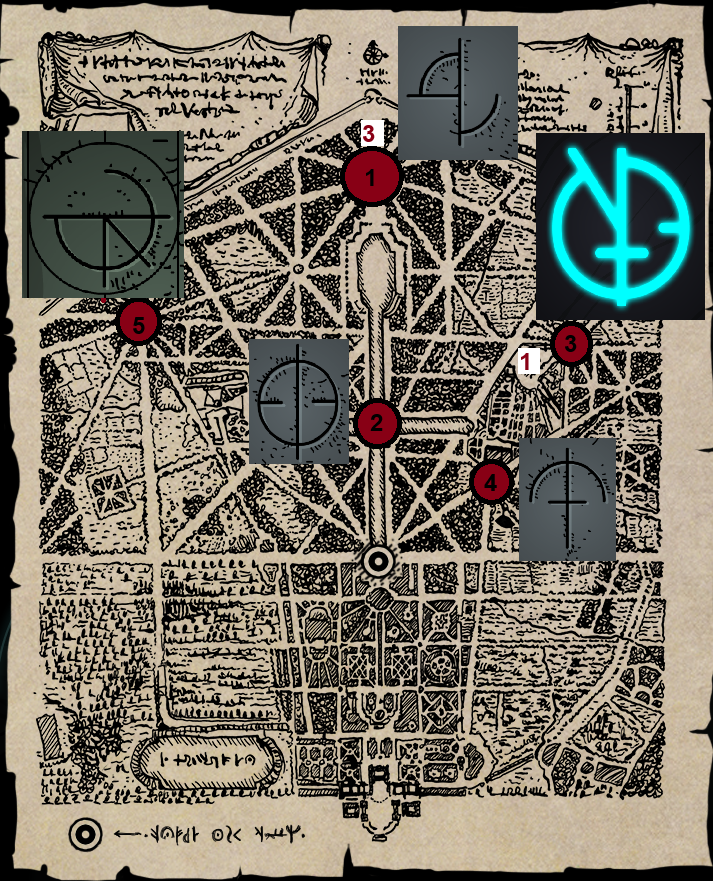
- To your left, there will be a information board with the current location marked on a map. Taking a screenshot of this map is recommended for taking notes on it later.
- Enter Gate 3 to your left. Take a note of the location on your map. To your right, take Control Room Key. Leave.
- In the garden, keep moving right. This area is the Docks. Go down, and to your left. Take Triangle Stone Key. Back out of the Docks. You will see a greeting sign into the Winter Palace. Enter. Use the Karma Portal.
- Go left. You can unblock the door now. Go upstairs. To your right is the control room. Unlock it with Control Room Key. Enter. Pull all the dials down.
- Go all the way towards your left, enter Karma Portal. Take Square Stone Key. Leave.
- Go back to the gates in the South Garden. From now on, these locations will be marked as Gate X in the guide, as done before with Gate 3, ordered 1-2-3-4 from the left.
- Enter Gate 2. Take note of the location on your map. Go all the way left, pick up Stone Grid note. Turn the wheel.
- Go up, push the button. Go down, and up the new ladder. Go up again.
- Take note of the sigil near the gate, on your map, next to Gate 2’s location. This guide will label the next gate as Gate 5. Enter it.
- Note the location of Gate 5 on your map. Go left, and take a close look on the sigil on the leftmost column on your map.
- Go right twice to find a Karma Portal. Enter it. Follow the road right.
- Use Gong Stick on the ladder controls to drop the ladder. There is a sigil on the way, but we don’t know which are this is yet. Move on. The gate map is smashed. We will return later. Exit to the South Garden. This area we were in is actually behind Gate 1.
- Enter Gate 4. Take a note of the location. Take Round Stone Key laying on the tree’s roots. Note that there is a giant tree here. Leave.
Winter Palace
- Move into the Winter Palace. Go all the way to the right.
- Use the Stone Grid notes, and Stone Keys found before to solve the puzzle. Enter.
- Move right into the Observatory. Enter the first door on your right. Take the Transmitter from the ground. Go back.
- Go right, and in. Look into the crack in the wall on your right, and take Monolith Catalyst. Go upstairs. Take note of the chest laying in this area. Go back to the main hall.
- Go right. Take a note of the transmitter controller on the floor for later.
- Go right and enter the room. Go upstairs, and into the Karma Portal. Take Solenoid.
- Go left and take a note of the sigil on the tree onto your map. It is near Gate 4.
- Leave the Karma Portal, and the room. Go right, from the edge of your screen. Pick up Chest Key, and open the chest from before. Take Solenoid.
- Go to the edge of the Observatory. Now take the door instead of moving towards the right edge. Take the note Sequence Order hanging off the rim. This note is very important. Compare your gate numbers with the numbers on this sheet. Take note of these numbers as well on your map. The orders of Gate 3 and Gate 1 are swapped, and the rest are the same.
- Go up. Use Solenoids and the Transmitter on the dish. Leave.
South Garden
- Enter Gate 1. Take note of the sigil on your map, now knowing its spot from the note Sequence Order. Leave.
- Enter Gate 3. Use Monolith Catalyst on the slot to the very right. Take note of the sigil on your map. Leave.
- Your map should look like this now:
Winter Palace
- Go back to the Observatory. Enter the sequence from your map. Turn the dial. You should hear a click.
Docks
- Enter Liz’s lab. Pull the switch on the top left as you enter.
- Move right. There’s another switch. Pull it to open up the way.
- Navigate upwards. There are lore notes around if you want to read them.
- Find your way to the force field generator. Pull the lever to open up the path.
- Go right, up, through the Karma Portal. You can now unlatch the hatch to open up the way from before.
Secrets
- Starting area: From the gong that opens the South Garden gate, move left. Check behind the flowerpot on the right.
- Winter Palace: Upstairs before the control room, there is a crack in the wall. Click the top left side of it to reveal the token.
- South Garden: Gate 1: On a crack inside the slab containing the Karma Portal.
- Winter Palace: Fourth room in the Observatory, counting from the left. Look behind the broken telescope mount, to find the token.
- Docks: Upmost floor, before you leave, go right. Look at the table. It’s behind the front left leg.
Post-game
- Monolith X ||o|||| (Layer 3) : In the Docks, downstairs in Liz’s lab. Use Light Bulb to open up a passage. Before you leave to Chapter 8 – The Plan, you can turn a wheel. This wheel unlocks the secret area. Karma Portal to the next area. Enter the Karma Portal in Layer 3 to reach the next area. Follow the path upstairs to find the Monolith.
Chapter 8 – The Plan
Playthrough
You have followed in the footsteps of Elizabeth, who has escaped from her mobile lab docked to the Winter Palace to avoid Murtaugh’s wrath. A Karma Portal brings you… somewhere. A plan has been mentioned in the previous chapter, which has been lost. Will we be able to follow it through?
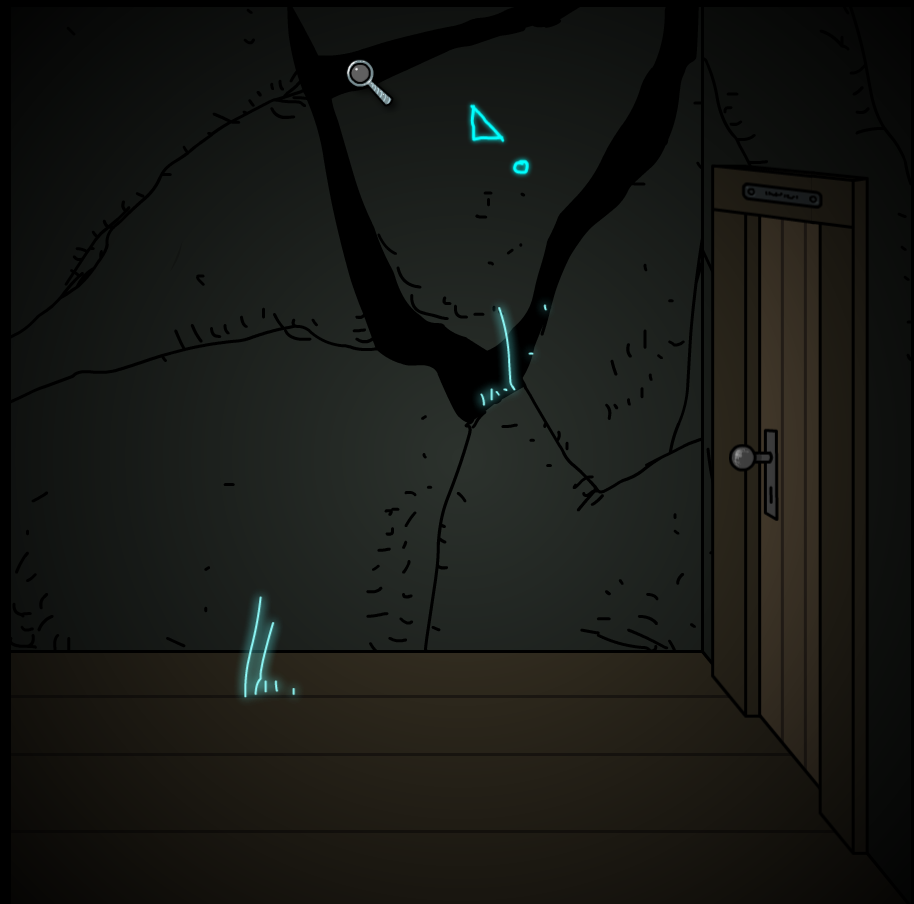
Layer 1
- Go right. Click the yellow beam in the background to move it left. Click the protruding rod below to get Improvised Crowbar.
- Go all the way to the left. Use Improvised Crowbar on the Key. Pick it up.
- Go right. Use Key on the lock, pull the handle, and press the button. Go down.
- Pick up a Stone Sphere.
- Go down. Pull the lever. Whatever did that do?
- Go right. Take the Navigator. You are on Layer 1. Pulling the lever has activated Layer 2. The areas will now be referred to by their Layer coordinates. Immediately go to Layer 2.
Layer 2
- Open all drawer doors you can. Take Small Chest Opener.
- Go right twice. Switch to Layer 1.
Layer 1
- Take Energy Coil.
- Move left, and take note Piece of Pillar Code. Use Small Chest Opener to get Cog Wheel.
- Go right and up. Take Stone Sphere. Switch to Layer 2.
Layer 2
- Take note Piece of Pillar Code.
- Go down and left twice. Switch to Layer 1. You will notice that some areas that are inaccessible can be accessed by switching layers. Some of these moves will be referred to as “jumps” from now on. You have jumped left through Layer 2 in Layer 1.
Layer 1
- Now we need to jump up in Layer 2. Go to the upmost point in Layer 1, and jump through.
Layer 2
- If you have done the jump right, you should see an igloo. Take another Stone Sphere from here.
- Use your Energy Coil on the left, and pull the lever on the right end to unlock Layer 3.
- Switch to Layer 3 from the igloo in Layer 2.
Layer 3
- Go left, use Cog Wheel, and pull the lever.
- Go right twice, and pick up Cube.
- Move down from the tree, pick up Beamer Arm.
- Move down to the floor, go right twice. You will see a clock dial. Switch to Layer 2, and move it into its supposed place.
- Switch back to Layer 3, and take Stone Sphere.
- Use notes Piece of Pillar Code, and Stone Spheres to unlock the ladder. Place Cube in the empty socket. Press it to unlock Layer 4. Switch to Layer 4 immediately.
Layer 4
- You are greeted with the Layer 5 beamer. It is however unavailable. Move down and left.
- Take Drawer Handle.
- Move left, switch to Layer 2. Use Drawer Handle to get Small Mirror. Switch to Layer 4.
- There is a liquid that bars our path. Jump left one step through Layer 1.
- Pull the handle on your right to drain the liquid.
- Go up and take note Wind Rose Code.
- Go up and right. Take Wire.
- Go left and down all the way to the drain arm. Jump right one step through Layer 1. Now we are capable of jumping down to a new location in all layers.
- Switch to Layer 1. Take the Fuse. Switch back to Layer 4.
- Use Fuse on the wall plug.
- Go back to the Layer 5 beamer, and switch it on. Immediately go to Layer 5.
Layer 5
- Go down, and take Beamer Arm from the ground.
- Go left twice. There is an arch with the current number of active Layers. You can use Layer 5 for easy jumps downwards from below the archway.
- Move down below the archway. Switch to Layer 2.
- Pick up Pyramid Cell. Switch back to Layer 5.
- Go up, left, and upwards towards the tip of a pyramid. When you see the stone pyramid with Murtaugh’s signature below, jump towards the right through Layer 1, as if you are going to the igloo in Layer 2. Place the Small Mirror on the pedestal, and the Pyramid Cell to the empty slot. Layer 6 is now unlocked. Immediately go to Layer 6.
Layer 6
- Go left. Use your Beamer Arms and Wire on the beamer. We still need another Beamer Arm to finish the job. Note the beamer spot.
- Go down from the beamer, and right. You will see a lever. Pull it. Your way will be blocked.
- Jump right through any layer. Pick up Pyramid Code. You may have seen the pistons laying around in all layers. We will use the code for these pistons.
- You can also see a barrel of sorts with a lever on its right. Pull it. Switch to Layer 2.
- Move left twice to push the piston down. Switch to Layer 6.
- Move right, pull the lever up. Move back to the barrel. Pull its lever. Switch to Layer 4.
- Go right, push the piston down. Go left, switch to Layer 6.
- Pull the barrel lever.
- Left, Left, Up, Up, Right. Push the piston down. Backtrack to the barrel. Pick up the Car Battery.
- Go right. Pick up Wind Rose Button.
- Go up. Pick up Beamer Arm.
- Backtrack to the beamer. Plug the Car Battery into the bare wires to the left. Attach Beamer Arm to the beamer. Pull the lever to unlock Layer 7. Immediately switch to Layer 7.
Layer 7
- There’s some lore to the left if you want to read it. Move down.
- Jump down through Layer 5. Move right all the way and pick up a Valve.
- Go up and take Stone Button and down.
- Move back left all the way. Use Valve and turn it.
- Jump up through Layer 5. Go up twice and right once. Pick up Hammer.
- Go left and down. Switch to Layer 5, and go below the archway.
- Switch to Layer 2, Layer 6 and Layer 7. Use Pyramid Code to set the piston positions.
- Jump above the archway through Layer 5 to Layer 1. Set the piston position.
- Go to Layer 2, all the way to the right and above. Set the Wind Rose Button to its place.
- Read the note Wind Rose Code upside down. Input code in its upside down form into the puzzle.
- Go down, all the way left, and up. Pick up Catalyst Stone from the receptacle. Go down once, and switch to Layer 7.
- Go right twice and place the Catalyst Stone into the mound to enable… Layer 8? You don’t have a button though…
- Immediately switch to Layer 3.
Remaining Tasks
- Layer 3: Go left once. Set the piston to its position using note Pyramid Code. Switch to Layer 5.
- Go right twice, and up once. Set the piston to its position.
- Go down, left, and up towards the pyramid. Switch to Layer 4, and set the piston to its position.
- Switch to Layer 5. Take Energy Trail. Use it on the archway, and knock the door.
Secrets
- Layer 3: From the upmost position, go to Layer 1 and pull the yellow beam in the background again. Move towards the left in Layer 3 to find the token.
- Layer 3: This is in the area with the clock dial. Click a loose tile on the ground to reveal the token.
- Layer 3: Switch to Layer 5, and go below the archway. Switch to Layer 3. Smash the dome with Hammer. Take the token.
- Layer 5: Place Stone Button into the slot next to the archway. Break the cat statue with Hammer. Push the button. Take the token.
- Layer 6: From the archway in Layer 5, move right twice. Switch to Layer 6. Smash the cracked spots on the pipes with Hammer. Take the token.
Post-game
- Monolith XI ||||o|| (Layer 5) : The secret area is located at an obvious spot. Move left from the archway. Enter tokens and use Karma Portal. The monolith is to your left.
Chapter 9 – The Temple
Playthrough
You have entered the gate in Layer 5 to an area. It seems to be a temple.
- Take your Navigator. Move to the right end. Pick up Brass Rod and use it on the slot. Pull it.
- Move left, and into the door. Go all the way right. Pick up Empty Brass Jug. Leave through the door.
- Go left, fill up the jug with karmic water. Go back into the room.
- Move right twice. Use the jug on the brass bowl. Pick up Cog Wheel.
- Move left and inside. Use the jug. Insert Cog Wheel to the slot on top, pull the lever.
- Go out of the room, and move all the way to the left. Enter the Pyramid.
Pyramid
- Go left twice, pull the ladder release, and go up. Go right and pick Brass Beetle. Go back towards the entrance, and use the beetle on the slot. Pick up Stone Key. Go upstairs.
- Go left, use jug. Pull ladder release, go up.
- Go left, use Stone Key. Go down. Pick up Ladder Rung. Go left.
- You now see the first Navigator-based puzzle. A tag is seen on the wall (|o|||||), meaning Layer 2. Other layers will have different kinds of things. You are free to explore.
- Layer 2, pick up Brass Key. Use it on the slot to the left.
- Take Brass Bowl, and go back towards the point of no seeming return. Use the bowl and jug to create a ladder. Go downstairs.
- Go right twice, and take off the lid from the bowl. Take Brass Sphere and use jug. Take Karmic Seal.
- Go right and take the Chest Key. The sign on the wall points to an inaccessible Layer.
- Left twice, go down into the lower section of the pyramid.
- Go left all the way. Look into the opening. Take Brass Tile.
- Go right past the ceiling of the temple, to a new puzzle.
- The layer information is (o||o||o), meaning you need Layers 1,4,7. Use jug in 4,7, push piston in 1.
- Go right and take a Brass Tile.
- Go left past the temple and enter Lower Left Pyramid below the cage.
Lower Left Pyramid
- Go left twice. Layer 6, place Brass Tiles. Need two more.
- Go left. Take Lever Handle.
- Go right four times. Take Jadeite Tablet. Go left and above.
- Go left. Use Jadeite Tablet on the slot. Go up and take Brass Tile.
- Backtrack upstairs to the upper pyramid area. Go all the way to the top floor, and right. Unlock the chest with Chest Key. Take Brass Tile.
- Get to Lower Left Pyramid , and then left to the Brass Tile slots. Place the remaining pieces. Go down.
- Go left to pick up Masculine Sarcophagus Ornament. Go right three times into a tower, leading downstairs.
- Follow the path down the tower. Pick up a Brass Bowl.
Lower Right Pyramid
- Go back to the caged entrance of Lower Left Pyramid. Go all the way right inside the temple. Use the bowl, and the jug to make a bridge.
- Go towards the right, and downstairs when you can into Lower Right Pyramid. Go all the way right and use Lever Handle on the slot. Pull it, and go back upstairs.
- Go right, up and left. Take Feminine Sarcophagus Ornament. Go back to Lower Right Pyramid.
- Go left inside the tower, and follow the path downstairs into the Temple.
The Temple
- Go left all the way. Pick up a Ritual Brass Bowl.
- Go right, and down. Follow the path out of the tunnel. You will find Murtaugh’s Tomb.
- Open the jug to your right and use your own jug to get another Karmic Seal.
- Head into the tomb. Use your jug on the statue’s bowl on the right. Take Gate Key.
- Use the Masculine Sarcophagus Ornament on the tomb to reveal Murtaugh’s Seal. Take it.
- Backtrack to The Temple entrance from upstairs. Go far right. Use the Gate Key.
- Go right until you find Elizabeth’s Tomb. Go in. Use the Brass Sphere to your left. Enter the Karma Portal to the tip of the pyramid. Take Climbing Rope.
- Use the Feminine Sarcophagus Ornament on the tomb to reveal Elizabeth’s Seal. Take it.
- You can now use Elizabeth’s and Murtaugh’s Seals on the locks near The Temple entrance. It is towards the right from the stairs. A tunnel to the left will be revealed beneath the statue.
- Lower Right Pyramid: Use Karmic Seals on the “broken beyond readability” sign, through Layer 2 and 4 in order. Layer 6, take Brass Valve.
- Go down through the tunnel. Move left to find a Brass Scale.
- Move right. Use Brass Valve and Climbing Rope to find a way down. Note that you can’t go back from the area below unless you have finished the chapter.
- Move to the right, towards the gray stone. Layer 3, Karma Portal into the pinnace from Chapter 5. Pull the lever, take Energy Crystalline Shards.
- Move left, slot the shards in Layer 2,4,6 (|o|o|o|).
- Move left, take the button. You can now use Layer 8. Switch to Layer 8. Move all the way left. Push the button.
Secrets
- Pyramid: After building the bridge towards Lower Right Pyramid, move right twice. There is a smashed label on the wall. Layer 4, and use Ladder Rung on the slot to get a token. This is softlocked if you use the rung in a previous area.
- Pyramid: Ring the bells in the towers in Lower Left Pyramid and Lower Right Pyramid on the way down. Go back to the area where the temple’s roof goes through the floor. Go right to find the statue with two karma earrings, and a token inside.
- The Temple: Go all the way to the right, and push the button. Go towards Murtaugh’s Tomb, don’t enter, go to your left. The slot below the statue will reveal a token.
- The Temple: Use Ritual Brass Bowl in Lower Right Pyramid. Through the tunnel to Murtaugh’s Tomb, go upstairs, instead of through and out. Find a token there.
- The Temple: After getting Brass Scale, use it upstairs from Lower Right Pyramid, to the far right, on a device. Push the scale to the left, and return to The Temple. Move rightwards to find one of the grates open. Push the rod on the wall outwards. Tip the scale right, and return to the same spot. Now enter the opened grate in front of Elizabeth’s Tomb. Take the token.
Post-game
- Monolith XII ||||o|| (Layer 5) : Switch to Layer 2,4, or 6. Take an Energy Crystalline Shard from the slot. Slot it back into Layer 8. A Karma Portal will take you back to The Temple. Lower Right Pyramid, go right to find a brass key where you used the Karmic Seals. Go back to the Pyramid, until you reach the lowest red level. Go right immediately towards the area, previously in an unreachable Layer (8). Use Brass Key, enter the area. Use your tokens on the statue. A Karma Portal will open to a circular room. Find the Monolith there.
Chapter 10 – The Exit (Part 1)
Playthrough – Part 1
You have ascended to the eighth layer. Now you can move in frozen time to see the light. Or, so does Murtaugh suggest. You end up in an area thoroughly messed up by Karma Portals. Let’s see where it leads us.
Note: Most of the area names in this guide follow “official” naming schemes from the Submachine Wiki.
Here’s a full list of the zone names, associated with the Binary Teleporter, or Karma Portals, always starting with Binary Teleporter location names if possible . Spoilers at your own risk!
000 Northern Garden Docks, Mossy Ship, Angel Ruins, The Lighthouse, Infernal Basement, The Basement, Lighthouse Tower
001 Iron Pyramid, Citric Acid Room, The Root
010 Resin Mine, The Lab
011 SHIVA Access, Winter Palace
100 Royal Storage Facility, The Loop
101 Stabilizer Bay, Rusty Docks
110 Karma Studies Facility, The Cliffs
111 Meditation Temple, The Temple
Note: There are some abbreviations in this guide:
- LC: Light Crown
- KP: Karma Portal
- BT: Binary Teleporter
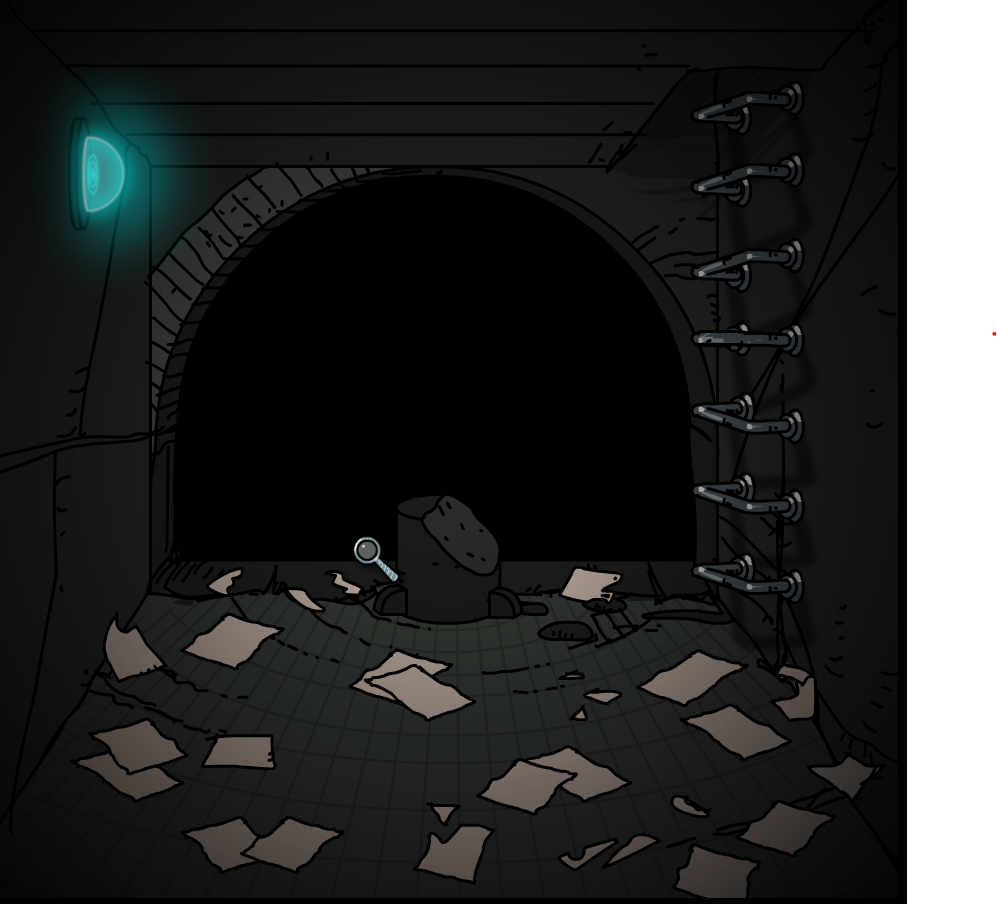
Northern Garden Docks (000)
- Go right across the archway. Pass through. Note that there is an anchor on Dock 3.
- Go up the ladder, when you find it. Take Light Sphere.
- Go downstairs. Further downstairs is a power plug we can’t use yet. Go right. There’s a blue glimmer that you can mouse over. These are going to be relevant later. For convenience in this guide, they are called Blinks. Note the Blink here. Go right.
- Use the Light Sphere on the Light Crown. Light Crowns are common in this game and are enabled by Light Spheres. Make sure to remember them.
- Go upstairs, and left. Pull the lever for Dock 3. Back out through the LC.
- Go left towards the ladder. Take Ship ID number.
- Use the Light Crown again. Go upstairs and far right. Use the Ship ID number on the device. Take Bottle Fuse.
- Go back out through the Light Crown. Go left twice, and down. Use the Bottle Fuse.
- Move into Mossy Ship (000).
Mossy Ship (000)
- Left, Let, Up, Up, Right. Take Hatch Valve. Backtrack.
- Right, Up, Up, Left. Take Ladder Piston. Right, Right.
- Use Hatch Valve. Right, Right, Karma Portal into Angel Ruins (000).
Angel Ruins (000)
- Take off the lid of the hatch. Use the ladder. Go down. Unblock the door. Go through.
- Go right. You will find the Binary Teleporter.
- Note the Blink on the far right end.
- Note the KP downstairs from the Blink area.
Iron Pyramid (001)
- Go left, down. Note the Glyph near the Anubis head. Use the Anubis head.
- Note Glyph. Go upstairs, twice. Note Glyph. Go far left. Note Glyph.
- Backtrack your way to the BT. Go right twice. The Glyphs you have found can be inserted in any order. They will always be unique choices. When you’re done, the eye will glow.
- Go upstairs, and far left. Take the Cog Wheel. Go far downstairs from the right side. Use Cog Wheel. Go downstairs. KP into Citric Acid Room (001).
Citric Acid Room (001)
- Take Light Sphere from the coil plug, then a Cog Wheel from the acid bath. Go right.
- Pull the sheet metal on the right out of your way. Pull the piston out.
- Go upstairs. KP available for The Root (001).
Resin Mine (010)
- Go right twice, and down. Take Range Confirmator and back up.
- Go far left. Take Drill Clamp Handle. Go right twice, and use the handle on the drill clamp. Pull the other handle as well.
- Go left. Pull the lever. Go right. Pull the lever.
- Down, Down, Down, Left. Use Range Confirmator.
- Right, Right. Open the airlock. Right, Right. Take Airlock Handle.
- Left all the way. Use handle on airlock. Get inside. Take Range Confirmator, and go left to find note Rotary Symbol.
- Right [x4]. Up. Plug in Range Confirmator. Leave the mines.
- Go right all the way, follow the tunnel to its end. Pull lever. Go back into the mines. Follow the path all the way down and right, to the KP to The Lab (010).
The Lab (010)
- Go right. Take Force Field Plasma Canister. Go right, down, left.
- LC in. Take Ladder Step. To your far right is a scanner with an ashtray next to it.
Royal Storage Facility (100)
This area features cubic rooms, and anomalies. Be careful and try to be exhaustive in your search movements.
- Go down and left into No.32/1. You will find: Vector Finder, Karma Fuse. There is a place to slot your Karma Fuses. Leave.
- Go right, downstairs into No.33/1. You will find: Loop Stabilizer, Karma Fuse. Leave.
- Go right. Enter No.33/2. There’s a KP to Loop (100) here, but we need Vector Finders to use it.
- Collect Karma Fuse. Leave.
- Go right. Enter No.33/3. Go left from entrance to find a dial. Switch to 1.
- Go right from entrance to find a Boiler. They are not boilers but they look like boilers.
- From the Boiler, go up to find a switch labeled 1. Flip it. Backtrack to entrance.
- Go left and switch dial to 2.
- Go to Boiler, and right to find switch 2. Flip it.
- Go left and switch dial to 3.
- Go to Boiler, and down to find switch 3. Flip it. Go left to the dial. Flip it to the sigil.
- Go down twice to find Loop Stabilizer. Backtrack to entrance.
- Go left, and up twice. Take the Neodymium Magnet on a String. Leave.
- Go up to No.33/4. Enter.
- Right, Right, Down. Flip switch. Backtrack to entrance.
- Left, Left. Pick up Karma Fuse, Up. Flip switch. Backtrack to entrance.
- Down. Take Loop Stabilizer. Right, Right. Pick up note Rotary Symbol. Leave.
- Back to No.32/1. Find the slots for Karma Fuses. Plug them in. Find the Loop Stabilizer that is given in return. Leave.
- Back to No.33/2. Left. Use Loop Stabilizers on KP. KP now available: Loop (100).
Stabilizer Bay (101)
- Note the ox statue to your left. You will come here later.
- Use the piston to your right. Go up. Use Ladder Piston. Push it.
- Go left twice. Take Vector Finder.
- Go right twice. Go up, and right. Take note Rotary Symbol.
- Go right, KP into Rusty Docks (101).
Rusty Docks (101)
- Take Coil. Go right.
- Assemble and use LC. Go right. Open hatch to get Insulator Cap. Go up the ladder to get Cog Wheel. LC back.
- Go down. You’ll need 3 Ladder Steps to go further.
SHIVA Access (011)
- Go right, and inside through the tear in the pipe. Go down.
- Use Insulator Cap on the bottom pad. Set the wheel, such that only the light on the left is green.
- Go right into the SHIVA room.
- Take a Plasma Charge from your left.
- Now open the way to the left. KP to Winter Palace (011).
Winter Palace (011)
- Blink on the right side, after you come downstairs.
- Check first door to your left. Take Telescope Tube. Leave.
- Go left. Take Stone Grape from the device. Enter the door ahead of you.
- Take Explorer’s Skull. Leave.
- Go left twice. Enter. Take Telescope Head. Leave.
Chapter 10 – The Exit (Part 2)
Playthrough – Part 2
Karma Studies Facility (110)
- Go left all the way. Use Force Field Plasma Canister to project a bridge. Note Blink.
- Go right twice. Enter room. Go downstairs. Pick up AAA Battery.
- Go right. Take Vector Finder. Leave.
- Go right twice. Enter. Remove chair. Enter. Go left. Enter. Note Boiler on the right side.
- Go far left. Take Vector Finder from the cupboard eye below the desk.
- Place Explorer’s Skull on desk. Look through the lens, take Explorer’s Chip. Leave.
- Go right. Go down and right. Enter.
- Go left and enter. Note the Pearlbox and ox statue. Leave.
- Right twice, enter. Go right, take Vector Finder. Leave.
- Left, enter. Assemble KP using Vector Finders to The Cliffs (110).
The Cliffs (110)
- Go left (up), left. Unbolt both grates. Go left, take note Rotary Symbol. Go right.
- Enter left grate. Up, left. Take Plasma Charge. Right, Right, Up. Note Boiler.
- Down, Left, Down, Right. Press button. Right, take Blockade Removal Tool. Leave.
- Enter right grate. Go right, use Blockade Removal Tool. Up, left, take Plasma Charge.
- To the far right, there is a wheel. Turn it such that it shows Up,Right.
- Go back to the junction, and right. Go down, take Ladder Step. Go up twice, turn wheel such that it is Right,Down.
- Go down from the junction. Take Karma Vial from the left side, and Hatch Valve from the right.
- Leave. To do this, you need to set the valves to lead you to a neighboring room, in the counterclockwise direction.
- Go back towards the KP. Then move far right and up. Use Hatch Valve, enter.
- Use Plasma Charges on the device, and press the button. Go right. Enable SHIVA emergency evacuation protocol. Leave.
Meditation Temple (111)
- Go far right, take Ladder Step.
- Use ladder on the left side. Note Boiler, and a device.
Rusty Docks (101)
- Use Ladder Steps. Go down.
- Go far left to get Root Path Finder. Go right to find Light Sphere.
- We are done here for good.
Meditation Temple (111)
- Use ladder on the right side. Assemble and use LC. Take Meditation Glyph. Socket it into the KP on the left side of the BT. Take the KP to The Temple (111).
The Temple (111)
- Go left and upstairs. Use Coil to get Portal Stabilizer from the left side.
- We are done here for good.
SHIVA Access (110)
- SHIVA is under emergency evacuation, so you will need to use the wheel to navigate to it.
- Go down. Go down the chain. Take Cog Wheel.
- We are done in this area for good, but the KP is needed for Winter Palace (110).
The Root (001)
- Use Root Path Finder to get Data Tape.
- We are done with The Root (001) and Citric Acid Room (001) for good.
Iron Pyramid (001)
- Use the Cog Wheels on the unassembled ladder controller to your left. Move the ladder down. Use the Anubis statue on the other side to get to the ladder. Go down the ladder.
- Take Portal Stabilizer Battery. Go back up.
- Go right and use Karma Vial. Press the buttons to reveal a Stone Grape (mine was on button 3).
- We are now done with the entire (001) line of areas.
Stabilizer Bay (101)
- Use your Stone Grapes on the ox statue. We will navigate to Karma Studies Facility (110) later to get our reward.
- Go right, up the ladder, and left. Use your Data Tape on the empty slot.
- We are now done with the entire (101) line of areas.
Winter Palace (011)
- Go to the leftmost door. Enter. Take Portal Stabilizer.
Karma Studies Facility (110)
- Backtrack to the area with the ox statue. Take Portal Stabilizer.
Angel Ruins (000)
- Go to the KP. Use Portal Stabilizers and Portal Stabilizer Battery on the KP. Push the handle to activate.
- KP to Lighthouse (000).
Lighthouse (000)
- Right, down, left. Take Light Sphere.
- Go all the way up. Find the LC, set it up, and cross.
- Go down, right. Note Pearlbox.
- Left, Left. Use Rotary Symbols to activate device in Meditation Temple (111). The symbols are unique, so the order is not important.
- Backtrack to Meditation Temple (111) to get Power Relay, and back to this very spot.
- Right, Down. You will see where the Power Relay goes.
- LC back, go down, and right. Pull the lever. Backtrack again.
- Go downstairs to find a KP to Infernal Basement (000). We are not quite there yet.
- We are in a circular room. Note Blink to the right. Enter the elevator. Press the button.
Infernal Basement (000)
- Right, pick up Unlock Lever, Up. Note the clock dial spot.
- Left, pull down lever.
- Down, Left, Left. Move stone wheel to the clock dial spot.
- Return to Tile Lock. Right, Down. Take Unlock Lever.
- Down. Pull lever.
- Right. Note shrine location. Take Stone Weight.
- From Tile Lock, Left, Down. Use Stone Weight, to get Unlock Lever.
- From Tile Lock, Right, Up, Right. Take Unlock Lever.
- Left, Down, Down, Right. Use Unlock Levers. KP to The Basement (000).
The Basement (000)
- Down, Left. Pick up 4 Electrical Fuses.
- Up, Left, Down, Down, Right. Pick up 4 Stone Cubes.
- Left, Up, Up, Up. You will see Tile Lock, which is KP to Angel Ruins (000). Don’t go yet.
- Left. Take Valve. Left. Take 2 Pearls. We are looting this place clean.
- From Tile Lock, Right, Up, Up. Pick up Light Sphere.
- Down, Right. Take Spoon!
- KP back.
Angel Ruins (000)
- Unblock the door, and go right. Note the Boiler location. This is where we’ll come back when we are done. Find all Boiler locations from the guide:
- Royal Storage Facility (100): No.33/3.
- Karma Studies Facility (110): Where you receive Explorer’s Chip.
- Meditation Temple (111): Down the left ladder. Hard to miss.
- The Cliffs (110): In the left sewer grate.
- Place Electrical Fuse in all Boiler locations. While you are up to it, you can also do the following:
- The Loop (100): Use Valve on the large circular contraption. Turn it to move the light. The light must reach either 3 or 9 o’clock positions.
- Navigate around to find the switches with the blue megaphones on them. You need to activate two, by using the valve as well.
- When you are done, you will eventually see an unlocked safe with a Plasma Coil inside. Take it. Leave. We are now (happily) done with the (100) and (111) lines of areas.
- Now take the Karma Stabilizer from the main Boiler in Angel Ruins (000).
- Take your stabilizer to The Lab (010). Use Explorer’s Chip on the ashtray, press the button. Go right.
- Charge up your stabilizer. Leave. We are now done with the (010) line of areas.
Chapter 10 – The Exit (Part 3)
Playthrough – Part 3
Northern Garden Docks (000)
Back to square one. We now have a stabilizer, so we need to go through many areas again.
- Right before the LC spot, stabilize the Blink. KP through to get Tile D.
- LC through, go upstairs, right, downstairs, stabilize. Go left. Note the Tile Lock.
Angel Ruins (000)
- Go to BT. Go right thrice to get to a Blink. Stabilize. Get Tile B.
- KP to The Basement (000). KP from there to Infernal Lighthouse (000). You can also navigate through The Lighthouse (000).
- Stabilize the Blink that lies three steps to the right from the KP in the painting. Take Tile C.
Winter Palace (011)
- Stabilize the Blink to the far right. Move across, get to the KP, and pick up a Plasma Coil. We are now done with the (011) line areas.
Karma Studies Facility (110)
- Stabilize the Blink to the far left. Move across, get to the KP, and pick up Tile A.
North Garden Docks (000)
- Backtrack to the Tile Lock. Open it with Tiles.
- Enter the room. Go left. Insert Plasma Coils, and turn on the switch.
- Enter the final area, Lighthouse Tower (000).
Lighthouse Tower (000)
- Right, up. Take ID Card and Fuse from the slots they are placed into. Do not use the lantern. It will send you to the Loop (100), as it has in the ending of Chapter 2 – The Lighthouse. If you have taken the items, it will be disabled.
The Cliffs (110)
- The final detour begins. Use Fuse on the receptacle that you may have passed near multiple times. Take Portable Light Crown Converter.
Mossy Ship (000)
- One final stop before the lighthouse tower. We will need to get something from the top of the ship. Get in the ship, navigate upwards (From the KP, it’s downwards, then at an intersection, take the upper leading tube up).
- Use ID Card to release the ladder. Go up.
- Take Portable Light Crown.
Lighthouse Tower (000)
- Go back to the lantern area.
- Go right to where you took the coil from.
- Place Portable Light Crown Converter into the socket.
- Place Portable Light Crown into the socket.
- Use Light Sphere on the Light Crown and move across to end the game.
Secrets
- Royal Storage Facility (100): No.32/1, on the upper right corner in the wall where you receive the Loop Stabilizer. The token blends in with the background.
- Winter Palace (011): Use the Telescope Head and Telescope Tube to assemble a telescope in the second room from the left. Look into it. A token will drop afterwards.
- Infernal Basement (000): Use Spoon on the shrine. Go ahead, you have been waiting for this.
- Karma Studies Facility (110), and Lighthouse (000): Navigate to Pearlboxes. Use Pearl on each box. Get tokens.
- Karma Studies Facility (110): Stabilize the Blink at the far right end. Pick up the token.
- Northern Garden Docks (000): The very beginning of the game. Use stabilizer on Blink, KP through to token.
- Angel Ruins (000): From where you came with the ladder, use the magnet in the hole. The token will be pulled out.
- Loop (100): The Loop is anomalous in nature. Randomly move around until you find the smashed panel. Click a screw on it to loosen the lid. Get token.
- The Temple (111): To the far right, in the resin. Hard to spot, but not if you are looking.
Post-game
- Monolith XIII : The Cliffs (110): You need to first unlock the S3C area by inserting AAA Battery into the associated slot in the North Garden Docks (000). The slot is near the top of the ship (the area to the left where you were asked to insert an ID card). In The Cliffs (100), this location is in the hatch, near the switch to the SHIVA emergency evacuation protocol. Go right, and enter the door S3C. Insert tokens along the way, and enter the KP. The Monolith is nearby.
- Monolith XIV : Infernal Basement (000): Another Blink is in this area. It’s in the machine with the hoops. Stabilize it to reveal a KP. Enter, and use Stone Cubes wherever they are needed. Go through the new KP to find the Monolith.