This guide will show you how to unlock the Storm Master Subclass of the Wizard Class in Card Quest. While this Subclass can be acquired relatively easily, the final battle requires some luck. The guide will provide detailed information on how to build your character to complete the unlock, as well as how to deal with particular monsters you will encounter.
Setup for Unlocking the Storm Master Subclass
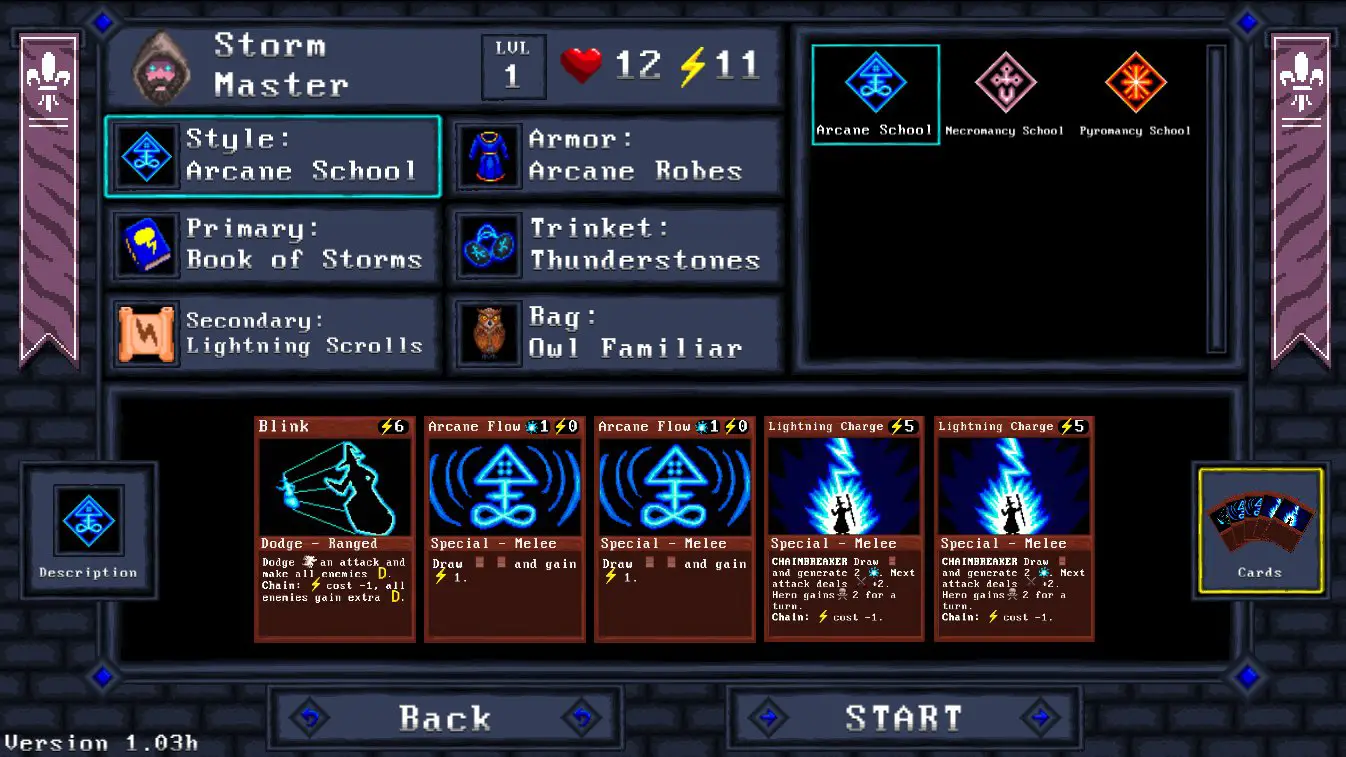
Unlocking the Storm Master Subclass in Card Quest is a relatively straightforward process, with the exception of one encounter that may pose some difficulty. To unlock this subclass, players must complete the Dwarven Mountains level, although attempting it from the beginning is not recommended due to the high degree of luck involved in facing the final boss. Unfortunately, using the Dragon Whistle as a Trinket to save time is not possible, so players will likely experience several losses before successfully unlocking the subclass. This is a flaw in the build, despite it providing the best odds. The image above provides a setup that players should use, while below is an explanation of why these specific items should be chosen over others and the basics of the card function. Assuming players are already familiar with how the cards work, this guide will not provide as much detail as the Electromistic build for the Wizard Class (which can be found in a separate guide).
Style: Arcane School

This is the Style required for this unlock. Blink is extremely useful for avoiding any direct attack (not indirect like MIASMA), but it comes at a high cost. Try to always use it at the reduced STAMINA rate in a CHAIN because the DISTANT effect lasts 2 full turns. It is best to have 1 stored for defense when the time comes. Arcane Flow provides a small STAMINA increase and 2-card draw for 1 ARCANE CHARGE. Note it initiates a CHAIN when used. Lightning Charge is a blessing and a curse. If you have a STAMINA regeneration card on hand, then it can be safely used without losing too much STAMINA. Inner Strength, in fact, will replace it entirely or leave you 1 STAMINA point up depending on CHAIN effects. The real benefit of Lightning Charge is that it charges your Wizard for 2 damage. Since it can be stacked you can wipe out whole lines of weaker monsters in a single defensive phase. But, you need to be careful of using it because it is a CHAINBREAKER and its higher STAMINA cost will drain your reserves quickly.
Primary: Book of Storms

You could also use Book of Lightning here but don’t. The problem is, other than the ultra-powerful card Zap, its primary attacks can be dodged. Book of Storms, however, has primary attacks that are UNDODGEABLE and you need this because you need to strike first. Chainlightning is of great benefit because even outside of a CHAIN it draws 1 card and always hits its target, including 2 random ones. This enables a whittling effect on monster HEALTH. Lightning Strike provides fairly heavy damage, but the preferred way to use it for this unlock, especially against monsters with higher HEALTH, is outside of a CHAIN. Use a CHAINBREAKER before another Lightning Strike. The reason for this is it will STUN most targets it strikes and this enables you to focus defense on monsters immune to STUN, saving ARCANE CHARGES and STAMINA simultaneously. Storm Pulse usually does not deal enough damage to make it matter, but in a CHAIN it costs 0 STAMINA and draws 1 card. Even if damage is minor or nonexistent, including DISTANT monsters, it will generate 2 ARCANE CHARGES along with a card in a CHAIN. This keeps ARCANE CHARGES and card-draw rates high. Lightning Strike increases its damage, but remember it’s a CHAINBREAKER.
Secondary: Lightning Scrolls
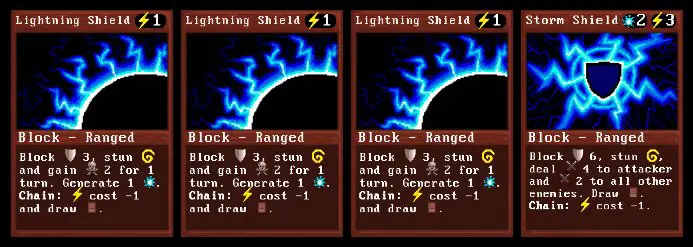
Unfortunately you have to utilize this Secondary. Lightning Shield has a low cost, 0 STAMINA when in a CHAIN, but it only protects against 3 damage and for enemies like the dragons that deal 4 damage or more or have aftereffects like BURN, you’ll lose HEALTH faster than you can recover over time. Storm Shield, however, is a saving grace of this otherwise weak Secondary. It will block the strongest of attacks and it attacks all other enemies unless they have active DODGE. With STUN to its primary target, this is a great benefit at a low ARCANE CHARGE and STAMINA cost. Unfortunately, this card appears more rarely and you can only have 1 on-hand. Therefore, have Blink also ready unless you know the damage you’ll receive is low, then use Lightning Shield. But you need to be keenly aware of monster damage before you make this decision.
Armor: Arcane Robes

This Armor is required to unlock the Storm Master subclass. It’s a must for any electrical build, in my opinion. They’re quite good, providing 2 extra HEALTH and STAMINA to your base build naturally, along with a generation of 2 ARCANE CHARGES every turn. When used it provides 3 ARCANE CHARGES and 2 STAMINA and only needs 1 encounter to recharge. You’ll likely use it every encounter. Note they are also a CHAINBREAKER.
Trinket: Thunderstones

The Storm Ring could also be used as a Trinket but it has less benefit. The Thunderstones provide 2 ARCANE CHARGES at the start of every encounter, 2 ARCANE CHARGES and STAMINA when used, 2 extra damage, and can be used 3 times. They require only 1 encounter per recharge and initiate a CHAIN, also note.
Bag: Owl Familiar

Though the Crow Familiar is also quite useful, the 1 ARCANE CHARGE and 2-card draw provided by the Owl Familiar is of more benefit to this unlock. It will save you a number of times and enabling a quicker wiping of enemies for encounters. Also note it initiates a CHAIN when used. 1 use per encounter and 1 encounter for a full recharge. You’ll use it every encounter, trust me.
Max Level PerksI’ve tried different layouts of perks for this unlock, but the following, in order of selection, is what I found works the best. Choose the following perks as you level, starting from those provided at Round 4: Arcane Affinity (increase ARCANE CHARGES by 2), Spell Preparation (first 4 spells cost -1 STAMINA), Arcane Expertise (start battles with 1 ARCANE CHARGE), Arcane Affinity again, Clarity of Mind (increase STAMINA by 1), Spell Preparation again, Arcane Mastery (gain 1 ARCANE CHARGE every turn), Arcane Expertise again, and Magical Vitality. You might wonder why I chose that final one only a single time, but here’s the deal. You need to generally avoid taking
anydamage if you get hit enough it won’t matter how much HEALTH you have anyway, so these perks increase the build’s attack and defense capabilities. Now that you understand the basic setup I will go through the recommended path with full explanation of monsters you can encounter.
First Level: Spider Caves
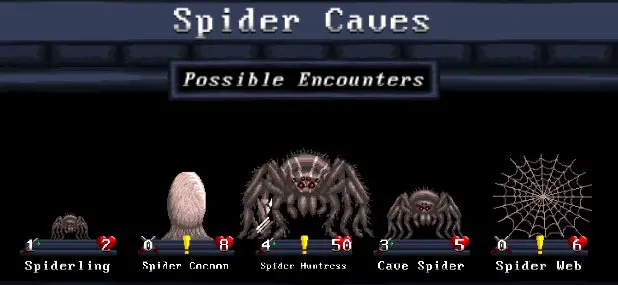
The Spider Caves you should find the easiest Level to start, don’t choose one of the other 2. The enemies are easy to wipe out quickly and the boss is rather simple. You want to make the route to Storm Master as easy as possible for inevitable losses to the final boss, so expect to repeat the Spider Caves several times until you’re successful. I’ve presented here explanations of every possible appearance.
Cave Spider

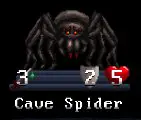
Extremely common. They have 5 HEATH and deal POISON. They appear frequently as HIDDEN ENEMIES on almost every Round. If you’re charged up with Lightning Charge when defending, they’ll be wiped out quickly. The appear in two different colors, as shown above, but there is no difference. The ARMOR above is due to Spider Webs (see separate entry below).
Cursed Rune Dwarf

Consider him an enemy. The Cursed Rune Dwarf is another rare appearance from a Spider Cocoon (see separate entry below), but he does not provide any benefit. Instead, if you don’t kill him, he will force a Rune upon you that has negative effects. Don’t waste time to see what it is.
Dwarven Brewer

This is a rare drop from a Spider Cocoon (see separate entry below), that provides a great one-use item. If you do not hit him, at all, before all the monsters are killed when he appears, the Dwarven Brewer will provide a Whiskey Flask. It provides you with 10 STAMINA regeneration when used. The drunken effect you won’t need to worry about.
Dwarven Miner

The most common drop from a Spider Cocoon (see separate entry below). The Dwarven Miner is a monster you find throughout the Levels of the Dwarven Moutains. They have 4 HEALTH and attack for 2. Why in the world they’d want to attack you after being released from a Spider Cocoon is a mystery, but treat them as you would any other monster.
Giant Cave Spider

This is a stronger version of the Cave Spider (see separate entry above). It deals more damage and has more HEALTH. They should be primary targets in most encounters. Note that the image shown here has ARMOR, but that’s only due to the Spider Webs (see separate entry).
Goblin Slave

One of the most common drops from a Spider Cocoon (see separate entry below), the Goblin Slave has minimal HEALTH and does minimal damage. The only thing to note about them is if you don’t kill them with the first hit, they will go DISTANT, but this just delays the inevitable.
Harpy Hatchling

A common drop from a Spider Cocoon (see separate entry below). The Harpy Hatchling has FURY (can attack twice) and POISON, but their HEALTH is low.
Healing Mushrooms

This is not the same thing as the Healing Mushroom provided by the Thankful Dwarf (see separate entry below) and a rare occurrence, as I found. For 1 Round you may find Healing Mushrooms on the ground among the rest of the monsters. You can strike them at any time to gather them. Each Healing Mushroom regenerates 1 HEALTH.
Huge Giant Cave Spider

An extremely rare occurrence in Round 4. The Huge Giant Cave Spider is just an over-powered Giant Cave Spider (see separate entry above) when it comes down to it, but it is immune to STUN so be aware of that. It provides no special rewards or anything else.
Spider Cocoon
These appear in a few of the Rounds in the Spider Caves. They’ll spawn Spiderlings (see separate entry below) if not destroyed in 1 turn provided there’s enough space for the them to fit in on-screen. Within each Spider Cocoon is a monster, sometimes one that provides some benefit to you.
Spider Huntress
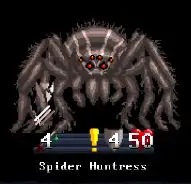
This is the boss. The Spider Huntress can do serious damage if you’re not careful. She has POISON but also FURY (can attack twice). When the battle begins she has initiative, so if you don’t have Blink, use a Mulligan until you get it. If you don’t, you just got unlucky and are about to get leveled. After you avoided her attack, focus on the Spider Webs (see separate entry below). She will spawn more of these, as well as Cave Spiders (see separate entry above) and Spiderlings (see separate entry below) when she reaches certain reductions in HEALTH. These won’t cause any problem. Once you get past her initiative, it’s short work of her HEALTH over time as long as you keep her DISTANT, which will also affect other active targets. If she spawns them while already DISTANT, however, they will be in front, but should never pose much danger. As long as you keep the Spider Huntress away this fight is easy. Once you beat her, it’s on to the next Level.
Spider Web

These should be your primary targets for every Round where they appear. The Spider Web does nothing except provide 1 point of ARMOR per monster. The more Spider Webs, the more ARMOR, so wipe them out immediately to make your attacks stronger.
Spiderling

These deal minimal damage but can POISON, please note. If you have a line of them a single Lightning Charge before your defensive phase will wipe them all out. They pose no threat at all but do spawn from Spider Cocoons regularly (see separate entry above).
Thankful Dwarf

This is an uncommon drop from a Spider Cocoon (see separate entry above). He only provides a single Healing Mushroom (see separate entry above) if you don’t hit him, which heals 1 HEALTH, but it’s free so try to get it.
Thankful Goblin

As common as the Thankful Dwarf (see separate entry above), but the mushrooms they give you are actually fake and have POISON, so just kill him.
White Cave Spider

Same as a regular Cave Spider (see separate entry above), but with 1 less HEALTH. Note this is not a different skin design of the Cave Spider but a different monster, technically.
Second Level: Fallen City

This is the next Level I recommend because the other two choices provide too much risk due to the potential for DISTANT and FIRE damage. The Fallen City is almost like the Spider Caves in many ways, except most of the monsters have more ARMOR naturally. As in the previous section of this guide I will describe all the monsters in alphabetical order and how you should deal with them. The boss in this case is more difficult, but easy if you keep him DISTANT like the Spider Huntress. After you complete the Fallen City you also have the option of purchasing Runes. I’ve placed that at the bottom of this section to show you what’s offered, because they’ll help for the final boss.
Acid Mushroom

This is the same enemy you face in the Mushroom Caves in the Dwarven Mountains. They pose little threat with the exception that, if not killed in one hit, they will deal an instant 2 points of damage to you and other targets near them. As such, be sure you’re killing them immediately when they’re struck. Chainlightning could hit them and deal less damage, leading to an attack if they’re not DISTANT.
Cave Spider
These are the exact same monsters you faced in the Spider Caves. Treat them the same. They typically appear only as HIDDEN ENEMIES or can be summoned for 1 turn during the boss battle (The Cursed One, see separate entry below) or by the Dwarven Spider Masters (see separate entry below).
Cursed One, The

The Cursed One is the boss of the Fallen City. Keep him DISTANT. This is more critical here because he has DODGE and FURY. Luckily, your primary attacks with this build ignore DODGE, but it’s best to keep him away. As you slowly waste the other targets during the battle, you’ll eventually focus on him. His high ARMOR and slight regeneration make it slow, but it will come in time. Note that at 40 HEALTH he’ll summon 7 Fallen Dwarfs (see separate entry below) and at 20 7 Cave Spiders (see separate entry above). The Fallen Dwarfs could pose a challenge to you if you don’t get the right cards, but I only had this happen on one attempt at completing the unlock, so in most cases you won’t have to worry. Once all of his adds are kill and only The Cursed One remains, attack him until he’s dead. A good rule is to have Lightning Shield ready for his attack phase because when DISTANT he uses the “Black Curse,” essentially a form of POISON attack. Lightning Shield will block it entirely, though he cannot be affected by STUN. Once you beat him it’s on to the hardest part of the unlock, the Dragon’s Lair!
Cursed Dwarf

A common enemy in this Level, the Cursed Dwarf has decent ARMOR and HEALTH naturally, so it takes a bit longer to kill them. Other than the risk of POISON if struck, you shouldn’t have much trouble with them.
Dwarven Spider Master

The Dwarven Spider Master summons Cave Spiders (see separate entry above) and they can POISON if they strike you, which they can do even when DISTANT. STUN them or wipe them out quickly if you can, to save time on fighting Cave Spiders.
Fallen Dwarf

A common enemy in this level and they’re summoned at one point during the boss battle (see entry for The Cursed One). The Fallen Dwarf will POISON if they strike you and can attack while DISTANT. Their STRIKEBACK is not a concern with this build and their lower health shouldn’t make them very difficult to wipe out, even when they appear in large numbers.
Giant Cave Spider
These are exactly the same monster you encountered on the last Level. Treat them the same.
Green Slime

3 of these appear when you kill (split) a Large Green Slime (see separate entry below), but otherwise they function the same with less HEALTH. When killed they split into 3 Small Green Slimes (see separate entry below). You do not have to worry about their STRIKEBACK.
Large Green Slime

They have a lot of HEALTH initially (the picture above was taken after damage was incurred) and split into Green Slimes (see separate entry above), but you should face no problem from these if you keep them DISTANT even though they can regenerate HEALTH.
Large Yellow Slime

Essentially the same as the Large Green Slime (see separate listing above), just a different color. The same approach applies. They spawn 2 Yellow Slimes when split (see separate entry below).
Mushroom Heart

A rare appearance in Round 4 of the Fallen City. The Mushroom Heart is actual the boss of the Mushroom Caves of the Dwarven Mountains, and it fights the same. With the Wizard Class the risk of STRIKEBACK is nonexistent, and this is the primary difficulty facing this monster, other than its natural proximity damage. Therefore, give it a Blink and tear away at it. Note when it dies it will drop some spores that will turn into Acid Mushrooms (green) and/or Spore Sacks (red). See separate entries above and below for more information.
Small Green Slime

3 of these appear for every Green Slime killed (split). They’re the same essentially with only 2 HEALTH. 1 Lightning Charge for your defensive phase will wipe them out if they’re close to you. They have no STRIKEBACK.
Small Yellow Slime
The same as the Small Green Slime, just a different color.
Spore Sack

Similar to the Acid Mushroom (see separate entry above), but with no damage, the Spore Sack will increase the damage of other monsters by 1 if you don’t kill them in a single hit. Otherwise they’re nothing to worry about.
Stone Golem

Less common than other monsters here, expect to see at least 2 of them in the Fallen City. The Stone Golem can deal out and take a lot of damage with great ARMOR, but they’re SLOW so if you keep them DISTANT and save them for the end of any battle where they appear, you won’t face any problems.
Yellow Slime
The same as the Green Slime (see separate entry above). 2 of these spawn for every Large Yellow Slime (see separate entry) killed. They spawn 3 Small Yellow Slimes when split (see separate entry above).
Purchases after the Fallen City
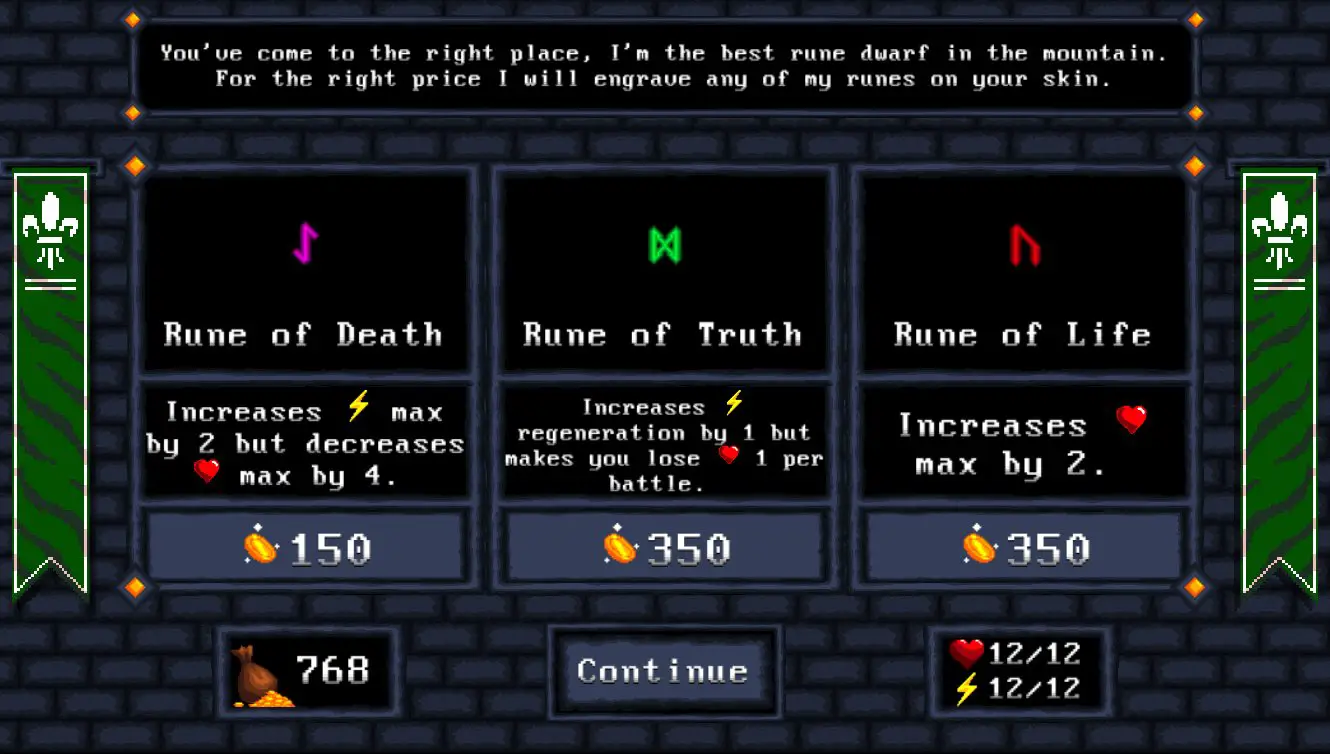
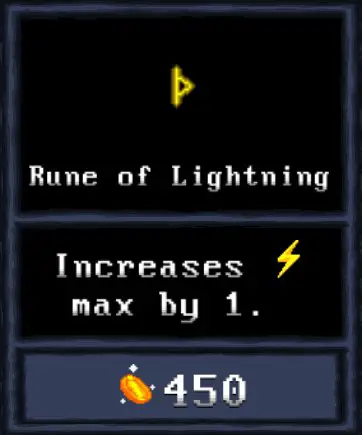
After completing the Fallen City you will have a choice of 3 different Runes to purchase. 2 of these are of extreme benefit, but it’s random in terms of which ones appear. The Rune of Life, for example, may appear as 2 purchases, or only 1, or none. All 4 possibilities are shown above. Definitely buy the Rune of Life, especially if there are 2. The Rune of Lightning is also of benefit, but prioritize the Rune of Life. Don’t bother with the other 2.
Dragon’s Lair
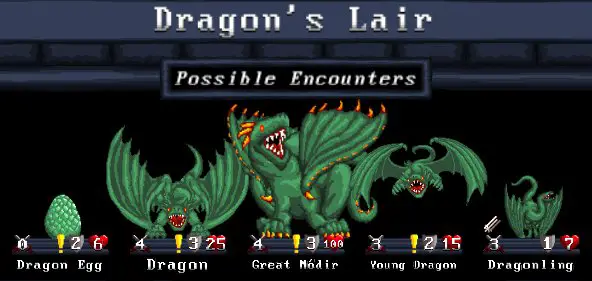
So you made it, almost… Get ready for pain! Though the path to the Dragon’s Lair, and everything in it, is rather easy, the final boss, Great Módir, is not! This is the problem with the Storm Master unlock. There is a great deal of luck in the last encounter and if you get the wrong cards, it’s all over in most cases. I would say, based on tons of playthroughs with this build to find the best combinations and strategies, expect to lose about 9 out of 10 times, no exaggeration. As with the previous sections I will describe the monsters you encounter in the Dragon’s Lair alphabetically.
Chest


The appearance of this is the center of a rare mob in Round 4 of the Dragon’s Lair. This includes HIDDEN ENEMIES (dragons) and the Dwarven Thief (see separate entry below). If you get the Key from the Dwarven Thief without destroying the box, you get 1 Healing Potion from inside. Because of the way this build works that means you need to rely on Lightning Strike to get the key and risk damage from the Dwarven Thief and other monsters. Chainlightning will most likely hit the Chest and destroy it before you kill him and he is immune to STUN so you can’t keep him in place to make it easier. If it’s too much of a risk, don’t worry about it. 2 extra HEALTH is not going to save you from the boss, trust me.
Dragon

Though they deal more damage and have more health, the Dragon is essentially the same thing as the Young Dragon (see separate entry below). You can deal with them in exactly the same way but it is best to STUN them first and then focus on lesser monsters, like Young Dragons, next before slowly reducing their health. Chainlightning will prove exceptionally useful for this reason. Do not let them, or any other dragons, hit you and keep them DISTANT!
Dragon Egg

Please note the Dragon Egg has 4 HEALTH when they appear, and not 2 as shown in the picture above. You should generally avoid striking them and just let them open naturally, but don’t worry if it happens because Chainlightning cannot be controlled for its additional 2 targets. Each egg contains 1 Dragonling (see separate entry below). Note that there is one particular mob that occasionally appears that is a straight row of Dragon Eggs with up to 2 HIDDEN ENEMIES (typically 1 Dragon and 1 Young Dragon, or 2 Young Dragons, see separate entries above and below). So if you see that one it’s a good idea to take out 1 or 2 Dragon Eggs to get the HIDDEN ENEMIES to appear so killing them is easier. Otherwise, eliminate them if you choose, it makes no difference.
Dragonling

You’ll be fighting a ton of these in the Dragon’s Lair. The Dragonling has lower health and is easy to kill, but note that they have FURY and attack twice. If there are a lot of them and they aren’t DISTANT this will be a huge problem, but Blink fixes that quickly, and you’ll likely have already used it before an open egg poses a danger.
Dwarven Thief
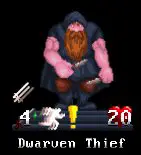
This is a rare encounter in Round 5 of the Dragon’s Lair. If you see it, groan, because it’s a little more difficult than the typical mob due to HIDDEN ENEMIES (dragons) and the Dwarven Thief himself, who is more powerful than a typical dwarf in the Dwarven Montains. You’ll know this is the mob you’re facing as soon as you see the Chest in the middle of the screen (see separate entry above). A nuisance more than anything, the Dwarven Thief has DODGE and FURY and can also hide when he takes damage. He won’t cause much of a problem but if you beat him before destroying the Chest you receive a Key to open it.
Great Módir

Here it is, the boss of the Dwarven Mountains and your final obstacle to unlock the Storm Master Subclass. Good luck with that because the battle against Great Módir is largely up to luck. This is entirely what cards you do and don’t draw, simply put. Note its abilities as follows. 3 ARMOR is not an issue because eventually you’ll do enough damage. The multiple attacks don’t matter, either, provided you keep Great Módir DISTANT for most of the fight. You also need to have at least Blink, but better Lightning Shield, ready to go for its attack phase, because those are the only 2 cards that keep damage off of you. Further, Great Módir drops adds at different points. Note carefully that at 75 HEALTH 2 Young Dragons are summoned (see separate entry below), at 50 2 Dragons including a retreat to DISTANT status by Great Módir (see separate entry above), and 2 more Dragons at 25. The Dragons and Young Dragons start DISTANT when they are summoned, but unless you can defend fire attack, you need to have them in STUN. At the start of the battle there are 2 Dragon Eggs flanking Great Módir (see separate entry above), but they’re easy. Give Great Módir some power from your lightning attacks and kill the Dragonlings when they appear. Once they’re gone, be certain you have Blink and Lightning Shield ready and do not, I repeat, do not hit Great Módir too much because when more dragons are summoned you have more targets to worry about! Try to utilize the CHAINBREAKER trick with Lightning Strike so your ARCANE CHARGE and STAMINA cost is minimal. Once the adds are in STUN, then you worry about taking off more life, but always make sure you have at least Blink but better Lightning Shield ready for Great Módir’s attack because you’ll take too much damage otherwise. Pay careful attention to Great Módir’s HEALTH to prepare for the appearance of the dragons. Before you know this is coming, be certain you have Blink and Lightning Shield, at least the latter. Try to keep the dragon(s) on the left in STUN and save Blink for the last one on the right if you’re running short, because this keeps all targets in 2 turns of DISTANT and that is preferable. If you do this with careful attention to your STAMINA over the course of the encounter you’ll eventually win. Unfortunately, even with the furious card juggling you’re doing, most of the time you simply won’t get the right cards in the long run and can only take about 2 total hits, with aftereffects of BURN, from the dragons. Always take the best option before you gamble with a Mulligan or extra card draw, but often there is no other choice. Eventually, you’ll get the right hands and unlock Storm Master, but don’t expect immediate victory.
Young Dragon

The Young Dragon in the Dragon’s Lair is a primary enemy and appears numerous times. Keep them DISTANT or at least in STUN. If they’re close they attack twice, first with FIRE and then with a regular attack. You will not be able to defend against all dragons if they are close! If there are Dragons with Young Dragons, however, STUN the Dragons first, and then worry about the Young Dragons. After you have them all in STUN Chainlighting will prove effective to whittle away their HEALTH, but this takes a lot of patience.
So that’s all there is to it! If you have any particular problem with any point of the various encounters towards the final battle in the Dragon’s Lair, let me know and I’ll add sections to the guide as necessary. But, as I said it’s easy to learn this build but hard to get the Storm Master unlock! Keep trying!