A general walkthrough of the basics of Chromosome Evil will allow players to grasp the fundamentals of the game faster, leading to more successful playthroughs.
Introduction
Chromosome Evil is a blend of This War of Mine‘s squad-based gameplay and a zombie apocalypse. While it may seem simple on the surface, the game can quickly become challenging if players are unfamiliar with how to manage its numerous surprises and hurdles.
To assist both new and seasoned players, I have created this guide and manual. While the in-game tutorial and tooltips are highly beneficial, it can be helpful to understand how the game functions as a whole before diving in.
Controls
The controls, while fairly basic, are not displayed while in exploration mode.
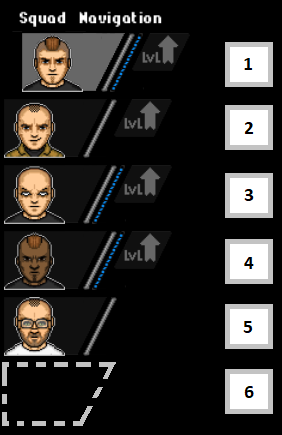
You start out with 2 squad members and can increase this to a maximum of 6. To select from different characters, press 1 through 6 on the keyboard.
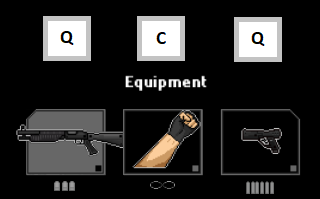
To switch between primary and secondary weapons, press Q. Pressing R will reload your weapon. Pressing C will select melee combat. It is not recommended to use melee combat unless the squad member is a soldier class and has at least one armor upgrade; otherwise, they may sustain health damage from enemies. Please note that you can select all squad members by dragging and clicking, and then press C to put all members in melee mode. This is particularly useful when extracting your team from a map to conserve ammunition.
Resources Review
So much of this game revolves around balance. You must balance your use of ammo against the number of zombies. You have to balance your need for certain resources on a map against waiting too long and witnessing a continual increase in zombie numbers. Additionally, you have to prioritize which resource to obtain first. There is a lot to consider while simultaneously fighting off hordes of zombies and other creatures.
Here is the basic hierarchy, in my opinion, regarding the importance of each resource. Understanding which resource is crucial and why will help you make decisions during game events and on exploration maps when choosing one resource over others. A prime example is at the start of the game, where you can choose between ammo or a mixture of resources such as antibiotics, wood, and tools, as well as fuel and food. In my opinion, you should prioritize either the ammo or the fuel, as they are two of the most important resources in the game.
Fuel
There are three major reasons why fuel is so important:
- If you run out of fuel during zone transitions, you will have to collect fuel from a parking lot while fighting enemies. This not only wastes all types of ammo but may also result in the potential wastage of antibiotics if your squad members get injured.
- Your aggro level, which we will discuss when we talk about the zone map, will significantly increase and reach maximum as soon as you start a new zone map. Consequently, every exploration map becomes more challenging, making it harder to gather necessary resources and leading to increased ammunition wastage due to the larger number of enemies.
- To reduce aggro, you need to use a researched ability called scouting, which consumes Action Points (AP) and food.
These are the critical reasons why fuel holds such importance. Running out of fuel will immediately impact your ammo, possibly antibiotics, food, and other resources due to their overuse and the decreased ability to gather additional resources.
Shotgun Ammo
Shotgun ammo holds the highest level of importance, as I will elaborate further in the weapons section. Rocket ammo could also be significant, but it is less abundant and limited to a single weapon type, which reduces its likelihood of being used in your game, even if you utilize the free weapon DLC. However, it goes without saying that all types of ammo, particularly shotgun and pistol/rifle ammo, play a vital role in keeping your squad members alive as they gather crucial resources.
Pistol and Rifle Ammo
Pistol and Rifle Ammo, which I will just call Pistol Ammo, is used by a lot of weapons. Pistols, submachine guns, rifles, and minigun all use Pistol Ammo. If you run out of this and shotgun ammo, you can still gather resources, but not nearly as much and life becomes a lot more dangerous for your squad very quickly.
Weapon Components
This game definitely follows the slogan “The best defense is a good offense.” If you can kill the enemies quicker, they never have a chance to cause armor or health damage and, as a plus, you can spend more time opening doors, gathering intel, or gathering resources.
Armor Components
Armor is important, especially for your soldiers. Unfortunately even at max armor, engineers and medics never gain armor points from armor upgrades, but, instead, gain more health as well as immunities like fire, bleeding, poison. As a result, armor components are usually best used to upgrade your soldiers first and foremost, especially in early game where the first upgrade makes it so they can tank hits without taking health damage. Do note that armor will regenerate during exploration mode, but do not keep soldiers in melee for too long or enemies will strip the armor and start doing health damage.
Tool Components
Tools are primary used for three different things. Upgrading your engineer’s abilities (turret and barricades), upgrading your APC to get certain abilities like expanding crew capacity, and building traps on exploration maps. Certain traps are better than others so pay careful attention to how important that location is; if the trap location is at a good bottleneck and spending that 20 tools will help you gather a lot of needed fuel or ammo, it might be worth it. However, if you’re only 30 tools away from getting a prelude or other helpful APC upgrade and there’s not very many high priority resources on the map, do not use tool components to build a trap on that exploration map.
Antibiotics
Antibiotics, like tools, are used for 3 main uses. Like tools and engineers, they are use to upgrade medic’s abilities (medkit and booster). They are also used on the zone map to fully heal your whole squad with the additional AP cost. Lastly, but not recommended, is they can be used by a medic to heal on an exploration map. Why not? Even though this does not consume AP, the healing efficiency of exploration healing is really low, expending a lot more antibiotics to get your squad members fully healed. If possible, heal while on the zone map, not in an exploration map.
Food
Food, despite being ranked so low, is pretty important. Without it, you cannot recruit, scout, heal, rest, or do other actions. The main reason why it is ranked so low is that it is fairly plentiful and usually a low priority while gathering resources.
Wood or Materials
Called wood on the zone map, but typically materials in exploration maps, this resource is used for two primary uses. Engineers use it to build barricades and can be used as ammo for bows. Even though it’s ranked low, be sure to always have some on hand as certain main missions are much, much easier if you can build barricades.
Research Points
Useful initially, but importance wanes as the campaigns draws to a close, research points are used to unlock certain abilities. Prioritize Action Point generation Research Bonus Scouting ~ Healing ~ Resting based on need. Certain unlocks are needed to be able to upgrade weapon and armor upgrades.
Rocket Ammo
As previously discussed above, rockets can do a lot of damage to a lot of enemies. However because finding soldier equipped with it or the weapon itself if using the weapon DLC is low, you typically do not end up using them.
Weapons Review
In general shotgun and rocket launcher (RPG) katana minigun bow rifle chainsaw melee pistol submachinegun, at least in my opinion. I will go through why below. The engineer’s turret also is a decent weapon, especially if used in certain missions, but it uses a lot of Pistol Ammo very, very quickly. Note that during a typical play-through you will only have enough weapon components to upgrade a single weapon all the way or a few weapons partially.
This more powerful shotgun variant is just awe inspiring, absolutely tearing through zombie hordes. Arguably the best ranged weapon in the game. Its one downside is that its upgrades are much more expensive than the normal shotgun.
Normal variant of the shotgun. Still very useful in clearing enemies of all types. Does an aoe like the peacekeeper just at shorter range when compared to all the Pistol Ammo using weapons or the bow.
RPG or Rocket Launcher
Extremely potent weapon. Capable of taking out the most enemies and doing the most damage, only hampered by its limited ammo and its limited availability through soldiers and through weapon crates if using the weapon DLC.
Katana
Your ammo needs are solved if you find a solider wielding this or find one in a weapon’s crate. With its quick attack speed and damage, it dispatches enemies with ease if used by a solider at a doorway or other bottleneck. By far the best melee option available. Note that melee weapons of all types cannot be used behind barricades, including the katana.
Minigun
The best damaging weapon that uses Pistol Ammo. Has a few drawbacks including a warm-up time before firing and it expends a lot of ammo, but it can clear a lot of zombies.
Bow
A very good weapon that exclusively uses wood as ammo. Its major downside is that it works best killing only a few enemies at a time, but unlike any other weapon, it can be fired while on the move. Just be careful not to use all of your wood or you won’t be able to build barricades when you need to.
Rifle
A good all around Pistol Ammo using weapon with good range. I would recommend having at least one solider with one of these.
Chainsaw
Uses fuel. Because of the “ammo” type that it uses, I try hard not to use it since fuel is so important. Can dish out a lot of melee damage when needed, but be very, very aware of when you are using it, if ever.
Melee
Only ranked lower than a chainsaw because of its damage, you can actually kill enemies in regular melee. I would only recommend doing this with armor upgraded soldiers, but it can be a viable alternative if you do not get a katana. Just realize, you will not kill enemies very quickly so its use is more limited than that of the katana, but you can still save some ammo if used wisely.
Pistol
Basic weapon for engineer and medic as well as an option for soldiers. Does the least damage. Really only useful in early game.
Submachine Gun
My least favorite weapon. Uses a lot of ammo, short range, but can dish out a decent amount of damage. At the end of the day, I’d much rather be using either a rifle so I can start shooting at a longer distance or, if I’m going to fire a lot of rounds anyways, a minigun. Overall, I almost ignore it in my playthroughs, even using the pistol instead.
Zone Map Review
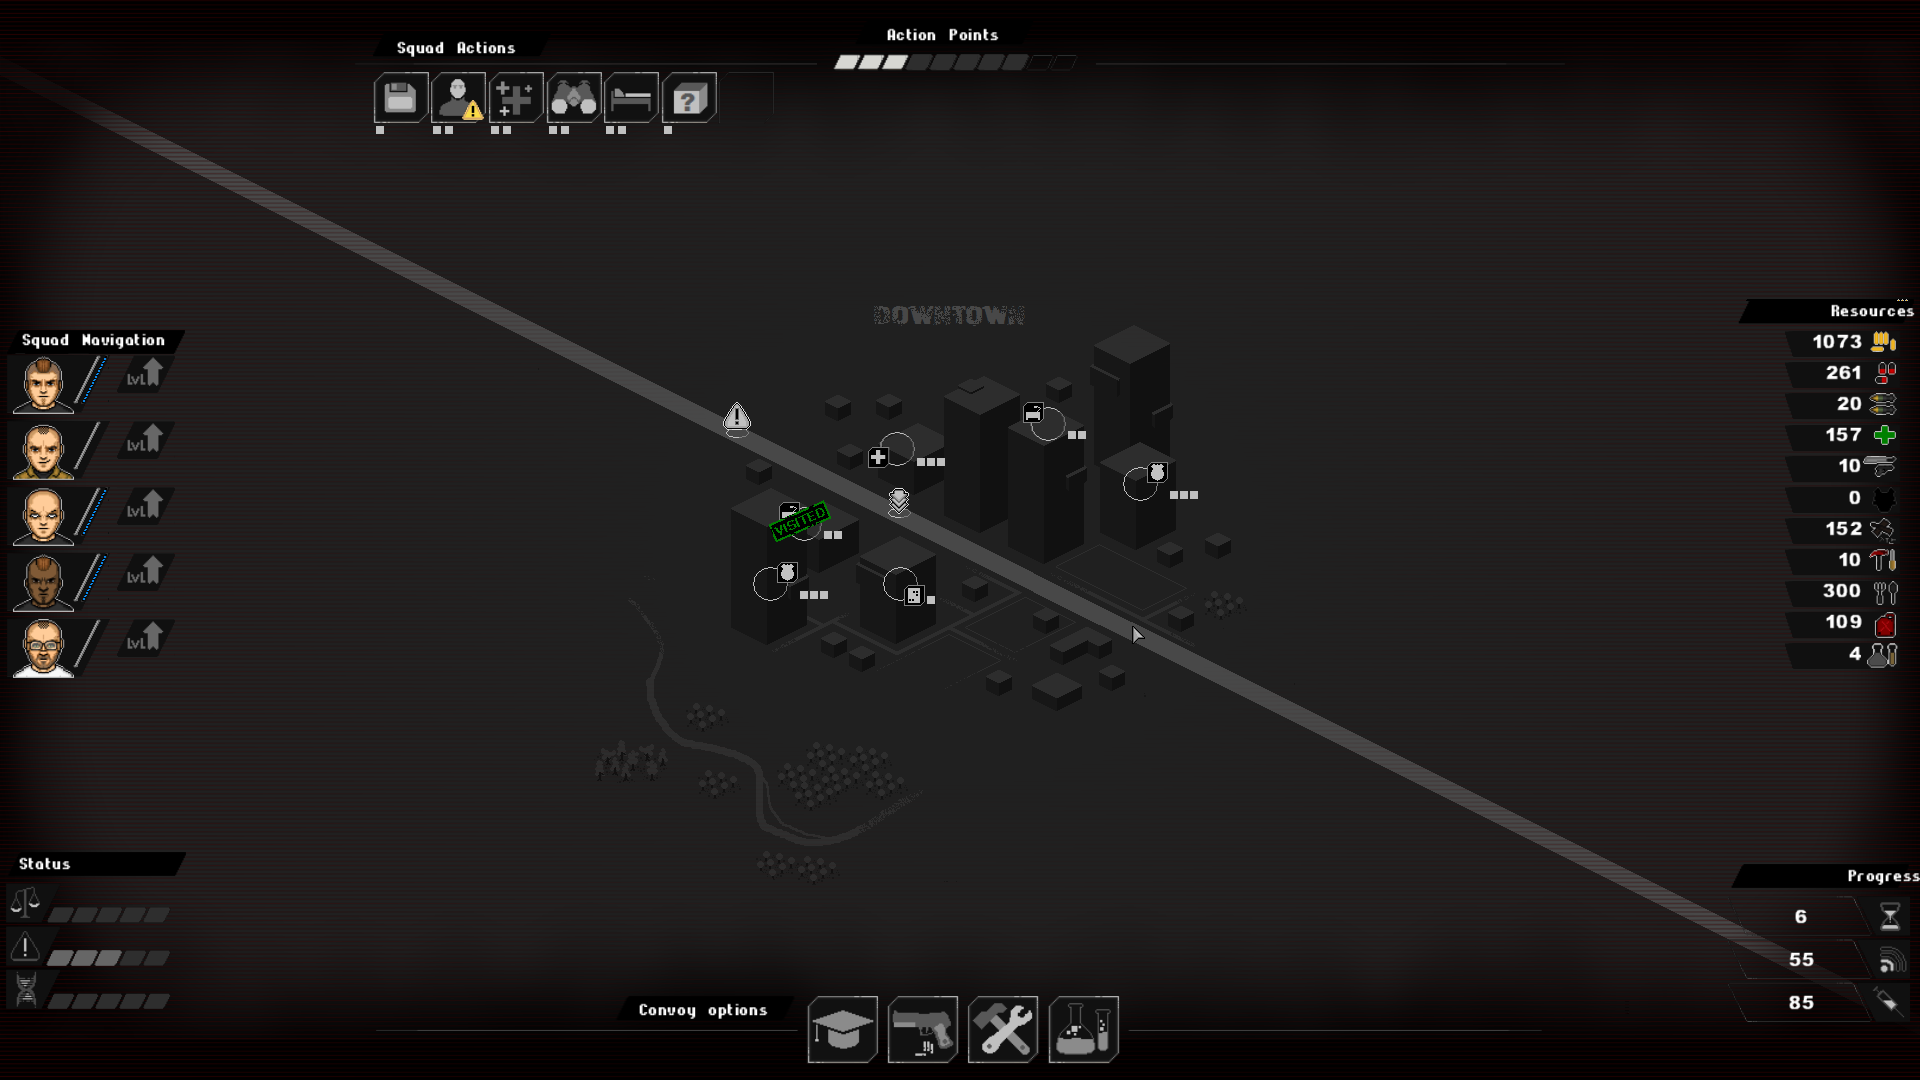
This is a zone map. This particular one is a Downtown map.
There are three types: Residential, Industrial, and Downtown. Residential allows 1 AP recruitment and typically has a lot of food, wood, and antibiotics. Downtown allows 2 AP squad member recruitment, has a lot of ammo, armor, weapons, and antibiotics. Downtown is the only location type that allows for vaccine progress but also some opportunities to advance satellite progress. Industrial, the third type, has the most expensive squad recruitment at 3 AP. Industrial zones are the best location to find fuel, tools, and to advance satellite progress.
Top left bar contains all the actions you can take that consume AP (once unlocked): Save, Recruit, Heal, Scout, Rest, and Scavenge.
Scavenge is usually a poor use of AP since you do not gather nearly as much resources as you would if you picked an exploration location instead, but it does not have any risk of your men getting injured.
Top middle is your available AP pool. Grey AP is used AP. White AP is remaining AP. Yellow AP is the amount of AP used for that action including exploration sites.
Far right is your list of resources.
Bottom right is your days left, satellite progress, and vaccine progress. To get the best endings, you will want to get 100% of both satellite and vaccine progress.
Bottom center is your various character and research options that take you to those screens.
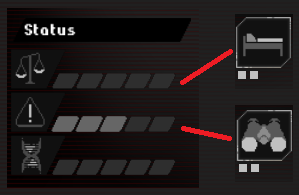
Bottom left is your campaign status bars: morale, aggro, and evolution.
Campaign Status Bars
Morale, represented by the scales, is how happy your squad is. The more bars (5 being the worst), the more unhappy your squad is and the more RNG works against your squad during events or encounters. This is improved by resting which is the bed symbol and is unlocked through research.
Aggro, represented by the caution symbol, is how many enemies will spawn in the exploration maps, 5 being the highest number of enemies. This can be reduced through some events, but mostly is reduced by the use the scout skill, represented by the binoculars.
Evolution, represented by the DNA symbol, is how deadly and advanced enemies will be when they do spawn. This is affected by mission choices and successes. Generally speaking the worse your squad does, the higher this gets and the more deadly your enemies will be.
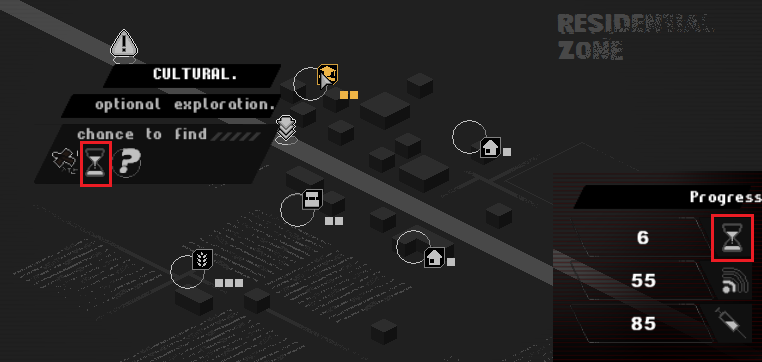
Different Hourglass Icons
Lastly, I want to cover the difference between the hour glass on an exploration location versus the hour glass used in the Progress Legend. The hour glass at an exploration location notes a location that contains at least one AP desk. Going to this location and interacting with the desk gives bonus AP, +1 or +2, to use in the zone (not a permanent increase). It does NOT give more days. This can be confusing since the symbol used for both is the same hour glass. Conversely the only way you can increase your time remaining is at the very beginning of the game when you can select between 3 options, one being leave earlier. If you choose to leave earlier, you will gain +1 day which I recommend over extra training or early gear.
Exploration Mode Review
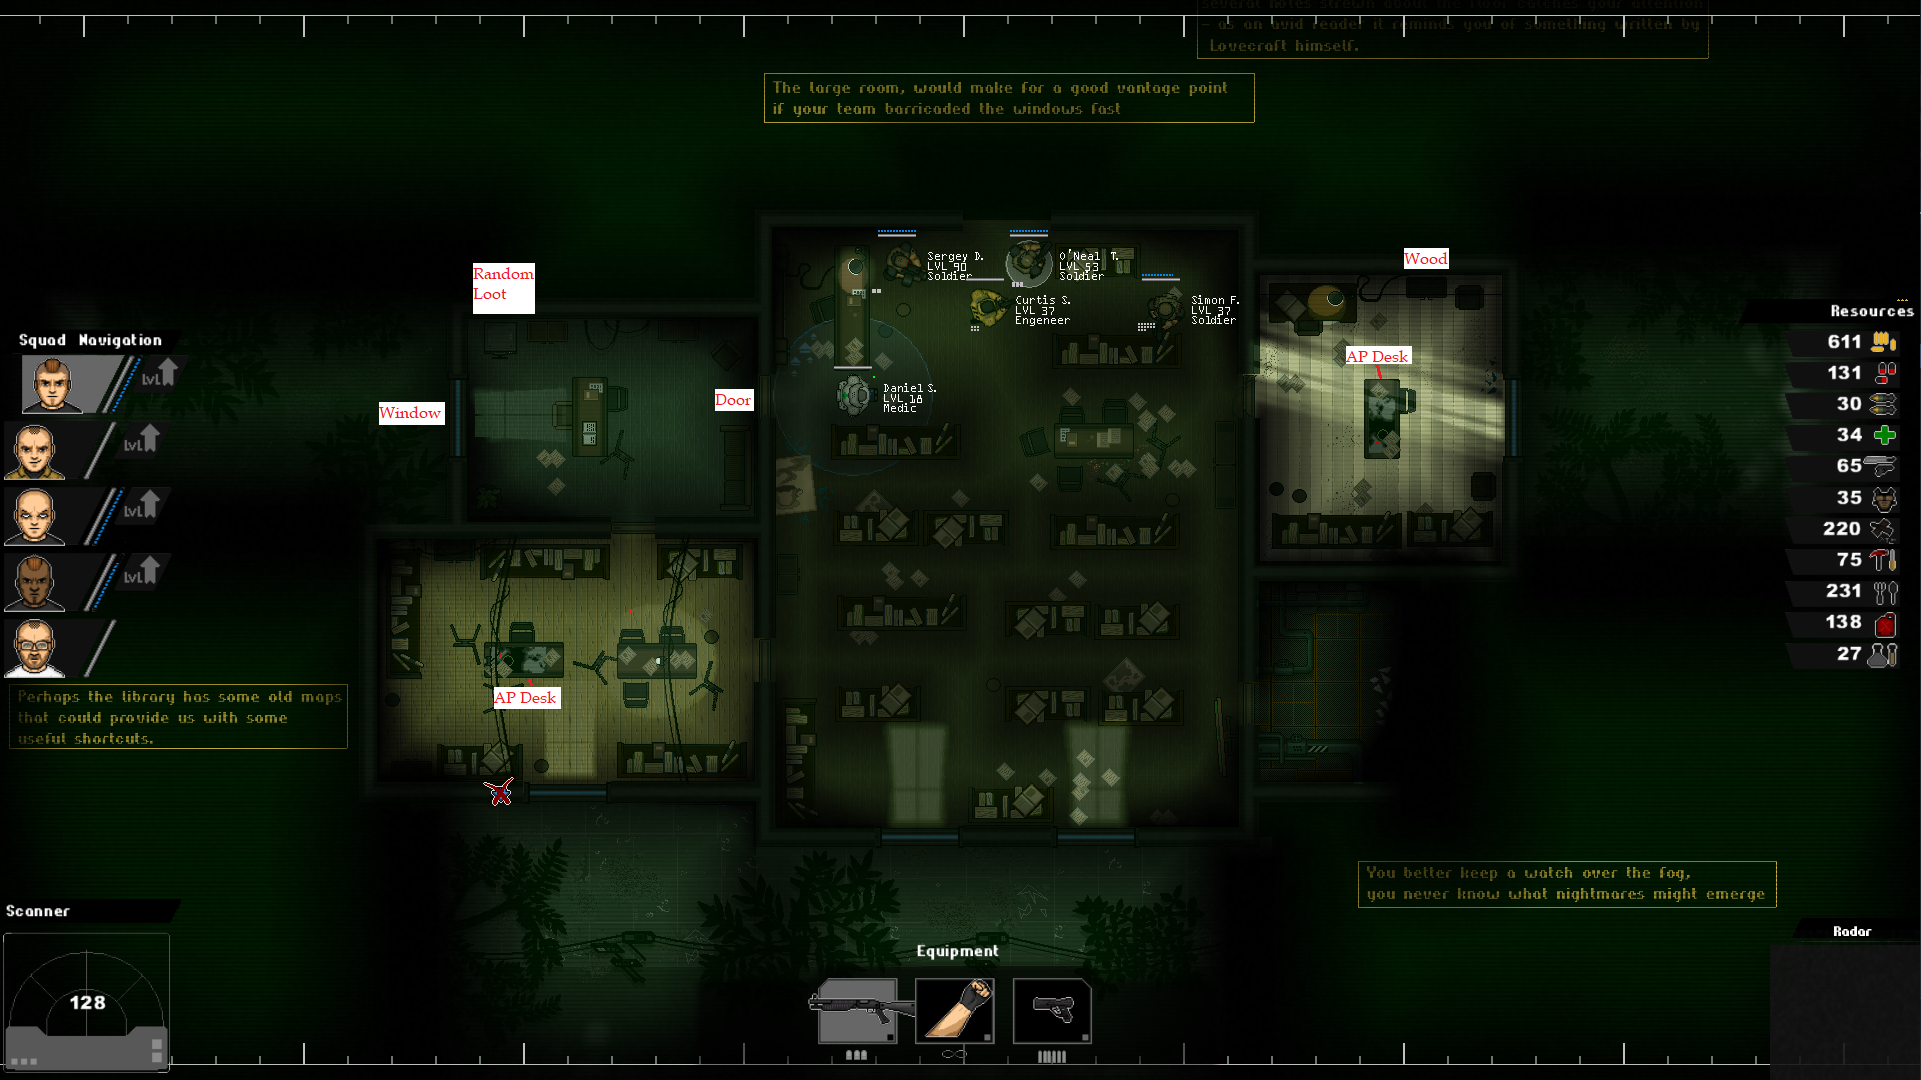
This is an example of an exploration map. This particular one is a library.
Some notable things to point out is that at this point in the game, the squad has unlocked the pause function, noted by the green hue and the fact I can order the men to do certain actions without prelude timer decreasing in the scanner. I have also unlocked the scanner in the lower left that lets me know how much time I have left (prelude time) before enemies spawn. I also unlocked the radar which displays certain things depending on its upgrade level; currently its only showing my squad members as green dots because there are no enemies spawned yet.
Neither the scanner nor the radar are vital, but the pause function is extremely helpful and I highly recommend it.
Note how where the squad spawned and the overall layout of all the rooms.
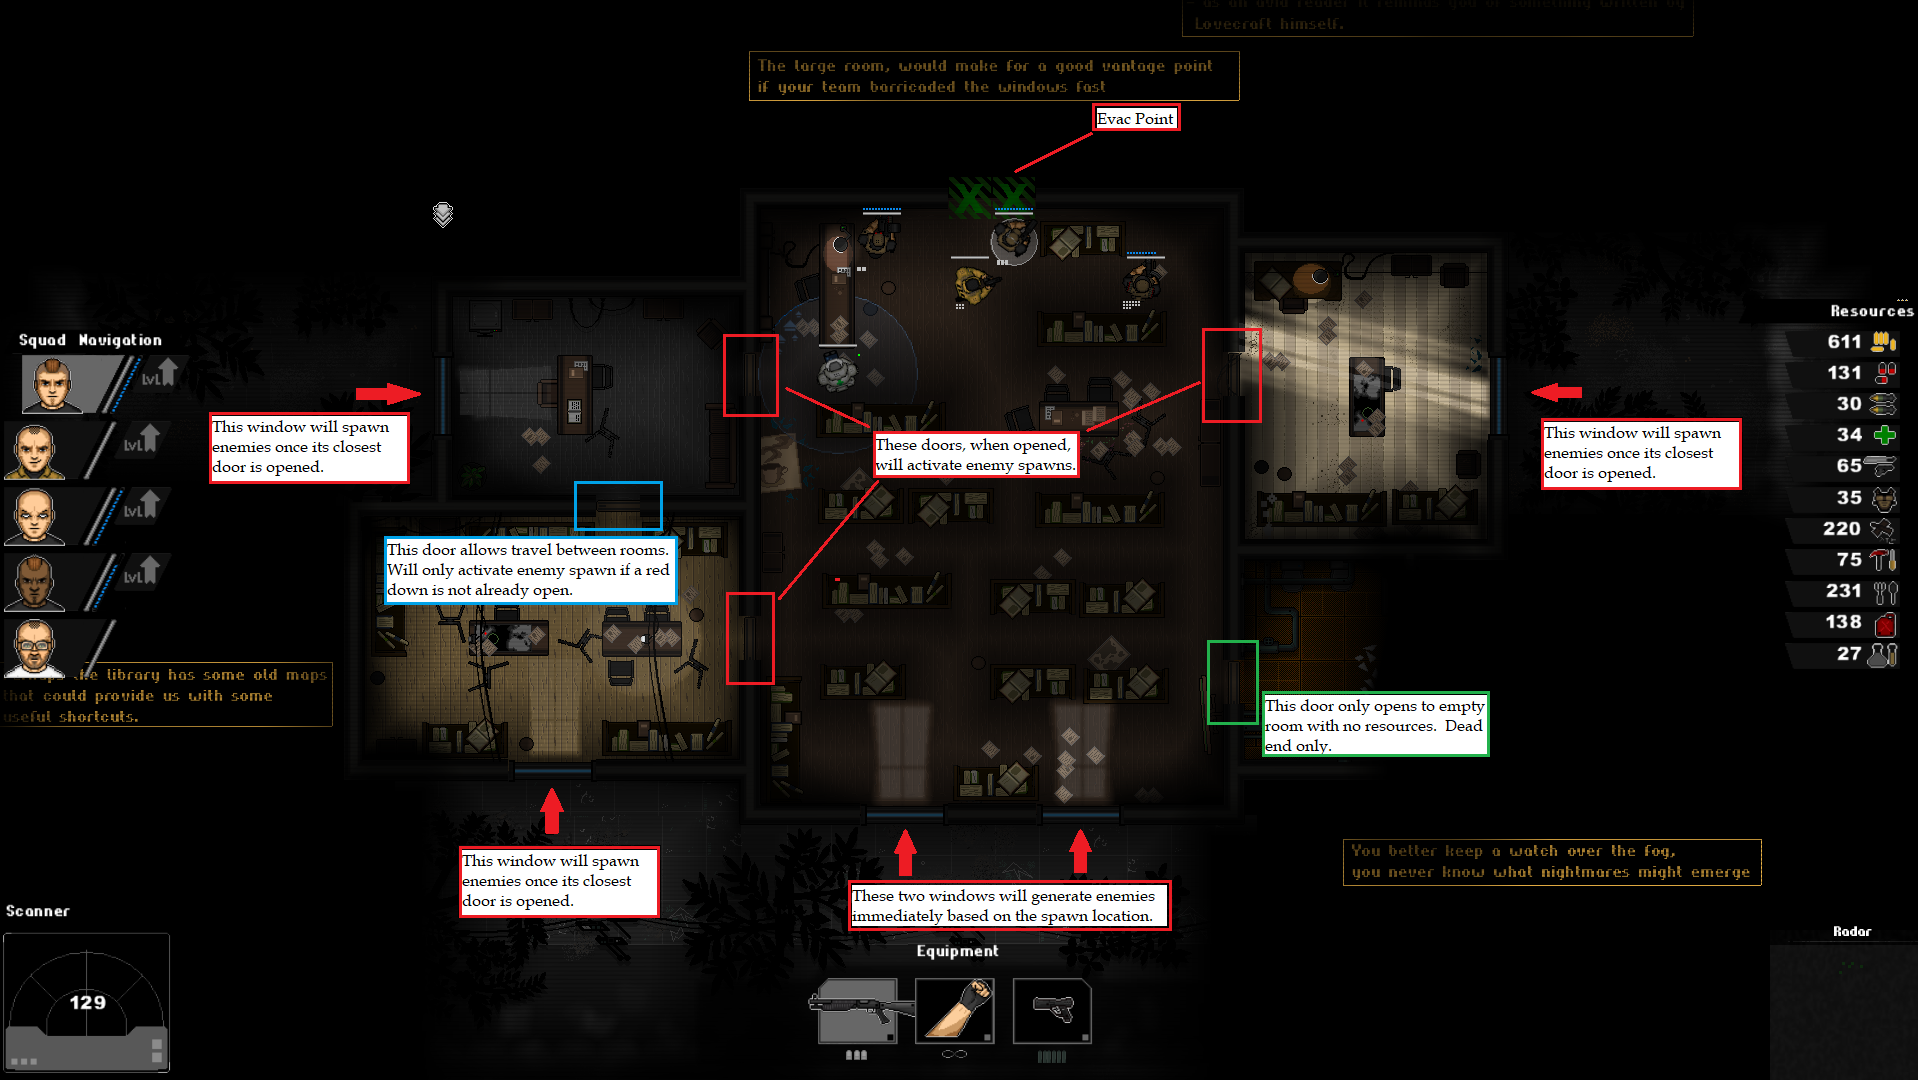
Because the squad spawned in a room with windows, as soon as the prelude timer ends, noted by either the scanner’s countdown timer and/or the grown of zombies (it’s quiet during prelude), zombie waves will start coming through the two bottom windows.
Not all maps are like this, however. Some maps start with all rooms closed. And just 1 or 2 maps actually spawn no enemies at all, but those are really, really rare.
Because zombies can only come through rooms that your squad has access to, opening any new doors will start a new zombie spawn location. So when you first start an exploration map, get your bearings, note valuable loot, what room it is in, and where zombies will come from once you start opening doors. Opening all doors is usually not a good plan since it then becomes really hard to kill all the incoming zombies and not get overwhelmed. Pick your high priority rooms first, open them, gather the loot and retreat. If you have a katana solider or someone with decent melee and ranged, they can guard the door while you work on other rooms.
Two notable tips:
#1 Always have a clear path to your evac point so if you get too greedy, you can still retreat with all your squad intact
#2 Opening a new room after the zombies have started to spawn, will spawn all the zombies that have been waiting for the room to open so be ready for a large group right away.
Resources on Exploration Maps
Here are examples of how resources appear on exploration map. Pay very close attention to the type of desks. Occasionally when the zone map displays possible satellite desk, you will find AP desks on that particular exploration map instead. Note that you can typically find resources of different types in addition to what is displayed on the zone map, but this happens more often for the higher AP cost locations than the 1 AP locations. Lastly, do not interact with a satellite desk if you are at 100% satellite progress as it makes no difference and will waste valuable resource gathering time. The same goes for vaccine desks and research desks respectively if you have 100% vaccine progress and all researchables unlocked.
Satellite Desks

Found in offices in both downtown and industrial zones. Notable blue screen. Only interactable by the engineer class.
Vaccine Desks

Found in hospitals and clinics only in downtown zones. Notable green screen. Only interactable by the medic class.
AP Desks

Found in any zone. No screens, but has lots of paperwork. Interactable by any class. In fact, you can have multiple characters use this desk to unlock the AP faster.
Research Desk

Found in both downtown and industrial zones. Only interactable by the engineer class.
Trojan

Found in main missions. Interactable by any class. Gives a permanent +1 AP for use on zone maps.
Pistol Ammo Crate

Pistol Ammo. Comes in various sizes.
Shotgun Ammo Crate

Shotgun Ammo. Comes in various sizes.
Weapon Component Crate

Weapon Components . Comes in various sizes.
Armor Component Crate

Armor Components . Comes in various sizes.
Antiobiotic Container

Antibiotics. Comes in various sizes.
Food

Food. Found in all zones. Possibly comes in the most sized containers of any resource.
Fuel

Barrel of fuel, but industrial areas can contain huge fuel tanks as well.
Wood or Materials

Material crates come a variety of sizes, but all different lengths and usually against a wall or under desks.
Tool Container

Tool Containers are usually all small, but either are grey like this example or have a orange/red coloring.
Random Loot Container

Grey or blue variants, but can contain anything from ammo of all types to components of all types to food to very, very important fuel. Resource type determine on exploration map generation.
General Tips
Here a list of tips and tricks that did not fit well in the above sections that can really help your playthrough.
Other Guides
- A really good guide to also check out is Steelpoint’s Chromosome Evil: Strategy Guide. It’s somewhat incomplete, but it still covers a great deal of topics including some I do not in this manual. It helped me learn a lot of this game’s mechanics.
- When it comes to character stats and APC upgrades, prelude is king. Being able to clear rooms of loot and not waste a single bullet because your prelude time is high makes exploration mode so much easier. For more general build info, start here with zalex101001’s starter guide. It gives a good starting unit builds. To gain prelude time for your character’s, focus on intellect.
Zone Map Tips
- Recruiting events and character order are always the same when using the recruit action. As a result, you can test what classes or events occur during recruiting in any zone using a save or autosave, reload, wait until you’re in a residential zone, and spend less AP to get the same sequence of events. This can be very helpful if you’re missing a particular class, such as a medic or engineer.
- Do not spend food and AP to lower aggro in a zone if you are about to run out of fuel and you’re not in an industrial zone. It’s just a waste of AP and food since your aggro will skyrocket as soon as you leave. With that said, do your very best to never get in this situation and always have fuel (150 units or more).
- Try to only recruit more characters when you have either tons of AP and/or it only costs 1 AP.
Event Tips and Tricks
- There are many choices in the game, but one “choice” can really backfire. Do not choose to gain a permanent +1 AP over more expensive workshop upgrade costs. The upgrade costs are already fairly expensive–making them double just for a bonus +1 AP can cost you the game. For example, just upgrading the capacity once makes the cost go from 100 tool components to 200 tool components. If you choose the +1 AP option, this would be 200 tools to start and 400 for another member.
- After you rescue Beta Squad Trojan APC driver, choosing to move as quickly gets you to the next map with no loss to AP. Choosing to take time to explore takes 1 AP (no days lost) but discovers a farm on the map (3 AP cost for the location). Because of this, only choose to take time if you have unlocked the AP bonus and do not need to recruit. Otherwise you will not have enough AP to actually be able to visit the farm and you will miss out on food, fuel, ammo and other really helpful resources.
- Choose the leave early option to gain +1 day during the game’s start. The other options do give nice bonuses, but the extra day, especially when you have a much larger AP pool, translates into a LOT more resources and experience as well as one more day to get vaccine and satellite progress. In my first playthrough, it allowed me to finish my satellite progress right before the final mission. I’d almost assume choosing the +1 day is mandatory for hard difficulty playthrough’s for these reasons as a result.
- I’m fairly sure you should always pick to explore the zone you need to instead of pursuing the main missions. Why? So you can focus on resources you need the most at the time. In fact, the game, once you have run out of a certain amount of flexible time, will make you take main missions instead of giving you the option of which zone. So pick the zone you need when you need to, especially if you’re low on ammo or fuel. If you’re not low on either, feel free to pursue the main mission. After you finish each main mission, you will be randomly assigned to a zone type, residential, industrial, or downtown.
Exploration Map Tips
- TV Traps electrocute barricades. Not that useful, but if you were wondering why you can use tools to construct a trap at certain TV’s, that’s why. Other traps like gas ones tend to work better.
- Be careful of fire and poison pools (little red embers or green puddles) as they can kill characters that have no resistances or immunity very quickly. Any character with high Body stat will have more resistances. Medics gain immunities to Bleed, then Poison, and at max armor Fire, though upgrading a Medic to max armor is not recommended. Engineers gain immunities to Poison, Bleed, then Fire in a similar manner.
- If you have a little bit of extra time while on an exploration map and there’s either an extra resource or door that a low level character can interact with, grab it on your way to the evac point. Every item interacted with 100% gives experience, even doors you don’t actually end up needing opened.
- Resources, AP desks, and doors can all be interacted with multiple characters if there is a spot next to the target to speed up the process. Use this mechanic to access these faster.
- If you do not hear moaning yet, you do not need characters defending chokepoints yet. Once you do hear moaning, get ready for incoming enemies though.
- Character levels and stats are not as important as making sure you have enough ammo and your men stay alive. Do not get greedy and put your men at risk. “Under control” situations can quickly spiral “Out of Control” and kill or injure your squad when it was not necessary.
- Always, always balance the use of ammo needed to fight off enemies against how much resources you might actually recover. If you find you’re using more ammo than resources gathered, it’s time to leave. In fact, it was probably time to leave a few minutes ago.
Conclusion
For a game made by just two guys, it is amazing how much fun and tricky this game can be. I had a wonderful time playing this game and I hope this “manual” I have written can help you become more successful in your playthrough as well.
Good luck and enjoy saving the world from the Ancient One.
