Following the release of Aghanim’s Labyrinth Battle Pass in Dota 2, the developer also confirmed that Dota 2 now features controller support. While the Dota 2 controller support is not yet officially launched, it is now available for players to test. But how can you play Dota 2 using a controller?
In this guide, we will be telling you all the details that you need to know about the Dota 2 controller support.
How to Use Controller in Dota 2
According to the official blog post, Dota 2 supports any gamepad controllers including Xbox controllers, Switch Pro controllers, PlayStation controllers, or any generic controllers available in the market. Players only need to connect the device to their machine and Steam will automatically detect it. Once connected, all you need to do is open Dota 2 and test the controller.
Below are the controls that you can use in Dota 2
- Left Stick – Hero movement
- Right Stick – Camera movement
- R3 – Recenter camera to hero
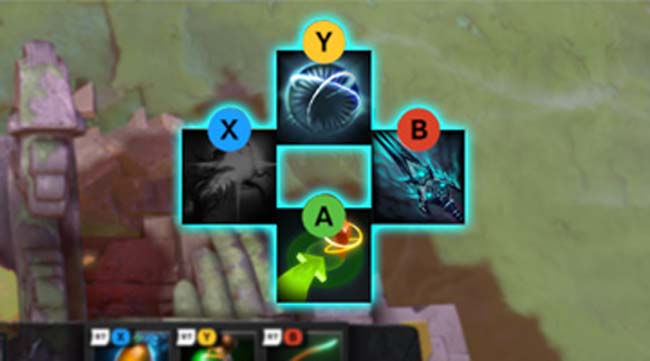
- X, Y, A, B – Activate abilities or items
- R1 / R3 – Select different pages of abilities and items
- R1 (Hold) – Select page 2 of abilities
- R2 – Page 1 of items
- R1 + R2 – Page 2 of items
- R1 (Hold) + R2 (Hold) + A – Cast TP
- Directional Pad – UI and level up abilities / Quick buy items / Open shop
- L1 – Targets an ally
- L2 – Targets enemies
- L1 (Hold) / L2 (Hold) – Target different types of units (creeps, heroes, or buildings)
- Right Stick – Move to stop target lock
How to Enable Dota 2 Controller Support
By default, the experimental Dota 2 controller support is disabled. You can enable this new feature by going to Settings > Options / Advanced Options > and checking the “Enable experimental controller support” located at the bottom of the miscellaneous section. Also, configure the Dota 2 gamepad controller configuration on Steam by going to Steam Library > Manage > Controller Configuration.