This walkthrough will help players enjoy the content of Escape Memoirs: Mini Stories > Bunker level. There will be multiple hints to the puzzles starting from tiny hints to completely solving the puzzle. I know there are hints in the game, but when I see an antenna on top of a box, I KNOW I have to send it a signal, but whats the first step!? (A picture of each figurine location is at the end of this Guide)
Game Start
Yup, as soon as you load up Bunker, you will realise that after finally escaping the Jail into the area called THE BUNKER, you have more work ahead of you.
“Bunker Collector” Achievement
The collection begins right in the first room. Just like Jail Break, when you ‘Esc’ into the Game Menu, you’ll see on the right there is a list that tells you how many “Collectibles” there are in each map section. If you want to collect as you progress through the game, I’ve added descriptions of where to find each one in their respective areas, but there are also screen shots of each at the end of the guide.
Staircase Area

As you progress through the Staircase Area, the first puzzle you find is the lock to the door (around the corner from the Starting position).
“Collectible #17”
Go up the stairs behind you, “Collectible #17” is at the top of the stairs, behind the railing on the right side of the stairs near the ground.
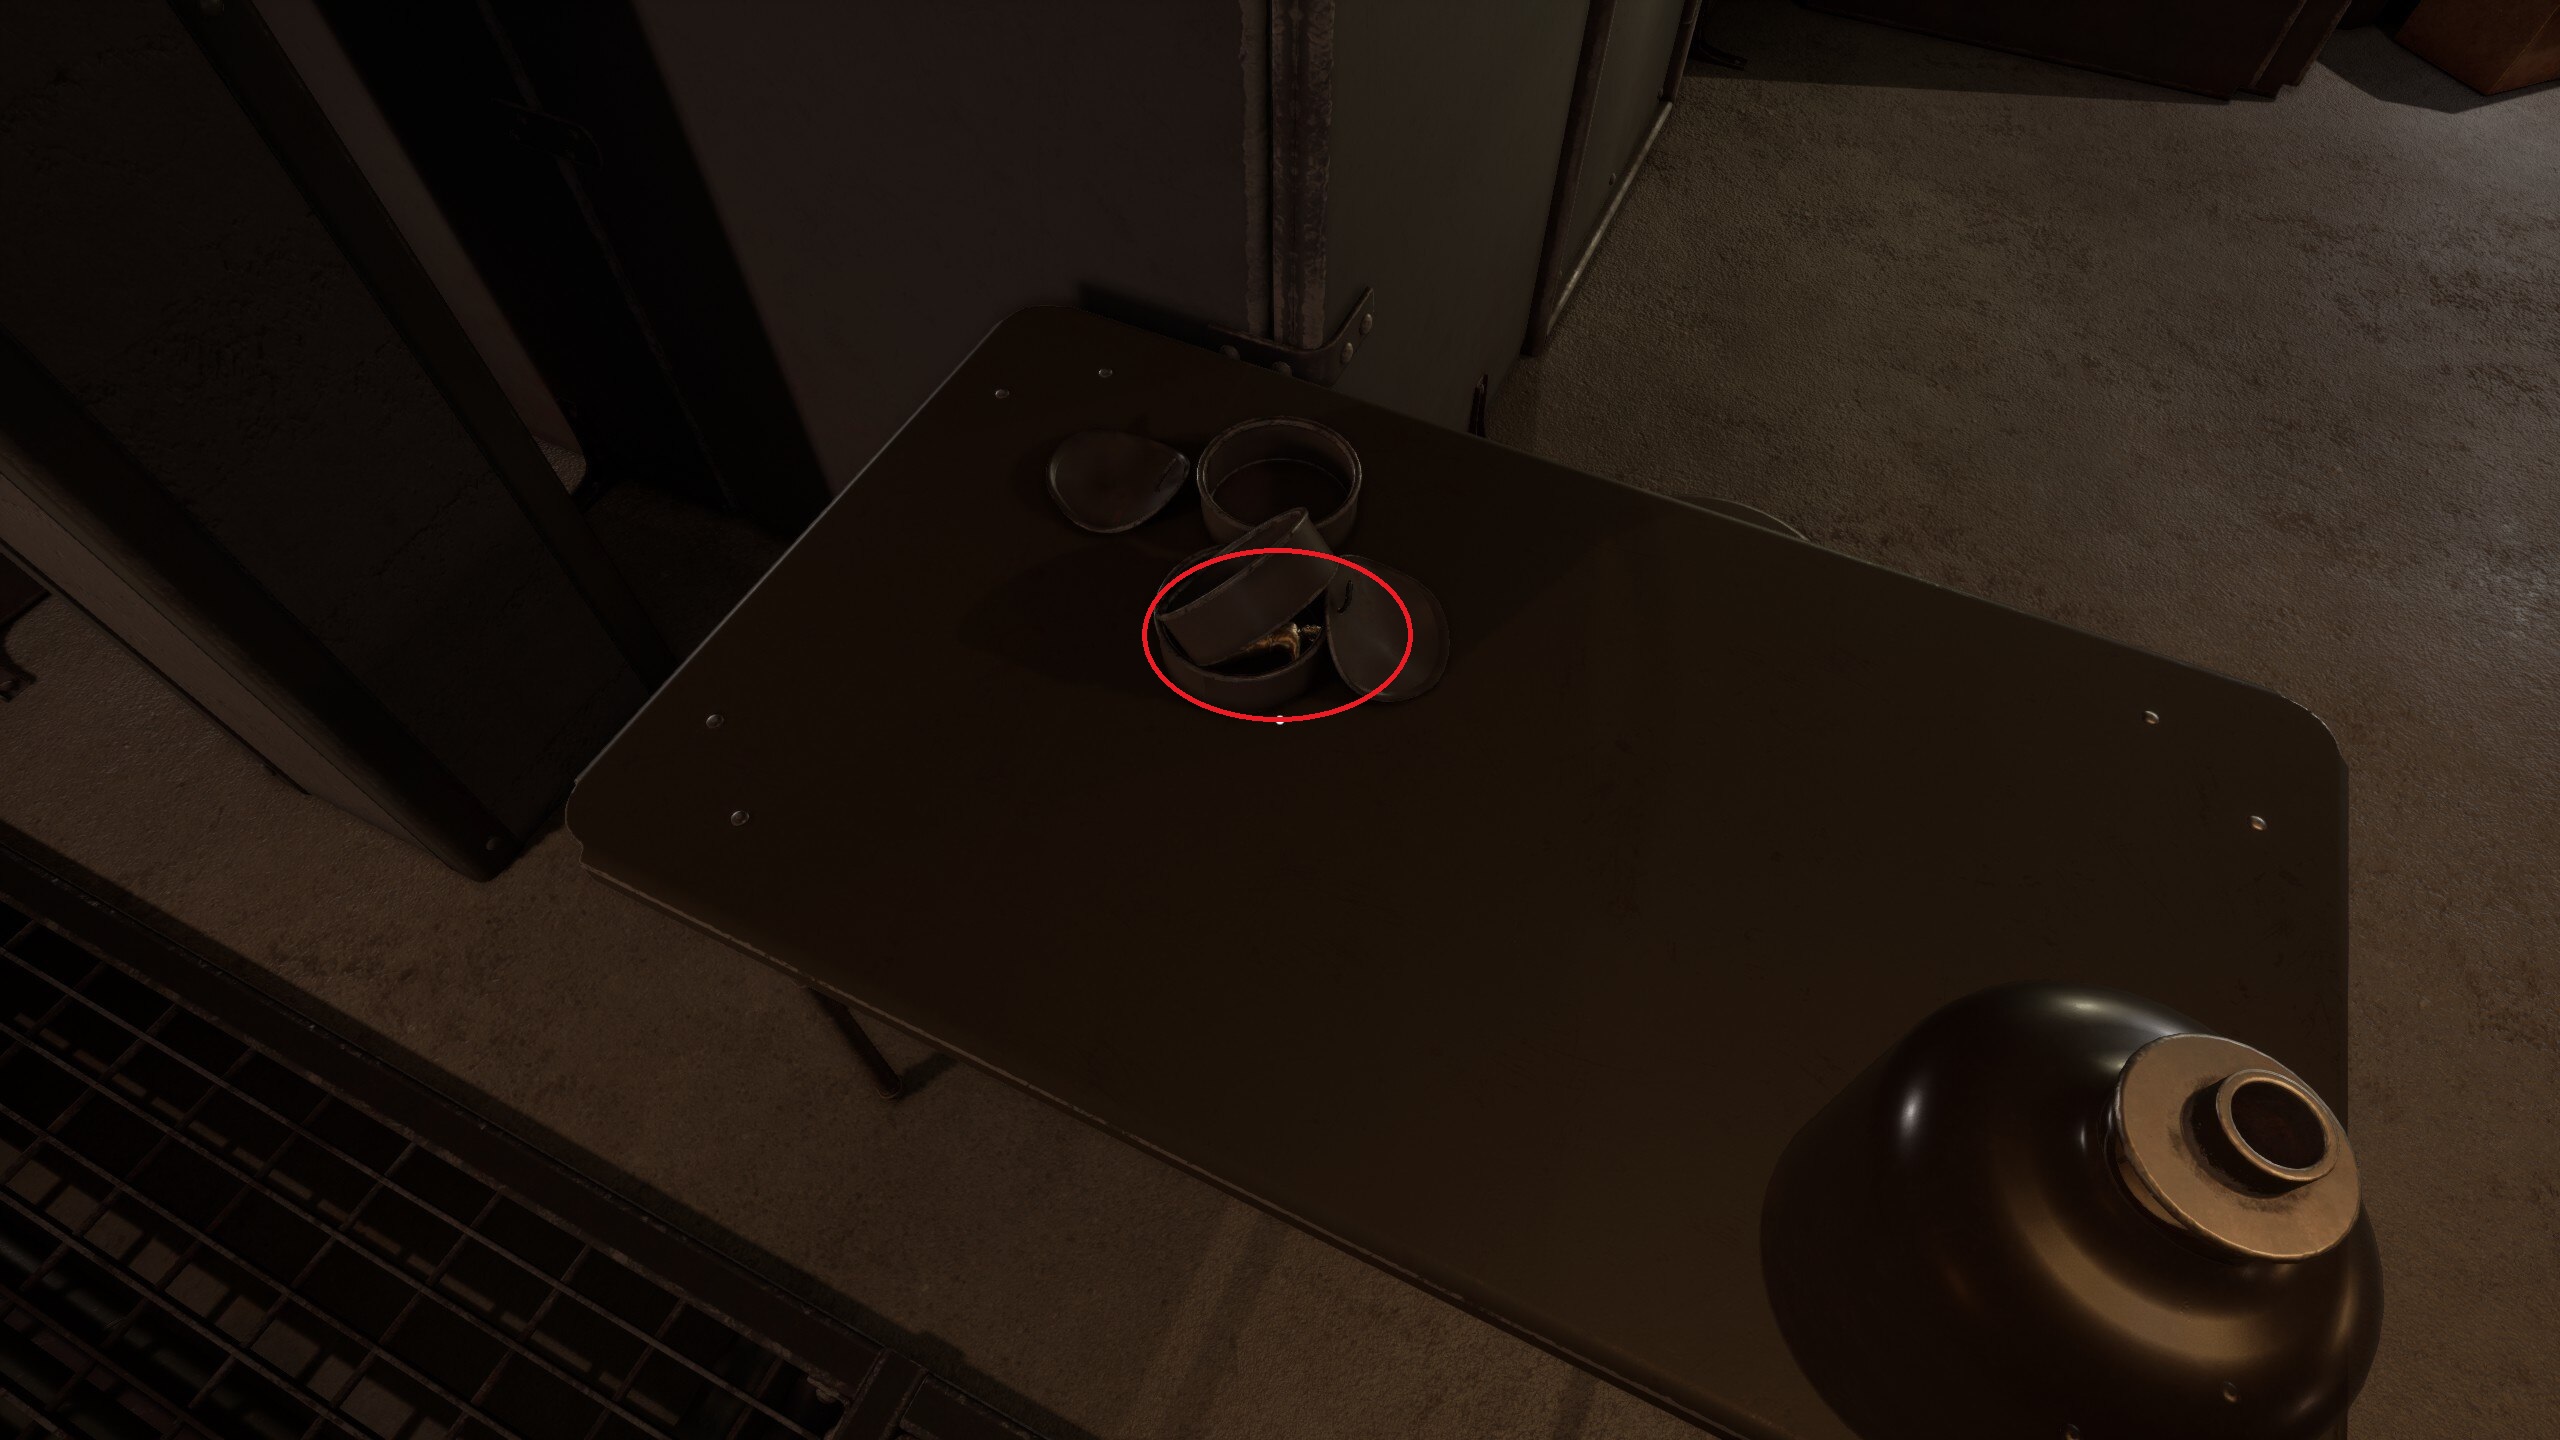
“Collectible #18”
This one is tucked beside some boxes on the top shelf, closest to the locked door.
Staircase Area Puzzle 1a & 1b > Open the door to the next area.
Puzzle 1a:
Find a way to open the cover for the door lock
- Hint 1:Try to interact with everything in the room. When you can interact with something, you’re cursor will change from a dot, into a hollow circle. Left click to interact.
- Hint 2:You can open the tool box on the bottom shelf.
- Solution:Use the screwdriver in the tool box to remove the four screws and open the cover of the door lock.
Puzzle 1b:
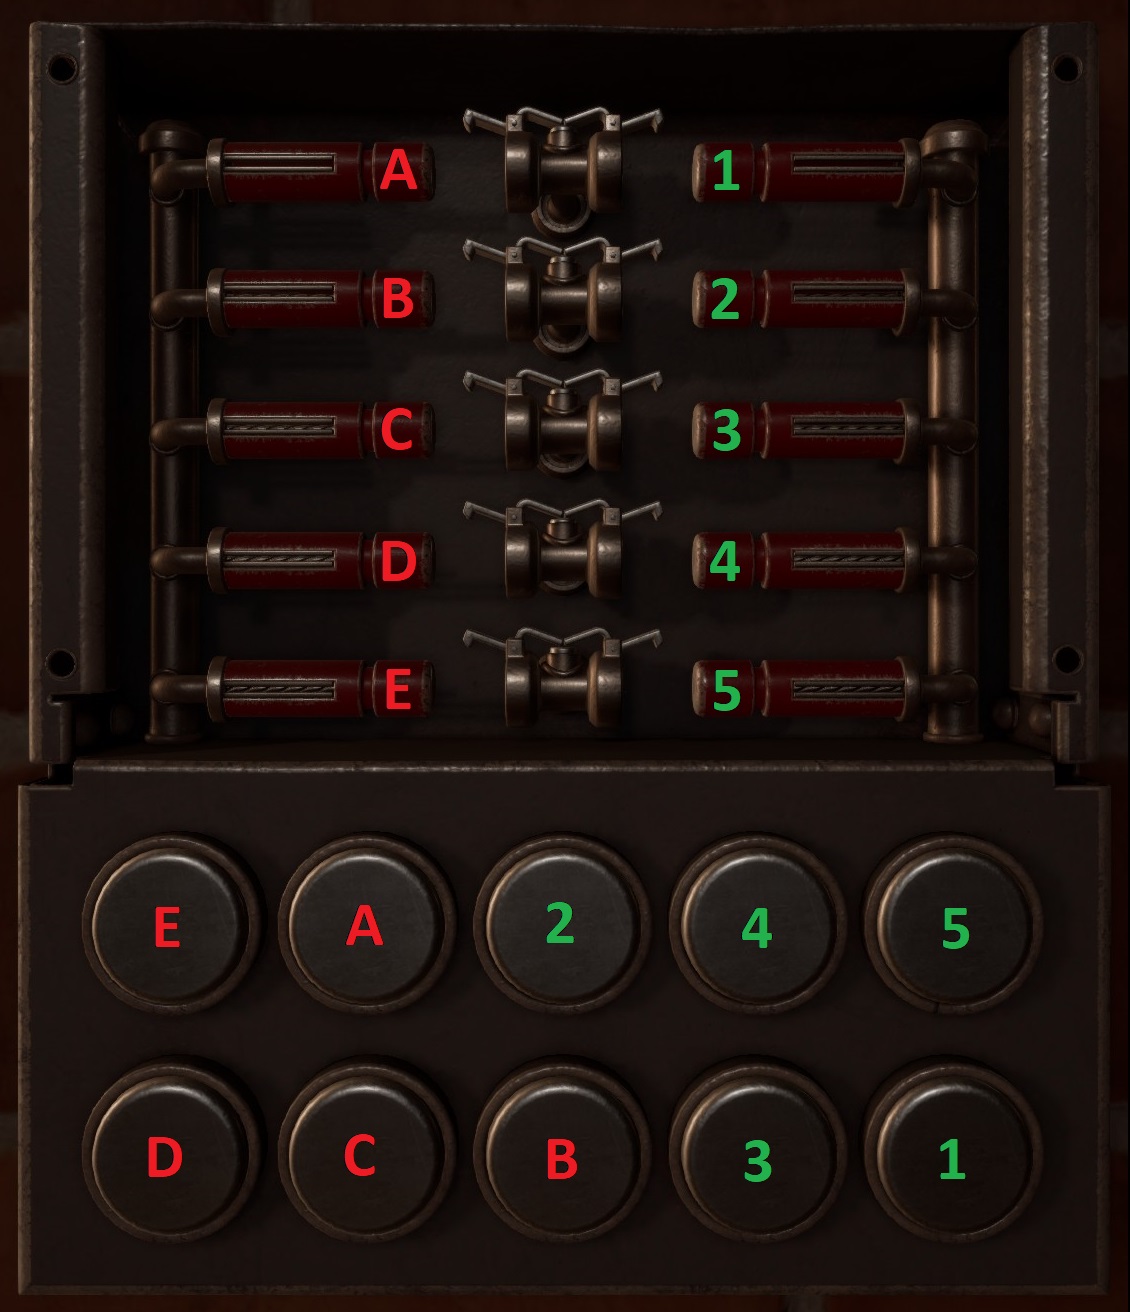
Restore the power to the door lock.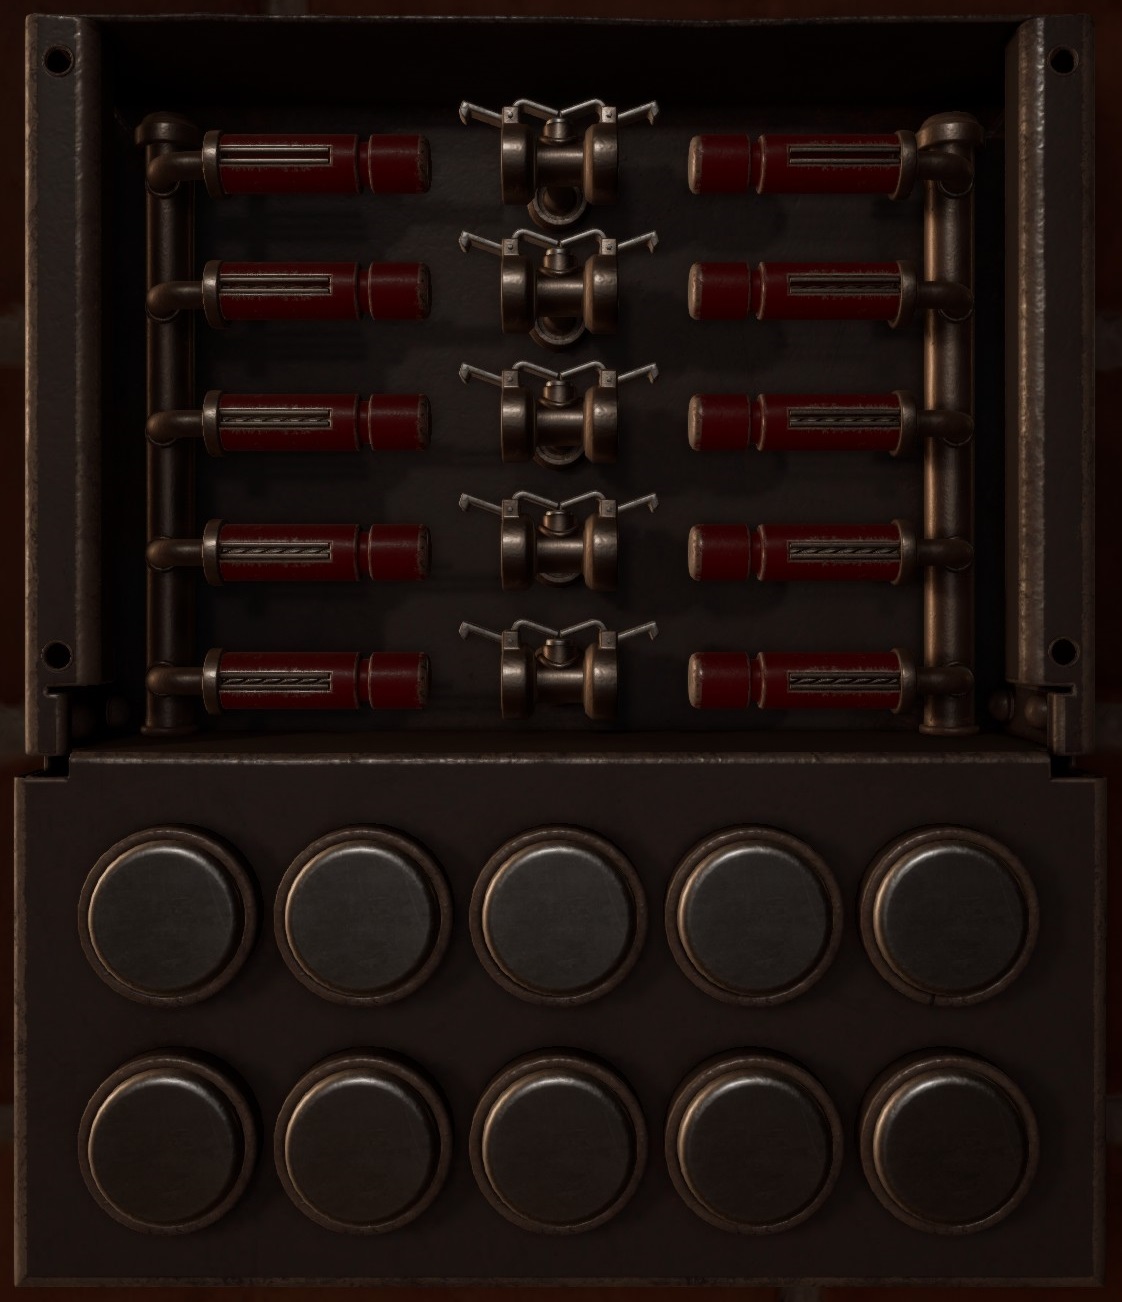
- Hint 1:Each of the ten buttons on the bottom correspond to one of the beakers on the top.
- Hint 2:You have to connect each of the five pairs of breakers. The trick is you have to connect a full row (one pair) before you attempt to connect another, or the puzzle will reset.
- Solution:If you assign letters to the left breakers, top to bottom, and assign numbers to the right breakers, top to bottom, the buttons, in order starting at top left and moving right are:
E – A – 2 – 4 – 5
D – C – B – 3 – 1
So the sequence would be A&1, B&2, C&3, etc.
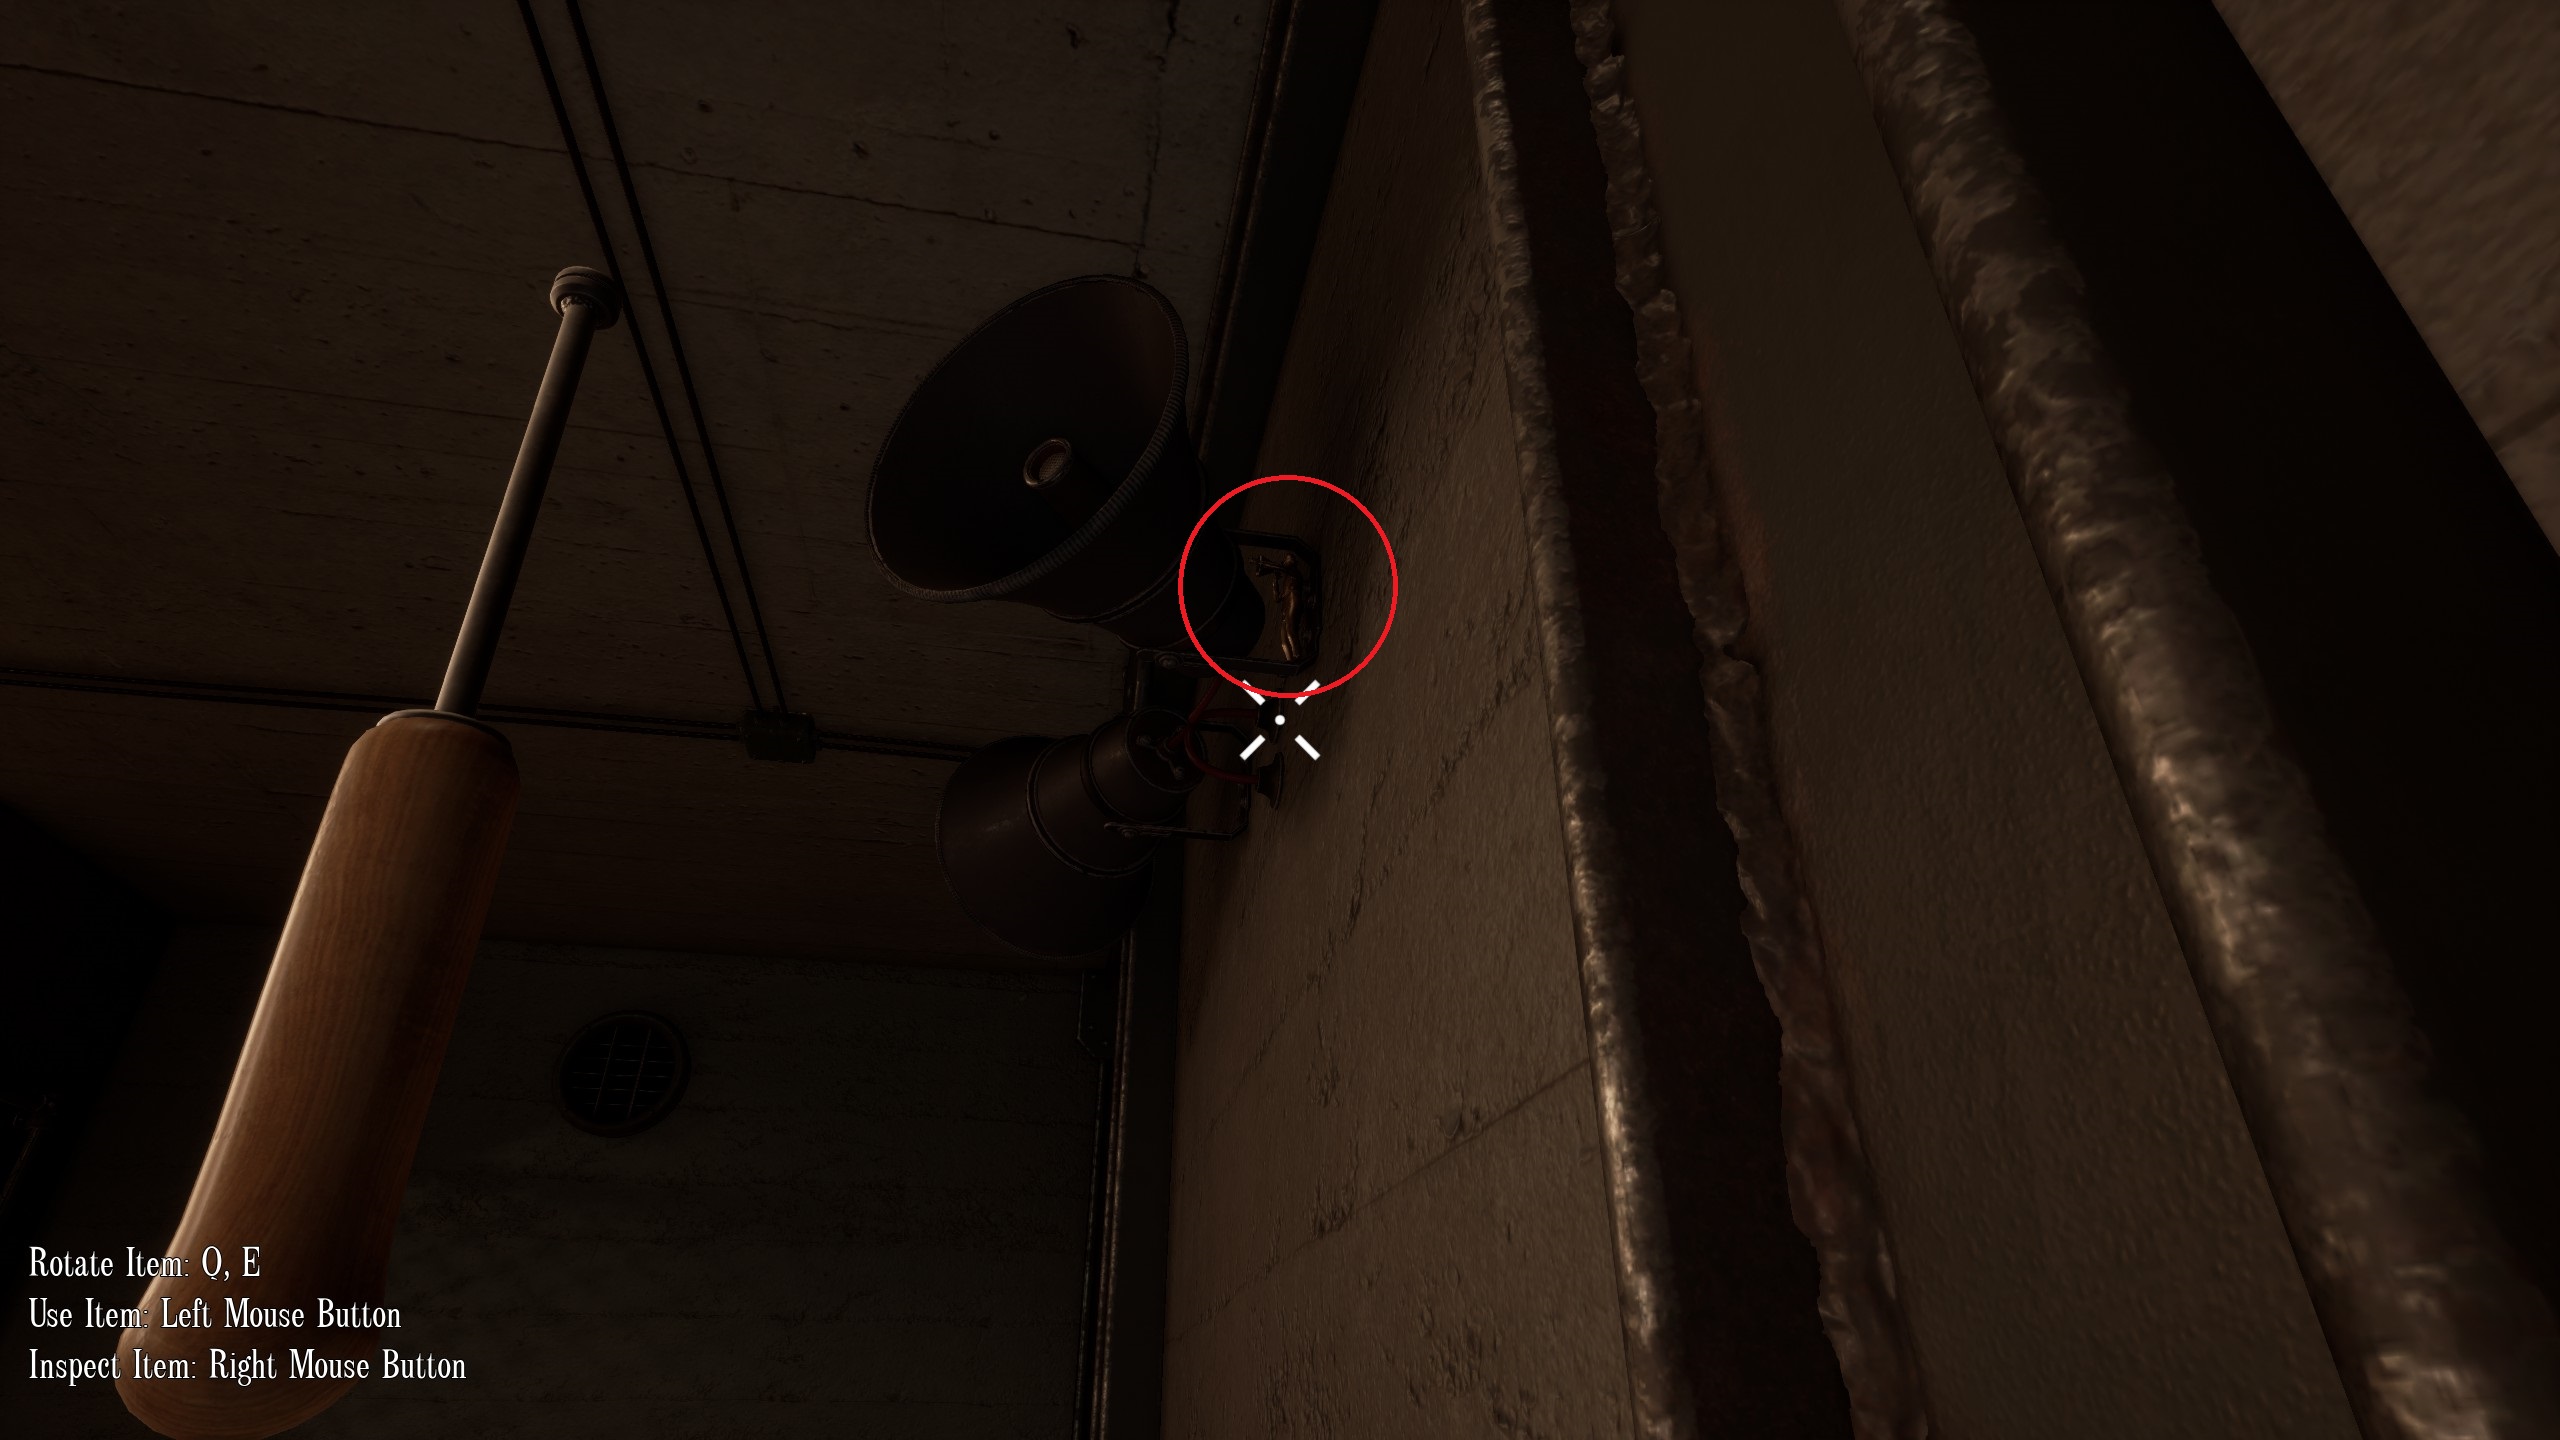
Entrance Area
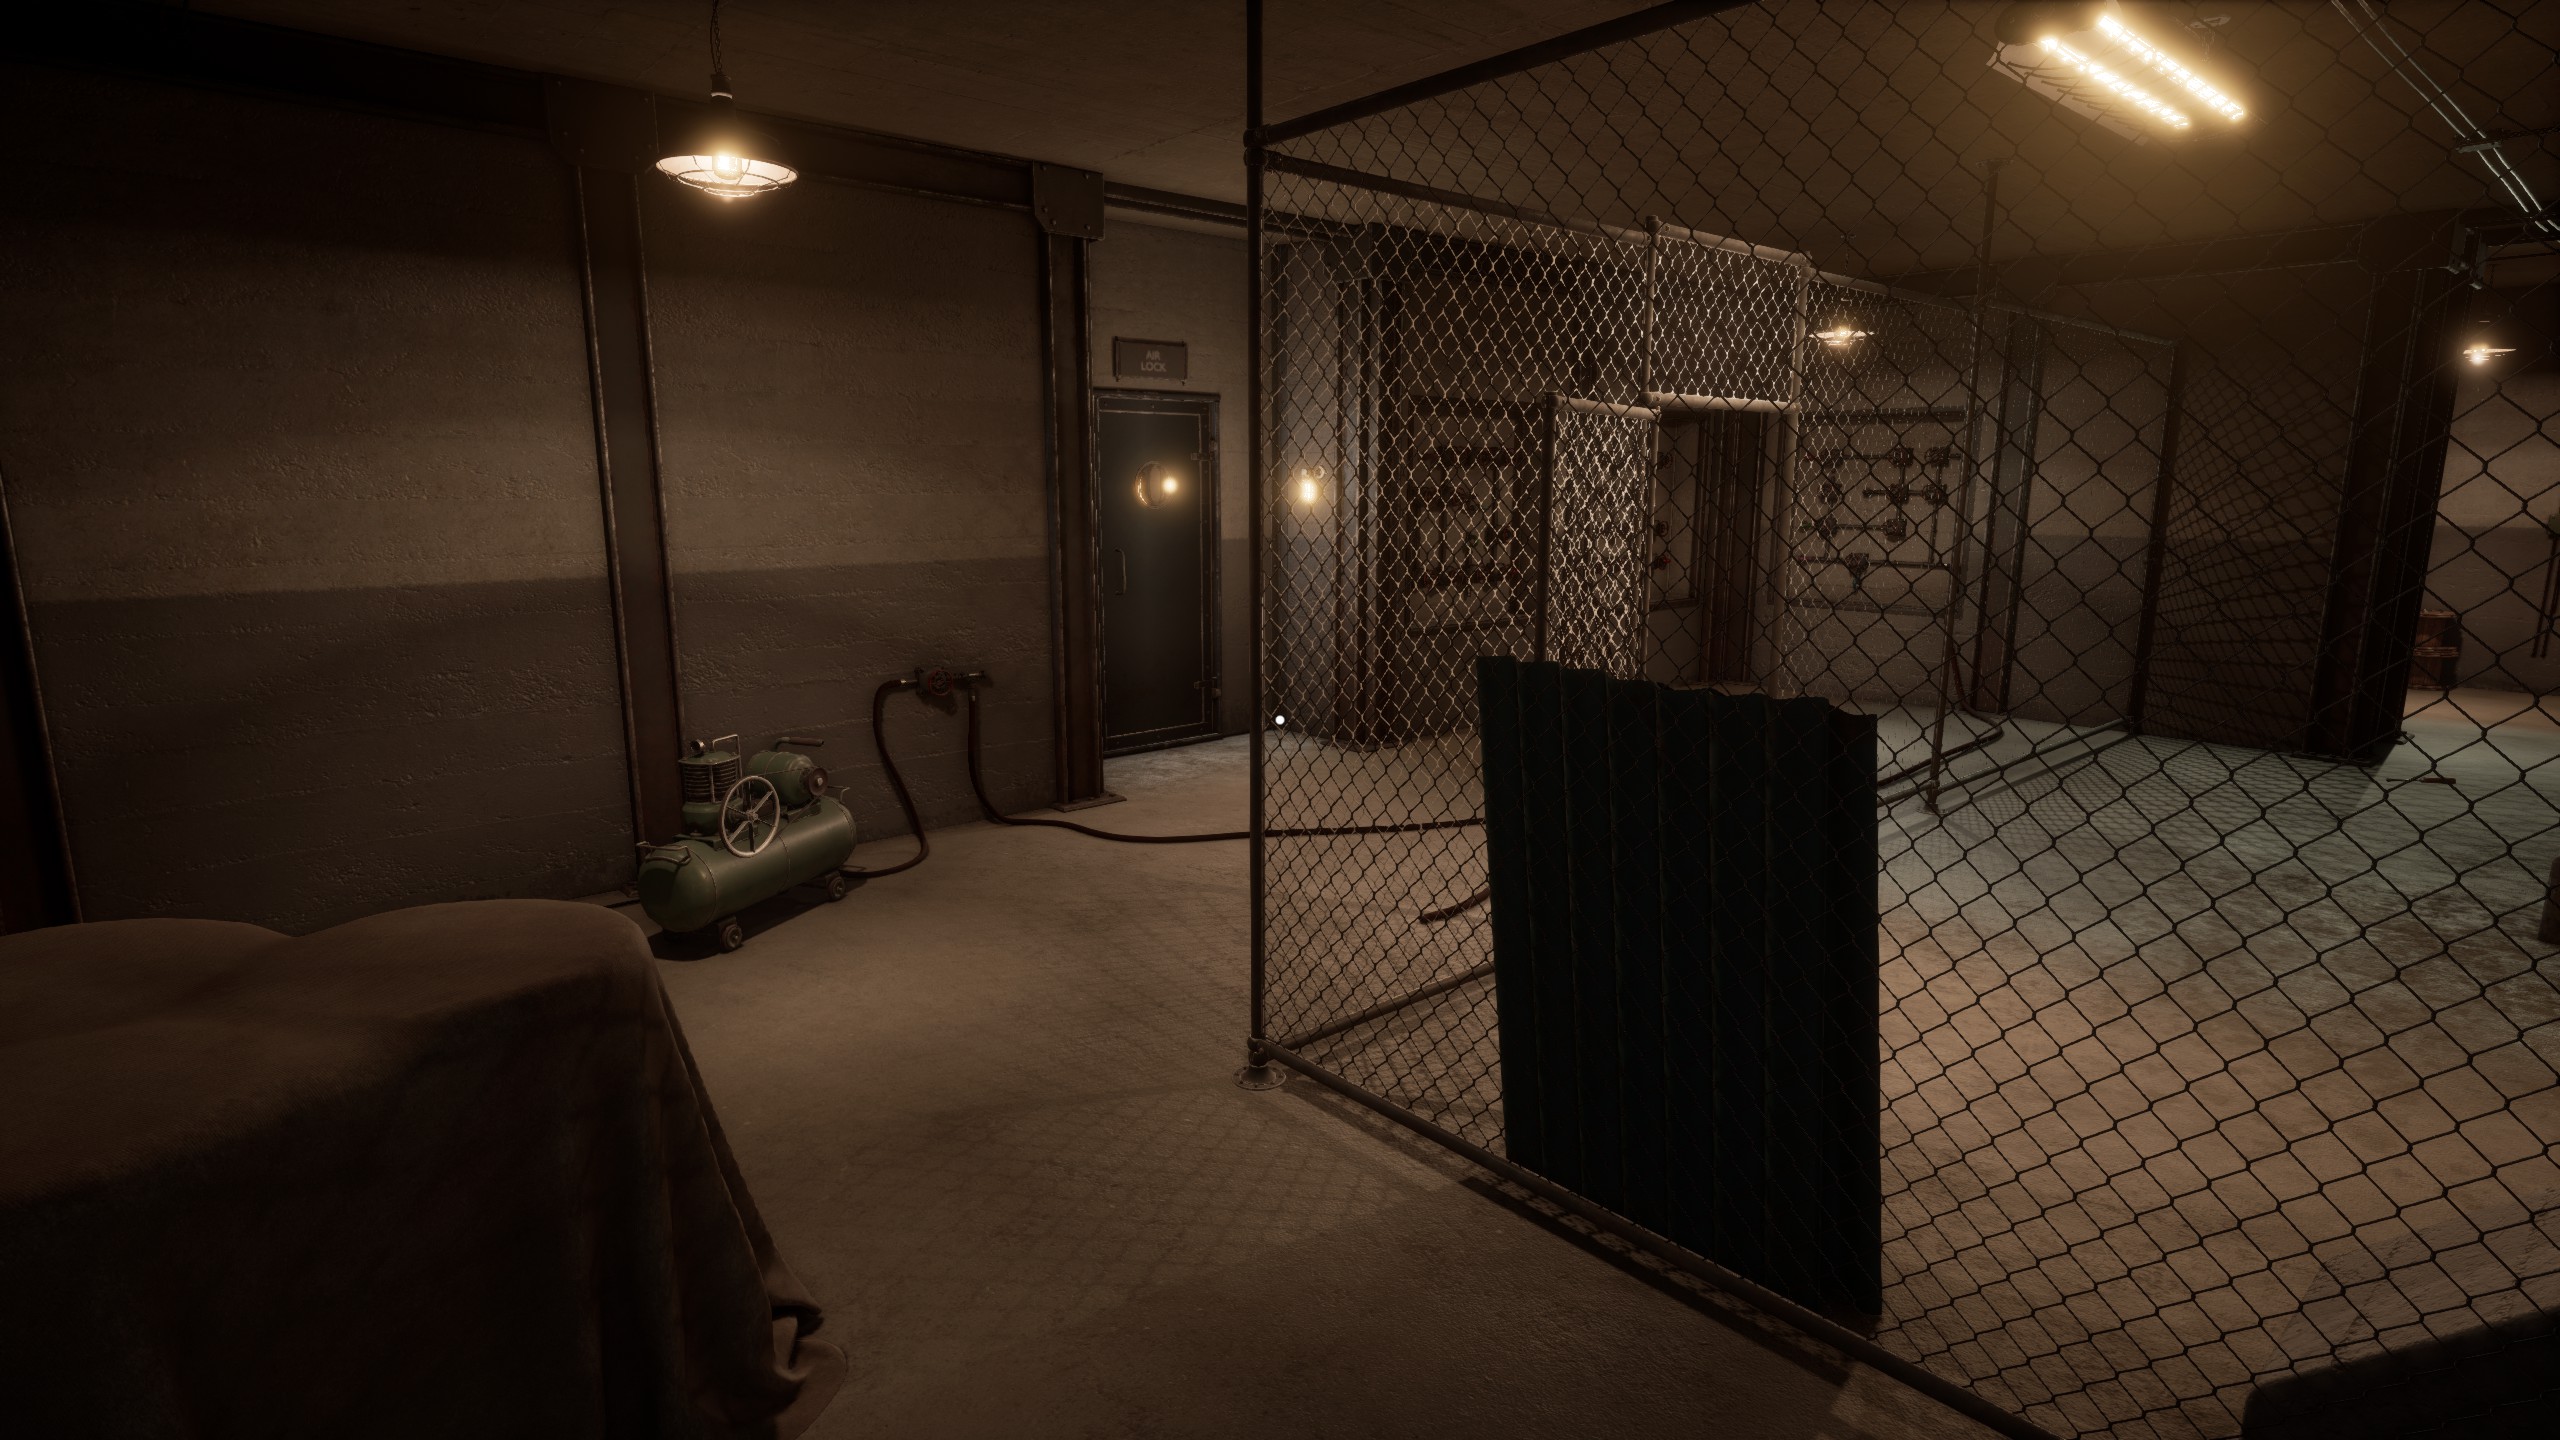
Next, you will move into a large entrance area. There are three sections that I will refer to. I’ll name them the Compressor area (seen at the left of the picture above), the Valve area (seen almost centre in the picture above), and the Cage area (see on the right side of the picture above).
“Collectible #19”
“Collectible #19” is stuck up behind the loud speakers on the left wall as you step into the main room of Entrance Area.
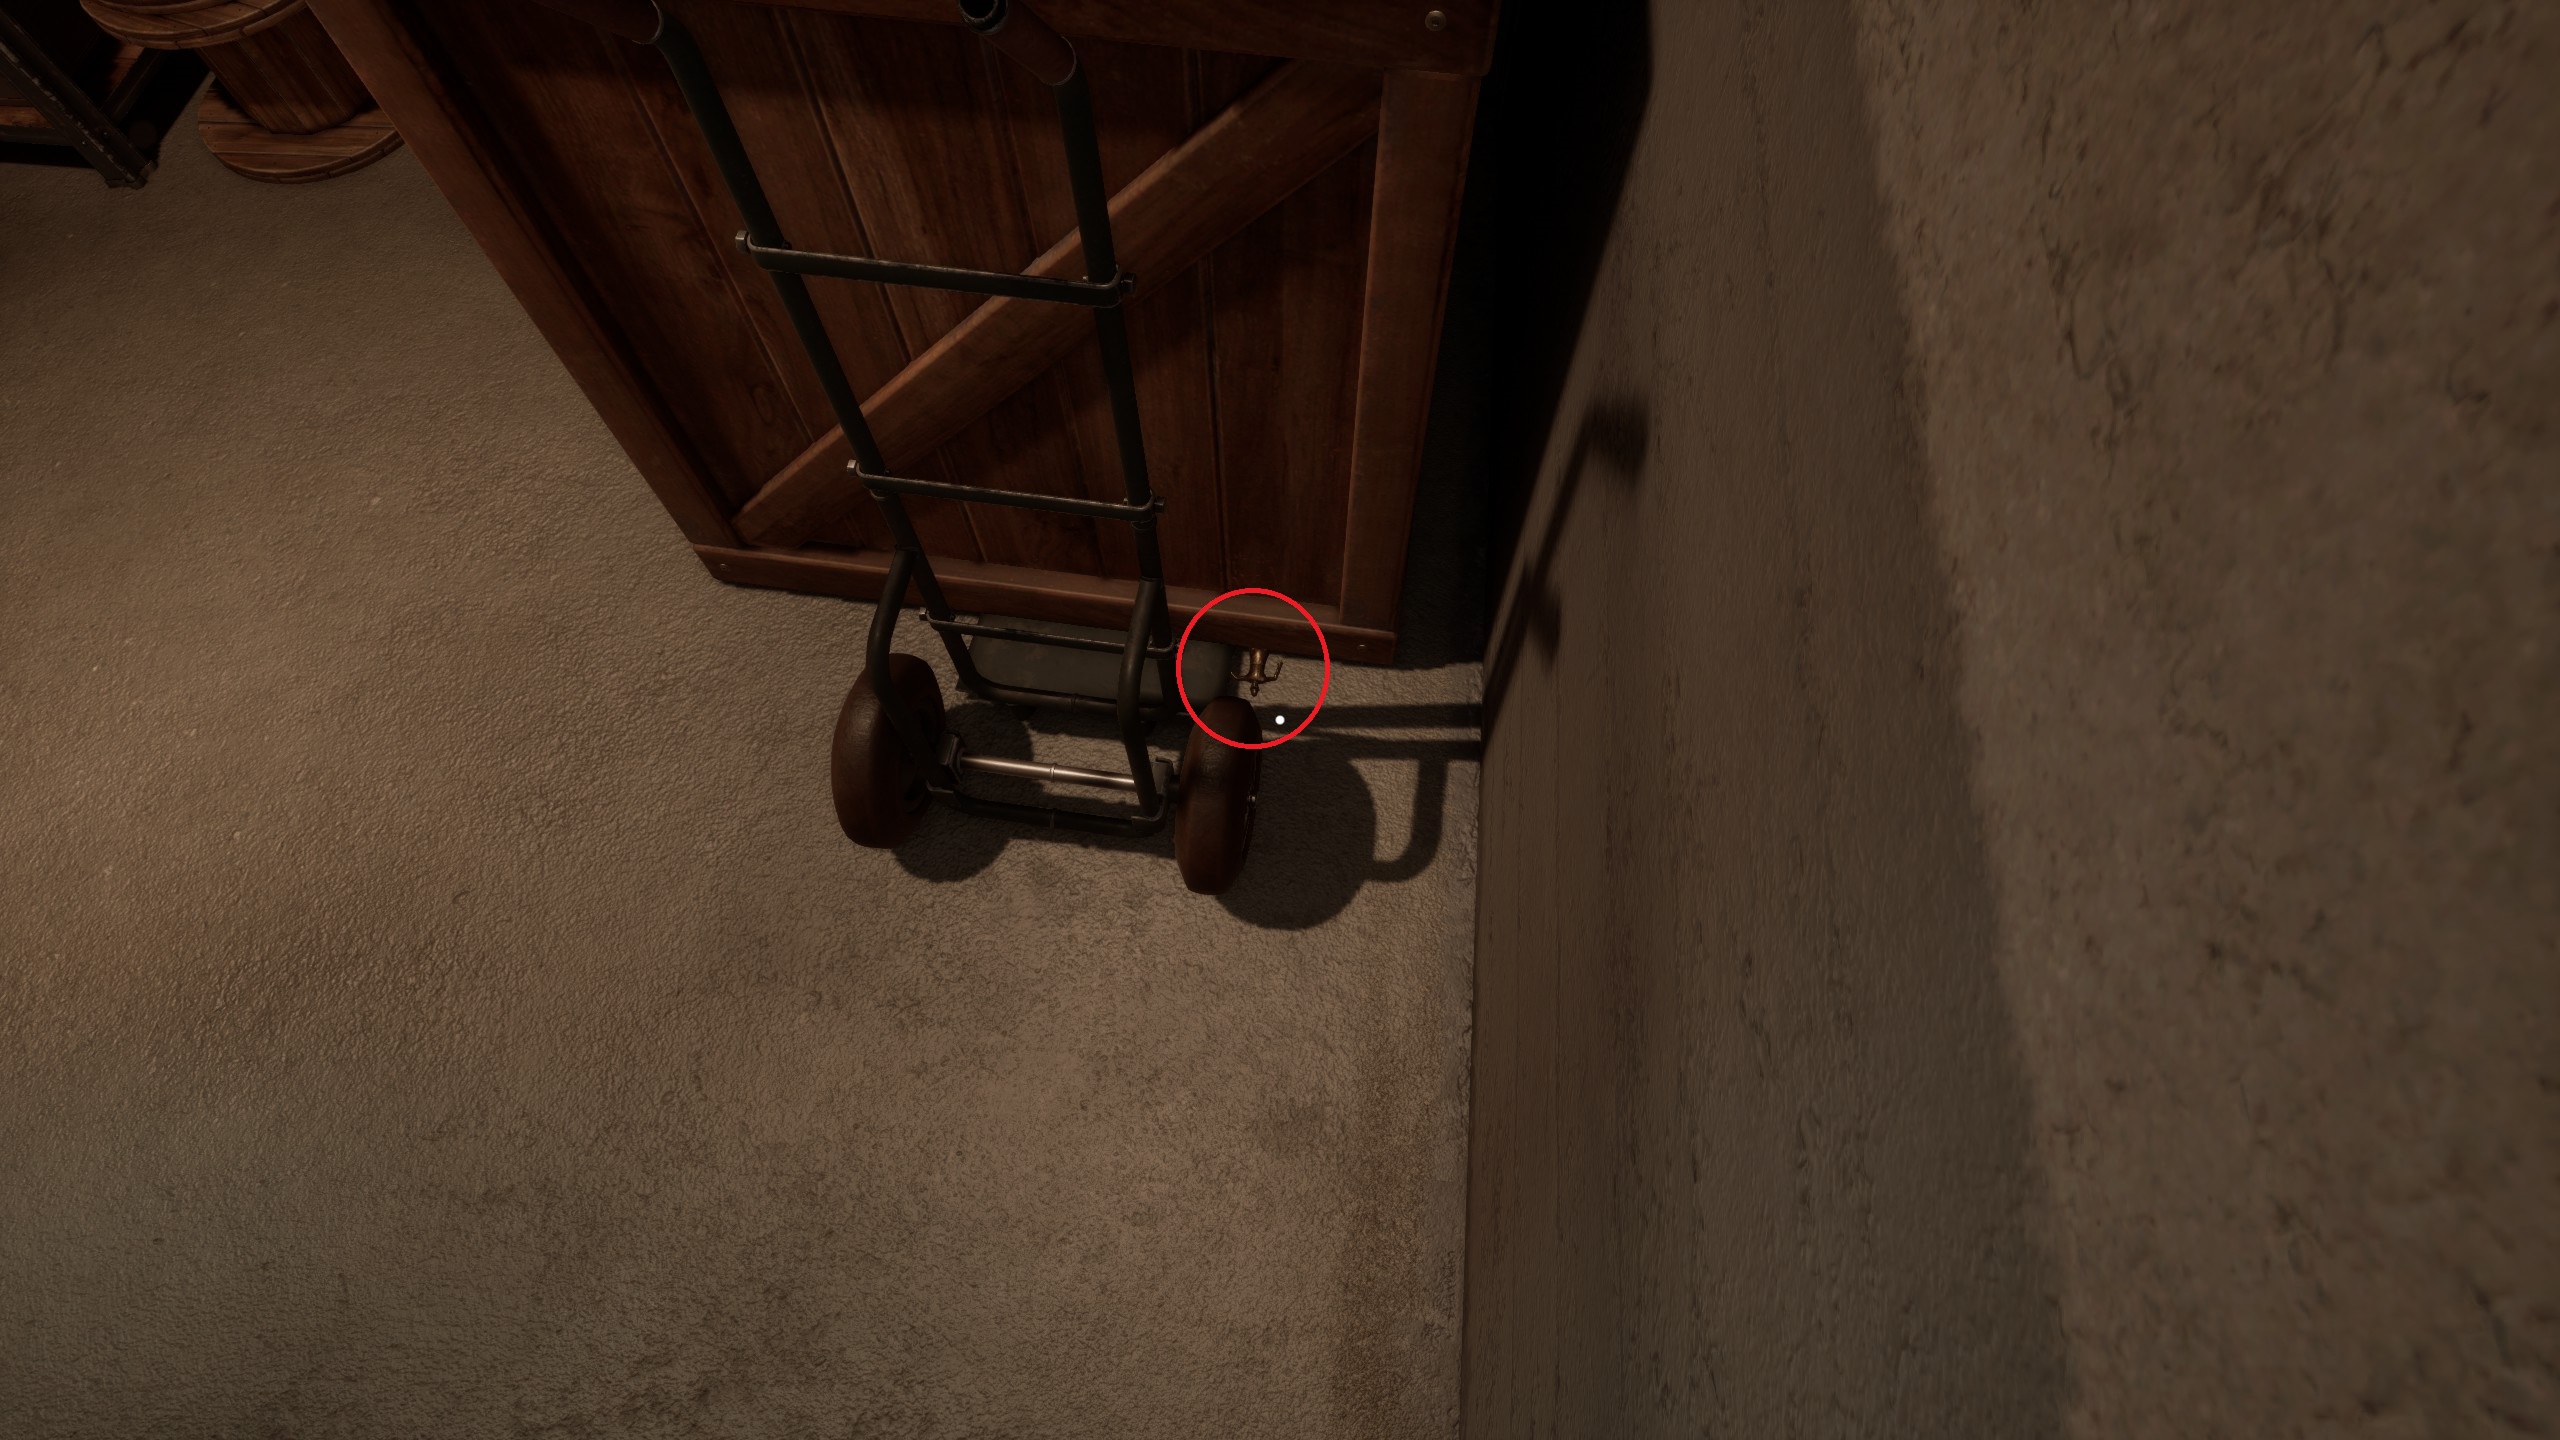
“Collectible #20”
“Collectible #20” is being crushed beneath the large create in the Cage area, where the dolly is propped.
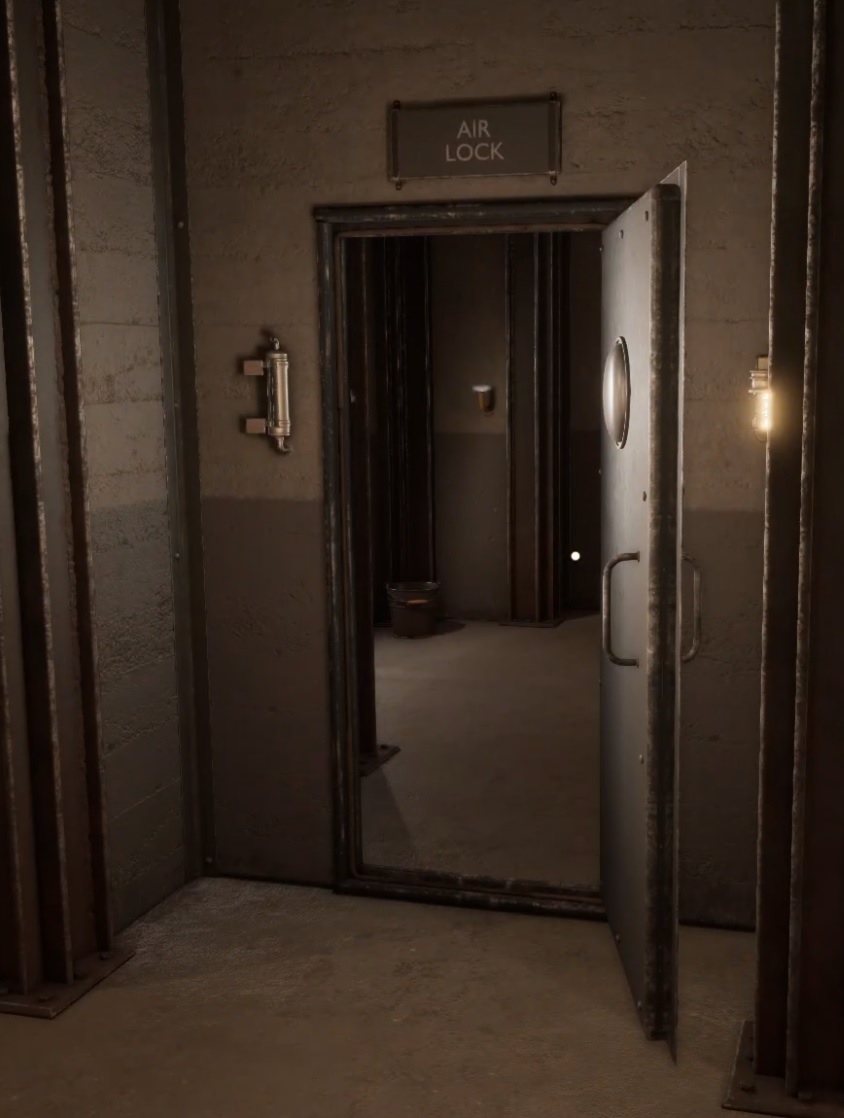
Your next objective is to open the pressurised door. To do this, you must solve the next puzzle.
Entrance Area Puzzle 1 & 2 > Pressurise the Air Lock
Puzzle 1:
Fix the Air Compressor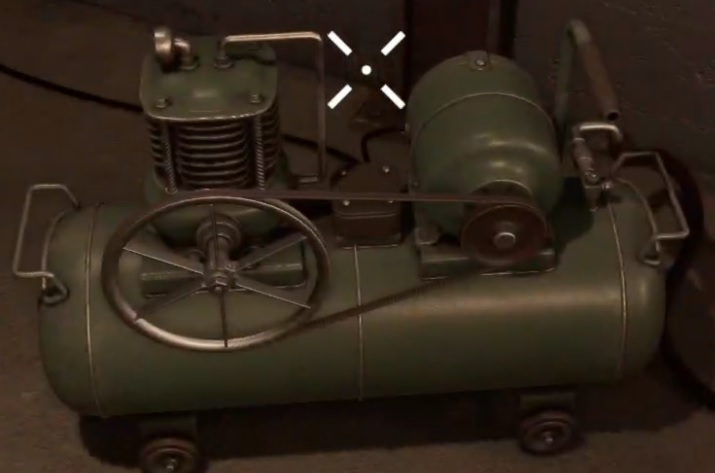
- Hint 1:The compressor breaks when you press the button to start it. You have to find a replacement drive belt. Look around to find a container that you can open.
- Hint 2:There is a cabinet in the Cage area, but it’s locked. There is no key to find, you’ll have to open it another way.
- Solution:Use the screwdriver you found in the Staircase Area to remove the hinges on the cabinet door.

Puzzle 2a:
Fix the Compressor.
- Solution:If you cannot install the new drive belt, don’t forget to start the compressor so the old belt falls off.
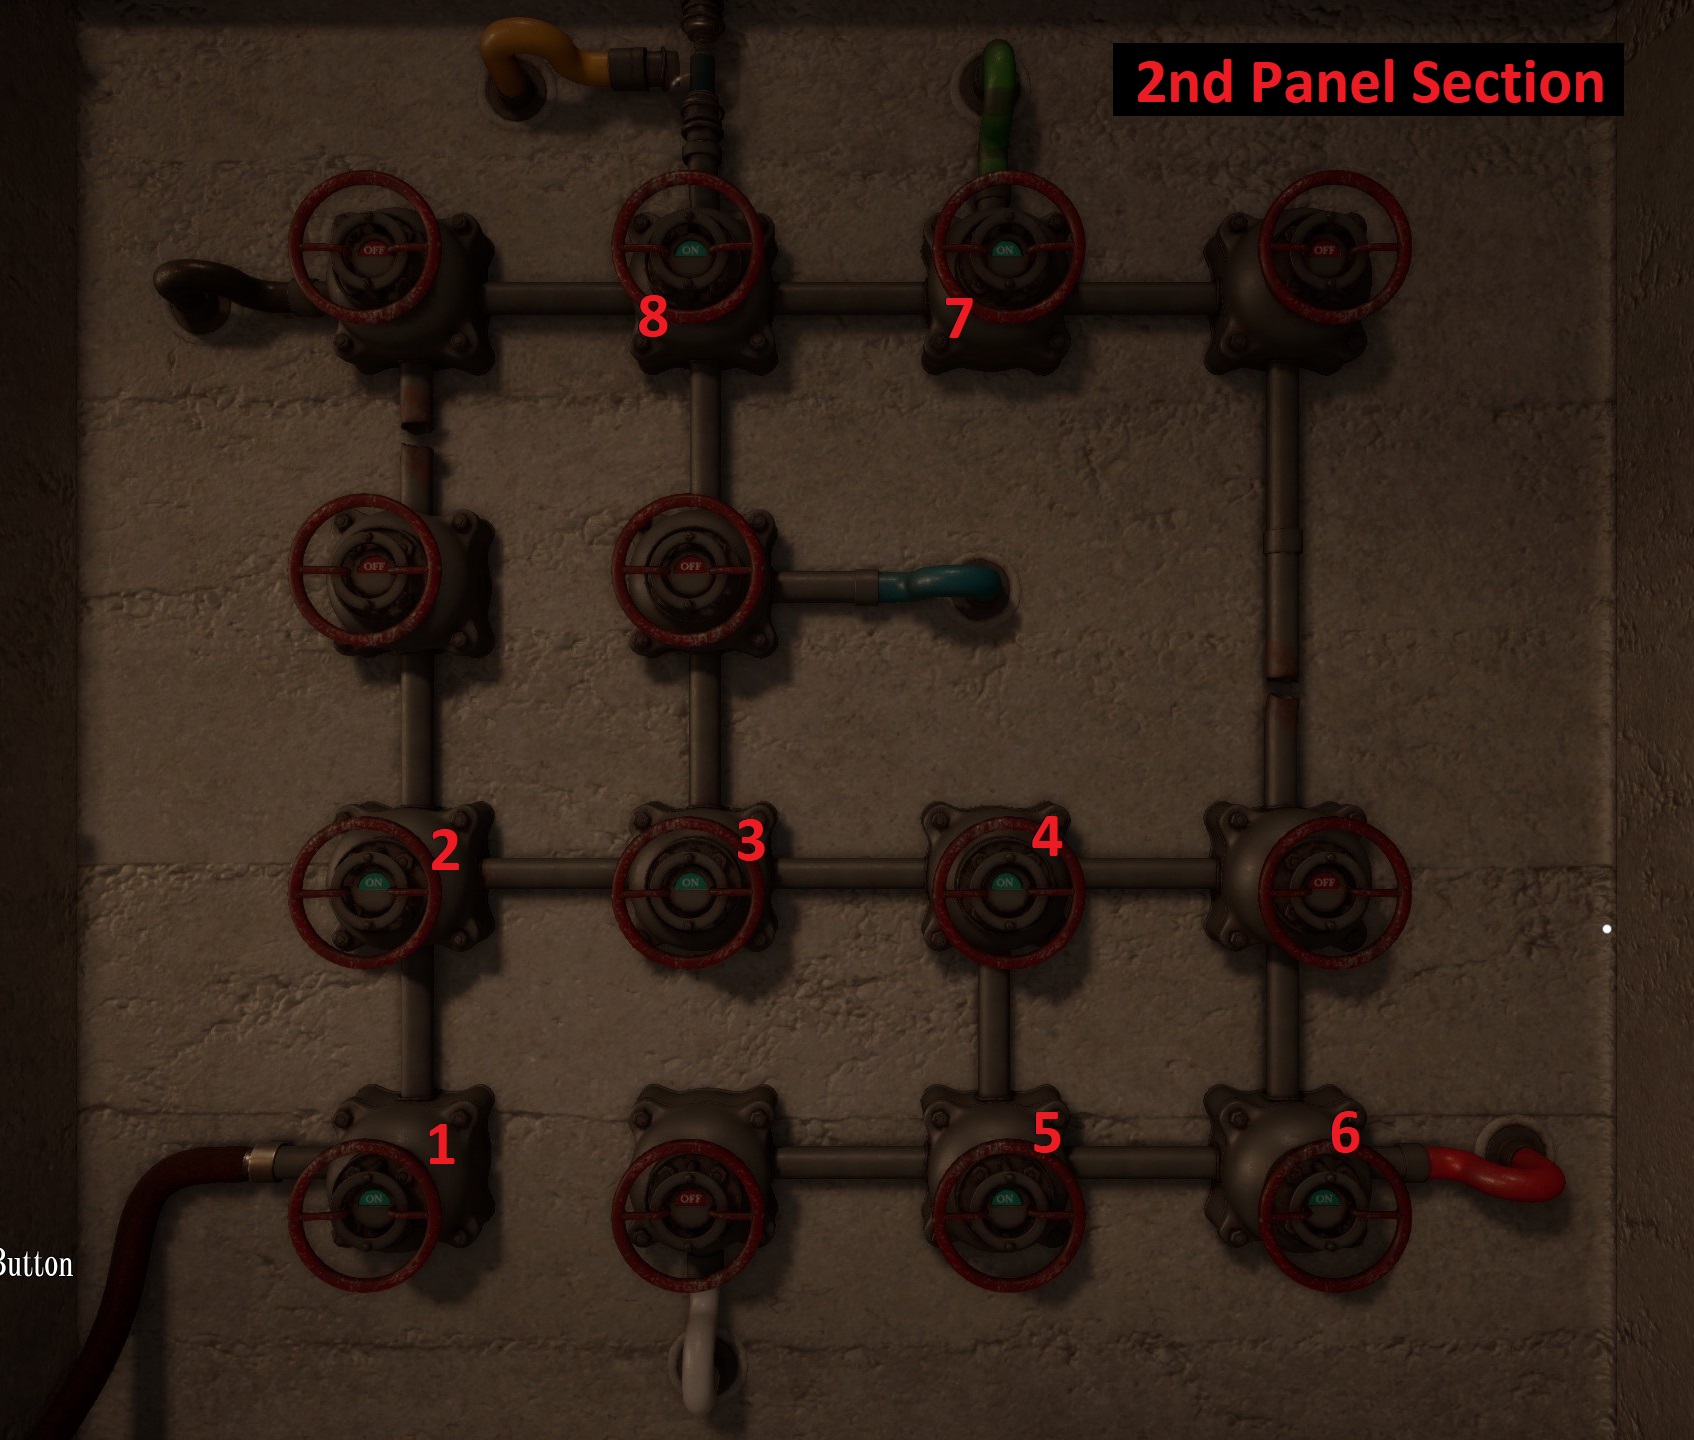
Puzzle 2b:
Use the Compressor to pressurise the Air Lock.
- Hint 1:In the Valve Area, open the valves in a sequence that will allow air to flow from the compressor to the room.
- Hint 2:There is only one path the air can take without leaking. The coloured pipes on each wall in the Valve Area match with some pipes in the other sections. Follow the pipes.
- Solution: Pay attention to the order of Panel Sections. You should start with the middle one.


Corridors

This area is a collection of hallways that connect the 5 remaining rooms. Above is an in-game map of the area that is located in the Corridors. I will be referring to this map for some hints.
Since you need puzzle pieces in each room to unlock progressive rooms, I will use this section for the first room-unlock only. Each subsequent room will contain the unlocks for other rooms.
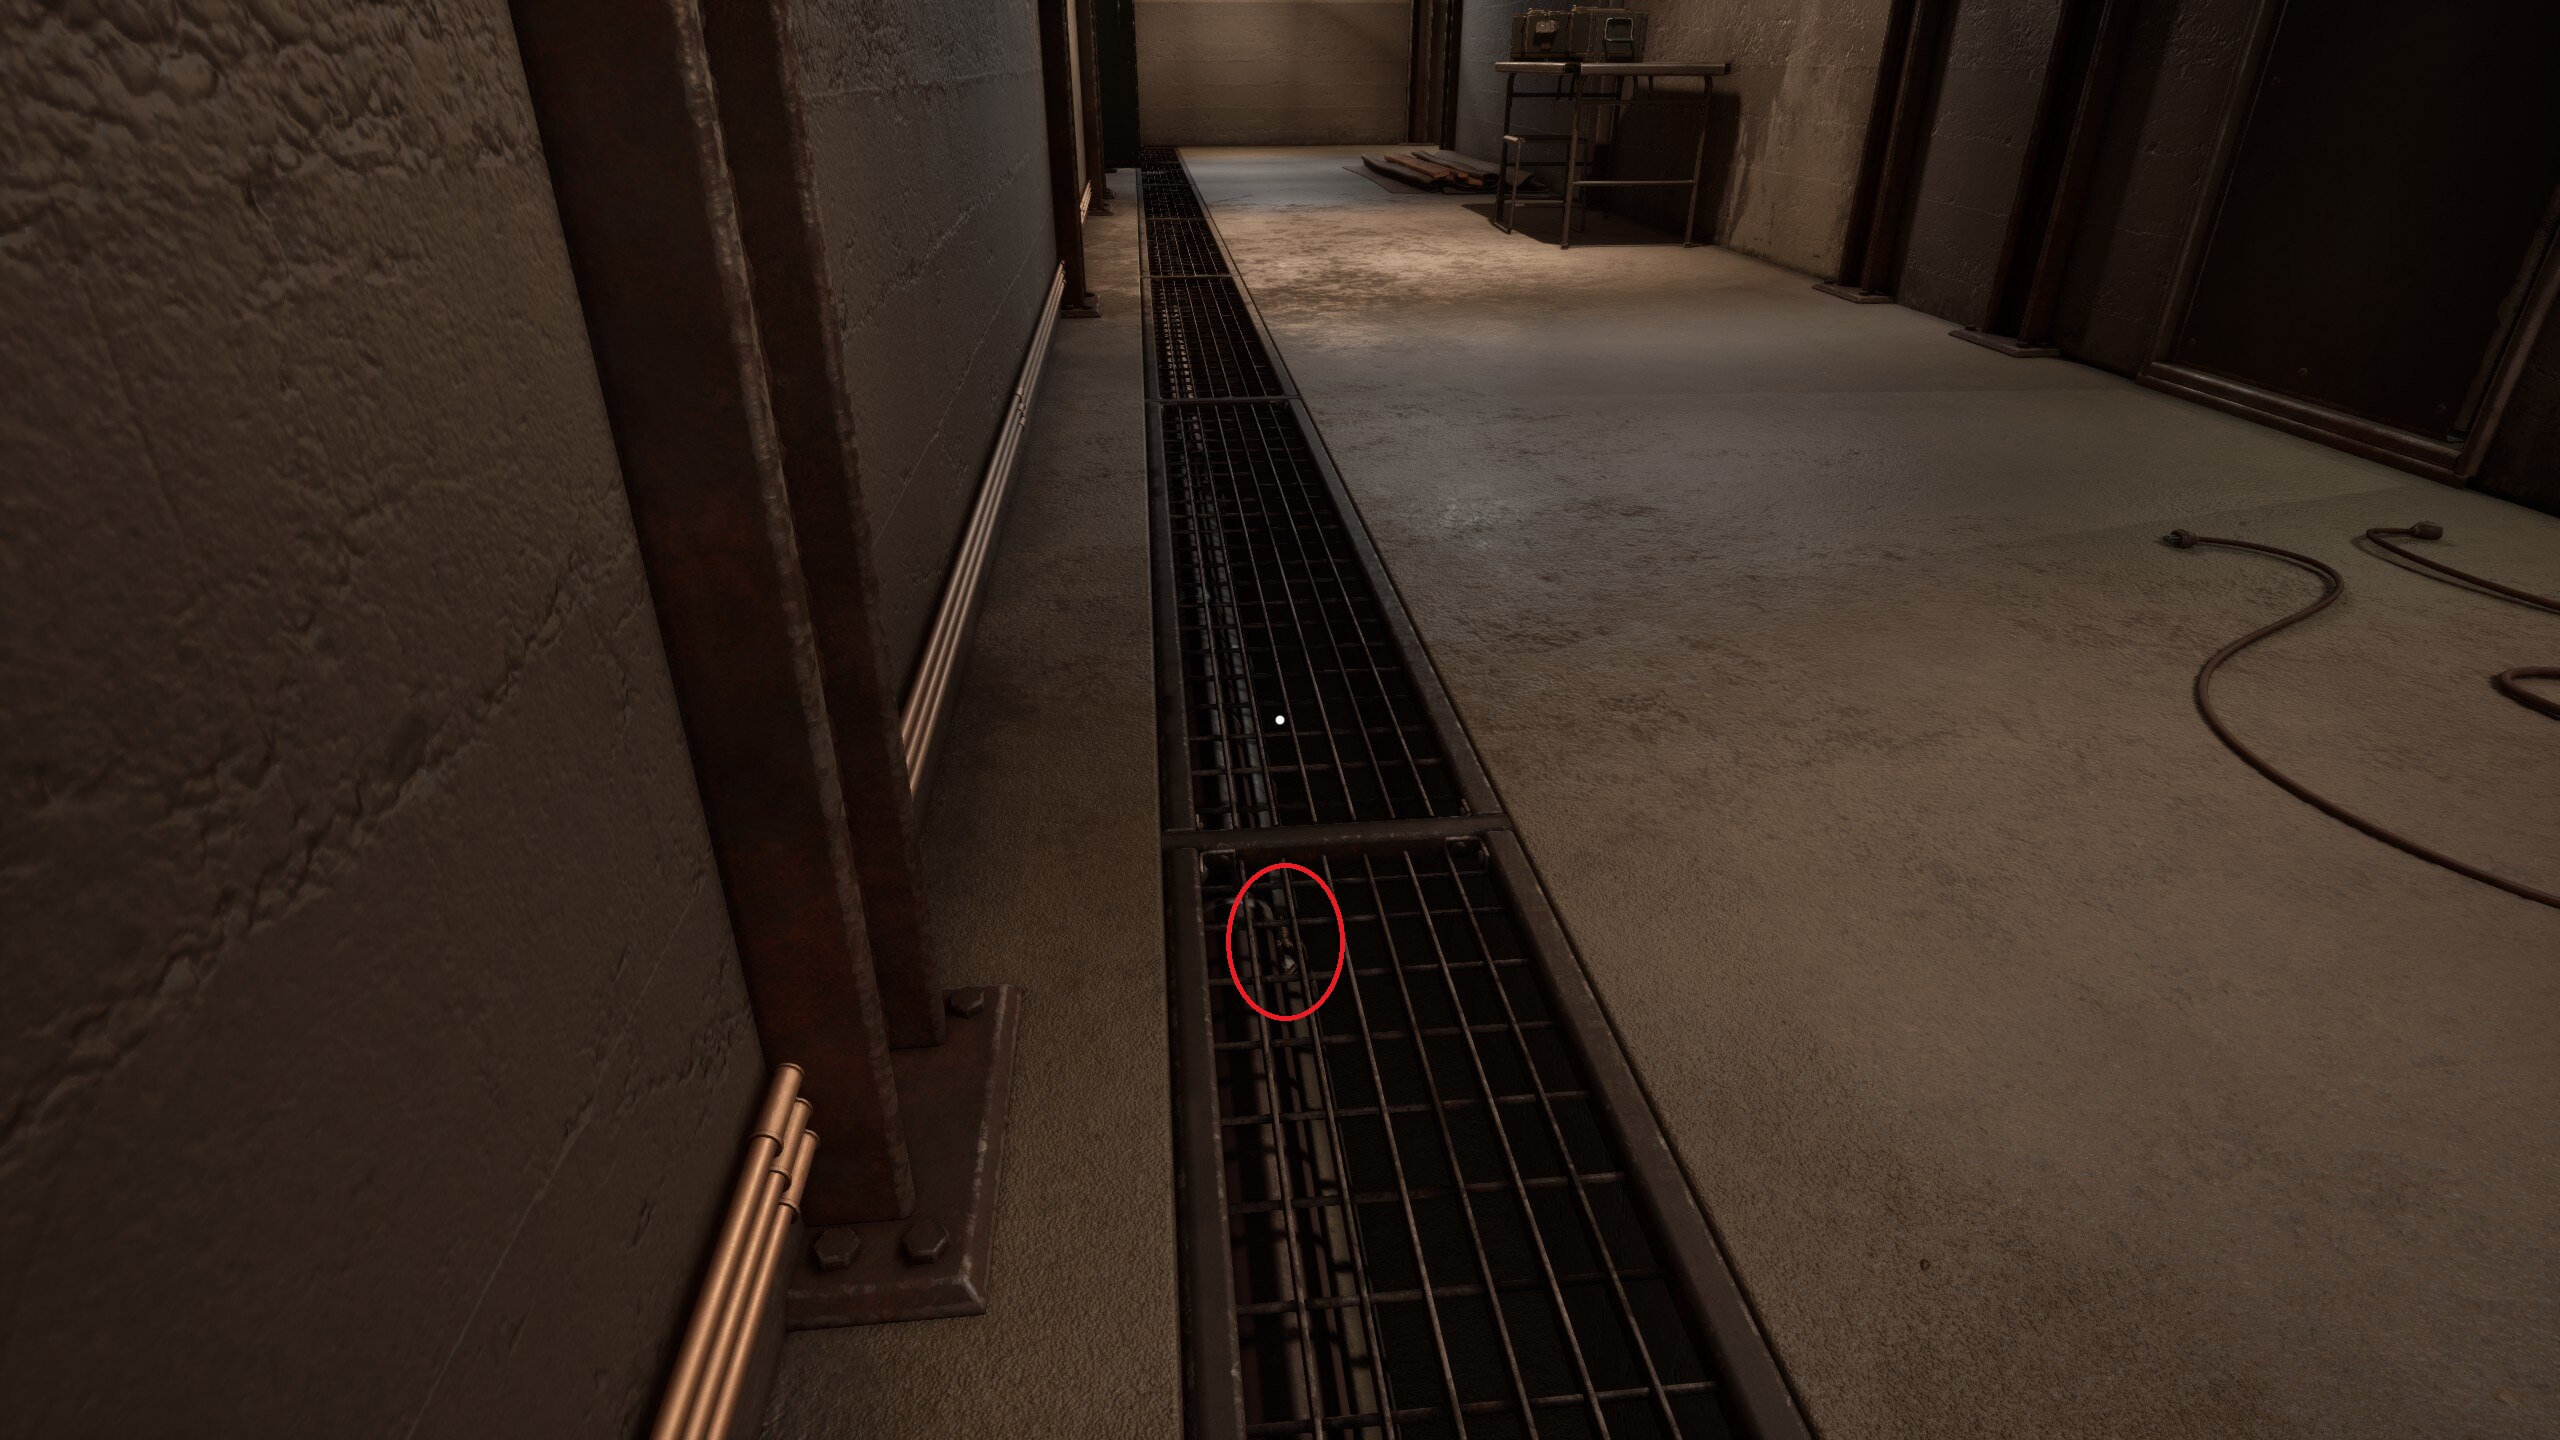
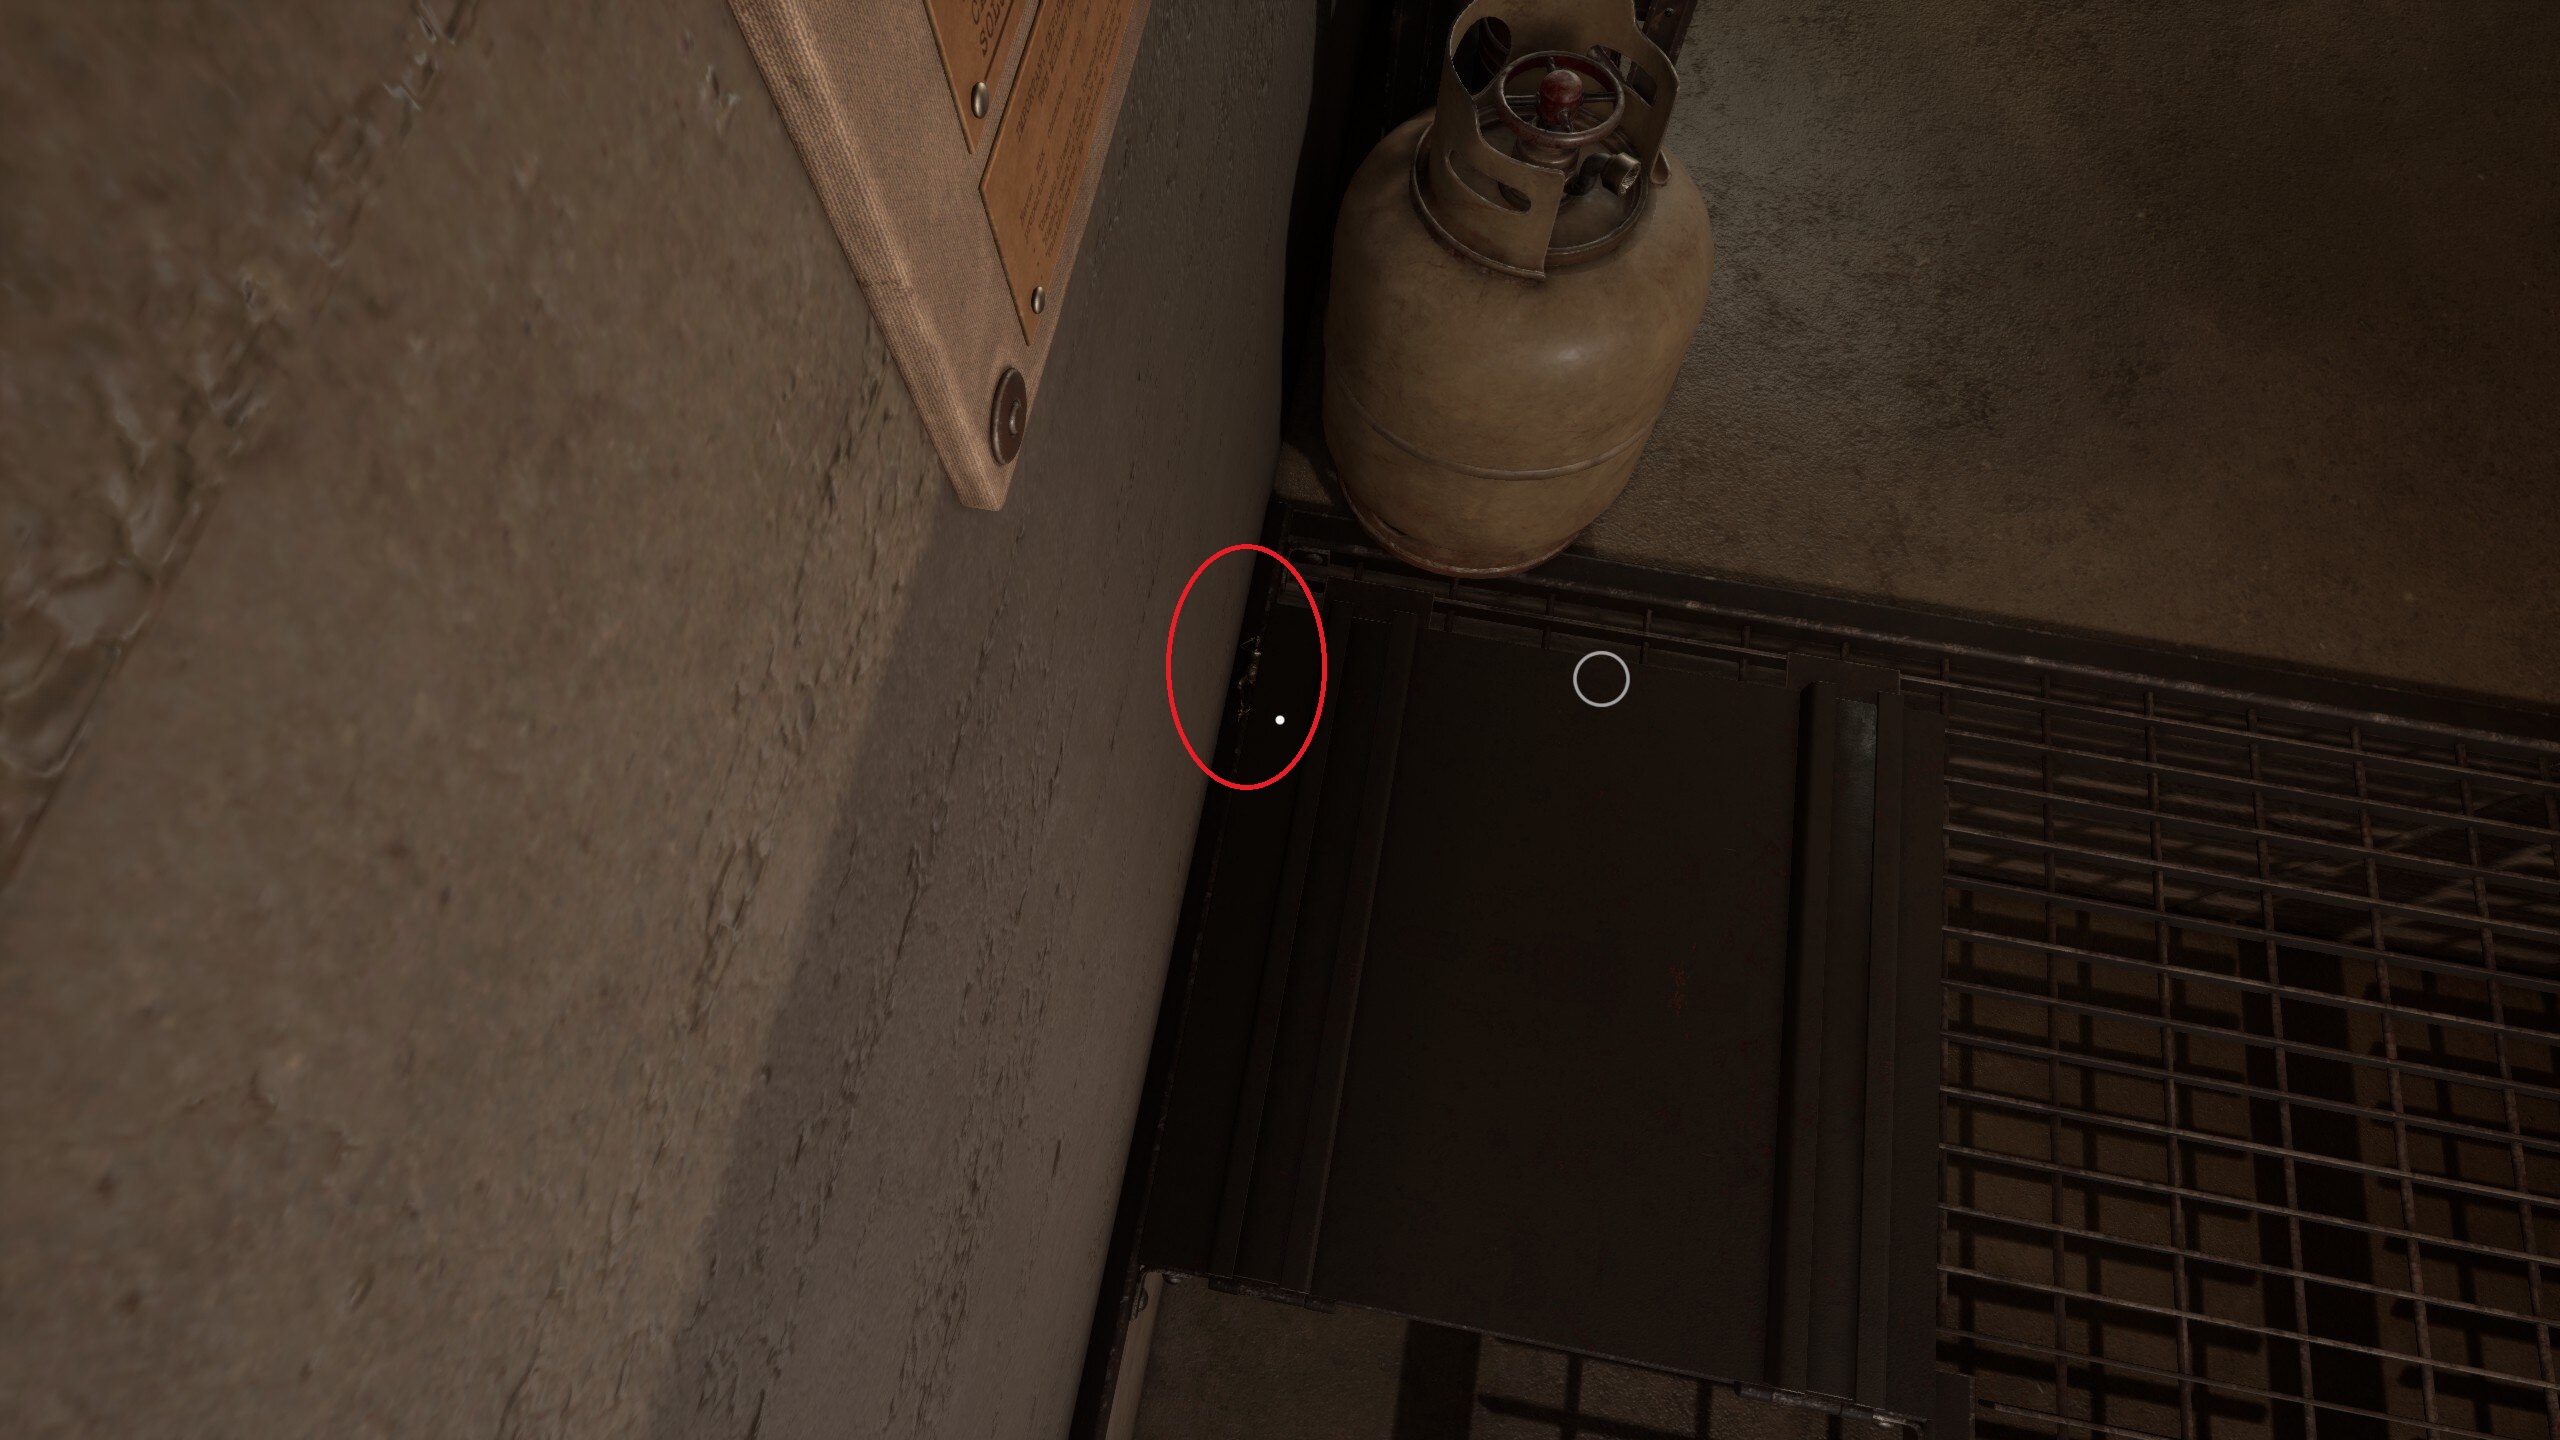
“Collectible #21”
As you move from the Air Lock clockwise through the Corridors, “Collectible #21 is under the grating on the pipes in the floor.
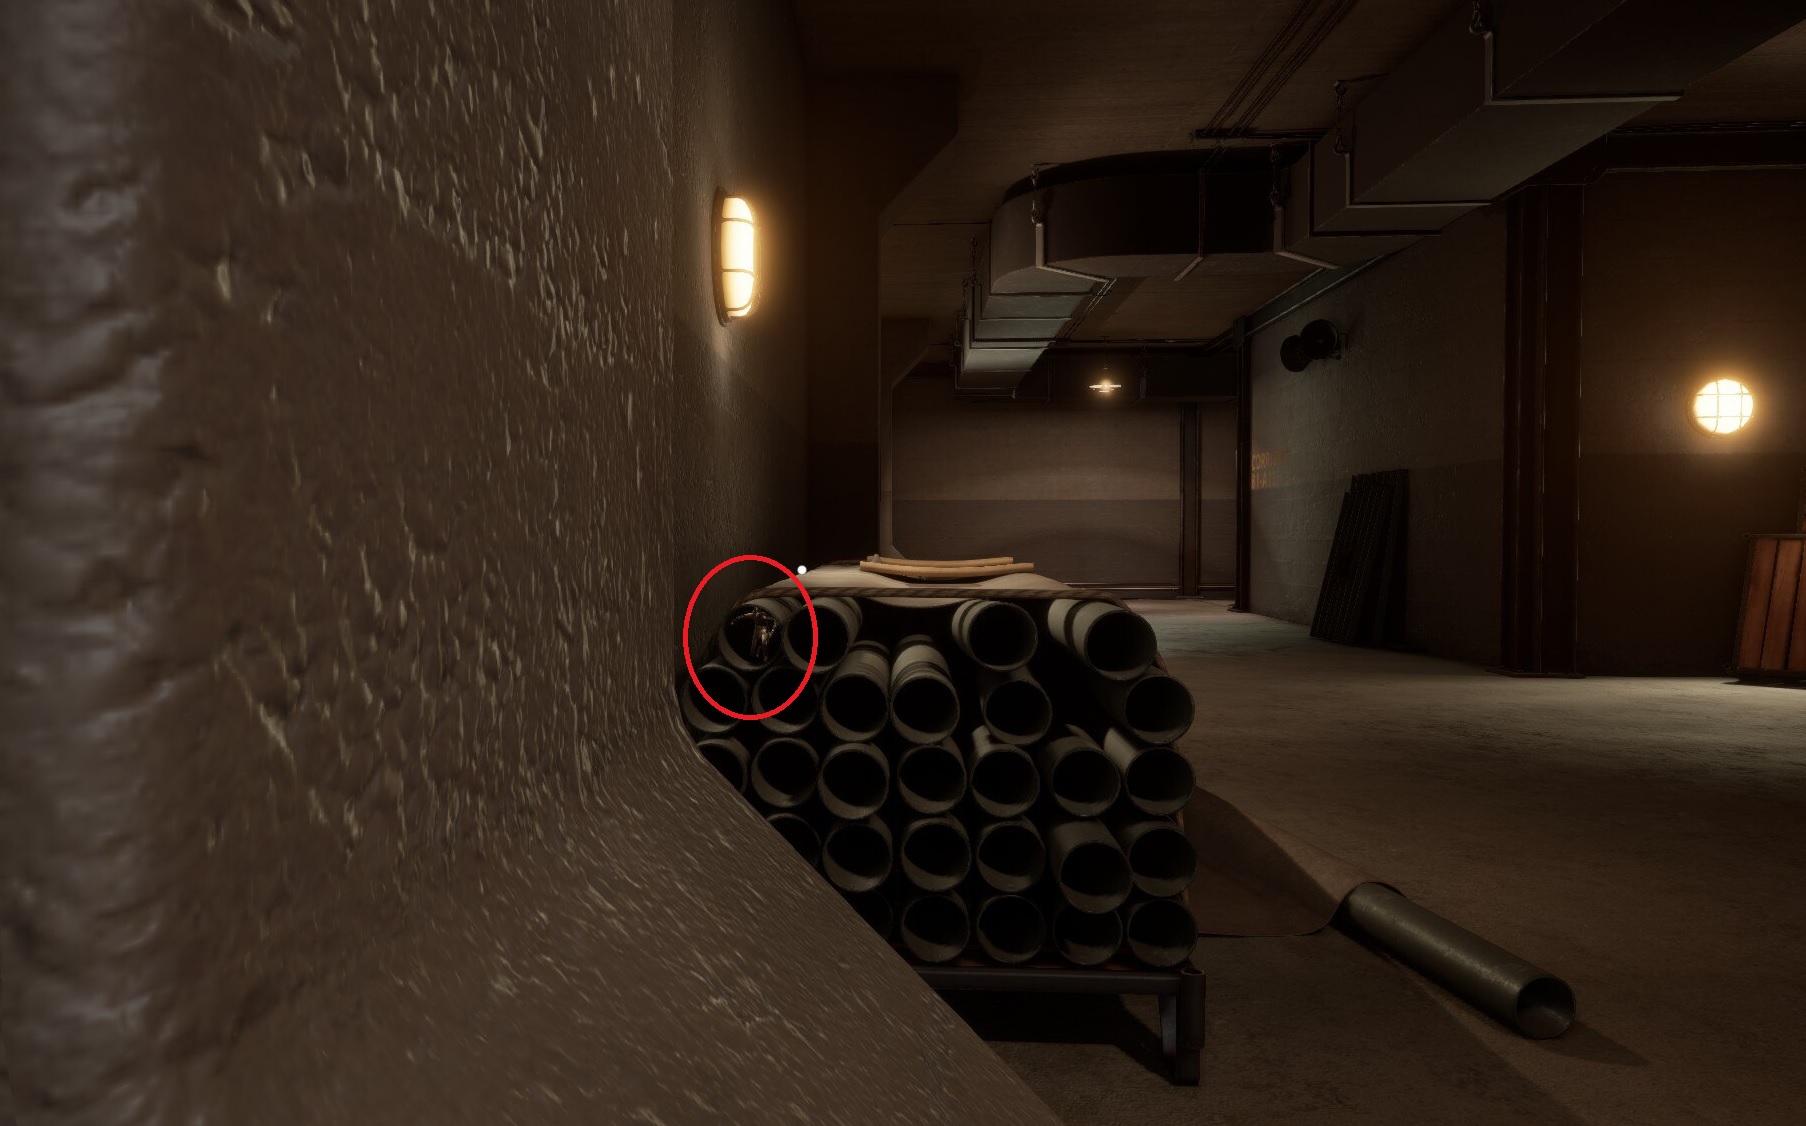
“Collectible #22”
Continuing clockwise, there is a stack of pipes along the same wall as the collapsed tunnel. “Collectible #22 is hidden in the top left pipe as you’re facing the collapsed tunnel.
“Collectible #23”
Along the back wall you will see a stack of pallets. “Collectible #23” is hidden on the middle brace of the leaning pallet. It’s easiest to see it from the left hand side of the stack.
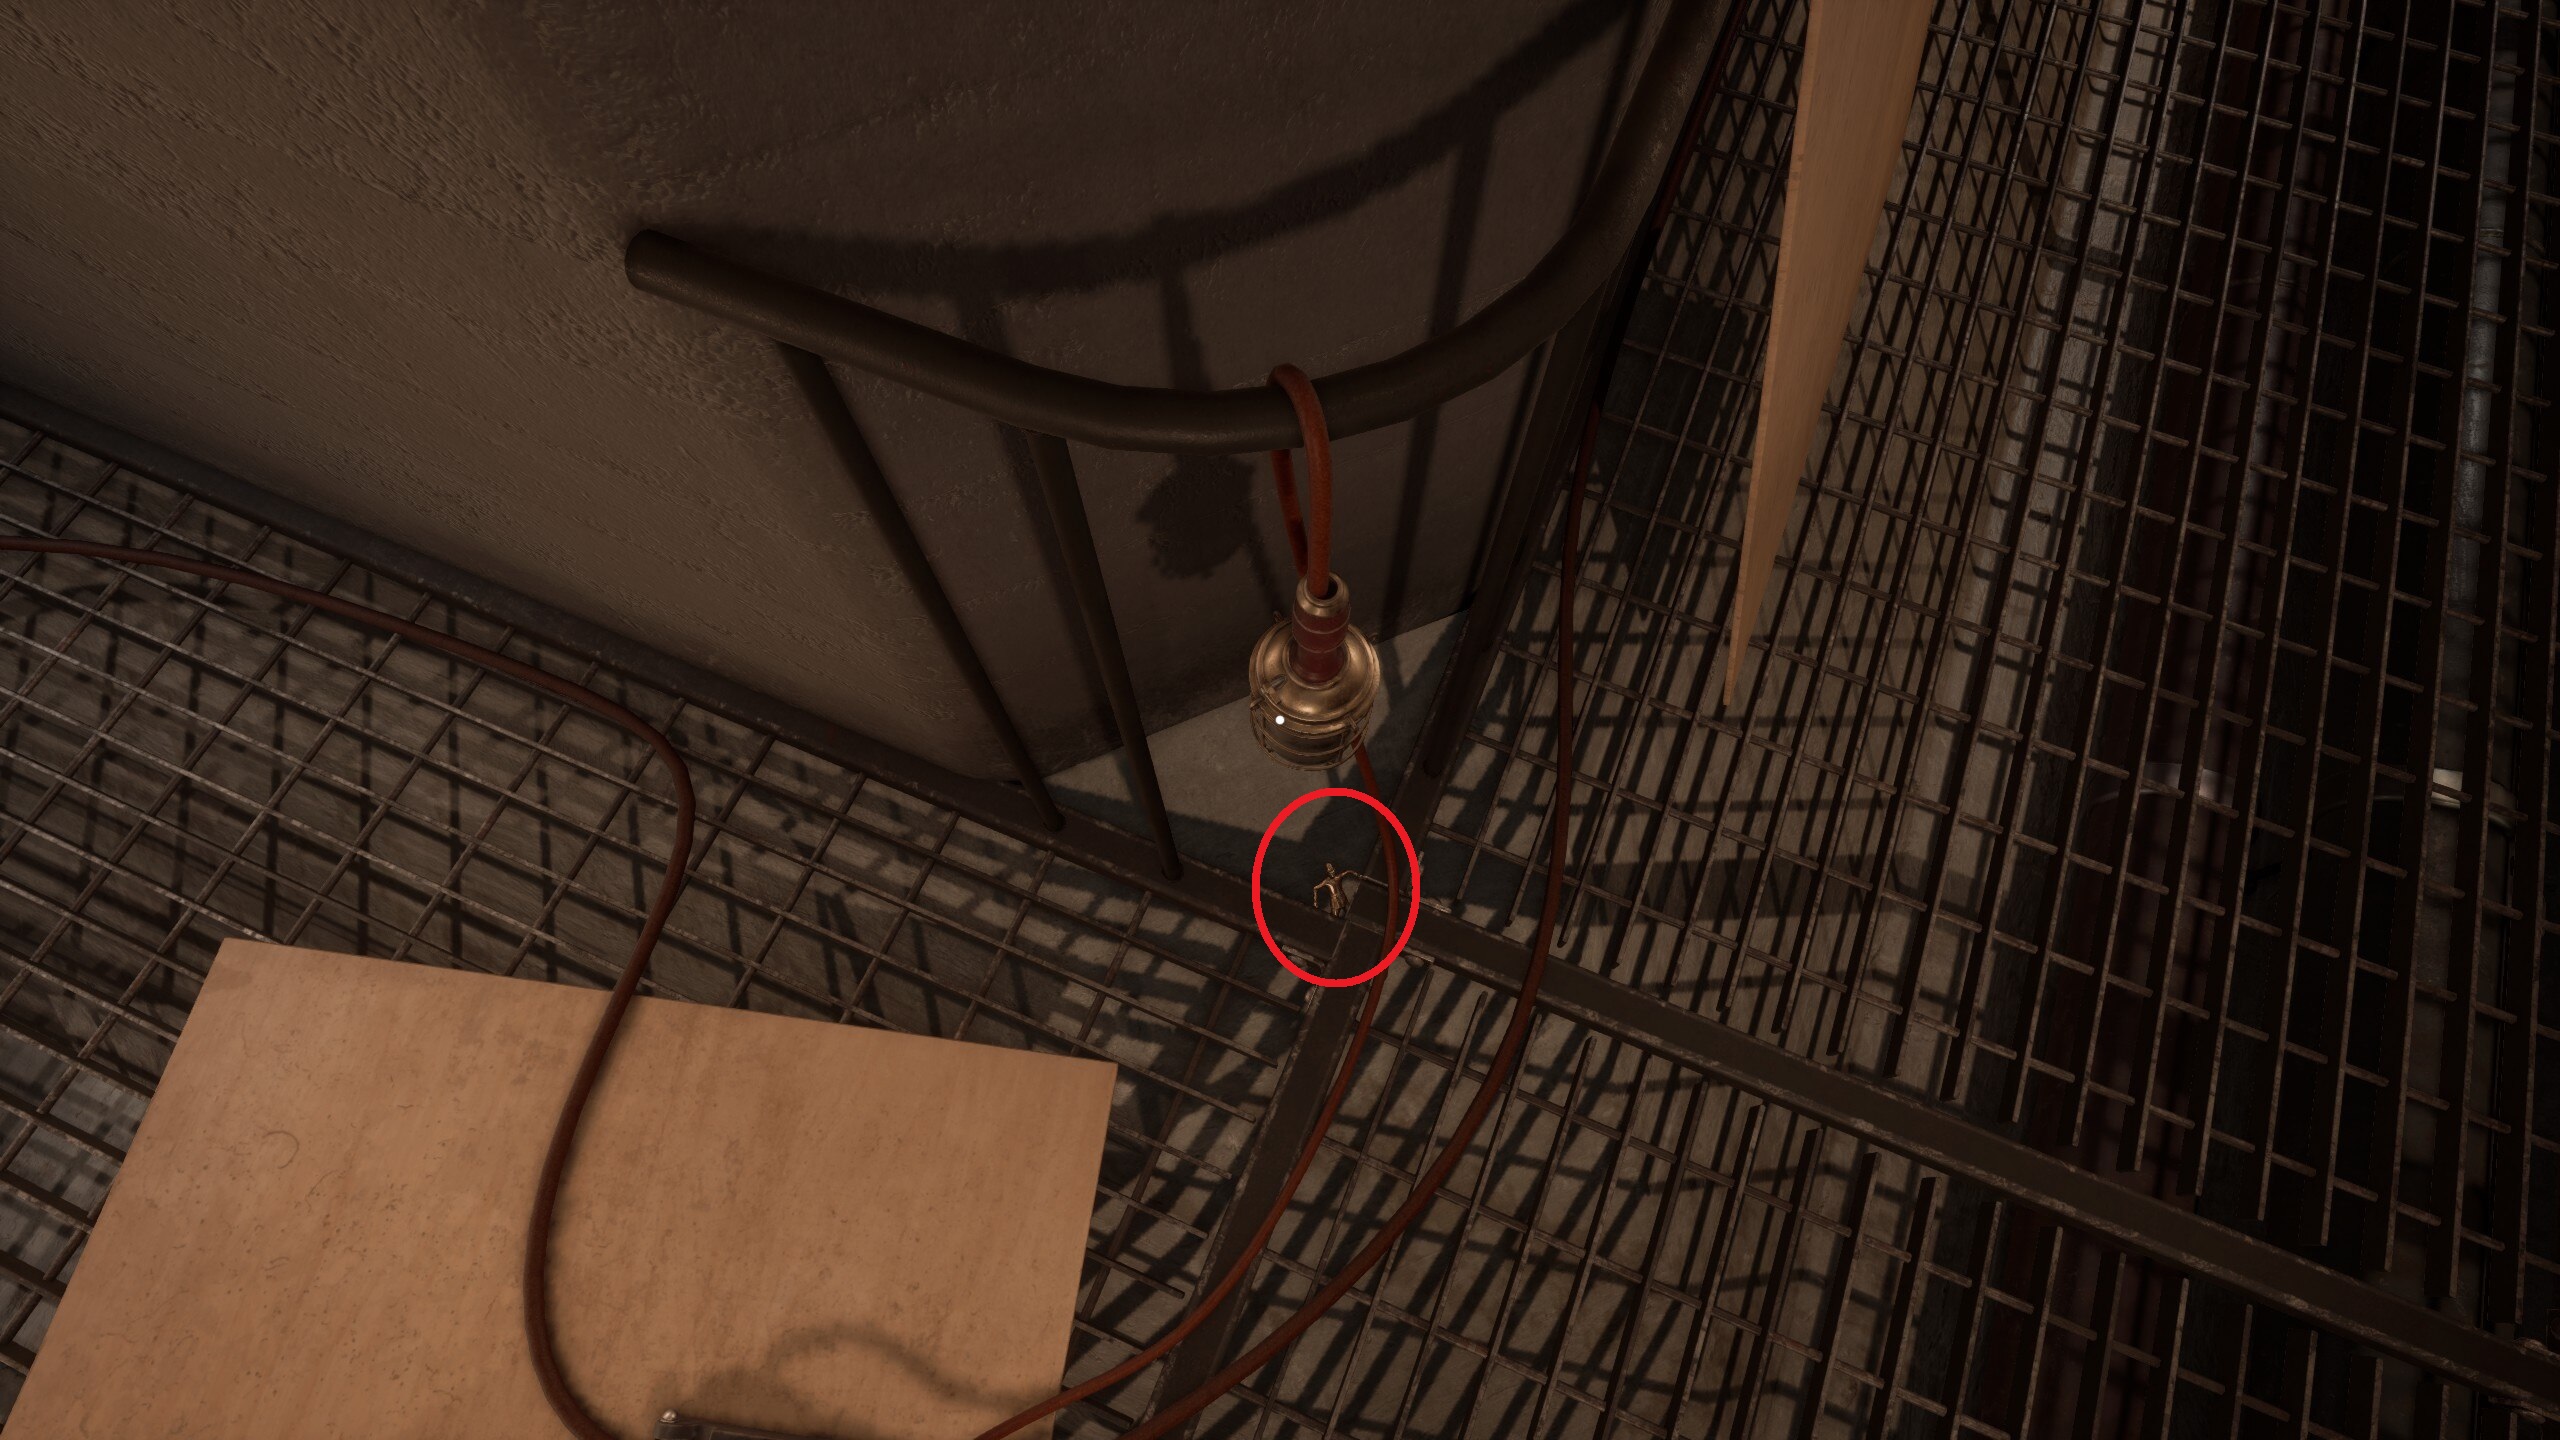
“Collectible #24”
Outside the Generator Room (see map, if needed) there is a work light hanging off a railing. Below that, tucked in the corner of the grating, you can see “Collectible #24”
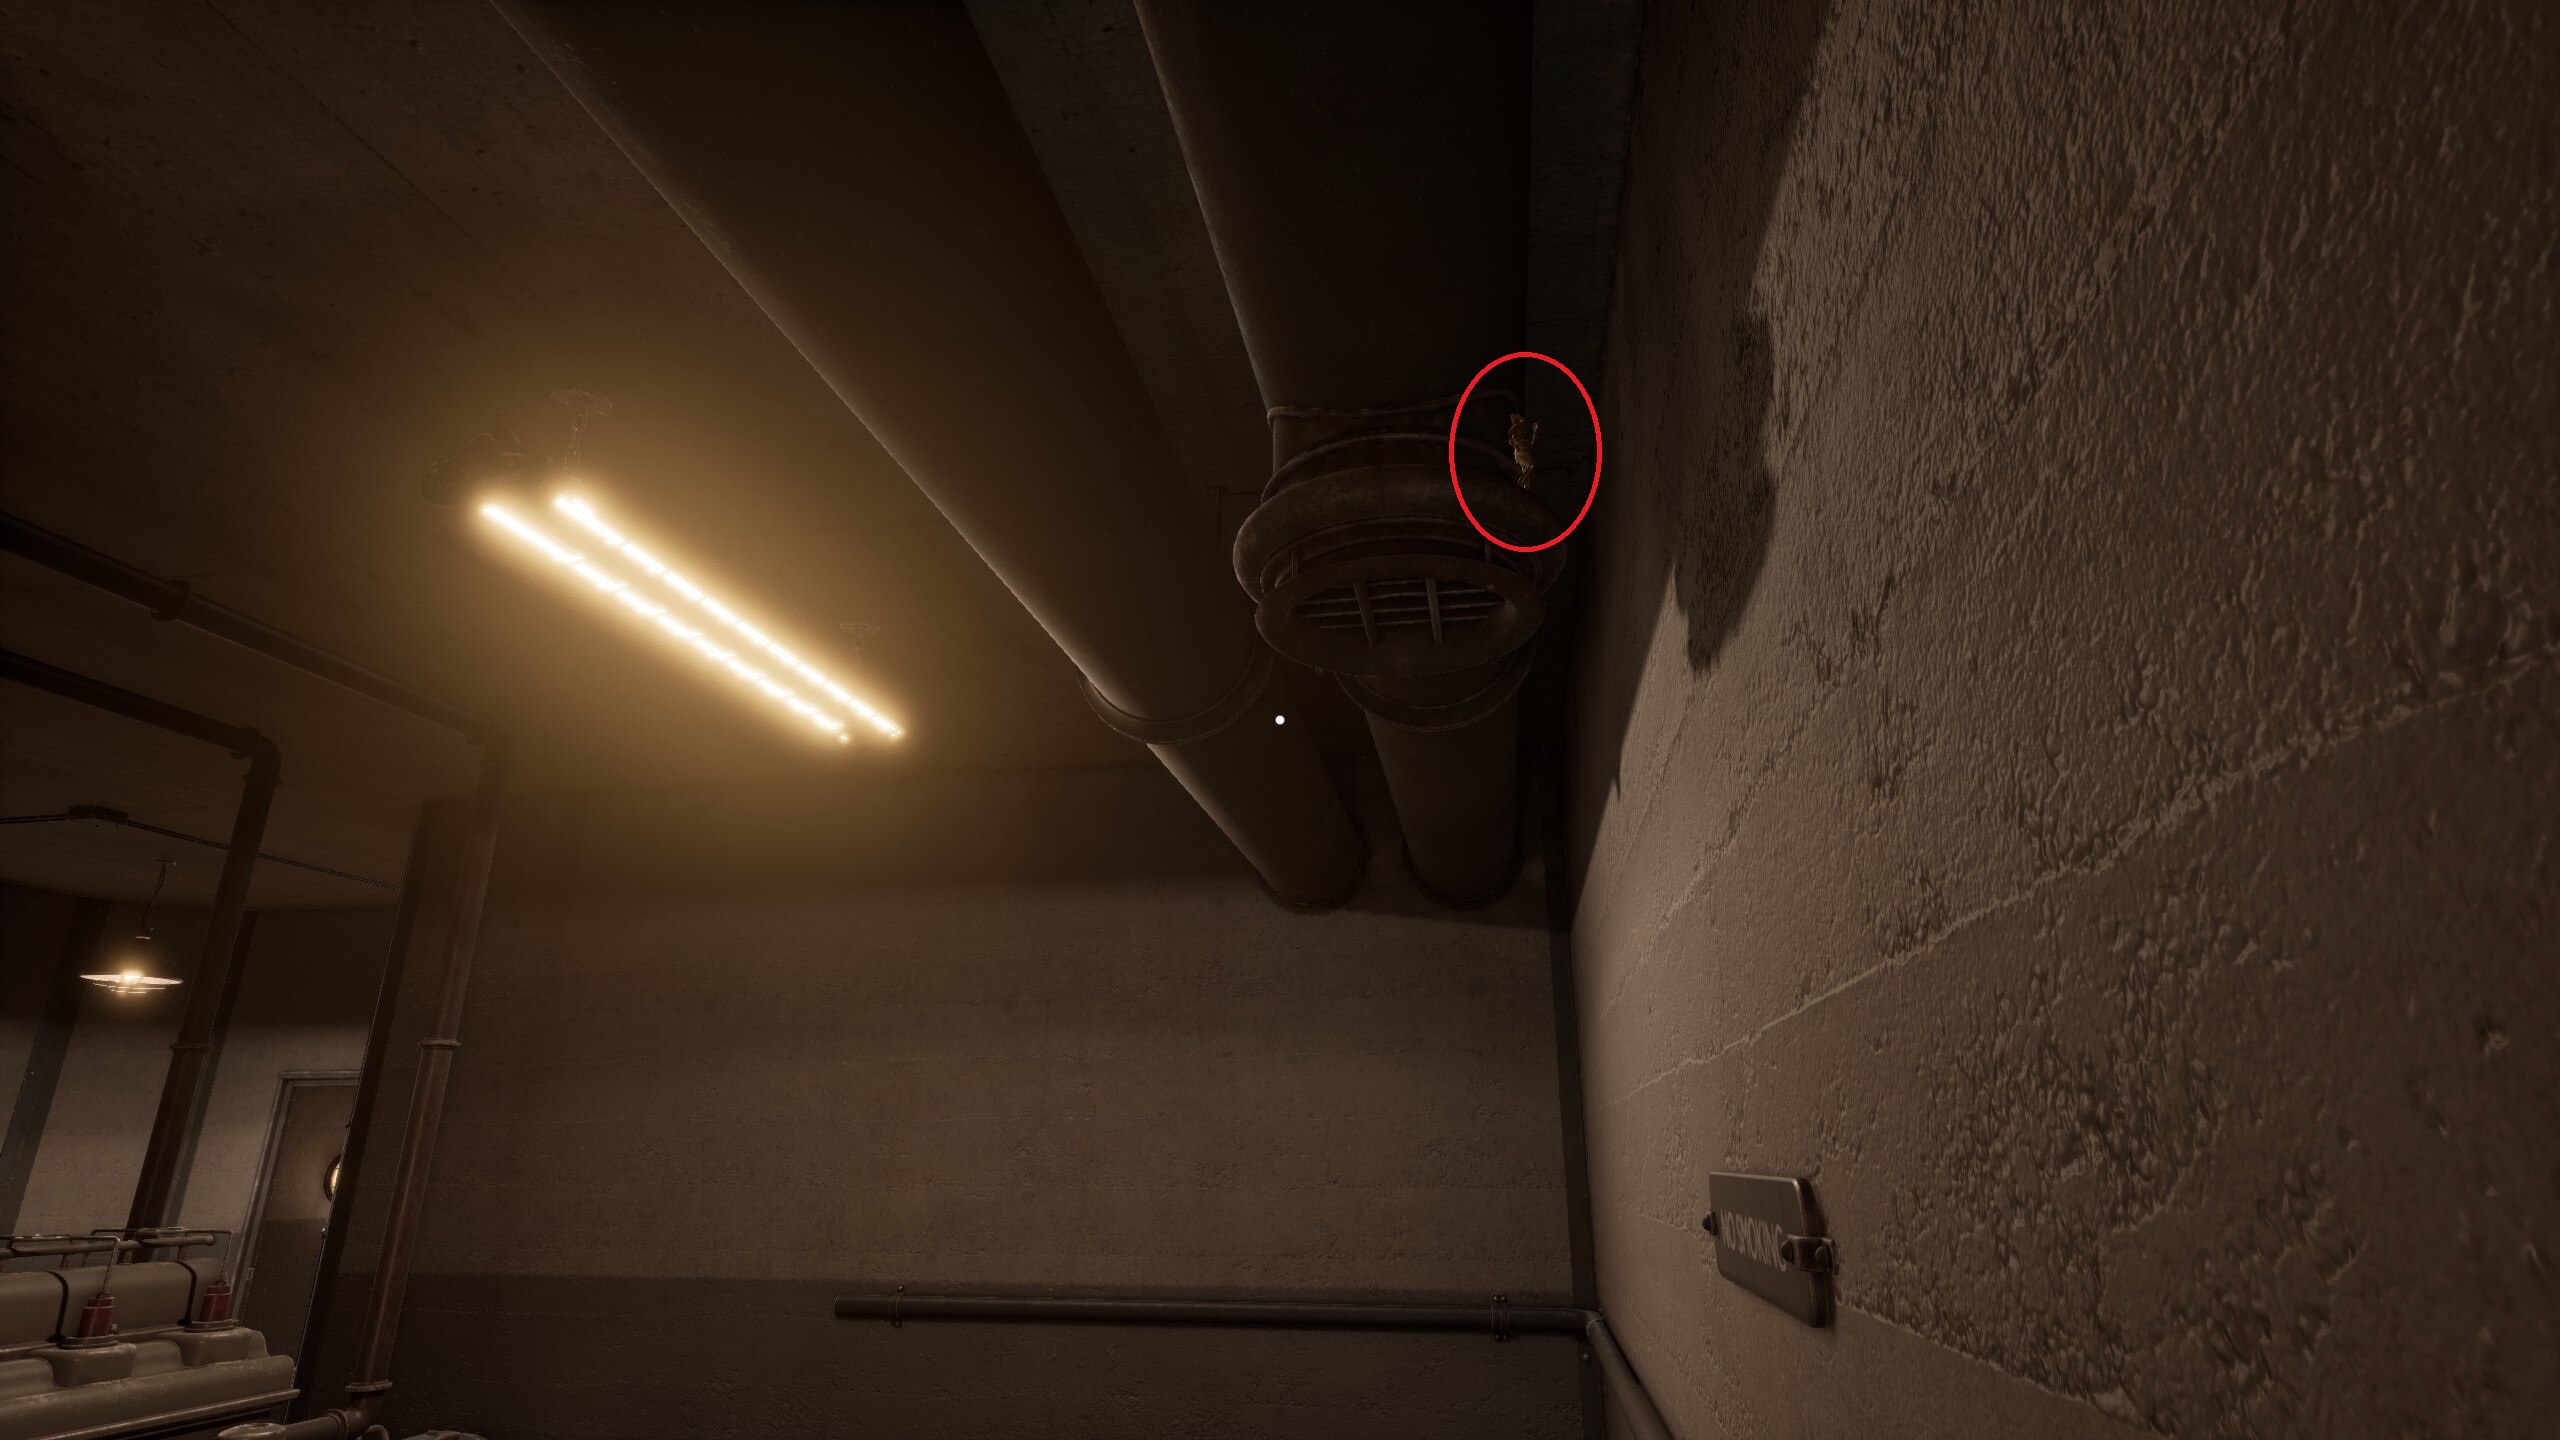
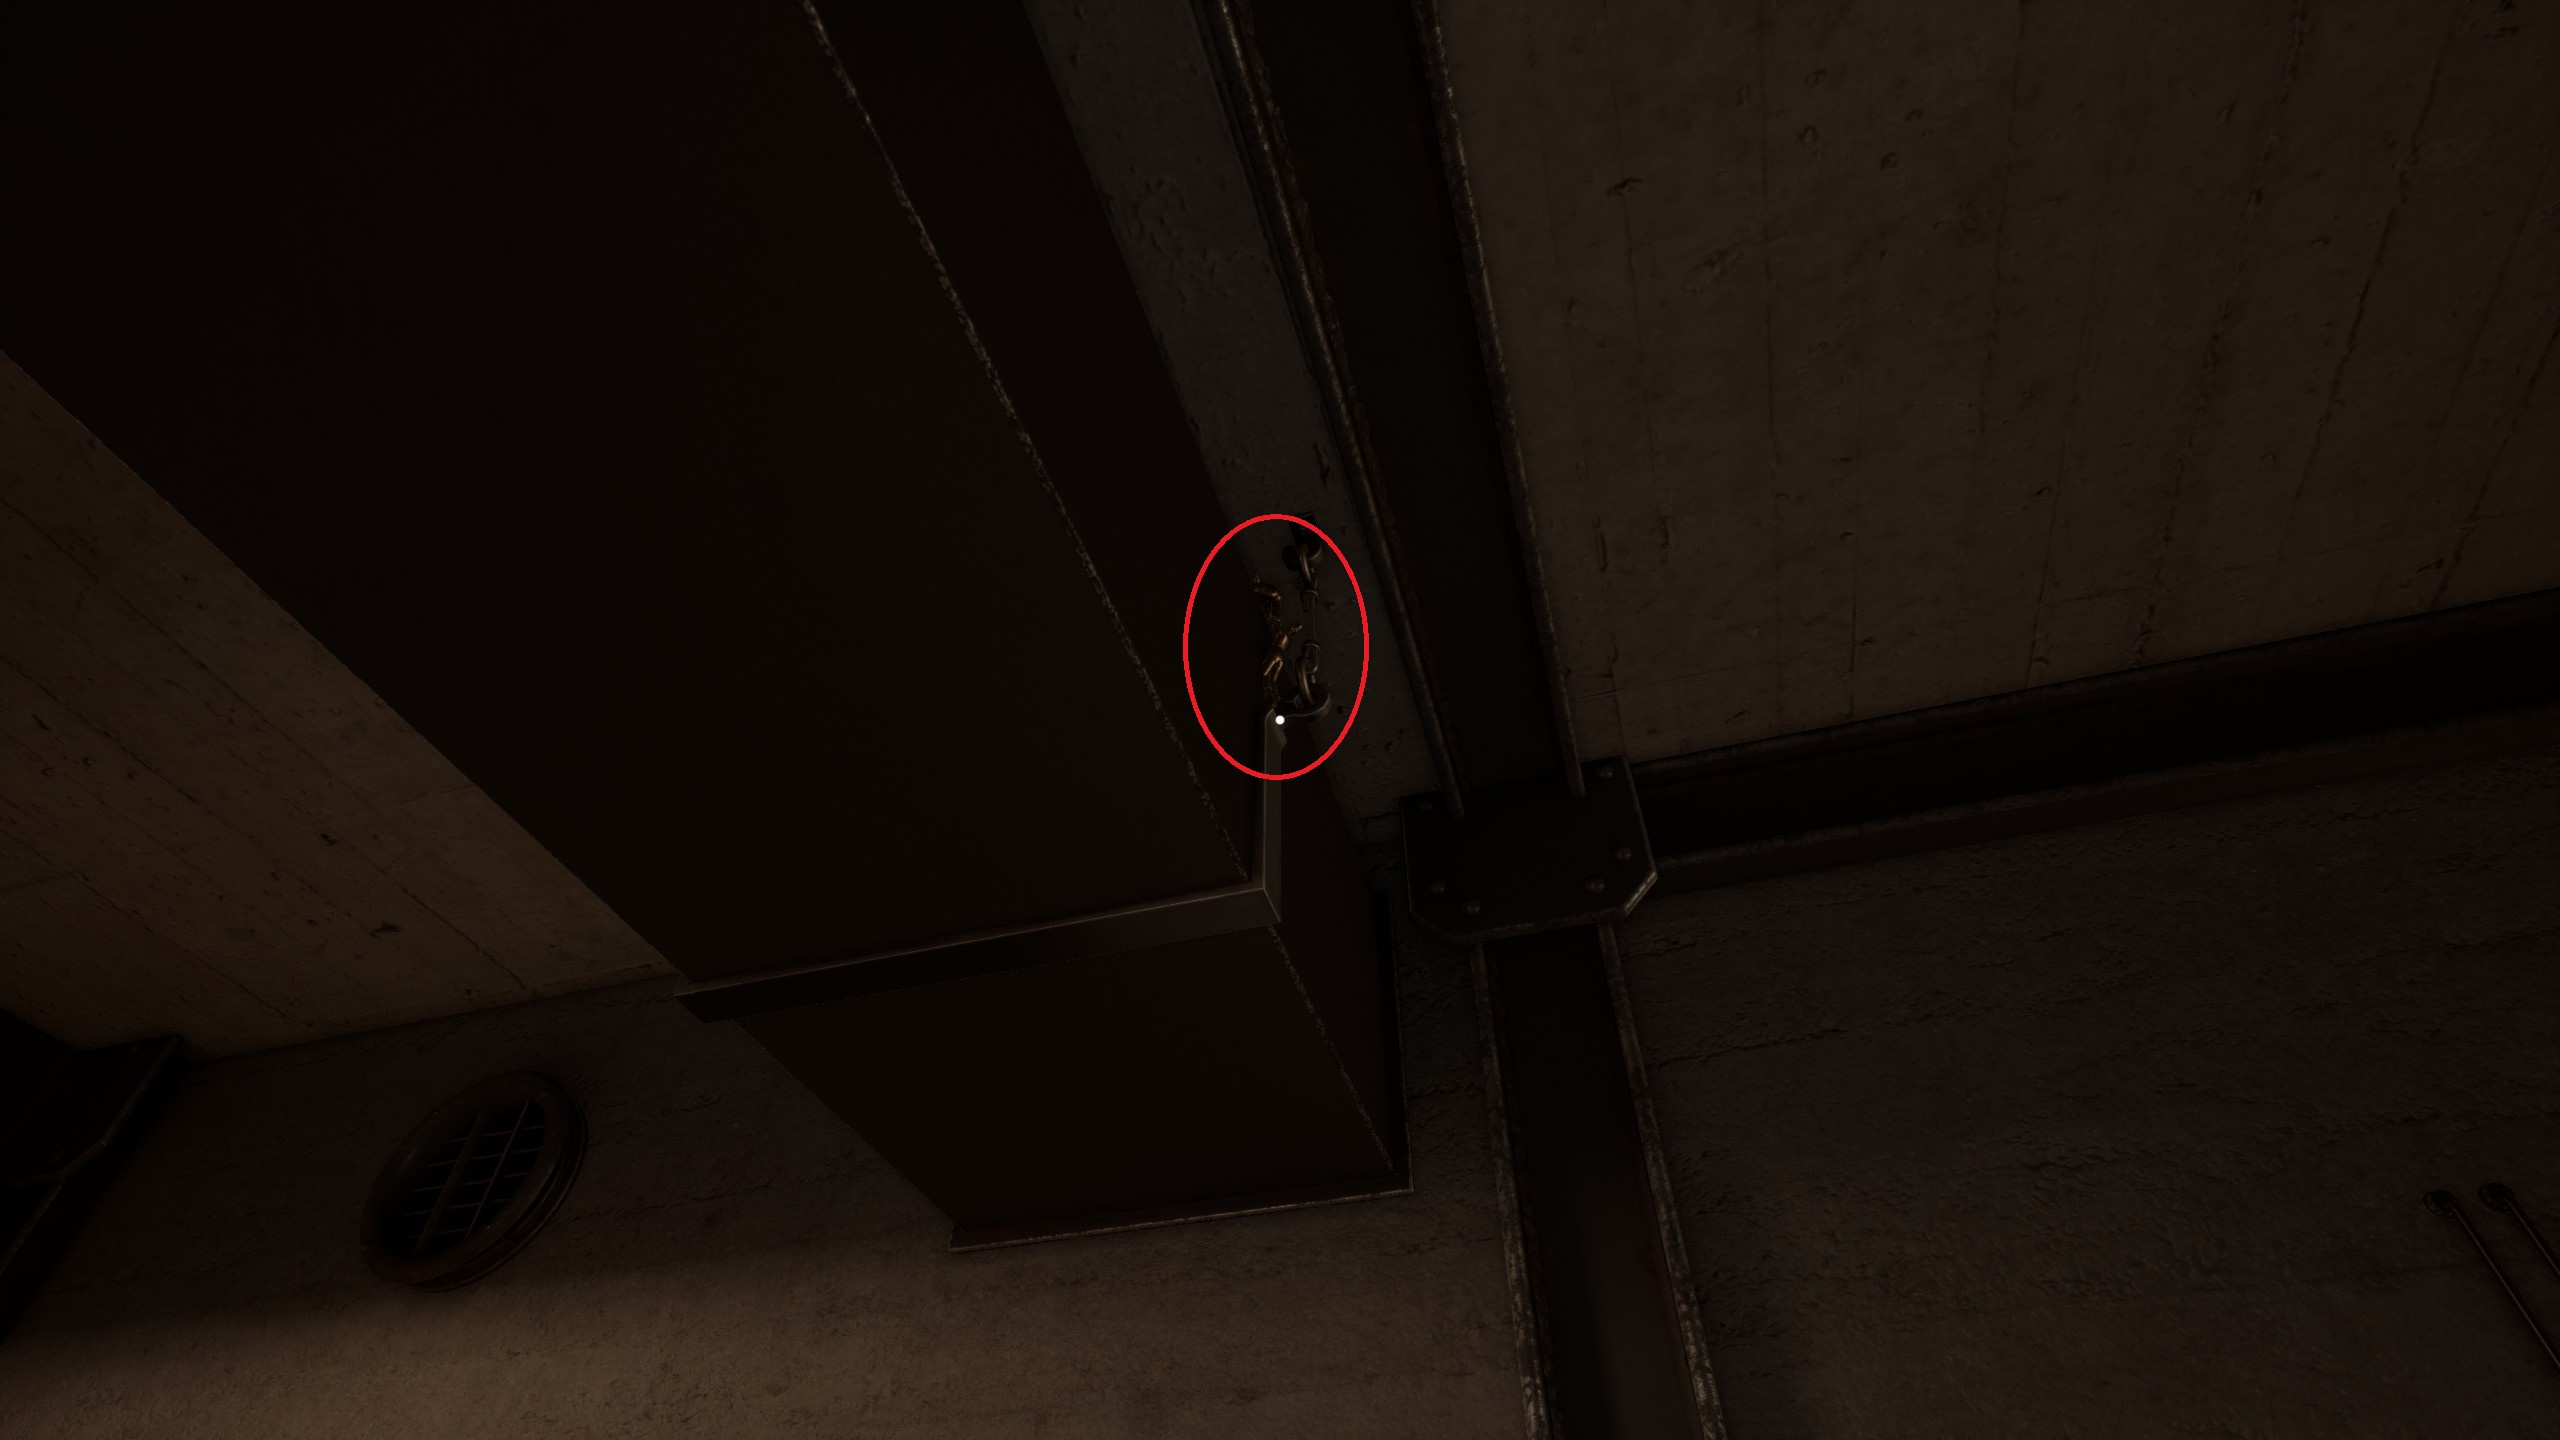
“Collectible #25”
Facing away from the Electrical Room, this “Collectible” is on the duct work overhead. it may be hidden behind the mounting fixture.
“Collectible #26”
In the back Corridor, where the collapsed tunnel is located, there is an alcove containing a stack of crates with a sheet over them. If you stand in the alcove and look back towards the Corridors, “Collectible #26” is sitting on top of the ducting along the celing.
Corridors Puzzle 1 > Gain access to the side rooms.
Puzzle 1:
Unlock your first room
- Hint 1:The first door that you can unlock is the Bunker.
- Hint 2:The map holds the key to opening the Bunker.
- Solution:The code to the Bunker is 3636.
Bunk Room
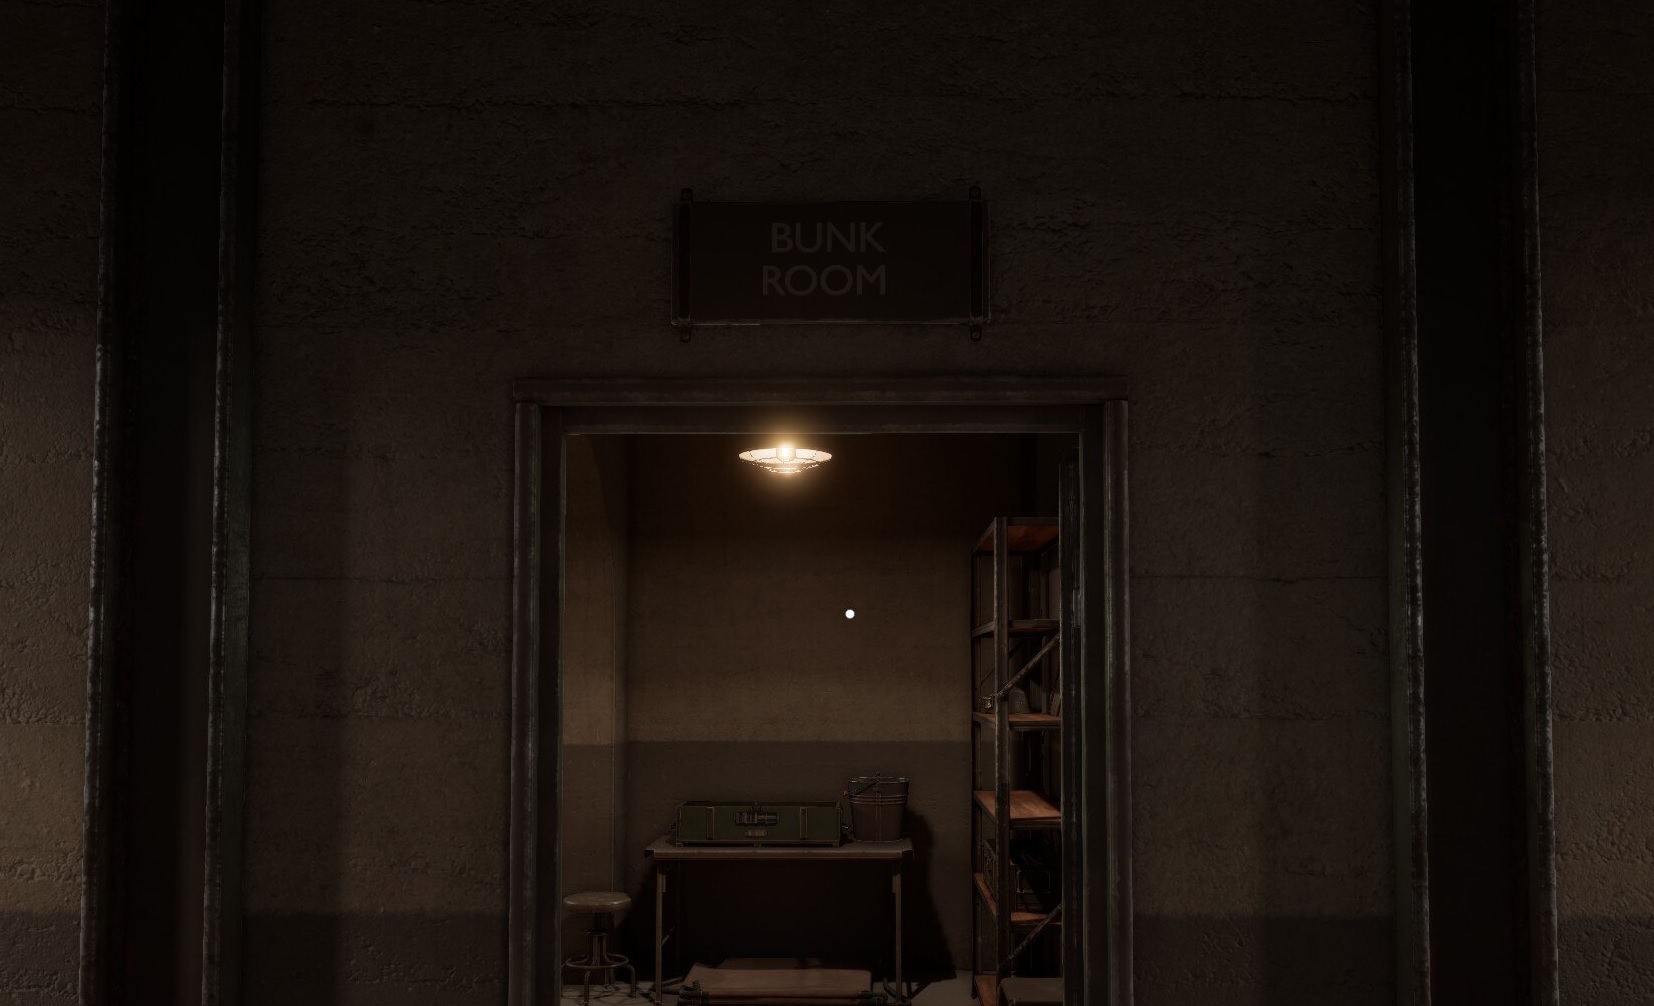
The first internal room you gain access to is the Bunk Room. This room mostly contains SOLUTION to puzzles, rather than any puzzles themselves. There’s nothing to unlock here, but you will need the objects here to help unlock items outside in the Corridors.
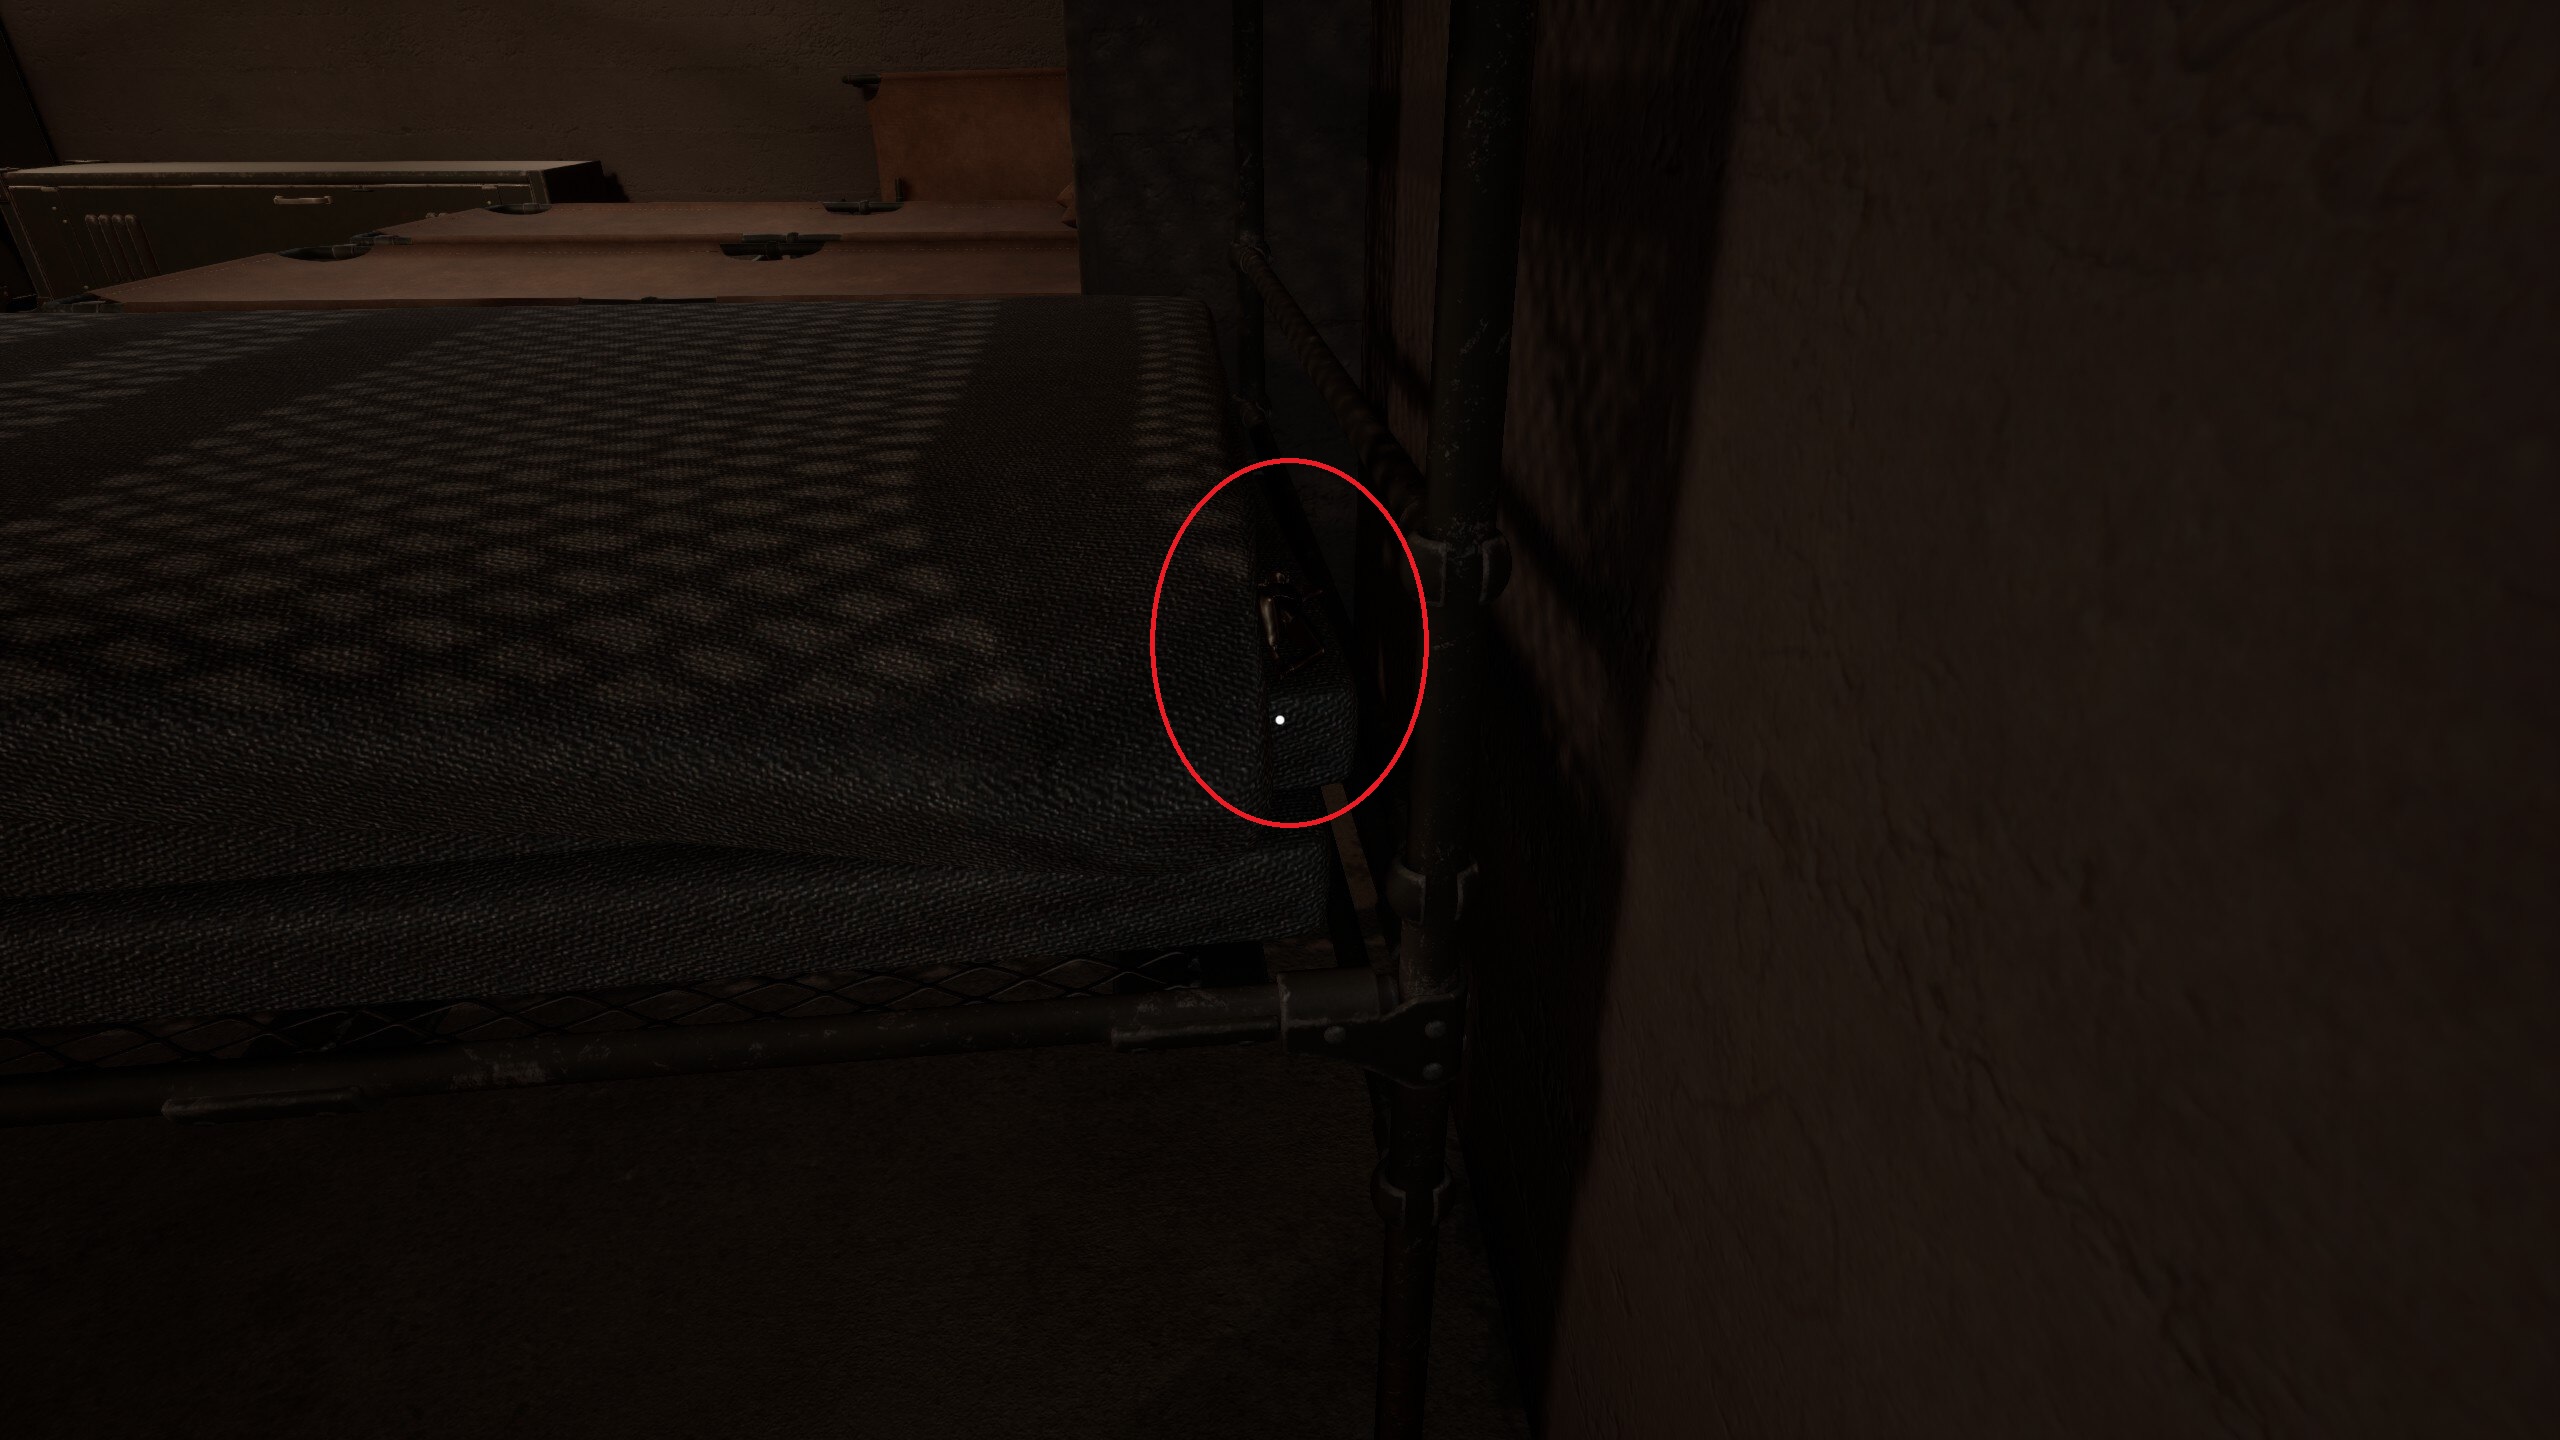
“Collectible #27”
Hidden at the back of the mattress on the single bunk along the back wall.
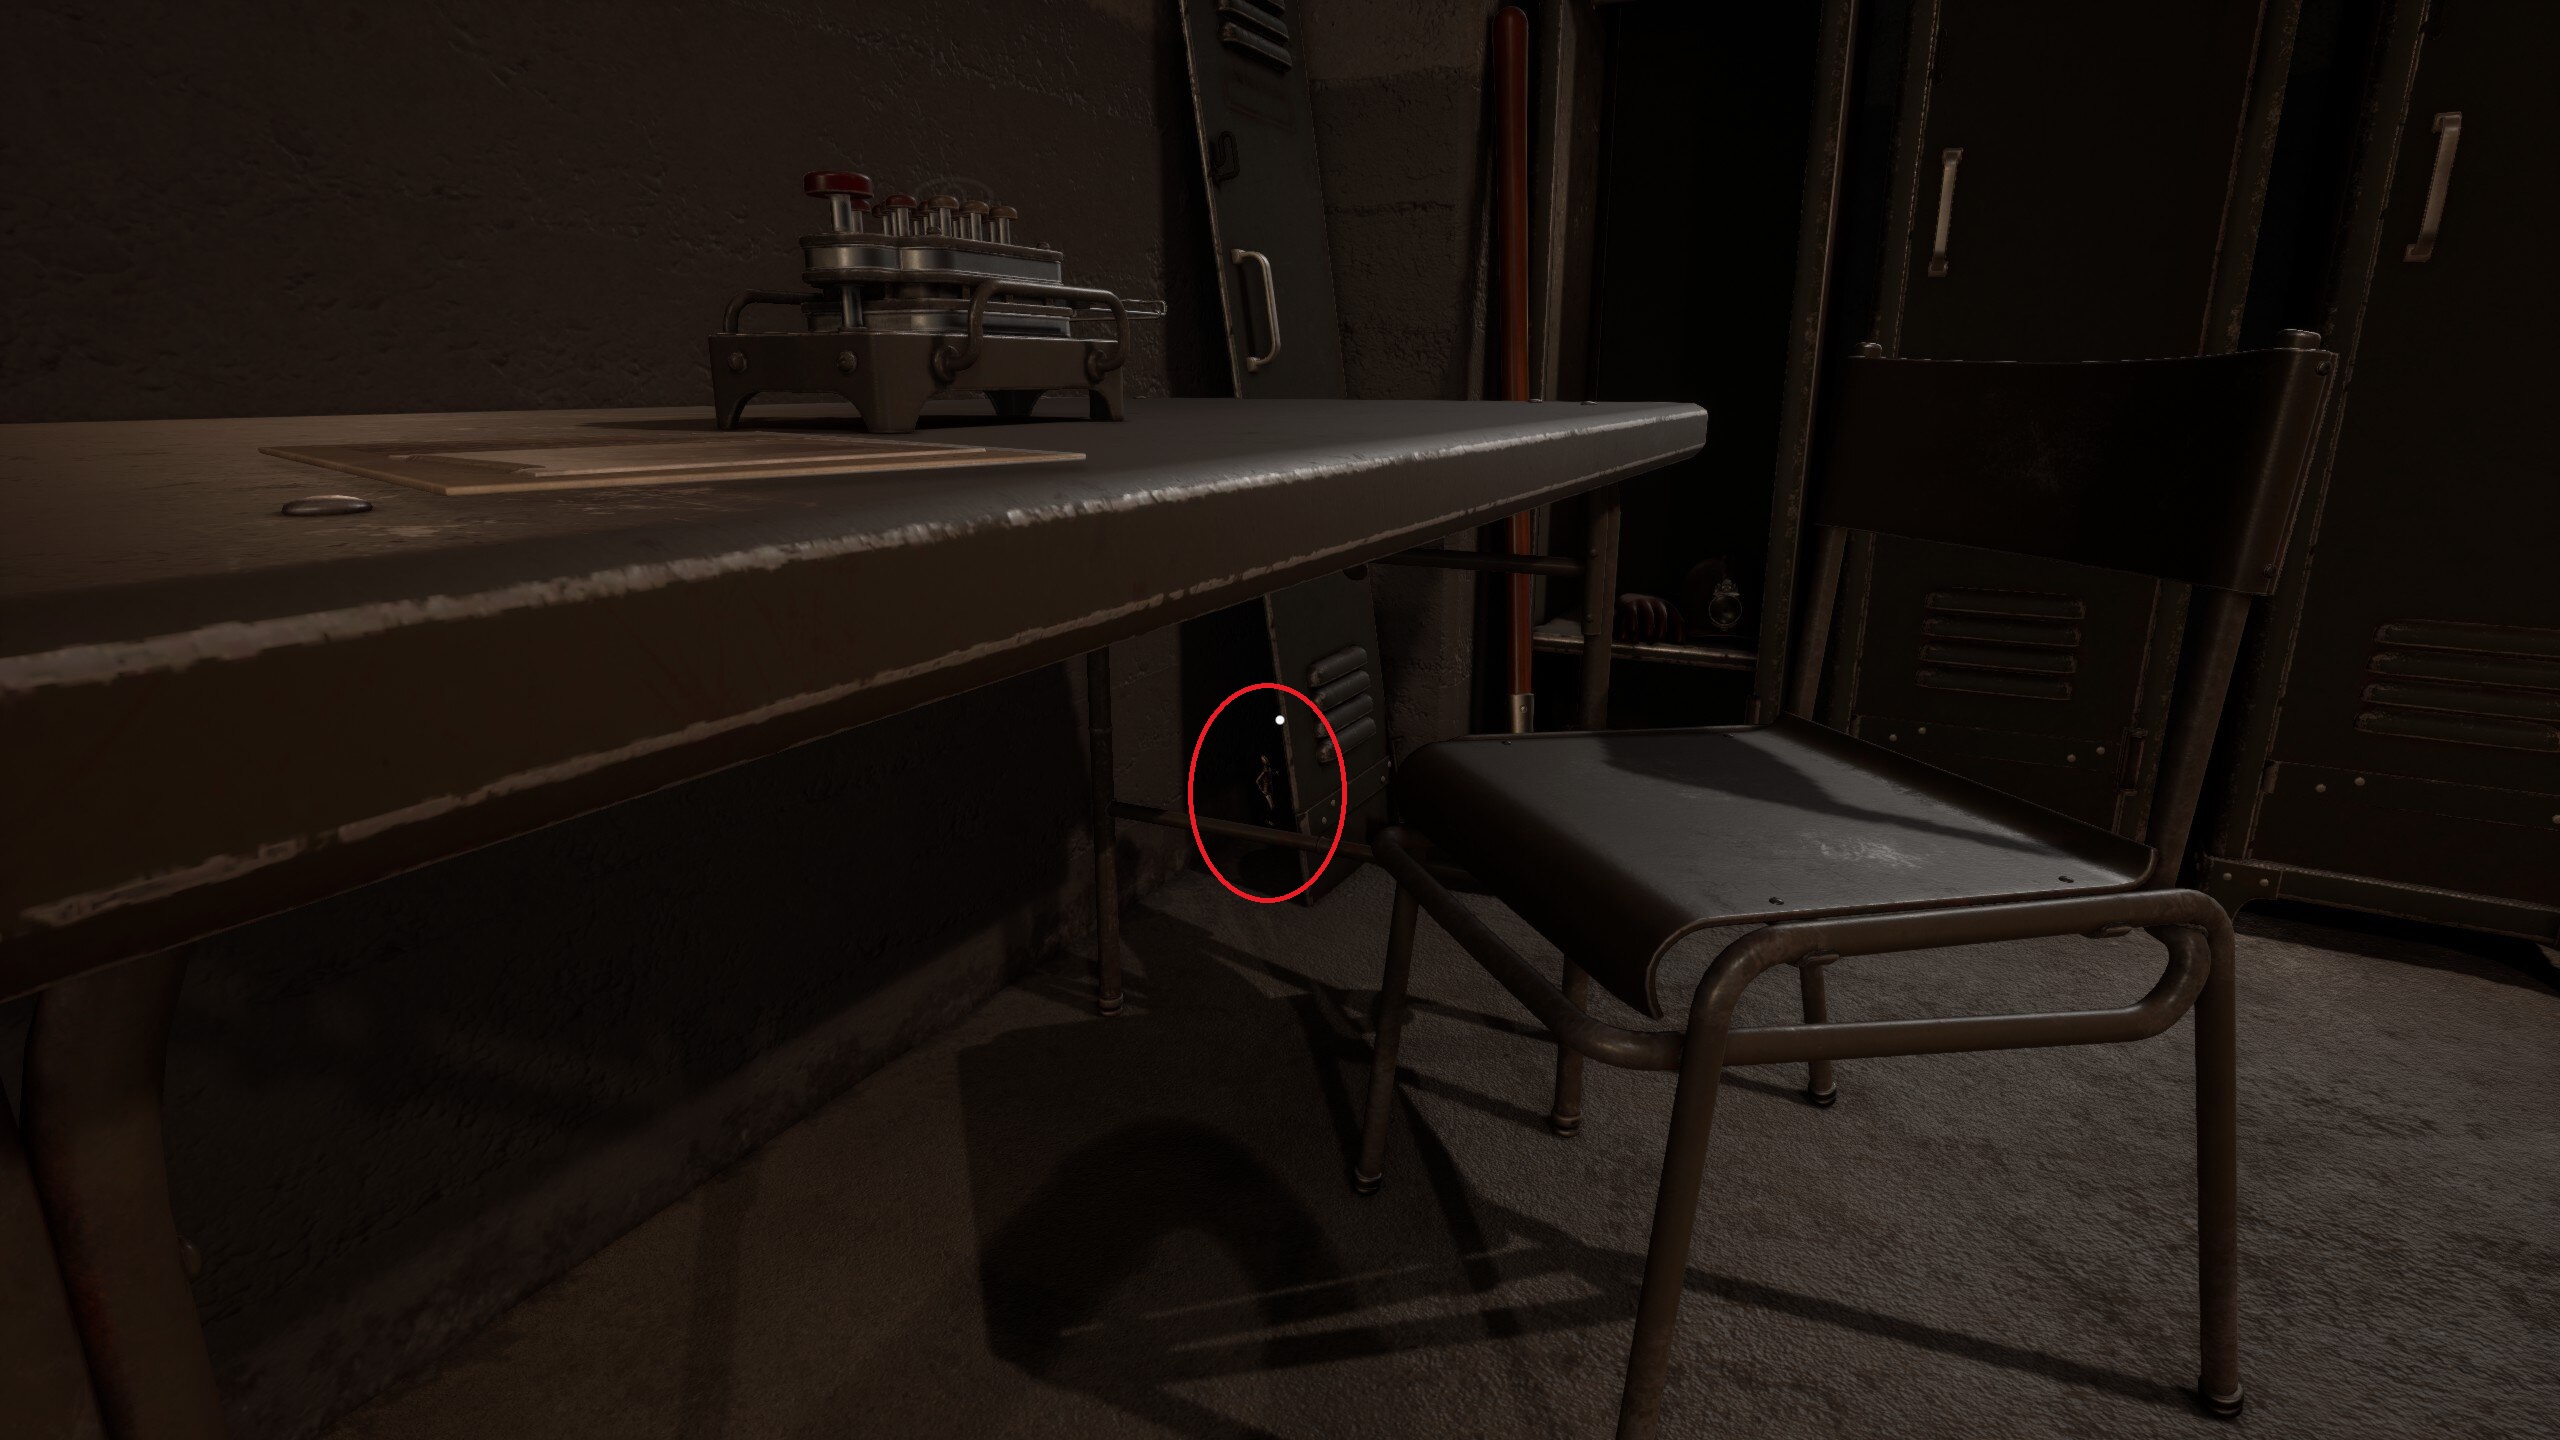
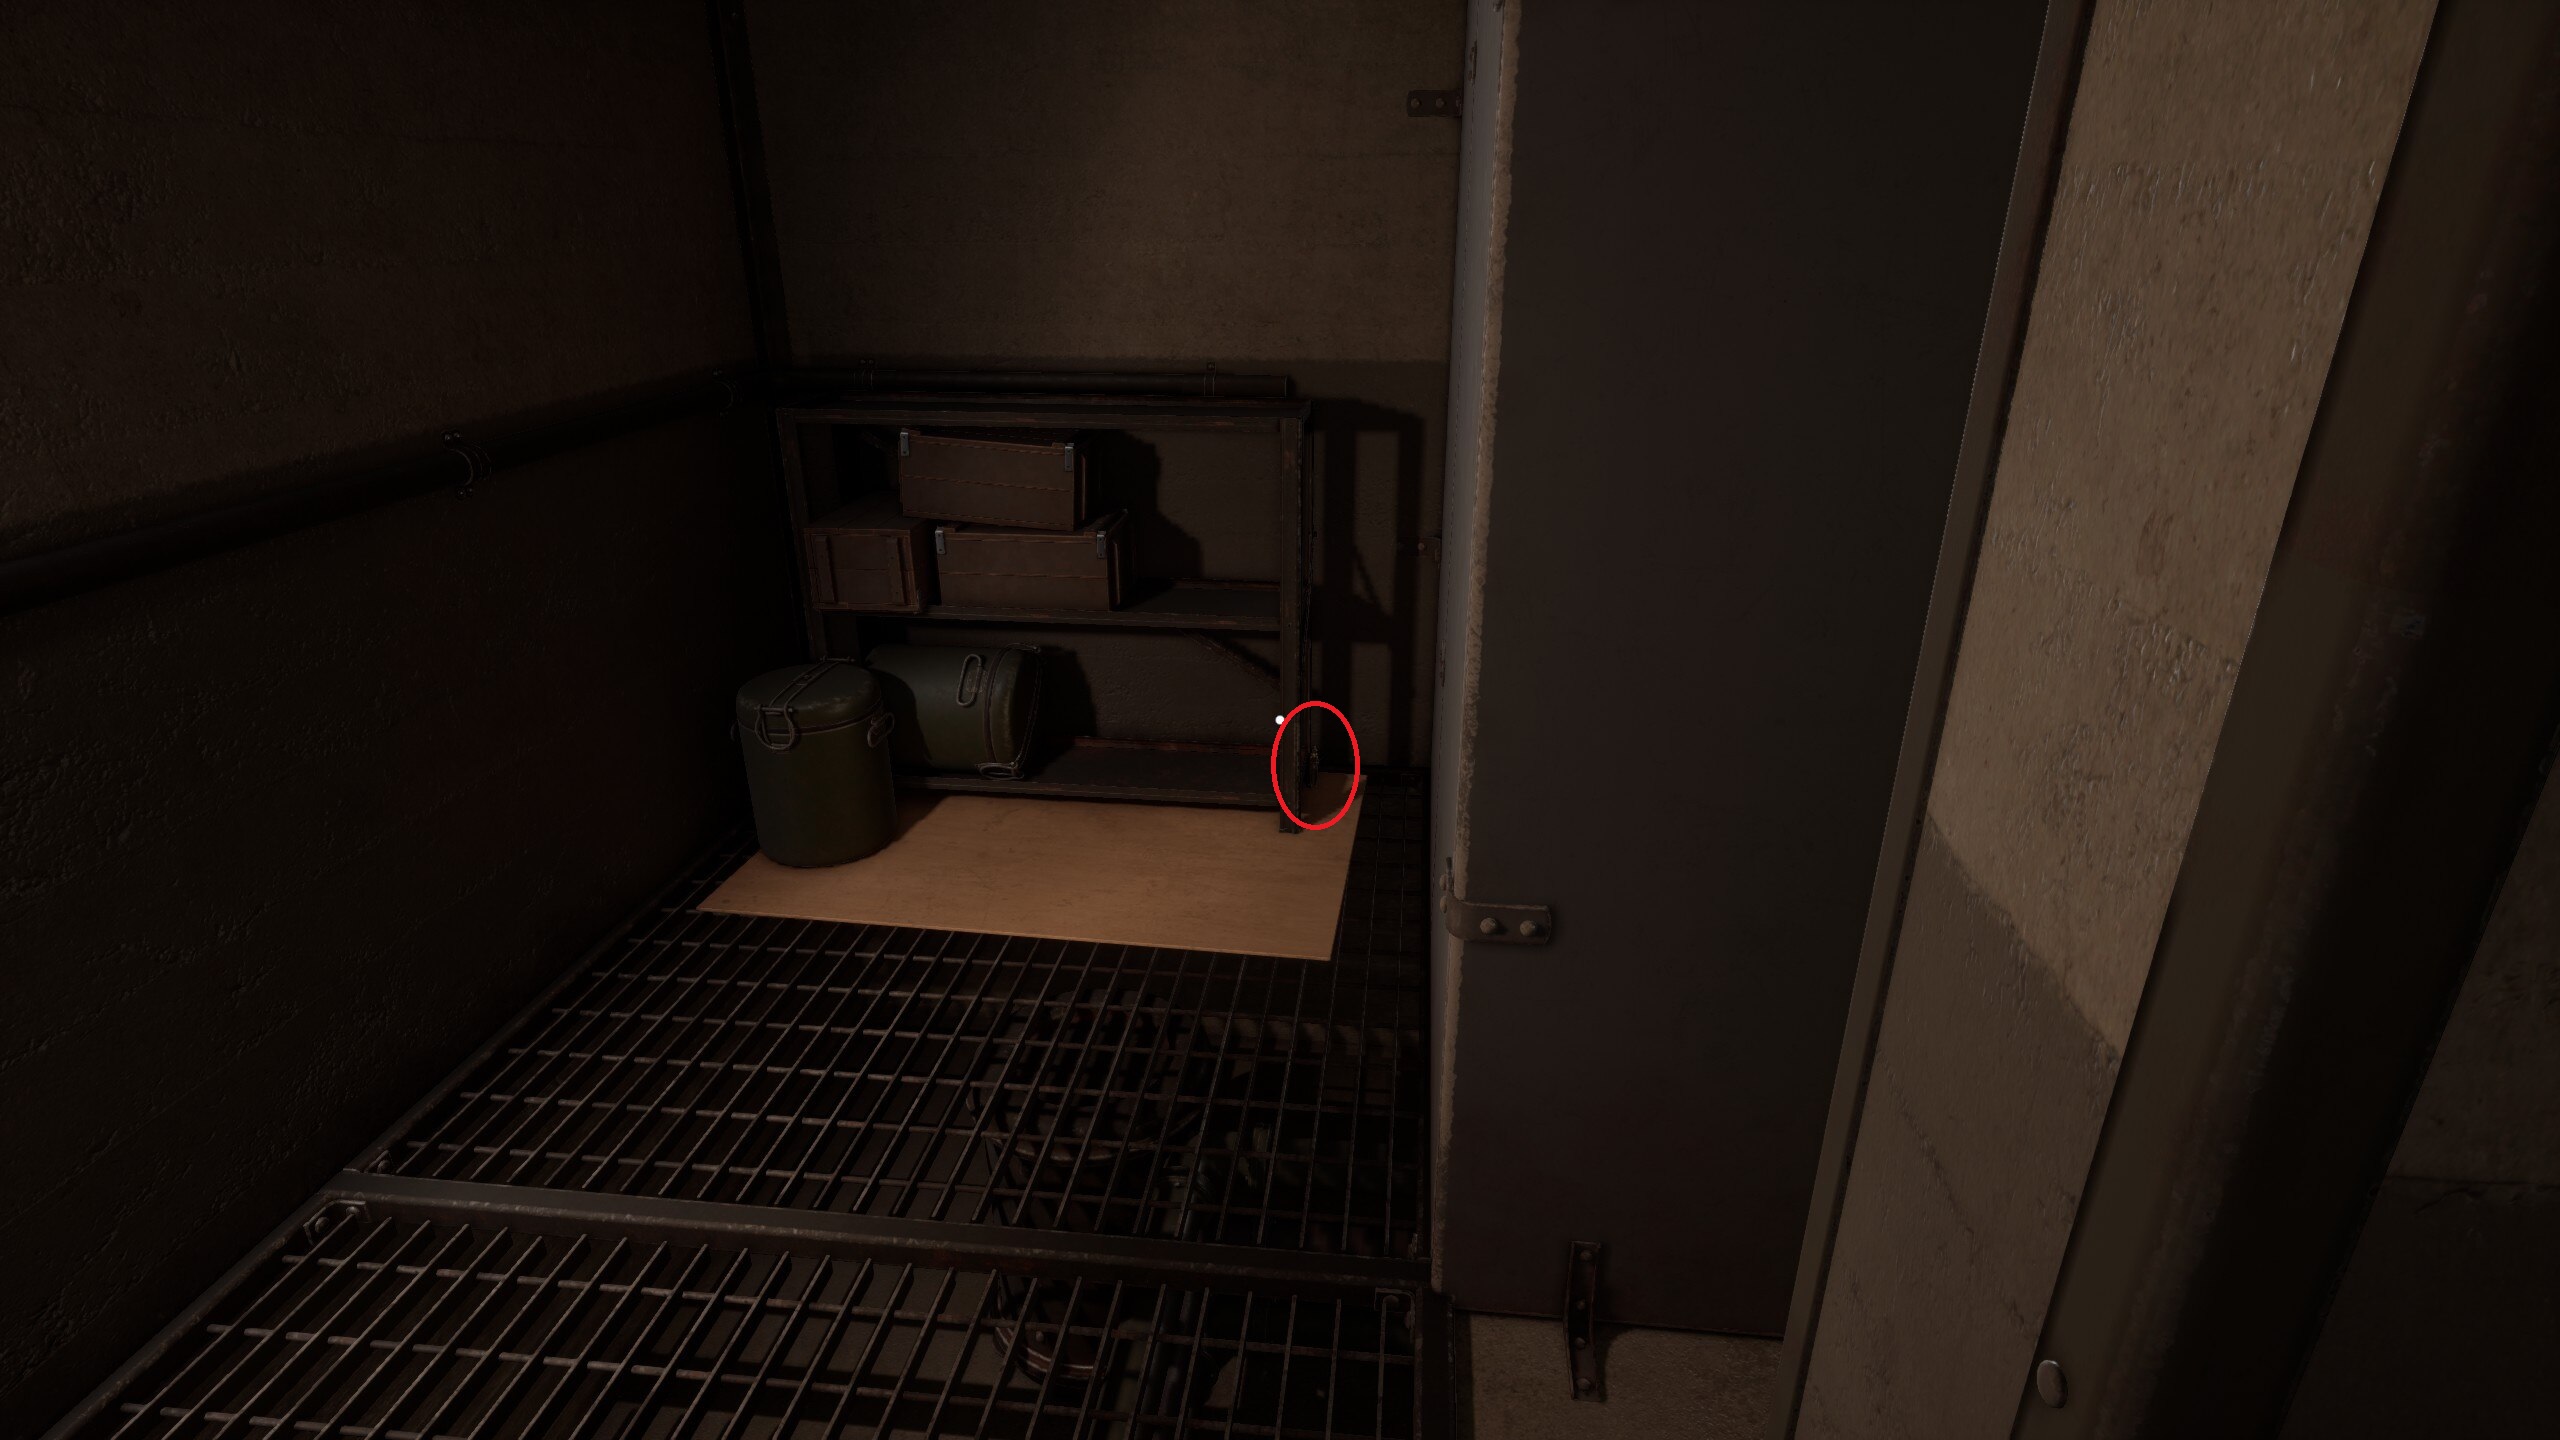
“Collectible #28”
Found behind the sole locker door that’s broken off it’s hinges. To the right of the table with the punch machine.
Bunker Room Puzzle 1a – 1c > Gain access to the other rooms.
Puzzle 1a:
Open the lockbox in the front hall of Corridors.
- Hint 1:There are three lockboxes in Bunker Room that have the same type of lock as the one outside.
- Hint 2:The shape (letter) and the numbers on the boxes correspond to how the pressed in blocks will change as you move from the far left 3 x 3 pad to the far right 3 x 3.
- Hint 3:The number 1 indicates: rotate the shape 90 degrees clockwise. 3: shifts all blocks once to the left by one column (blocks already on the left side of the 3 x 3 move to the right side). 4: shift all blocks to the right by one column. 5: invert the pressed in blocks and the unpressed blocks.
- Solution:

Puzzle 1b:
Use the blank cards from the lockbox to make key cards.
- Hint 1:There’s a note on the table with the punch machine that holds a clue to the first key card.
- Hint 2:Notice the picture of the card, and the way the card sits on the punch machine.The card is upside down in the picture.
- Solution:

Puzzle 1c:
BONUS: Create the second key card.
- Hint 1:There is a misplaced key card somewhere in the Corridors.
- Hint 2:The lost card is under the grate in front of Generator Room. Replicate the pattern on another blank card.
- Solution:
Electrical Room
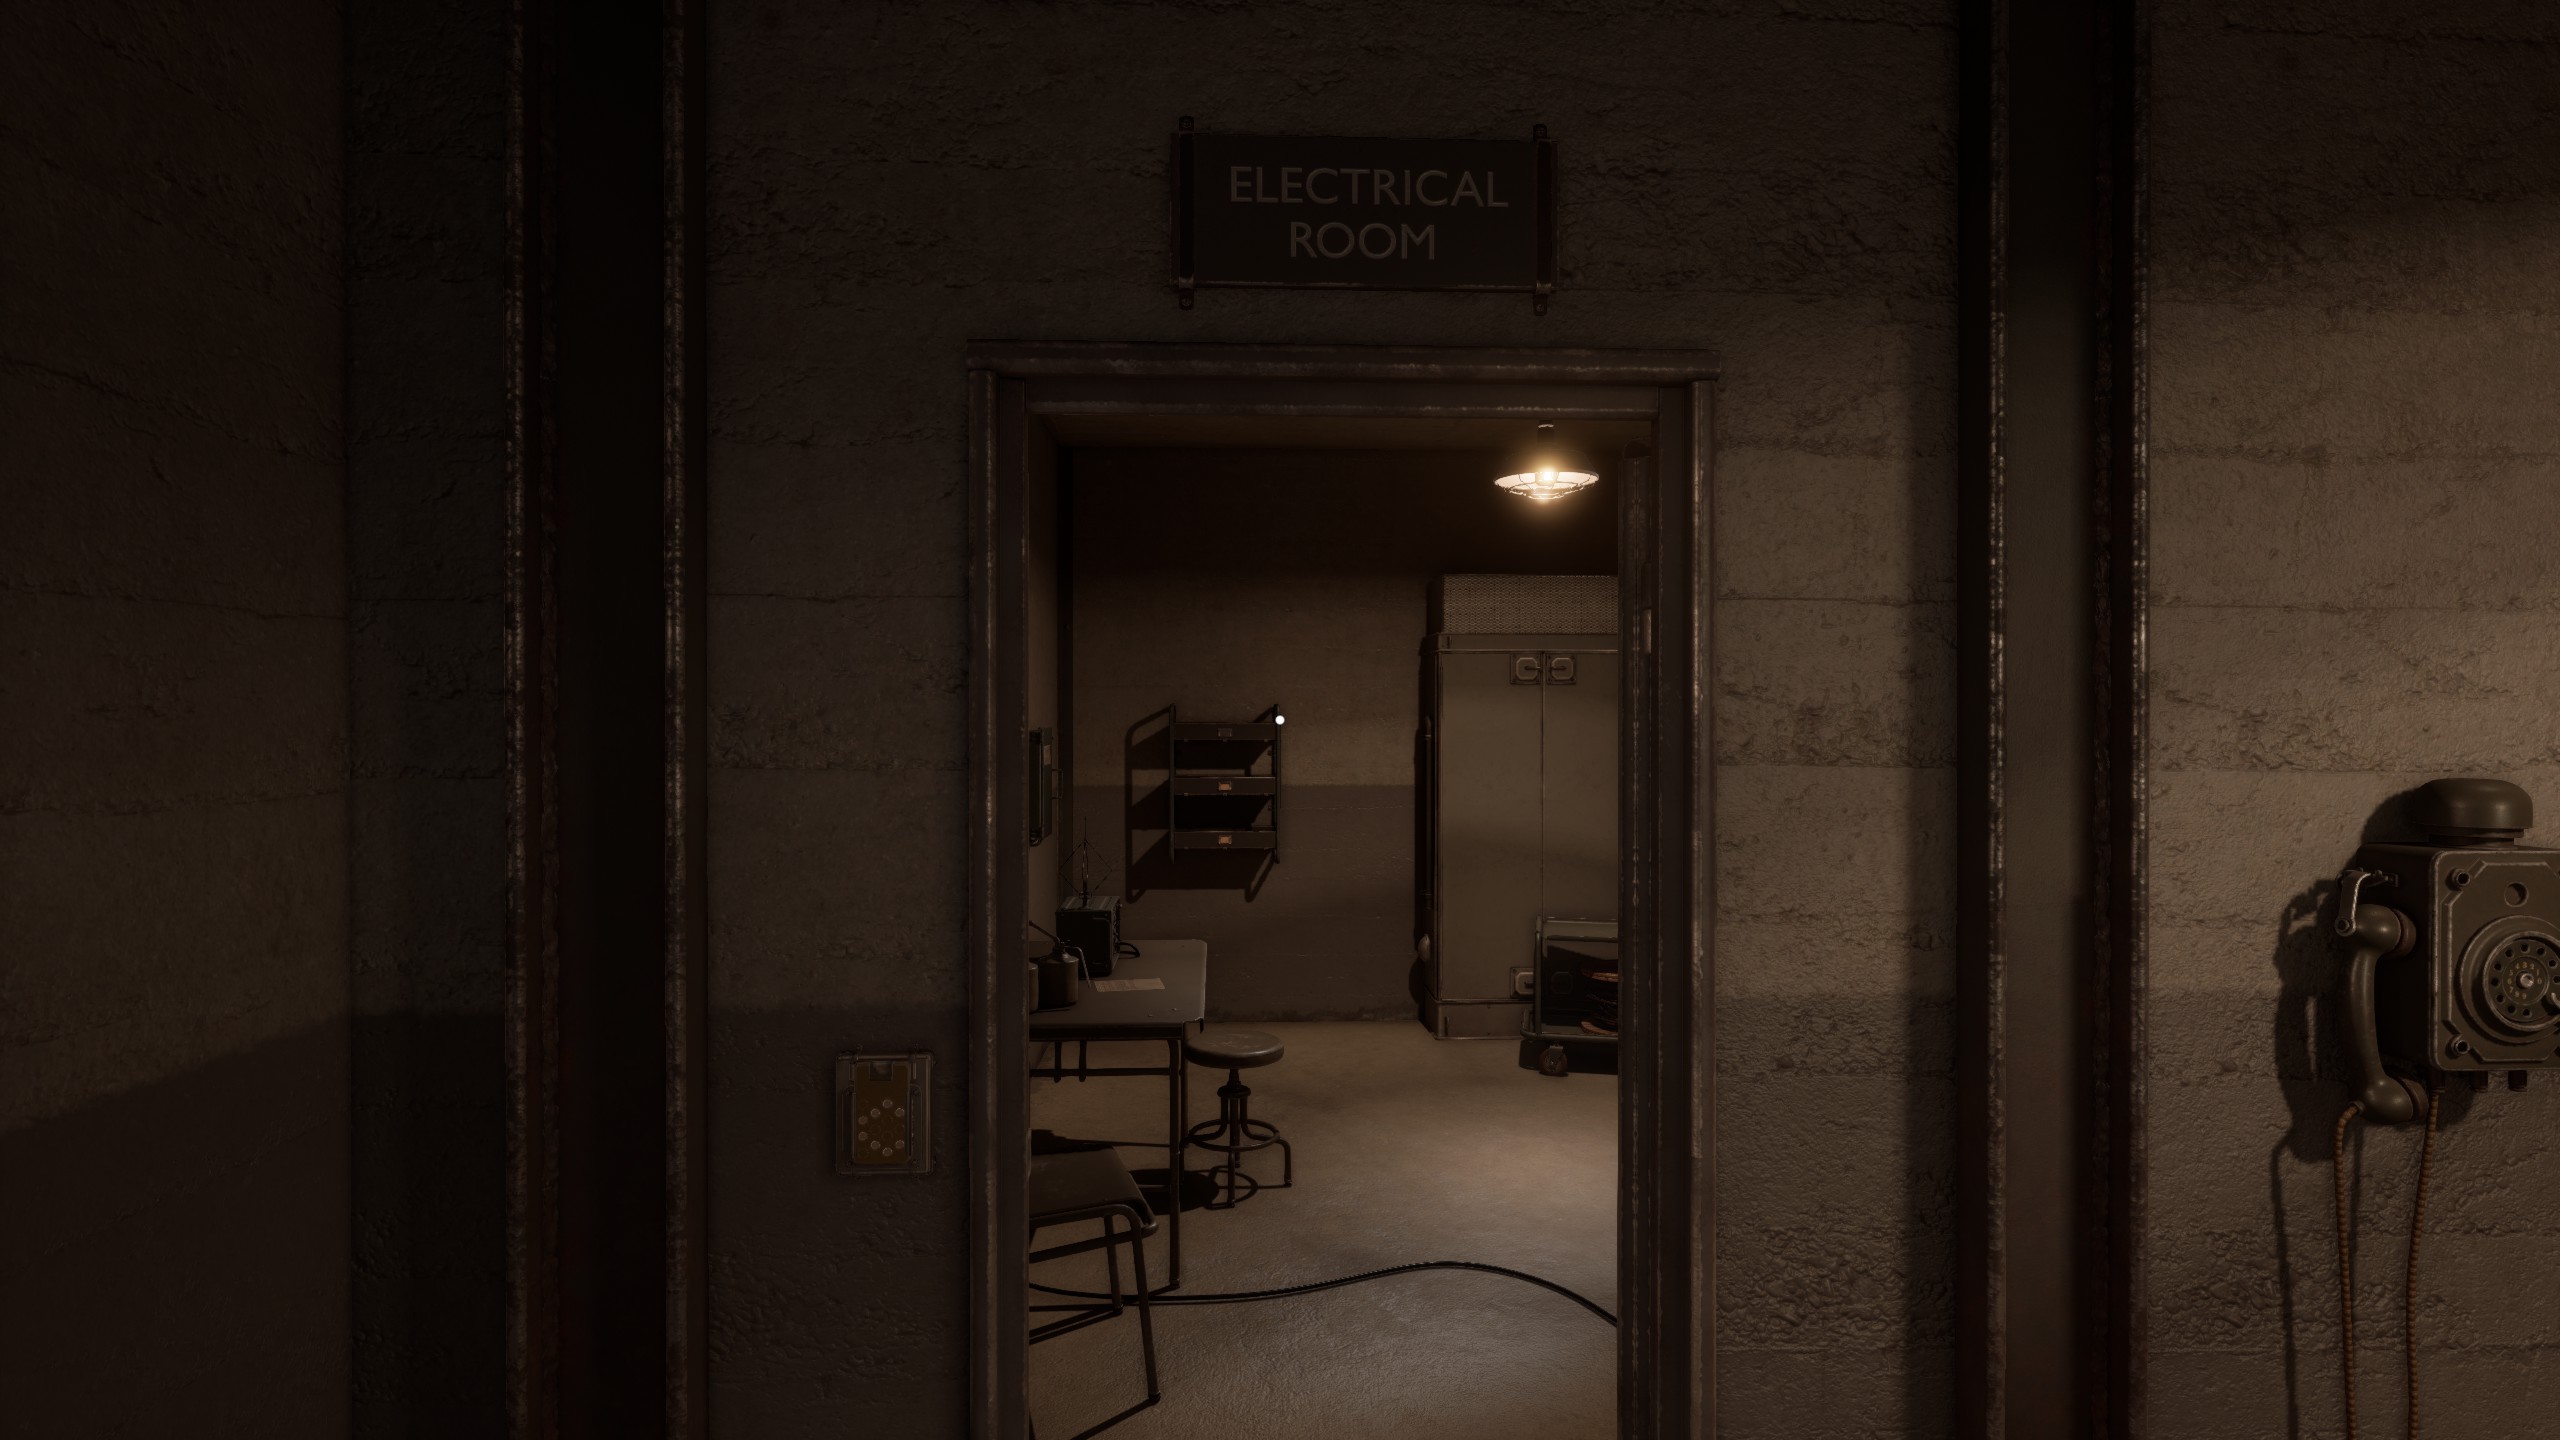
The Electrical Room contains several important puzzle pieces and one locked drawer.
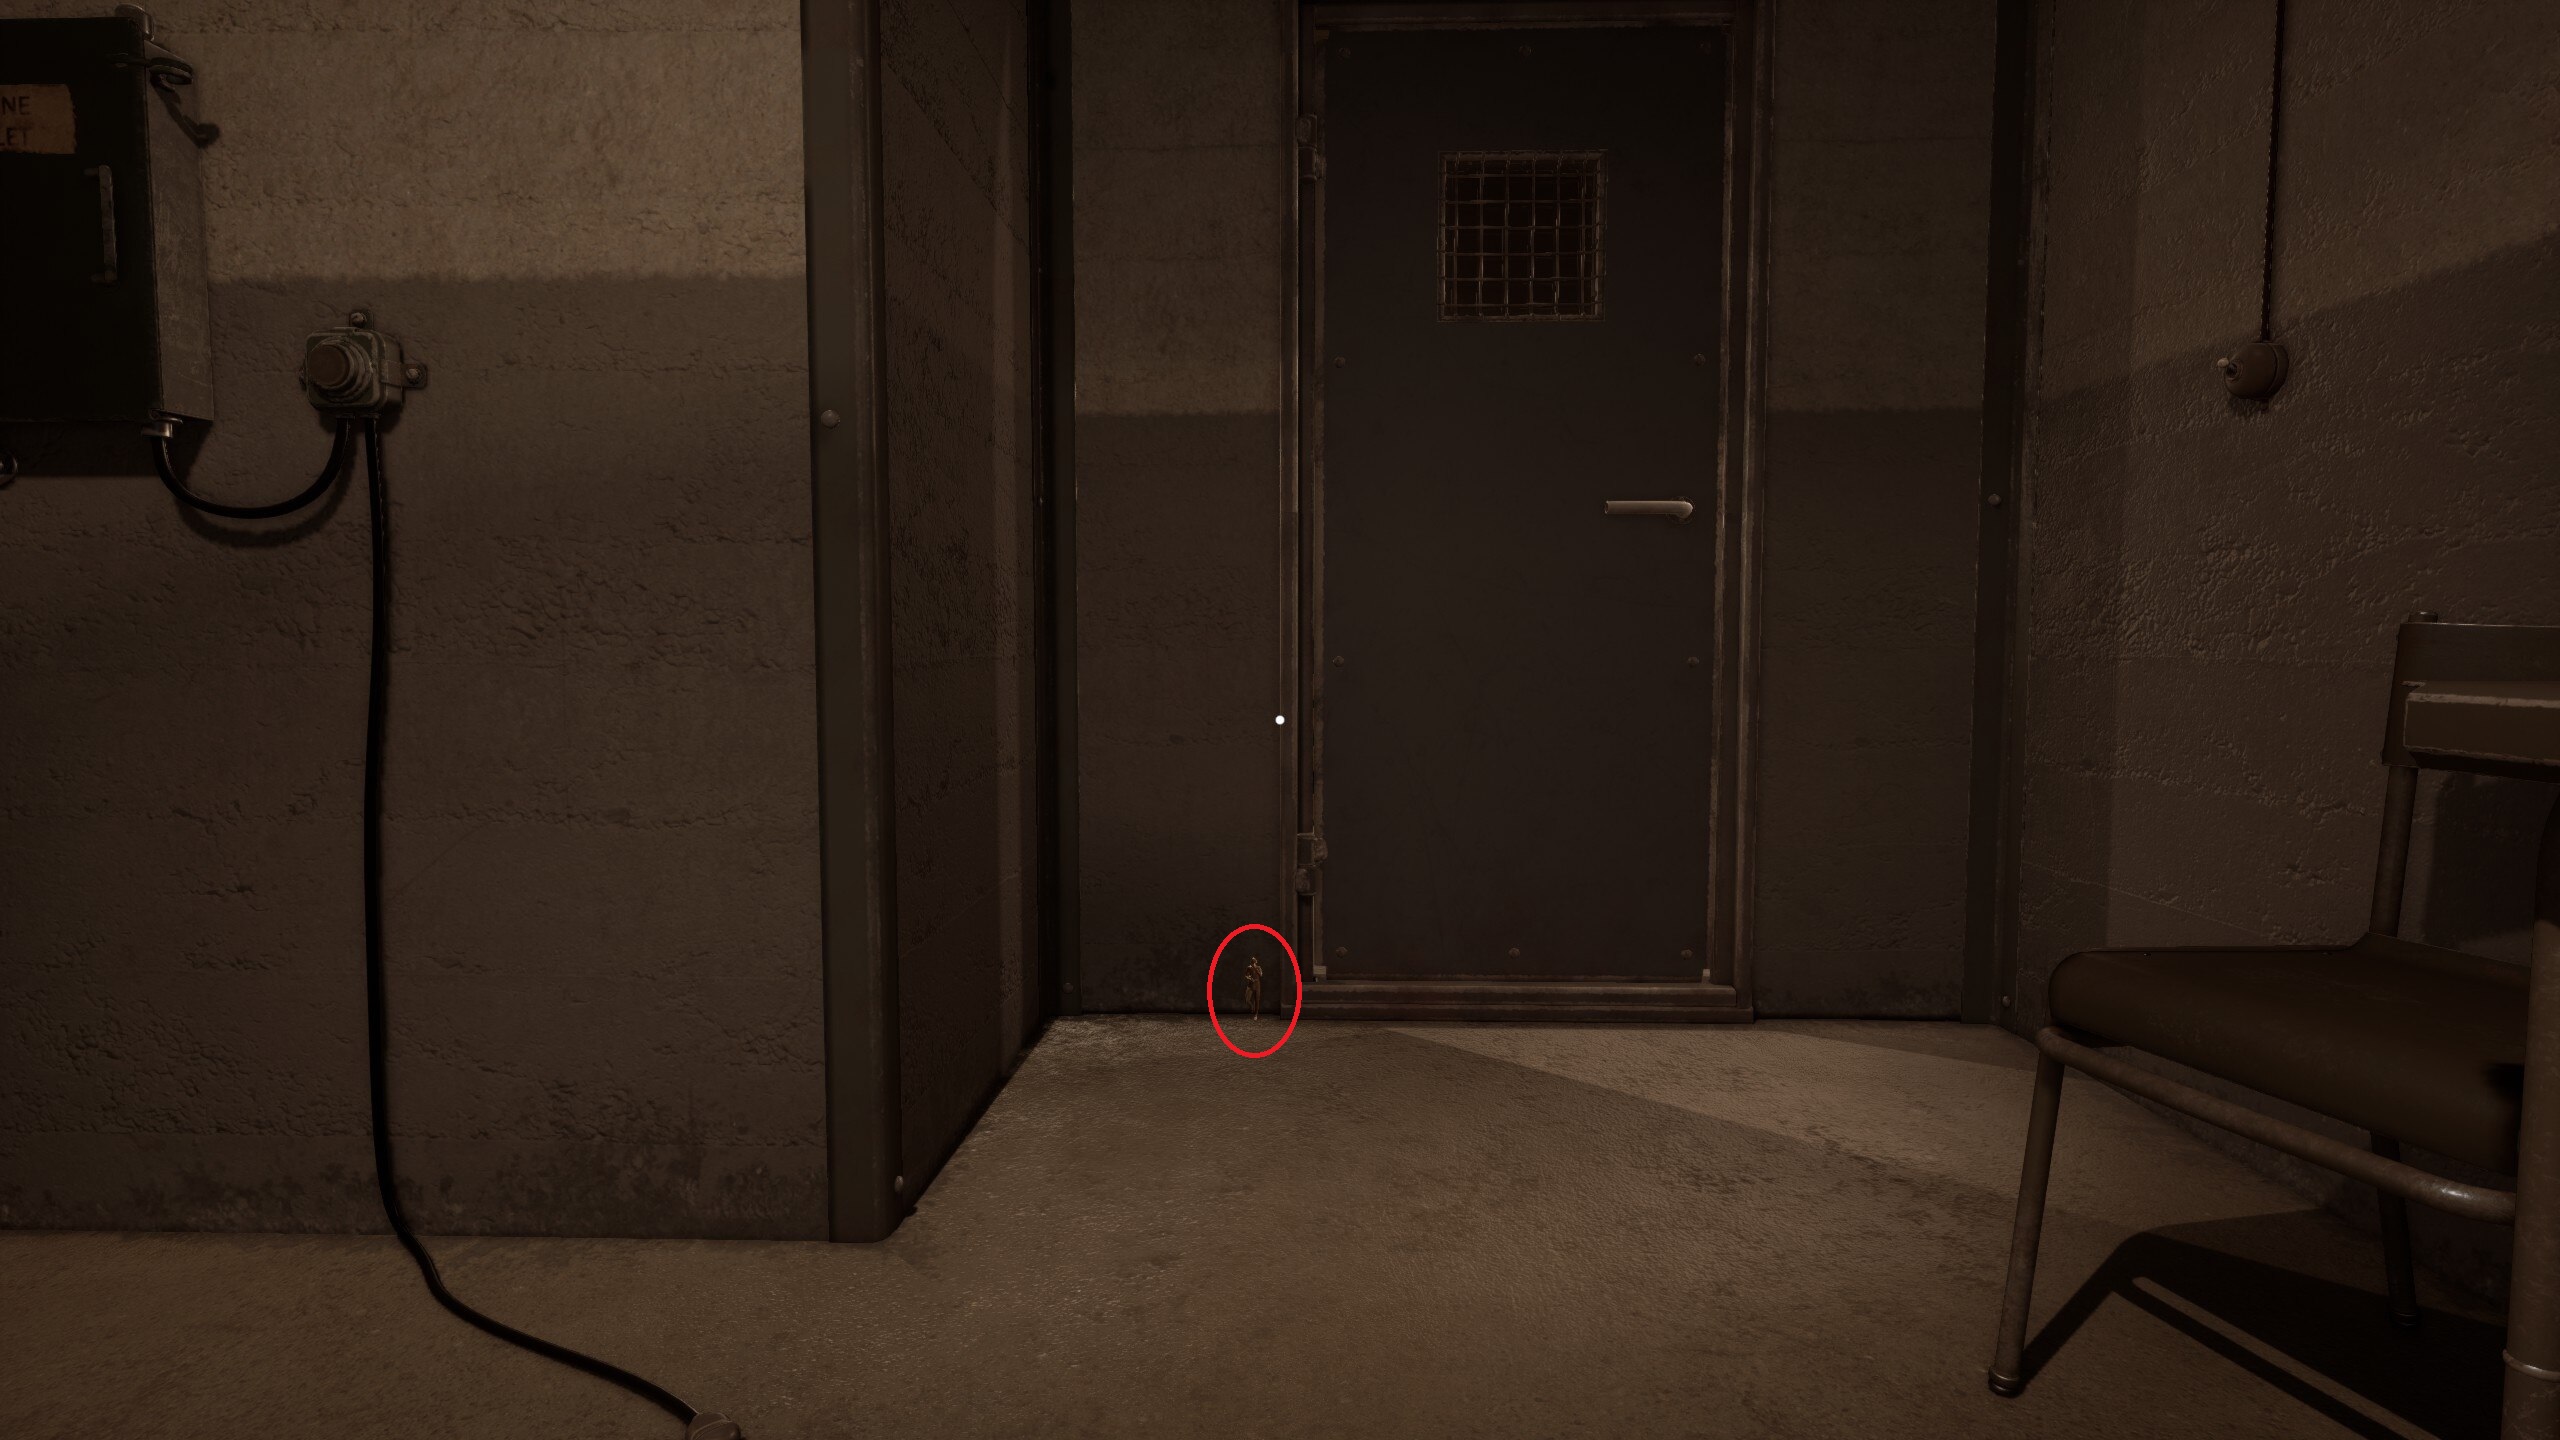
“Collectible #29”
#29 is behind the door into Electrical Room.
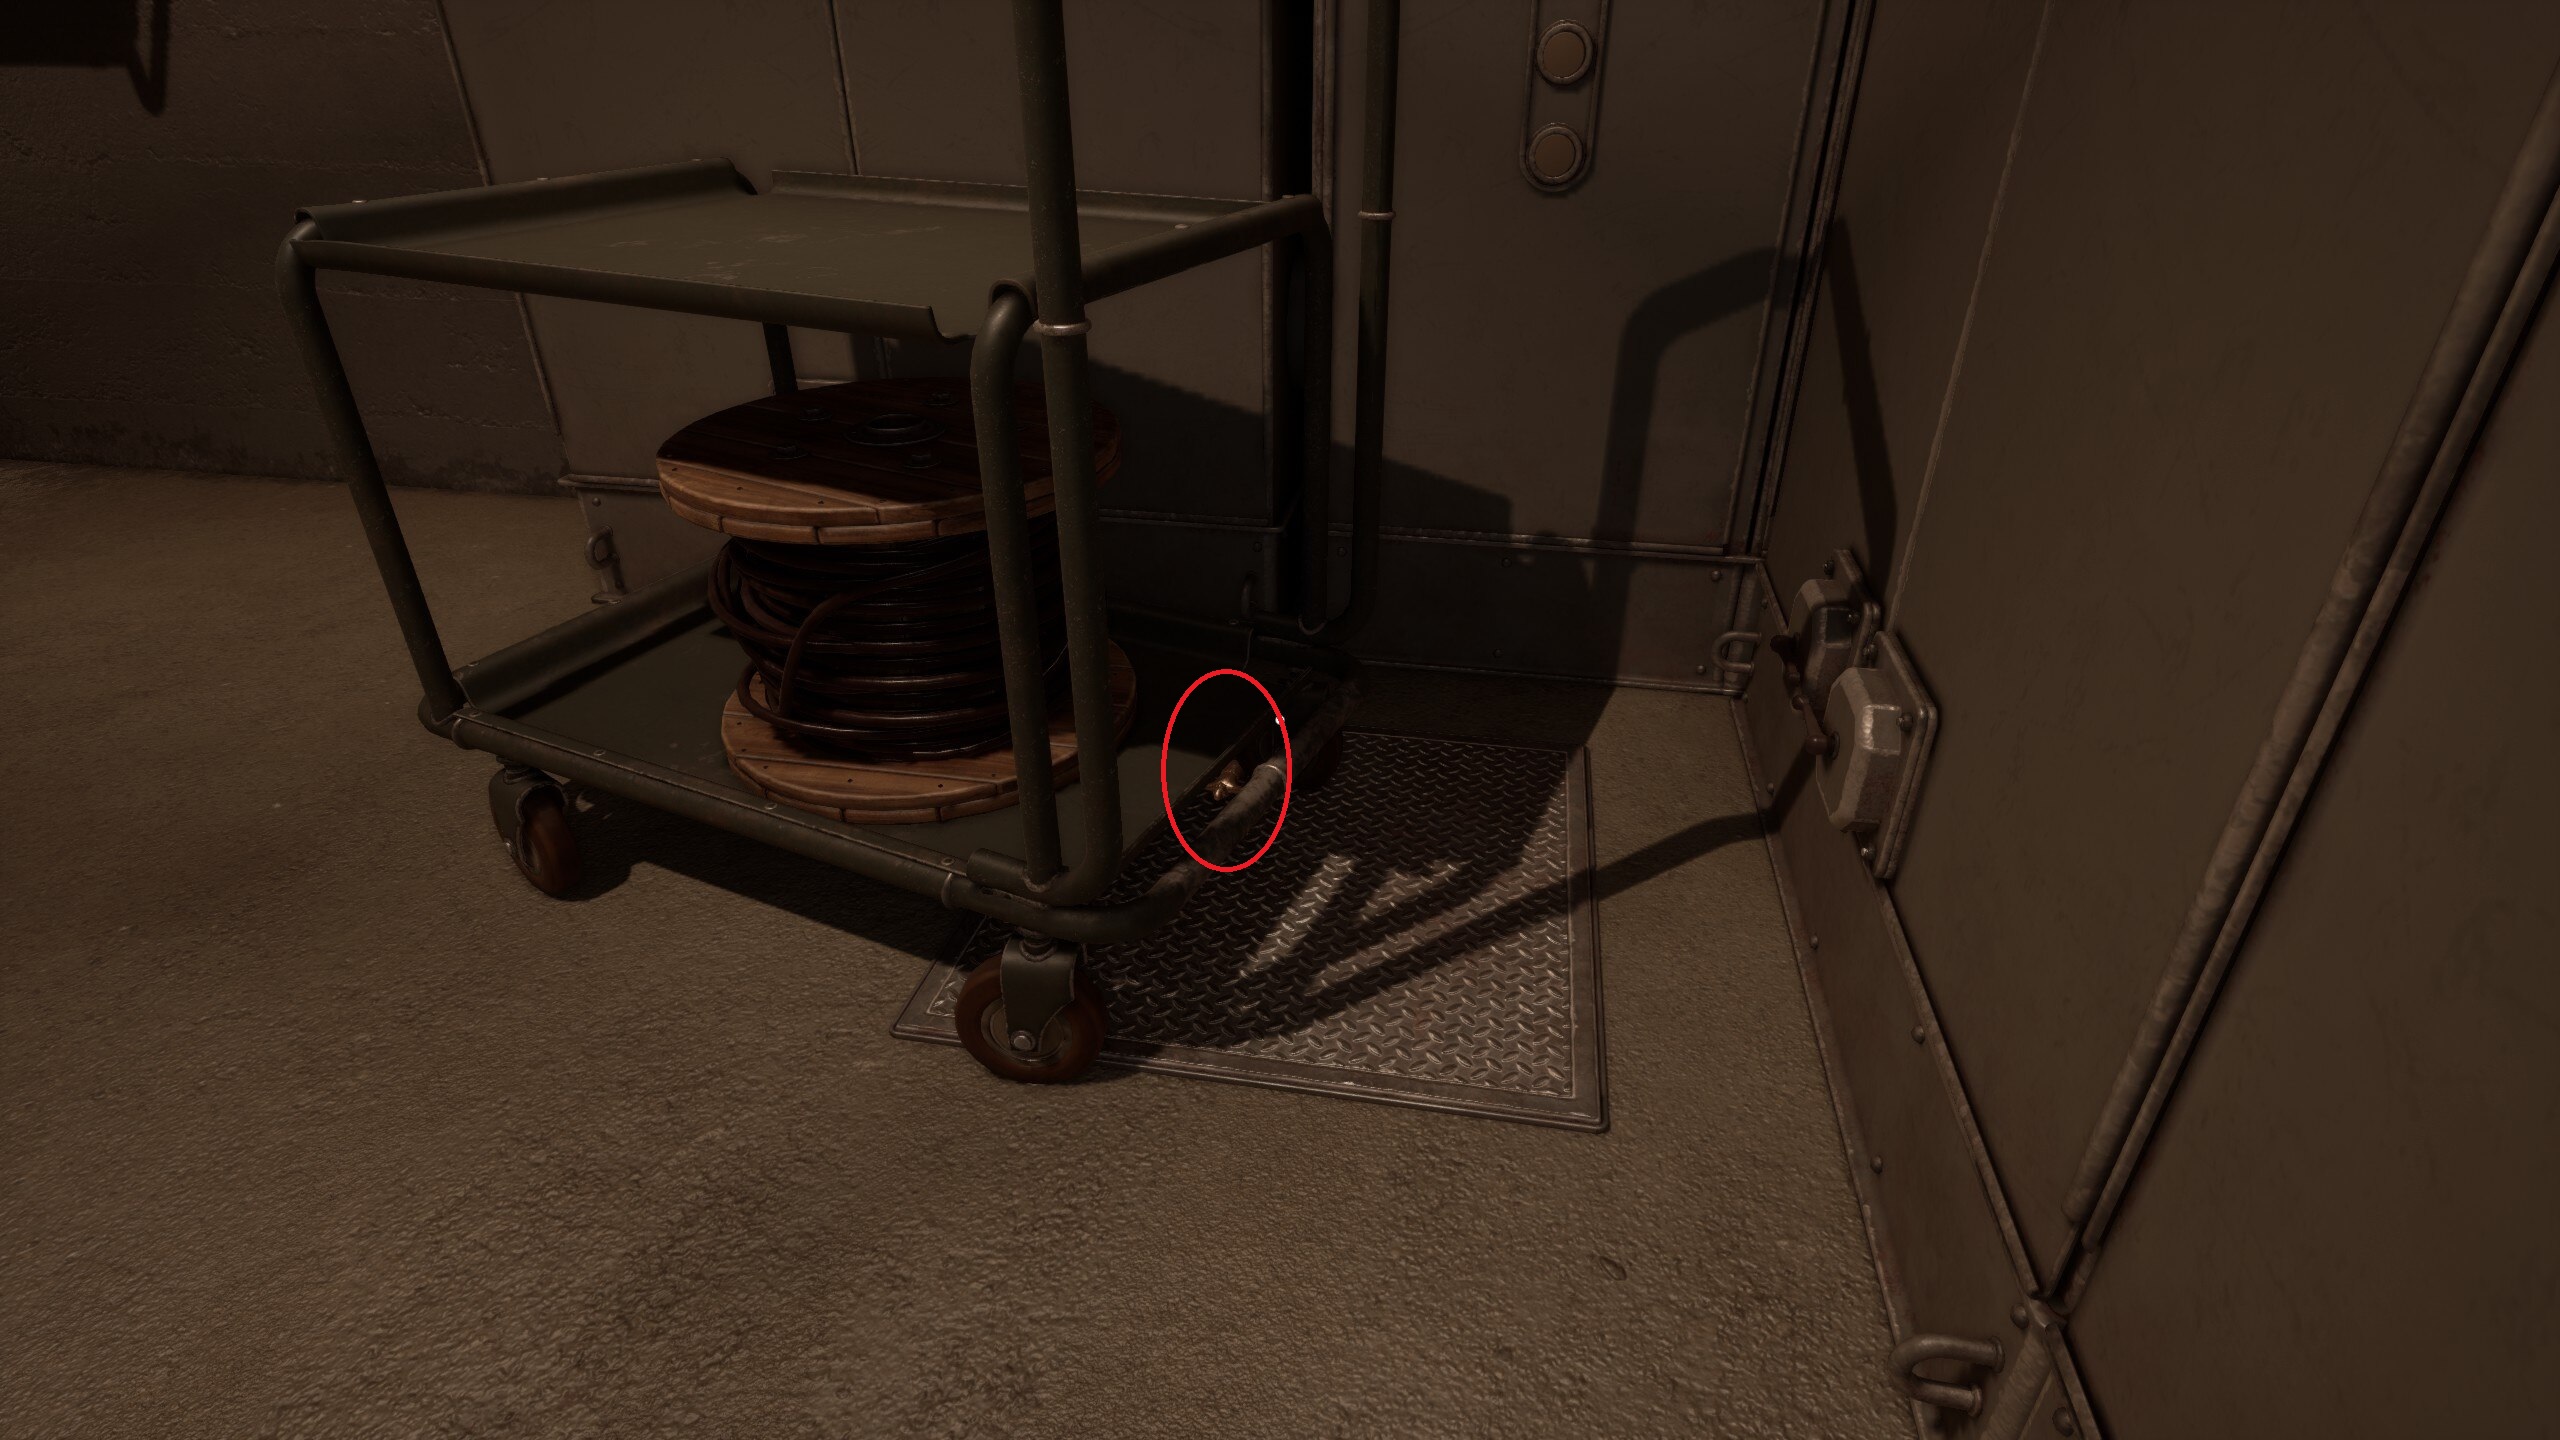
“Collectible #30”
Tucked under a wheel of the cart in the back corner.
Electrical Room Puzzle 1a – 1b > Gain access to MORE rooms.
Puzzle 1a:
Power the radio.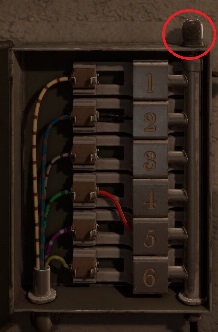
- Hint 1:The electrical panel on the wall with the radio can be interacted with.
- Hint 2:The wires in the electrical panel correspond to wires in the breaker box on the wall near the cabinet.
- Solution:

Puzzle 1b:
Set the correct frequency on the radio to open the cabinet.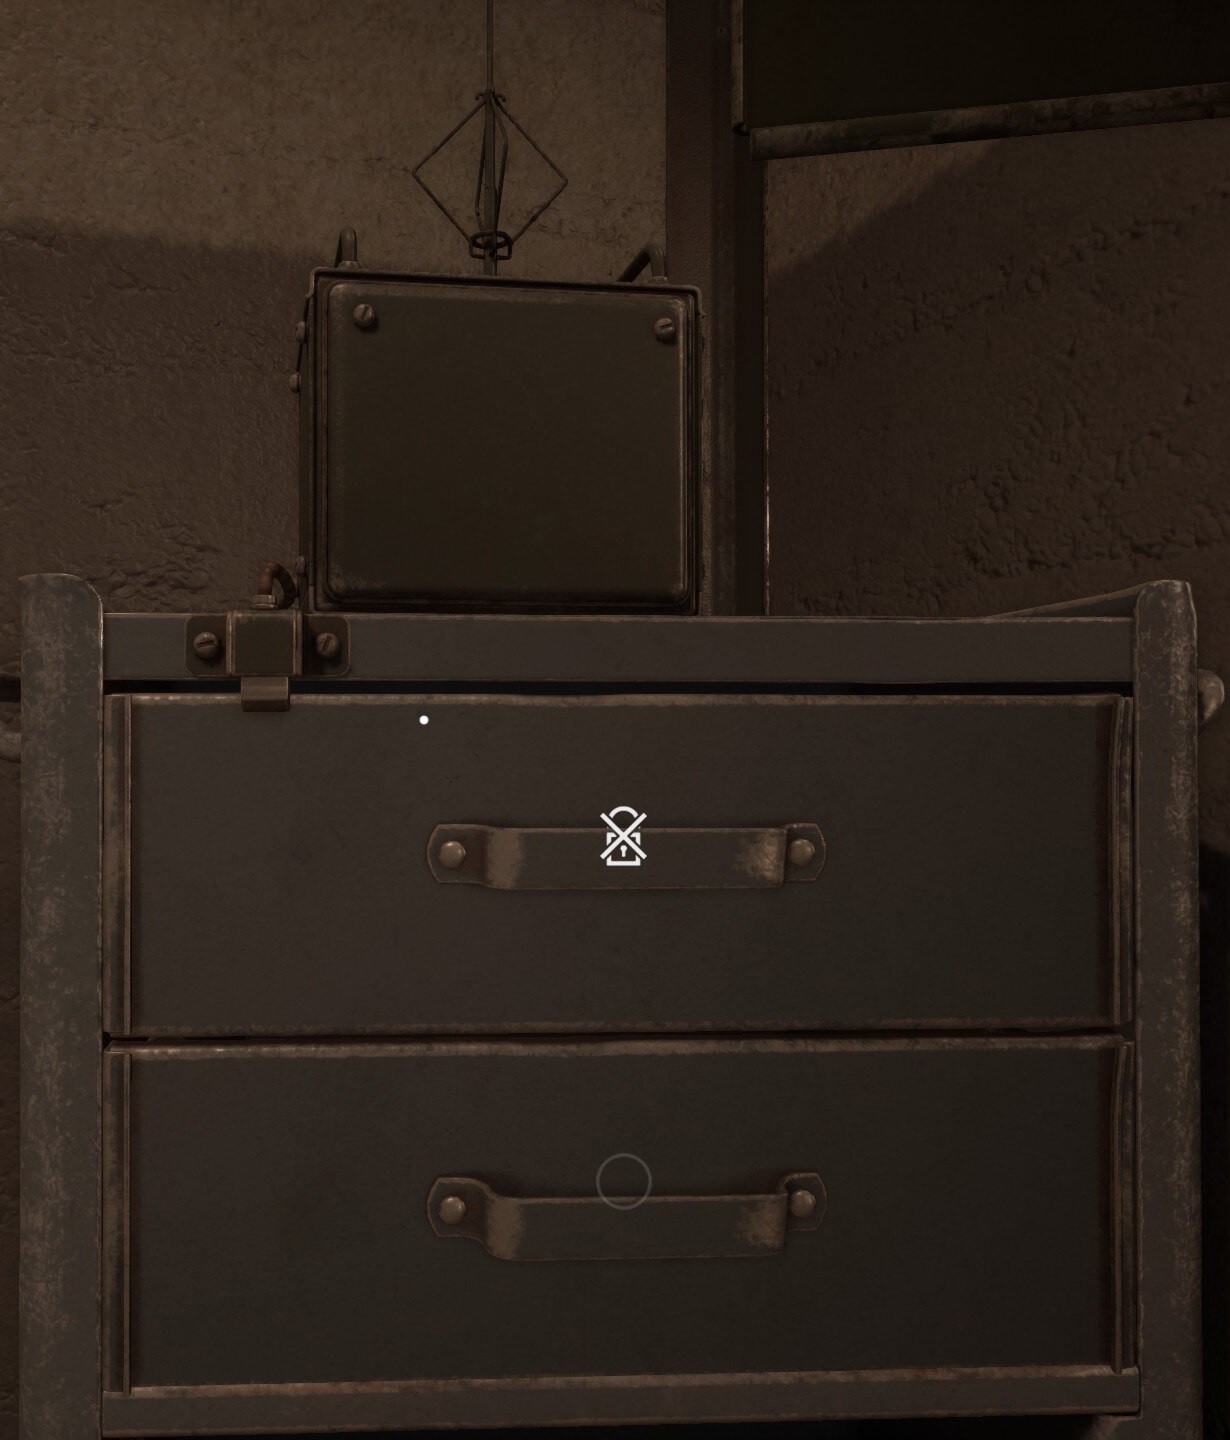
- Hint 1:There’s a clue on the right side of the radio. Start changing the radio one switch (or the dial) at a time to see how the switches and the dial affect the sequence.
- Hint 2:The dial and switches only affect the last 5 bulbs. Try drawing a grid to map out where/when the bulbs light up.
- Hint 3:Set the switches and dial to make the bulbs light up in order from left to right.
- Hint 4:The dial increase the sequence delay (on all 5 bulbs) by one step. The switches delay their individual bulb one step.
- Solution:
Dial adjusted by two clicks
Switch 1: down one click (Switch 1 = first on the left)
Switch 2: NO CHANGE
Switch 3: down three clicks
Switch 4: down one click
Switch 5: down four clicks
 With the drawer unlocked, you now have access to the Toilet.
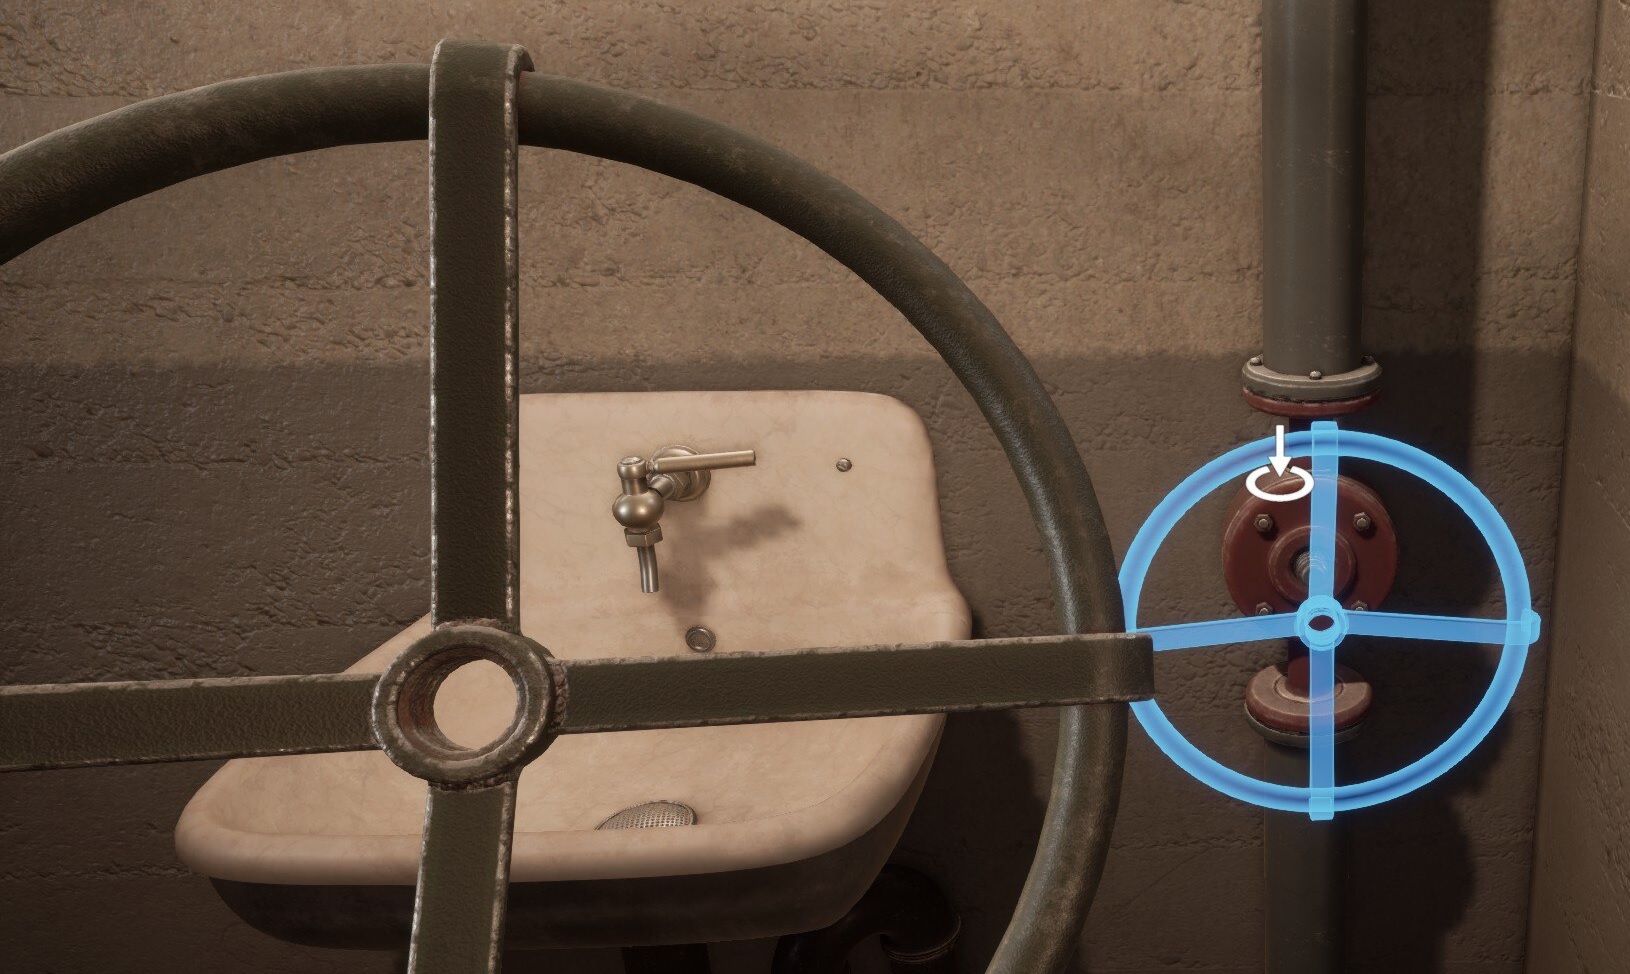
Toilet
It is an important room. Essential in any house, lab, jail, or bunker. Oh, and there’s some puzzle pieces here, too. This room contains no Puzzles to unlock.
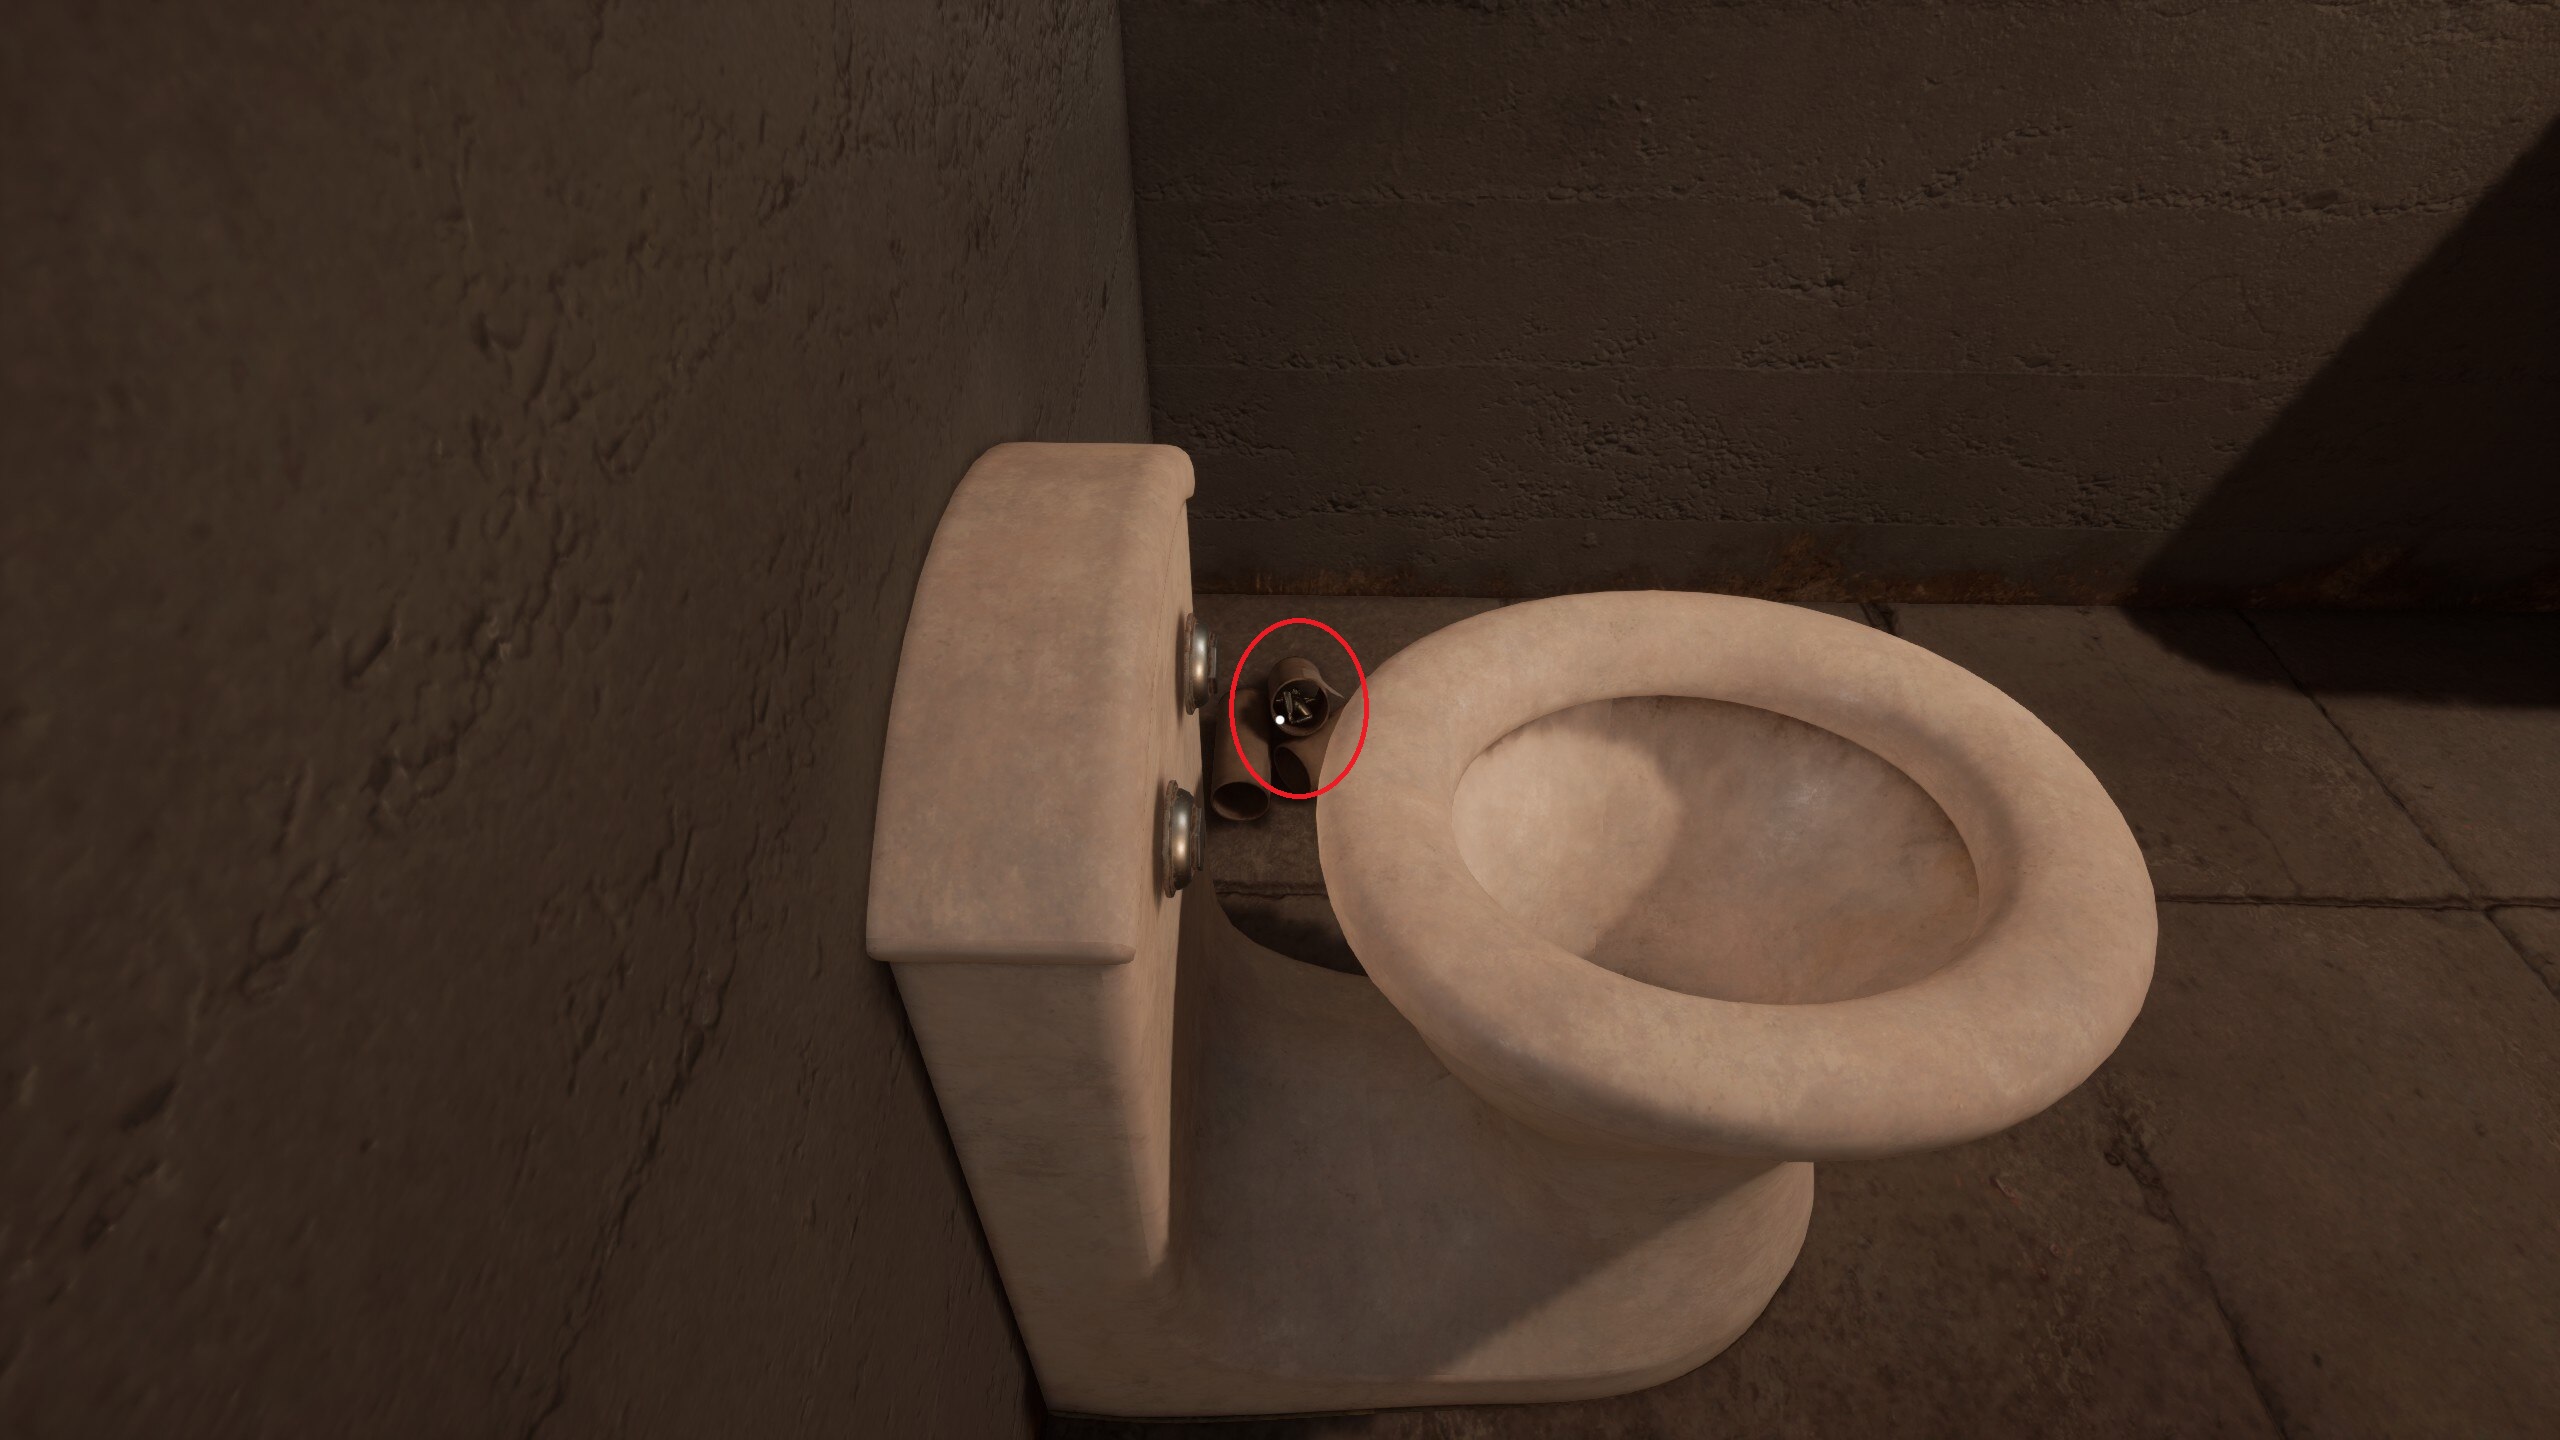
“Collectible #31”
Hiding in the loo rolls beside the toilet. Loo rolls AKA Toilet paper rolls.
Toilet Puzzle > Find the puzzle pieces.
Puzzle Piece 1:
Look for anything you can interact with.Solution:
The water valve next to the sink can be taken.
 Puzzle Piece 2:
There is another piece of information you can gain access to here.
- Hint 1:You can’t jump, but you can get higher.
- Hint 2:You can crawl through the vent above the toilet.
- Hint 3:There’s a chalkboard in the Storage Room that you can see from the vent.
- Solution:The code for the Storage Room door is: 02468

Storage Room
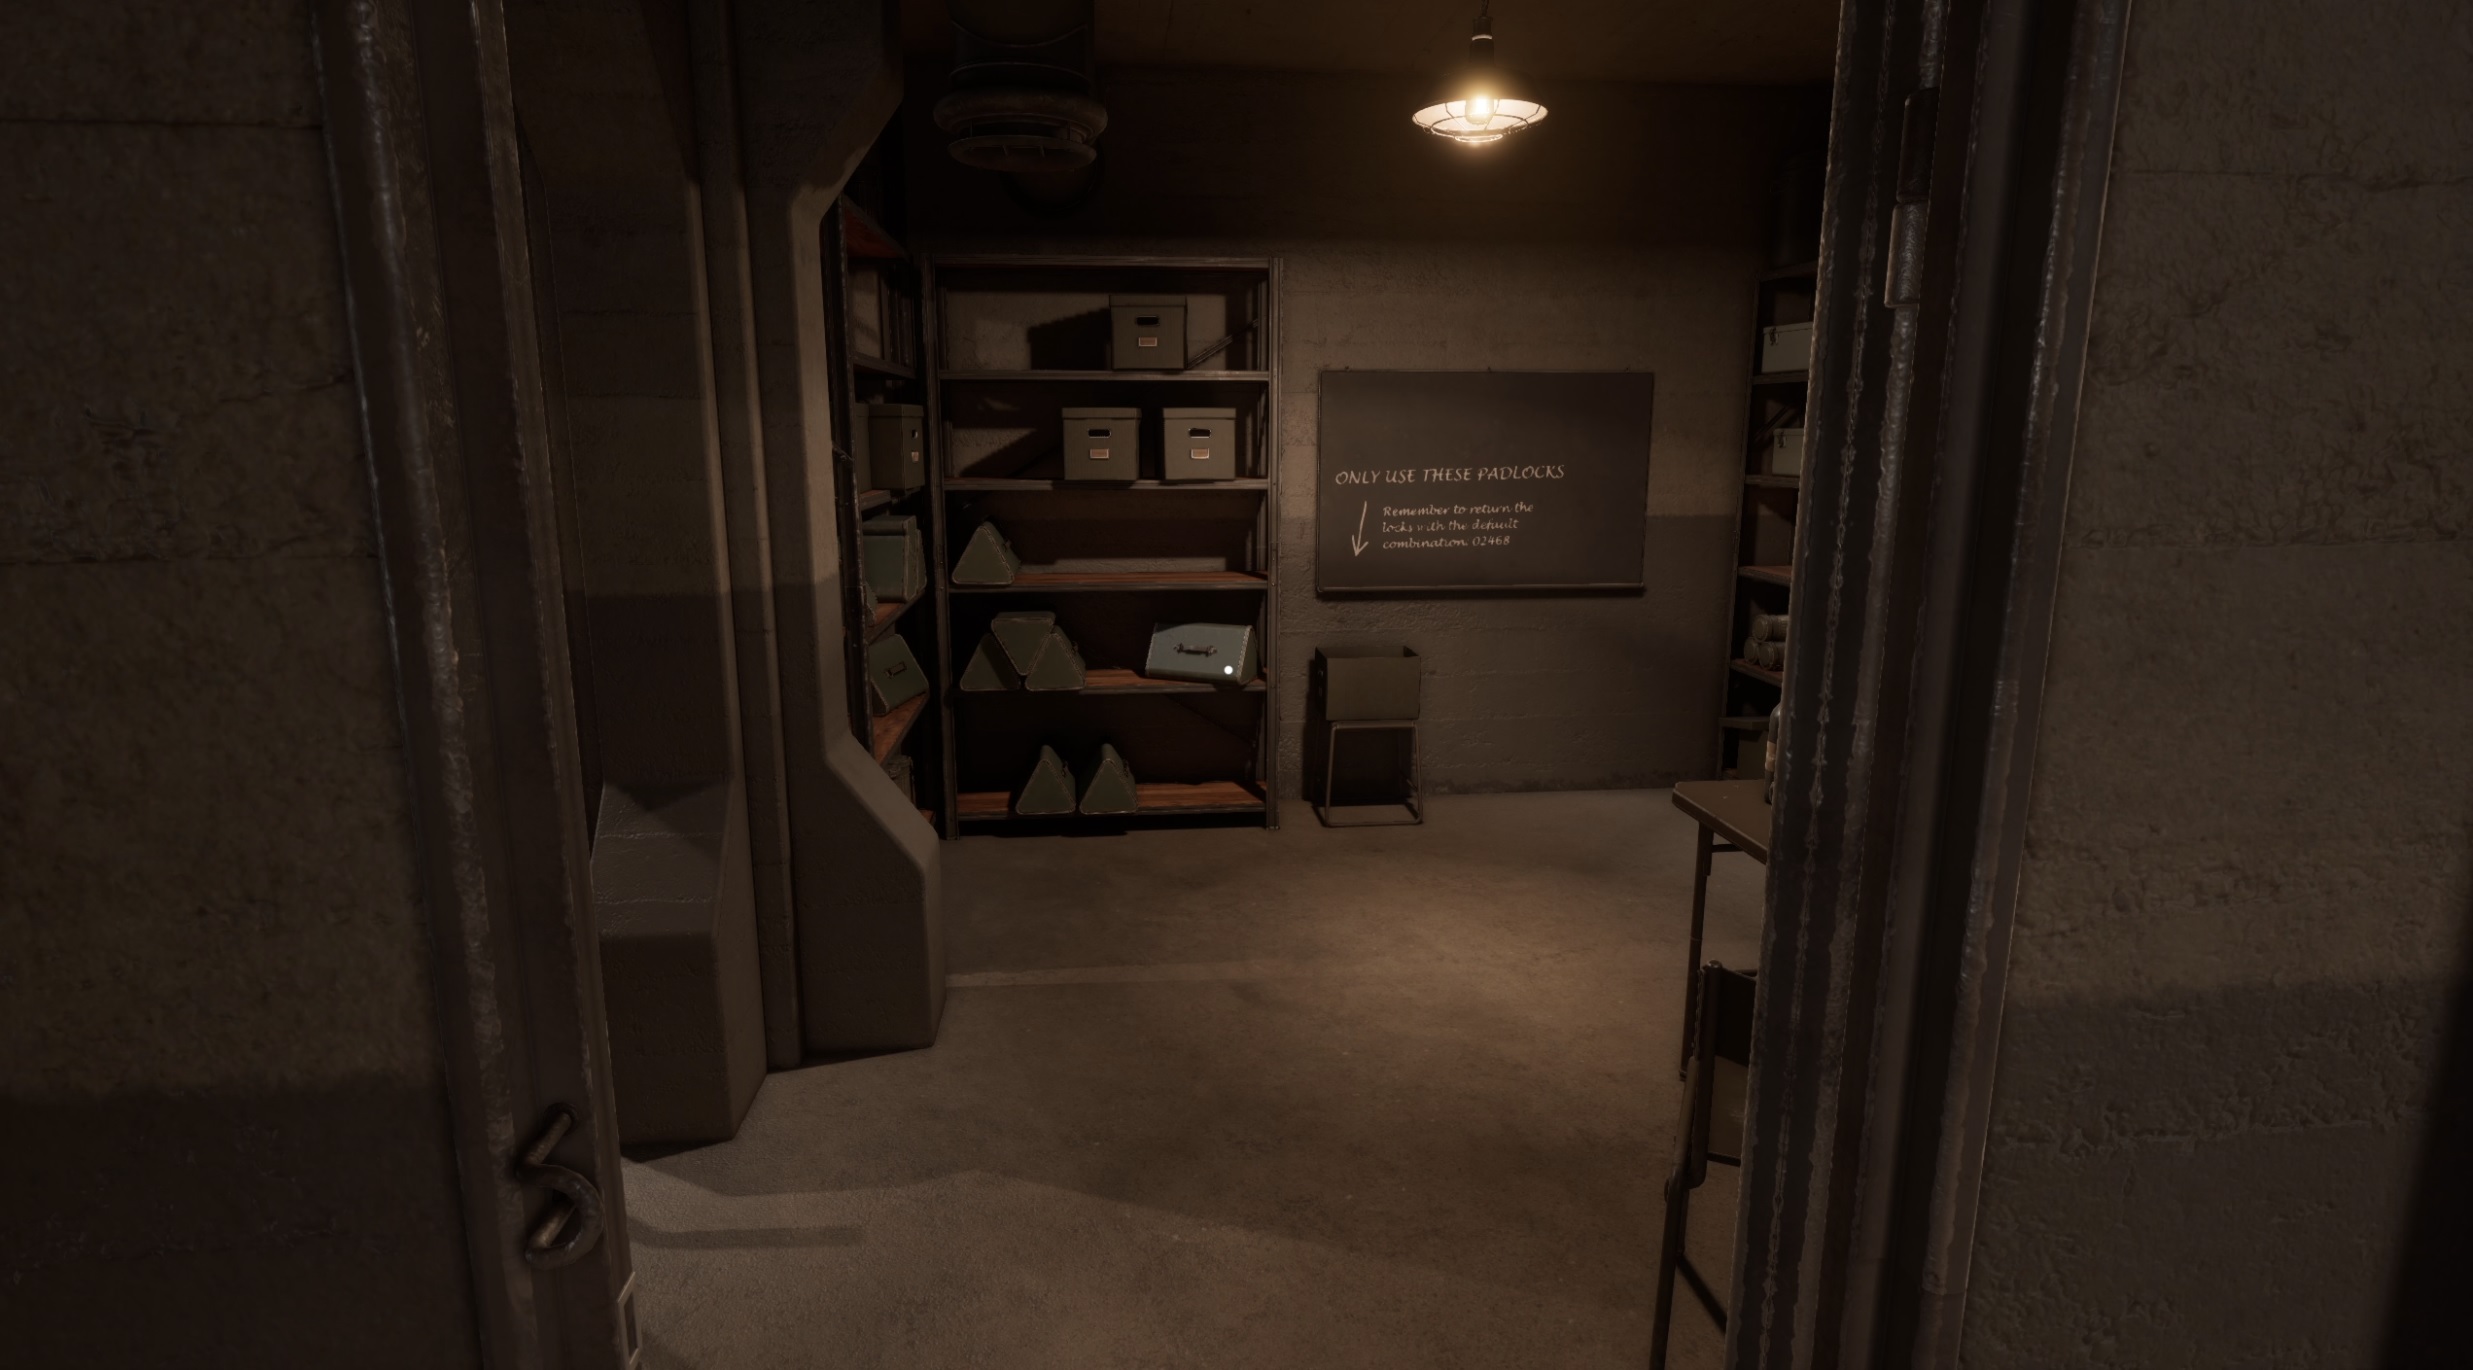
Almost there. You just need to collect a few more puzzle pieces to be on your way to the big ‘W’.
“Collectible #32”
Found in the box under the chalk board with some locks.
“Collectible #33”
Near the second receiver, on the bottom shelf, behind the tins of Emergency Rations.
Storage Room Puzzle 1 & 2 > Collect the final pieces.
Puzzle 1:
Unlock the puzzle box on the card table.
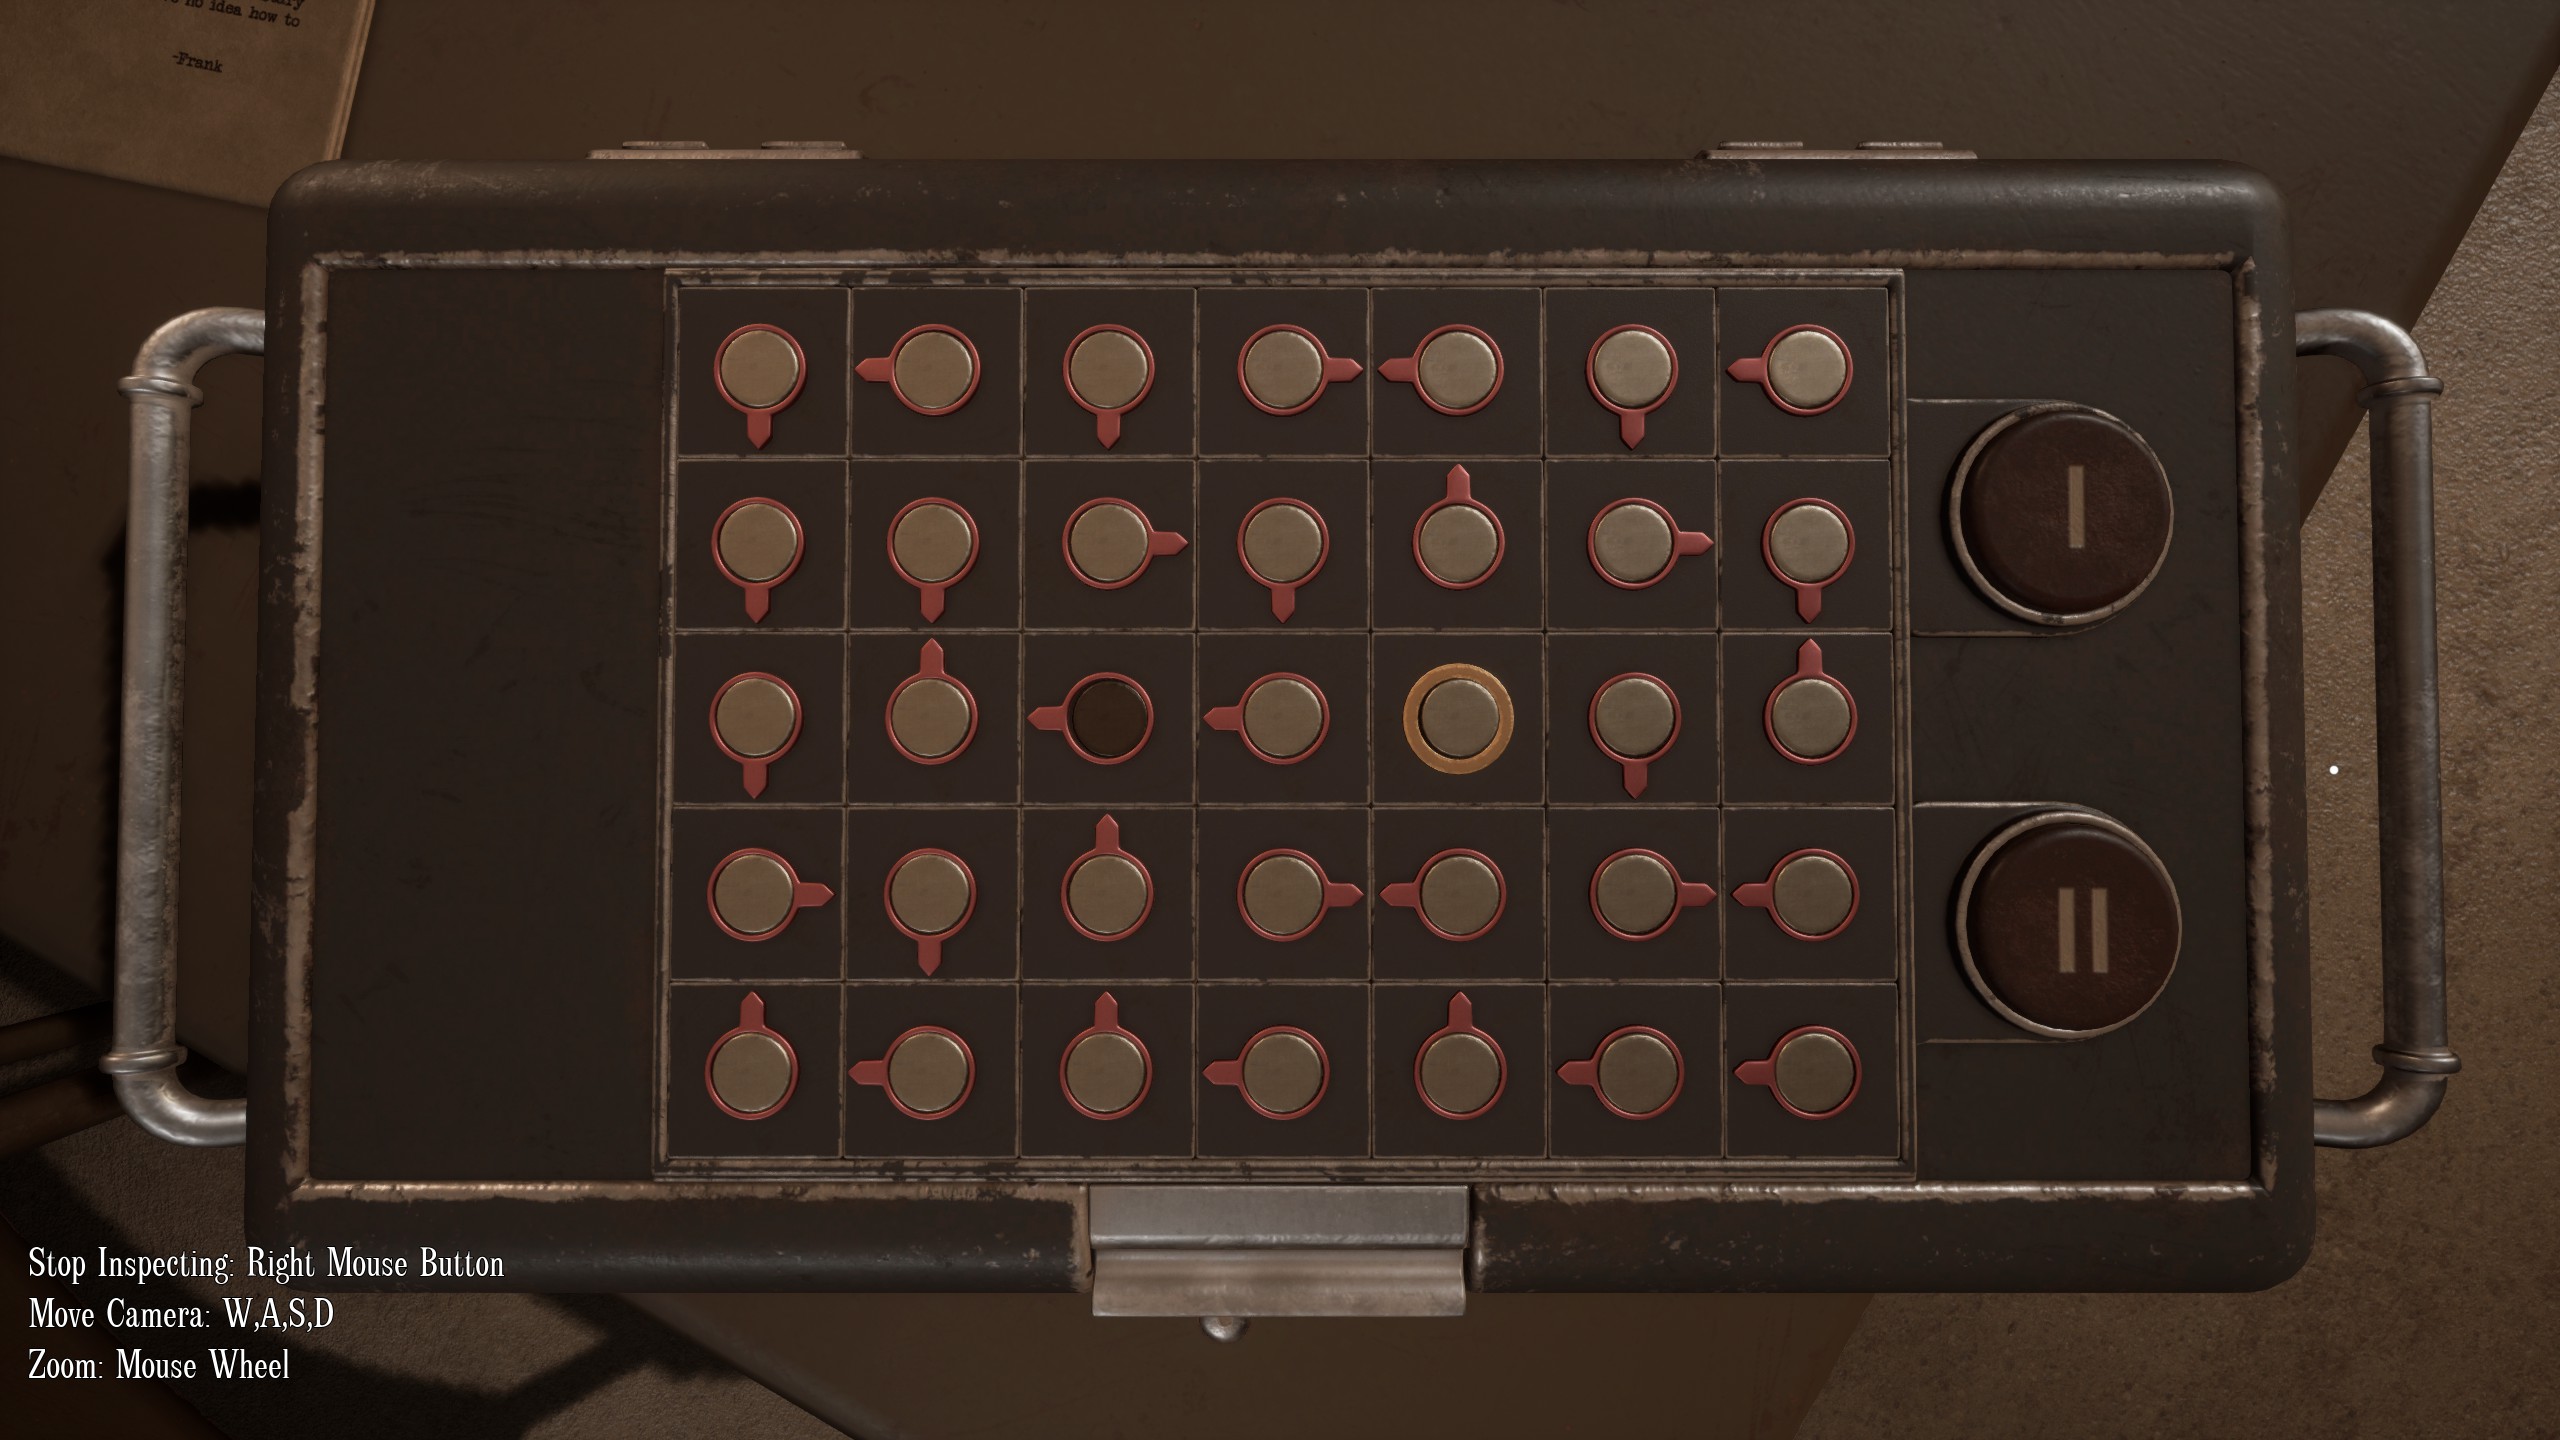
- Hint 1:Use the buttons on the right side to move the pressed-in dot to the golden circle.
- Hint 2:The arrows on each circle indicate the direction the dot will move. The roman numerals on the buttons indicate how many spaces the dot will move. I: move one (1) space. II: move two (2) spaces.
- Solution:Press the buttons in this order:
2 – 1 – 2 – 2 – 2 – 1 – 1 – 2 – 2 – 2 – 1 – 2

Puzzle 2:
Open the lockbox on the shelf with the receiver.
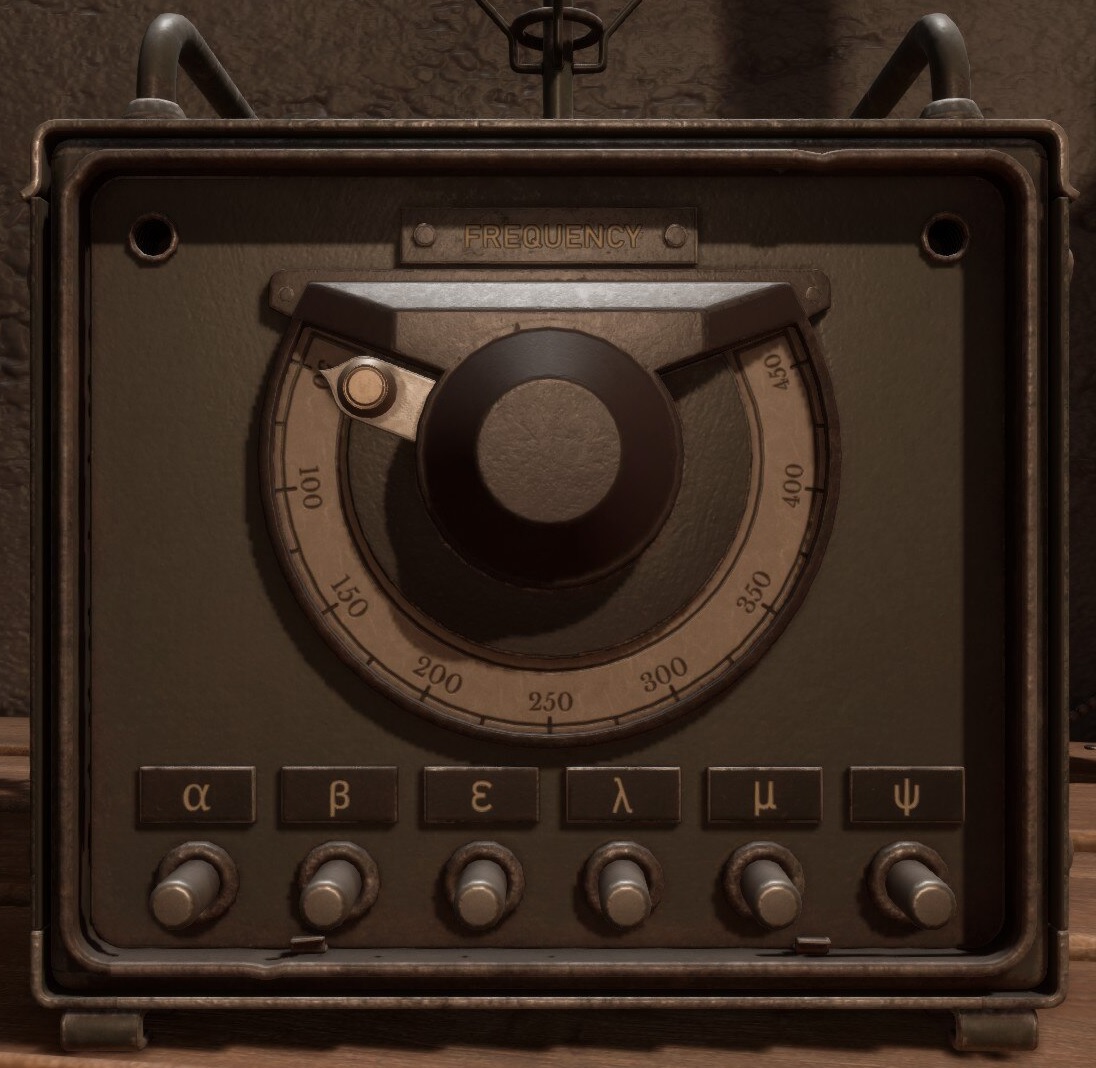
- Hint 1:You have to open the puzzle box first (Puzzle 1) to collect the ‘Signal Analyzer’.
- Hint 2:Use the ‘Signal Analyzer’ in conjunction with the Radio from the Electrical Room. Try to set the Receiver in the Storage Room to the same signal.
- Solution:The frequency is 350 kHz, and the pattern is λ (lambda) and µ (mu).

Now you have a battery. You will need this later.
Generator Room

The biggest room off the Corridors, this room contains 4 ‘Collectibles’ and has 4 different sections: The Generator; The Fuel Enricher; The Access Tunnel, and; Chemical Storage.
All the puzzles here are connected. You can’t finish certain ones before solving others.
This includes solving one puzzle not in this room.
“Collectible #34”
In the tins on the table next to Chemical Storage
“Collectible #35”
In Chemical Storage, under the hatch (when open)
“Collectible #36”
Behind the right leg of the shelf around the corner of Chemical Storage
“Collectible #37”
On the second of the two (2) large pipes against the ceiling back behind the Generator
Generator Room Puzzle 1-7 > Start the Generator to power the exit
Puzzle 1:
Access Chemical Storage

- Hint 1:You won’t find the key to the Chemical Storage lock, look for another way to get in.
- Hint 2:There’s a crawlspace behind the Generator but it’s blocked. You should already have what you need to get past this, it just might not be with you.
- Solution:Use the water valve you can pick up from the Toilet on the pipe in the crawlspace that’s leaking. Once you get into Chemical Storage, look for the door key.
Puzzle 2:
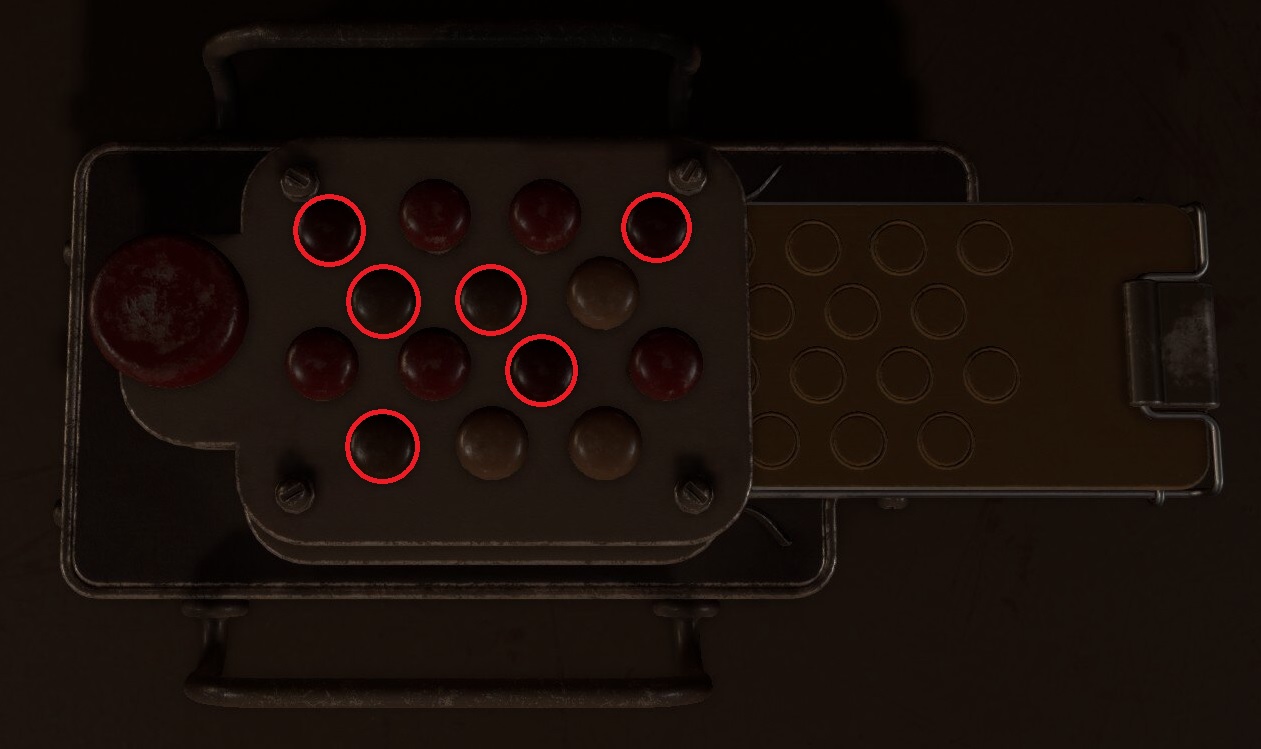
Open the lockbox in Chemical Storage
- Hint 1:Press in the circular sections in such a pattern that the numbers above light up.
- Hint 2:Avoid connected sections in order to make a set of 5, 5, 4, 2, and 2 of pushed in sections that aren’t connected to anything else.
- Solution:
The next steps to turning on the generator are interconnected. Move to whichever Puzzle you’re having problems with.
Puzzle 3:
Create the fuel to Fuel the generator
- Hint 1:There are four (4) places you can get info for how to mix the fuel.
- Hint 2:There’s a note on the wall of Chemical Storage. There’s a note on the side of the Generator Fuel Tank. The Start-up sequence note has a small piece of information. One of the containers also has a note on it.
- Hint 3:The note on the side of the generator says “Cetane Enriched Fuel Only.” The Start-up note is titled “Grynghus Diesel Generator Start Up Sequence.” The note on the container says “Do not enrich ever.” The note in Chemical Storage outlines what chemicals react poorly to each other. Look at all the available fuels and enriching materials, and narrow them down by the fuels available to choose the two containers that will work together.
- Solution:Use Diesel III and L3-Cetane in the enricher. You have to place the empty bottle inside, then pour the diesel into one tube and the cetane into the other.
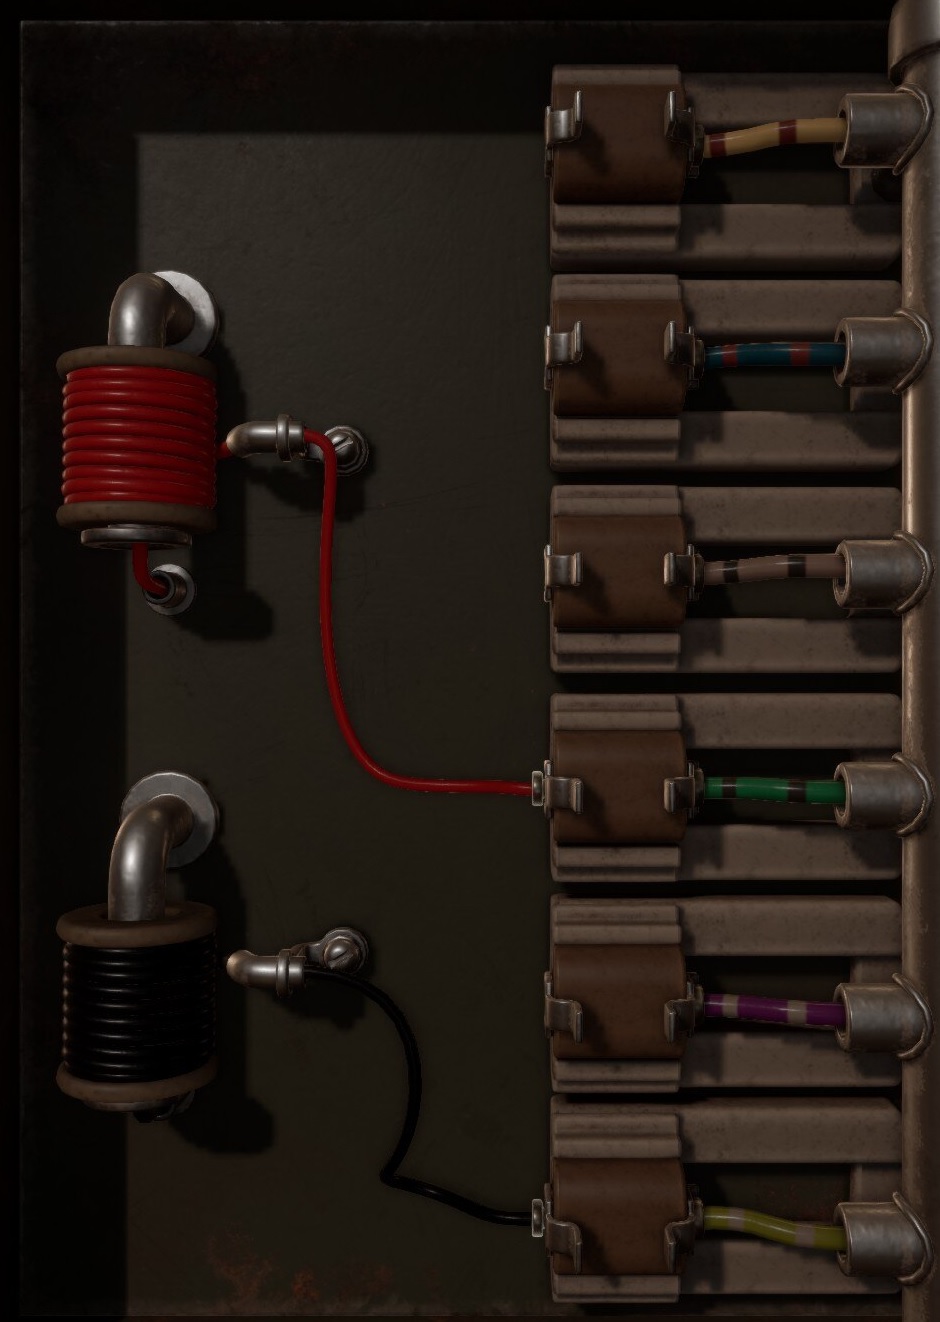
Puzzle 4:
Turn on power to the Enricher
- Hint 1:Use the electrical box in the Electrical Room to move the power to the Generator Room’s breaker box.
- Hint 2:Use the schematic map in the Corridors to identify different breaker boxes. Check these boxes to see how their wires are set up.
- Hint 3:There are three breaker boxes you can investigate. C4|E2 is in the Entrance Area; B5|F2 is in the Electrical Room; E1|D3 is in the Corridors. Observe how the red and black wires are connected in each box, what wires they are connected to.
- Hint 3:According to each breaker box:
Breaker BoxRed WireBlack WireC4|E2 (Entrance Area)Purple/GreyTan/BrownB5|F2 (Electrical Room)Green/BlackBlue/RedE1|D3 (Corridors)Tan/BrownLime/WhiteB6|D4 (Generator Room)UnknownUnknownTry to use this information to choose the correct location for the wires in the electrical panel.
- Solution: Red to Green/Black – Black to Lime/White
Mix the fuel and put it in the generator’s fuel tank.
Puzzle 5:
Identify the Generator
- Hint 1:Unlocking the box gives you access to the Manual. Use the manual to determine the model of Generator.
- Hint 2:Check each page, determine what type AND the amount of each part is used on this Generator. Using the chart on page one (1), narrow down the types of generators possible until you are left with only one.
- Hint 3: If you’re having trouble figuring out one or two items, here’s a quick-fire list to check the items you’re not sure on:
– Fuel InjectorsFI-2
– Heat ExchangersHEX-2
– Air FiltersAF4-A
– Safety Expansion ValvesSEV-1
– Mechanical TransmissionsRubber belt pulley - Solution:The Generator type is: BR-2. With this information you can determine the correct start sequence.
Puzzle 6:
Determine the correct start-up sequence
- Hint 1:You have to use information in the Manual along with the note on the wall to get the right sequence.
- Hint 2:There are only 2 air filters installed. This is the only change to the sequence.
- Hint 3:Don’t use the Choke at all during start-up. Follow all other instructions.
- Solution:Start-up Sequence:
- Make sure it has fuel.
- Engage Clutch
- Set throttle adjust to at least halfway (You can set it right to 1250)
- Set Conditions from Table 1:
- OVER PRESSURE = ON
- EXHAUST BYPASS = ON
- Turn on the Starter Motor
- Wait for motor to stabilise, press Engine Start
- Set Conditions from Table 2:
- OVER PRESSURE = OFF
- HYDRAULIC PUMP = ON
- FLOATER LIMITER = ON
- EXHAUST BYPASS = OFF
- If not already at 1250, set Throttle Adjust to 1250
- Release Clutch
If everything was done correctly you’ll see the OUTPUT OK light turn on.
Puzzle 7:
Complete the circuit
- Hint 1:There’s a stool beside the generator that can hold a box-shaped object.
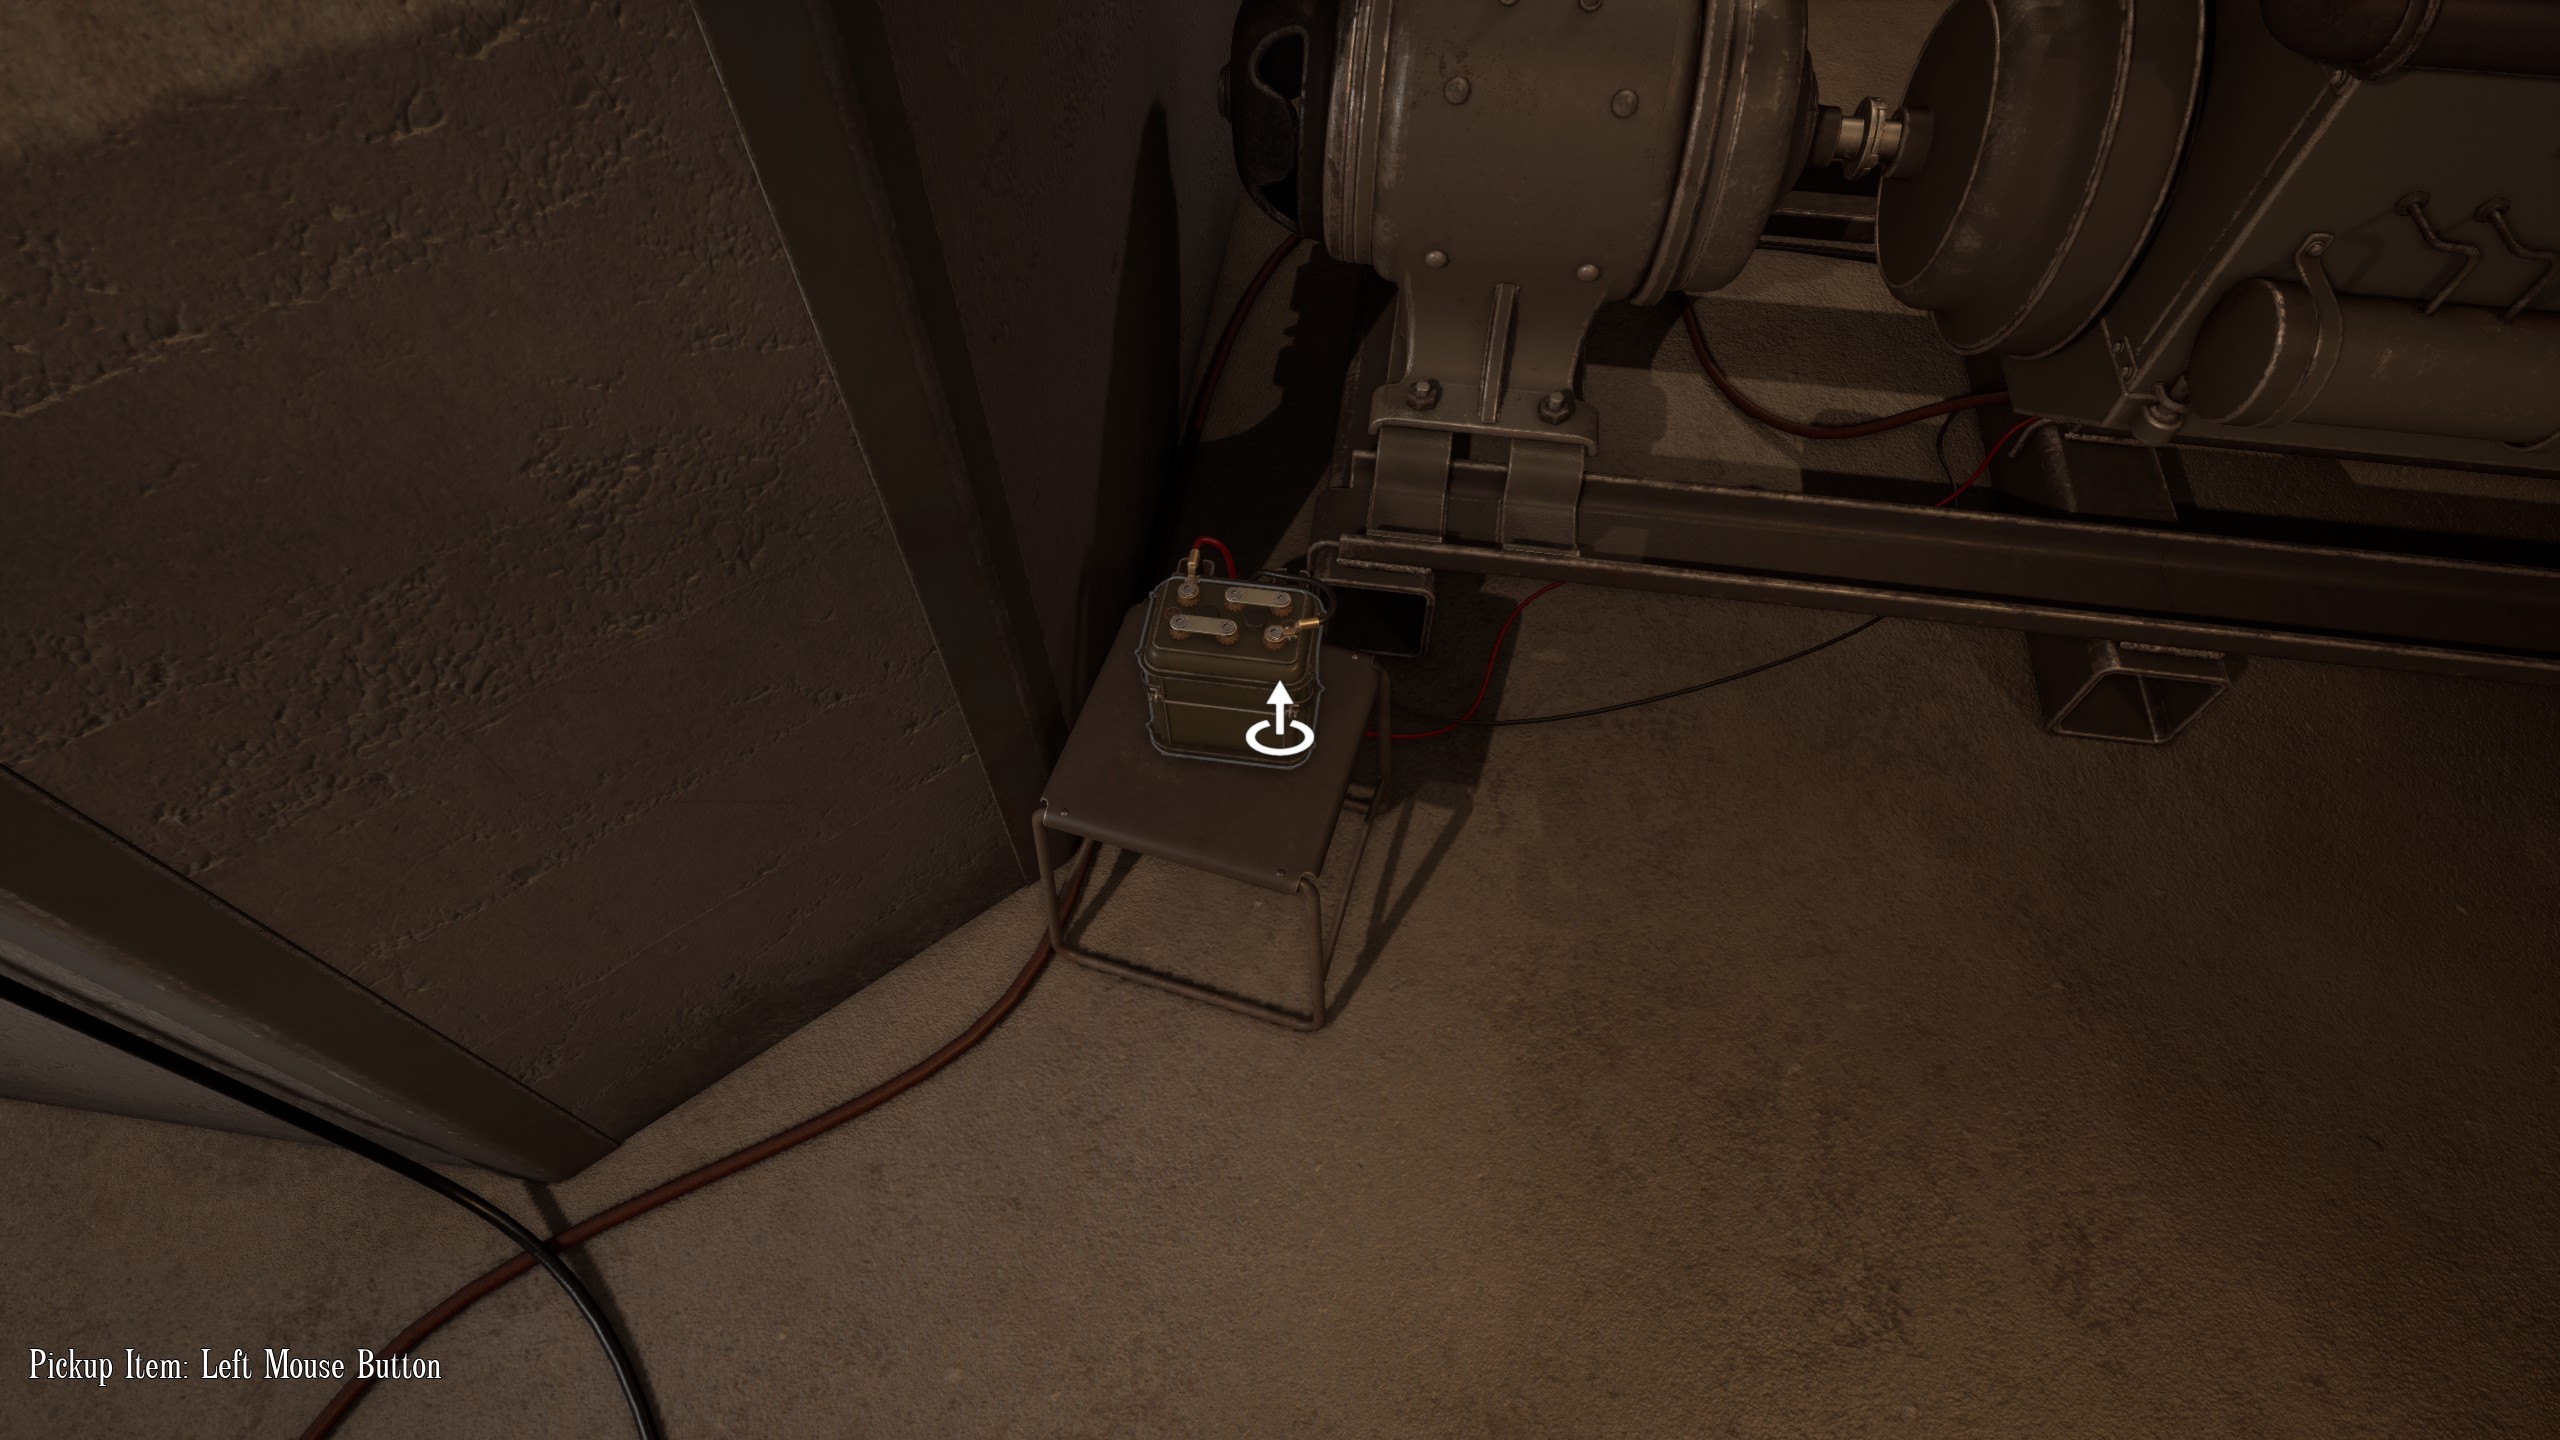
- Solution:Place the Battery you found in the Storage Room here.

The Emergency Exit is now powered.
The End
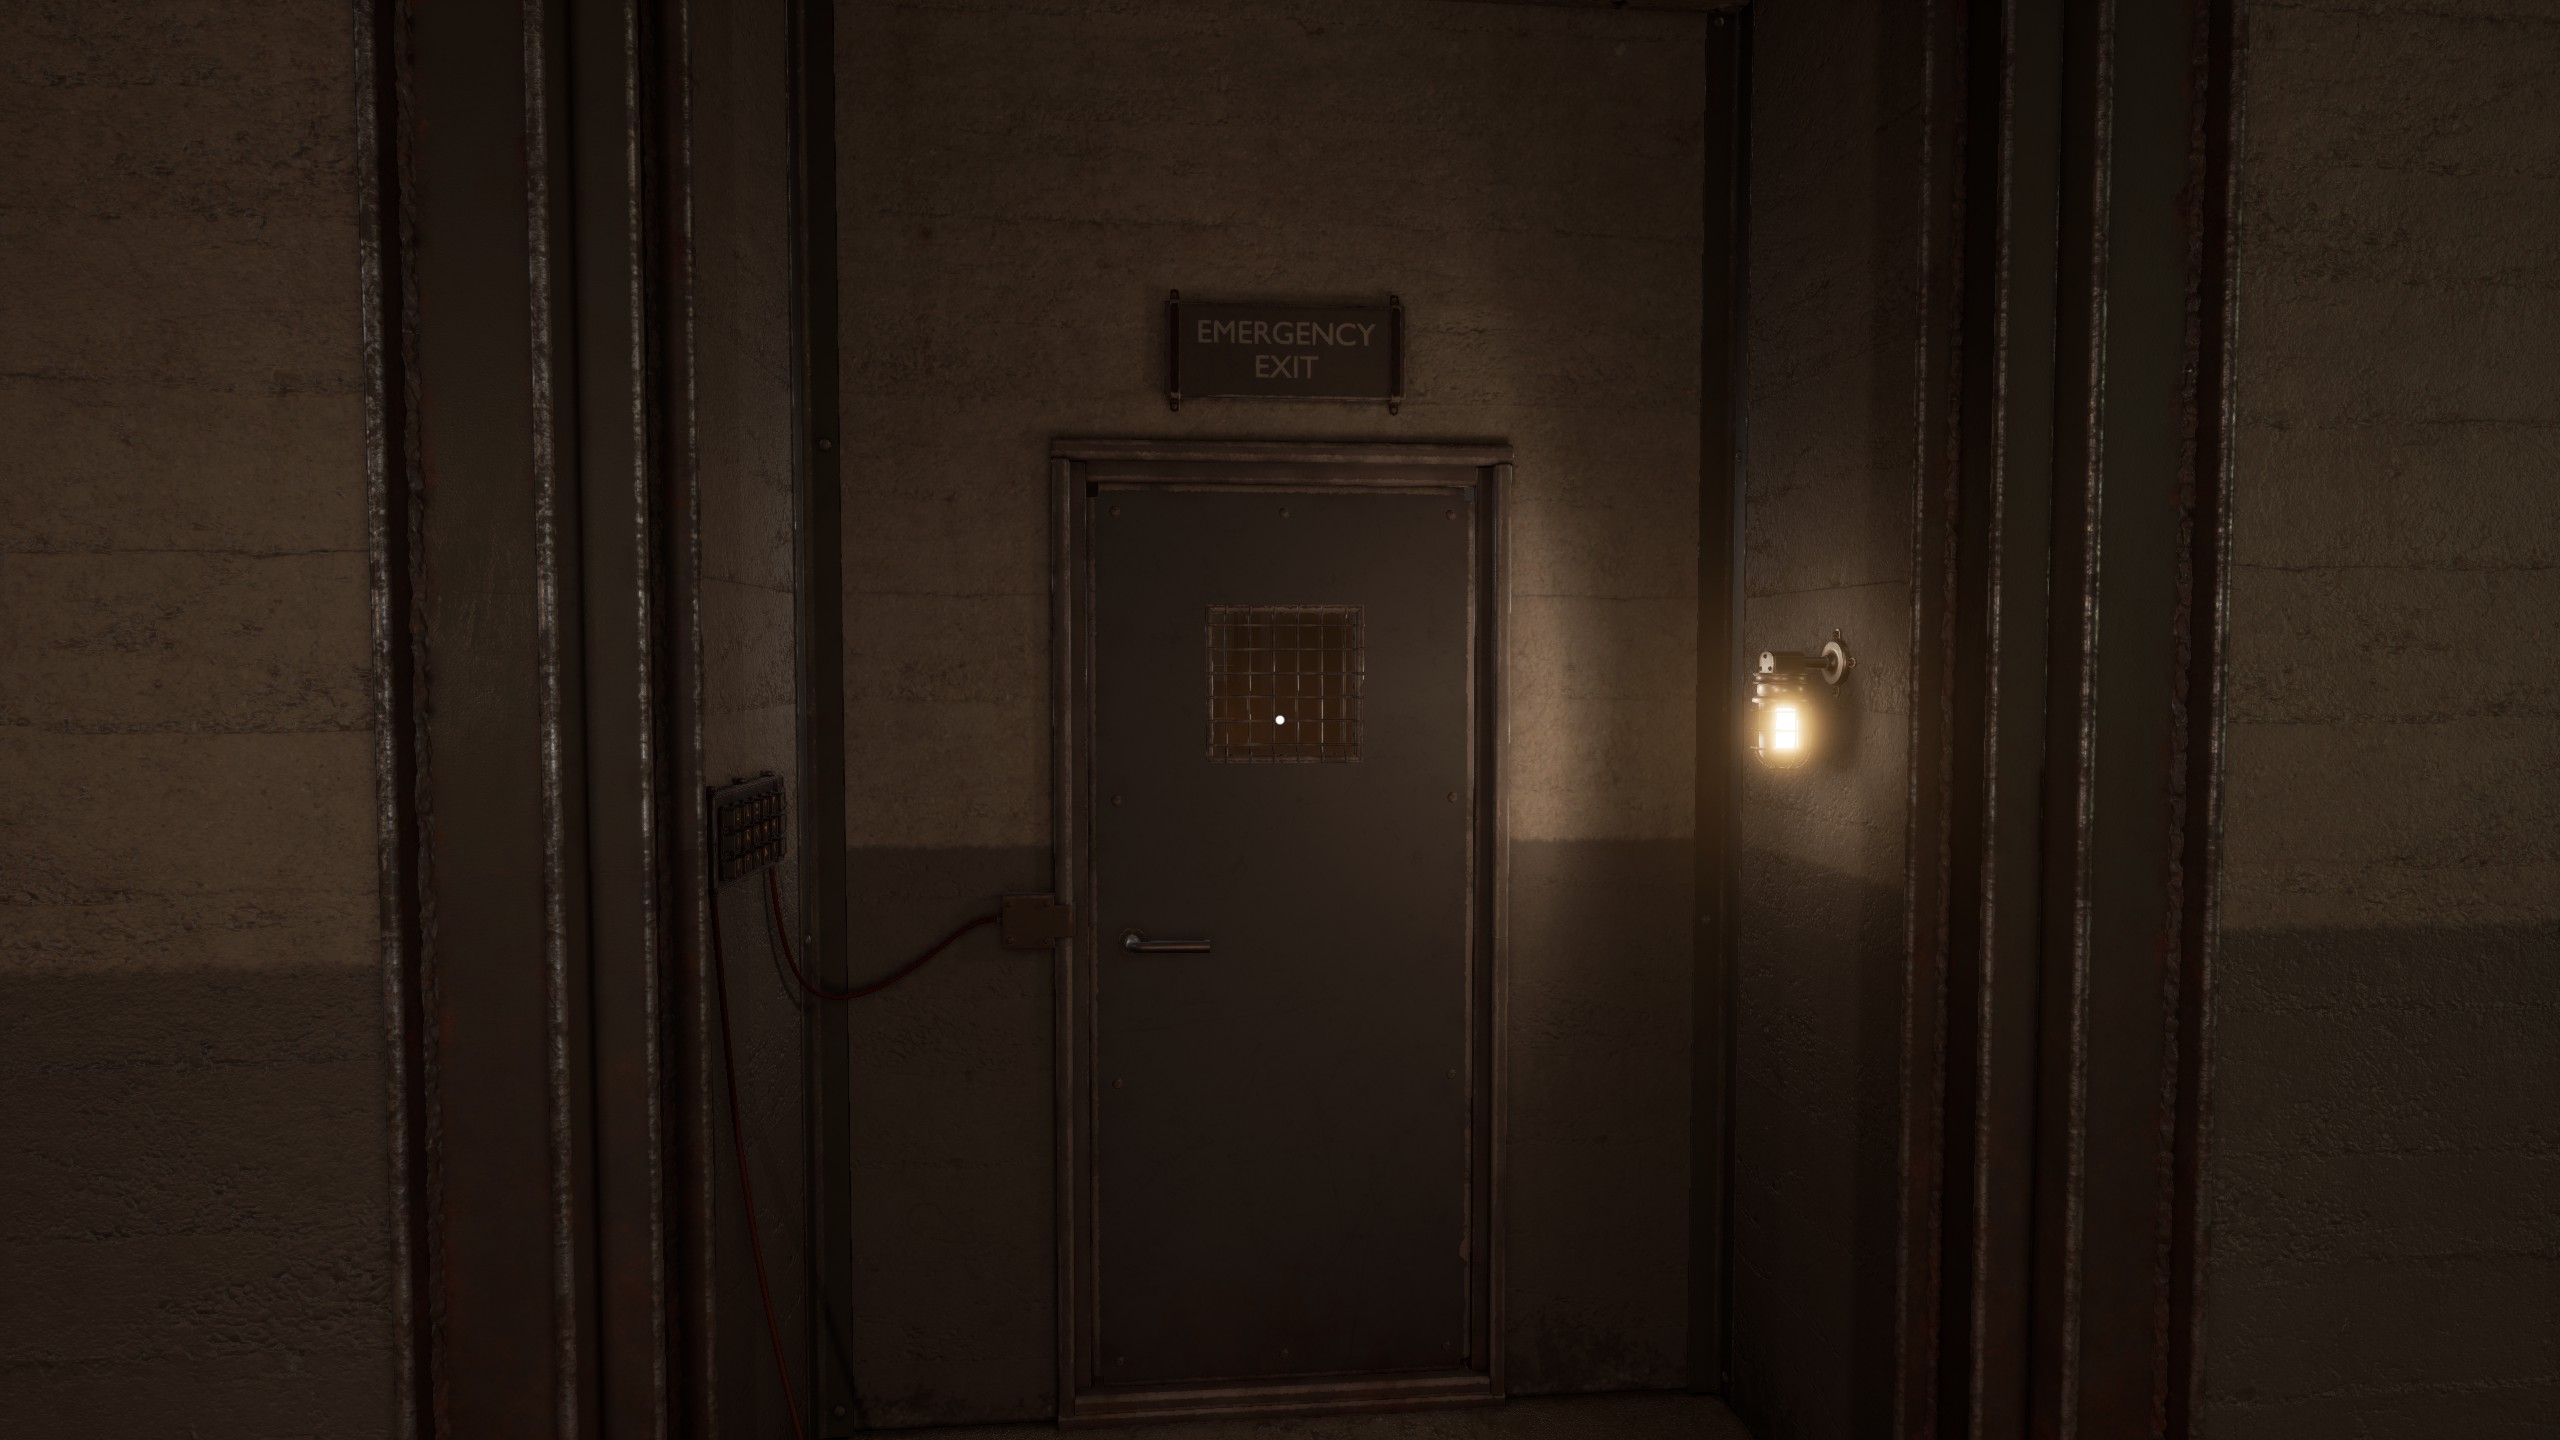
Now you have all you need to unlock the Emergency Exit.
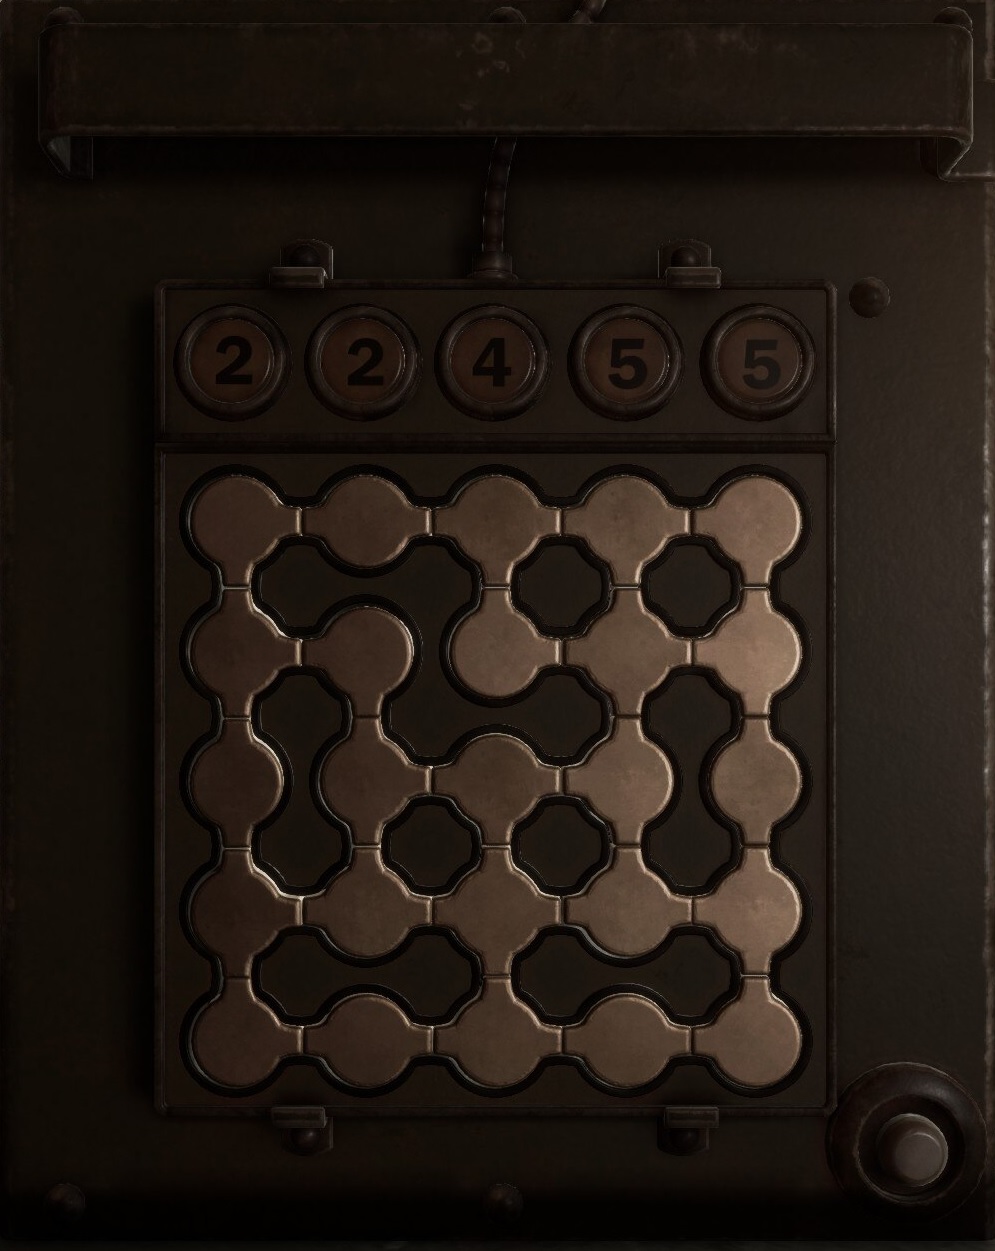
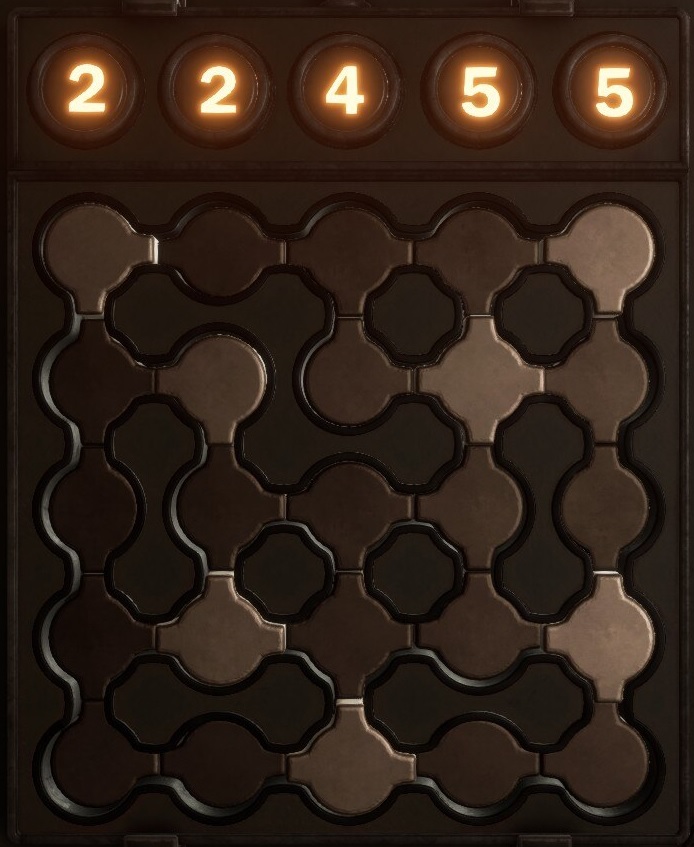
Emergency Exit Puzzle > Unlock the door
Puzzle:
Unlock the Emergency Exit
- Hint 1:You have to push in the buttons to to match the symbols at the end of each row.
- Hint 2:You can only push in one button in each column, limiting your choices.
- Solution:

You’re
FREE
! GTFO
Just the Collectables (Collectibles?)
Collectible #17
 Collectible #18

Collectible #19
Collectible #20
Collectible #21
Collectible #22
Collectible #23

Collectible #24
Collectible #25
Collectible #26

Collectible #27
Collectible #28
Collectible #29
Collectible #30
Collectible #31
Collectible #32

Collectible #33

Collectible #34
Collectible #35
Collectible #36
Collectible #37