Not sure where to start with modding characters? Look no further! A step-by-step tutorial for beginners, demonstrating how to replace basic textures in 100% Orange Juice.
Introduction
So you want to make a unit mod for 100% Orange Juice… but after looking into the technical jargon, you’re feeling more lost than ever?
This guide is intended to walk you through the process in the simplest language possible, so it’ll be easy for anyone to understand regardless of skill level with modding. As long as you follow these steps, you’ll have your newly replaced character ready to go in no time.
Before we start, these are the things you will need:
- An archiver software, such as WinRAR or 7-Zip
- paint.net (or any other program that can open and modify .dds images)
- Your image editor/art program of choice
- Your word processor of choice (Notepad is okay!)
- A little bit of patience
If you are already an intermediate/advanced OJ modder, or are looking for more detailed info (such as how to replace voices, hair colors, or cosmetics), this guide isn’t for you.
Part One: Creating Your Mod Folder
First things first.
Navigate here: C:\Program Files (x86)\Steam\steamapps\common\100 Orange Juice\mods
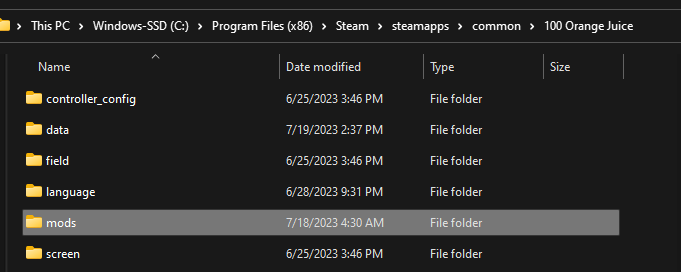
Or go to wherever you have OJ installed on your computer, and look for the folder named mods.
Create a new folder inside that folder, and name it anything you like. Congrats, you’ve completed the first step!
Now, go into your new mod folder, and create another folder inside of it named units. This is where your sprites will eventually go.

Once it looks like this, you’re done for now — but we’ll come back to this later.
Part Two: Unpacking Your Images
Navigate here: C:\Program Files (x86)\Steam\steamapps\common\100 Orange Juice\data
Same as before, but now you want to go to the folder named data.
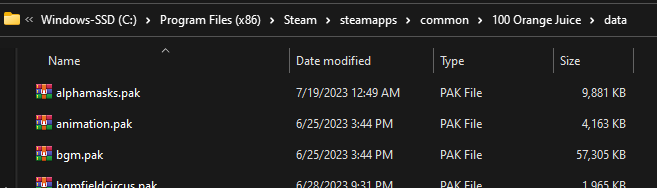
What you’ll see is a bunch of .pak files, like so. All of 100% Orange Juice’s assets are zipped into .pak format — which means you’ll have to extract them to obtain the files yourself.
Scroll down to units.pak and open it in your archiver software.
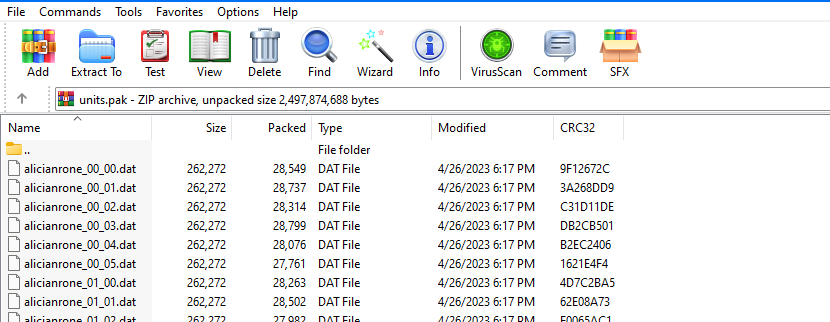
You’ll see tons of these .dat files inside, so ahead and search for the character you would like to replace in your mod. (If you’re having trouble finding them, look for their unit ID here.)
Found ’em? Good! Now, select the files that are named like so:
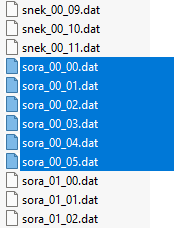
name_00_00.dat
…
name_00_05.dat
These are the default sprites for the unit you’ve decided to use. (Images named “name_01_00.dat” and so on are for the alternate colors and costumes.)
Drag or copy-paste those files onto your desktop, or wherever you can easily find them.
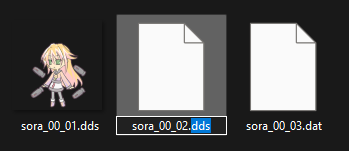
Now, rename the .dat extensions to .dds.
Make sure you have filetype extensions visible, and just click on them to edit them. Easy enough, just make sure the file names themselves remain unchanged.
You’ve successfully extracted your character sprites!
Part Three: Editing Your Images
Preparing For Editing
To begin, open each of your new .dds files with paint.net, like so.
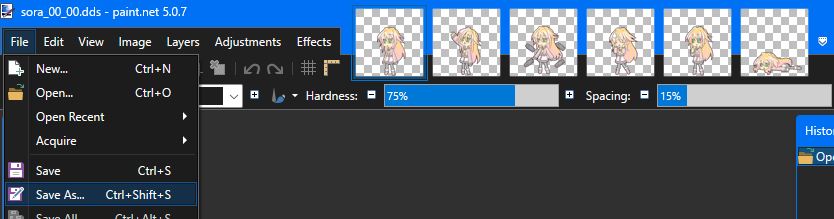
(You can use any viable program for this if you have one, I just personally prefer paint.net as it’s the easiest way to view and modify images in the .dds format.)
Once you’ve done that, press Ctrl+Shift+S on your keyboard (or click on File, and then select “Save As…”).
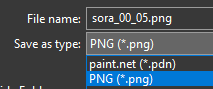
You’re going to want to save these new copies of your sprites as .png, to make things easier for editing in the very near future. Repeat this process for all of your current sprites.
Now then, remember the units folder you made earlier?
Put your new .png images inside of your mod’s units folder. You can either save them there directly, or just move them
Making It Real
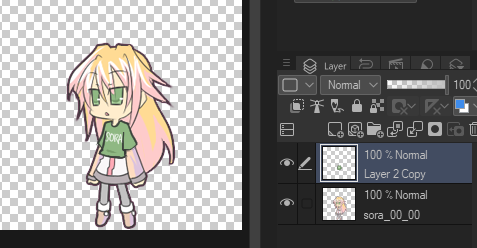
Once you’ve followed all the steps above, you can finally start opening your sprites in whichever editing or art program you’re going to use.
It doesn’t matter what program you do this in, as long as it supports layers and transparency (so, not something like MS Paint).
At this point, you’re free to do whatever you want with your mod! Add new features, replace them with another game’s sprites, or draw new ones altogether. (If you’re going to replace the entire sprite, I would first recommend setting the existing one to a low opacity to use as a reference for size. You can erase it once you’re done.)
Just remember to save all of them with a transparent background!
And now, the world is your oyster!
Part Four: Getting The Mod to Work!
Once you’ve finished modifying your sprites, there’s one more thing to be done in order for your mod to appear ingame. 100% OJ mods will not run without a corresponding .json file that tells the game what assets to replace.
So, get out your word processor and create a new document.
Next, copy and paste the following code into said document:
{
{
    "ModDefinition": {
     "name": "---",
     "description": "---",
     "author": "---",
     "system_version": 2,
     "contest": false
    },
    "ModReplacements": {
     "textures": [
      "units/name_00"
     ]
    }
   }
You got all that? Here’s what you need to change:
- name: Whatever you want your mod to be called.
- description: This field should describe what it is your mod does. (e.g. “Gives Marc a cool hat.” or “Replaces Poppo with a cabbage.”)
- author: This tells people who made the mod. (That’s you!)
There are many more things that can be customized with .json configuration, but we’ll leave it at the bare minimum for now. Don’t delete any of the quotes!
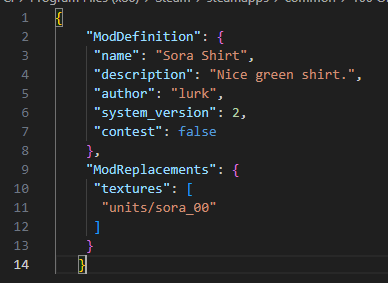
Here’s the most important part: Under “textures”, replace “units/name_00” with the unit ID of your sprite. For example, in this case, mine would be “units/sora_00”.
You do not need to list every single pose that you’ve replaced — as long as you list the name and costume, the game will do the rest for you.
When everything looks correct, save your text document under the name “mod.json”.
(Word processors like Notepad++ or Visual Studio will let you do this instantly, but if you’re using regular old Notepad, simply save it as mod.txt and rename the file to mod.json.)
Now put your finished mod.json into your mod folder, like so:
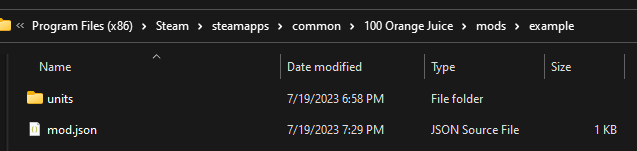
Once your folder looks like this, you are done!!!
It’s time to launch OJ to see if it worked. Make sure your mod is enabled in the settings menu.
An easy way to see right away if it’s functional is by checking the character in the Avatar settings, or by starting a custom singleplayer game.
Tldr
If you don’t feel like reading all that, here is a condensed (but much less detailed) version of this guide.
- Go to C:\Program Files (x86)\Steam\steamapps\common\100 Orange Juice\mods
- Make a new folder inside mods, named units
- Go to C:\Program Files (x86)\Steam\steamapps\common\100 Orange Juice\data
- Open units.pak with WinRAR or 7-Zip
- Look for the character you want to replace, then copy the files name_00_00.dat through name_00_05.dat to your desktop
- Rename your .dat file extensions to .dds
- Open your .dds images in paint.net, and export them as .pngs in your mod’s units folder
- Edit your .png images however you wish
- Make a new text document
- Paste the following into your text document:
{
 {
     "ModDefinition": {
      "name": "---",
      "description": "---",
      "author": "---",
      "system_version": 2,
      "contest": false
     },
     "ModReplacements": {
      "textures": [
       "units/name_00"
      ]
     }
    }
- Replace the — with whatever you want (don’t remove any quotes)
- Replace name in “units/name_00” with your character’s unit ID
- Save your text document under the name mod.json and put it in your mod’s main folder
- Launch 100% OJ to see if it works, make sure your mod is enabled in the settings
Extra: Replacing Hyper Card Art
Now, if you just wanted to make a fun little mod for your own personal use, you can stop reading here. The rest of this guide will be focused solely on making finishing touches to your mod.
“Hold up,” I hear you say, “what about the Unit and Hyper cards? Now the art on them doesn’t match my character!”
Card art can easily be replaced as well! Think of this portion as a test to see how much you’ve learned up to this point.
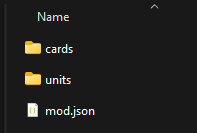
First, make a new folder in your mod directory named cards.
Then, go back to the data folder from earlier, and look for the file cards.pak. When you look inside, you’ll see those .dat files again, but now they seem to come in pairs: “128” and “256”. What gives?
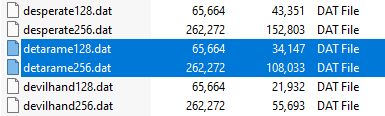
Cards require two different resolutions in order to display properly. One is 128×128 pixels in size, and the other is 256×256 pixels in size. But you don’t have to extract both.
So, look for the cards that you want to replace (use this to find the correct ID).
Copy the larger one from the archive — e.g. cardname256.dat — and rename it to .dds. Then export your .dds again as a .png. Same process as last time.
Now, place your .png in your newly made cards folder.
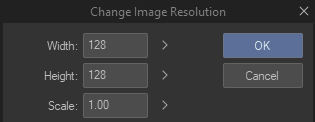
Make whatever changes to it you want to make. After you save it, resize it to 128×128 pixels. Save another version of it ending in 128.png.
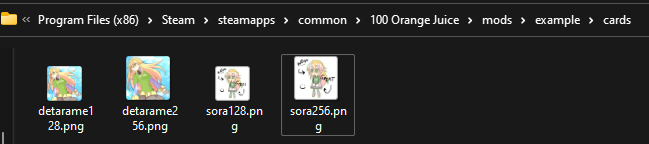
At this point, your cards folder might look something like this:
Ready to move on?
Go back and open your mod.json file again.
Under “textures”, add a comma after your unit from earlier, and type your card(s) in like this:
"ModReplacements": {
     "textures": [
      "units/name_00",
      "cards/cardname"
     ]
    }
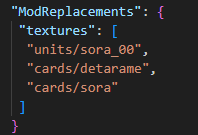
So, in my case, it would be “cards/detarame”, “cards/sora”. No need to add the numbers.
(Make sure that the last texture on the list does not end with a comma.)
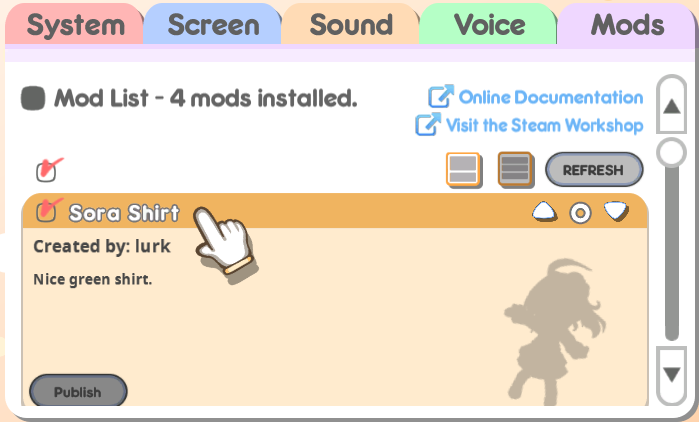
Save the changes you’ve made to your .json file, and check to see if it worked! (If you’ve left OJ running, remember to click “REFRESH” in the Mods tab.)
Congrats! You can replace the art of any card in the game with this method, so have fun!
Extra 2: Publishing to Workshop
You’ve decided you want to share your mod with the world (or maybe just your friends, so you can play online with your new characters). Not a problem!
To do that, you will need a thumbnail picture named preview.png within your main mod directory. Ideally, it should be in a 16:9 resolution, and it must be less than 1 MB in file size. This is what will be shown on the Workshop page (though you can always change it later).

Once you have that set up, just open up 100% OJ and click on the “Publish” button from the Mods tab. It’ll do the work for you.

When it’s done uploading your mod, it will redirect you to the Workshop page you just made. From there you can edit the description, visibility, preview images, required DLC, whatever else you want to do. Keep in mind that the visibility will default to public when uploaded.