Is the base game not enough? Forge Industry has been built with modding support in mind. In this guide we’ll go into the modding toolkit and how you can make your own mod.
Introduction
The purpose of this guide is to help you understand how the Forge Industry modding toolkit works, and guide you in creating your first mod.
In this guide, we will be using Unity and the Forge Industry modding toolkit. So make sure you have both Unity installed, and the toolkit downloaded. This guide was written using Unity 2021.3.25f1.
While any other Unity version should work just fine, it has not been tested and thus we cannot guarantee you’ll achieve the same results.
For now, you can find the mod tools inside of the Forge Industry installation folder as “Forge Industry Mod Tools.unitypackage”
This .unitypackage will be uploaded to a standalone site at a later date.
Project Setup
First things first. We need a to create a new Unity project that will in essence become our mod and contain all its components.
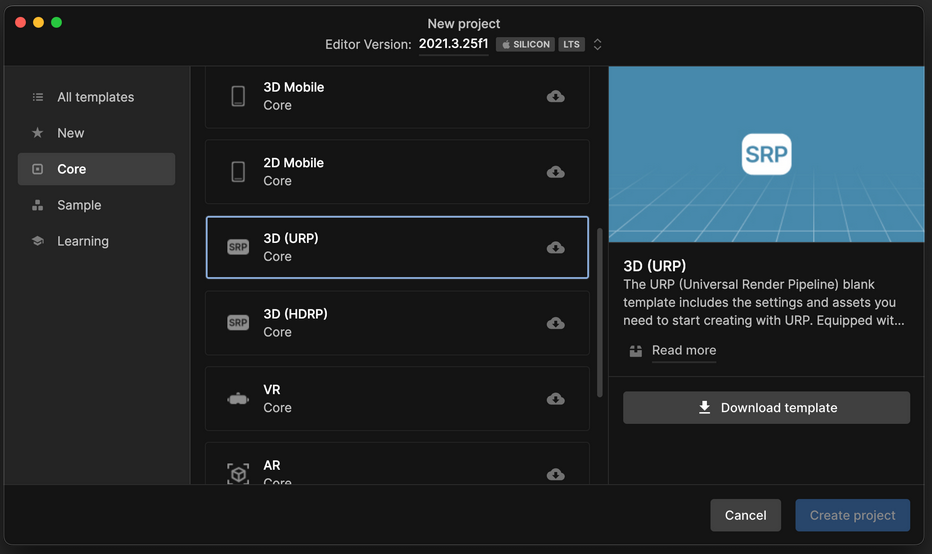
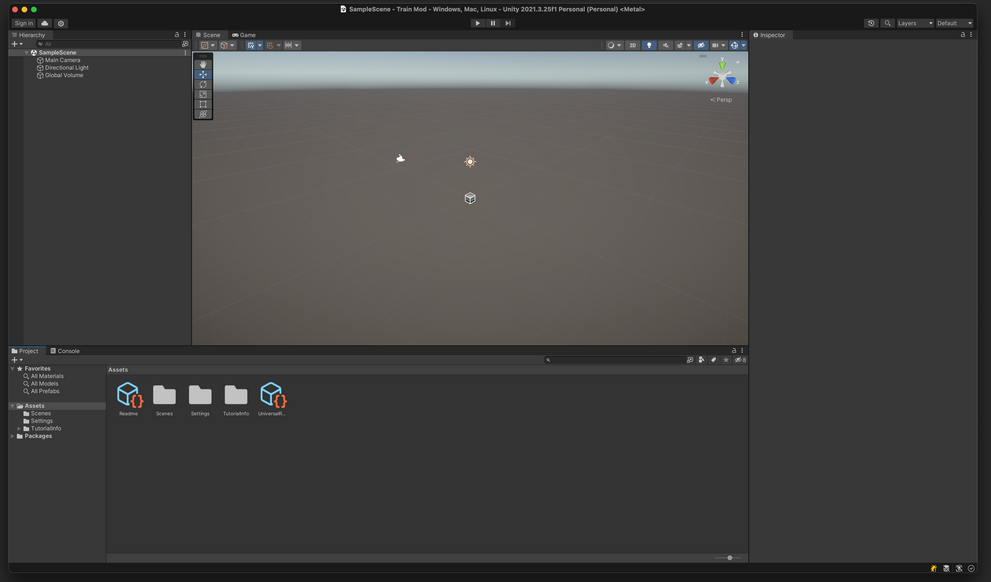
So we’ll just open Unity, and create a new project. For the template, we will use the “3D (URP)” template. You can find this in under the “Core” tab. Again, we are using 2021.3.25f1 in this example.
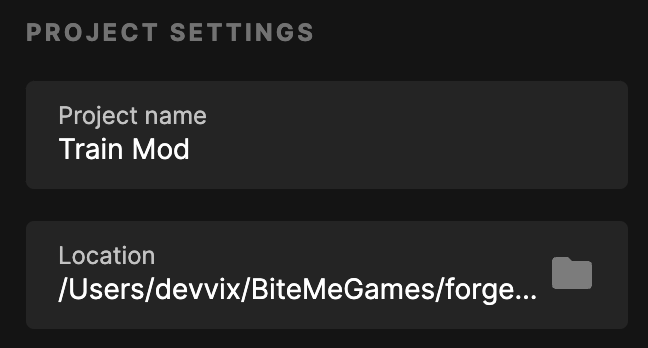
After that, just enter a name, and where you want to save the project files. In this guide we’ll be creating a new building that is a Train, so we’ll name the mod “Train Mod”, and give it a location that I can easily access.
Preparing the workspace
Now that we’ve got Unity open and loaded with a new project, we need to do a bit more setup before we are ready to start creating the mod.
Firstly, we’ll be removing all files that Unity created for us, such as the camera and lights, as we don’t need them going forward.
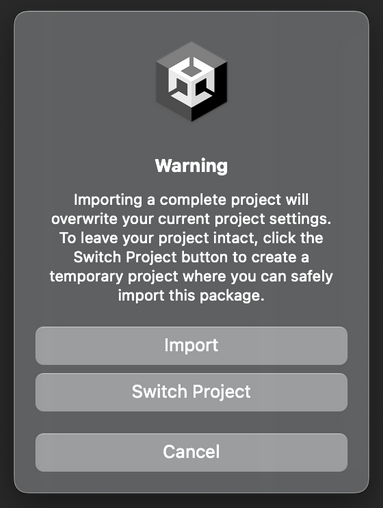
Now open the folder of the toolkit you downloaded, and drag the Forge Industry Mod Tools. Unity package file into your Unity Assets. At this stage, Unity might prompt you and ask if you want to Import the project or switch to it. Go ahead and click “Import”.
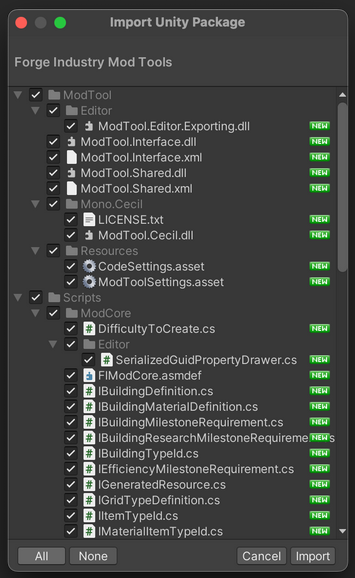
Next, Unity will ask you what you want to import. Press the “All” button, and then click “Import”. If you happen to spot any unchecked boxes even after clicking the “All” button, feel free to ignore them. Everything will work just fine.
Now the toolkit is ready to use. We have just 1 more step before we can create the actual mod.
Preparing the objects and sprites
Add all your Sprites and Models to your Unity Assets.
The first thing we’re going to do is turn the models into usable prefabs for our mod.
Since this is outside of the scope of our mod, and to keep the guide short, we’re not going to go in-depth on how to create prefabs in Unity.
But our toolkit does require certain settings and rules to be followed when creating them.
Each square in the game is a 10-meter by 10-meter object in your 3D modeling software (we use Blender).
If you have not created your own model but downloaded one from the internet. Then you might have to play around with the scaling a bit to get it all looking correct in the game.
Under your transform properties for the topmost object in your prefab, set the scale to “2” on all axis.

After that, you’ll also have to make some adjustments to your sprites. They won’t work just as-is.
Fortunately, it’s only a small change.
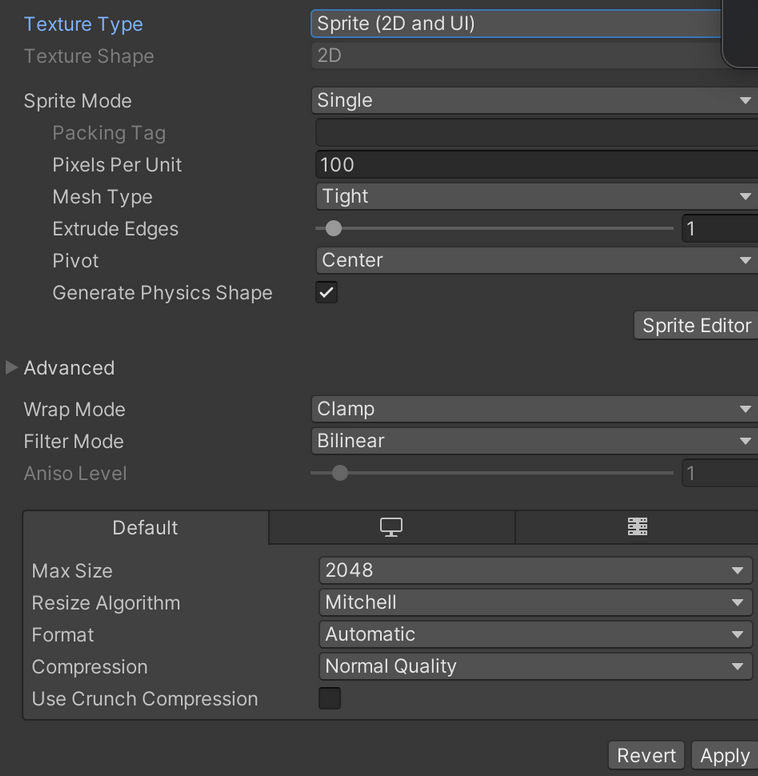
Make sure all your sprites are max 256×256, and set its Texture Type, no “Sprite (2D and UI)”
You’re now done with the setup!
Time to create your mod.
Making the mod – Buildings
Since we’re gonna be making a train mod, we have to add a new building to represent the train.
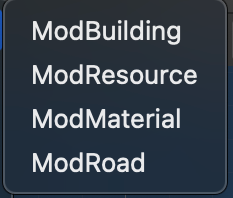
To add new elements to the mod, right-click your assets area, select “Create”, then “BiteMeGames”, and then “Modbuilding”. We’ll get to most of the other entries at a later point in this tutorial.
The new Scriptable Object that is created, will contain all the settings related to our building.
We’ll change both the Name and Localised Name to “Train”, and the Localised Description to “A simple train”.

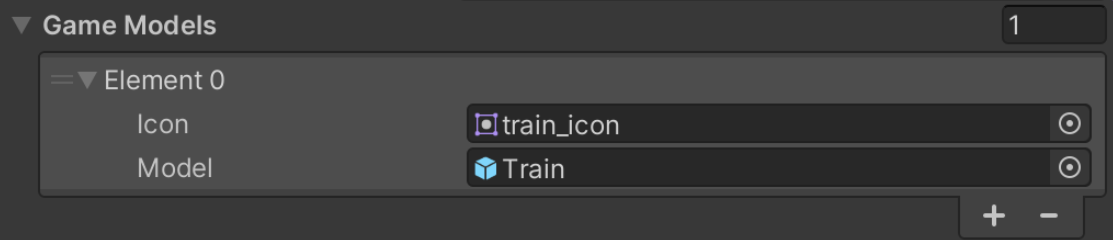
In the Game Models list, we can define the models that will be linked to our building. A building can have multiple models, an example of this can be seen in-game with decorative buildings such as trees.

In there, we’re going to add a new entry that will link our new prefab and icon to the building. So go ahead and click the “+” icon, and then point the Icon to your Sprite, and the Model to your Prefab.
Parameters
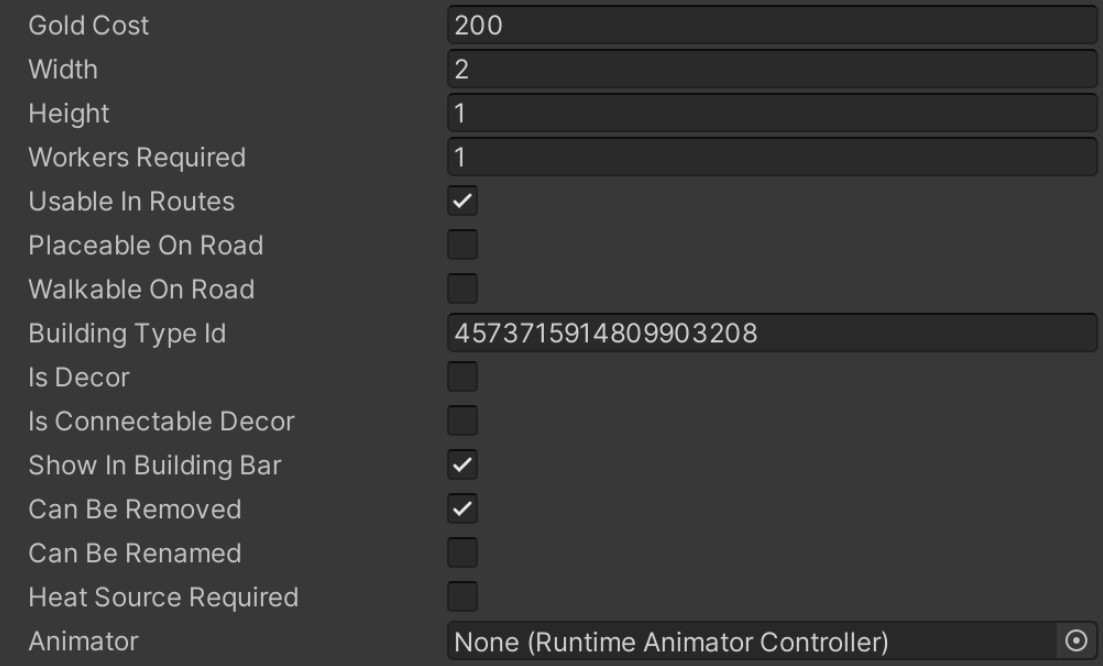
- Gold cost: defines how much our building will cost to place in-game, so we’ll set it to 200 for demo purposes.
- Width, Height: Defines how many squares in the X and Y direction our building will use in the game. In this case, our train is 2 by 1 since there are 2 wagons of each 1 square grid.
- Workers Required: how many workers are needed for the building to be operational? As a train can be controlled by 1 person, we just need 1.
- Usable In Routes: defines whether the building can be used in our Routes.
- Placeable On Road and Walkable On Road: Controls if the building can be placed on Roads, and if so, if workers can walk on said Road.
- Is Decor: Says if the building is Decor or if it has a function.
- Is Connectable Decor: Controls if this decorative building has multiple variants that snap to each other. An example of this is the decorative flower perk in the game.
- Show In Building Bar: Defines if the building can be shown in the bottom building bar under the building tab.
- Can Be Removed and Can Be Renamed: Controls if the building can be removed or renamed respectively.
- Heat Source Required: Defines if the building required a heat source to run (such as coal).
- Animator: Allows you to link an animator to your building to give it an in-game animation that is respected by the game speed setting.
We skipped over Building Type Id as this field required a bit more explanation. This field is the unique identifier of your building across all mods. This value should be globally unique for that building type. As such, you can choose your own id and have a fun number, but we recommend just generating a random Long and pasting it in there.
You might also want to keep a separate document to help yourself keep track of what Id belongs to what Building/Road/Item of your mod. Especially when you create a bigger mod. You will still need to remember this number, however, since you will need it later to say what building your item recipe belongs to. Some IDs are reserved for internal use, so they are taken. But you will still need them to link to our existing in-game objects. You can find these IDs in that section of this guide.
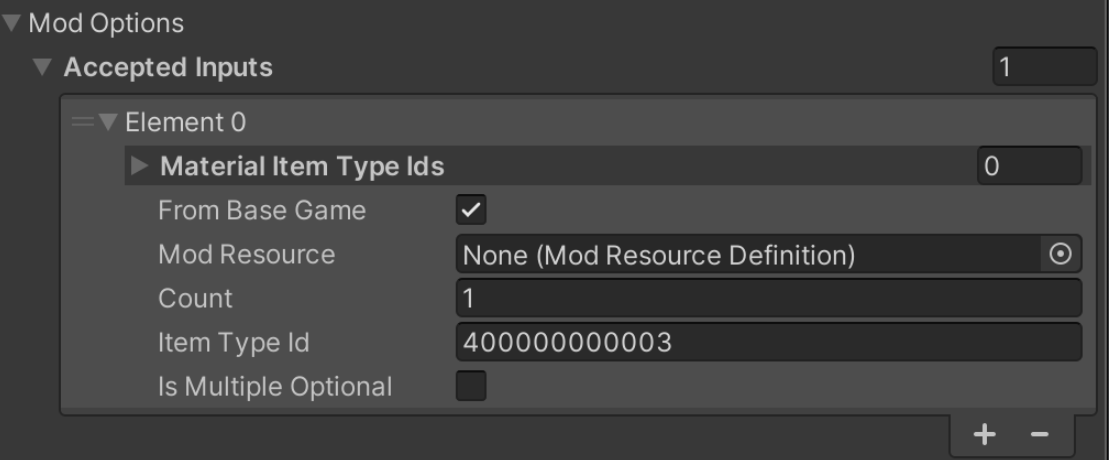
Those are the main settings for our building. But now we need to tell the building what inputs it can accept. We can do that via the “Accepted Inputs” list. Ignore “Available Recipes” for now, we’ll come back to that later.

Material Item Type Ids is a list where you can define what material types are accepted for a certain item. Here we’re gonna say that we accept Coal as an input, signified by the 40000000003 Id. As shown in the list mentioned earlier, all Ids in the 4xxxxxxxxxxx range, specify Specific items without materials in the base game.
Since we’re referencing something from the base game and not a mod item, we have to check the “From Base Game” checkmark. “Count” is ignored here, but is shown since this object is reused throughout multiple mod components. And “Is Multiple Optional” is also ignored here, we’ll come back to that later.
Now that we’ve got the building, we can start creating our own items for it to create. You can find out how to do that in the next section.
Setting the positions of workers
You might have noticed that workers don’t appear in your buildings where you might want them and felt an immense wave of disappointment after all the hard work you already put into making your amazing new building.
But fear not! We can easily remedy this.
Go back into your mod project, and open the prefab.
Now just add an empty object for each worker location, and move it to where you want it in your building.
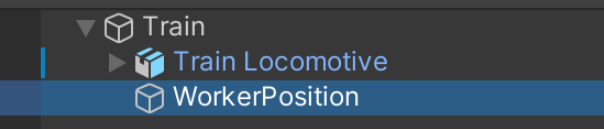
Open your new empty object, and set its Tag to “WorkerLocation”. Do this for each one.

Making the mod – Resources
Now that we have the Mod Building, we need items that it can create. That’s what we’re going to be creating next.
Go through the same Right Click Assets -> Create -> BiteMeGames motion that we did earlier for the building, but this time select “ModResource” instead. Just as we did with the building, we’ll walk you through each setting here.

Obviously, we want to give the item a name, we can do that with the “Name” field. In this case, I want to turn Coal into Ashes eventually, so I’ll create a new “Ashes” item.

- ItemTypeId: used to define an item that has a material that is not “None”. Whereas as you’ll remember from earlier, “Specific Item Type” is used to define an item without any materials. Since we don’t have any materials, we’re gonna enter a new randomly generated Id into the “Specific Item Type Id” field. Note that we still have to enter 50000000000 into the “Item Type Id” field, which signifies “None” for the Item Type. Again, refer to the part above and the Id list if you’re confused about these numbers.
- Combined: A checkbox that tells our game wheter to look at the Item Type + Material (when checked), or the Specific Item Type (when not checked).
- Difficulty To Create: Says how easy your item is to create, this is used in the supply & demand price calculations.
- Rarity Tier For Specific Item: Specifies how Rare your item is, this is used in the supply & demand price calculations.
- Is Possible Heat Source: Specifies if your item qualifies as a Heat Source. If you check this box, you must also specify how many Ticks of heat the item provides in the Provides Heat For Ticks field.
- Craftable: Specifies if the item is Craftable. If this is disabled, then the item can only be generated by the Generates section in the Modbuilding.
- Has Components: Marks the item as a finished/complex item. This means that the game will add all resources used to create the item as components, and this will influence the item’s sell price.

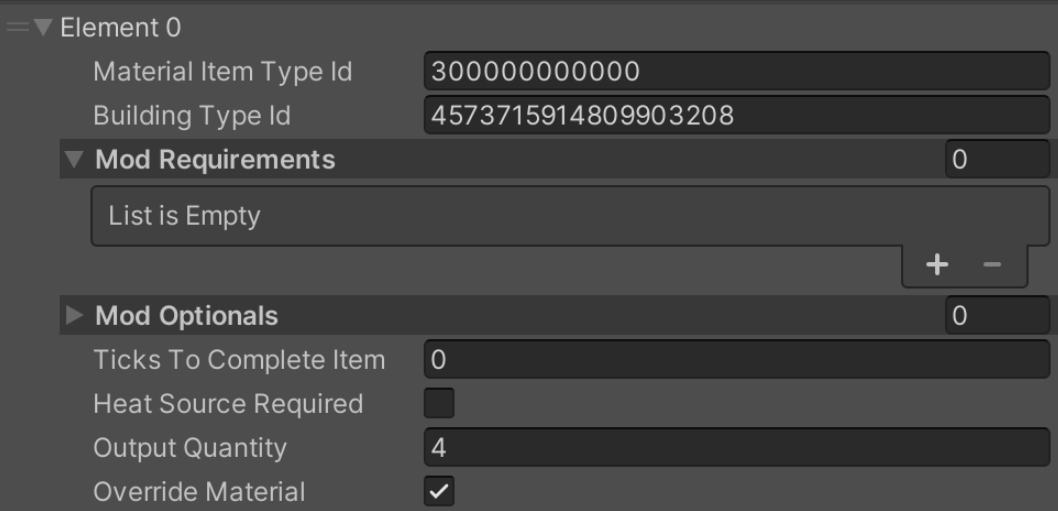
Now we specify how this item can be created. You’ll notice Mod Recipes is empty by default. Go ahead and add a new entry.

Start by entering the “Building Type Id”. Go ahead and enter the building id from earlier, to say this recipe can only be used by that building. Leaving this empty will make the recipe not work at all.
“Ticks to Complete Item” says how many in game ticks it should take to transform the input to the output. In this case I want Coal to be burned instantly so I’ll set this to 0.
- Heat Source Required: Will define if this recipe requires a Heat Source to be made. Only possible if the building allows heat sources.
- Output Quantity: The amount that is created. E.g. for 1 coal, we will get 4 ashes.
- Override Material: This is a special field. When disabled, the building will try to find an input item of the Material Type as one of the Materials in the output item. Ashes don’t have any material, so we will enable this box, which tells the game to ignore material matching checks. When this is enabled, you can specify the Material Item Type Id that the created item should have. Which is None in our case.
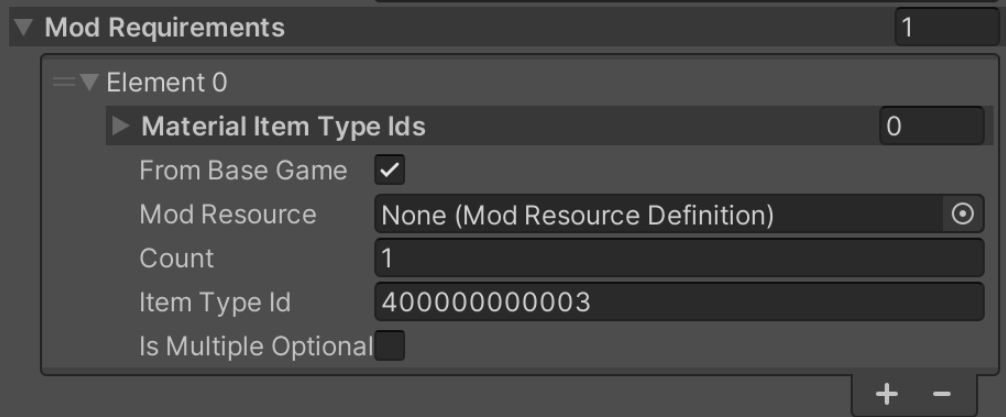
In the Mod Requirements, we choose what is required to create our item. We can choose what Material Item Type Ids we want to allow, and the same settings as we talked about previously. With a few exceptions.
Here, Count is not ignored and will define how many items we need to create x amount (x is defined by the Output Quantity) of our new item.
Is Multiple Optional is a more advanced setting that we’re going to ignore for now. Leave this unchecked.
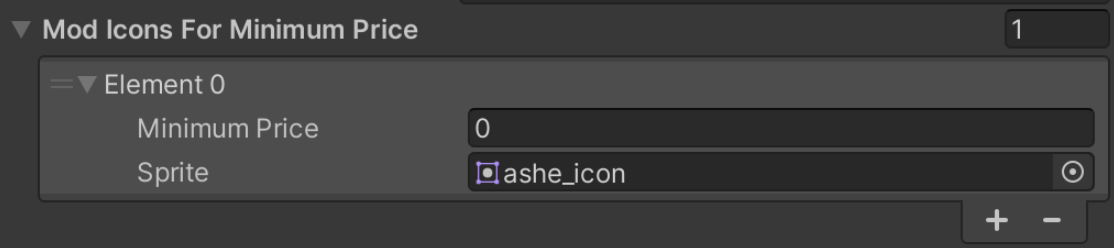
Items have the ability to show a different icon based on the price, to mode visually signify their value over others of their kind.
We’ve only got 1 icon, so I’m just going to set the Minimum Price to 0 and the Sprite to the Sprite of our Ashes.
And with that, we have our new item configured!
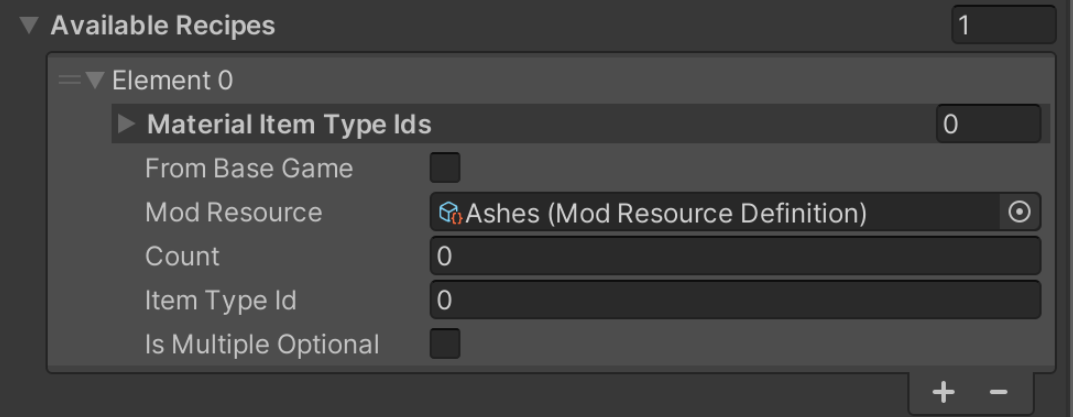
Before the building knows that this is a recipe it can use, however, we have to go back to our ModBuilding, and add the Recipe to our “Available Recipes”. Here, since the item is not from the base game, we leave that unchecked and link the “Mod Resource” to “Ashes (Mod Resource Definition)
Believe it or not, that should be all!
If you’ve followed this tutorial, you should now have a working mod.
If this is not the case, retrace all your steps and go through the guide again, or create a post on the community forum, where we’ll further help you out.
In the final part, we will show you how to export your mod to use it in the game.
Exporting your mod
Exporting the mod is the easiest part. Yes, even easier than creating the project!
All we have to do is press “Tools” -> “ModTool” -> “Export Mod” in the top bar.
Now we just have to enter a “Mod Name”, “Author”, “Version”, and a simple “Description”. These are values that will be shown in-game.
For “Platforms”, leave that on “Everything”. And set the “Content” to “Assets, Code”.
Then just set your Output Directory. (Tip: you can directly set the output directory to the Mods folder of Forge Industry for quick testing).
And press “Export Mod”.

If you didn’t directly export your mod to the Mods folder in Forge Industry, move it there manually.
Now start the game, open the Mods menu, enable the mod, create a new world, and enjoy your new creation!
Mod Object Ids
Road Type IDs
- Brick Road – 100000000000
- Paved Road – 100000000001
- Dirt Road – 100000000002
- Wooden Road – 100000000003
- Rail Road – 100000000004
- Delete Road – 100000000005
Building Type IDs
- Refinement Station – 200000000000
- Forge Station – 200000000001
- Woodsaw – 200000000002
- Alloy Station – 200000000003
- Fastener Station – 200000000004
- Storage Crate – 200000000005
- Jewelry Station – 200000000006
- Workbench – 200000000007
- Marketplace – 200000000008
- Recreation Area – 200000000009
- Decor – 200000000010
- Mine – 200000000011
- Fletcher Station – 200000000012
- Armory – 200000000013
- Harbor – 200000000014
- Notice Board – 200000000015
- Lumberyard – 200000000016
- Recycling Station – 200000000017
- Harbor Abandoned – 200000000018
- Architect Atelier – 200000000019
- Architect Atelier Abandoned – 200000000020
- Bazaar – 200000000021
- Bazaar Abandoned – 200000000022
- Gondola – 200000000023
- Gondola Abandoned – 200000000024
- Railway Station – 200000000025
- Quarry – 200000000026
- Kiln – 200000000027
- Material Foundry – 200000000028
Material Type IDs
- None – 300000000000
- Oak – 300000000001
- Birch – 300000000002
- Cedar – 300000000003
- Mahogany – 300000000004
- Iron – 300000000005
- Copper – 300000000006
- Silver – 300000000007
- Gold – 300000000008
- Tin – 300000000009
- Platinum – 300000000010
- Titanium – 300000000011
- Bronze – 300000000012
- Steel – 300000000013
- Rose Gold – 300000000014
- Silver Wood – 300000000015
- Cinder Heart – 300000000016
- Aracia – 300000000017
- Skystone – 300000000018
- Kiaxorite – 300000000019
- Tungsten – 300000000020
- Durasteel – 300000000021
- Celestial Bronze – 300000000022
- Acacia – 300000000023
- Emberbark – 300000000024
Specific Item Type IDs
- None – 400000000000
- Gold Coin – 400000000001
- Stone – 400000000002
- Coal – 400000000003
- Leather – 400000000004
- String – 400000000005
- No Item – 400000000006
- Wild Card Any Ore – 400000000007
- Wild Card Any Ingot – 400000000008
- Wild Card Any Material – 400000000009
- Wild Card Any Heat Source – 400000000010
- Wild Card Any Finished Item – 400000000011
- Wild Card Any Valid Item – 400000000012
- Failed Alloy – 400000000013
- Long Sword – 400000000014
- Short Sword – 400000000015
- Falchion – 400000000016
- Cutlass – 400000000017
- Claymore – 400000000018
- Rapier – 400000000019
- Broadsword – 400000000020
- Scimitar – 400000000021
- Zweihander – 400000000022
- Saber – 400000000023
- Tankard – 400000000024
- Marble – 400000000025
- Clay – 400000000026
- Charcoal – 400000000027
- Broadhead Arrow – 400000000028
- Splayed Arrow – 400000000029
- Single Barb Arrow – 400000000030
- Whistle Head Arrow – 400000000031
- Shortbow – 400000000032
- Longbow – 400000000033
- Recurve Bow – 400000000034
- Crossbow – 400000000035
- Heavy Crossbow – 400000000036
- Hand Crossbow – 400000000037
- Diamond – 400000000038
- Ruby – 400000000039
- Amethyst – 400000000040
- Emerald – 400000000041
- Fire Opal – 400000000042
- Monazite – 400000000043
- Onyx – 400000000044
- Pearl – 400000000045
- Peridot – 400000000046
- Sapphire – 400000000047
- Skymox – 400000000048
- Topaz – 400000000049
- Padded Armor – 400000000050
- War Bow – 400000000051
- Yumi – 400000000052
- Repeater – 400000000053
- Coke – 400000000054
- Jian – 400000000055
- Katana – 400000000056
- Hand Axe – 400000000057
- Logger Axe – 400000000058
- Splitter Axe – 400000000059
- Battle Axe – 400000000060
- War Axe – 400000000061
- Club – 400000000062
- Flail – 400000000063
- Mace – 400000000064
- Warhammer – 400000000065
- Fleshpounder – 400000000066
- Nunchucks – 400000000067
- Ice Pick – 400000000068
- Simple Dagger – 400000000069
- Sword Breaker – 400000000070
- Narrow Dagger – 400000000071
- Tanto – 400000000072
- Sai – 400000000073
- Horse Shoe – 400000000074
- Chandelier – 400000000075
- Boomerang – 400000000076
- Hammer – 400000000077
- Pickaxe – 400000000078
- Nasal Helmet – 400000000079
- Great Helm – 400000000080
- Kettle Hat – 400000000081
- Spangen Helm – 400000000082
- Orcish Helmet – 400000000083
- Cuirass – 400000000084
- Chainmail – 400000000085
- Breastplate – 400000000086
- Scale Armor – 400000000087
- Small Buckler – 400000000088
- Tower Shield – 400000000089
- Heater Shield – 400000000090
- Nguni Shield – 400000000091
- Spear – 400000000092
- Glaive – 400000000093
- Halberd – 400000000094
- Poleaxe – 400000000095
- Ring – 400000000096
- Pendant – 400000000097
- Diadem – 400000000098
Item Type IDs
- None – 500000000000
- Axe Head – 500000000001
- Ball – 500000000002
- Bar – 500000000003
- Barb Head – 500000000004
- Battle Axe Head – 500000000005
- Bolt – 500000000006
- Broad Head – 500000000007
- Broadsword Blade – 500000000008
- Butcher Blade – 500000000009
- Chain – 500000000010
- Chokuto Blade – 500000000011
- Claymore Blade – 500000000012
- Crossguard – 500000000013
- Cutlass Blade – 500000000014
- Dagger Blade – 500000000015
- Dual Axe Head – 500000000016
- Eastern Guard – 500000000017
- Falchion Blade – 500000000018
- Glaive Blade – 500000000019
- Grip – 500000000020
- Halberd Head – 500000000021
- Handguard – 500000000022
- Ingot – 500000000023
- Jewelry Chain – 500000000024
- Jian Blade – 500000000025
- Katana Blade – 500000000026
- Katar Blade – 500000000027
- Katar Handle – 500000000028
- Kukri Blade – 500000000029
- Lath – 500000000030
- Log – 500000000031
- Longsword Blade – 500000000032
- Mace Head – 500000000033
- Machete Blade – 500000000034
- Nails – 500000000035
- Narrow Dagger Blade – 500000000036
- Odachi Blade – 500000000037
- Ore – 500000000038
- Parring Crossguard – 500000000039
- Planks – 500000000040
- Pole Axe Head – 500000000041
- Pommel – 500000000042
- Rapier Blade – 500000000043
- Rivet – 500000000044
- Rod – 500000000045
- Saber Blade – 500000000046
- Sai Blade – 500000000047
- Sai Grip – 500000000048
- Scabbard – 500000000049
- Scimitar Blade – 500000000050
- Staff – 500000000051
- Sheet – 500000000052
- Shortsword Blade – 500000000053
- Spear Head – 500000000054
- Splayed Head – 500000000055
- Splitting Axe Head – 500000000056
- Stirrup – 500000000057
- Swordbreaker Blade – 500000000058
- Trigger – 500000000059
- Wakazashi Blade – 500000000060
- Warhammer Head – 500000000061
- Whistle Head – 500000000062
- Wrapped Grip – 500000000063
- Wrapped Katar Handle – 500000000064
- Zweihander Blade – 500000000065
- Claymore Crossguard – 500000000066
- Zweihander Crossguard – 500000000067
- Limb – 500000000068
- Heavy Lath – 500000000069
- Stock – 500000000070
- Broadhead – 500000000071
- Single Barb Head – 500000000072
- Scraps – 500000000073
- Ring – 500000000074
- Sword Breaker Blade – 500000000075
- Tanto Blade – 500000000076
- Pendant – 500000000077
- Diadem – 500000000078
- Hammer Head – 500000000079
- Gem – 500000000080
- Shaft – 500000000081