Want easy xp in a legit way? I’ll show you how I earn anywhere from 150 to 2k per 1 or 2 minute rounds (or even less time).
The Oversight of Custom Difficulty
Using the games Custom Difficulty can bring some fun to the game when things get bland in professional or nightmare, or when you just want to mess around with all 7 cursed objects with your buds. We’ll be exploiting this to it’s (near) fullest for this guide. At the end of it all you should have a whopping 9.85x multiplier for your game while still retaining your life at the end to claim that Phat bonus.
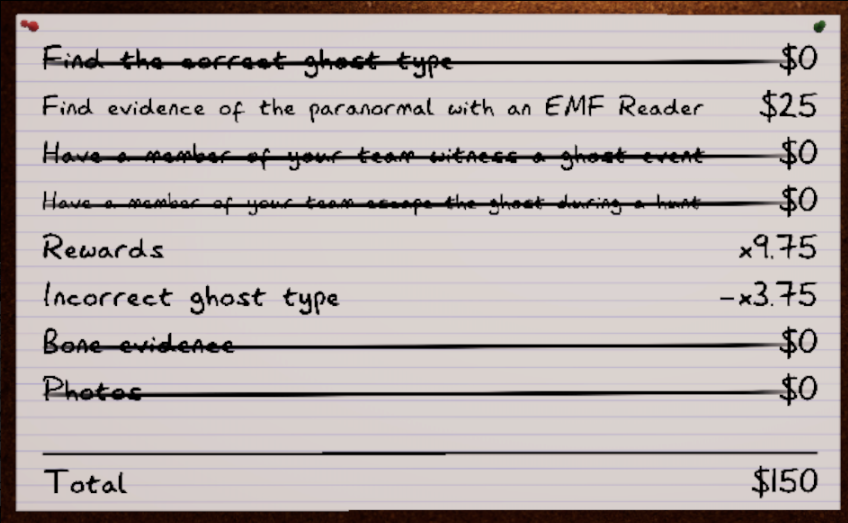
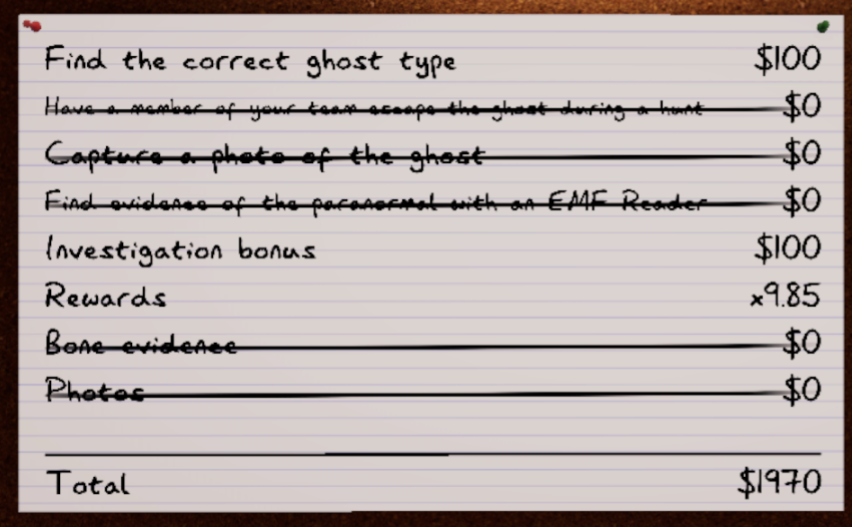
At the end you should have a multiplier of 9.85, which makes objectives (without knowing the ghost type) have 150~ xp/money. Getting the ghost type will net you 1,970 as well. Info on both of those below!
How much xp?!
For around a 1 to 3 minute game, you can net an easy bare minimum of 150, while earning an upwards of 2,000 for the same amount of time. It all depends on the objectives you get and the ghost you’re paired with. Here’s an example of getting the
Find paranormal evidence with an EMF Reader objective, while still not knowing the ghost type: (this took me 45 seconds from start to finish)
It’s pretty straightforward for that one. Just throw an EMF or two into a hallway and hide/leave between hunts. More on that later!
Now what happens if you guess the ghost by accident, or its clear by the way the ghost is moving during a hunt that its something like a Revenant? Well…
More on both of those scenarios and the settings later in the guide.
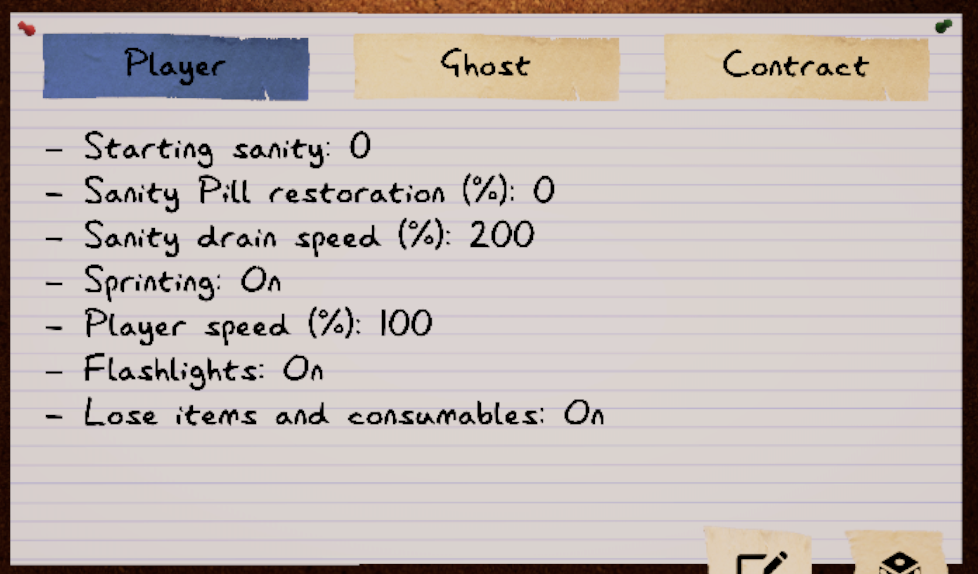
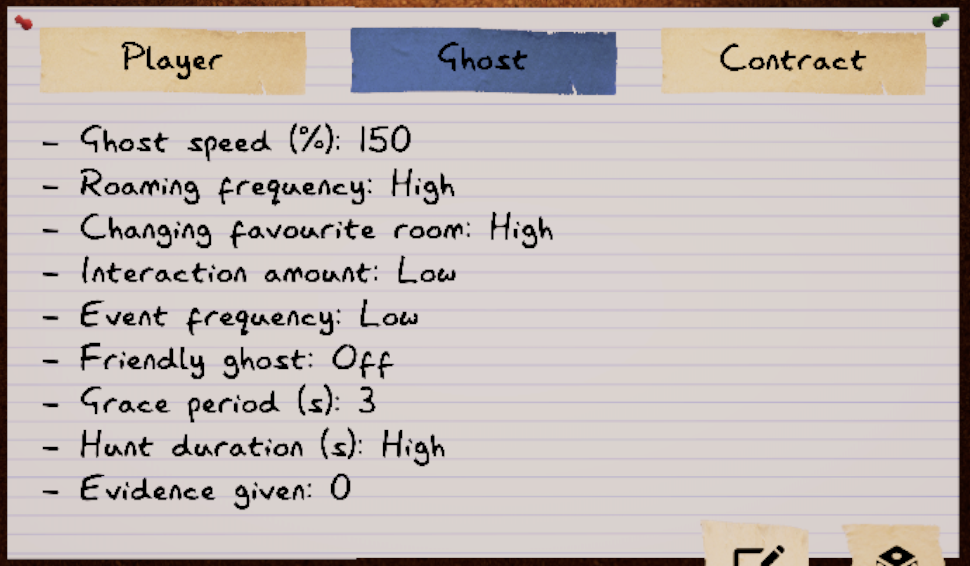
Custom Difficulty Settings: Player
For all of these, it’s pretty straightforward. You’re a completely insane schizo some poor sod hired to find the ghost in his house. You could turn flashlights off or reduce your speed to 75% (or 50% if you’re extra cheeky and want to die), but it won’t really net you that much more while massively hindering you if the ghost decides to jump you right off the bat.
Sprinting is a must, do not turn it off.
You’ll need to be able to move to a hiding spot very quickly when the ghost decides to be active. You’ll only have the very brief cooldown between hunts to leave the house to finish up or check your objectives. Being unable to sprint puts you in a very bad spot for hunts, even with a 3 second grace period.
Custom Difficulty Settings: Ghost
Important notes about these settings below!
But before we start, I would like to note this won’t be the primary source of income and XP with this method. While guessing the ghost gets you a HUGE 1,970 xp/money reward it can be painful to discern the ghost based on its feet. I would know as a ghost feet expert.

Ghost Speed: Why is it on crack?
Very good question, young investigator! Not only does this give you a much higher bonus at the end, provided you don’t die from it being a crack-addled spider monkey, it also lets you guess certain ghost types by hearing its movements during its hunting phase. For instance, the Revenant (as seen in another screenshot in this guide). The Rev moves extremely slow while it can’t find you. With these settings it’ll sound like a normal ghost during a hunt, as opposed to a ghost like Hantu which might sound normal then go back to being on crack when it cools off.
I find this one important. Having a 3 second grace period gives you more reward points, but also is a fair amount of time to book it to a hiding spot. You can turn it to 2 or 1 if you want, but I’d highly recommend against it. After this 3 seconds, if this ghost finds you with 150% move speed you’re probably dead.
This gives you a pretty good amount of reward points. This is also why we’re mainly going to focus on getting simple objectives done over finding the ghost type (unless you’re lucky). With the rest of the settings, it’s kind of pointless to be looking for evidence when you’ll likely end up dead and that’s not very Min/Max of you.
If you’re changing settings to try and determine the ghost type you’re not being a Min/Maxer and I’d like you to leave my guide. You should be going in and out quicker than a regrettable date, not staying for the ugly divorce (death).
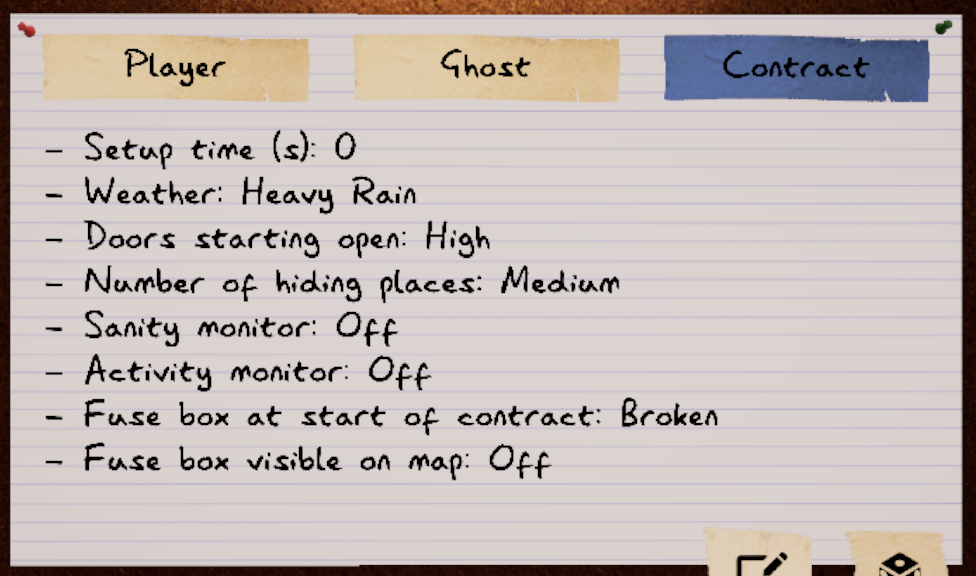
Custom Difficulty Settings: Contract
There’s only a few to mention here!
This method revolves around using the two small maps to get the quickest results. In the case of Tanglewood Drive specifically, having it turned to Medium nearly guarantees there’s 2 hiding spots near the front of the house. One being either of the two closets in the front entrance, or the one in the boys blue bedroom (the bedroom you’ll see from the window before walking in). This is important to not die from the ghost after it starts a hunt fairly soon after walking in. Make sure to find it quick! You’ll only have a few moments to hide, and a few more to leave the house/setup for objectives between hunts.
Setting Weather to Heavy Rain will give you a little bit of points. Why? I don’t remember or care enough. Heavy Rain gives you the most out of the other selectable weathers.
How-To: Tanglewood Drive
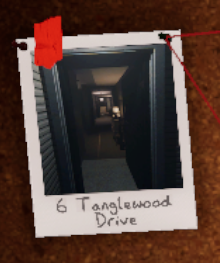
Our main map we’ll be using is 6 Tanglewood Drive, the classic Phasmo map where it all started. This map is small, has a bunch of decent hiding spots, and makes things a lot easier than Willow or the 2 story houses. Hell, if you’re lucky enough you can literally just hide around a corner to avoid a ghost during a hunt (or behind a closet door). Where trying that in Willow will probably kill you. And dying is simply not in the Min/Maxer Mindset™️.
What items should I bring?
I usually do this with the starter items and nothing else to mitigate the possible death from facing the crack-addled spider monkey ghost. But if you want to make sure you can complete all the easy to do objectives, bring Candles/a lighter, a parabolic, and motion sensors. Preventing it with a crucifix will prove difficult and all the other objectives will probably lead to your death fairly quickly. So, with only the basics or some added items you should be limited to some easy objectives. Here’s some examples:
Paranormal activity with an EMF Reader
If you’re being a true Min/Maxer you’ll only have one EMF reader, but if you have 2 it gets a bit easier to pass this objective.
Having two, you should run in (don’t actually run and waste your sprint) and place one on the side table in front of the hallway to your left as you walk in, and your other by the basement door/kitchen. if you only have one and are a true Min/Maxer, put it on the side table then move it to the basement door if you’re unsure of where it is after this next step.
After, be quick to find a hiding spot near the entrance as, if you haven’t already, you’re about be chased down. Wait for a hunt to start/pass and make note of where you hear the ghost come from if it didn’t trip the EMF before the hunt. After the hunt, you’ll (depending on the ghost and it’s aggressiveness) have a few seconds at least to move an EMF to it’s active area. If it’s the basement or garage, then Godspeed soldier. Throw it in near some throwable items quick and get the hell out to your hiding spot. Wait for the next hunt to start and listen for the EMF to start making noise (during a hunt doesn’t count). Once you’ve heard that, leave and close up the van. Pick a random ghost! Or, if you have another easy objective (candles, parabolic, etc) go for it if your hiding spot is near the door.
Paranormal activity with a parabolic microphone
This one is fairly easy too, probably more so than the EMF once you’ve been through a hunt.
If you have this one (and a parabolic mic) simply go in with it and find your hiding spot somewhere in the entrance. Wait for a hunt to start and make note of where it starts/comes from. After it’s clear, turn your mic on and point it towards where the ghost just spawned from. Remember, it might move favorite rooms! Rinse and repeat until you’ve heard a spooky sound from the ghost.It’s better to point the mic at the ghost, so if you hear it throwing stuff around aim towards that direction. If your hiding spot is inside the boys room and not the front hallway, AND the ghost is active in the kitchen/basement/garage, you might struggle to get this one. Simply pop out of your hiding hole and listen with your mic, hide when the hunt starts. Rinse repeat. yada yada.
Get the ghost to blow your candle
If you’re doing this, make sure you have the lighter with you to relight the candle. Depending on your hiding spot, place it where you know the ghost will come from (its favorite room) and relight the candle until you see smoke coming from it. This means its been blown by the ghost and you can move on, or leave.
Sanity below 25%
I’m not sure if this one even generates as you just start off with 0% sanity, but if it does you (probably) pass instantly. You can always set your starting sanity to 50% and suffer less points at the chance of getting this extremely easy one if it doesn’t give you it with these settings.I think this ones pretty self explanatory, but all you’ll need to do is sit in a hiding spot and pop out every now and then to check if you’ve passed the objective.
Detect a ghost with the Motion Sensor
If you have the EMF or parabolic objectives, do those before this one. But bring the sensor with you while going in the first time. Either way, after sitting and hiding through the first hunt you’ll have a general idea of which side of the house your ghost likes. If it’s the kitchen/garage/basement place the sensor on the basement door facing the garage, on the side closest to the living room. If it’s in the living room, place on the basement door or in the front entrance hallway/way to the living room. For the children’s bedrooms, place it on the entrance into the hallway or in front of the rooms entrance if you know it. Then, wait for it to trip or wait for a hunt for it to roam around. Luckily, this one works during a hunt so it shouldn’t take long at all to do.If this is your only objective (or you want a safer one to do instead of the others), place it somewhere on the living room wall and wait for a hunt to trip it.
All other objectives do not fit the Min/Maxer Mindset and I am not responsible for your gains or lack thereof.
How-To: 13 Willow Street
Don’t.
Okay, fine. Just follow the steps for Tanglewood. The only main difference is your hiding spots. You might have one of:
- Right next to the TV in the living room behind some boxes (10/10 hiding spot)
- Behind a toolbox in the corner of the garage, to your left as you walk in
- One hiding spot in the laundry room (in the garage, best for getting parabolic)
You could also hide in the bathroom right across the entrance to the basement. Or if you’re feeling lucky you can duck behind the kitchen counter. Either way, unlike in Tanglewood all hiding spots in Willow have major disadvantages to complete your objectives as fast as possible. That or you’re too far away from the entrance to leave safely/quickly enough. And yes, there are other hiding places but those are either even further inside the house or more likely to be noticed by the ghost zooming at mach 10.
Conclusion & End Notes
This method is entirely meant to be done in the span of anywhere from 1 to 3 minutes. You’re meant to run in with one or two of the objectives in mind, complete them as fast as possible on Tanglewood, then leave. Once you get a feel for where Tanglewoods hiding spots are with these settings you’ll be able to do it fairly quickly and be earning 150 on a really bad 1 or 2 minute run, or 300 to 450 on a decent 3 maybe 4 minute run. And, if you’re lucky like me, you’ll be able to guess the correct ghost and get a massively higher boost to your rewards and a huge 1,970 xp/money boost from the ghost type.
