Here’s a barebones guide to prospecting, repairing and selling derelict ships in version 0.12.1.16.
1) First you find a ship that is in close-to-fixable condition.
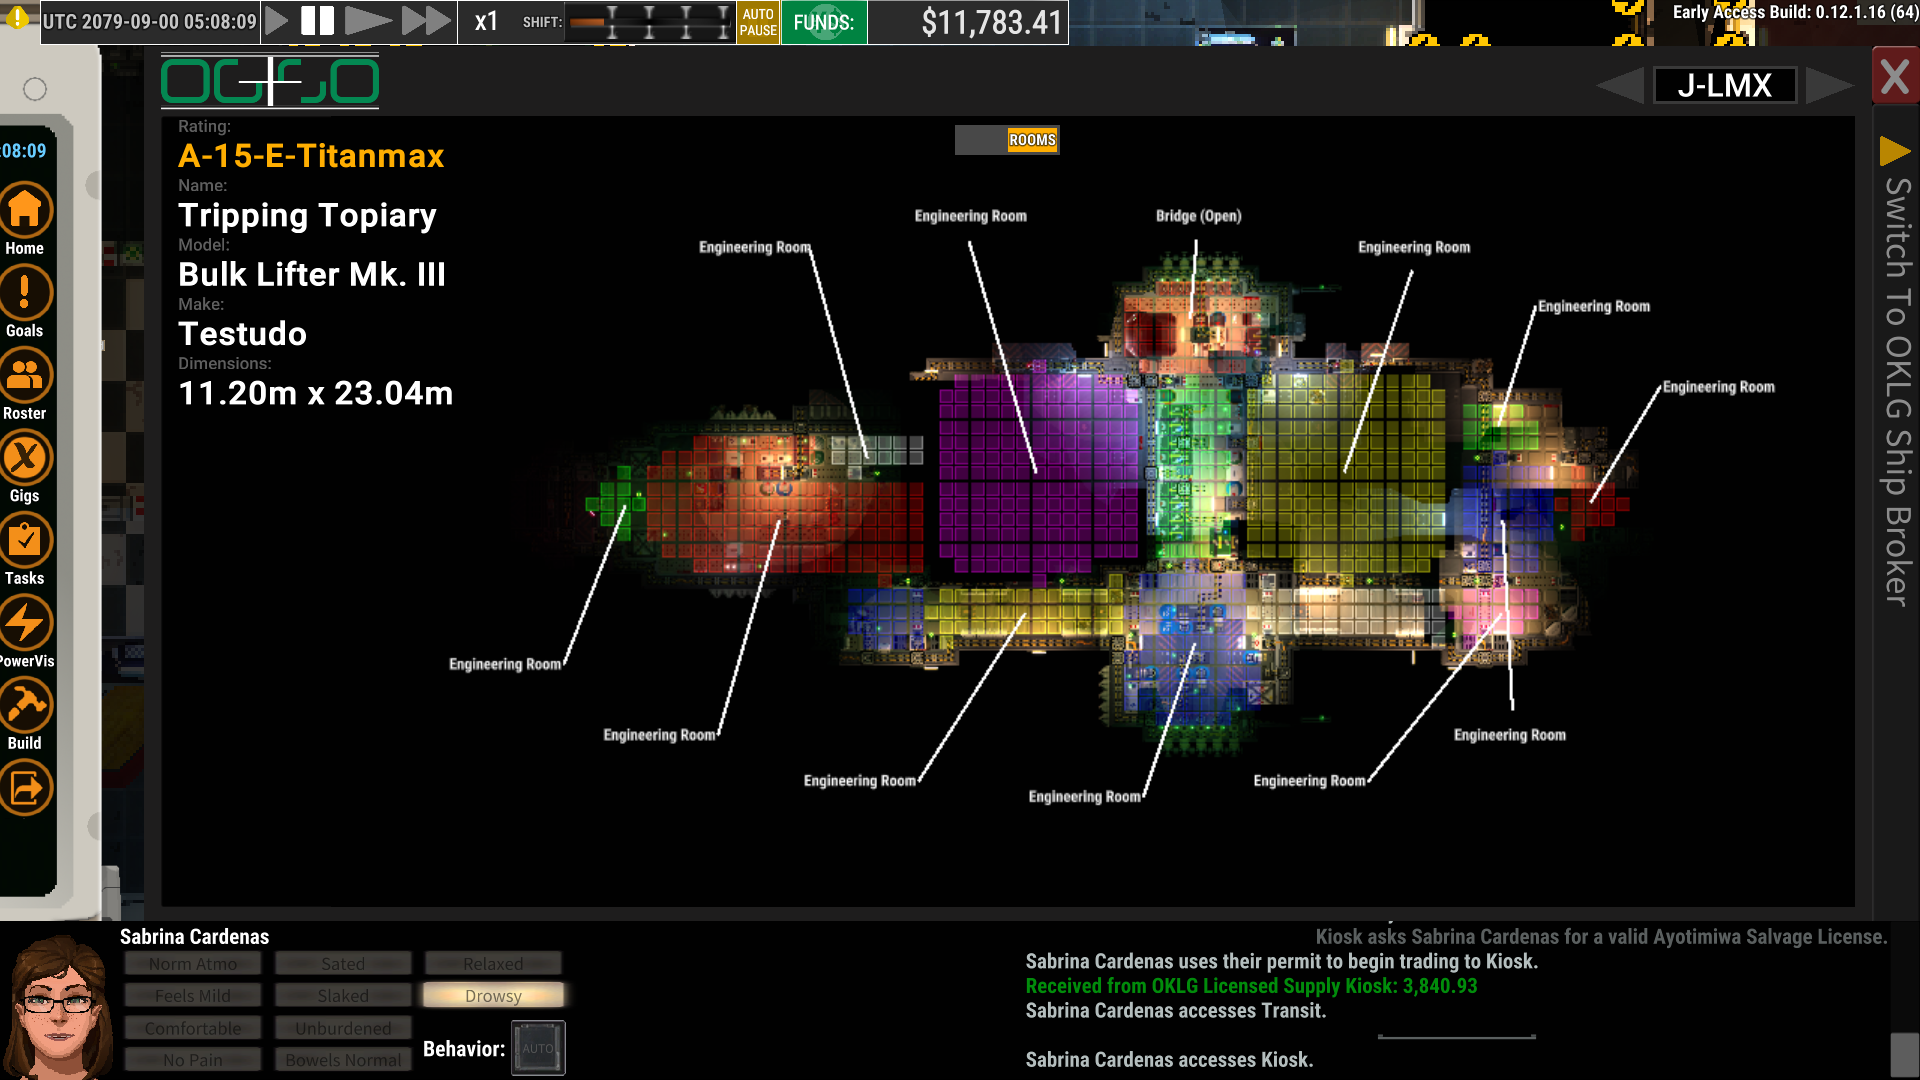
What you’re looking for is a large derelict with a lot of walls and rooms, Ideally with a nav computer + thrusters + enough N2 in RCS to make it back to port. Those aren’t strictly necessary to start with… but you need to show up with those if you want to sell the thing.
If you have a big enough ship to start with, then it pays to stash critical parts in a secondary storage area, as well as stockpile key repair resources like motors, motherboards and carbon fiber.
2) Remember where it is
If you come out of OKLG on the other side of Ganymede, then you won’t see the ship. It appears that you only track ships in visual range.
So you’re going to want to remember where it is. If you can, activate a towing brace and then drag it closer to the shipyard in an easy-to-remember spot, then stabilize the orbit:
3) ideally tow it closer to oklg using towing brace.
By that, I mean you need to click on Ganymede so it’s your current nav target, then nudge the thrusters until the relative velocity and cross velocity are as close to zero as possible. This means that if it takes a number of hours to get back to the ship and repair it when you’re back (it will, BTW), then you won’t have to worry about it either crashing into the moon or going off into the void.
If you haven’t seen a towing brace:
The towing brace is actually very easy to miss. It comes attached to a derelict’s exterior airlock and, when you uninstall it, it comes out in two parts. Installing it on your ship is a bit of a pain because you’ll likely need to scrap or uninstall a couple of the corner walls and do some finagling to make it fit into your airlock.

Once you have it, it allows you to manually unspool the tow cables in a long animation… and then, in order to release docking clamps… you need to do the same long animation to release it. Moving your ship with another attached without a tow cable causes massive damage to your ship. I did some modest boosting once to keep a ship from crashing into Ganymede and it wiped out half the hit points on almost all my walls/floors. With the tow cables, there appears to be no damage at all even with a good amount of boost, except for maybe a little wear on the airlock.
Actual convo from discord:
“I thought you could tow without a brace?”
“You’ll break your ship and the derelict. But you can, yes.”
“Yeah like I said, I boosted about 100 mps total and ended up nuking half the hit points throughout my hull.”
4) Buy the thing cheap.
Crappy small derelicts I’ve seen sell for under 100k. Larger ones for like 200k. I’ve seen one mostly intact derelict sell for about 1 mil… AFTER I stripped the mofo down to the studs. I gather that the state of repair of the floors and walls counts for a lot, plus perhaps a bonus for being pressurized (i.e. the atmo isn’t vented down to void).
It appears that adding stuff to the ship or making repairs before you buy will make it more expensive.
Not confirmed, but also possible that it works in reverse: removing expensive gear from the derelict and making sure it’s vented before you buy it may decrease the price.
It appears that price is rated on quality, # of rooms, maneuverability and size?
So when you fix a ship up, bring as many doors and thrusters as you can manage. Conversely, when you find a nice derelict, uninstall all the doors and thrusters before you buy it. My freighter had a final A rating for quality but an E rating for maneuverability… if I had more thrusters, I might have sold it north of a million for a fraction of the investment… MAYBE?
NOTE from Disgo on Discord: “It seems to be just stuff value * room multiplier and maybe an extra for having atmo”
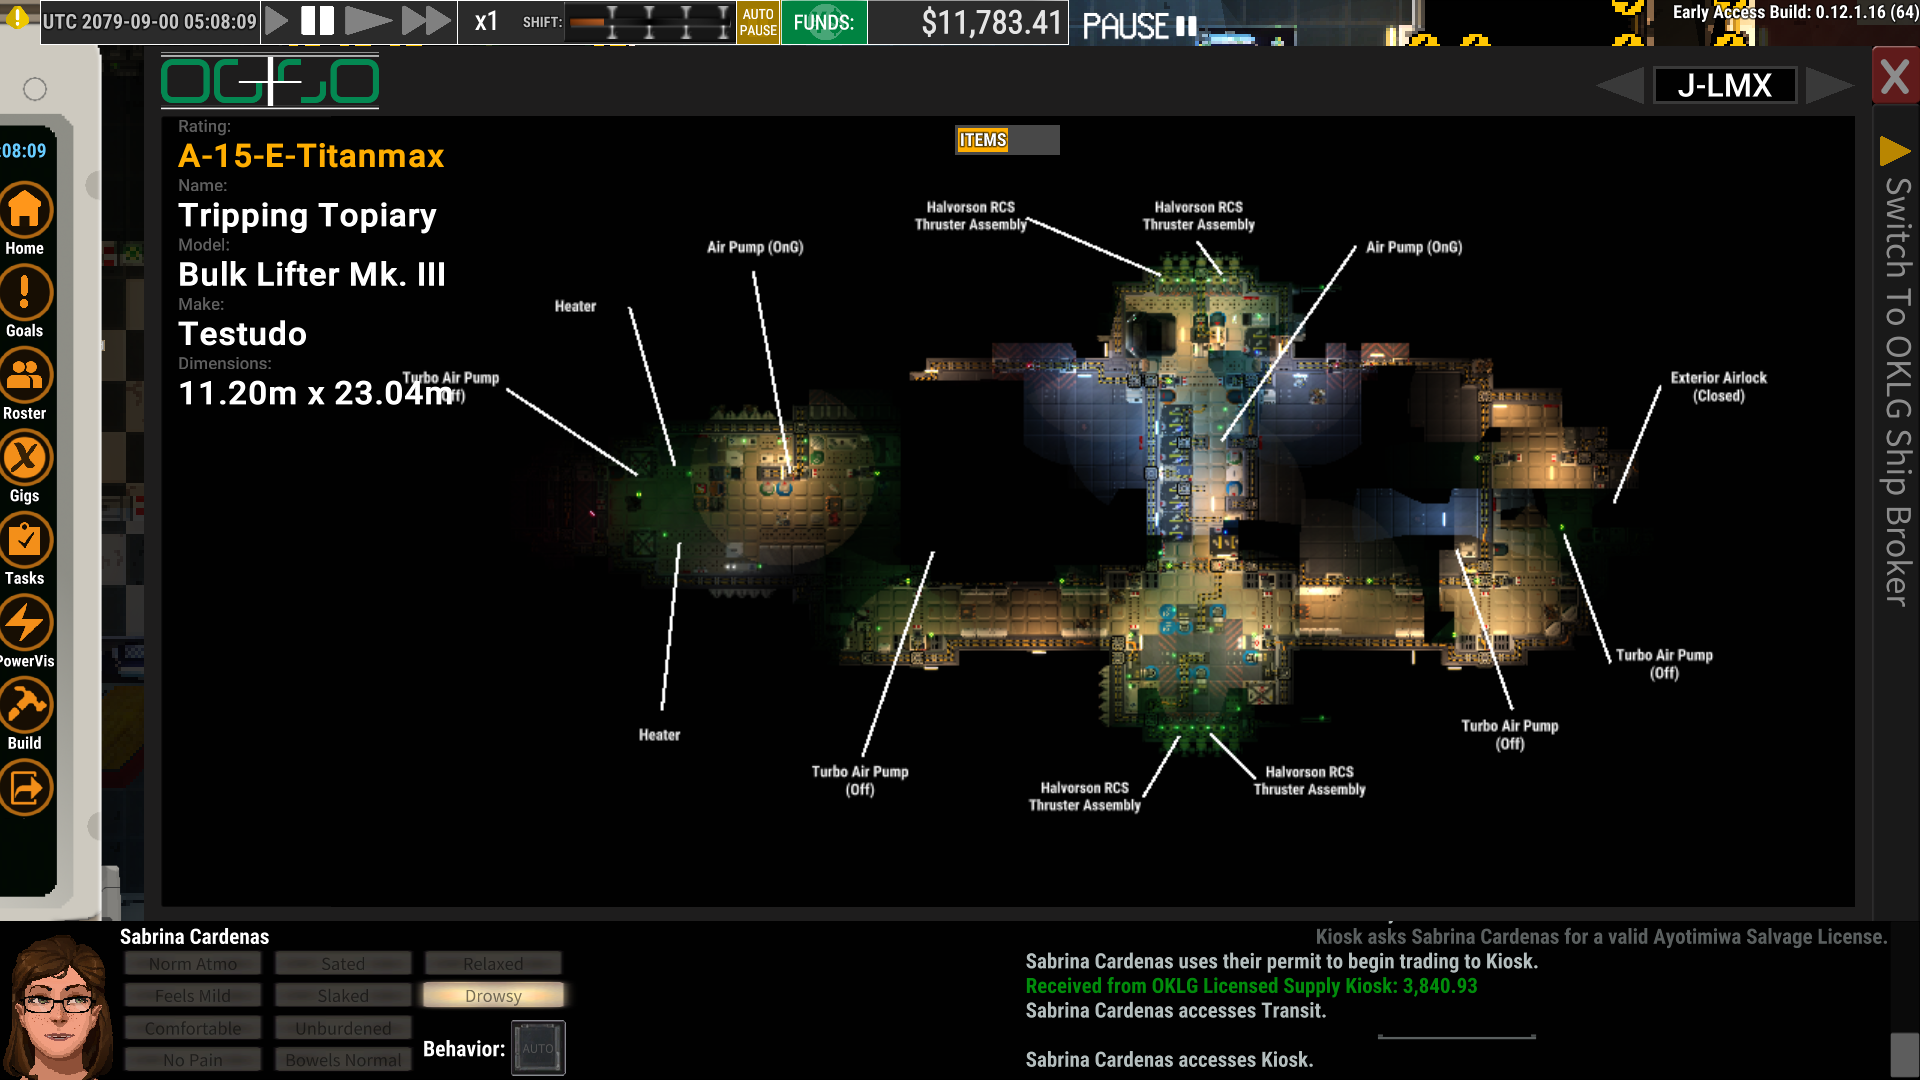
5) After you buy the ship, make sure that you have a transponder and working antenna
If the derelict you find doesn’t have a working transponder, then you’ll need to buy one. And, if it doesn’t have at least one working antenna, you’ll need to install one of those too. That’s why I always keep at least one antenna in my cargo hold, just in case I run into that situation.
Keep in mind:
A) Transponders will break if you move them and cannot be repaired and broken transponders are worthless! So once you place one or find one that is intact… DON’T MOVE IT!
B) While doing your repairs, at least one of your two ships must be broadcasting a transponder code (i.e. be sucking power) or security will ram your ship so hard that you’ll probably not be able to limp back to port unless you immediately burn most of your fuel. Given that keeping the nav computer + antenna + transponder combo online consumes a decent amount of power… you might want to set things up in advance so you don’t run out. What I ended up doing was creating an air-gapped conduit circuit in the cockpit with one battery just keeping that combo active… It looks like that should last at least 8 hours.
C) Note that reactors seem bugged in the latest build, so you can’t always count on them for extra power!
6) Go back to the derelict and activate a towing cable.
The towing cable isn’t strictly necessary, but it’s extremely helpful.
7) Repair the son of a gun
This is going to be the most arduous and dangerous part of the process.
First, as I said before, ensure a power supply to one nav computer, antenna and transponder… and nothing else!
A) Then work your way through the ship, systematically repairing all of the walls and floors. Once you’ve done that, pressurize the hull so you can take your EVA helmet off. This doesn’t just save you O2 and battery, it means you’re more likely to hear proximity warnings from your nav computer etc.
B) Then repair all critical components and install everything in your “refurbish derelicts” stash. If you’ve got extras… then install them too! It appears (unconfirmed) that the effect on the final price is greater than what you’d get from selling it to the black market – almost certainly more than the license or scrap store. I showed up to my latest derelict with too many air pumps… so I just installed two extra in the cockpit!
C) DOORS! It appears the biggest factor on price is the number of rooms in the ship. So go and create extra “rooms” by splitting up larger spaces with walls and installing doors in them.
D) Hit the Auto button and repair ALL the floors, conduits and walls. I also like to scrap jumper cables and replace them with quality conduits, but that’s just a personal quirk. This can take quite a while, so go ahead and fast forward to 16x.
UNCONFIRMED: I believe that the repair level of the walls/floors is a major factor in the final quality rating.E) Once everything inside the ship is repaired and installed, then turn on the power on and go out an exterior airlock door so you can repair all the walls outside.
This will take a LONG TIME! Be prepared with enough battery and O2 to handle all of this.
8) Fly the ship back to OKLG and sell it for HUGE PROFITS
Technically you can sell the ship remotely, but – depending on the distance – it will go for a FRACTION of what you can get from selling it while it’s currently docked.
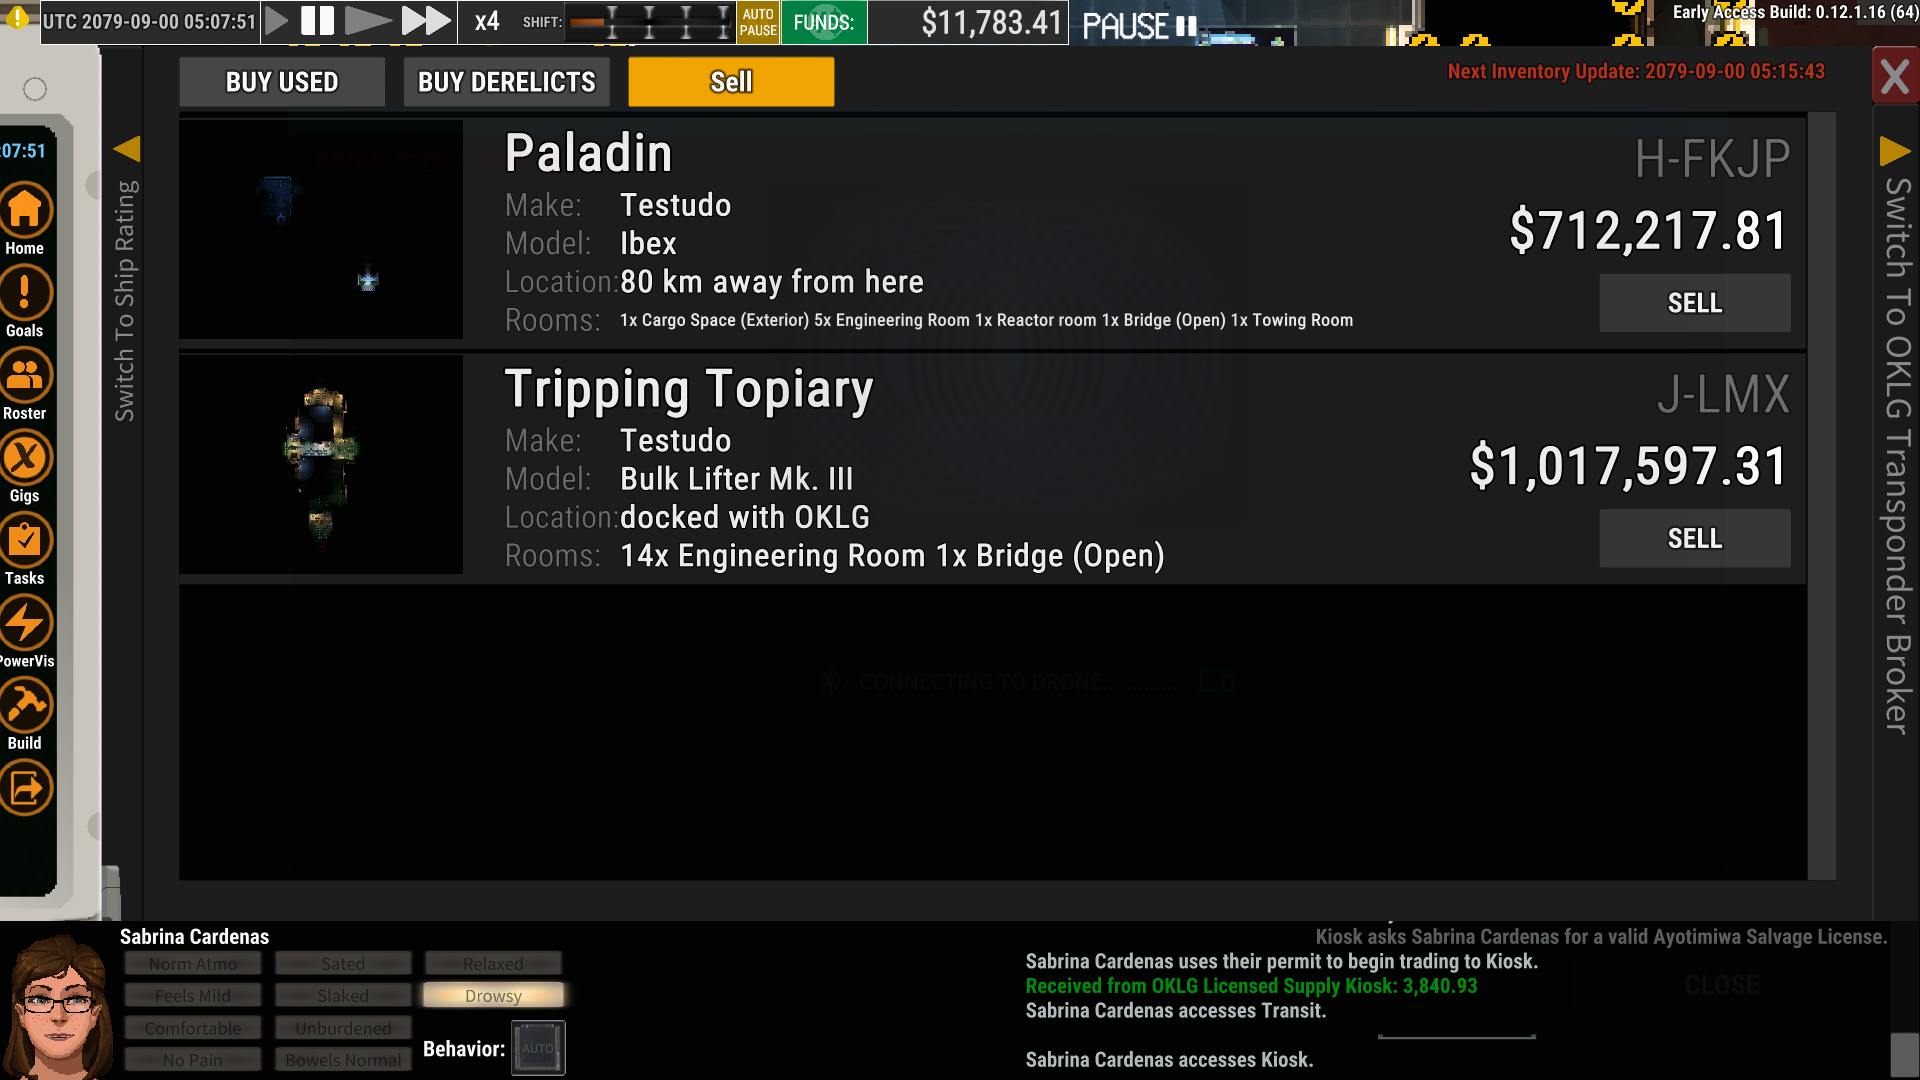
Interesting note: my regular survey vessel (Paladin) was worth 2 mil in-dock but the price to sell it remotely is ~700k. This means there’s a hefy price cut if you don’t bring the ship in personally to OKLG, no matter how well you fix it up. I probably could have paid my mortgage much sooner if I hadn’t sold my original vessel from space.
9) Use the shuttle service (PASS in your handheld) to zip back to your original ship
Random: I was curious if you could dock two ships at OKLG at the same time. No dice: it gives you a “NO CLEARANCE” warning… er… right after giving you clearance.
Also NOTE:
Swapping to a new ship will blank the ID’s of all the ships you’ve already visited. If you want to keep those records, then you must reinstall your original nav console into the new ship.