A Basic List of Tips for Mimic Dungeon for Finding Those Pesky Mimics in Mimic Logic
Forward
Welcome to my guide for Mimic Logic. Within these pages, I aim to equip you with all the knowledge necessary to conquer every dungeon. This guide comprises my “best practices” alongside some illustrative puzzles. Due to the game’s randomized nature, specific solutions cannot be provided; instead, I offer general strategies to tackle each puzzle.
General Tips for All Dungeons (Except Doubt and Confuse)
- Mimics cannot self-report.
- If a chest asserts that an adjacent box is a mimic, either the claimed box is indeed a mimic, or the chest itself is lying.
- While hunger might seem pressuring, it typically isn’t a critical issue. If starvation occurs frequently, consider investing in hunger upgrades.
- Sometimes there are multiple valid solutions. In such cases, it’s often preferable to prioritize chests guaranteed not to be mimics and skip any 50/50 chests.
- Generally, the most beneficial shop items to acquire are the attack and defense candies.
- If a statement is repeated more times than the number of mimics, it must be true.
- Sometimes mimics make illogical claims, such as asserting the presence of two mimics in black chests when the puzzle only contains a single black chest.
Standard Dungeon and General Mimic Finding Guide
Welcome to your initial dungeon exploration. The standard dungeon presents the fewest mechanics to contend with, typically featuring chest rooms that are relatively straightforward to solve. Unless specified otherwise, every dungeon adheres to these guidelines:
- Mimics always lie, while non-mimics consistently tell the truth.
- Each dungeon floor provides precise mimic and loot counts.
- Every 10 floors comprise a town, except for the final floor.
Mimic Pairs:
Now that we have the foundational information, let’s delve into the most effective strategy for this and many other dungeons: mimic pairs.
A mimic pair denotes a set of chests containing at least one mimic. For instance, if a chest claims the left chest is a mimic, either the left chest is indeed a mimic, or the claiming chest is lying, making it the mimic. Either way, you’ve pinpointed the location of one mimic. Utilizing mimic pairs enables you to dissect larger puzzles into more manageable segments. Whenever two or more chests present conflicting statements, at least one must be a mimic.
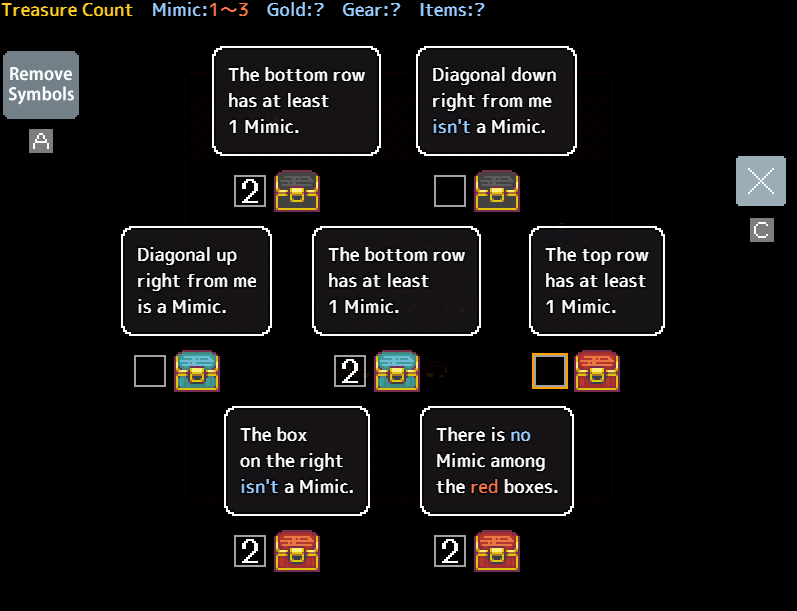
Let’s illustrate this concept with the following example from a standard dungeon puzzle:
While initially daunting with seven chests, this puzzle offers a promising mimic pair to tackle. The middle-right chest asserts that the chest above it is a mimic, establishing a mimic pair. We can now label both of them (I typically use 1, but feel free to choose any number).
Thus, instead of confronting a puzzle with seven chests and two mimics, we can disregard the pair and approach the remainder of the puzzle as a scenario with one mimic and five non-mimic boxes.
The joy of 1 mimic puzzles:
The simplicity of one-mimic puzzles lends itself to straightforward solutions, thanks to the following principles:
- Any chest affirming an adjacent unmarked box as non-mimic must be truthful. If it were lying, the puzzle would contain an excessive number of mimics.
- Mimics remain unable to self-report.
Let’s progress with the previous example. Among the five unmarked boxes, the one at the bottom-left insists that the adjacent box on its right is authentic. This assertion must hold true because if it were false, both it and the neighboring box would be mimics, resulting in three mimics in total, contradicting the puzzle’s setup. Consequently, we can confidently designate both bottom boxes as genuine.
Furthermore, we can pair the two middle boxes since both their claims cannot simultaneously be accurate. This deduction also confirms the authenticity of the last unmarked box, as both mimics must occupy the pairs.
Finishing Touches:
Once all mimic pairs are identified and all easily discernible genuine chests are located, the following steps can be taken to conclude the puzzle:
- Any statements from real chests that remain unmarked can be confidently labeled.
- Utilize any remaining mimic pairs that interact with one another to pinpoint the location of each mimic.
The 50/50 Conundrum:
Occasionally, you may encounter pairs with multiple potential solutions. In our example, two possible solutions exist: either the top-right and middle-left chests are mimics, or the middle and middle-right chests are mimics. In such scenarios, it’s advisable to open all safe chests and then exit. If you possess a blue orb, it can be employed to resolve the 50/50 dilemma after opening all safe chests. Otherwise, it’s best to leave, as the risk outweighs the reward of 40 gold.
But What If I Have No Pairs?
At times, a puzzle may lack pairs or possess an insufficient number of them. In such instances, alternative quick strategies can be deployed.
Duplicated Statements:
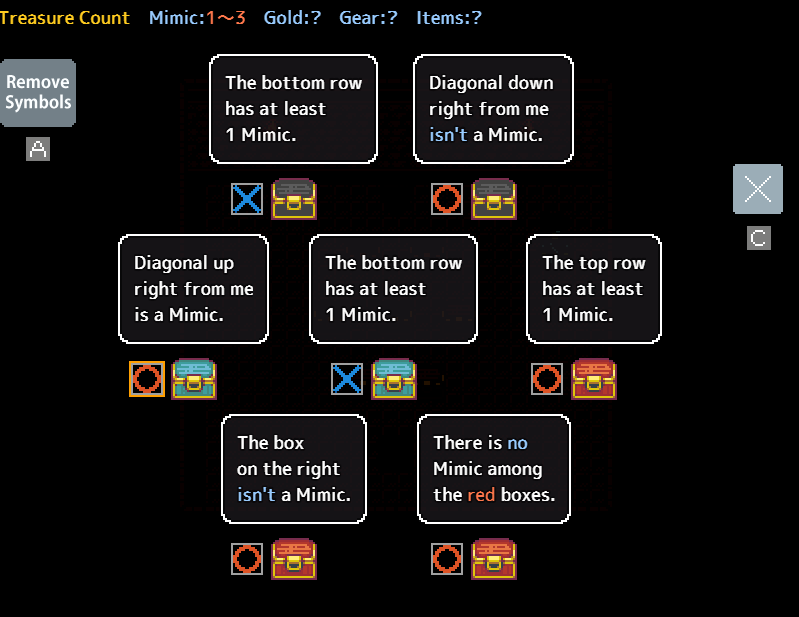
Consider the following puzzle:

Within this puzzle, although only one mimic pair is identified, no other readily apparent pairs exist. However, a significant clue is presented by both top chests sharing the same statement. If the number of chests making a statement exceeds the count of unmarked mimics, that statement must be accurate. Referring back to the previous example, we could confidently mark the two top chests, followed by the black chests, and subsequently the bottom-right chest, leaving two chests remaining where the mimics are situated.
Pair Positioning:
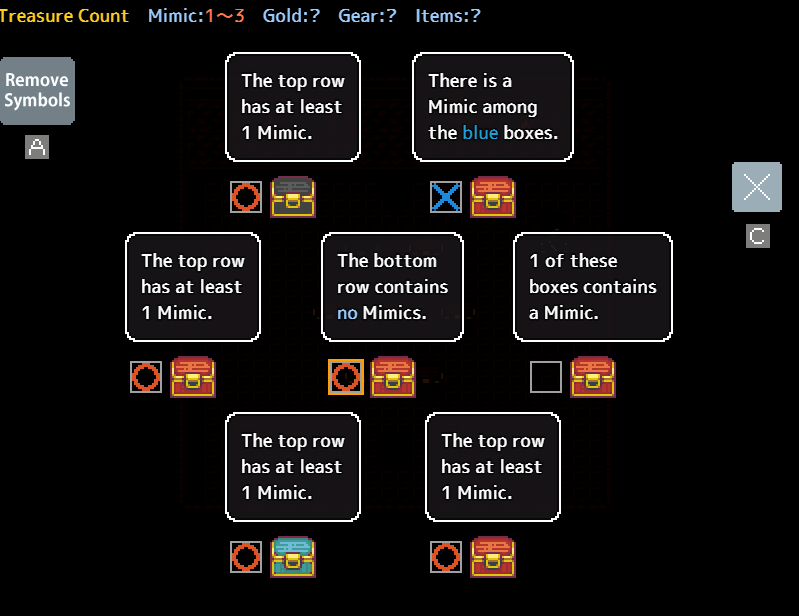
consider the following Puzzle:
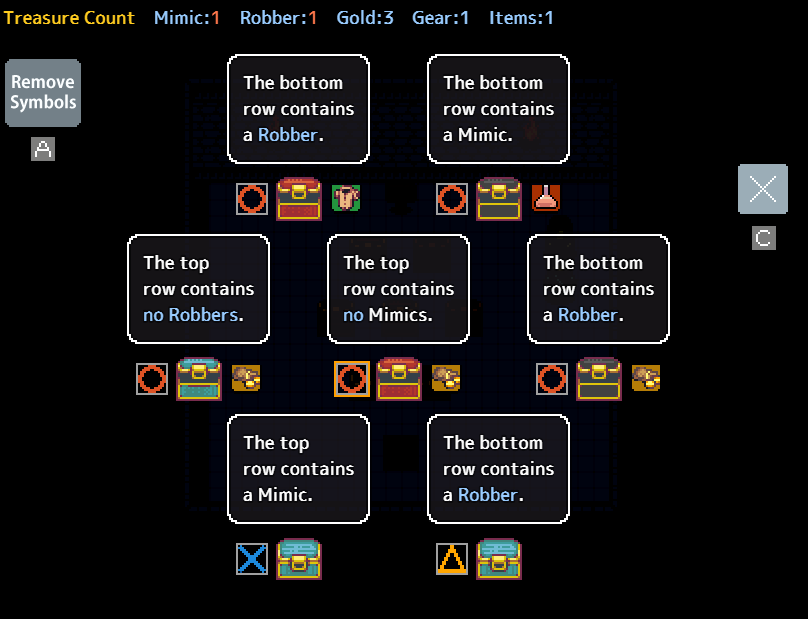
With three mimics and two pairs, only one of which is marked, the positioning of the pairs offers a solution. Given that there must be at least one mimic in the top row, the chest asserting that the top row contains no mimics is deceitful and therefore a mimic. Conversely, the chest affirming the presence of at least one mimic in the top row must be truthful. Consequently, we can confidently mark the following:
Expert dungeon Guide
Welcome to the Expert dungeon. for the most part the strategies are the same as the standard dungeon, just with a few new chest types. So instead of repeating all of those I will instead go into the new chests and a couple more advanced strategies.
Truth Chains:
consider the following puzzle:
In scenarios where all easily solvable chests have been addressed, leaving two pairs remaining, reaching a solution directly may lead to incorrect paths, as some puzzles admit multiple valid solutions. A technique I employ, termed a truth chain, or alternatively trial and error, serves as a methodical approach.
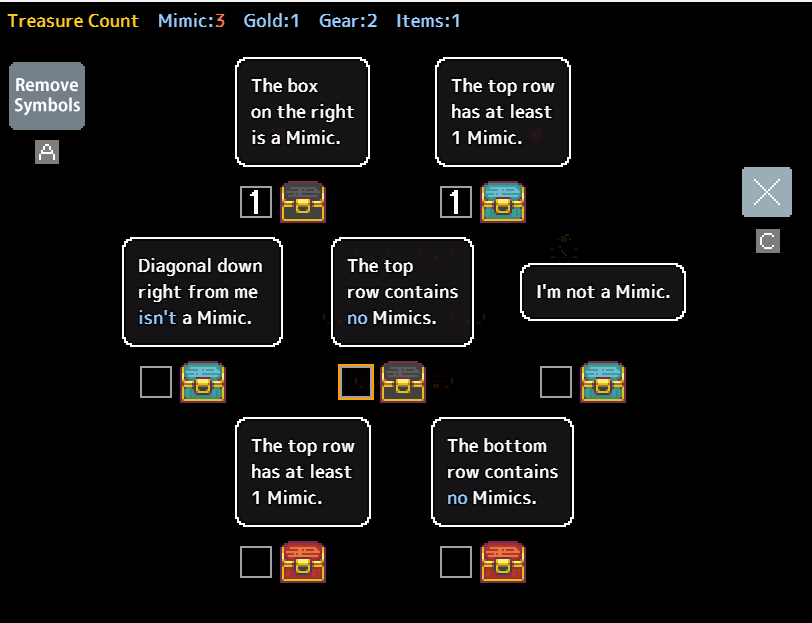
The essence of a truth chain lies in exploring the consequences of a statement being either true or false. In this puzzle, we can initiate the process with the assertion “The bottom row contains no mimics,” supported by two chests. Consequently, both chests must either be genuine or mimics.
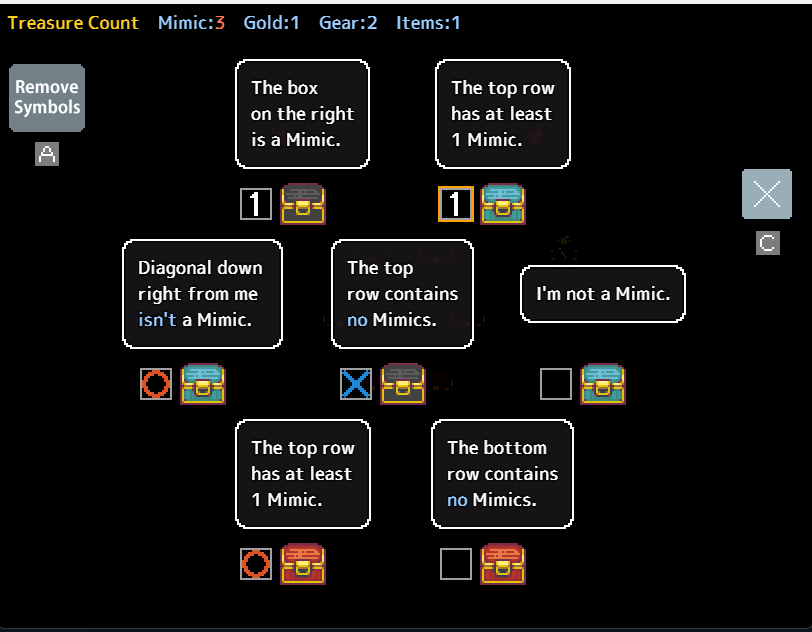
Let’s begin by assuming they are both truthful. We would mark them both as genuine and also designate the other chest on the bottom row as genuine. However, this results in only two mimics being identified when the puzzle contains three, indicating this solution is incorrect. Therefore, it follows that “The bottom row contains no mimics” must be a false statement.
It’s important to avoid immediately assuming that your initial assumption is correct if it yields a valid solution. Instead, it’s necessary to test the opposite scenario as well. In certain cases, both solutions may be valid, resulting in a gridlock situation.
Gridlocks
look at the following puzzle:
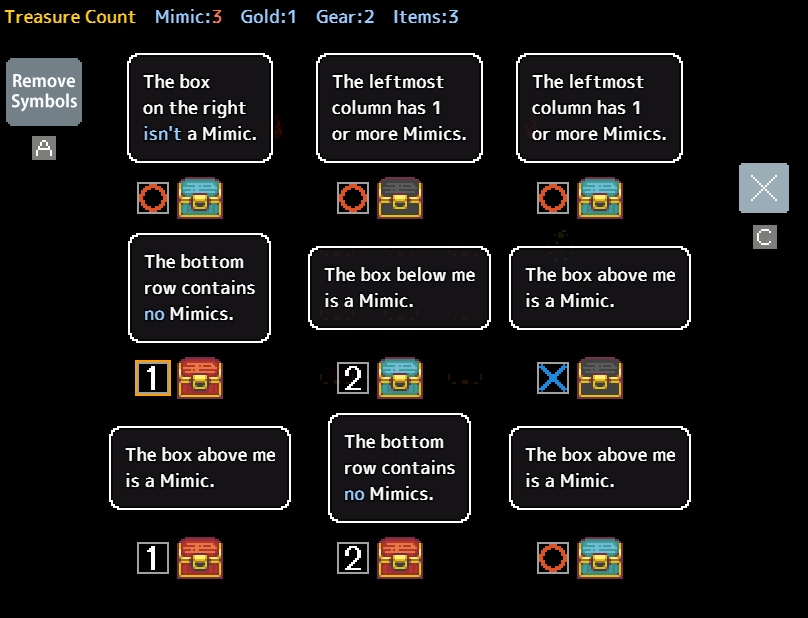
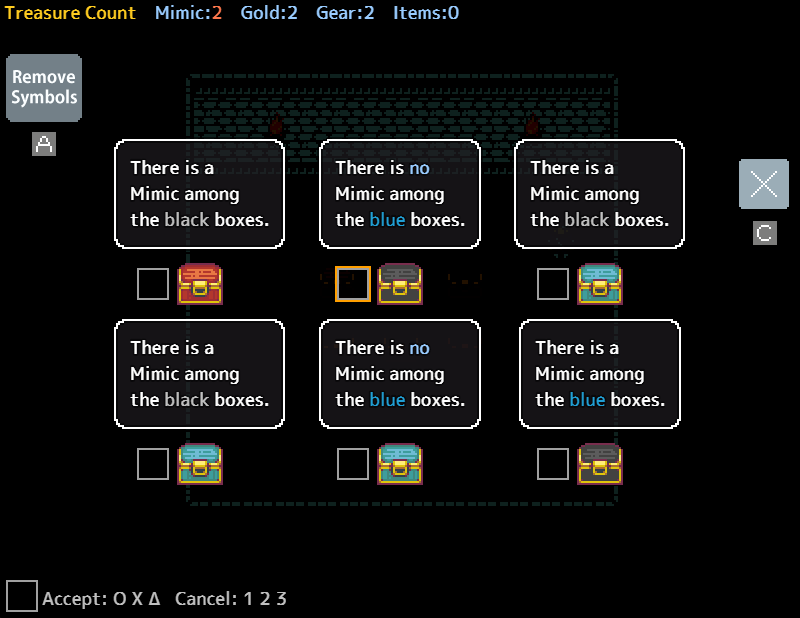
This puzzle appears to be insoluble. Employing a truth chain on the two boxes alleging that the red box is a mimic reveals two valid solutions. Either the red, middle right, and top-left boxes are mimics, or the bottom-right, middle-left, and middle boxes are mimics. Occasionally, it’s necessary to accept the impasse and proceed forward.
Color based deduction
look at the following puzzle:
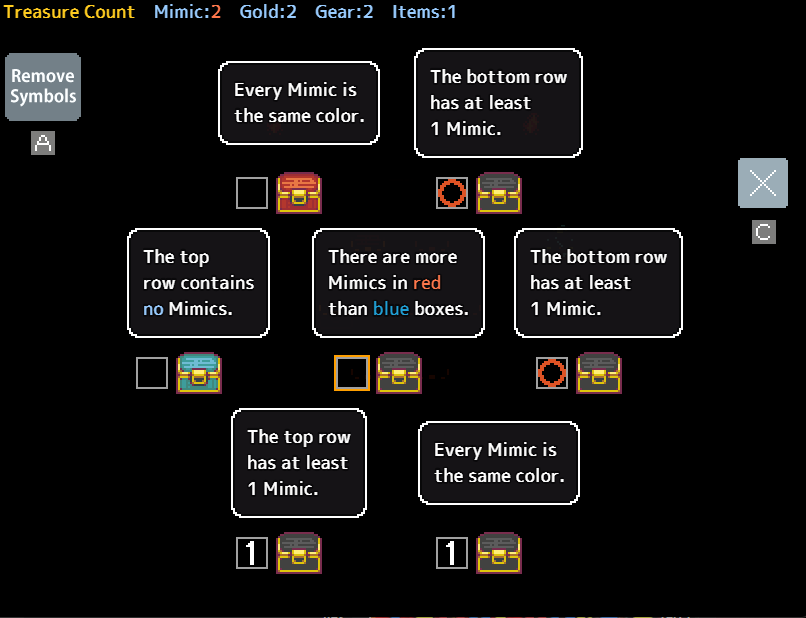
in it there is a set of clashing statements. the statements “every mimic is the same color” and “there are more mimics in red than blue boxes” cannot both be true. leading to one of two possibilities. either both of the boxes claiming that the mimics are the same color are lying, or they are both real and the remaining 2 black boxes are mimics. In either case the blue chest must be real, and we can mark it. we can then use the true statement from the blue chest to solve the puzzle.

Gold Logic
Consider the following puzzle:
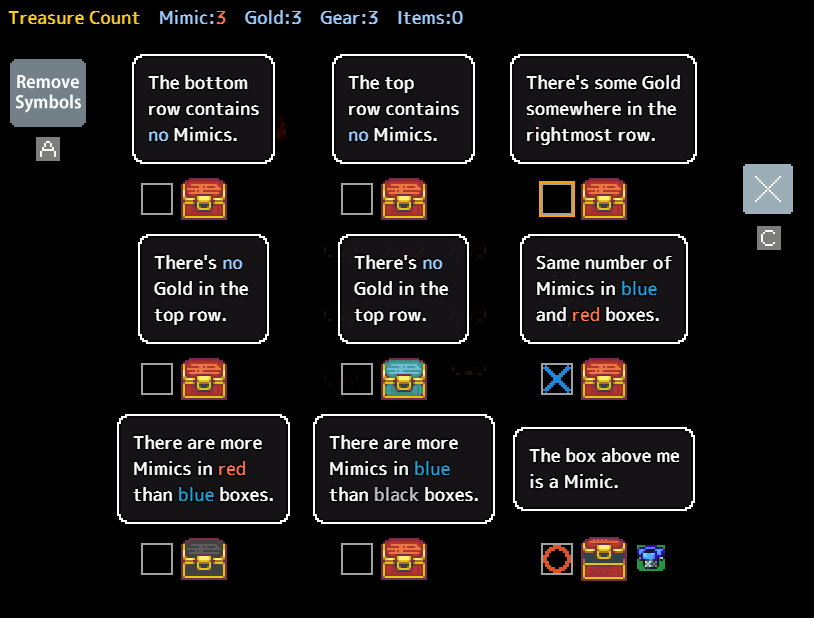
Since both the other chests on the right were solvable, and since neither one contains gold, the chest in the top right becomes very important. using a logic chain, we can see the if it’s lying, it would lead to too many mimics. therefore it must be real and contains gold. This means that both chests saying “There’s no gold in the top row” must be lying
Random Dungeon Guide
Random dungeons are the first time the game shakes up the rules a bit. instead of giving you an exact chest count, you get a range for the number of mimics. Usually this leads to the safest strategy being to treat each puzzle as if it contained the maximum amount of mimics. However some strategies involving mimic counts become less reliable.
Basics of randomness
Consider the following puzzle:
due to how this is set up, either both bottom chests are mimics or both chests claiming at least one of them are. however we are still left with a problem. we don’t know if 2 or 3 chests are mimics.
We can however, confirm that the middle right box is telling the truth. if it is lying then the box up-left from it is also lying, creating a situation where there are 4 mimics. marking this box as true allows us to solve the puzzle and see that there are 2 mimics.
Single box 50/50
Random Dungeons can have single box 50/50 chances as in the following:
In this puzzle the unmarked box may or may not be a mimic. since we don’t know the mimic count, we can’t tell if it’s telling the truth and there is only one mimic, or if it’s lying and it’s the second mimic.
Robber Dungeon Guide
Robber Dungeons include a new type of chest, the robber. This chest always tells the truth, but if opened steals 100 gold from you. if you have less than 100 gold it just steals as much as you have. Because of this, testing possible robber chests when you have very little gold (such as at the start or after a shop) is usually better than using the open all button.
Getting robbed for profit
Look at the following puzzle:
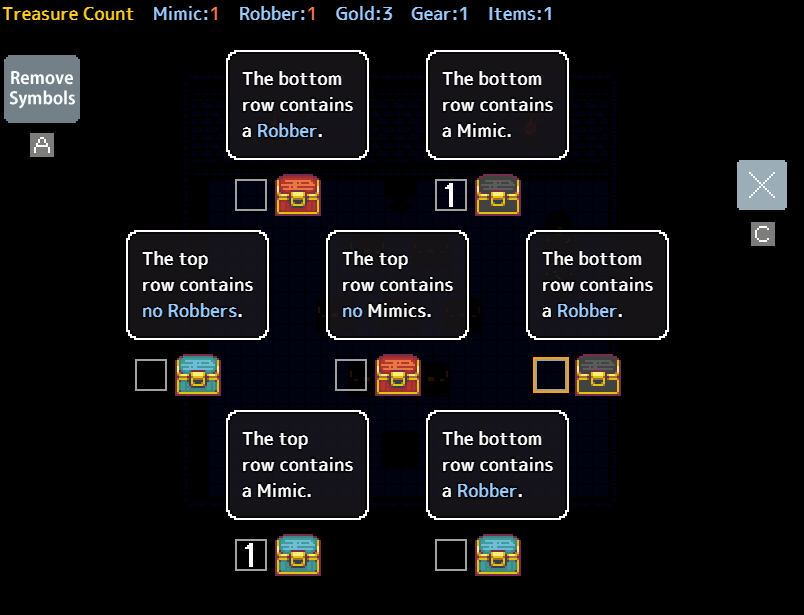
while a bunch of chests are concerned about the robber, the two most important ones are the marked pair. one of those is the mimic. additionally, the bottom row must contain the robber. Therefore all non marked non bottom chests are safe. this means that the chest saying the top row has no mimics is true, leaving us with both the mimic and the bottom chest as being unsafe to open (one is the robber, one is the mimic)
eyes on the prize
Consider the following:

after marking the first round of mimic locations, the 3 middle chests are immediately truthful. this means the top chests are safe, the and the blue chest is the mimic. following this, we arrive at this solution:

What you do next depends on your gold count. if you Just visited a shop or just started you should open the triangle marked boxes one at a time until you find the robber. since none of the chests contain any gold you will be able to open all of them without fear of the robber taking any. If you have 100 or more gold, then you need to weigh the value of 2 items/equipment against 100 gold. this is largely subjective so it’s up to you.
robber reports
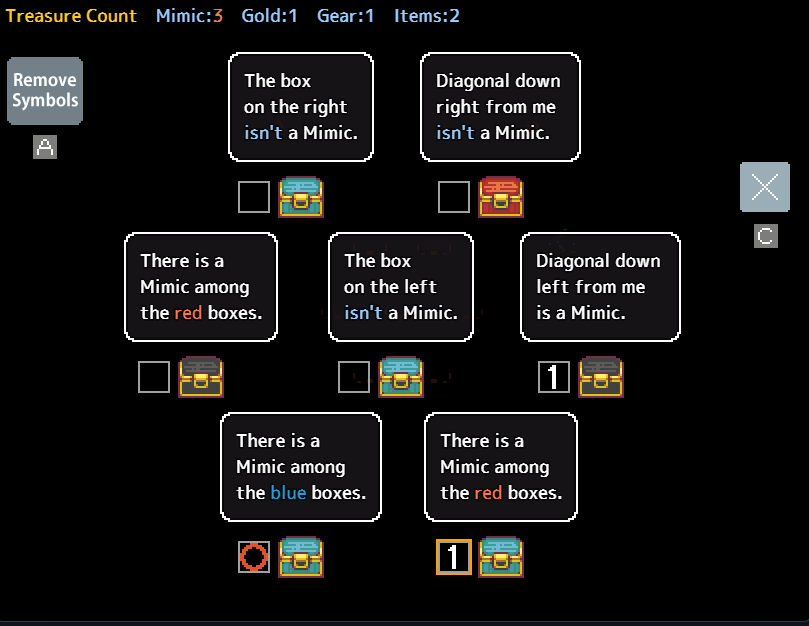
In a 1 mimic situation, a chest reporting the location of a robber guarantees a non mimic chest, such as in the following puzzle:

In this puzzle, the bottom right chest claims the middle is the robber. since one mimic is already in a mimic pair, the middle chest must not be the mimic. as either the bottom right chest is telling the truth, or it is a mimic, and lying about a normal chest being the robber. Similarly, the chest on the middle right must also be telling the truth, since if blue was a robber they would not be able to lie about their location.
I am not the robber
If a chest ever says it is not the robber, such as claiming red chests have no robbers when it is the only red chest, it cannot be the mimic or the robber. The robber can’t lie, and a mimic would lie and say that a red chest was the robber.
Number Dungeon Guide
Welcome to the minesweeper dungeon. While the number dungeon initially might seem daunting, it’s not that bad once you get a basic understanding of how to navigate it. Most boxes have a number, that number is how many mimics are near them, counting diagonals.
how does this number thing even work?
A number on a box means that there are X mimics nearby, X being the number. So a box with a zero is telling you all nearby chests are safe, while a four would mean there are four mimics nearby. however due to each puzzle always being three by three, a basic strategy is fairly easy to do.
Go for the Centre
checking the centre box allows you to solve many of the number puzzles, take this one for example:
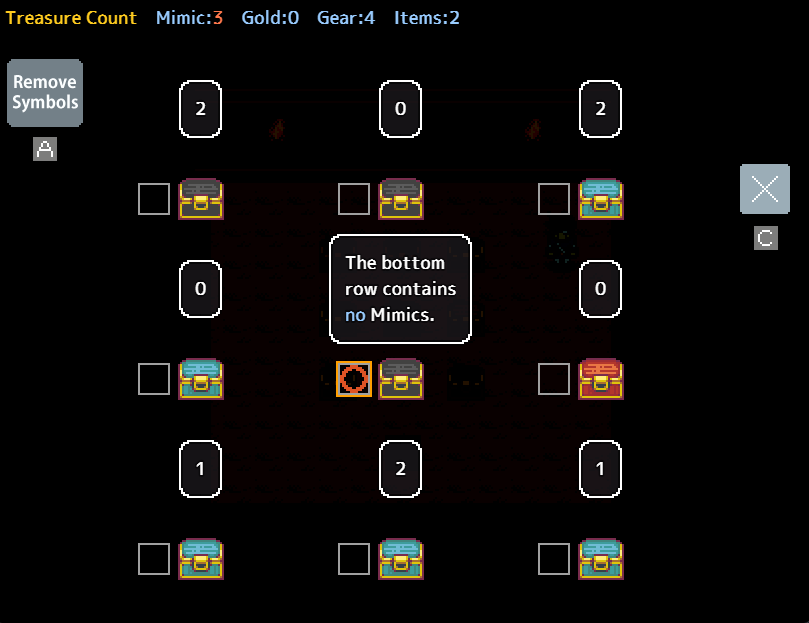
In this puzzle the centre box must be real. if it was a mimic, the three 0 boxes would also be mimics. that would leave us with 4 mimics, which is Impossible.
Check the corners
If a 3 Box is in a corner, it means that either all the boxes surrounding it are mimics, or it itself is a mimic. usually it isn’t too hard to figure out which one it is.
Doubt Dungeon Guide
Welcome to the Dungeon most likely to give you a headache. The doubt dungeon flips the rules on their head by having mimics always tell the truth, while all-non mimic chests of the same color as a mimic lie. This means that many of the normal strategies will not work. However, once you wrap your head around this new ruleset, there are a few new strategies that you can use to quickly find the mimics.
Color Based Self reporting
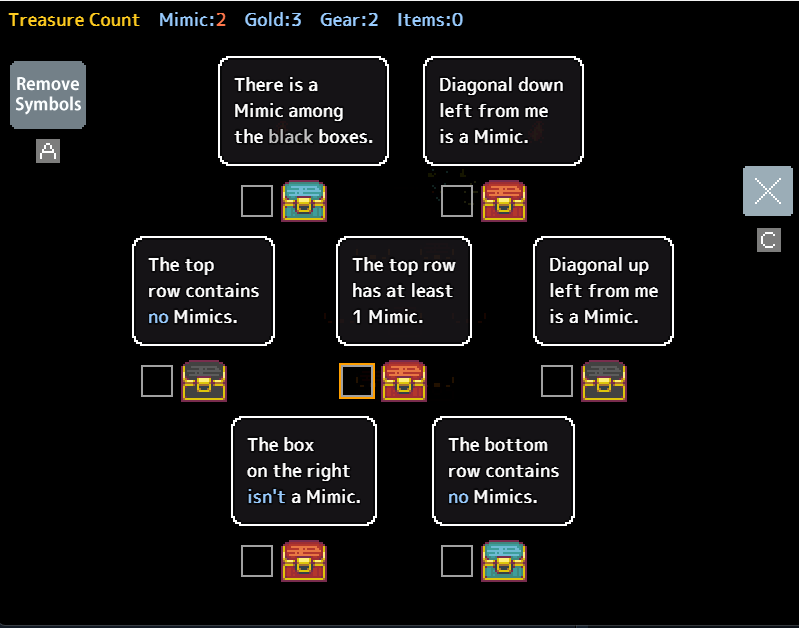
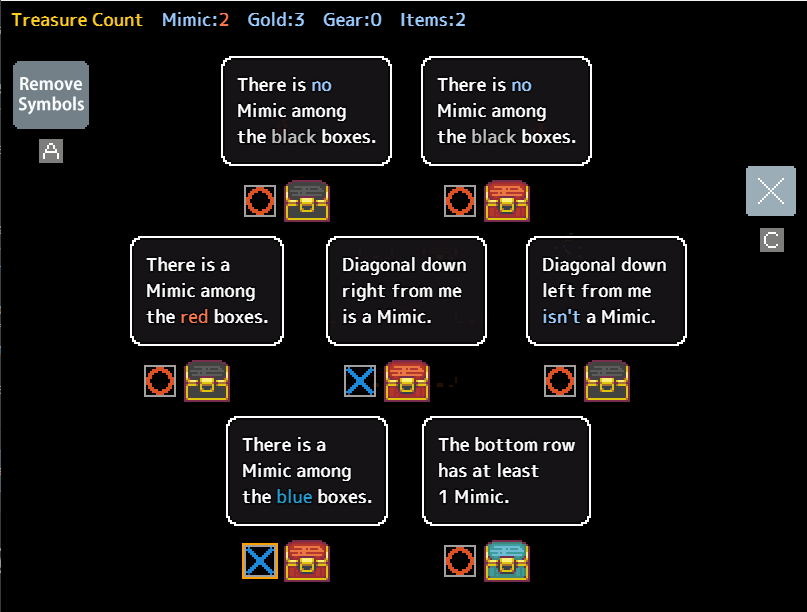
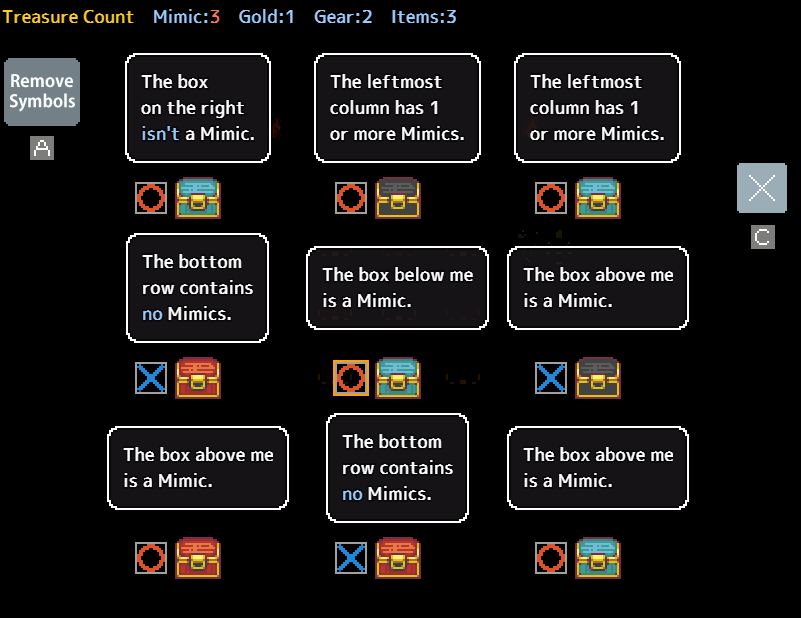
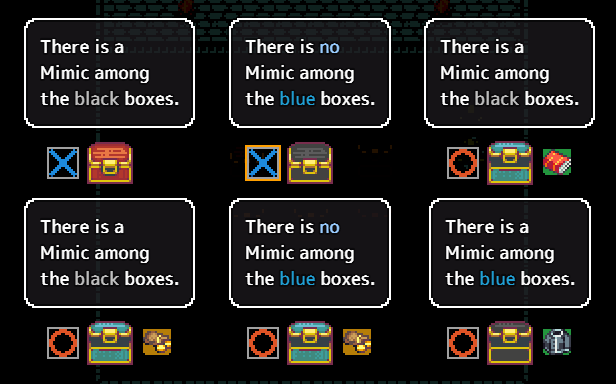
Unlike the dungeons before it, mimics self report in doubt. Take the following puzzle:
The Black box in the bottom left claims there is a mimic among the black boxes. This box must be a mimic, as only a mimic is able to self report in Doubt dungeons. Same goes for the top middle blue box.
reverse self reporting
similarly, if a chest claims it is not a mimic, it must not be a mimic, although it might be lying, as in the following:
In this puzzle, the bottom middle chest cannot be a mimic, if it was, it would tell the truth that there is a mimic among the blue boxes.
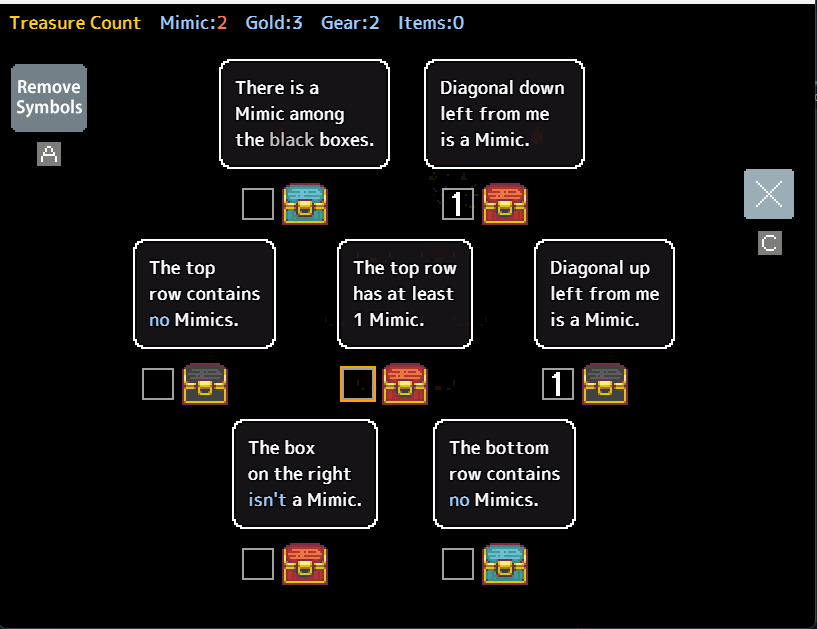
Single Color statements
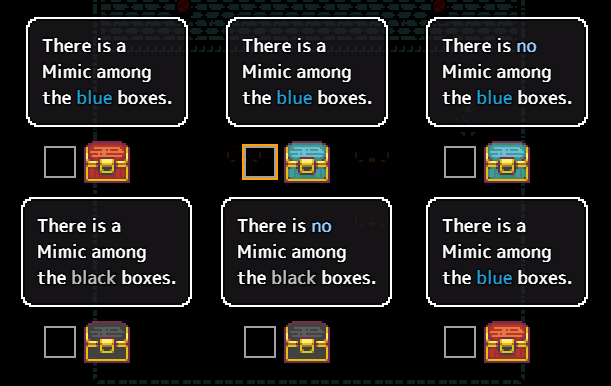
Continuing from the puzzle above, the red chest must be telling a true statement. If a chest is the only chest of it’s color, the statement it says must be true. Using this, we can mark the blue boxes all as true (since if both were lying we would have 3+ mimics), then mark the red box as a mimic, as only one black box can be a mimic, then finally mark the top middle box as a mimic, as it is telling a true statement, and whichever black box is telling the truth is a mimic.
Location based self reporting
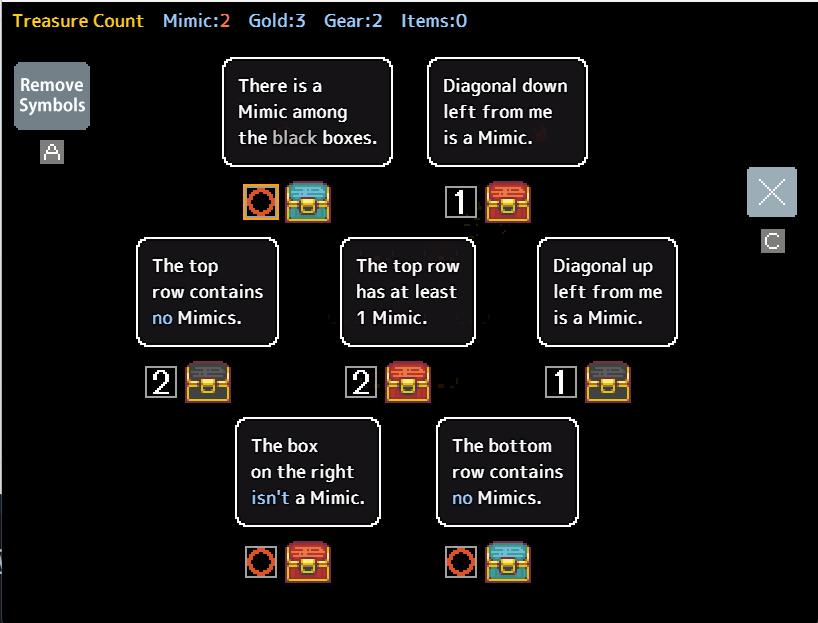
In order for a mimic to be “self reporting”, all possible mimics of that color must be included in their statement. Take the following:
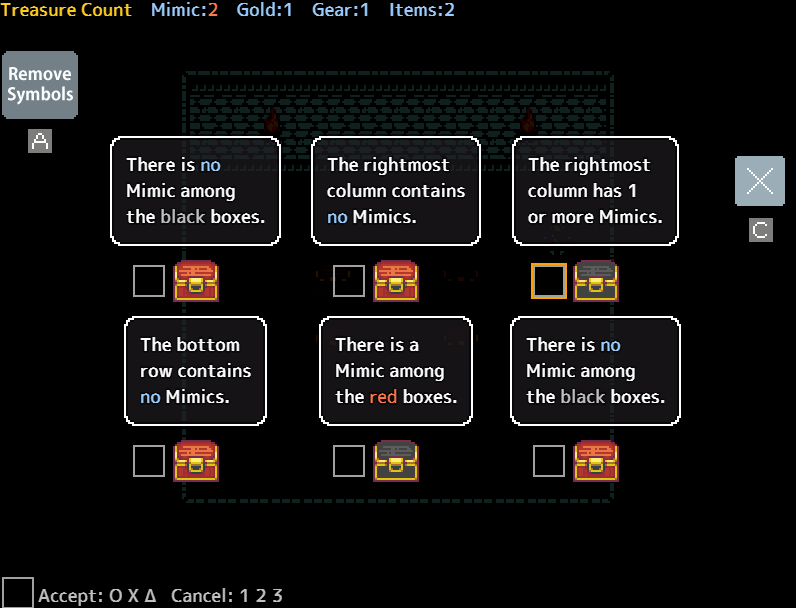
While at first glance you might think the mimic in the top right is self reporting, This is not the case. since all possible black mimics aren’t in the right column, it could be a real box that is lying. In this specific puzzle it is real and is telling the truth.
Confuse Dungeon Guide
Welcome to the final dungeon of the game. Confuse dungeons don’t need their own dedicated strategies, just a modification to the rules we use.
Here’s a quick list of rules in confuse dungeons:
- statements said more times than there are mimics + confuse chests must be true
- true statements mean the chest is real
- a chest being real does not always mean it’s statement is true
- puzzles can be treated as containing one more mimic for the purpose of mimic pairs
- if you hit the maximum number of mimics/mimic pairs, all remaining chests must be telling the truth
- in one mimic/confused box situations, all rules that apply to one mimic dungeons work, treating confused boxes as the only mimic
- blue orbs are very useful for cracking open later puzzles, 50/50 situations are also much more common, so try to not use them on every 50/50 you find
- A chest that self reports must be real
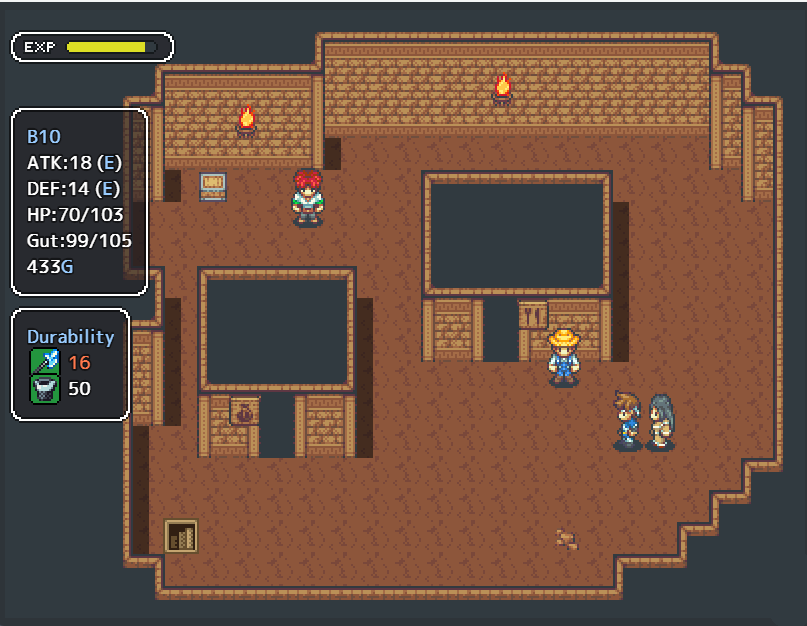
Basic Town Overview
A town is a Location that spawns on floor 10 and floor 20. A town will always contain the following:
- NPC with 1 tip
- restaurant that sells two different gut and hp restore meals, one that is a full heal, and one that is a small heal
- A shop that contains a shopkeeper
Towns also have the chance to spawn one of the following NPCs:
- Strange Doctor: gives you medicine that can either heal you or damage you 30hp
- lottery ticket salesman: sells you a scratch ticket for 200 gold. The prizes are 1100 gold for 1st, 400 for second, and 300 for third.
- Blacksmith: will restore 10 durability on your weapon and armour for 10 gold.
Notable Chests
The following is a list of noteworthy chests:
Sleepy Chest
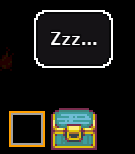
A sleeping chest is just that, sleeping. You can wake them up using a specific item, otherwise they will provide no useful information
Countdown Chest
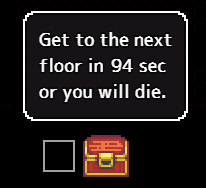
A countdown chest comes with a timer that counts down from 100. If it’s real you will die when time runs out. If it’s lying nothing will happen.
“Innocent” Chest
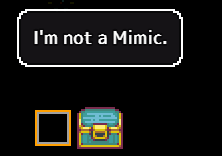
Chest that claims it is not a mimic. on most Dungeons this provides no useful information. In Doubt dungeons it allows you to mark all chests of that colour as real. In confuse dungeons it lets you know it isn’t confused
End
Thanks for taking a look, I hope something here helps. If you have any strategies or patterns that I missed feel free to add them in the comments and I can add them to the guide (with credit of course)