This guide will be covering the steps on how to get the 100% achievements in Kona. If you’re one of the players trying to obtain all Kona achievements, this guide is exclusively made for you.
Kona Achievement Guide
Rendezvous – Reach the General Store.
- As the description says, you need to reach the General Store after you get your car out of the snow. If you are trying to unlock Onwards of foot!, do not get back in the car after this point. You can still store things in the trunk.
Last Stand – Complete Gilles Lachance’s vision.
- Watch Gilles Lachance’s vision. He’s located in the woods on the path between the General Store and the Lachance house. When you find his frozen body, get close to it until the cutscene triggers.
Frosty Relationship – Complete Gisele Lachance’s vision.
- Watch Gisele Lachance’s vision. She’s on the first floor of the Lachance house. The cutscene will trigger when you get close to her body.
Lost Cause – Complete Rejean Blouin’s vision.
- Watch Rejean Blouin’s vision. He’s located inside the Icy Cavern. You will need to get a winter coat from Old Rosaire before entering (see Winter is Coming for more information). The cutscene will trigger when you get close to his body.
Journey in the Hereafter – Complete Jean-Guy Lamothe’s vision
- Watch Jean-Guy Lamothe’s vision. He’s in his garage, pushing against the door. The cutscene will trigger when you get close to his body.
Winter is Coming – Find a winter coat to keep you warm.
- To unlock this achievement, you will need to obtain a winter coat from Old Rosaire. This coat will protect you from the cold in general, and it’s necessary to enter the Icy Cavern. You will need the sherry wine found in the General Store and one empty bottle to complete this achievement. Go to Old Rosaire’s house and open the door. He will try to shoot you and miss. Go inside and talk to him. Eventually, he will offer you some warmer clothes if you bring him his favorite drink, Caribou. Travel to Rejean Blouin’s house (AKA The House of the Patriot). On the right wall of Rejean’s house is the recipe for Caribou. Go to the distillery and interact with it to make a bottle of Caribou. Once you have it, take the bottle back to Old Rosaire. Give him the bottle, and a coat will appear in his hand. Select the coat, and Carl will automatically equip it.
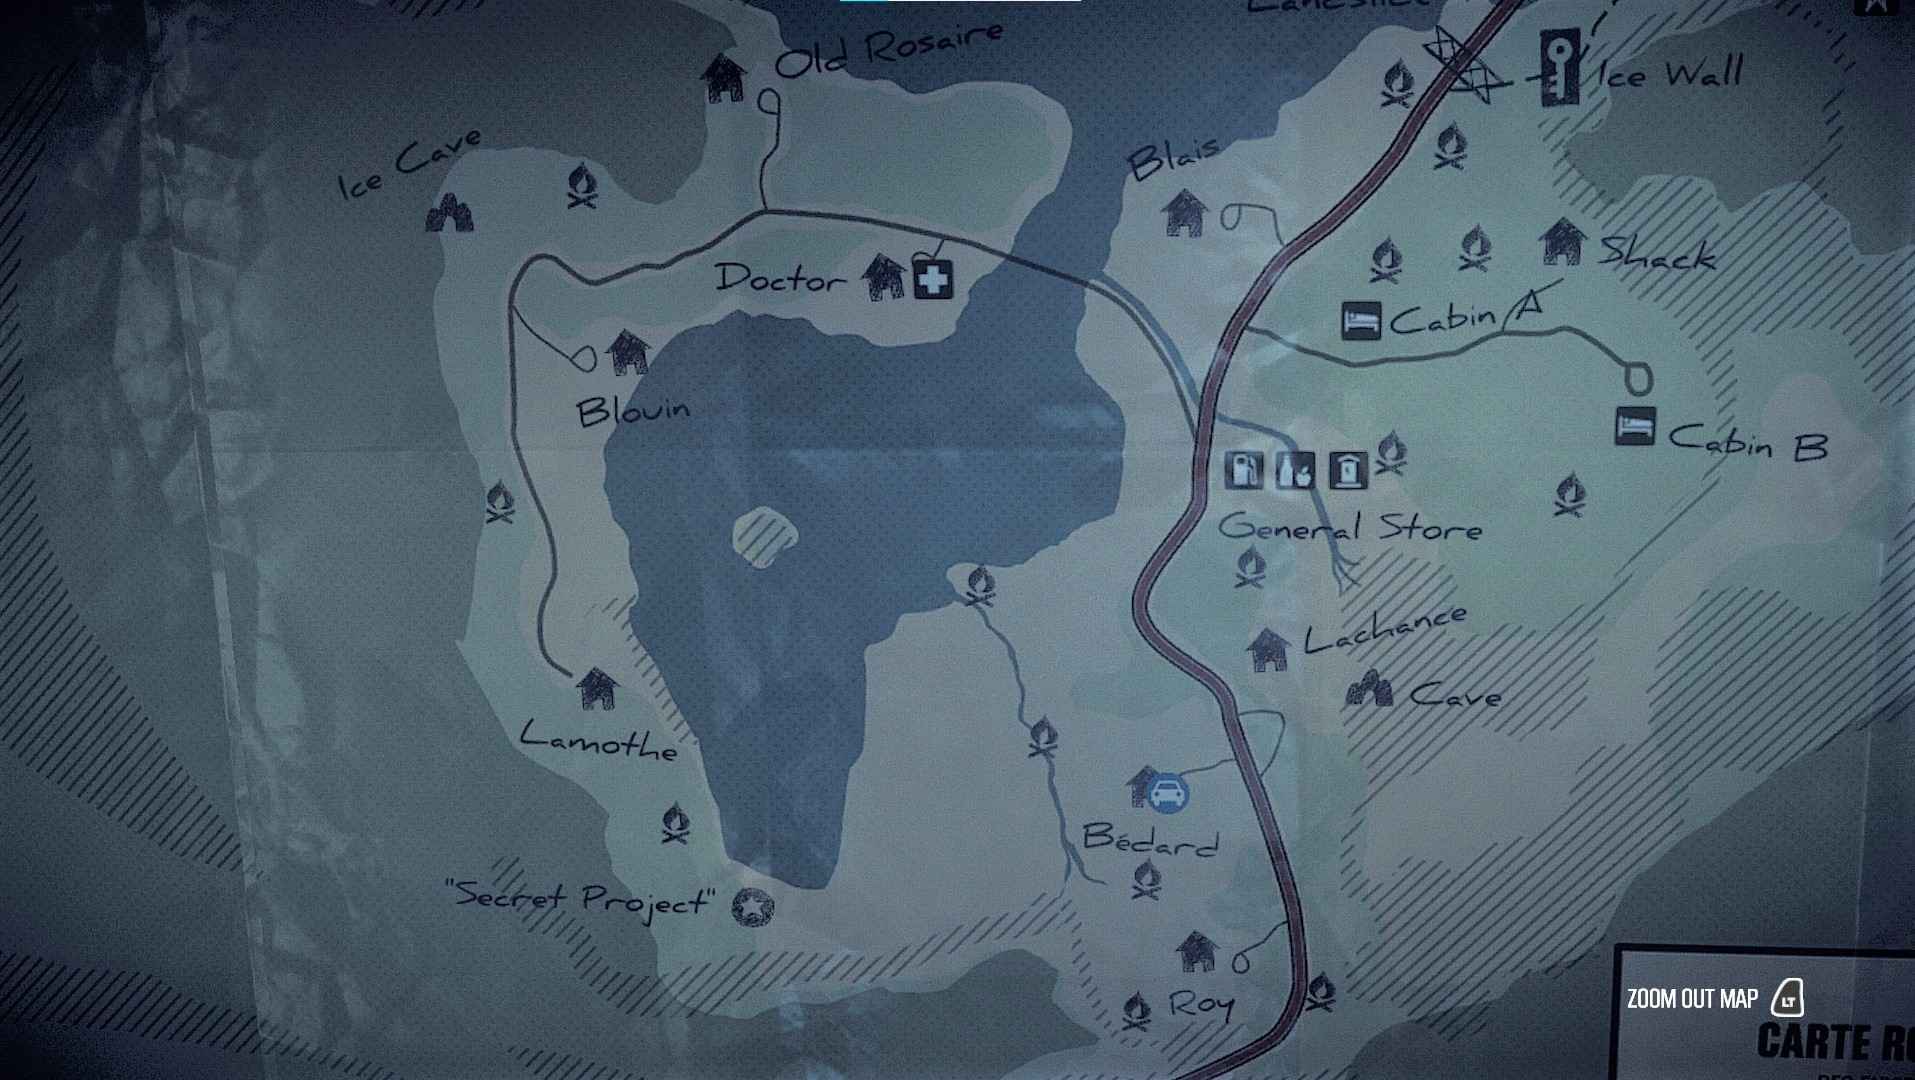
Fall of the Wall – Get rid of the ice wall.
- Once you have watched all the visions (thus unlocking Last Stand, Frosty Relationship, Lost Cause, and Journey in the Hereafter), go to the Ice Wall near the Landslide. You will trigger a cutscene, after which the Ice Wall will disappear.
The Murderer – Find Hamilton’s killer.
- You need to find Hamilton’s killer to unlock this achievement. Enter the Sanctuary past the Ice Wall and trigger the cutscene. The identity of the killer will be revealed, and the achievement will unlock.
A Mari Usque Ad Mare – Complete the game.
- As the description says, you need to finish the game. There will be a final cutscene during the credits. After this, the achievement should unlock.
Sorry, eh? – In typical Canadian fashion, Carl left $10 for the cutoff chain.
- This achievement is very easy to miss. At the beginning of the game, after you cut the chain across the gate that blocks your path, walk toward the wooden booth. There will be a rock on the counter. Interact with it to leave some money to pay for the chain you just cut.
Nature Lover – Get rid of wolves without killing.
- All you have to do for this achievement is throw a steak at wolves when they run to attack you. They will leave you alone and eat the steak before running off. You can find steaks in several fridges and coolers scattered throughout the game. Be sure to keep one steak in your inventory until the end of the game if you’re also going for the Vegan achievement.
Cozy ambiance – Light a dark area with the lantern.
- This achievement is super easy. Simply pick up one of the lanterns you find, and equip it in a dark area instead of the flashlight.
Revolution! – Find the rifle.
- You need to find and obtain a rifle to unlock this achievement. You’ll have two opportunities to do this. The first is in Rejean’s secret hideout in the Icy Cavern. The second is right before you enter the Sanctuary, in the hand of the frozen man on the left.
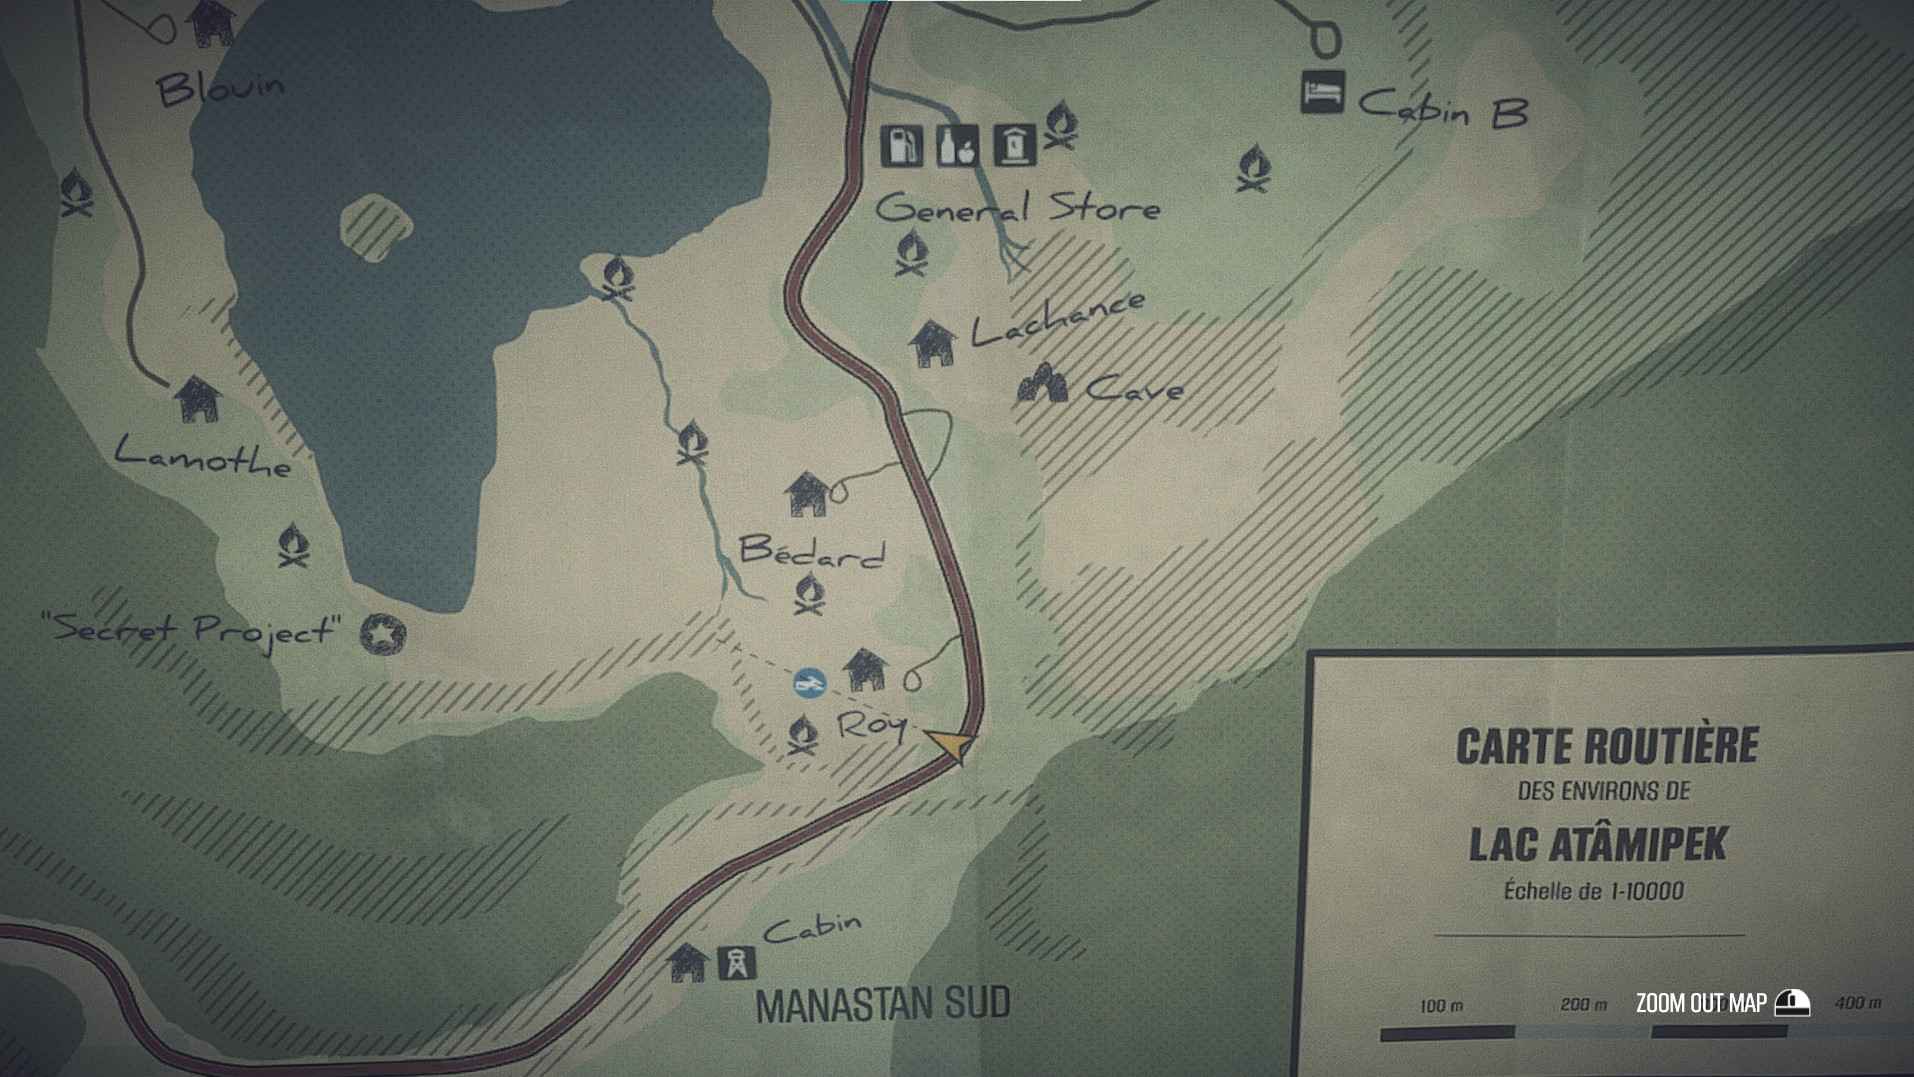
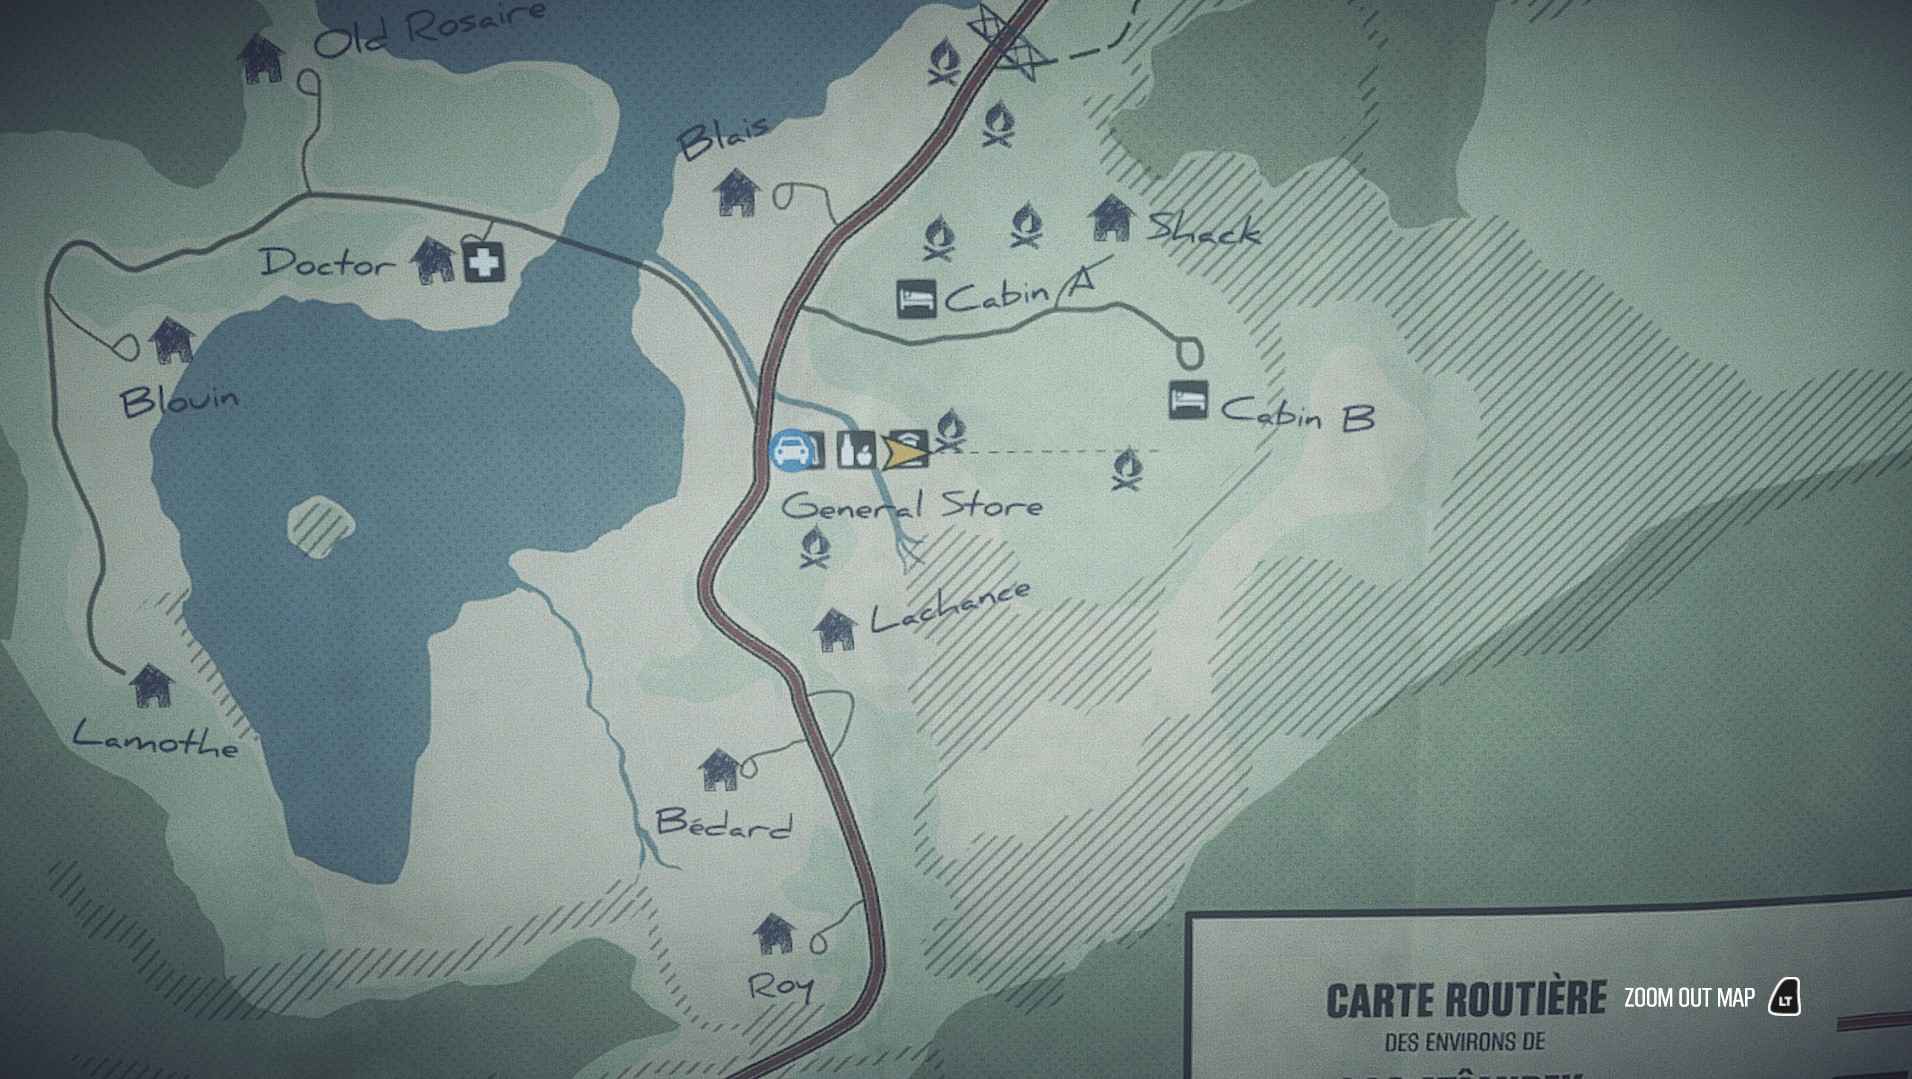
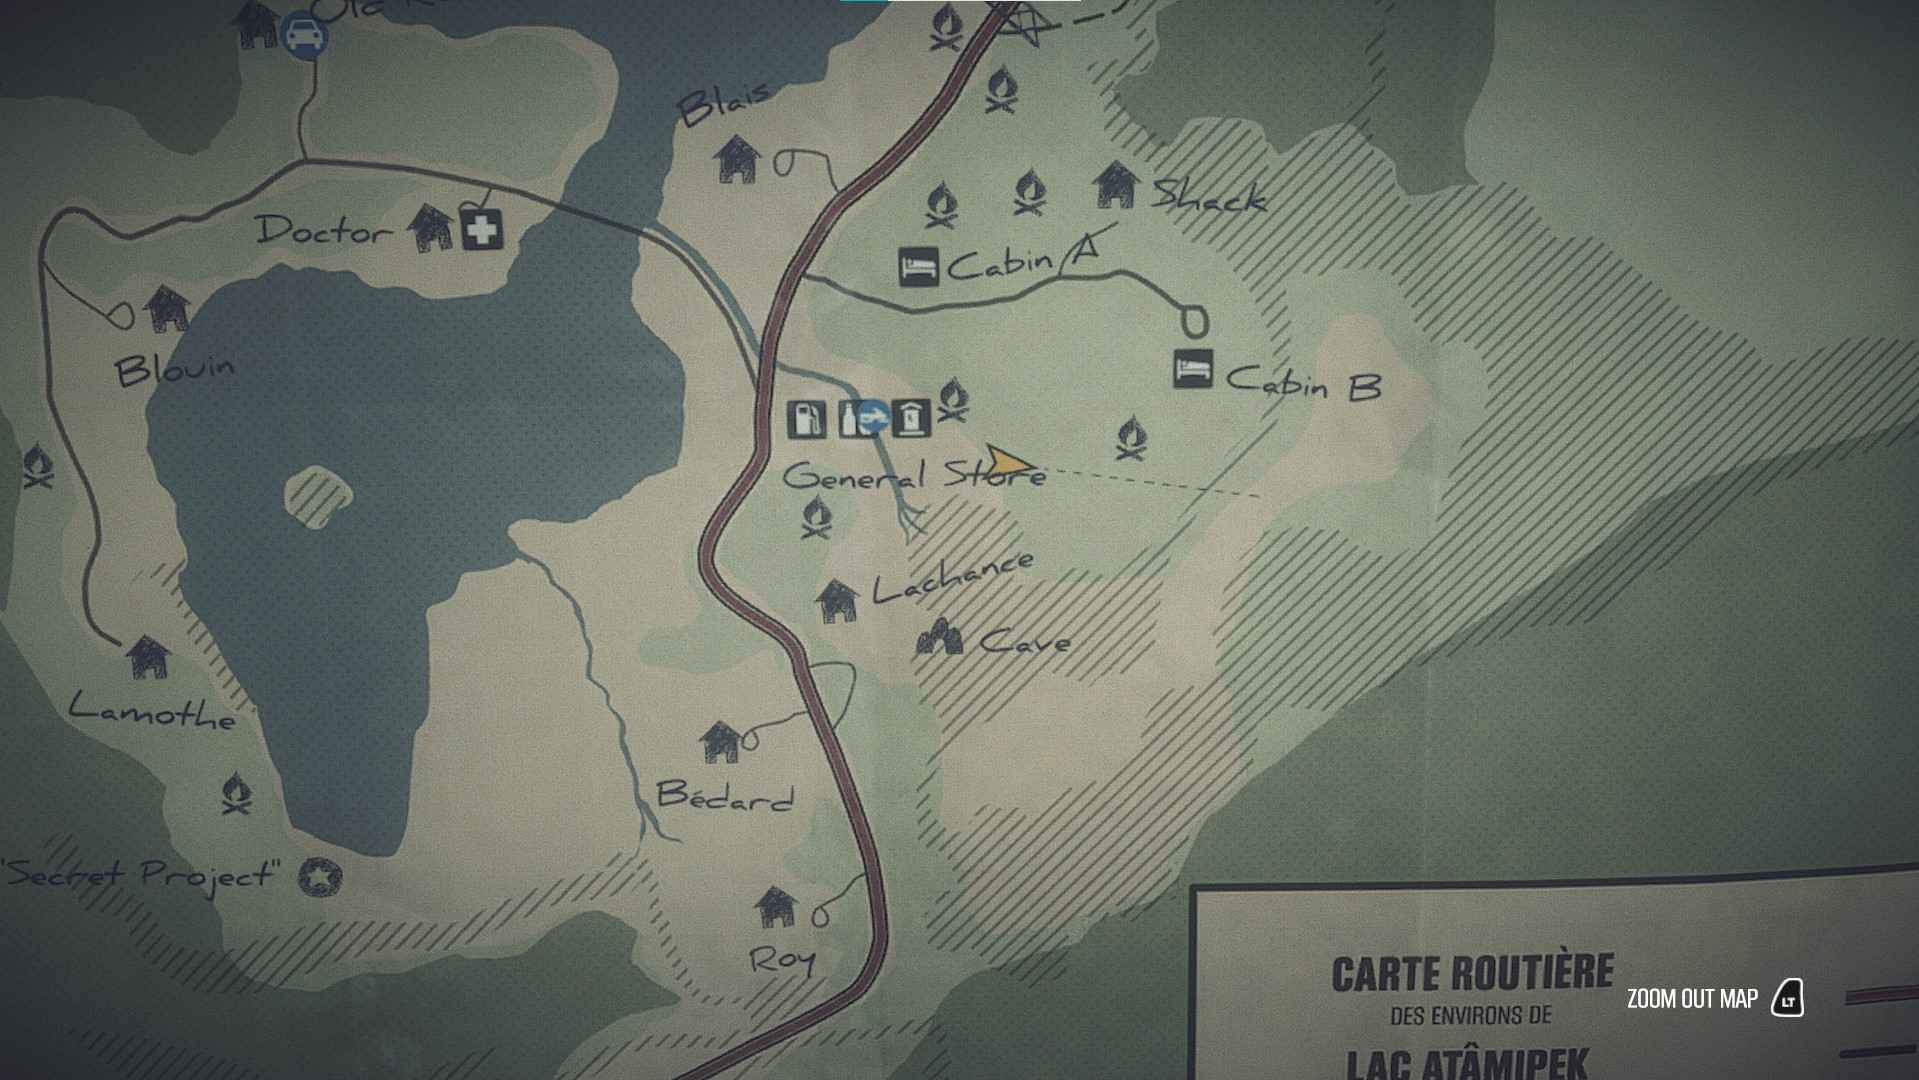
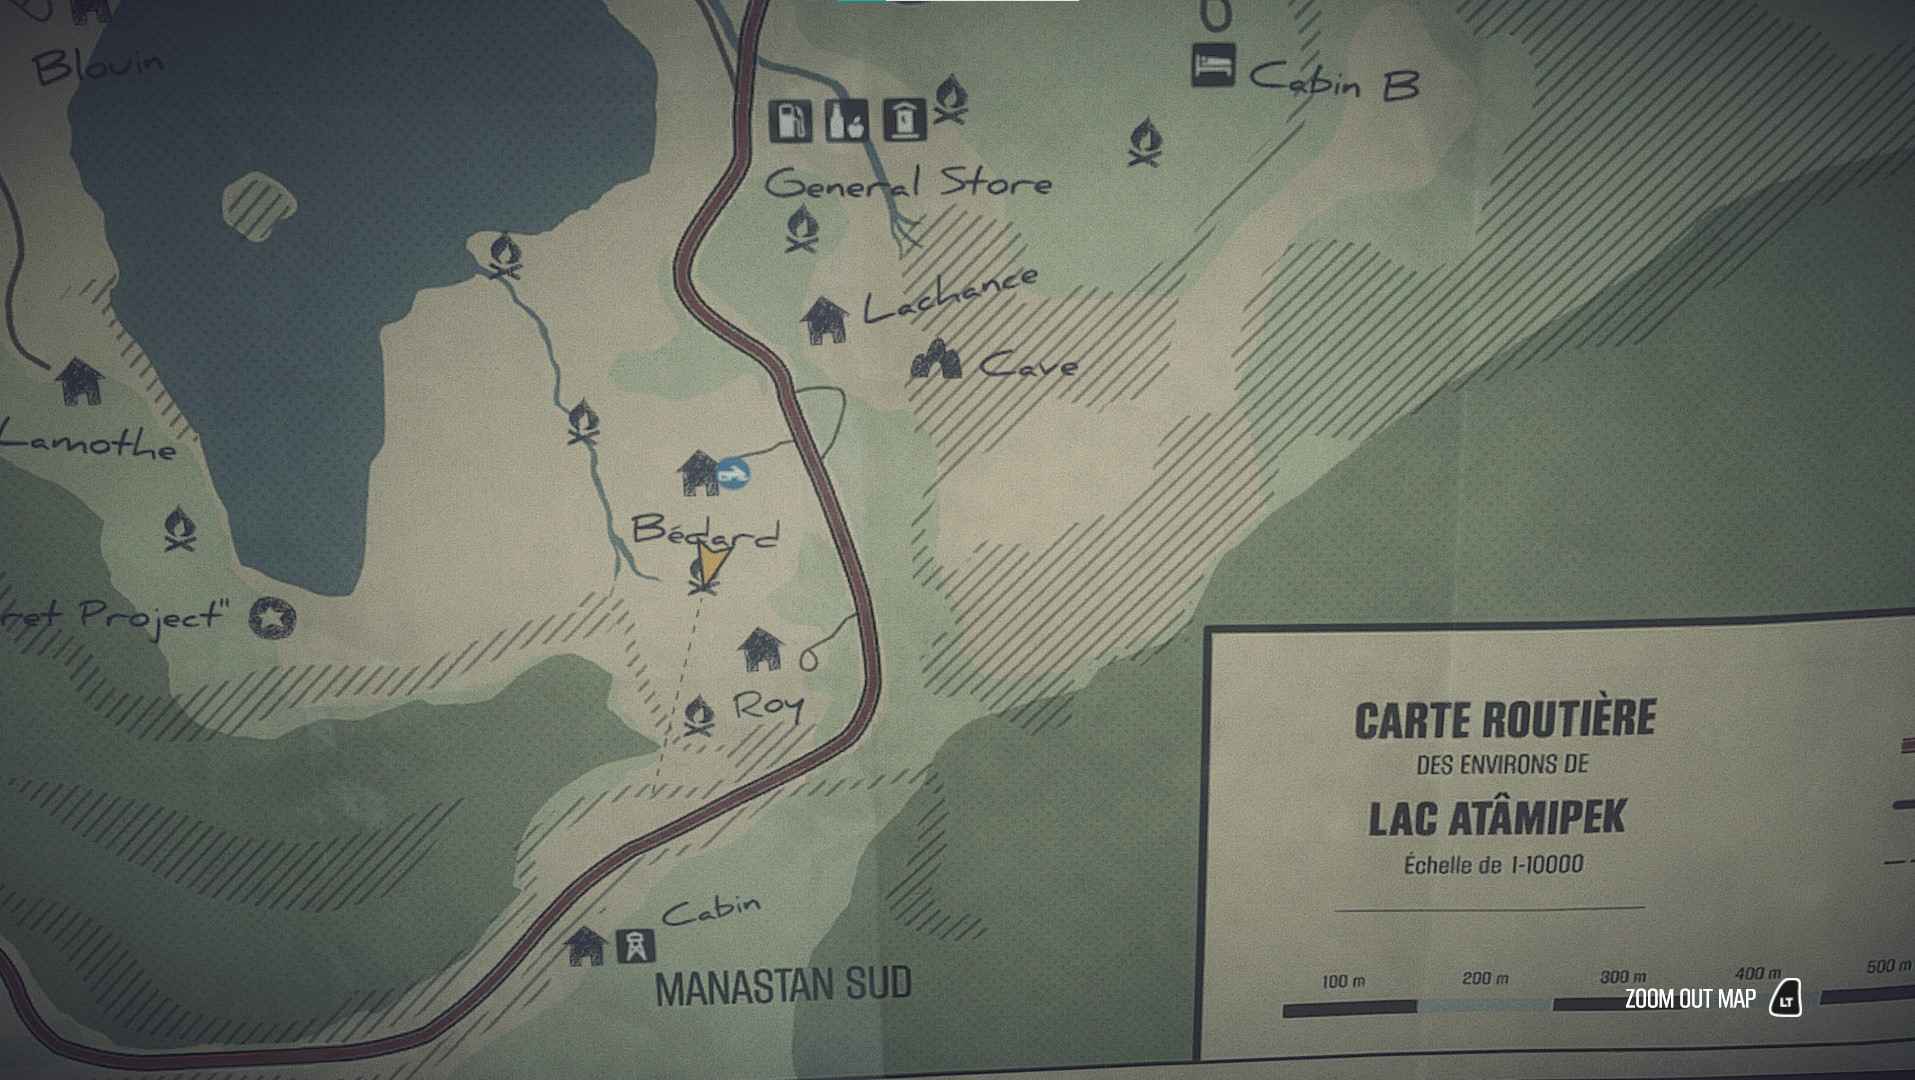
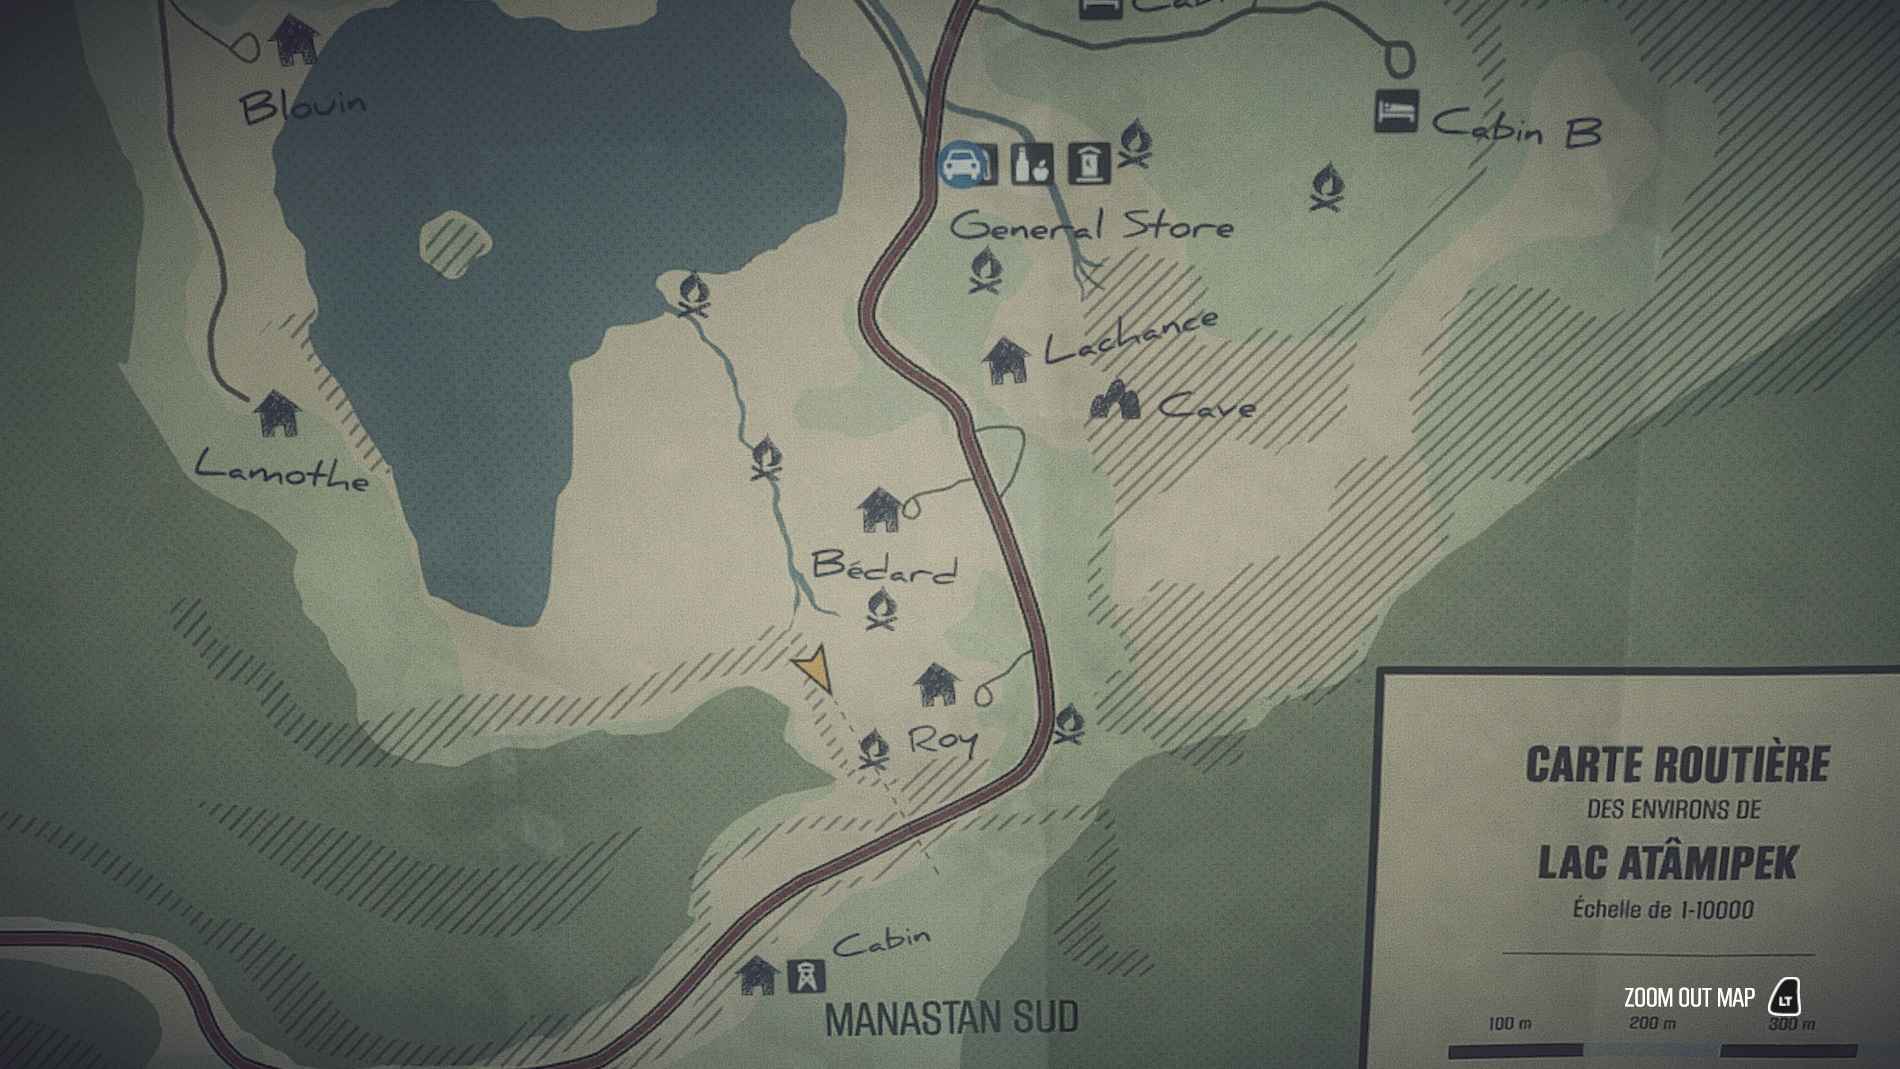
KABOOM! – Clear the boulders near the Lachances’ house.
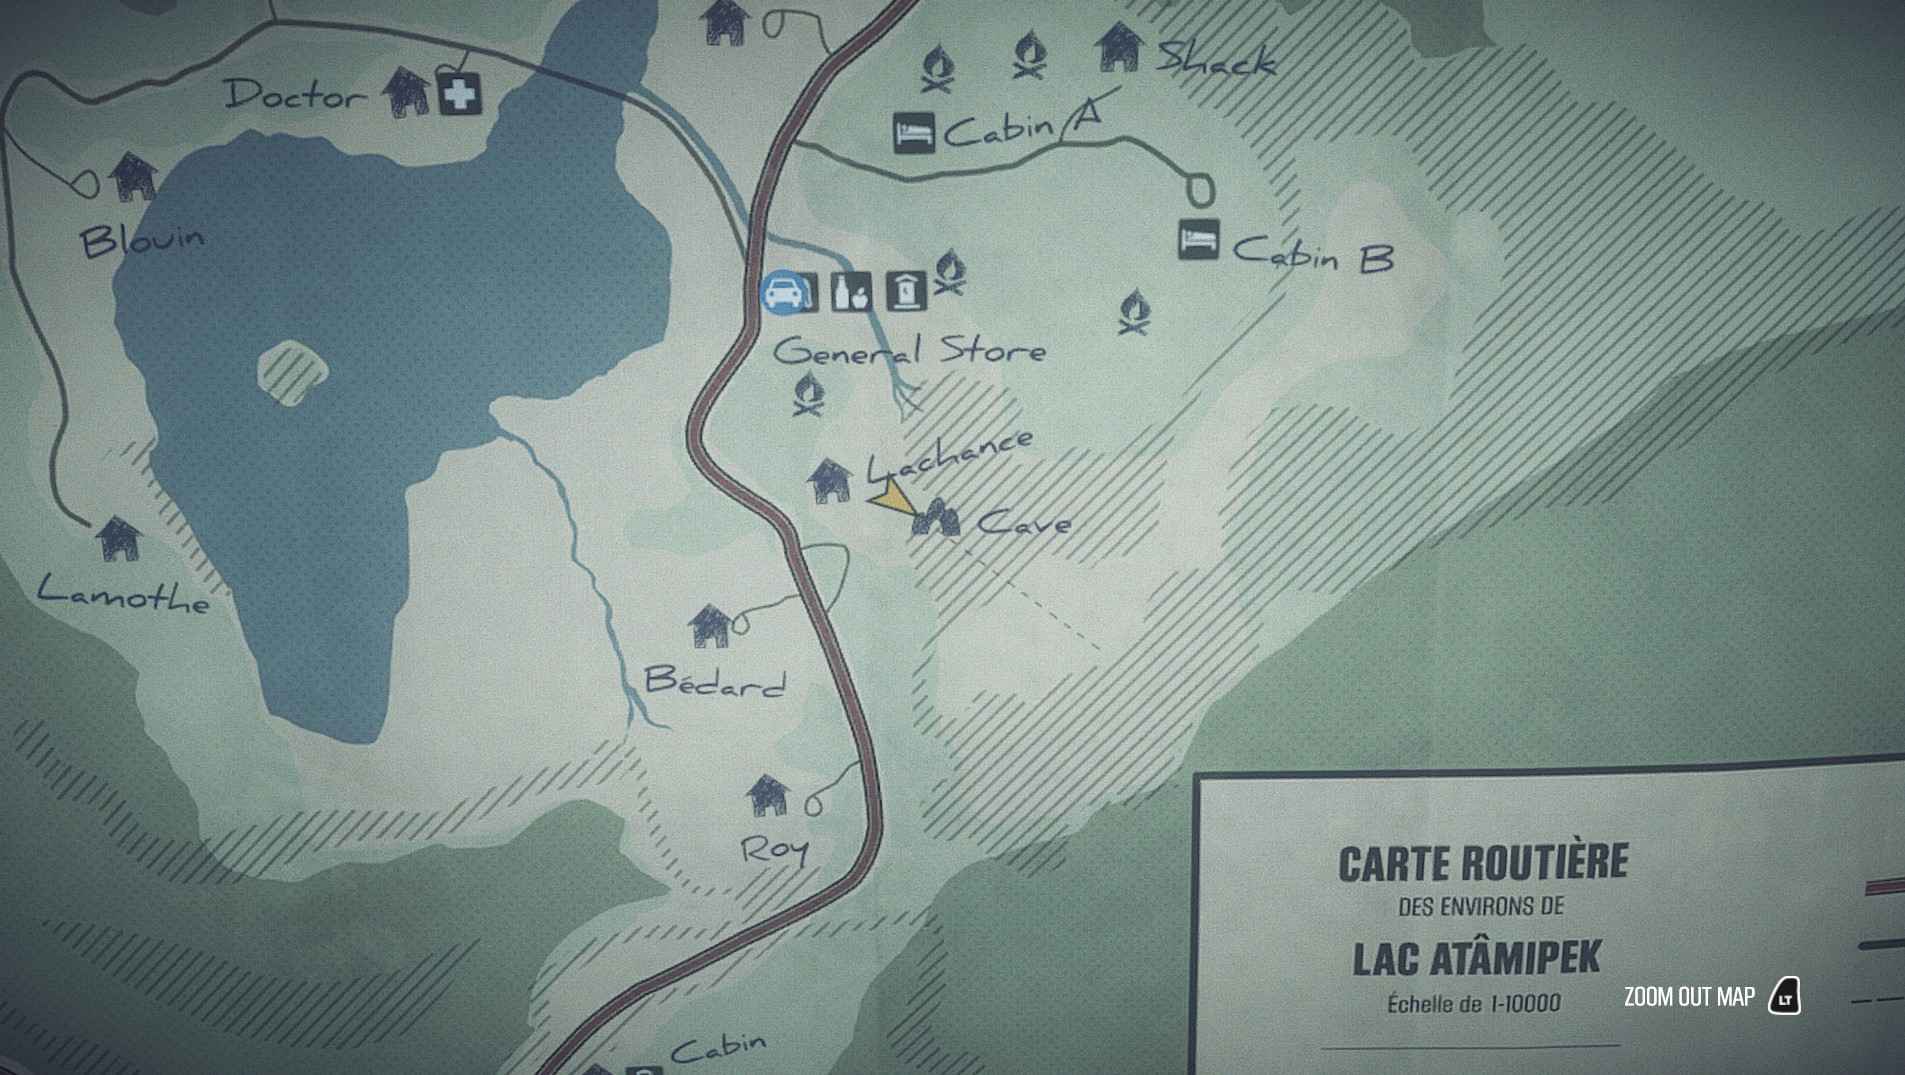
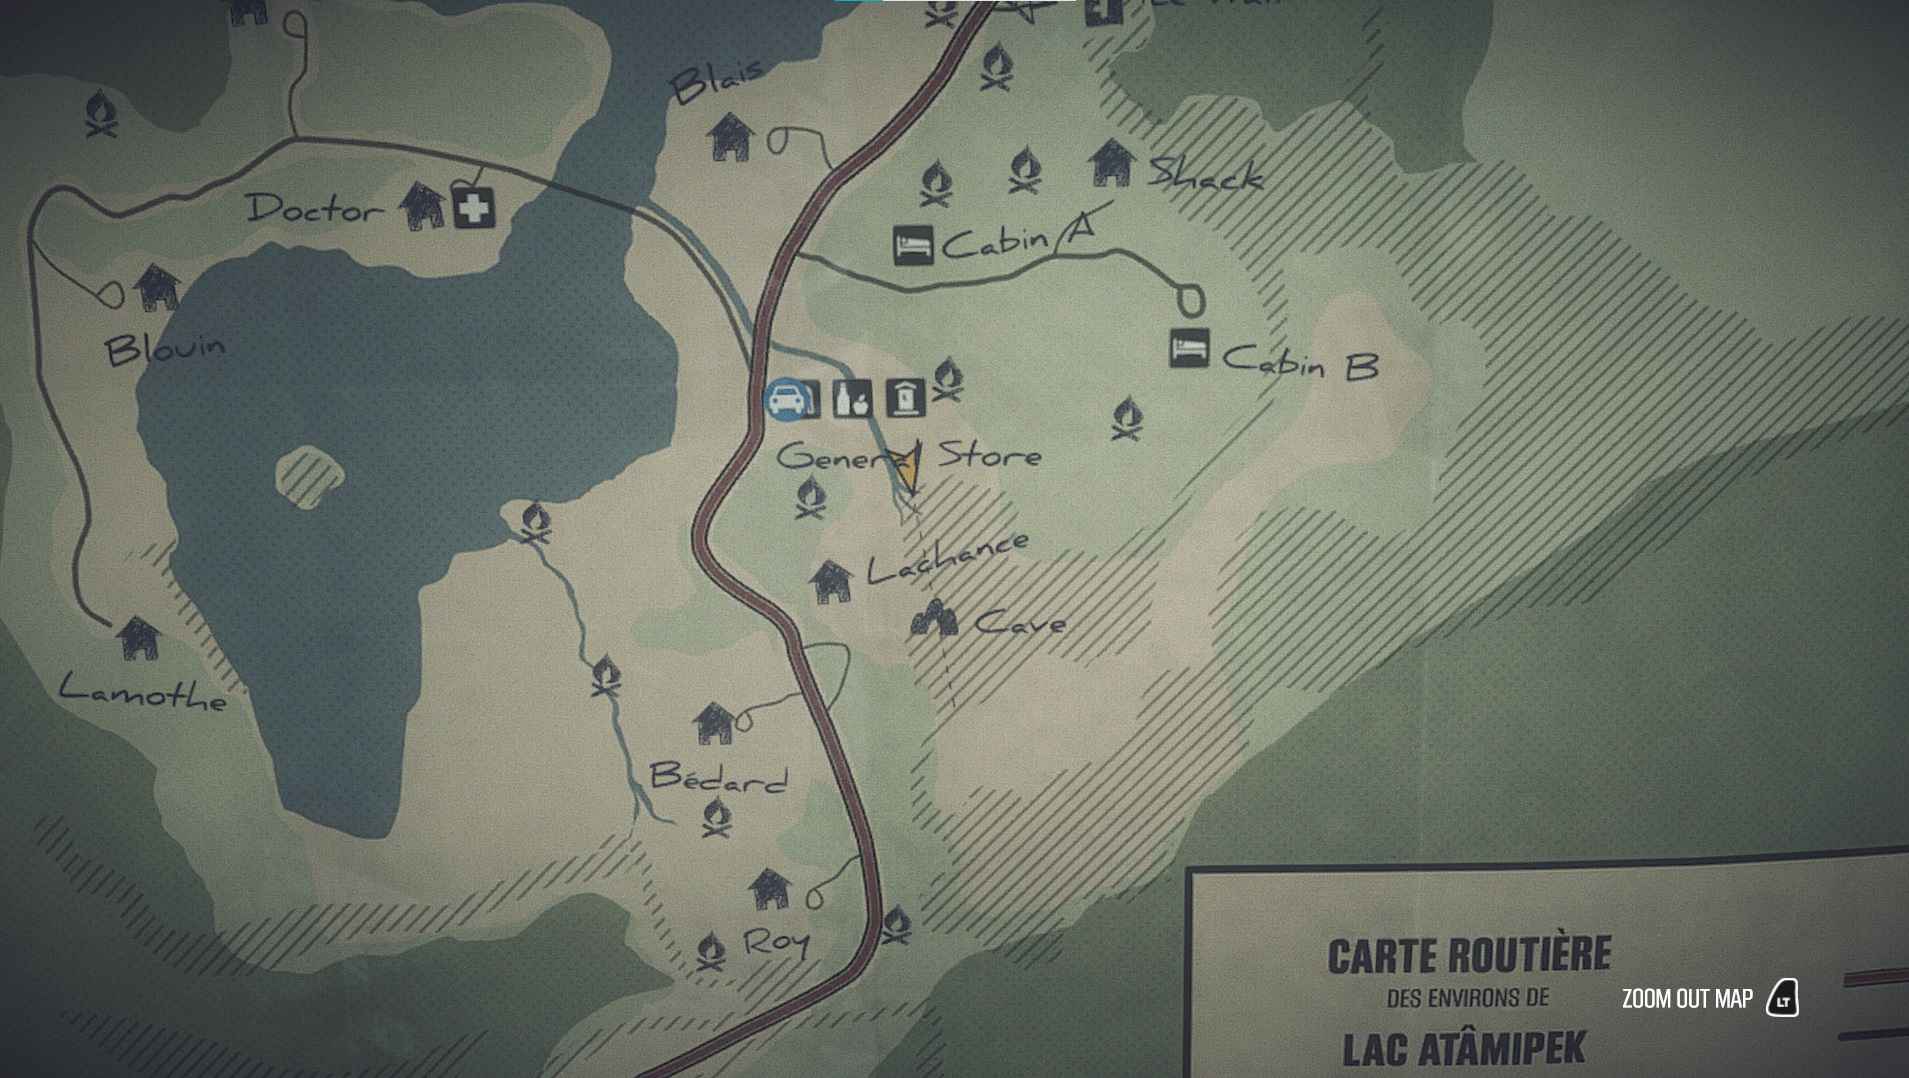
- To unlock this achievement, you need to use dynamite to blow up the rocks blocking the cave near the Lachance’s House. You will find dynamite in Rejean’s hideout inside the Icy Cavern. The map below shows the location of the cave. Be sure to put some distance between yourself and the boulders after setting the dynamite.
A star in the night – Shoot a flare at night.
- To get this achievement, you will need to trigger the night sequence of the game and obtain the flare gun and some flares. The night is triggered after watching Lamothe’s vision (which also unlocks Journey in the Hereafter), and the flare gun is found in the final treasure chest in Martin Blais’ treasure hunt (see the Treasure Hunter section of this guide for more info). Flares can be found in several locations, including treasure chests and sheds.
Astronaut – Activate the spaceship.
- You could technically get this achievement before nightfall by rushing past Lamothe before the vision is triggered. This is an easy one. You will need duct tape, hardware, and pliers to repair the spaceship. You will also need to collect the Spaceship Blueprint from inside Lamothe’s house. Once you have all the necessary equipment, enter Lamothe’s garage, approach the spaceship, and choose to repair it once the option appears.
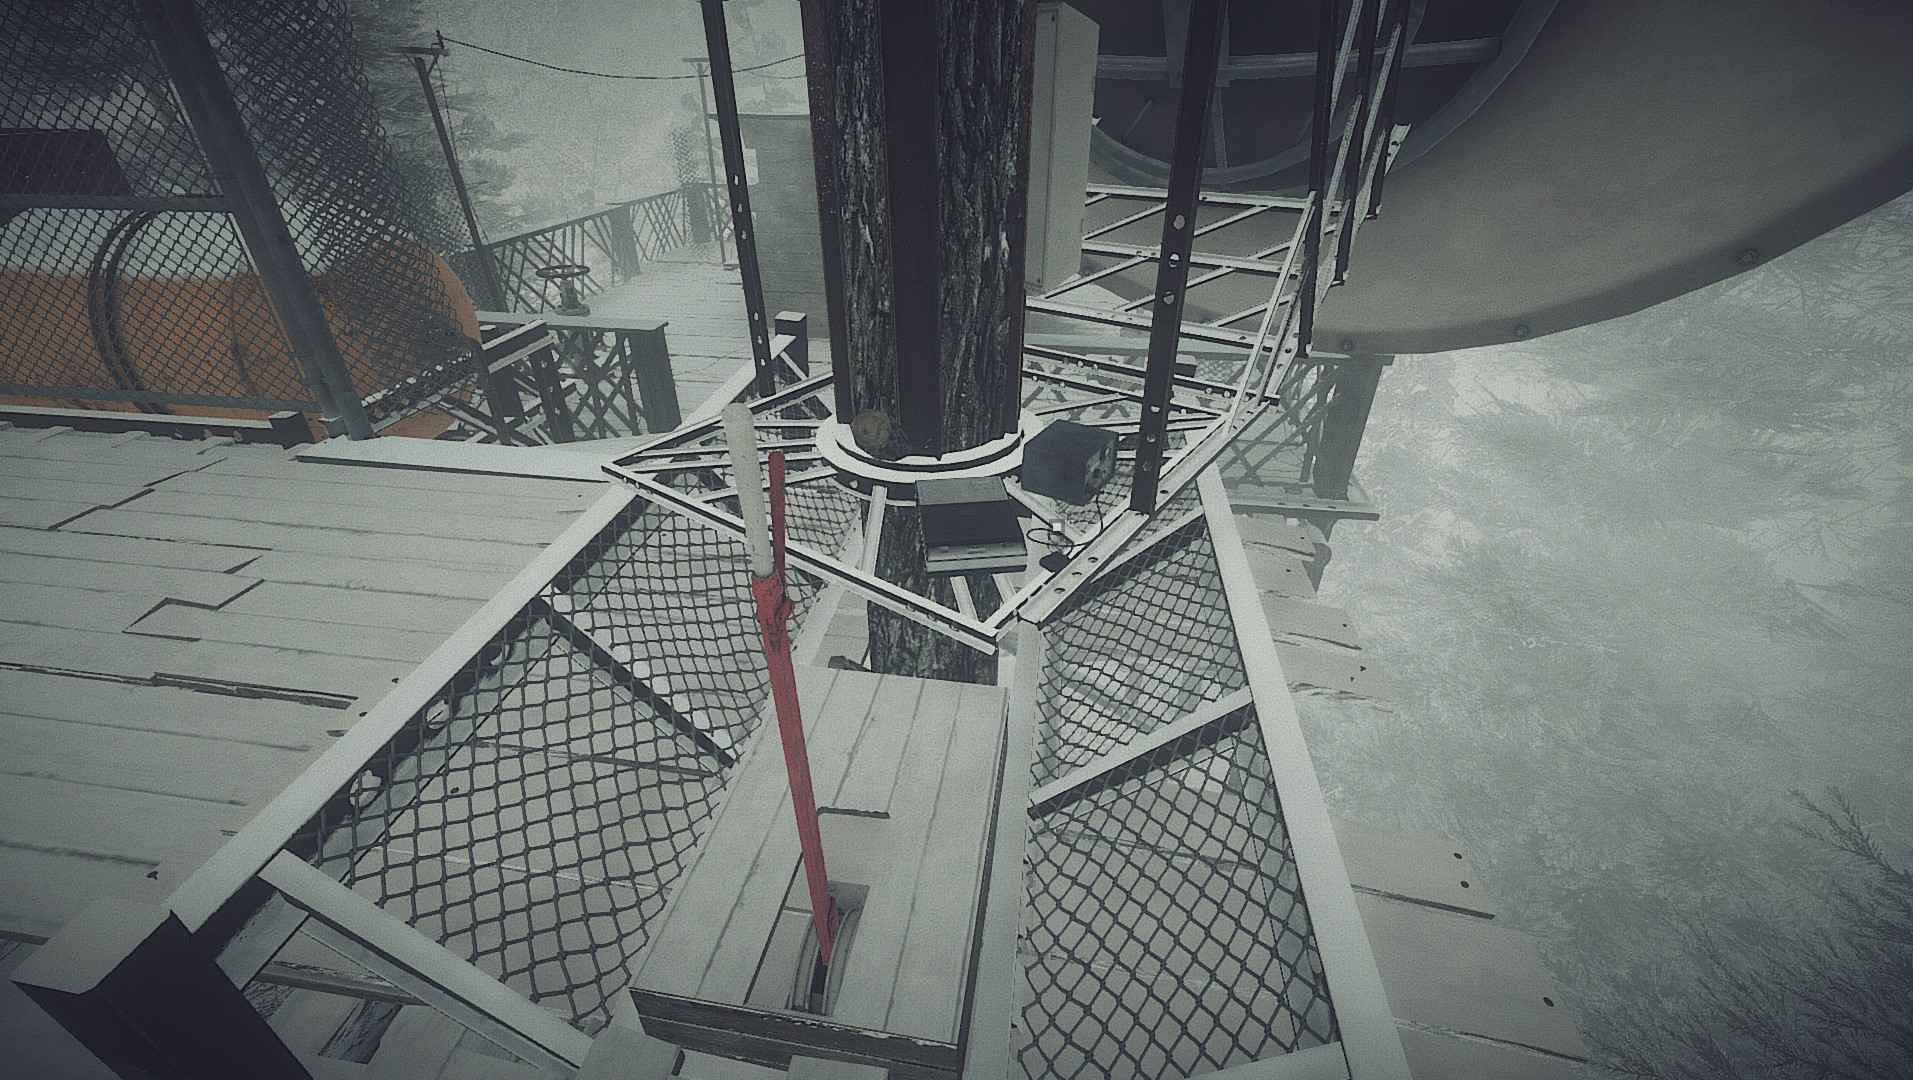
S.O.S. – Send a radio message with a big antenna.
- You could technically get this achievement before nightfall by rushing past Lamothe before the vision is triggered. Before you can unlock this achievement, go into Lamothe’s house and examine the map covered in thumbtacks. This will give you the location of Lamothe’s secret hideout. Head to the hideout and turn right when the path forks. Walk down the path until you reach the satellite and lever. Pull the lever to move the satellite out of the way. Once this is done, you should be able to see the black box (pictured below). Interact with it to unlock the achievement.
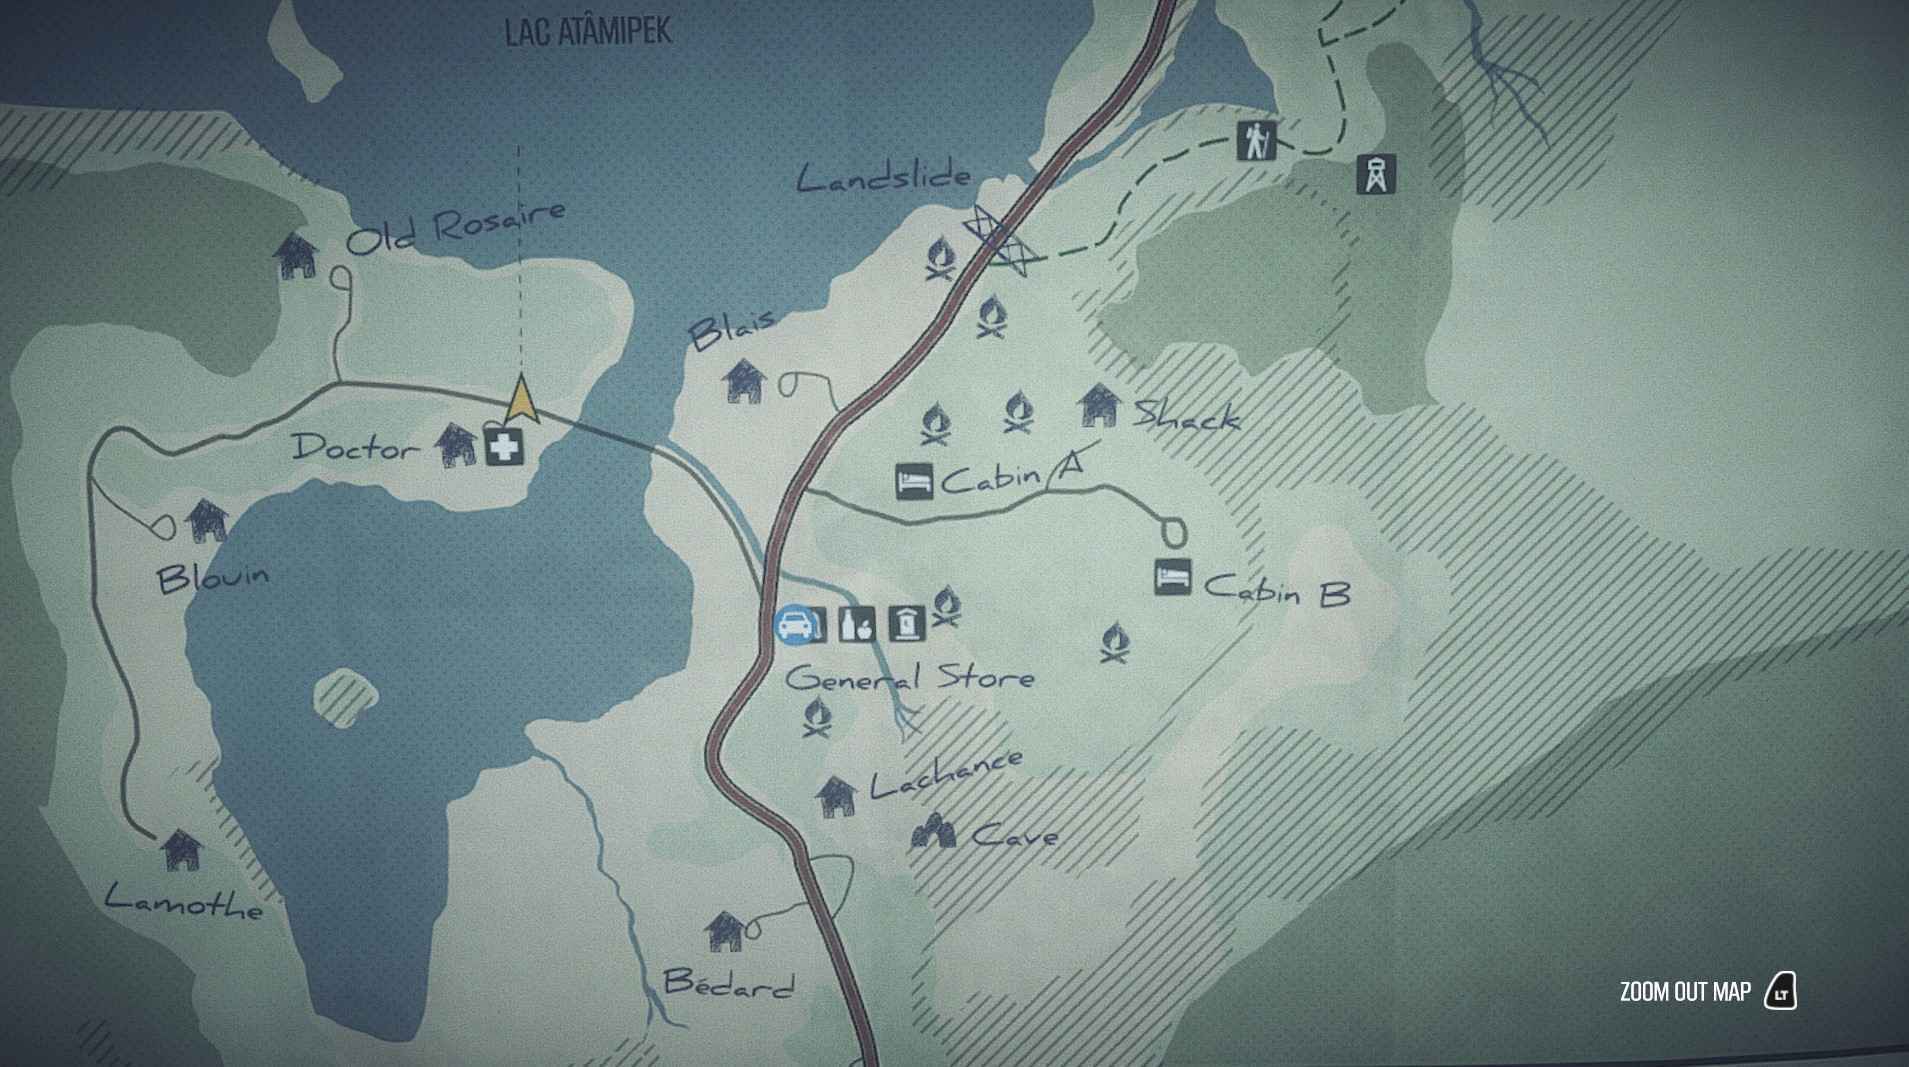
Carl the Explorer – Find every house and cabin in the village.
- This one is simple: go to each of the houses and cabins in town. House locations will be marked on your map after reading “Customer Credit” in the General Store. Cabins can be found along the road through the Woodlots. Any buildings beyond the Ice Wall do not count towards this achievement.
Chess Master – End the unfinished chess games.
- There are three chessboards scattered throughout the game. Interact with all of them to unlock this achievement. This will trigger the pieces to move and commentary from the narrator. The chessboards are located at Roy’s House, Cabin A, and the North Cabin (beyond the Ice Wall).
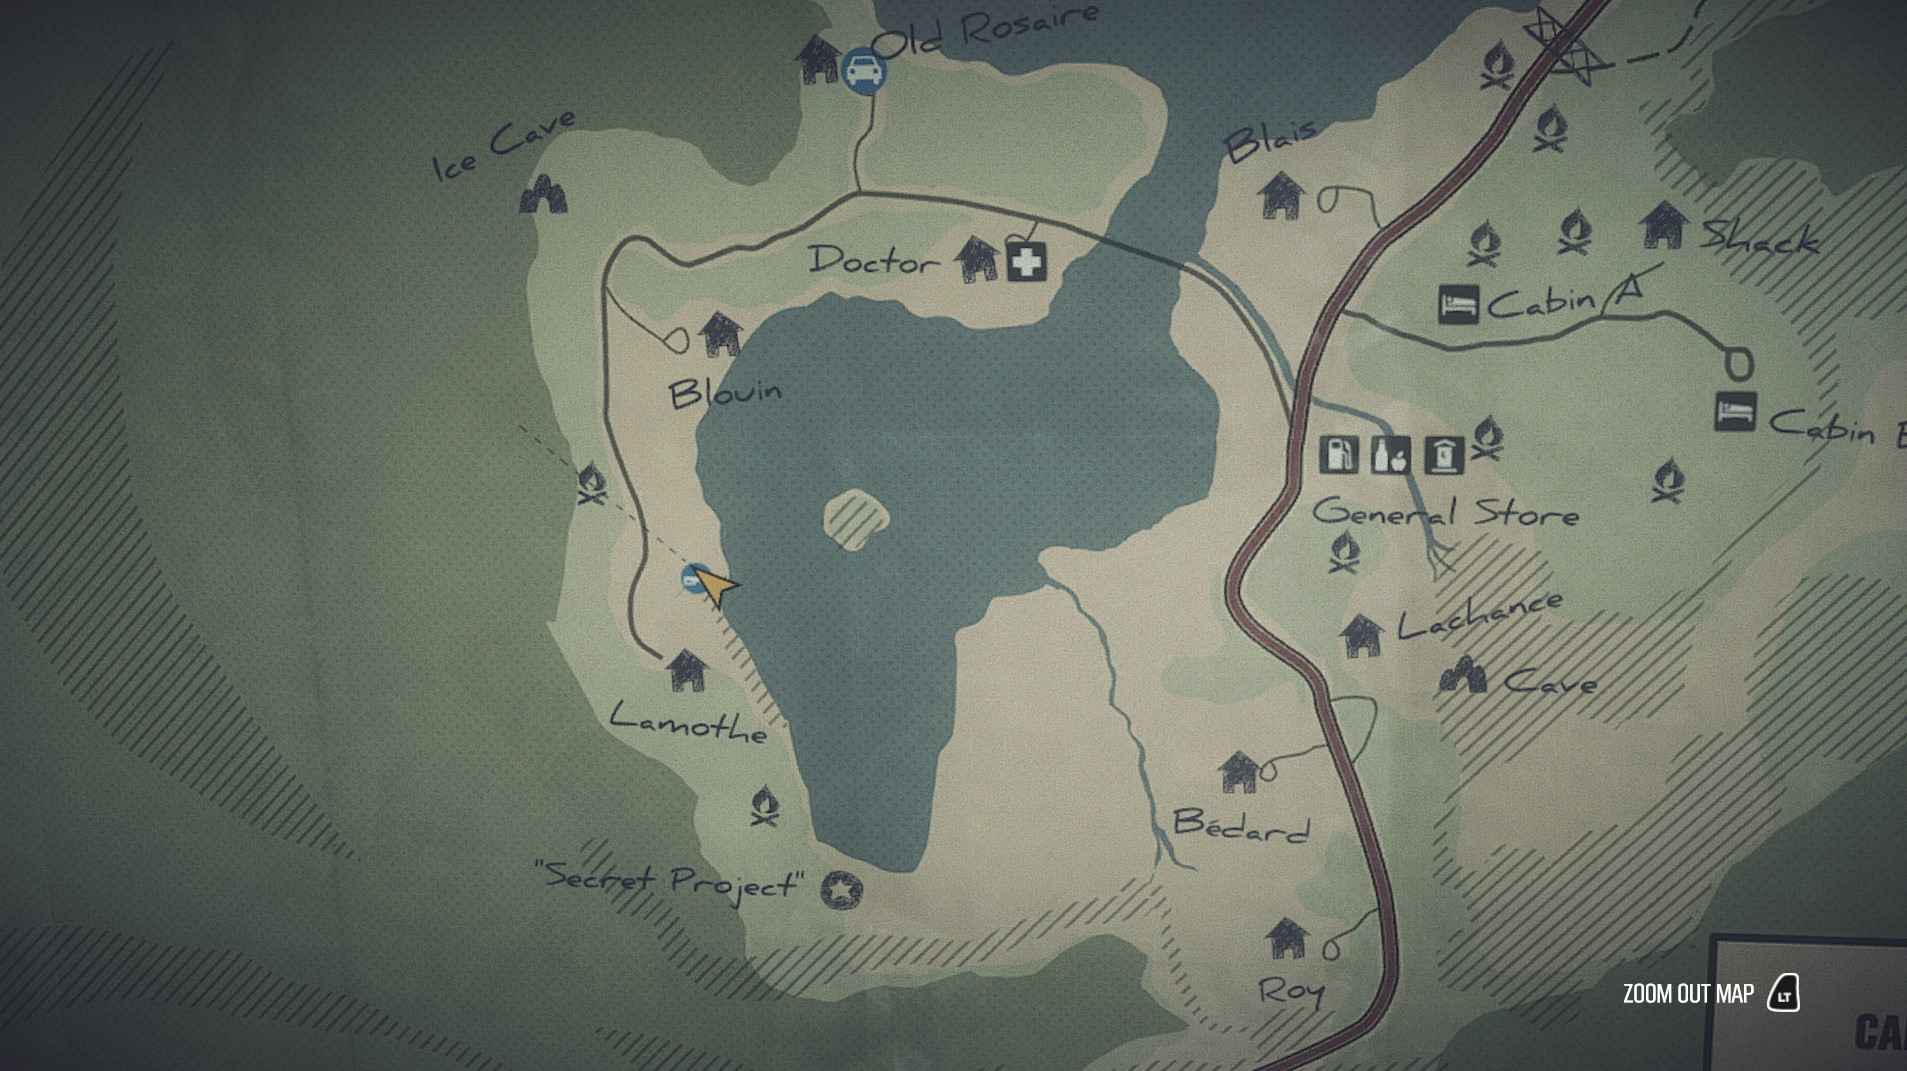
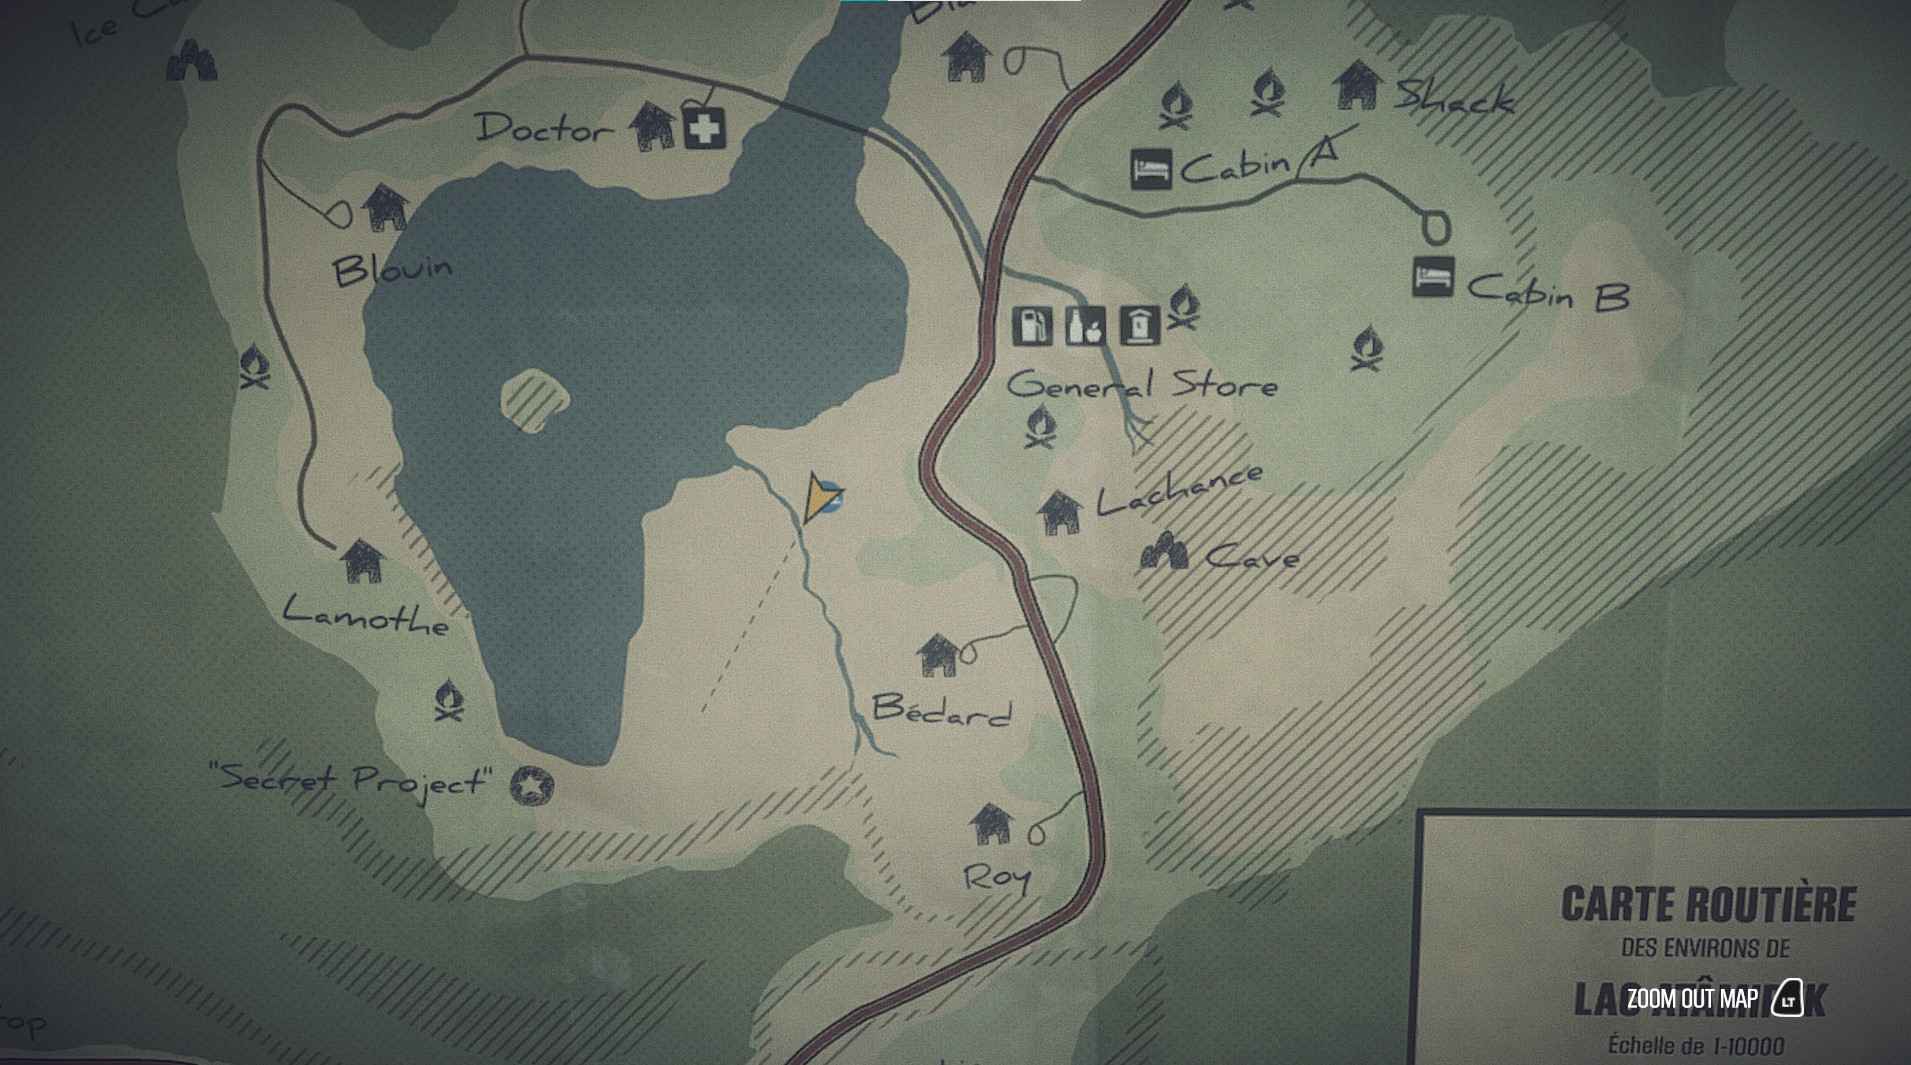
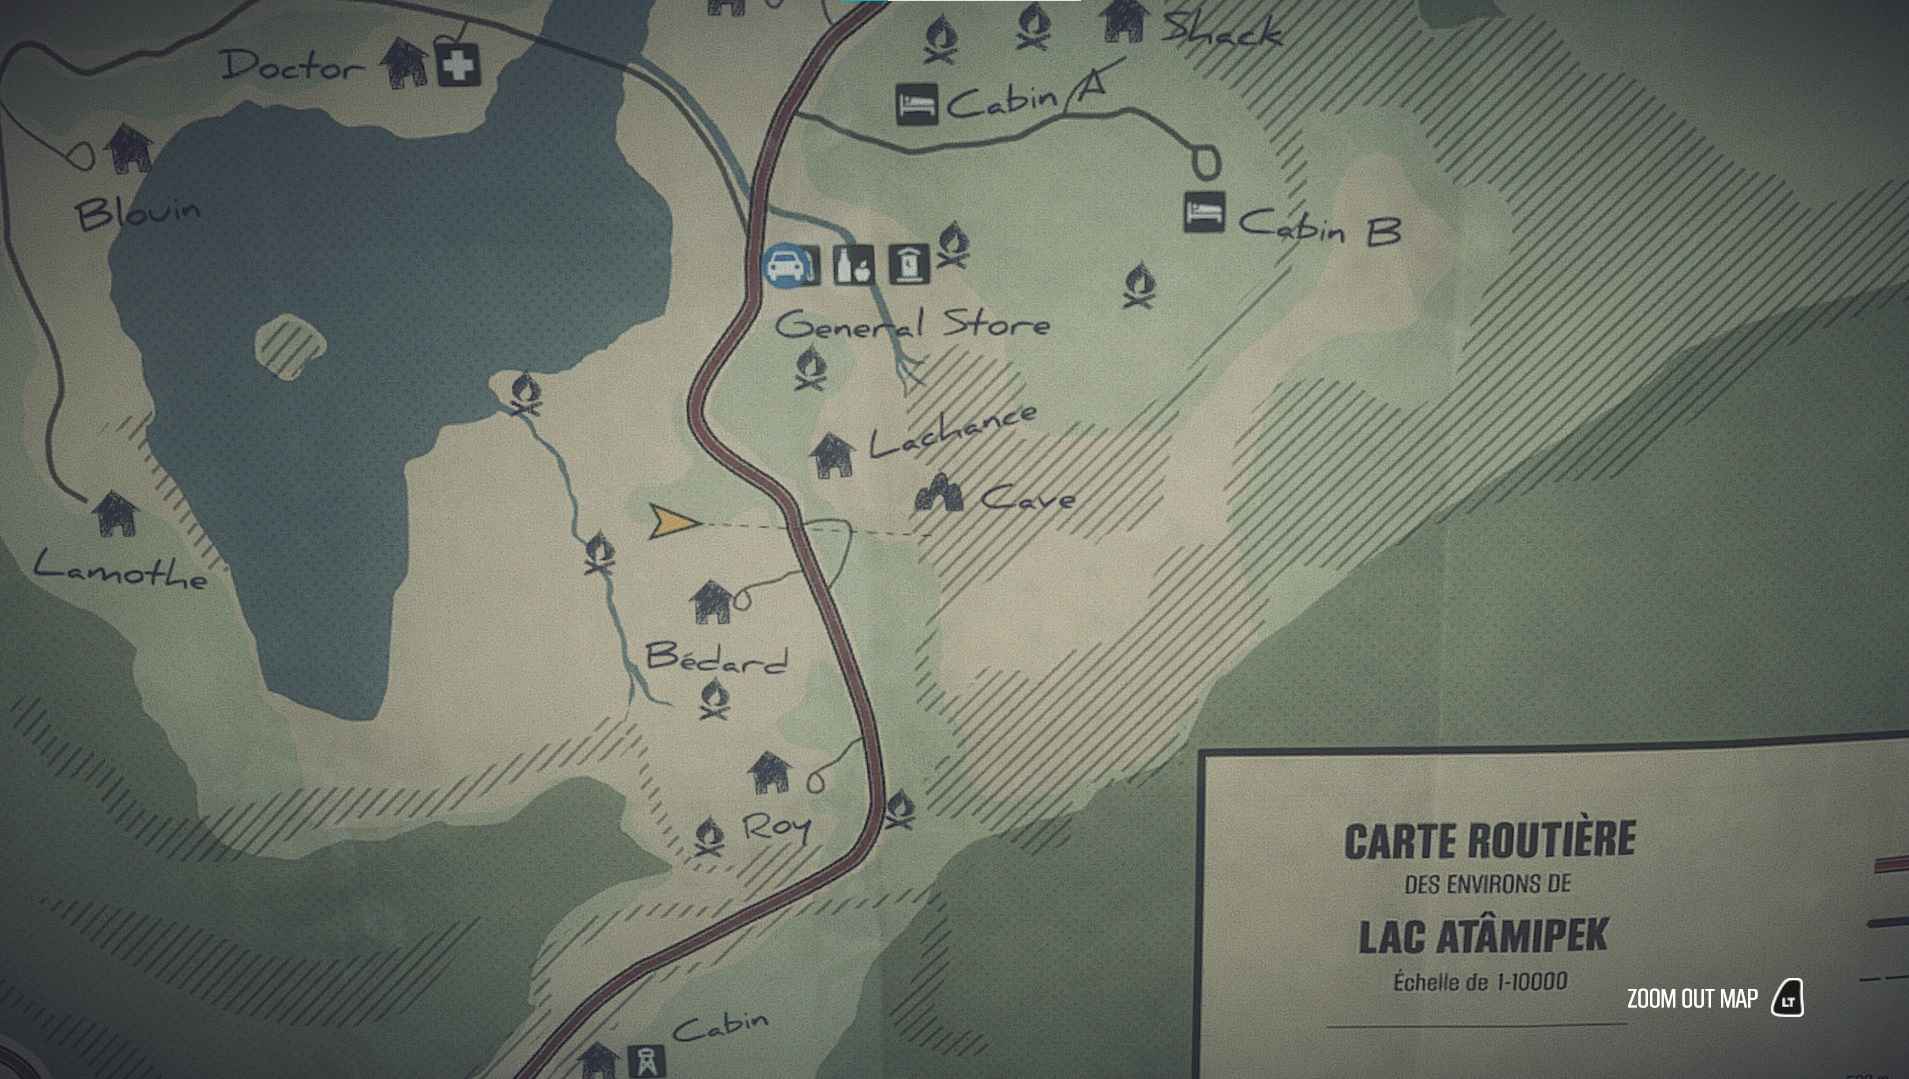
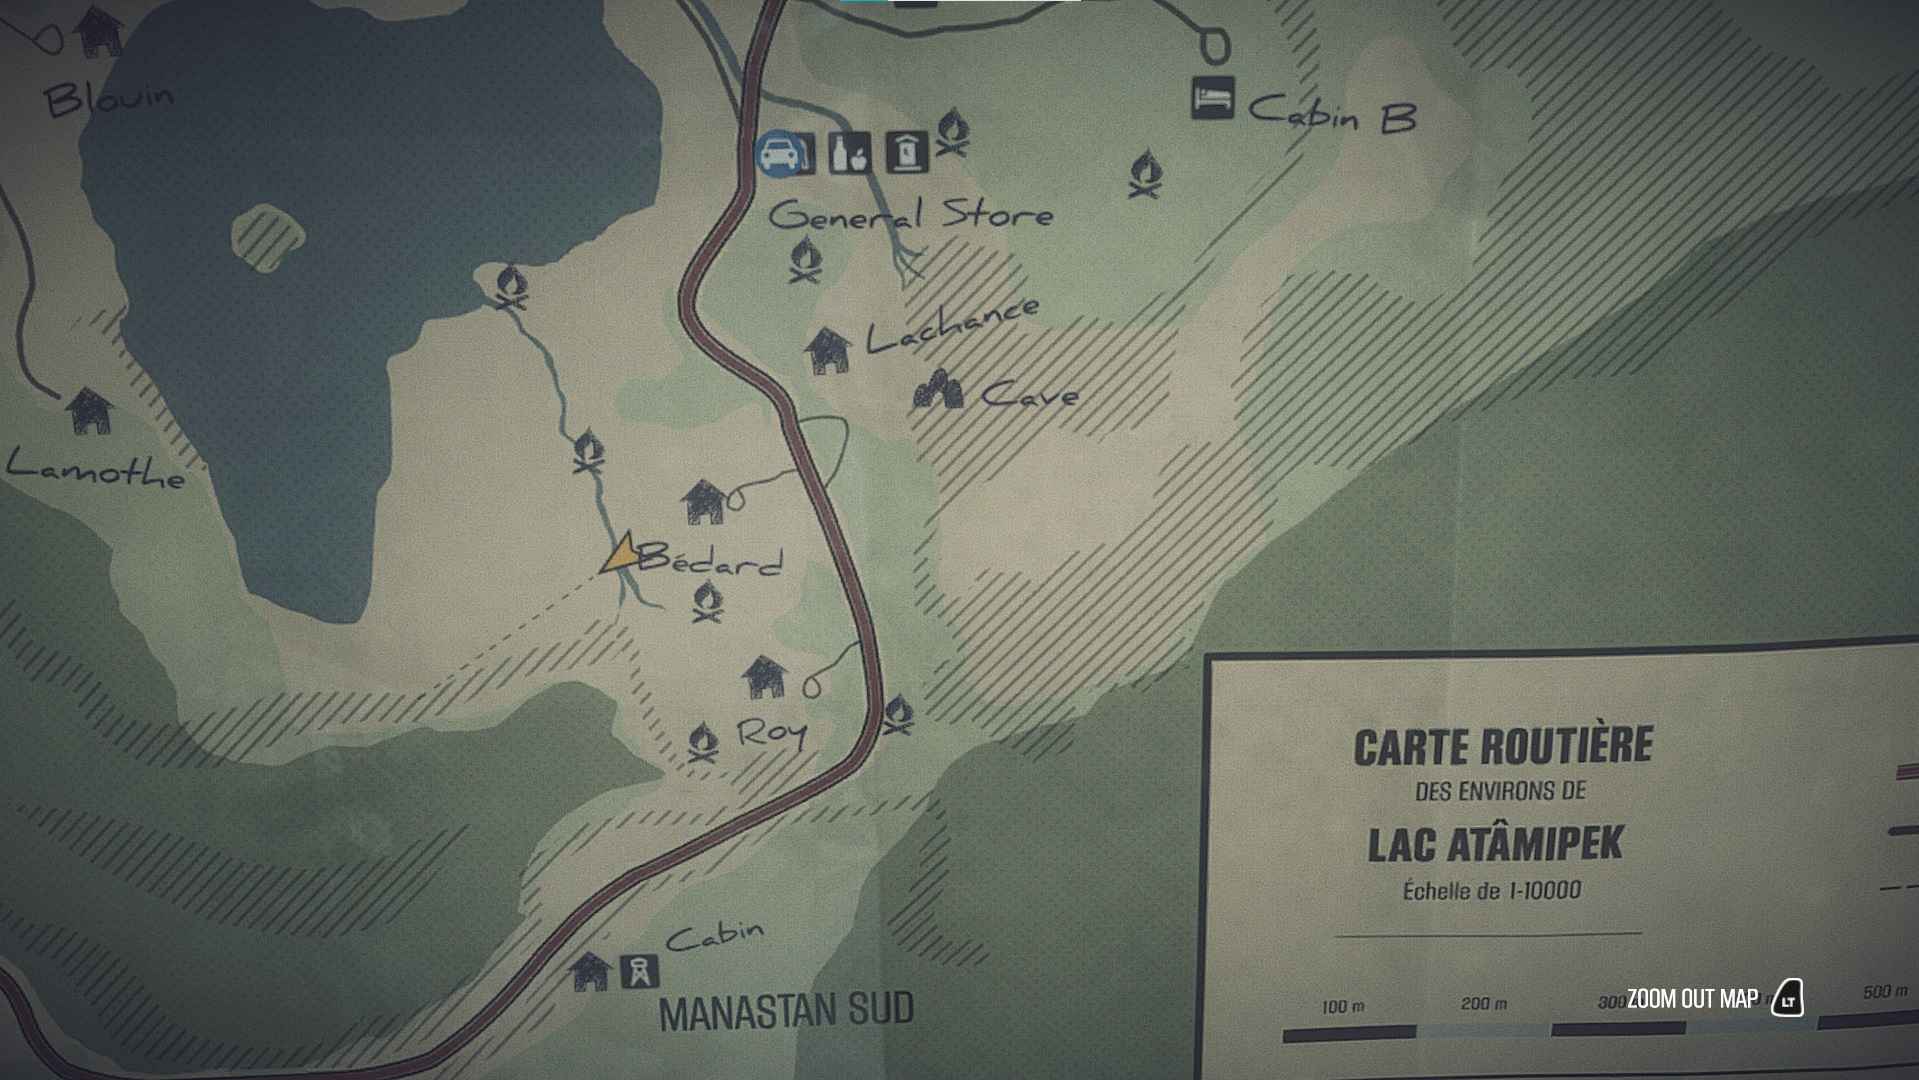
Marshmallows – Find all campfires in the wild.
- To unlock this achievement, you need to find all the campfires in the game. You aren’t required to light them all. Below are the locations of all campfires in the game:
Bulletproof – Shoot the Wendigo with the rifle.
- Before triggering the final sequence of the game, make sure you have a gun in your inventory. Once the wendigo begins to approach, try to shoot it. The gun will have no effect, but the achievement will unlock.
Vegan – Throw a steak at a strange creature.
- Once you trigger the final sequence of the game, select a steak from your inventory. Throw it at the wendigo as you did with the wolves. It won’t stop the wendigo, but the achievement should unlock. Make sure to conserve a steak from earlier in the game, as you won’t find any near the wendigo’s location.
Onwards on foot! – Complete the game without using vehicles (past the Store).
- Once you park your truck at the General Store, you cannot use any more vehicles for the remainder of the game. You can still get the Mechanic achievement in the same runthrough, but make sure not to hop on the snowmobile once it’s fixed. You can still use the trunks for storage. I highly recommend unlocking this achievement in a separate runthrough from Treasure Hunter, Talismaniac, Prohibition, and Pink Lungs. The first two require a lot of travel, and it’s difficult to play a long game and maintain a healthy stress level without drinking or smoking.
Firearms Registry – Complete the game without firing any firearms shot.
- As the description says, do not use any firearms during the game. You can still unlock Revolution and A star in the night (flare gun does not affect this achievement) in the same runthrough, but you cannot unlock Bulletproof . You can still use melee weapons like the hatchet to defend yourself in the final sequence.
Pink lungs – Complete the game without smoking any cigarettes.
- As the description says. Feel free to discard any cigarettes you accidentally pick up. You can use painkillers and drinks (unless you’re also going for Prohibition) to maintain a healthy stress level.
Prohibition – Complete the game without drinking any alcohol.
- While the description of this achievement only mentions alcohol, YOU MUST ALSO AVOID DRINKING ANY WATER. If you pick up any beers, feel free to throw them away. You can do the same for empty bottles, but make sure to keep one of hand to make some Caribou for Old Rosaire. You can use painkillers and cigarettes (unless you’re also going for Pink Lungs) to maintain a healthy stress level.
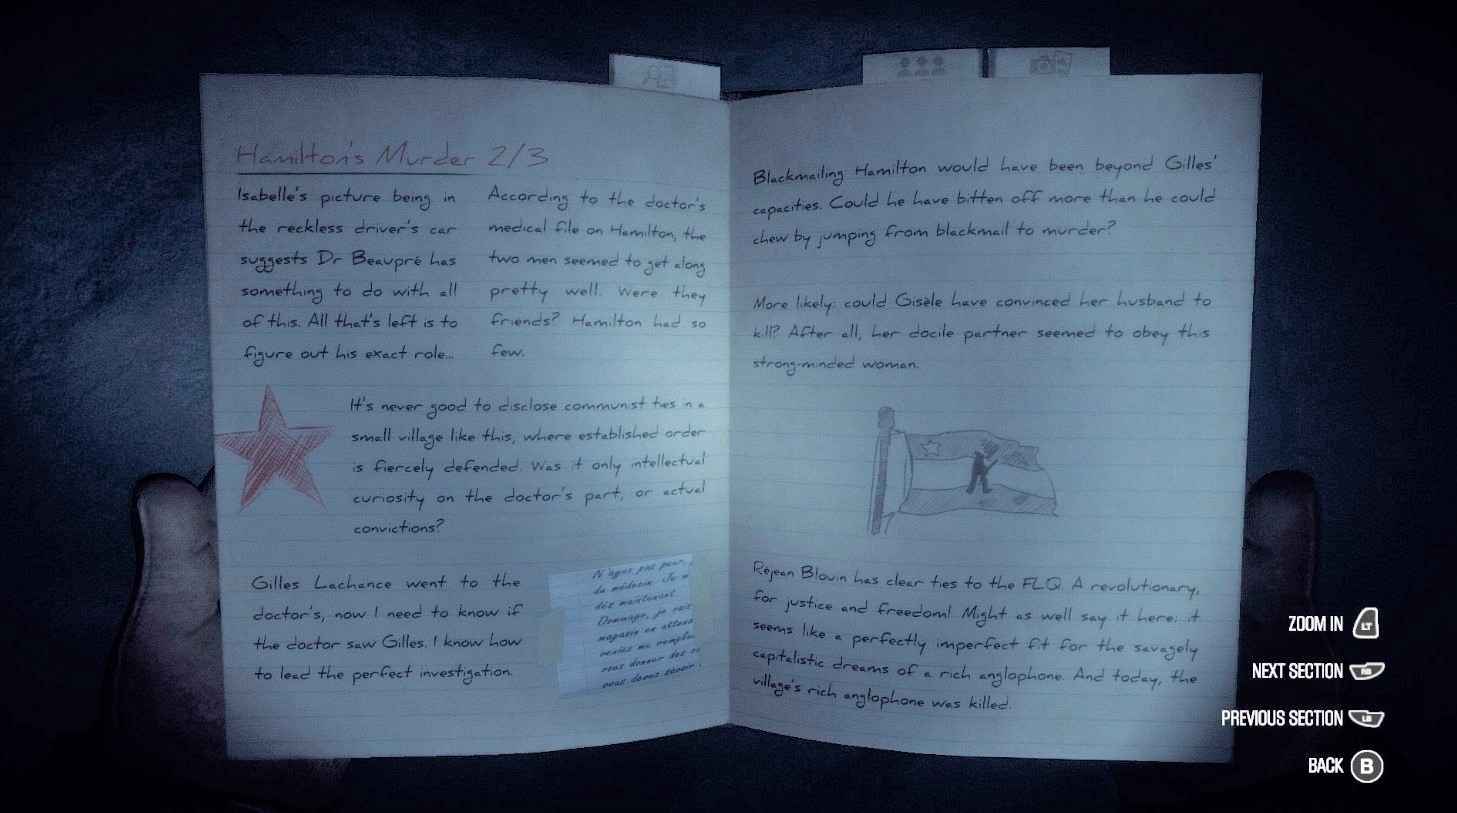
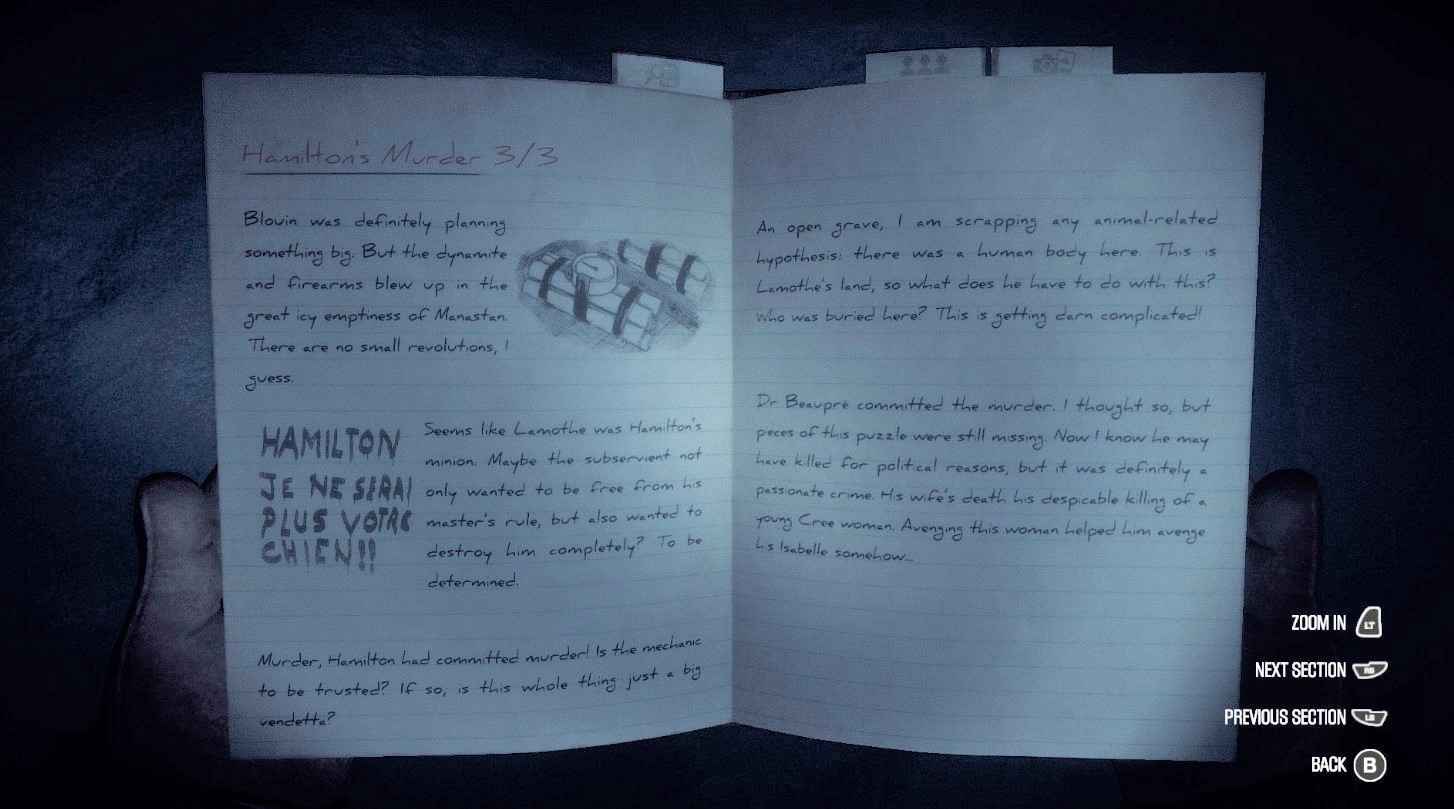
Carl Faubert, Private Investigator – Find all evidence tied to Halimton’s death.
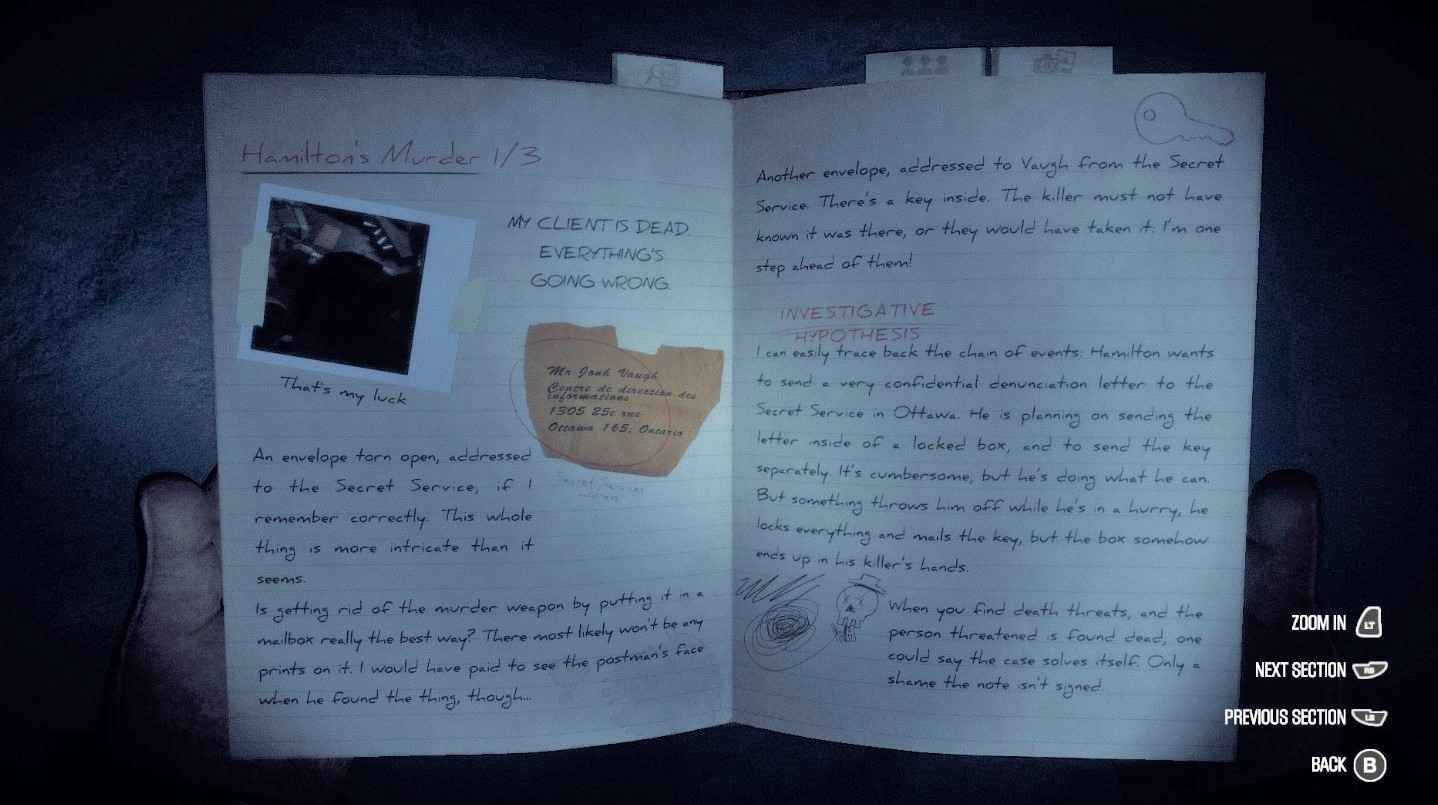
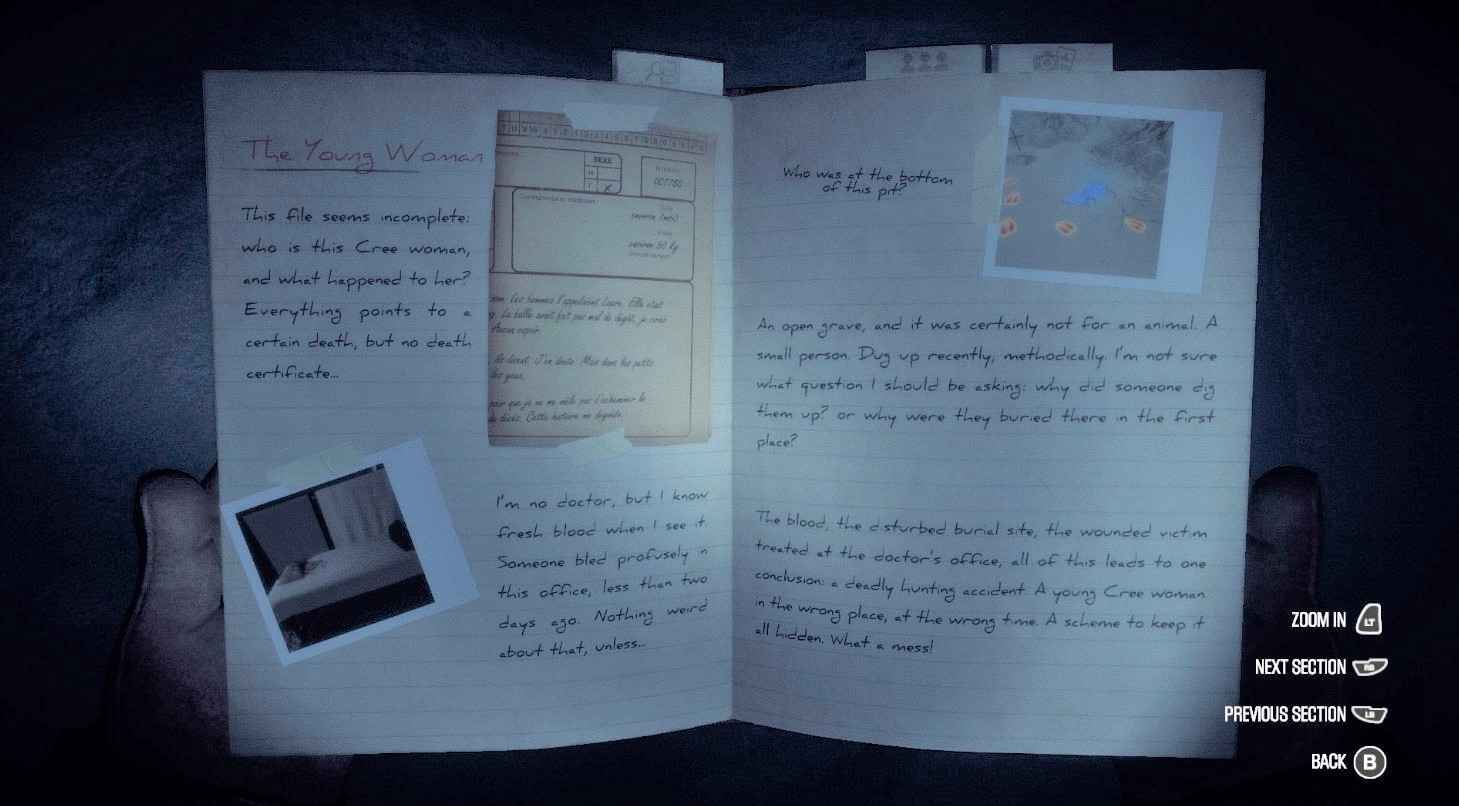
- This achievement requires you to find all evidence related to Hamilton’s death. This means having no blanks spots on the journal pages dedicated to the murder. If you are going after the Reader and Paparazzi achievements, you should receive this one as well. Below are screenshots of the completed “Hamilton’s Murder” section of the journal. The bottom section of the final page of “Hamilton’s Murder” will remain blank until the end sequence. Luckily, this means it’s impossible to miss.

Jeweller – Find three talismans.
Talismaniac! – Find all talismans.
- Both of these achievements require finding various talismans that are hidden throughout the game. You will need the crowbar or wired magnet to reach them. The crowbar is in the General Store garage. The wired magnet will require a magnet (found out back of the Lachance House) and can be assembled at either the Bedard’s House, Blais’ House, or Doctor’s Clinic. Below is a list of all talisman locations and the item required to obtain them.
Talisman 1
- Requires: Wired Magnet
Talisman 2
- Requires: Crowbar
Talisman 3
- Requires: Crowbar
Talisman 4
- Requires: Wired Magnet

Talisman 5
- Requires: Wired Magnet
Talisman 6
- Requires: Wired Magnet
Mechanic – Repair the snowmobile.
- You can technically get this achievement before nightfall by rushing past Lamothe before the vision is triggered. This achievement will require you to find all pieces of the snowmobile and reassemble them. You will also need to fill up the gas tank. Simply take an empty gas can to the fill station behind Lamothe’s garage, fill it, then return to the snowmobile to fill up the tank. Inside Lamothe’s house, you will find the document “Parts Manual.” This will give you clues as to the locations of the missing snowmobile pieces and allow you to reassemble it. The missing pieces are found at the following locations:
- Bench – On the chair in the corner of Lamothe’s property, underneath the colorful umbrella
- Handlebars – On a lower shelf inside Lamothe’s garage
- Headlight – On the spaceship inside Lamothe’s garage
- Skis – One is under the hood of the broken down car in front of Lamothe’s garage; the other is on the top shelf outside Lamothe’s front door
- Spark plug – Lamothe’s Mailbox
- Track – On a railing leaning against the wooden structure behind the snowmobile
Once you have all the pieces, go to the snowmobile and walk around it, reattaching the missing pieces. The last thing you will need is the key.
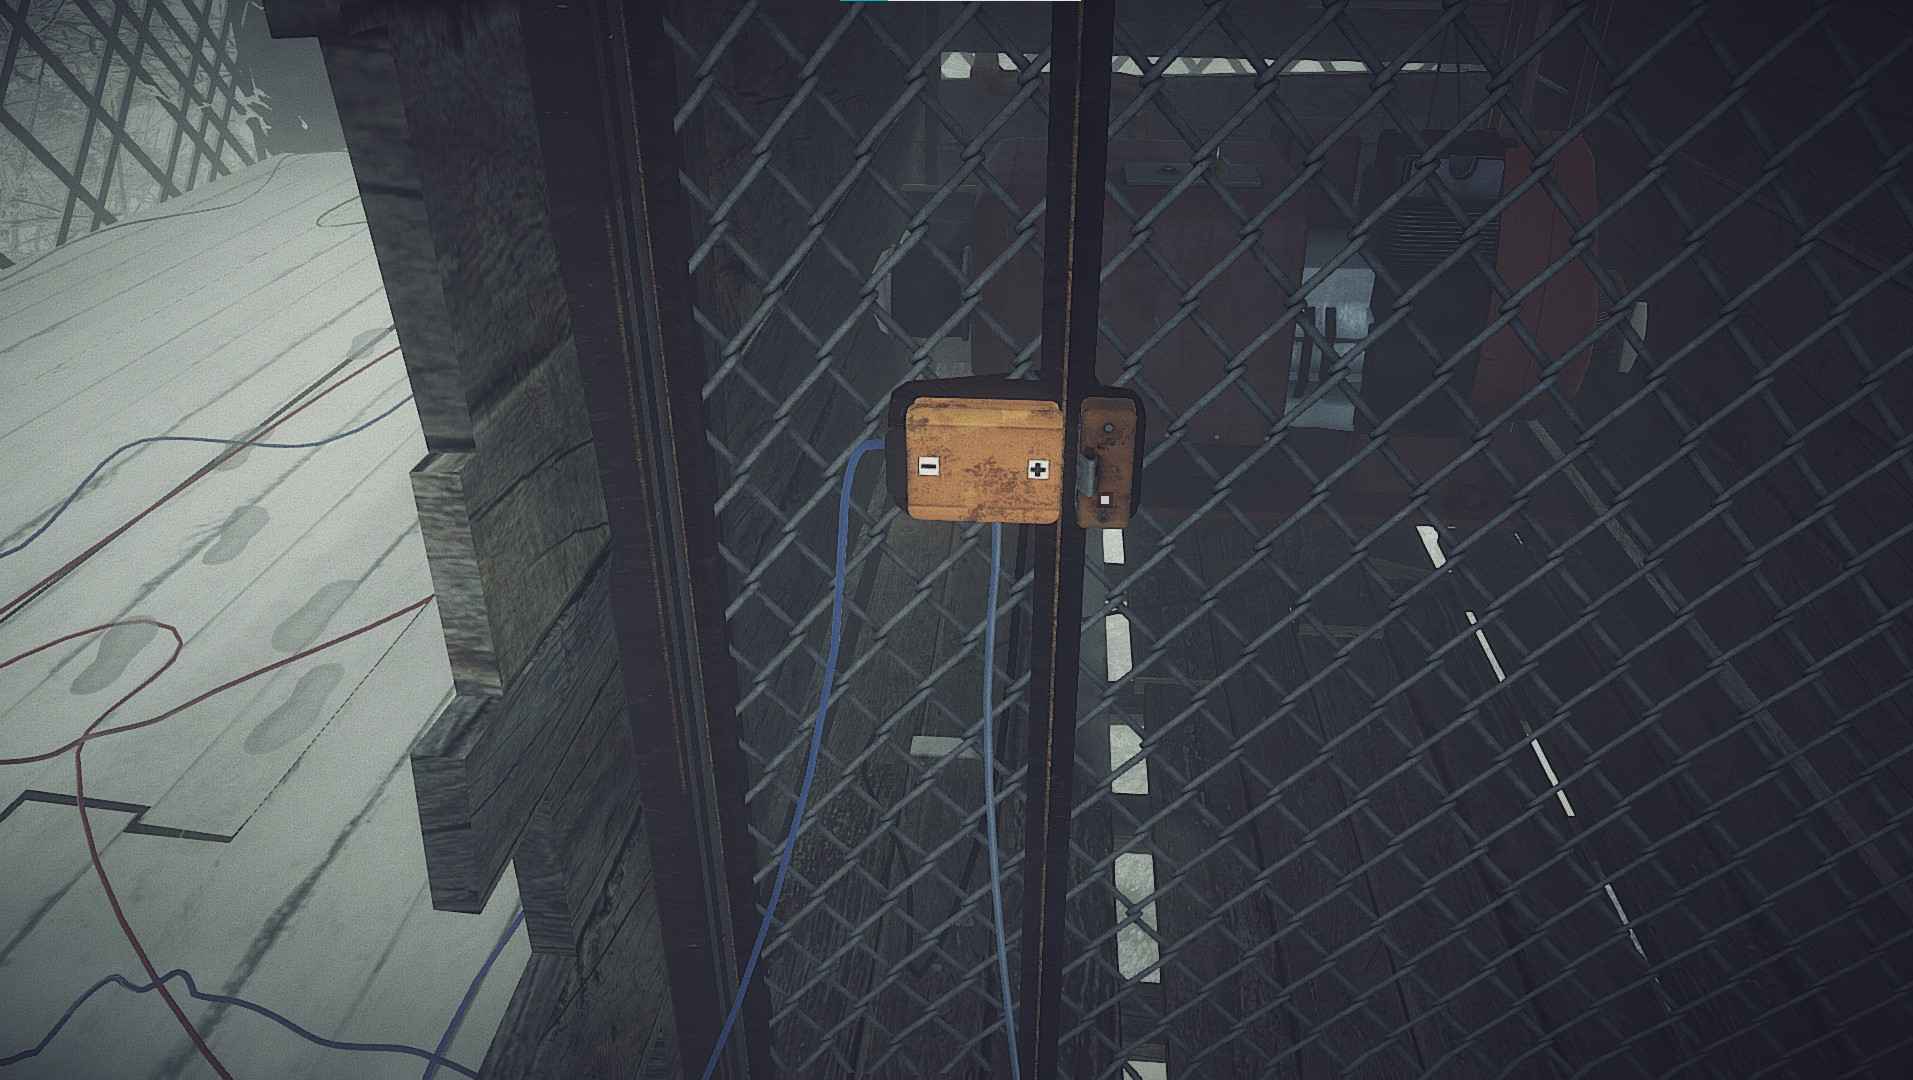
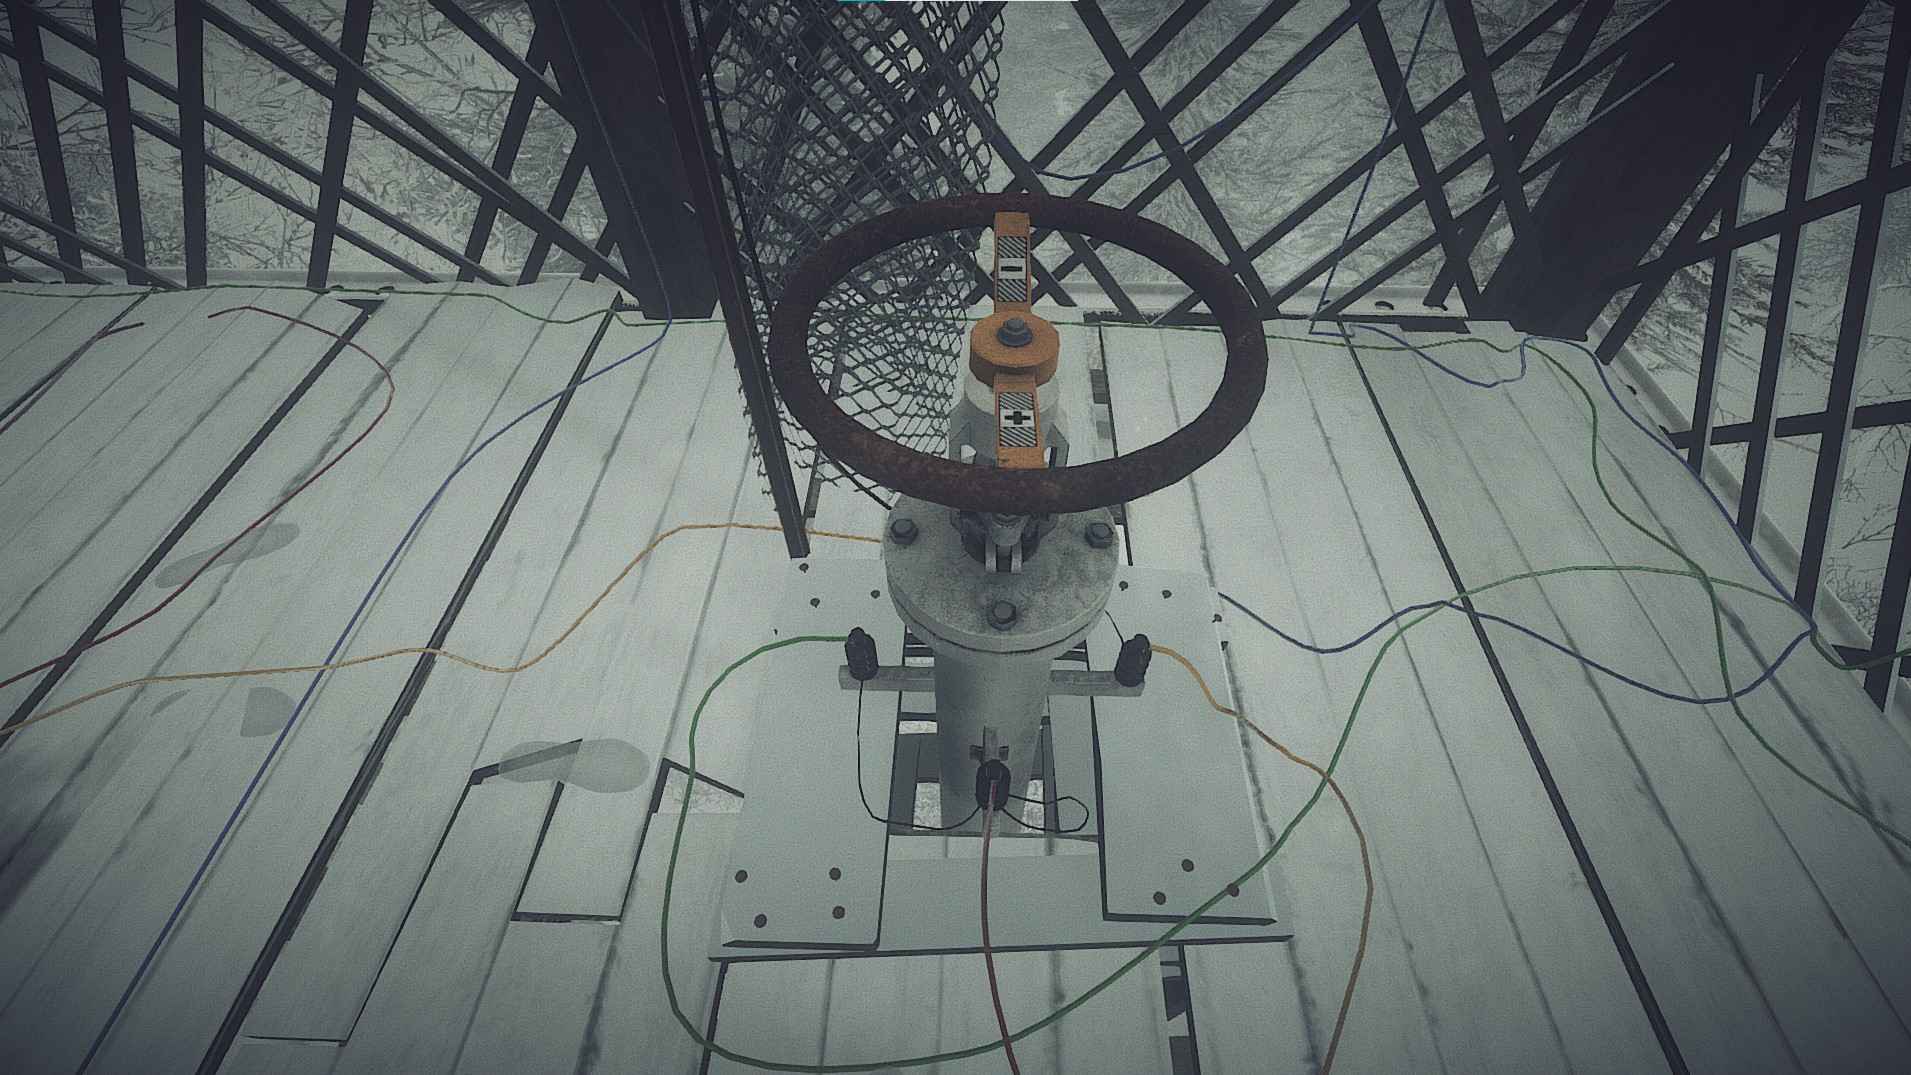
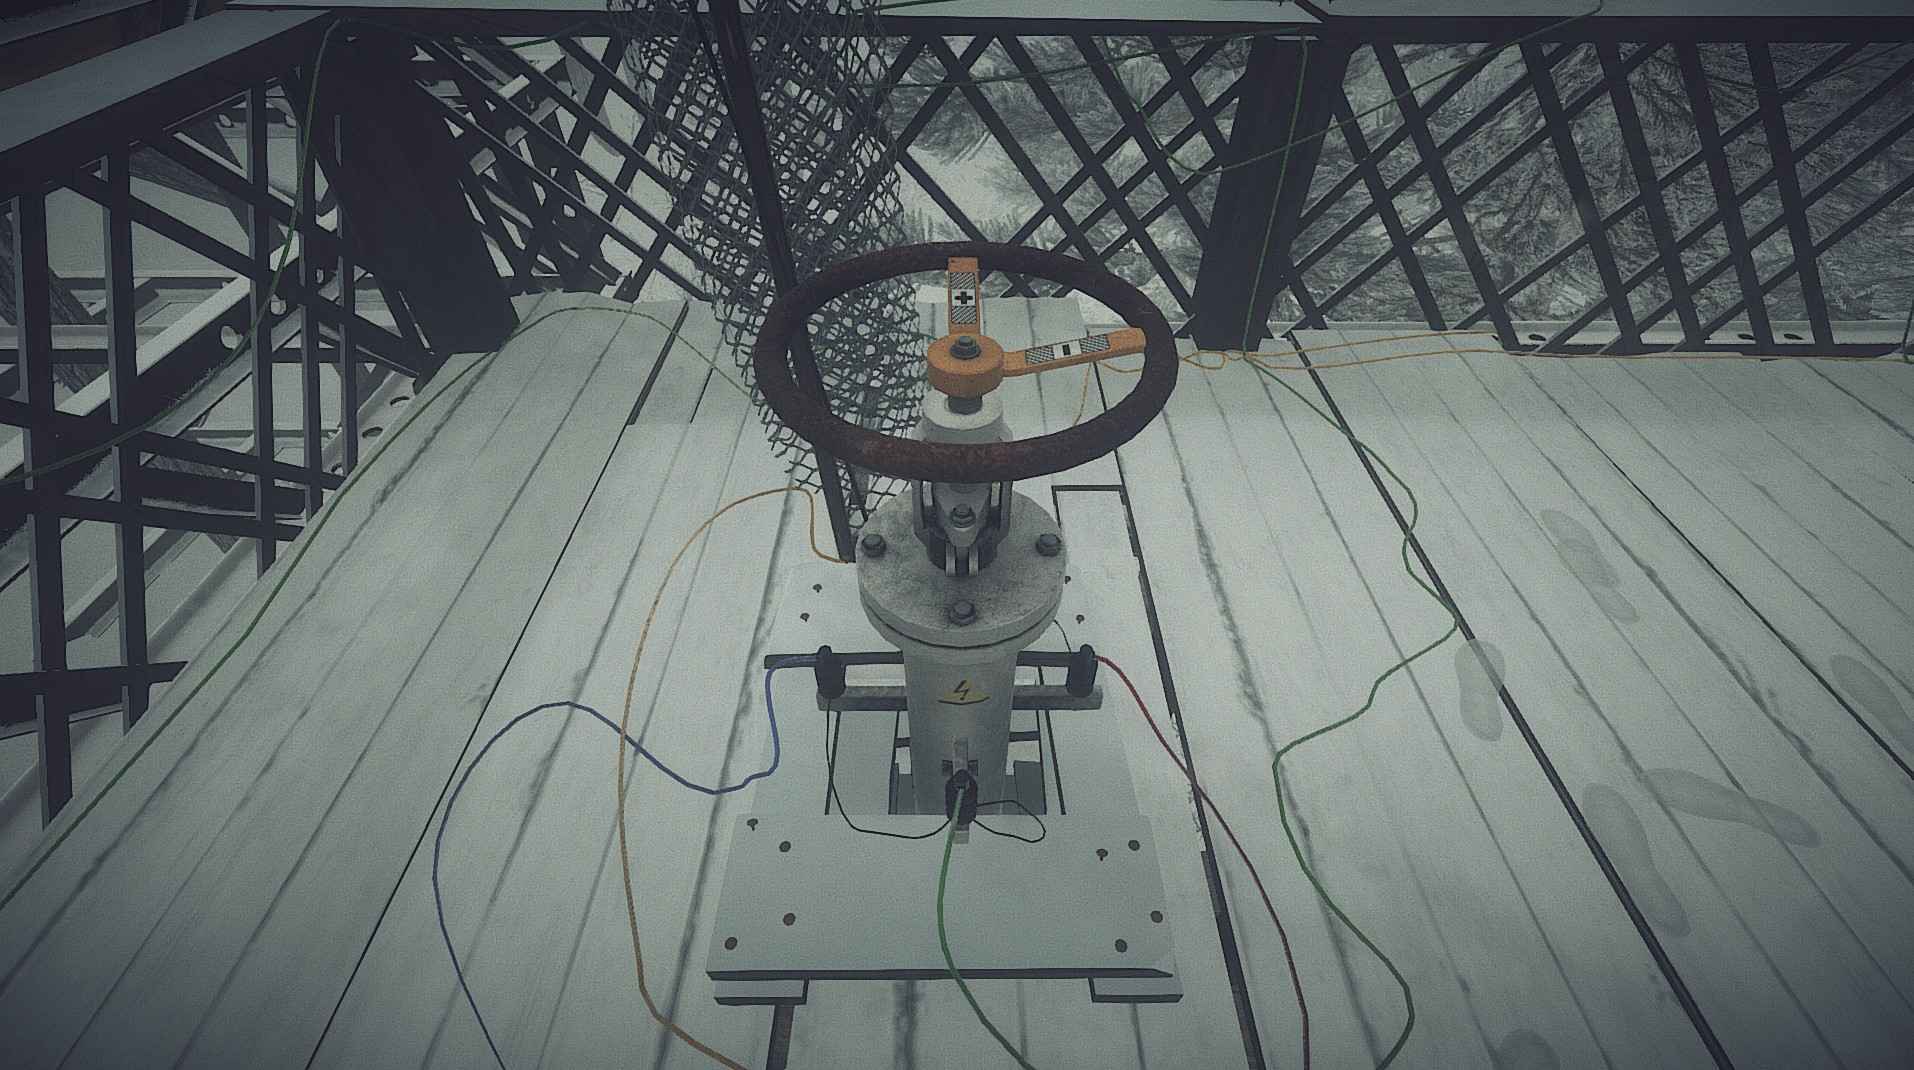
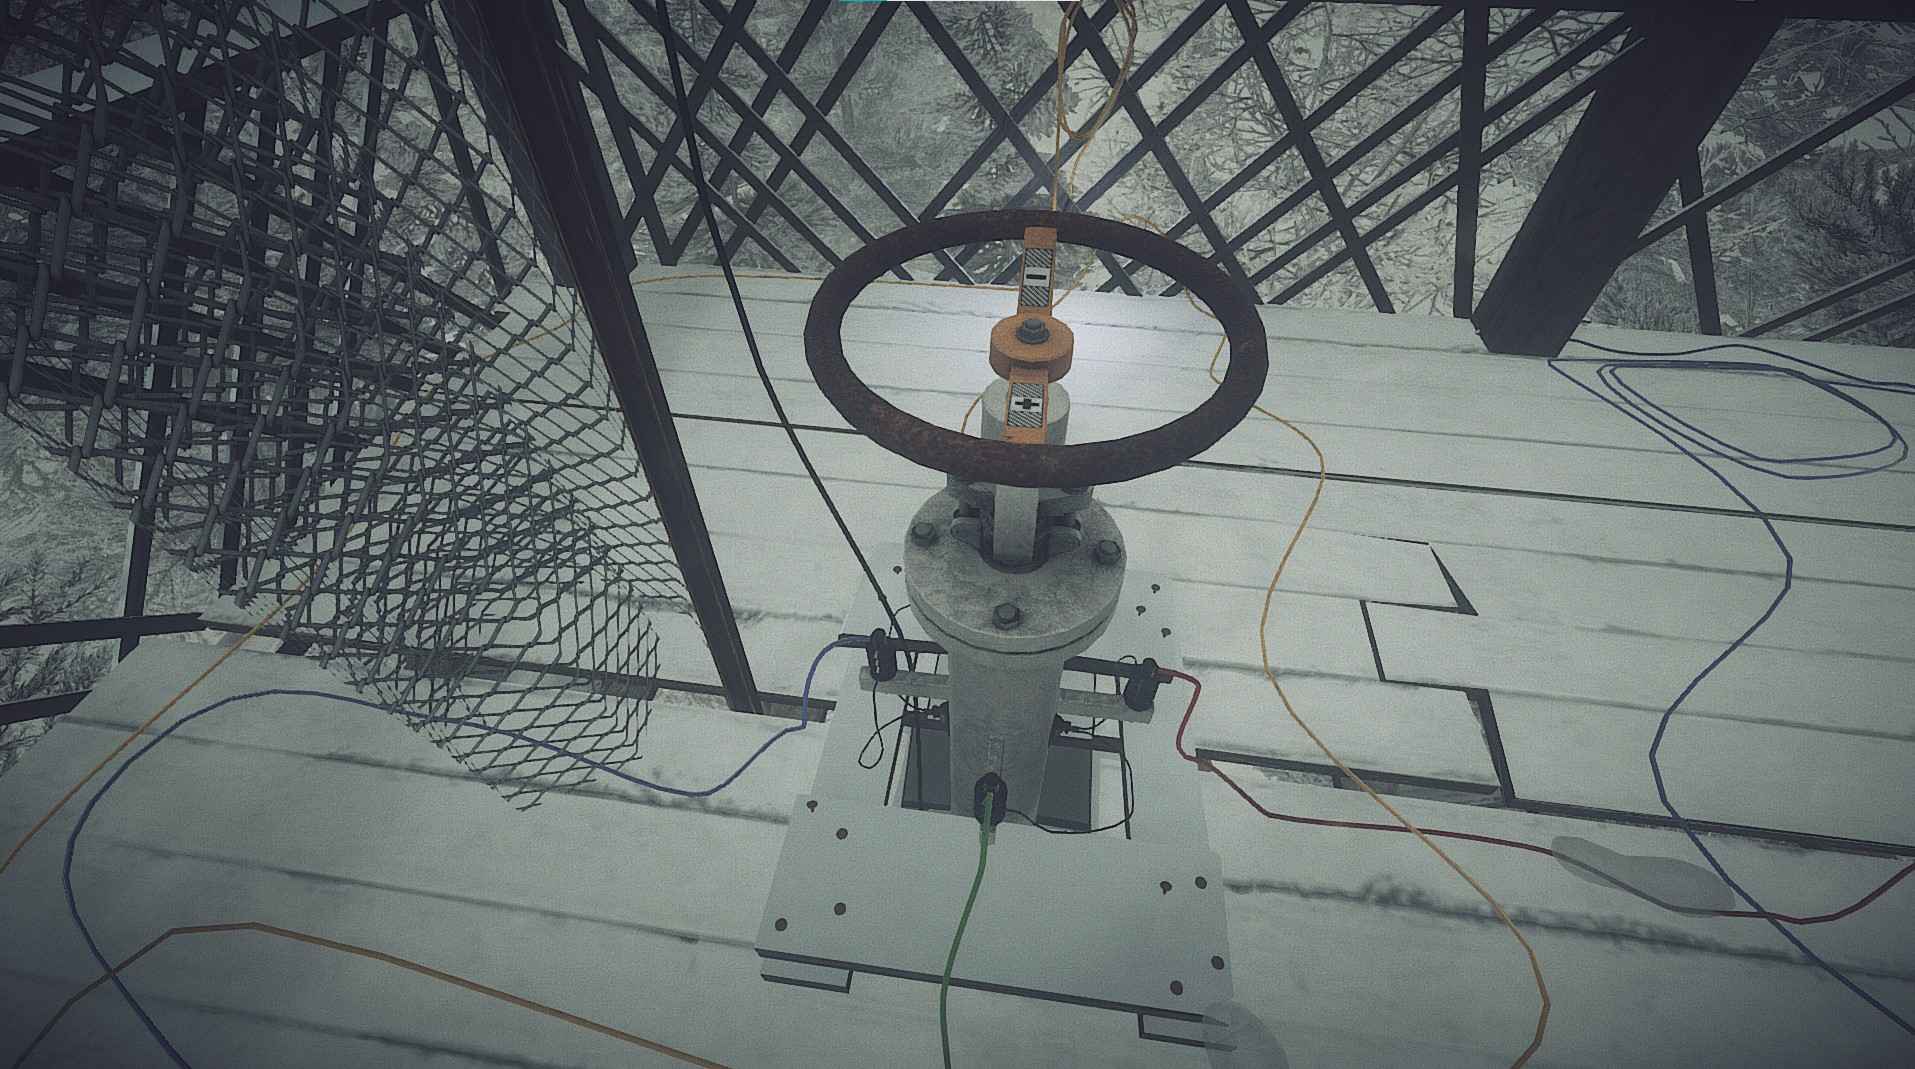
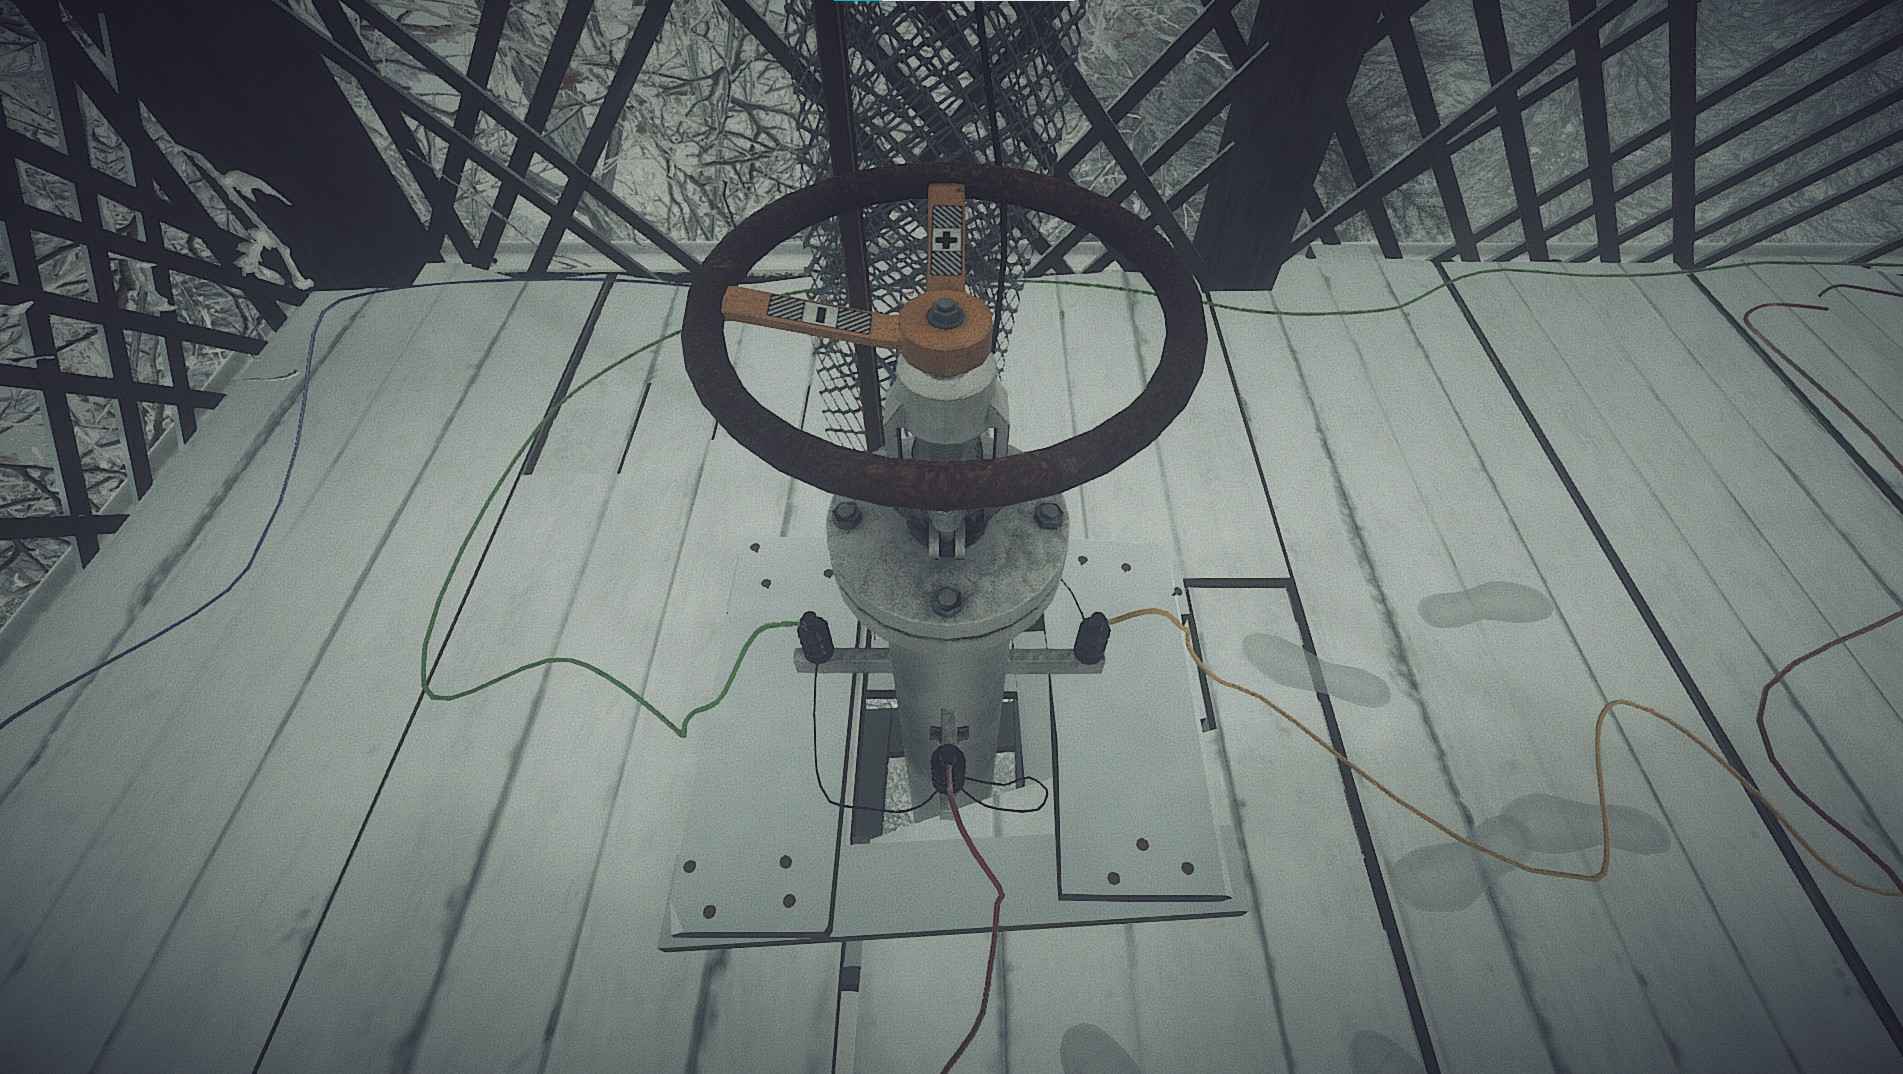
The key is located at Lamothe’s Secret Hideout, locked inside the generator building. You will need to solve a puzzle to get it. On the door, you will see a box with a + and – sign on it, with two wires coming off it. Follow the + wire to one of the wheels. Twist the wheel so that the – line on the wheel matches the + wire. Look at which wire matches up to the + line on the wheel, and follow it the next wheel. Continue matching the wheels and wires (+ to -) until a noise alerts you to the door unlocking.
See the screenshots below for the answer to the puzzle.
Photographer – Take a picture needed for the investigation.
Paparazzi – Take all pictures needed for the investigation.
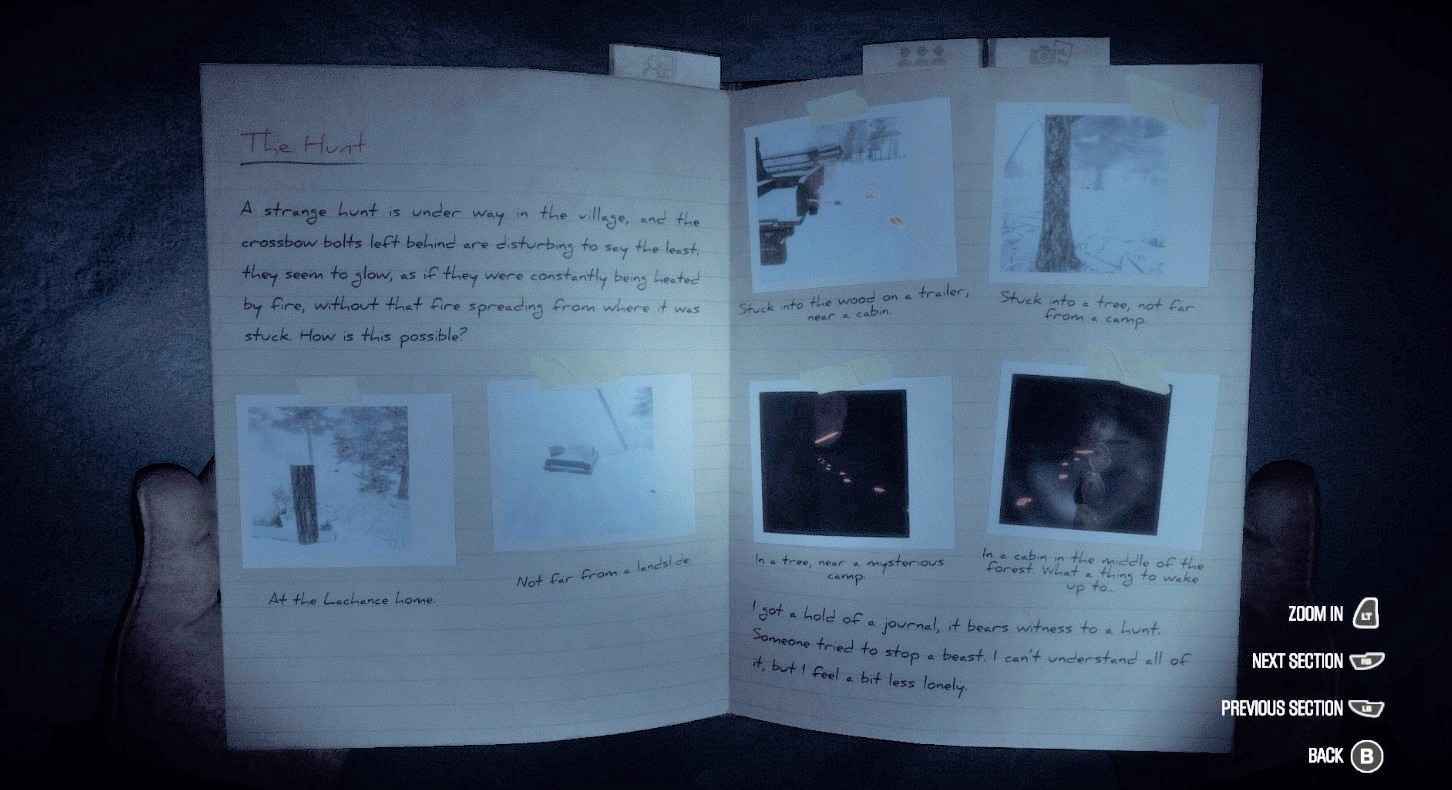
- Paparazzi requires you to collect all photos needed for the investigation, while Photographer only requires one. There are 15 photos total needed, 6 of which will also unlock The Hunt (see below). The game will often prompt you to take out your camera when viewing key evidence, but when in doubt, take a shot.
Here are screenshots of the photos you need:
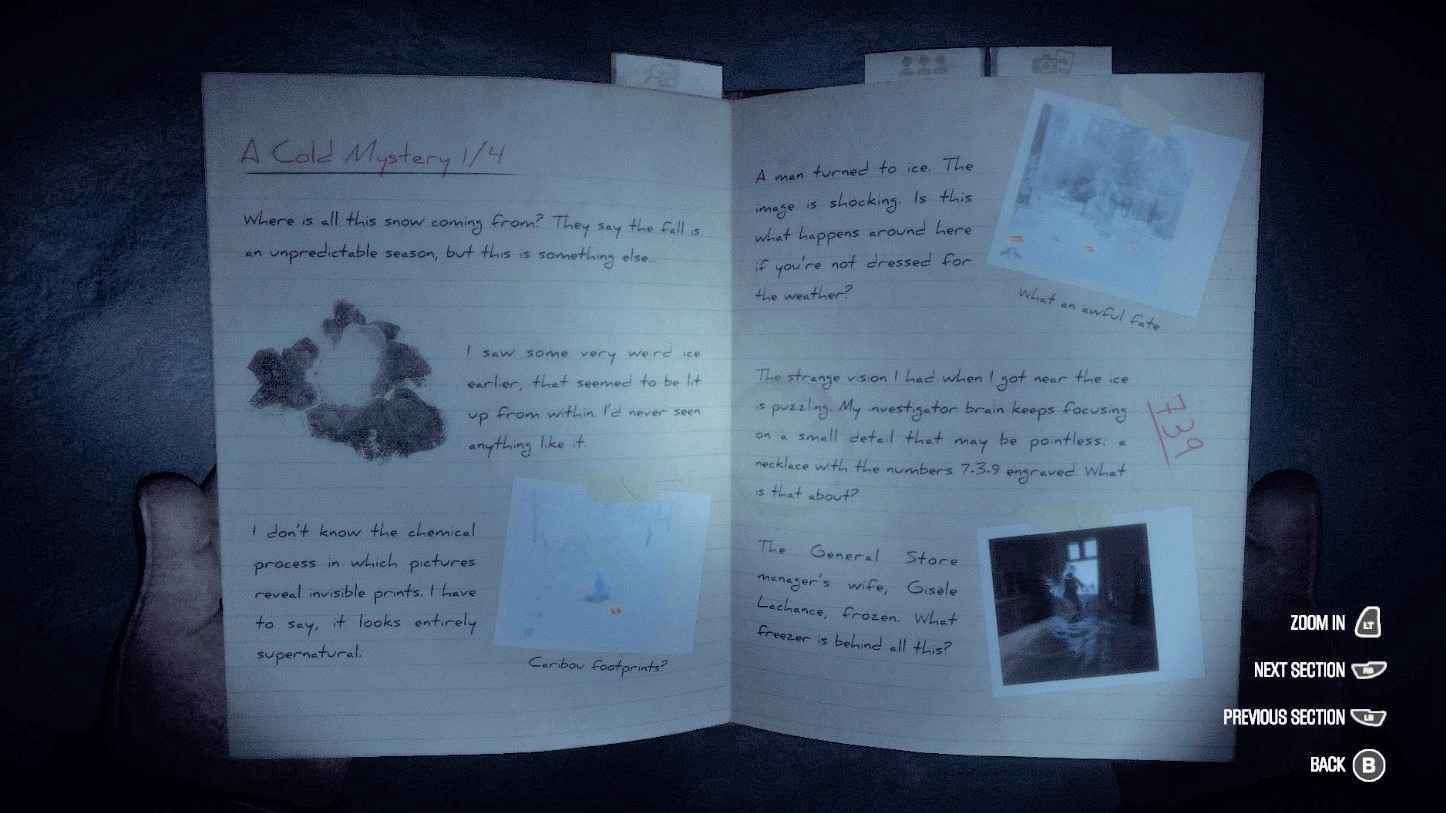
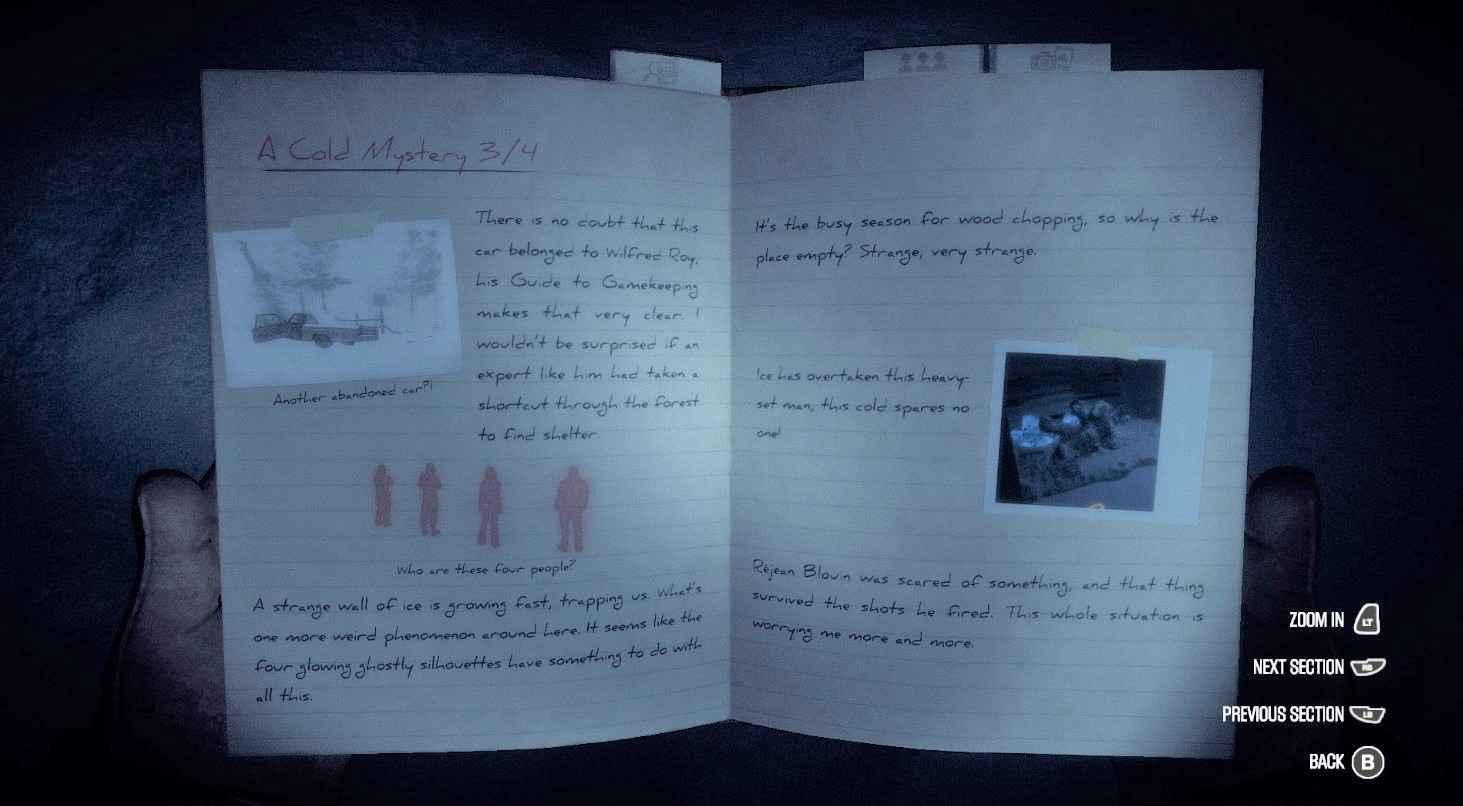
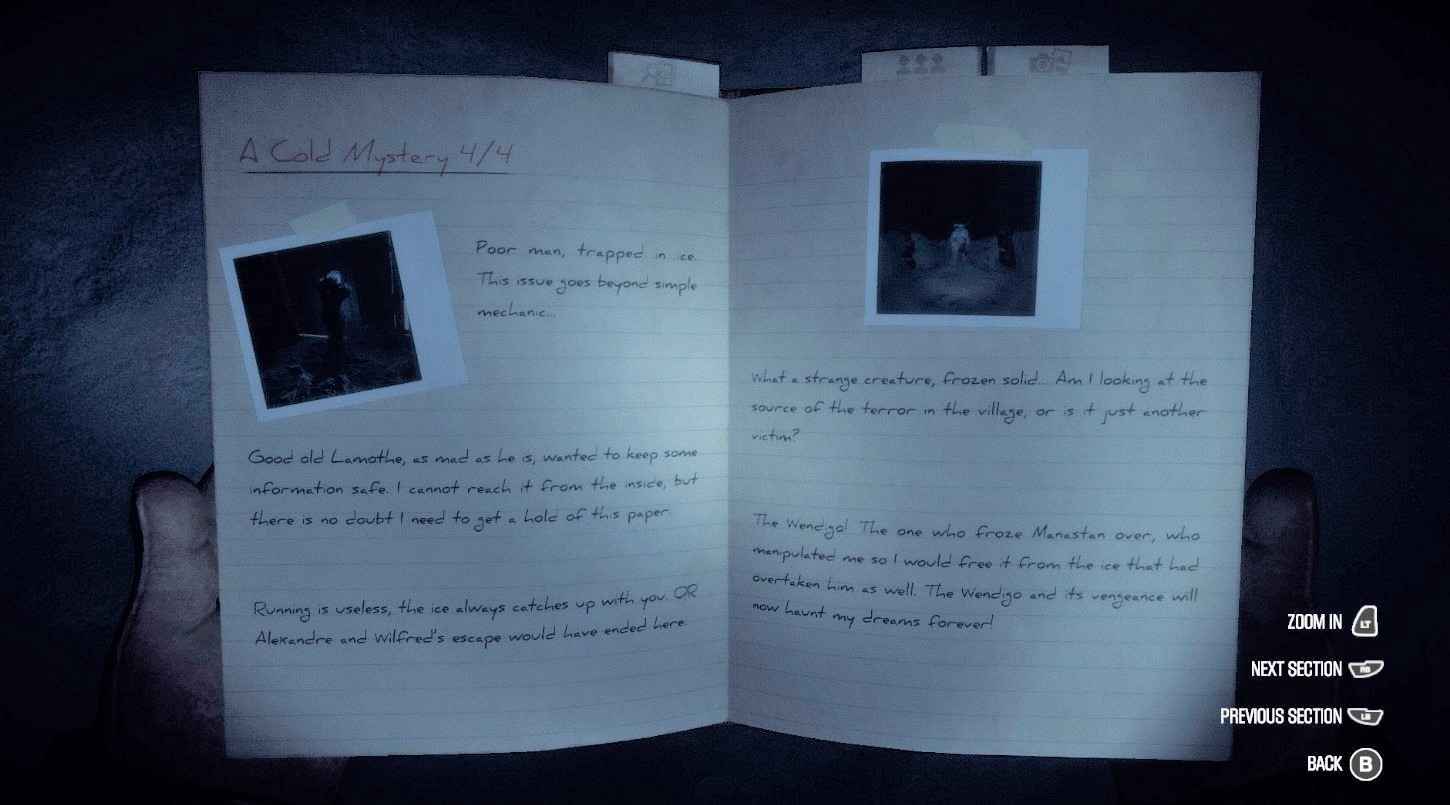
A Cold Mystery
Hamilton’s Murder
The Young Woman
The Hunt – Find all crossbow bolts.
Reader – Find all documents.
- Reader is earned by finding (and reading) all documents in the game. Make sure that you flip to every page of a multi-page document, otherwise, it won’t count towards the achievement. I also recommend getting as many documents as possible before nightfall, so it’s easier to see. Below is a list of all documents by location.
Note: Cannot obtain until night has fallen
East Atamipek
Car Crash:
- Isabelle Photo (Don’t miss the inscription on the back!)
General Store:
- Cash Register Instructions
- Customer Credit
- Draft Letter
- Envelope
- Gilles’ Wallet
- Hamilton Letter
- Letter From Gilles
- Mysterious Journal
- Necklace
Campfire:
- Mysterious Journal #1 (You will encounter this during Gilles’ vision)
Gilles’ Truck:
- Gilles’ Wallet (You will find this after watching Gilles’ vision and unlocking Last Stand.)
Lachance’s Mailbox:
- Letter for Gilles
Lachance’s House:
- Article About The Store
- Compromising File
- Gisele’s Diary
Bedard’s Mailbox:
- Letter for Marie
- Treasure Map #1 (For all treasure map locations, please go to the Treasure Hunter section of this guide)
Bedard’s House:
- Marie’s Diary
- Sylvie’s Diary (You will need to get a key from the Bedard’s shed to get this. The key is in the drawer in the far left corner of the shed, next to the empty beer bottles.)
Roy’s Mailbox:
- Letter for Wilfred
Roy’s House:
- Novel Page 1
- Novel Page 2
- Novel Page 3
- Novel Page 4
Blais’ House:
- Article About P. Blais
- Drawing
- Louise’s Diary
- Note From Martin Blais
- Stub Alexandre Blais 1
Shack:
- Toolshed Note
Landslide:
- Ranger Manual
West Atamipek
Doctor’s Clinic:
- Communist Manifesto
- Doctor’s Note
- Medical Files
Old Rosaire’s House:
- Tales and Legends
Rejean’s House (House of the Patriot):
- Caribou Recipe
- Rejean’s Note
- Rejean’s Wallet
Icy Cavern:
- Rejean’s Log
Lamothe’s Mailbox:
- Letter for Lamothe
Lamothe’s House:
- Parts Manual
- Spaceship Blueprint
Lamothe’s Garage:
- You could technically get all documents here (except Crazy Thought) before nightfall by rushing past the frozen man before the vision triggers
- Crazy Thought
- Magazine
- Package Note
- Police Letter
Past the Ice Wall
Campfire:
- Mysterious Journal B
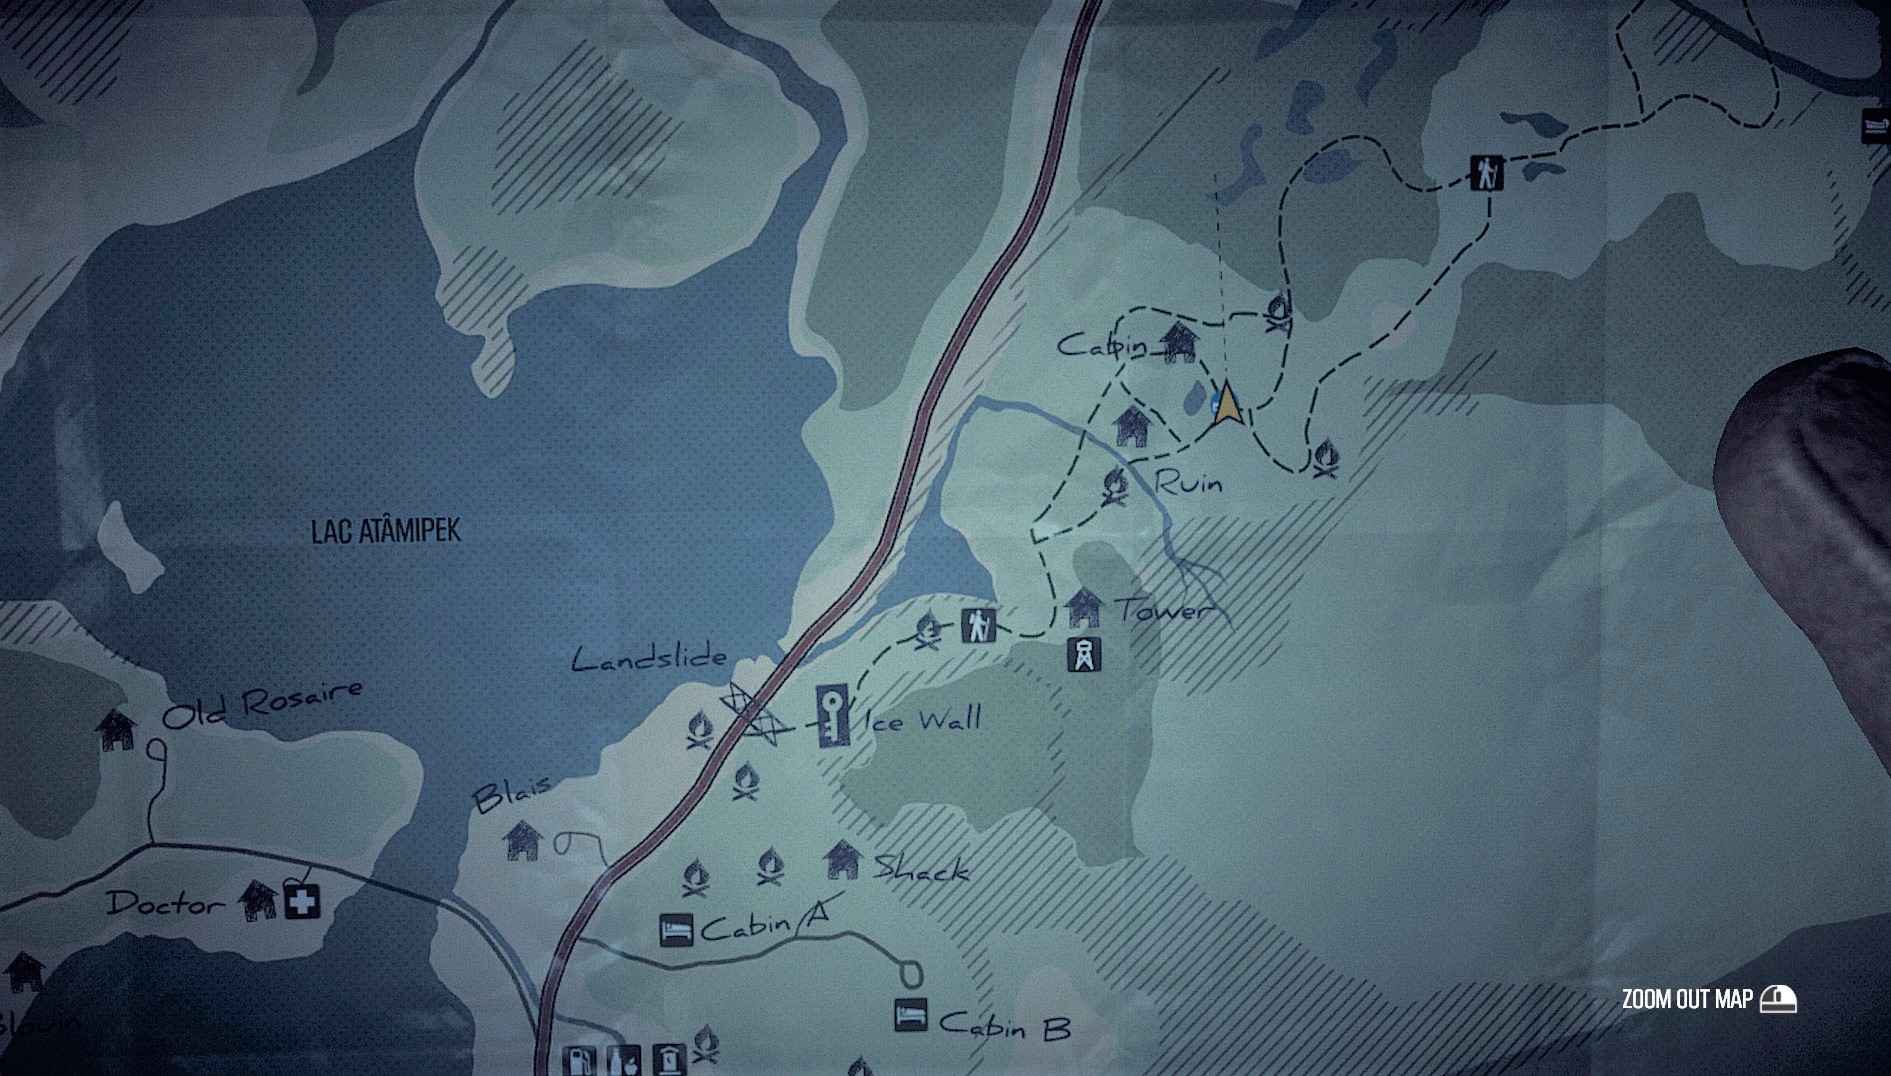
Tower Cabin:
- Letter To Pierre 1
- Letter To Pierre 2 (Picked up at the same time as Letter 1)
- Stub Alexandre Blais 2 (Under the pile of clothes)
Treasure Hunter – Collect the 10 letters from Martin Blais’ treasure hunt.
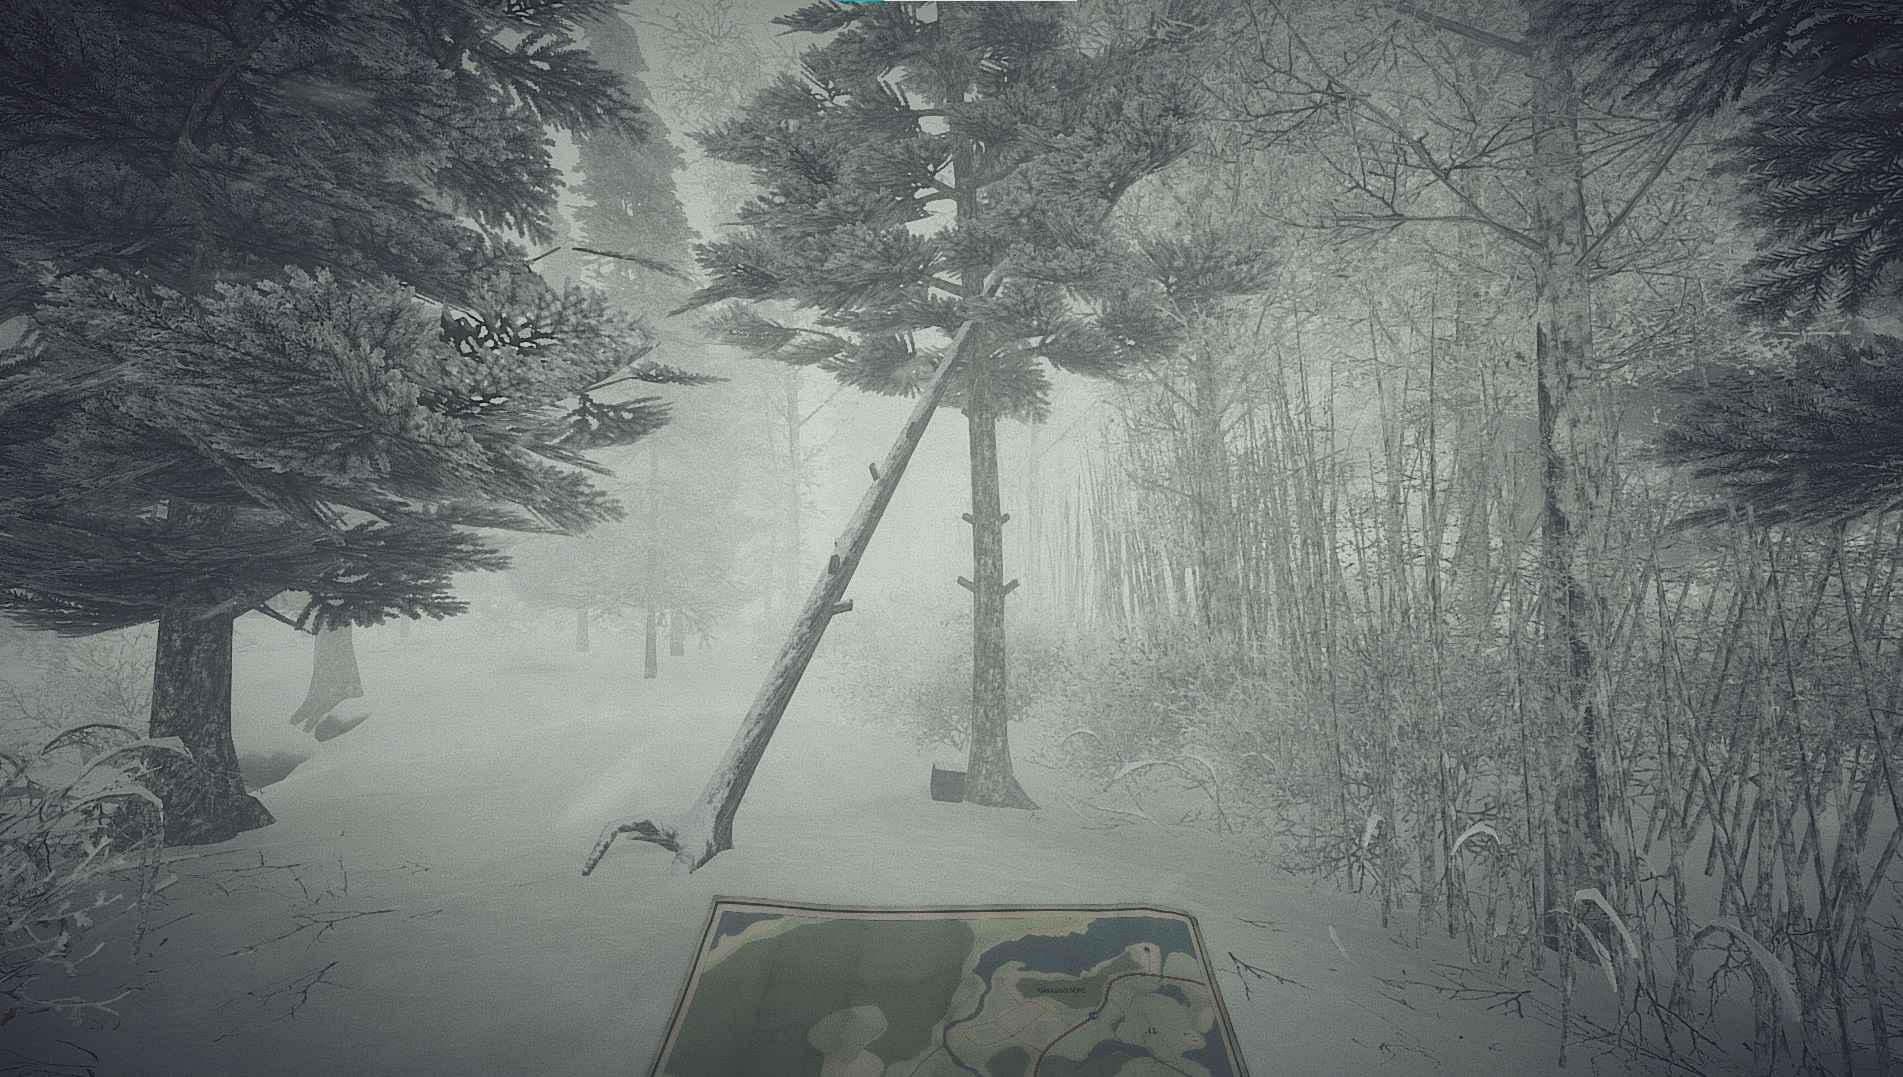
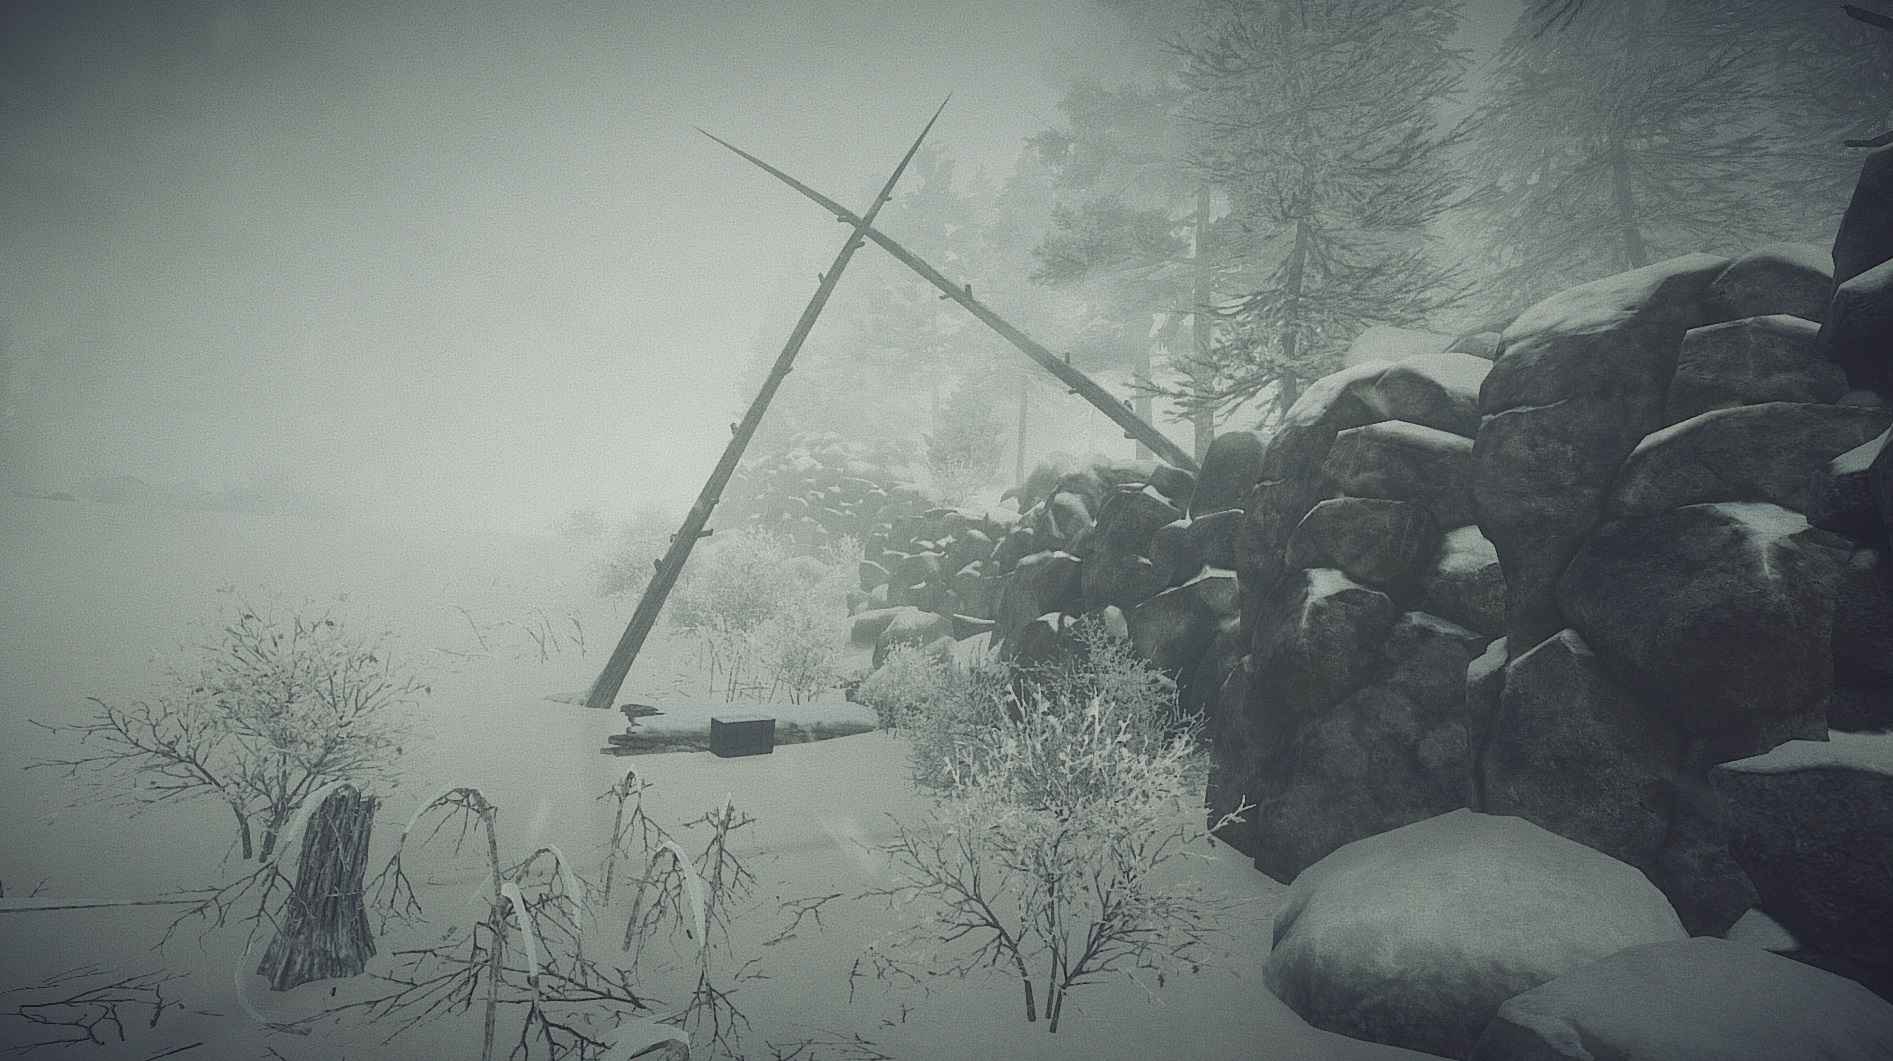
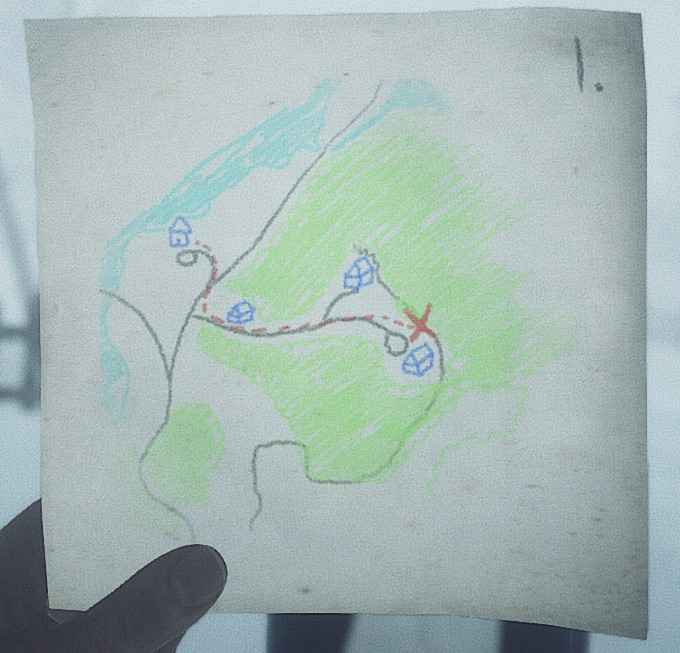
- This achievement requires you to find all the treasures Martin Blais has hidden around town. It involves a lot of running back and forth, so I highly recommend completing this achievement during daylight and not during the same run that you’re trying to achieve Onwards on foot! as it will take much longer. When looking for treasure chests, keep an eye out for trees that cross each other in an X formation (pictured below). There will usually be a chest under them or nearby.
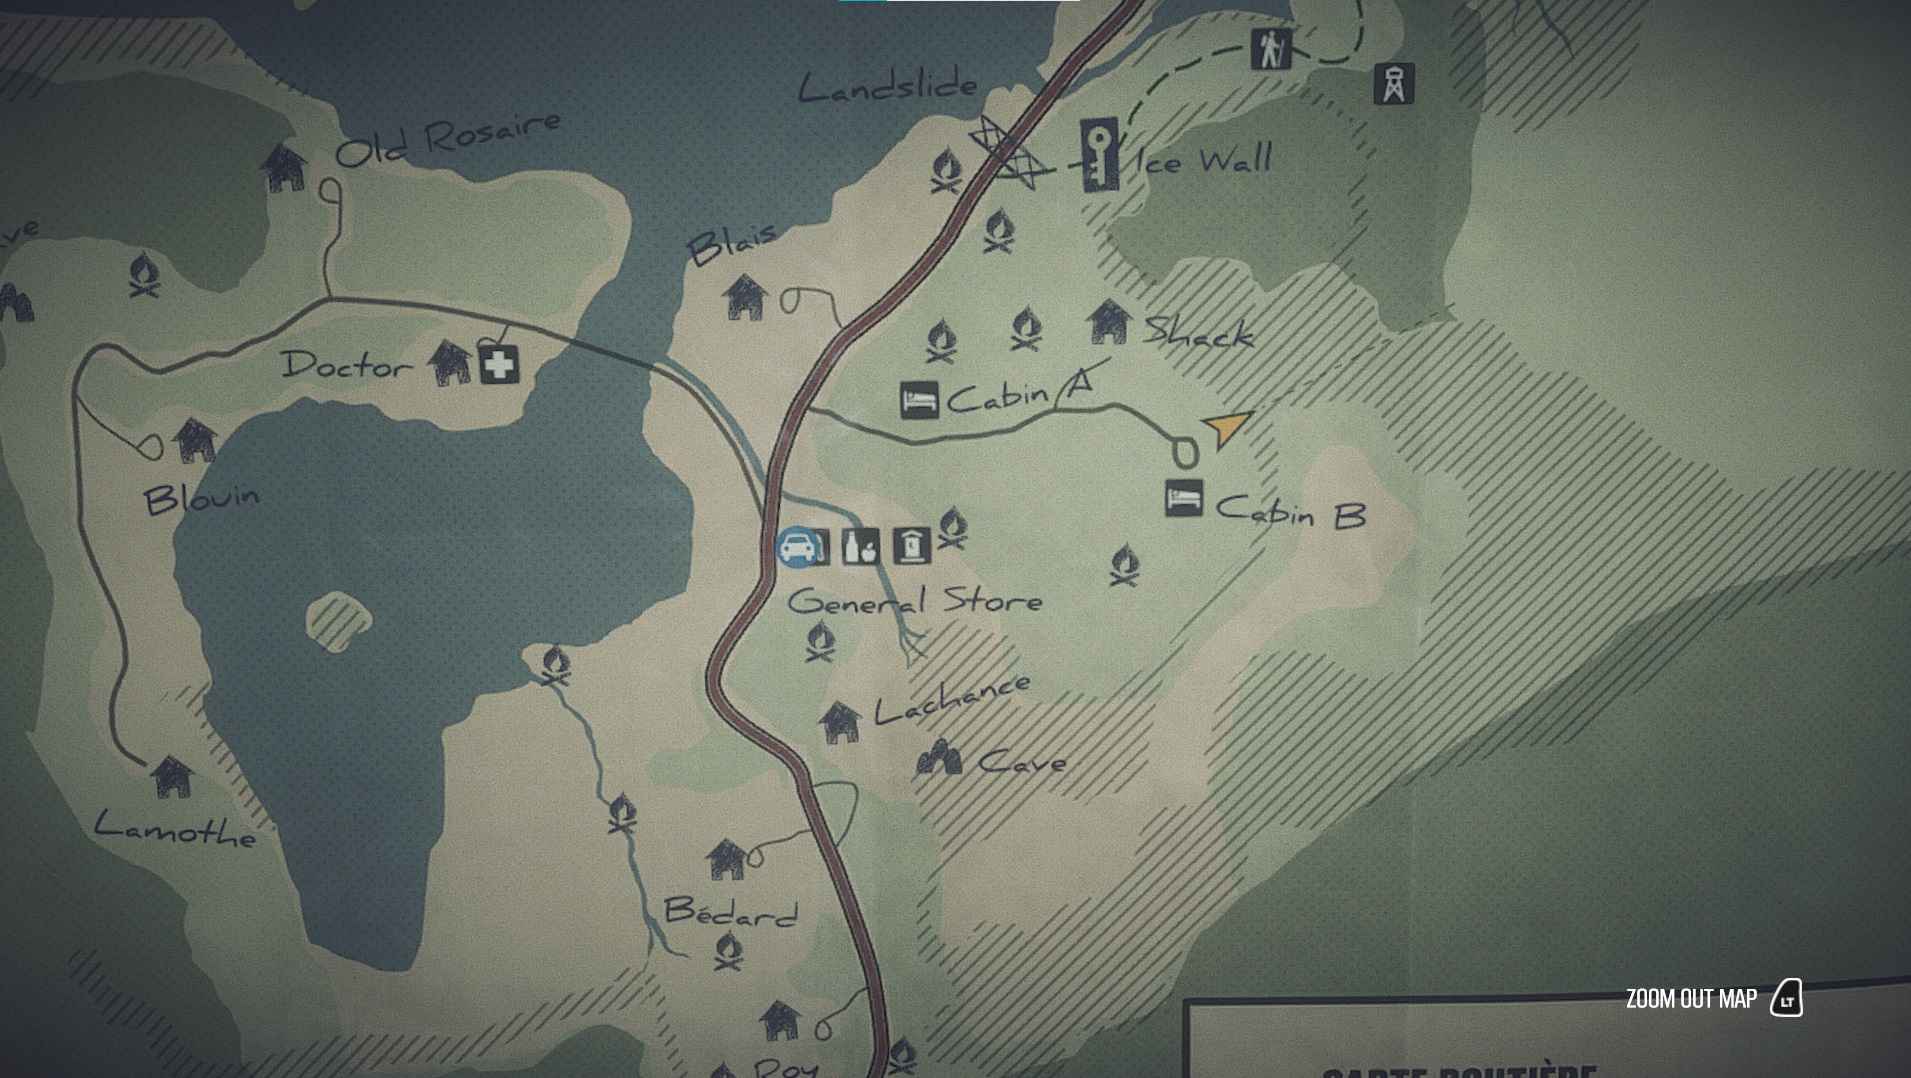
Below are the locations of all treasure chests. Each (except for the last one) will contain a map by Martin and possibly a bonus item. The maps Martin draws will reflect smaller parts of the map in your inventory (see Treasure 1 below for an example), but for simplicity’s sake, I’ve stuck with screenshots of the player map.
Treasure 1
- Bonus Item: None
- Found in Bedard’s Mailbox
Treasure 2
- Bonus Item: Fire starter
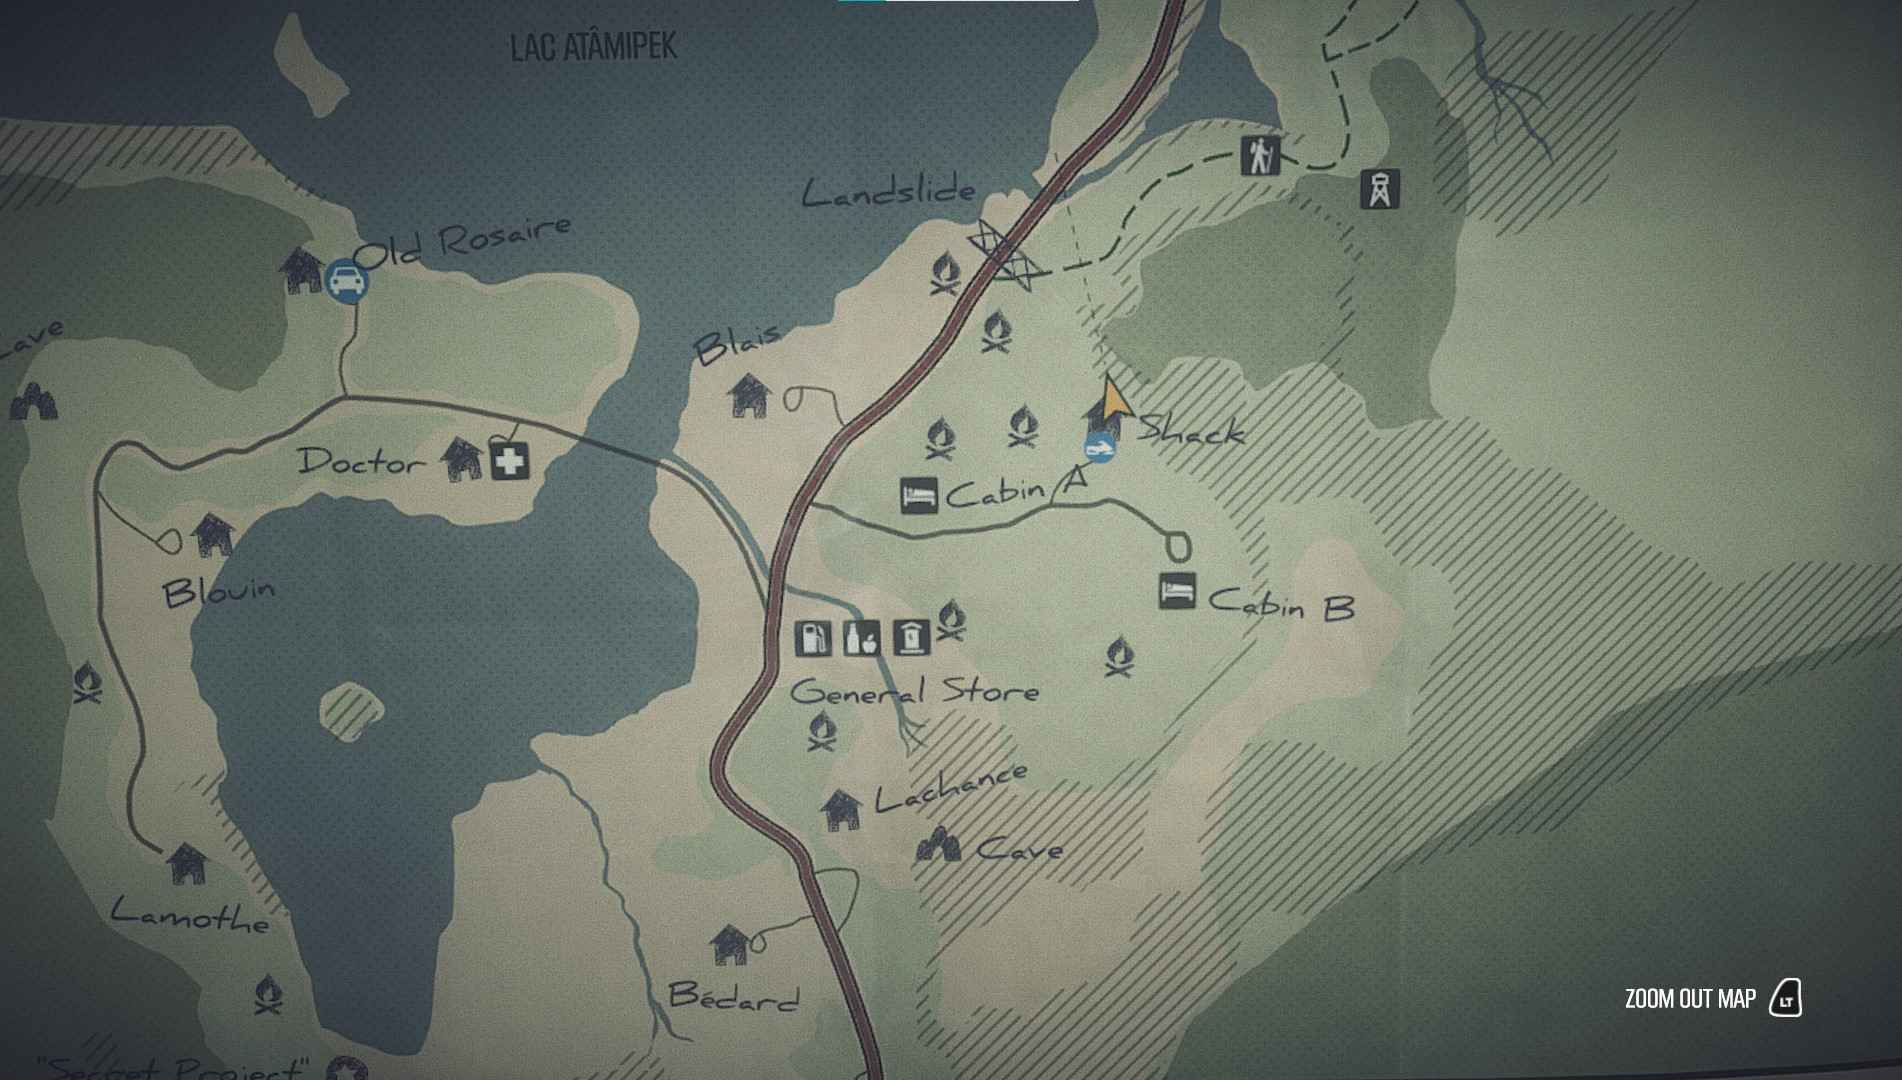
Treasure 3
- Bonus Items: Flare

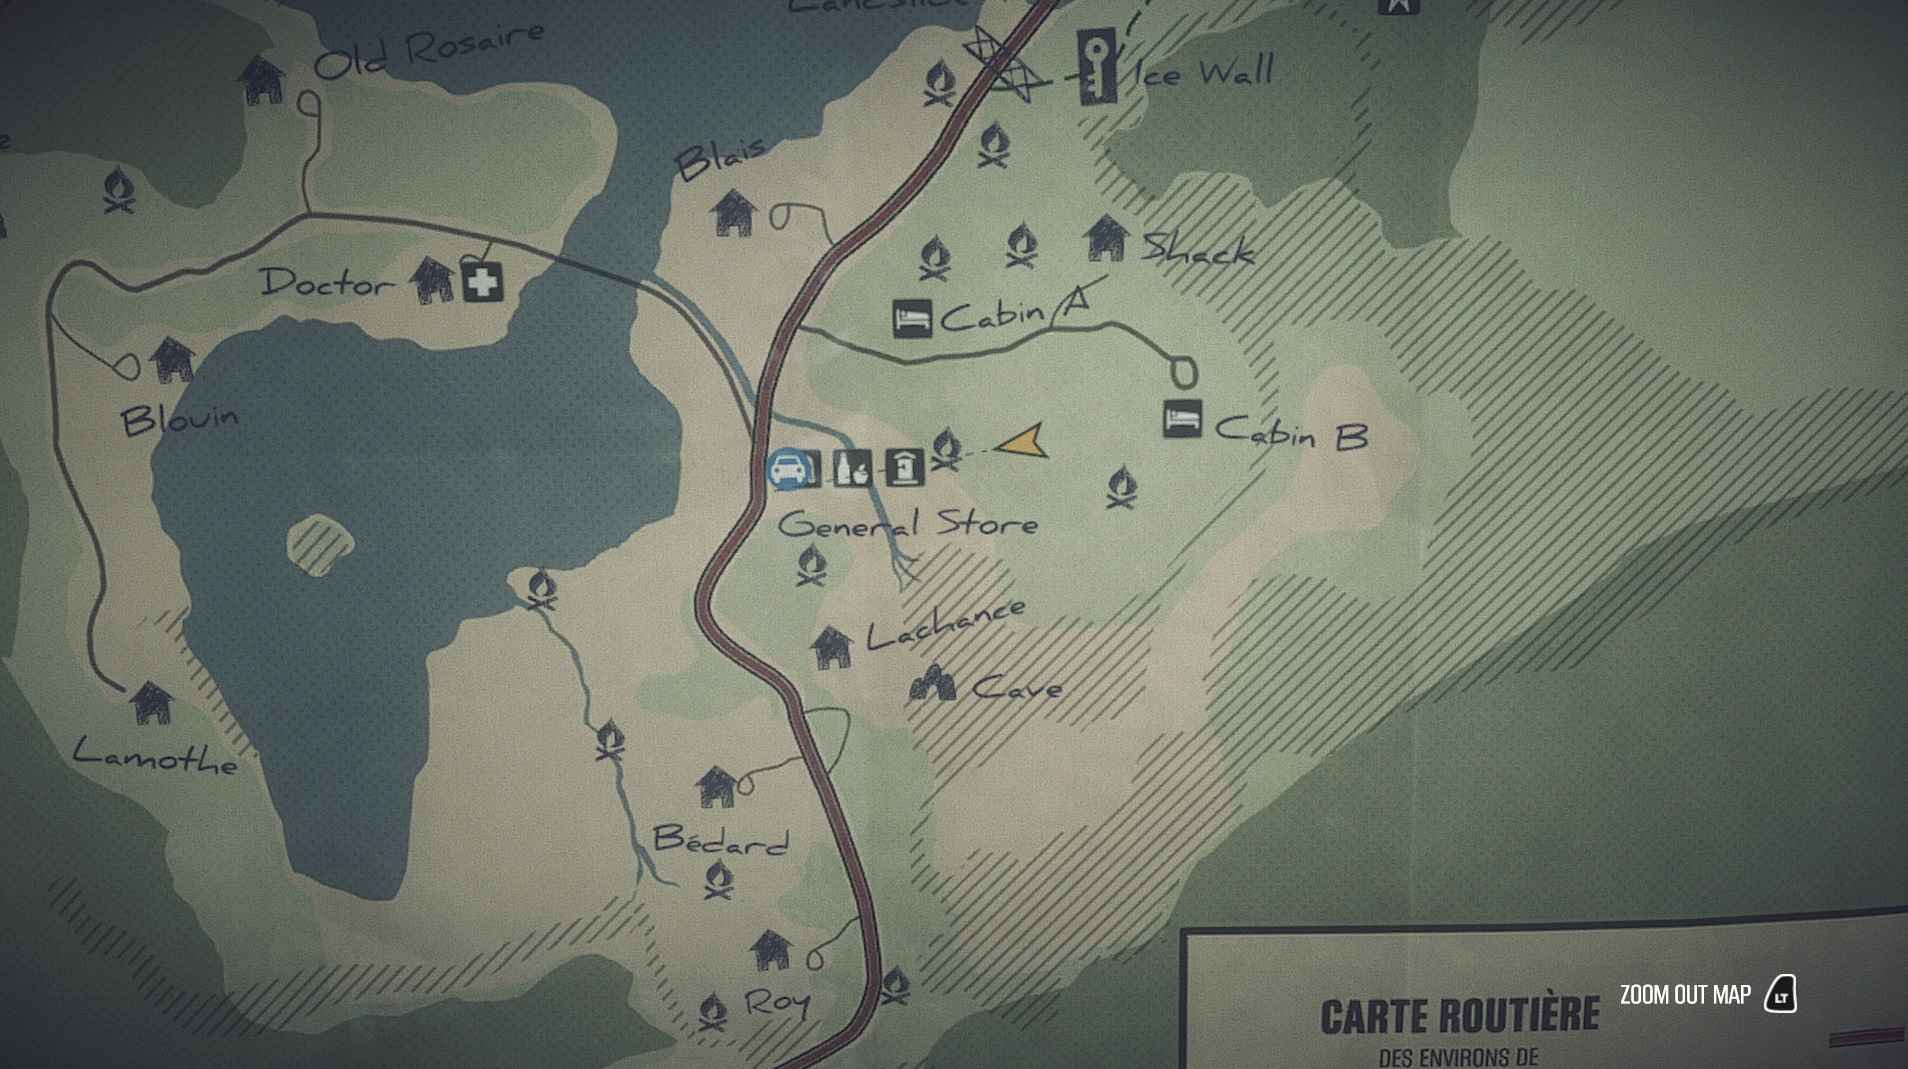
Treasure 4
- Bonus Item: Polaroid film
Treasure 5
- Bonus Item: None
Treasure 6
- Bonus Item: Fire starter
Treasure 7
- Bonus Item: Flare
Treasure 8
- Bonus Item: Polaroid Film
Treasure 9
- Bonus Item: None
Treasure 10
- Bonus Item: Fire starter
Treasure 11
- Instead of a map, this chest will give you the flare gun, which is necessary for the A star in the night achievement. There is no bonus item.