The guide for people playing the most unfair difficulty and pretending they’re having fun. Gives a rundown of what you need to survive the dungeons, kill the bosses, and kill Amon since he’s hiding in there too.
Introduction
This guide is not going to teach you fancy tricks that require hours to learn and execute properly. This is a struggle guide for people a little over their heads. No tiger drops, no counterattacks, just strats for stubborn people playing a difficulty they should’ve be playing.
Gearing Up
The most important thing to have is free regeneration.
While bowls of takeout food are effective in the early game and special vitality pills in the later game, you can only take so many and the dungeons can be very long and a single spearman can eat through a good chunk of your provisions.
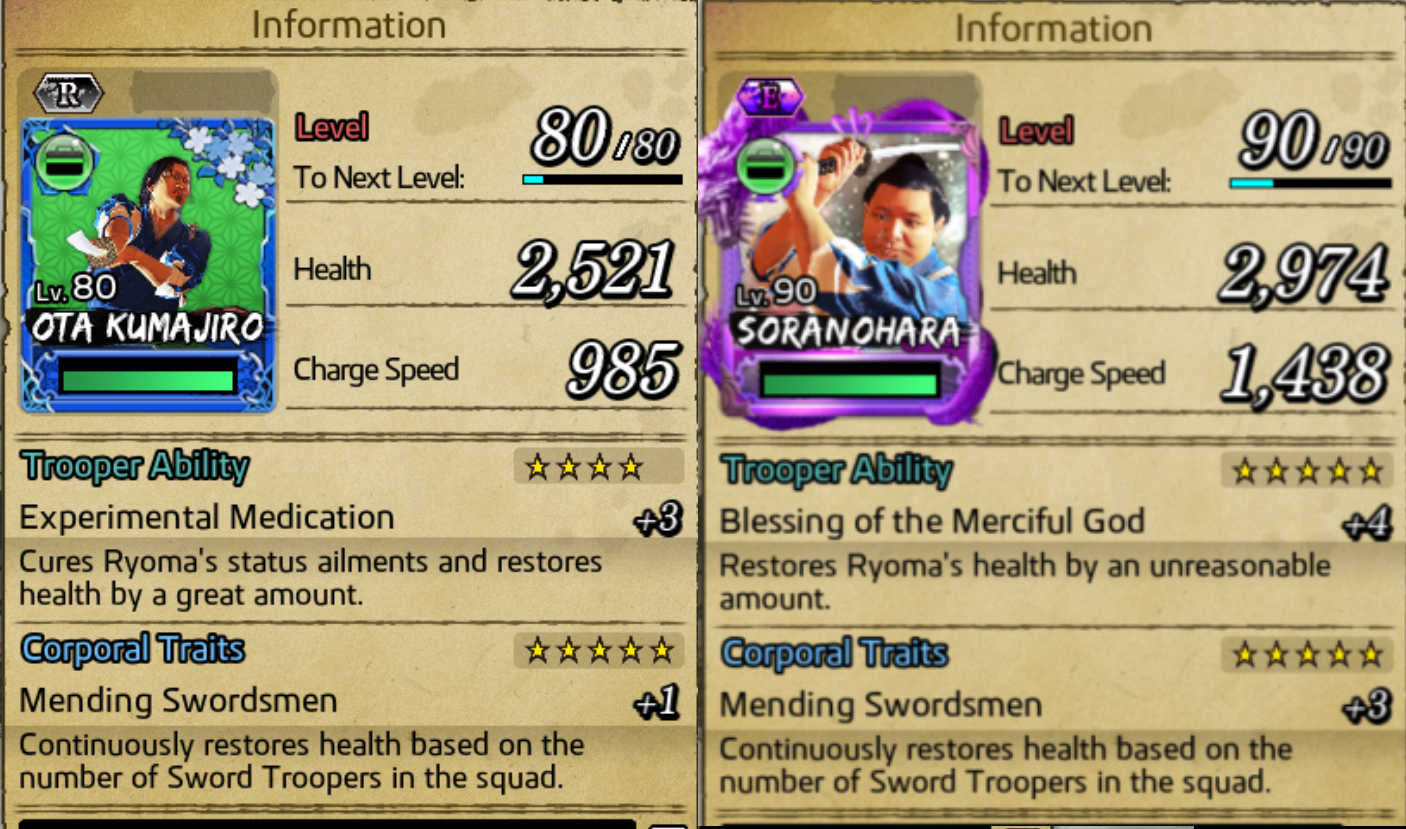
I highly recommend a healer corporal with a trait such as Mending Swordsmen which are relatively easy to come by. Soranohara is a great Mending Swordsman obtainable by giving him enough eggs and daikon radishes to win all his sumo matches. He also will come with Majestic Heal which is a massive plus.
I recommend setting healers to use their abilities automatically because they can activate mid combo saving you from things like “pole dancer” style spearmen.
For weapons, one option stands out above the rest for the early dungeons. The Juzu-maru
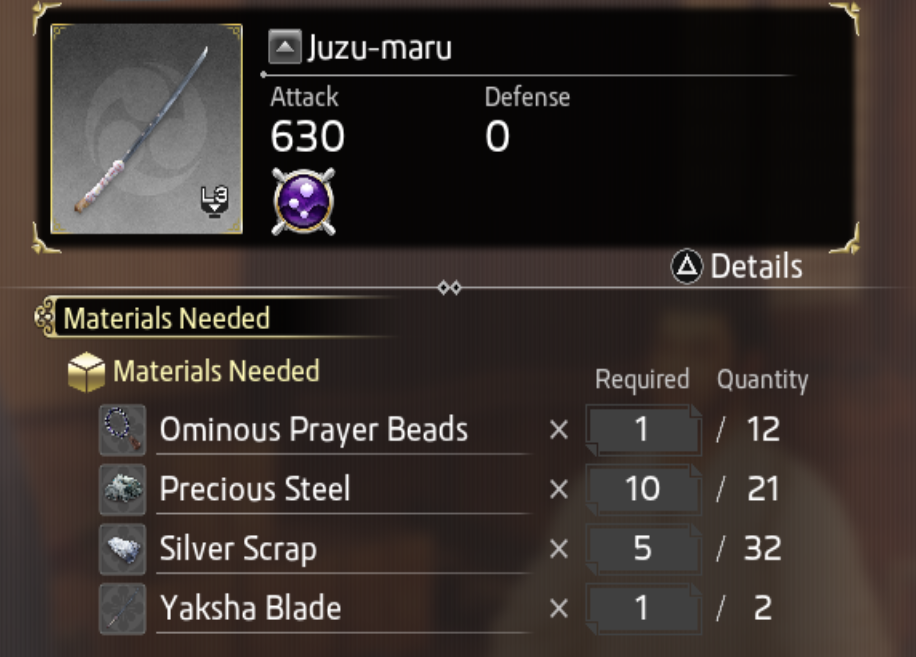
Poison is by far the best element to deal with trash mobs especially in the early game when your damage is a bit of a joke but also it allows you to safely shoot otherwise immune targets due to AI weirdness. Other elements come off as overkill when most enemies can be stunned by any light attack and wind is only against (some) bosses.
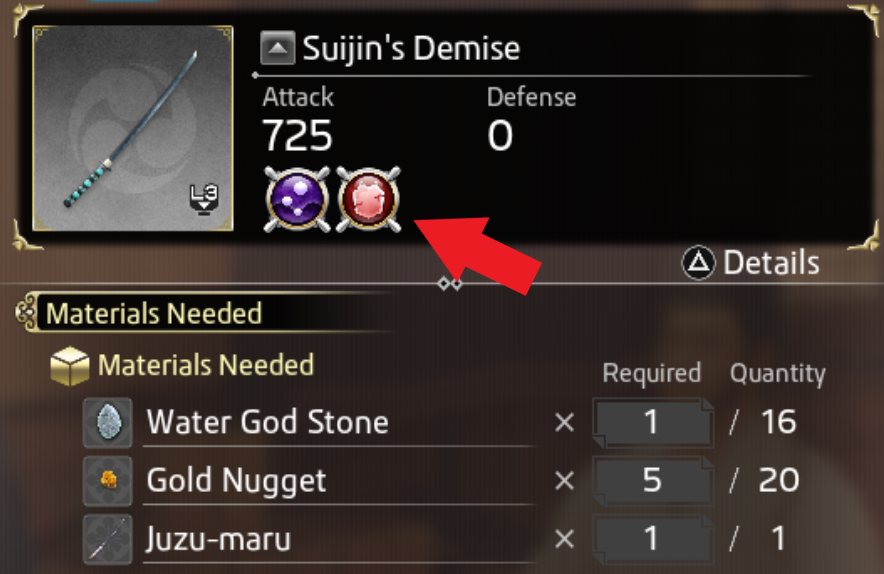
In addition, the upgraded version, Suijin’s Demise has a Pierce Seal that on paper deals 20% more damaged to armored foes but actual means it’ll rip them apart in a single swipe or two. You can easily make Suijin’s Demise by upgrading the Shinto Priest Exchange and buying the Gold Nuggets and Water God Stone with virtue. Due to its very nice base damage, poison, and armor busting, Suijin can carry you through even most of the third level dungeons.
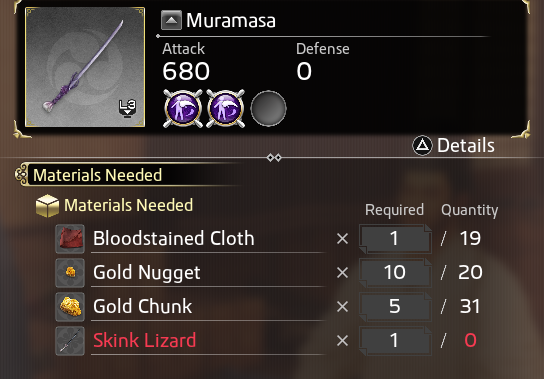
Muramasu and the other lifesteal swords are pretty mediocre. On Ishin Difficulty, your HP is actually quite high but your damage is very low. You’ll typically be healing for single digit health while dealing far less damage with no armor piercing and no elemental effect. It might work decently in the early game but it scales poorly into the lategame.
If you’re wondering why there’s no guns listed that’s because guns are a bit of a crutch that the game has no intention of letting you rely on. Guys in armor take single digit armor damage and everything after Bandit Camp has a few hundred points of the stuff. Unless you “””legitimately””” obtained a lifetime supply of acid bullets, you might as well just whatever you can find.
The same also applies to Brawler. It just can’t handle armor and even if it could, it’s not amazing at clearing large groups of enemies so not a huge fan. Wearing a loincloth is just asking to get one shot.
Combat Tips
Don’t play safe when you see a big group. Two enemies is just as dangerous as ten enemies because only two are ever really “in combat” as far the computer is concerned. One is the main attacker and the other is “on standby.” The standby enemy will likely only attack if the main attacker can’t be it they’re either down, defeated, or out of range. Both the current attacker and standby are usually obvious. This is necessary or else gun squad would be impossible.
Spearmen are so dangerous because not only can they close gaps very quickly and deal a lot of damage, but are not obvious when they’re in standby nor do they telegraph whether they’re normal or pole dancer variants. As counter-intuitive as it sounds, you gotta dive into the spearmen. Take advantage of the ones that are not “in combat” with you yet. If you get the first hit on them they go down without much of a fight. The spinning attack on Wild Dancer does a good job of taking advantage of these large crowds and with poison their DPS is great.
Baiting enemies is a good way to get yourself killed. Do you want to fight two active spearmen and eight sleepy boys, or two spearmen five times? Not only is it slower but more dangerous that just throwing yourself into a mob.
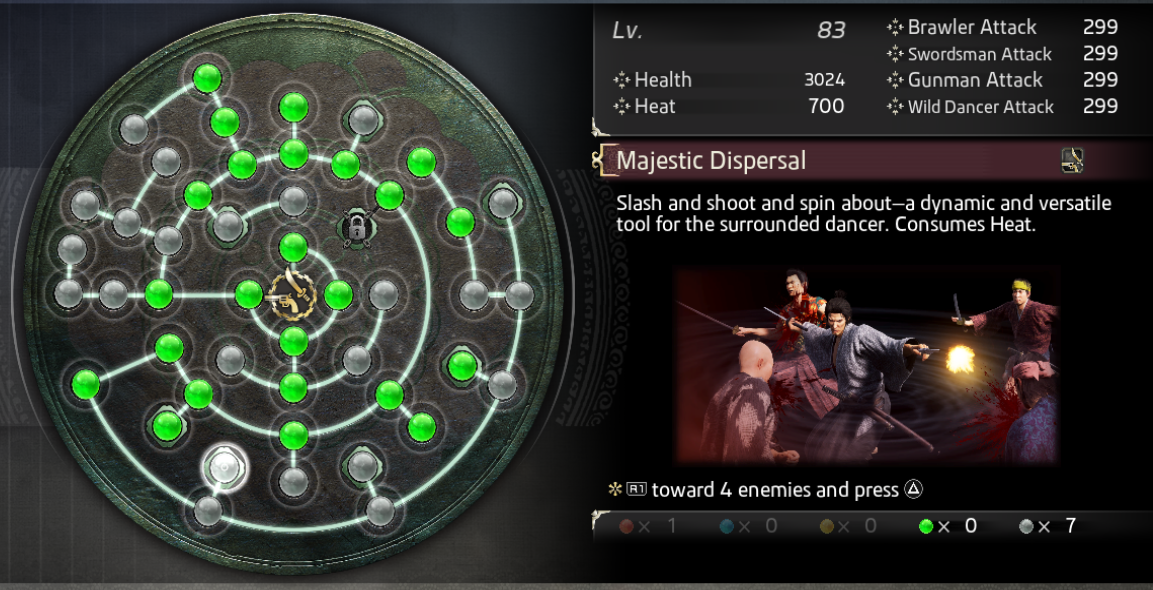
This move is so broken its not even funny. Its a spammable heat action that hits FOUR enemies at once for a large amount of damage giving it one of the highest heat to damage ratios out there without any crazy condition. Just be around four enemies. This makes it great for clearing dungeons with just a few passion pills. Being on Wild Dancer, a fantastic style defensively, it can be abused like no other. The best part is, if you mess up the activation requirement, no big deal. There’s also Rain of Steel and Fire that works on single enemies with the exact same button input. Since most a lot of bosses have goons with them, it comes up a lot more often than you think. The damage will consistently be high and seems to be based on the target from my experience and not the other affected enemies so it’ll hurt, and keep hurting until all four enemies are dead. Because of this move, I recommend bringing plenty of passion pills into longer dungeons for the consistency.
Bandit’s Cave Boss
The first boss is a nightmare when you first encounter it.
If you get hit by the lightning katanas you die. If you get hit by the club you die. If the spearmen attack you you die. Your actions don’t work on the big dude. Dancing is too inconsistent with all the insta-kills running around.
But there is an easy strategy. Stand by the door. The boss can’t actually hit you with his club (usually) so you can deal with the spearmen easily on their own. Then, you can safely exploit the bosses many weaknesses. A lot of his attacks have a long wind-down period and most of the boss’s attacks can be blocked or just avoided by standing in the door frame.
By now, you should be able to use Suijin’s Demise to rip apart his armor and proc a poison or two. You can remove your passive healing corporal as well and replace them with something to boost damage. There’s not much of a dungeon after all.
Bandits’ Mines
While most of the dungeons were a simple war of attrition, Two Elite Thieves is your defense check. Even going back with end-game gear, they’re still an awful fight. Having a large group of enemies (with lots of spears, guns and a quickdraw samurai for good measure of course) just to get to the boss fight is agonizing. However, there is a good strategy against them.

All their materials are now available either for trade or from the dungeons.
Steel and silver are found in the earlier Bandits’ Cave and the occasional well.
Gold Nuggets are available from the shinto priest for virtue.
Platinum filings can be obtained from the Bandits’ Mine Spear Squad and some substories.
And Phoenix Feathers can be found in the Two Elite Thieves boss room reliably.
If you’re having trouble finding a hot pepper idk what to tell you man.
While they’re starting to get too beefy for poison, they are not immune to fire. Rush the spearman and spam spam spam. Your basic combo will likely burn them and your spin attack has a good chance to ignite them both. Keep being aggressive to the spearman and then you can handle the swordsman in a far more relaxed environment.
Honestly doesn’t deserve the extra star. Maybe deserves one less.
While the boss should be harder on paper, all of the enemies are very passive and now that there are 4+ trash mobs, you can just Majestic Dispersal to your heart’s content. Rush in with dancer, break some armor, then spam that R1+Heat. The boss is a repeat of the first dungeon so just block his attacks and slowly chip away his HP. A little inconsistent to kill just due to his high damage but after you clear his guard he’s very predictable.
Sanada Stronghold
By now you should have both a poison and fire sword. Keep using the poison for the dungeons but keep the fire katana for the boss fights. You should probably consider using a damage boosting corporal and keep Gunman as the dedicated healer style since you’re really going to need both regen and damage now. The dungeons are exceptionally looong. At this point, I recommend getting Special Passion Pills from the Shinto Shop. Heat is hard to get on Ishin! difficulty but groups are getting too large to whittle quickly.
Bring passion pills. They won’t work on the boss itself but each monk has a very high danger level and screwed up is almost inevitable. You most likely will either take little to no damage or get one shot so stocking up on extra heat doesn’t cut into your longevity as much as you think. Poison is extra effective at keeping these guys at bay. They move incredibly slowly when poisoned and hey, if you want, you could even use Gunman for a bit 🙂
Boss is a repeat of the boss from Bandits’ Mines so that’s fun. Still not too hard of a boss fight. The entire room is heavy weapons so you can use Swordsman effectively to kill the boss first then the smaller enemies. You really don’t want to get clipped by some random attack while dodging as Dancer and be sent all the way back.
Fire still works. Rush Cho. If you don’t know where Cho is, Cho is charging at you with his spear. You are going to get one shot and there’s nothing you can do about it. Always keep your eyes on Cho.
Arguably easier than the Triumvirate due to Majestic Dispersal spam being available. However, do not use Majestic Spam to kill the gunner. Use it to kill the spearman. Not only will this allow you to get more Majestic Dispersals off by keeping the number of enemies at four, the gunner is frail and the spearman is not by any account.
Welcome to seppuku central. Everything about this one is a miserable fight with all the looming threats you can barely keep track of. Here is where Majestic Dispersal is more important than ever. For some reason, the range of it is very generous in this arena and the Sky General can be sucked towards the door and outside of the giant general’s aggro range. Don’t worry about armor. You can chew through it afterwards. You just need to pull them away from the big Water General.
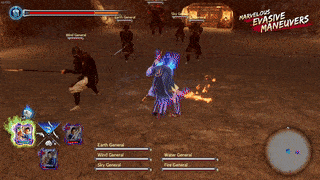
This gives you much needed time to kill the Wind General (the spearman). Sky General (the gunner), while a pain, can be put off a little bit due to his low health same as the Four Heavenly Kings. Once Wind or Sky is dead, its most likely time to just train the enemies. The big guy is just way too difficult to handle up close with how easily he can one shot you but his flaming katanas are decently slow. Just walking around the edges of the arena will cause them to miss. Just chip away at the remaining generals until you can safely switch to Swordsman and fight Water General safely, blocking hit attacks and taking advantage of long animations.
If you see a heat action available, use it. Even if the damage is trash it’ll help with tempo and lets you reset. This is a battle of attrition and every bit helps.
Another easier final boss this time around. However, not a walk in the park. Yes, he has goons that let you disperse to your heart’s content but this is a bit riskier than usual because now the big guy, Sanada, is actually aggroed immediately. However, he isn’t immune to heat actions. Chip away at his guard until it’s just him then switch to Swordsman or Brawler (finally, it has a use) and wittle him down bit by bit. Every single one of his attacks can be blocked or parried and he has a very predictable moveset. Just don’t get too greedy as he has a fast low sweep that can one shot you if you overextend. Surprisingly reasonable after the last boss fight.
Amon Guide
Amon is back and you know he means business when he shows you that cursed sword.
He has three shadows, blue, red, and green that are only damaged normally by swords, unarmed attacks, and guns respectively. They also seem to take reduced damage from any heat action, even ones they’re weak to. On top of that, they buff Amon’s defense drastically. Each of them can give Amon the buff making stopping them a top priority. Amon himself is incredibly dangerous but has a very simplistic moveset but can one or two shot you with ease. He’s not very accurate but considering how bulky he is with all the defense buffs he’s getting and he’s bound to scratch you sooner or later.
Funny thing. Majestic Dispersal can prevents Amon from getting his defense buff. There just so happens to be four of them so just spam the one move you’ll ever need and keep chipping away at Amon. Once he’s down, the looming threat of being one shot is gone and the three shadows are pretty easy to kill. I’d just save green for last because ho boy, does gunman not have great targeting.
Honestly I wouldn’t read further. Amon isn’t too bad and you should try to figure him out for yourself but just in case…
Amon is back for round two and unlike his pathetic first outing, he actually poses a big threat. At least in phase two. Brawler is viable yet again for the second time this entire guide as Amon has no armor and can be parried with ease. Fire still works but its nowhere near as easy to proc as other bosses. It does give you some nice openings though.
In phase one, he’s a lot like he was in Sanada Stronghold. Predictable and pokey attacks except now he has a super move that threatens to one shot you. You can either
- Block it. Reblock. Reblock.
- Dodge like a madman (make sure to delay that last one, its a roll catcher)
- Use a priority heat action
- Activate a trooper ability
All of these are viable but 3 and 4 can massively punish Amon. Wild Dancer has many priority heat actions with R1+Heat, running + Heat, being attacked with a sword + Heat. Generally speaking, you have a lot of options to stop it from going off. Brawler can feed him an orange. Troopers with attacks on auto tend to be great at parrying attacks and healing you as well when Amon starts comboing you. Besides his massive move, Amon’s move set in phase one is very manageable.
Phase two is kind of just panic mode. He becomes just as spamming as you are and he has a far shorter windup on his new special attack, a spin that will likely kill you if it grazes. Keep your distance though and it won’t surprise you. So long as you keep a lid on him with heat actions and trooper abilities, he can be whittled down slowly but surely.
I would have more but not many cheeses work well on him without some OP trooper setup. Use whatever style your most comfortable with (unless its Gunman) and you’ll persevere. He doesn’t have any particular style he’s weak to but I just found Wild Dancer to be the most consistent due to the many heat actions at my disposal to stop his big attacks. Brawler and Swordsman can safely block and parry (fancy block, not Tiger Drop) his moves. It’s honestly a lot easier than you might expect.