Ever since its release, I’ve been an enthusiastic participant of this game! I have accumulated numerous tips and tricks throughout my journey, which I intend to share with you in this guide. However, be warned that there may be spoilers ahead. If you want to experience the game without any prior knowledge, I recommend bookmarking this guide for future reference, but refrain from reading it at this moment. I will strive to keep this guide current with the latest information.
How to have 2 versions of Night of the Dead
It’s quite frustrating when the updates for this game take forever to download. Sometimes we might not even like the new updates and would prefer to continue playing the previous version. Luckily, there’s a solution! As long as you have enough hard drive space, you can create a backup copy of the game.
First, locate the installation directory of your game. For instance, mine is located here:
E:\SteamLibrary\steamapps\common\Night of the Dead
This folder contains the file LF.exe. Simply make an exact copy of the folder and place it in a different location to clone that version of the game. For example, I put mine here:
D:\NOTD\LF.exe
Now, create a shortcut to that LF.exe file. Whenever you launch the game using that shortcut, it will start that particular version of Night of the Dead. However, keep in mind that you will need to have Steam running in order to play and it will likely only work for single-player games. When the game updates, it will only update your original copy and not your cloned copy.
This means that while the original copy is updating, you can still play the backup copy without any interruptions. If you dislike the updates, you can always continue playing the previous version using the backup copy.
Another advantage of having a backup copy of the game is that you don’t need to copy your character or save data. They will be accessible automatically through either version of the game that you choose to play. However, sometimes old saves might not be compatible with the new game version, so it’s important to mark which saves are for which version because they are mixed in your save screen.
If you’re looking for an older version of the game, you can check the BETAS menu. Open the Night of the Dead properties page in Steam (Steam -> Library -> NOTD -> right-click -> properties). From the menu on the left, select BETAS. If you choose v.1.3.x, the game will want to update (downgrade) to version 1.3. Once you’ve done this, create a copy of it and opt out of the beta. Then, you can always play the old version 1.3 using the LF.exe shortcut in single-player mode, and play the new version 2.0 that Steam always updates in online multiplayer games.
Playing Night of the Dead
– Establish a camp somewhere near where you start, look for a relatively flat area that you can build a foundation on.
– Be able to build a few traps on a foundation to survive the first night. I made like 5 or 6 traps my first night by following the tutorial and winning a couple trap machines as prizes for completing tasks. You will have to scavenge the copper to make the other trap machines. Break down coins that you find into copper bars then make it into copper wire at the proper work bench.
– Make a wrench as soon as possible. It honestly took me 3 days the first time but that’s awful. You have to do better.
– On night 5 they send the first exploding zombies at you so upgrade your base to stone before day 5 wave so the exploding zombie doesn’t cause a fire to burn down your wooden base.
– Create a dirt bike to explore faster with. first thing to do is to go after some books. Go on foot if you have to. Some research just needs to be done early. Figure out what you need. I’d focus on engineering and being able to build electronic components.
– Build an MRL before the day 10 wave to be able to defeat the giant zombie who’s coming. If you didn’t make it that’s OK, you can take him down with a lot of bullets. Be prepared though, you will now have to defeat at least 1 giant every-other night from now on (with normal game settings).
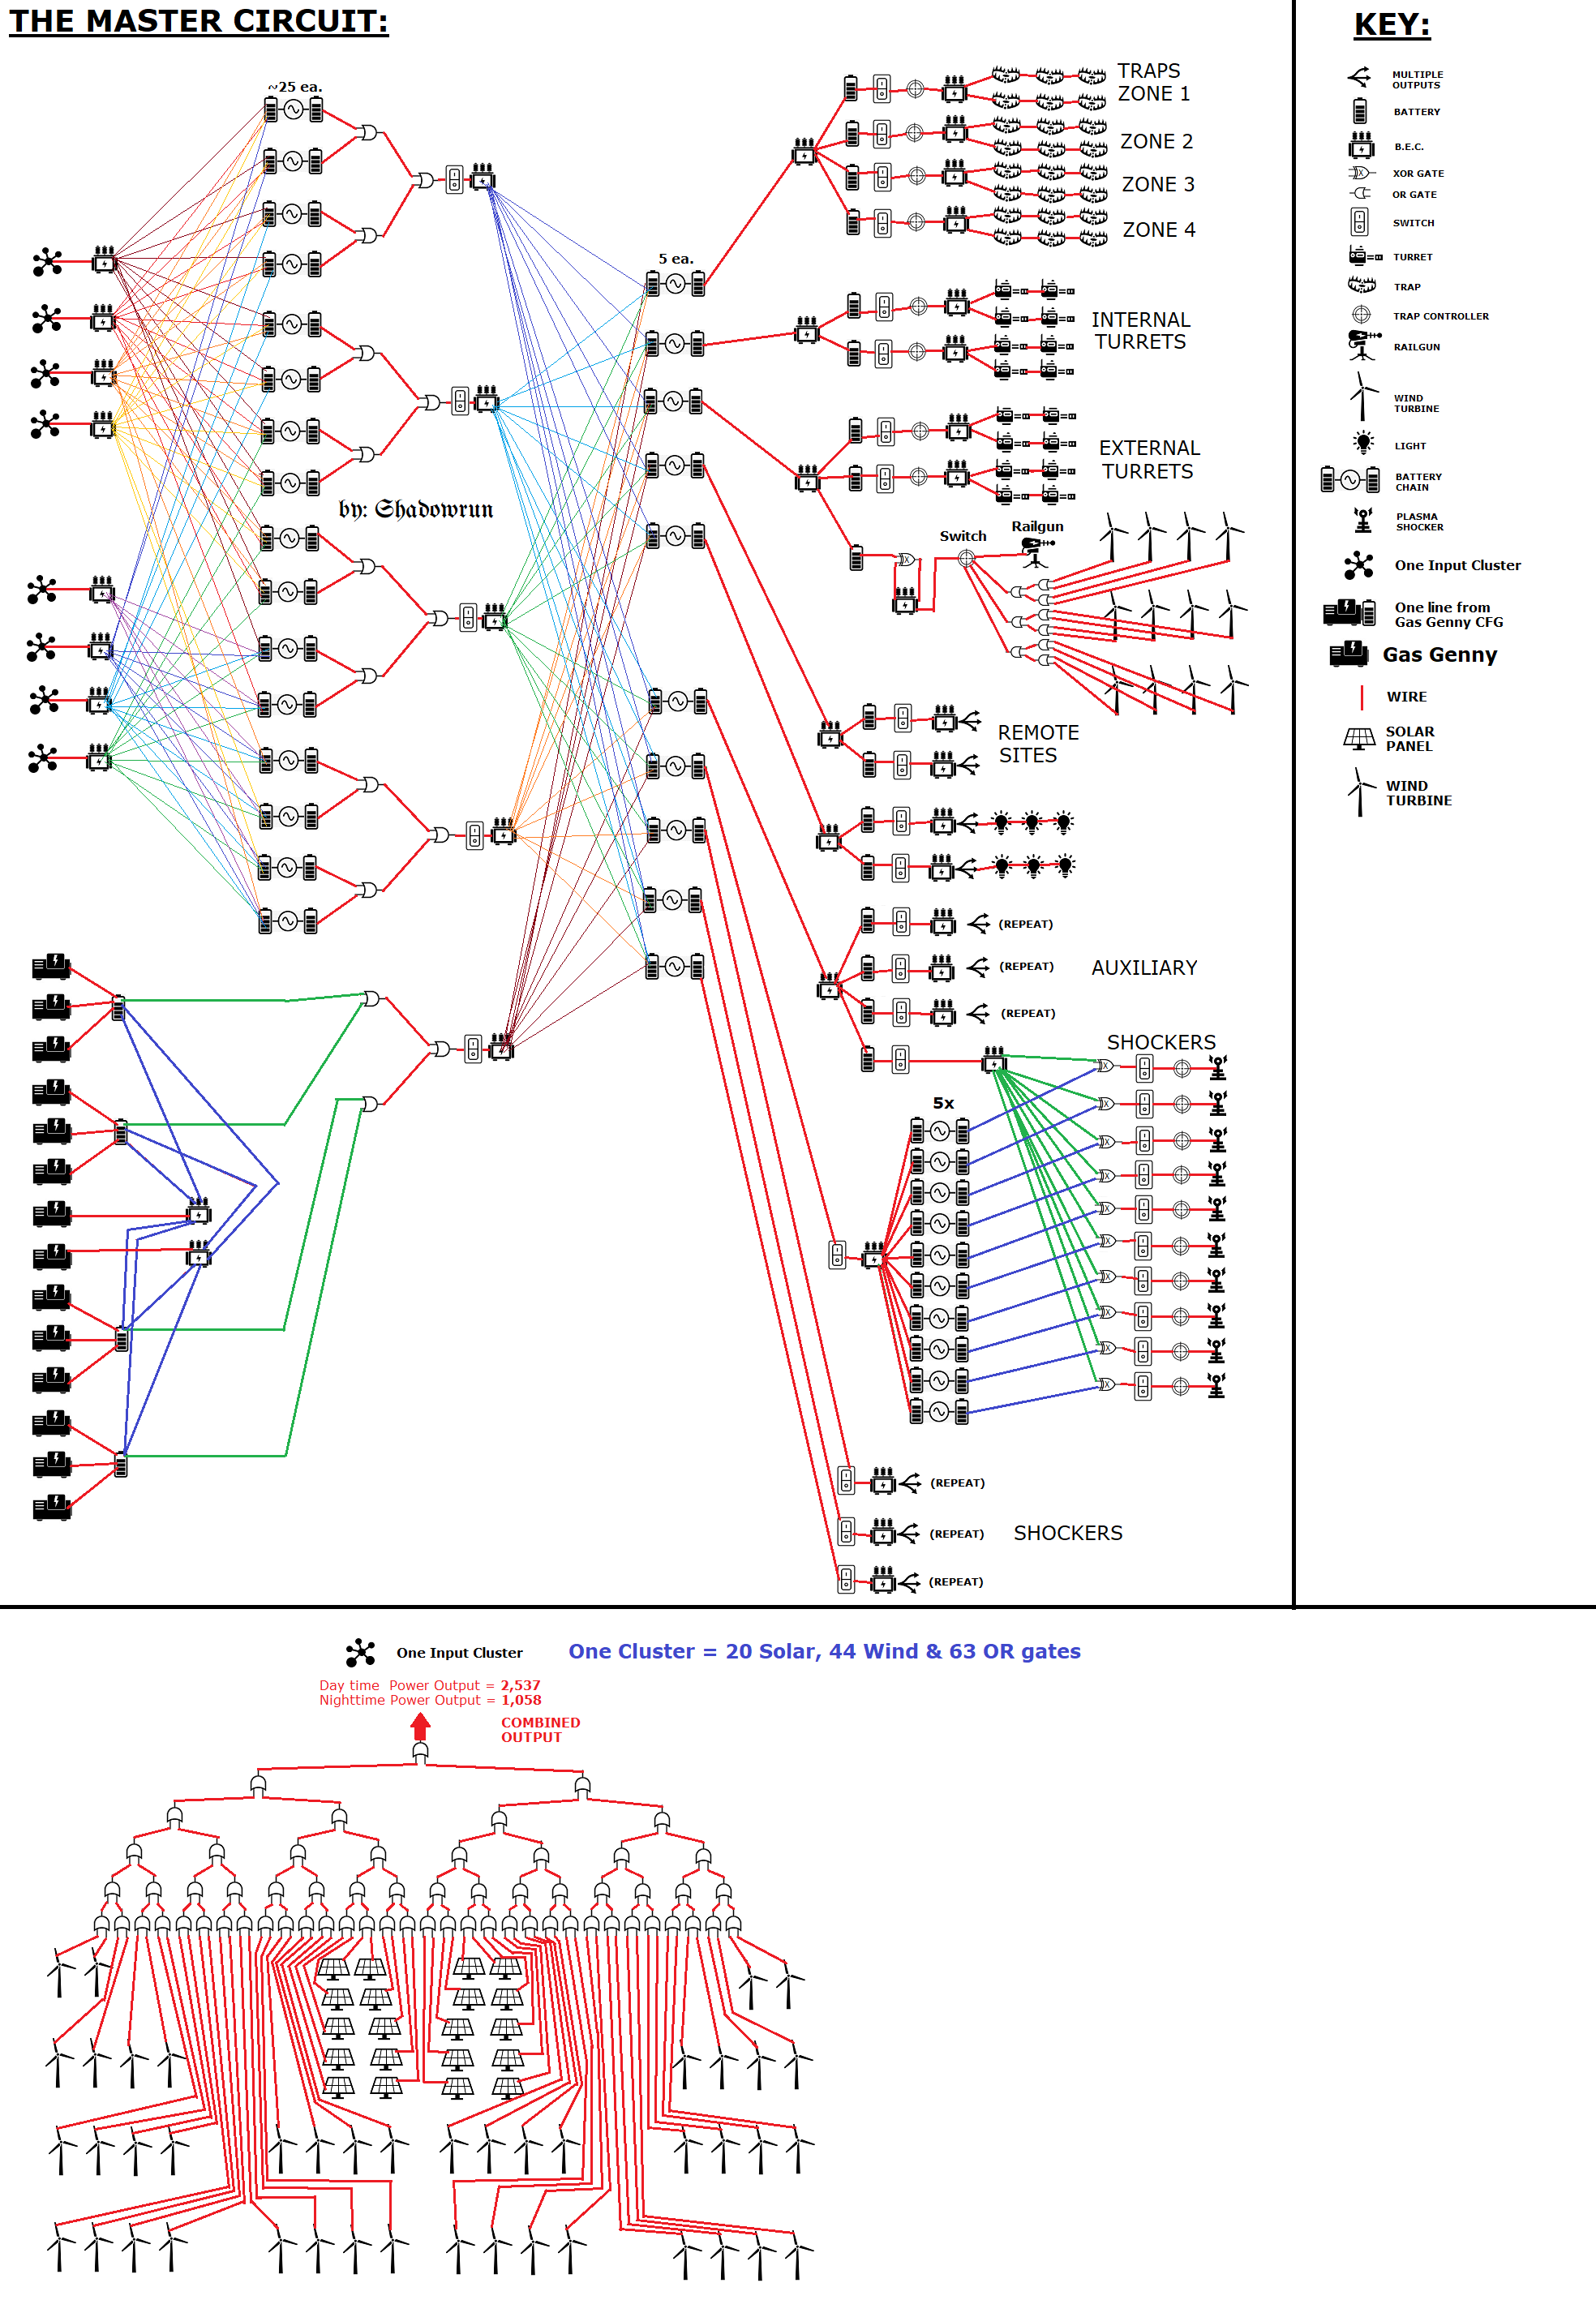
The Master Circuit
It’s great that you have taken the initiative to document your complex circuit design for others to learn from and replicate. Having a massive electronic power grid for your base can certainly be a challenge, especially with the need to rebuild it every time there is a restart. Your storage and retrieval system for power is an interesting solution to prevent any battery with power in the backend from being wasted when power is needed in the frontend.
It’s also good that you acknowledge the bottleneck in the circuit where power is combined into 5 main lines, but it’s impressive that the circuit can handle heavy loads and perform well under pressure. Overall, designing a master circuit for a base is an important task that requires careful planning and consideration of power needs, and your documentation can be a helpful resource for others.
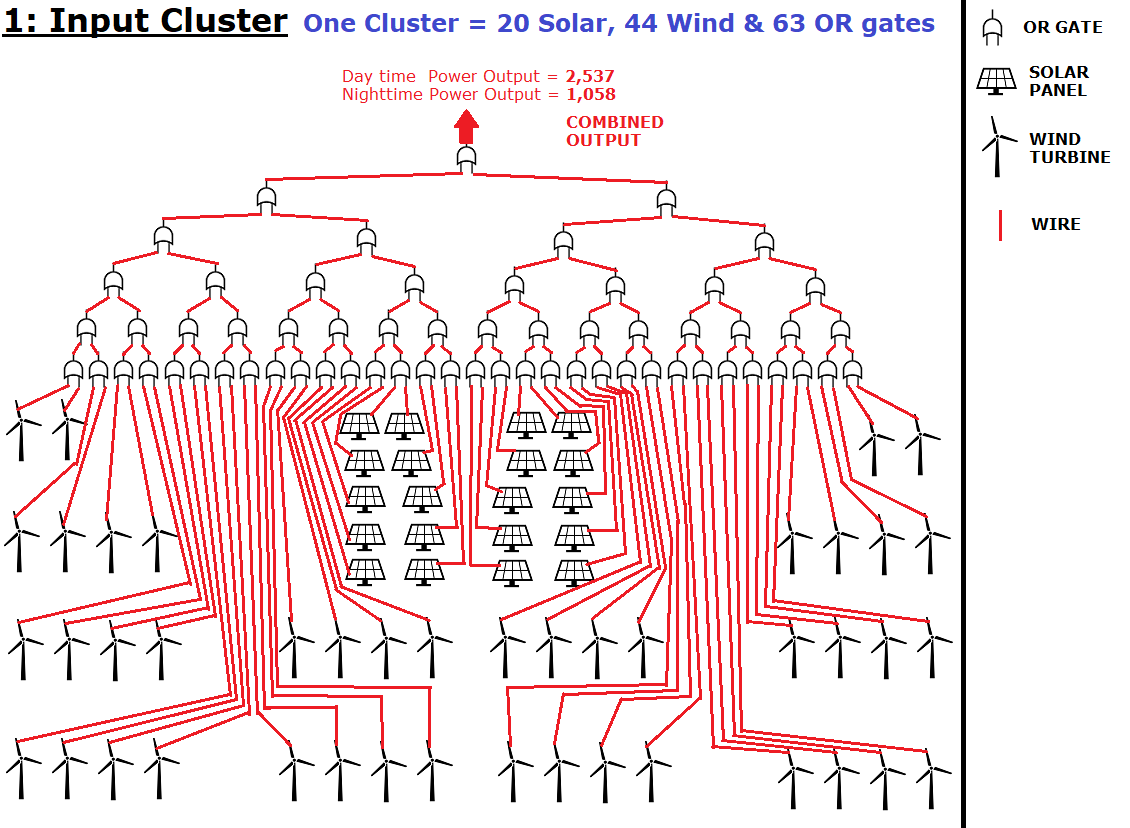
Master Circuit Phase 1: Input Cluster
Creating energy is the primary goal of Phase 1 in the Night of the Dead’s master circuit construction. This involves building solar panels and wind turbines to produce energy, which is then collected and combined using OR-gates, resulting in a compressed main power line. The upgraded electronic devices that you can construct can support up to 2,500 power per second (pps). Hence, this setup is designed to generate that amount of power in a single line during the day. However, it can still sustain all the auxiliary systems (1,000+) with enough power during the night.
To link a single cluster, 126 wires are required. I refer to these clusters as they resemble the following:
Master Circuit Phase 2: Gas Generator Configuration
The second phase of the master circuit entails utilizing 14 gas generators configured in a particular manner. The four batteries play a crucial role in monitoring the generated power and storing it until it can be dispatched to the primary grid. These batteries act as buffers, and if they reach full capacity, the generators automatically shut off until the stored energy is transmitted.
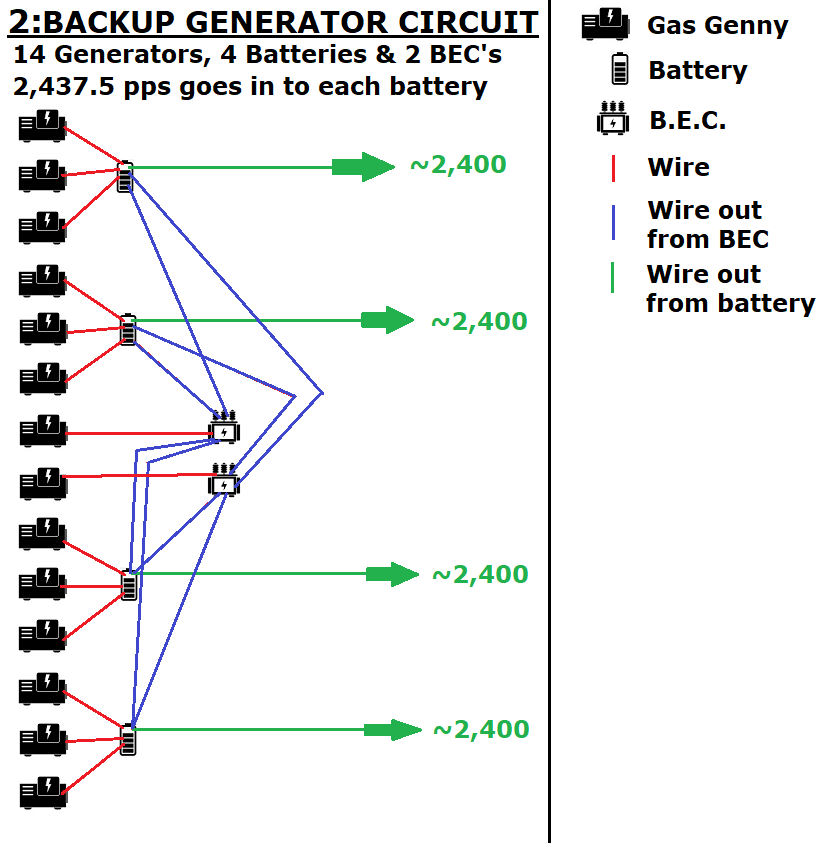
You also don’t need to upgrade those 2 BEC’s but you should upgrade those batteries for sure. 🙂
Master Circuit Phase 3 – Storage Method
Phase 3 of the master circuit involves storing the produced power. The circuit allows a maximum of 8 power input clusters, which are sent to a Battery Eliminator Circuit (BEC) and then divided into 10 lines, each leading to an array of 16 chains of upgraded batteries, with 25 batteries in each chain. The storage array contains 400 batteries, and all components, including the BECs, are upgraded to maximize the power output.
The storage array’s output comprises five lines, each connected to a BEC, which, in turn, outputs to ten more chains of batteries acting as buffers. These buffers provide power to essential systems during emergencies and power loss. For instance, when the power drain is high due to dozens of shockers, the buffers keep the critical systems, such as the MRLs and maze traps, operational.
In this setup, the gas generators directly power the buffers, providing emergency power when needed. This arrangement ensures that power is quickly directed to the required systems and not lost in the storage array. Additionally, this storage and retrieval system ensures that power is not lost in the array. However, there may be instances where some systems require more power, and the buffers cannot provide sufficient power immediately.
This setup requires 183 wires to connect, and it’s essential to note that the batteries can drain auxiliary power. Therefore, it’s advisable to build a mass of wind turbines before constructing a mass of batteries.

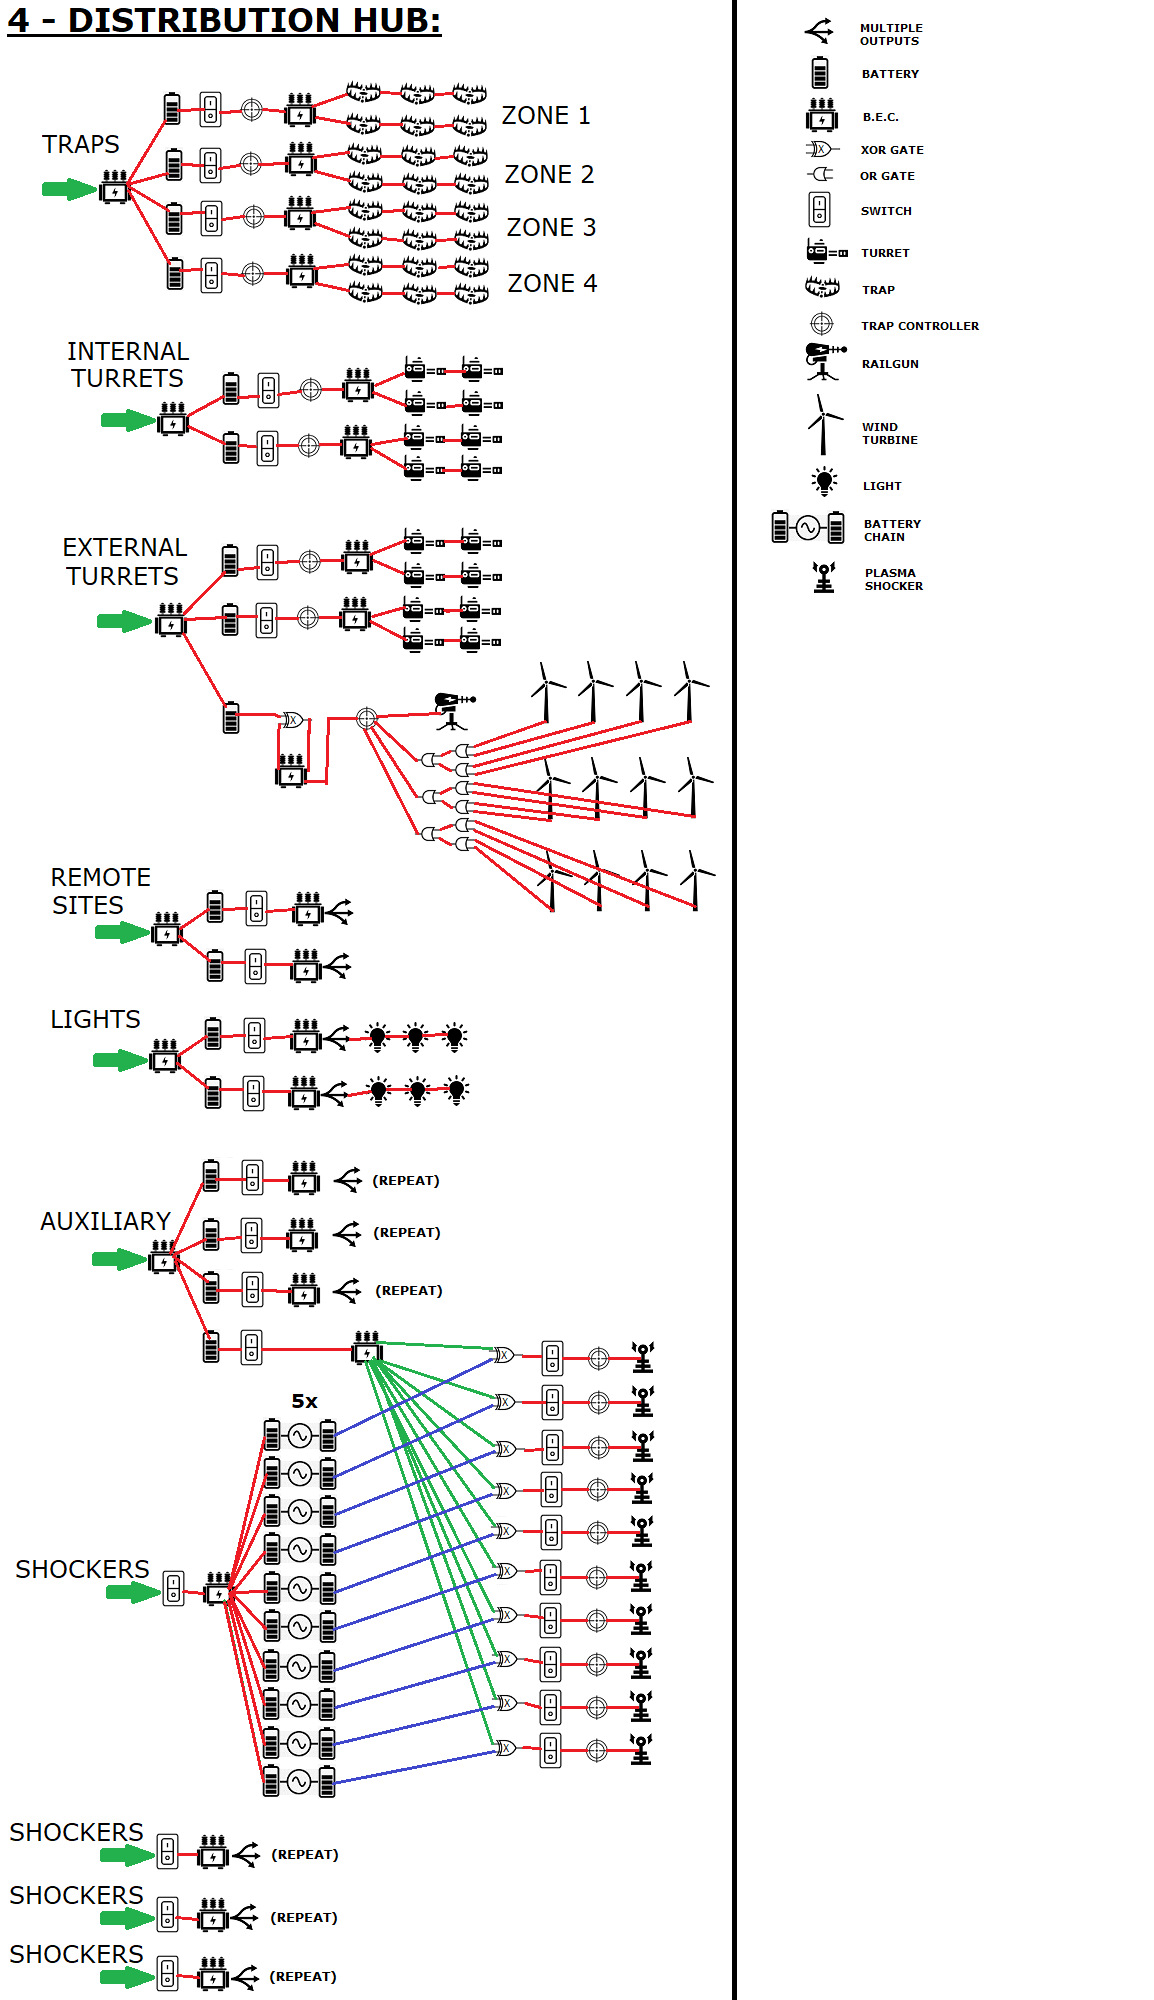
Master Circuit Phase 4 – Distribution Hub
This is the end of the line. This is where power gets spent. This setup can support up to 40 plasma shockers although I wouldn’t recommend running them all at once or all the time for that matter.
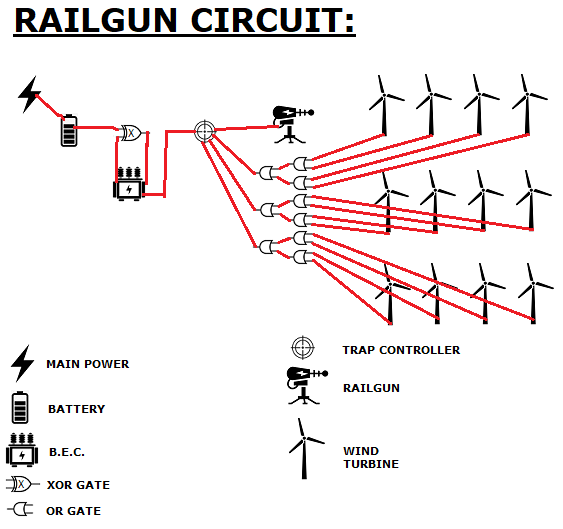
NOTE: The railgun circuit is included in this diagram so that it won’t always blow the circuit. You can use a gas genny if you want instead of the 12 wind turbines but then you have to pay for the gas bill. Plus you’re way overproducing power then. With this setup the 12 wind turbines exactly cover the auxiliary power needed to keep the thing from blowing up all the time. If it blows up on you too much (it will blow on occasion), then try adding 1 wind turbine and connect it directly to the TC. There should be 1 port open.
NOTE: This diagram includes running 10 shockers on 1 switch. Please note that the switch will operate backwards, to turn the shockers on, the switch needs to be flipped off and vise-versa.
The XOR gate requires power from both sources in order to shut a shocker off (the main battery which powers it and the power from the master switch BEC).
If a battery loses power then the shocker will come online drawing power from whichever source still has power. This is not good as it will continually drain power and prevent the battery you need to recharge from charging up. This is why I put the extra 10 switches in (one for each shocker). This was initially installed as fail-safe in case I needed to flip a shocker off in this kind of situation. It ended up becoming pattern control for me because I like to build 4 lines of these 10x shockers.
I’ve had a lot of good fortune working with this master circuit design and I hope that you will too. Enjoy! 🙂
Here is specifically just the railgun circuit:
Here is the entire circuit in one image:
Important locations
There are 6 mineral mines:
1 Aluminum mine near the east city:
45.57N 171.87E
2 Aluminum + Magnesium mines in the desert biome:
38.35N 170.5E
34.9N 163.76E
1 Titanium mine near the southwest city:
37N 158.57E
2 Titanium + Gold mines in the tundra biome:
52.45N 156.55E
53.4N 163.52E
List of Dedicated Server Hosts
I’m going to post this list because the official servers are still plagued with cheaters still and people are still looking for solutions to play this game with their buddies online. I had to go search all this up and it was kind of a pain. No good list out there to reference (well OK a couple).
Pros of having a Dedicated Server:
– Your buddies can play even when you’re not there to host the game. Game is 24/7 live if you want it to be.
– Your PC doesn’t have to carry the load of processing everything so the game should run faster / better / more stable, especially when multiple other clients are connecting.
– You can control who gets to play there by using a password and / or the ban filter. No more WeMOD cheaters. You can also flip it off if you don’t want it used when you’re not there.
– If the game gets messed up you can simply restore a backup (similar to loading a save game).
– The official servers can reset at any time to day zero and force you to start over. With your own server you start over when you want to (or when an update forces us all to).
– You don’t have to worry about saving the game all the time, the server is constantly saving automatically for you.
– When my game crashes I worry that I lost progress but I swear each time I log back in and pick right back up where I left off, it’s craaaazy good.
– They’re not that expensive. I eat $10 or $15 a day easily. In one meal sometimes. So in this sense I am willing to buy the hosting company one meal a month for hosting my game for me. Deal.
I use GTX Gaming. They run out of the U.K. Been using them for months and it’s been a really solid service, I highly recommend them. I chose them because they are the cheapest one I found at the time I was looking that has good Night of the Dead integration.
All these hosting companies have integrated with Night of the Dead already so it’s easy to setup and use. I already checked over each web site to make sure it looks solid. Each link will take you to the hosting companies NOTD page.
GTX Gaming: $9.60 /mo.
https://www.gtxgaming.co.uk/night-of-the-dead-server-hosting/
My Black Box Hosting: $10.20 /mo.
https://www.myblackboxhosting.com/night-of-the-dead-server-hosting/
Zap Hosting: $12.14 /mo.
https://zap-hosting.com/en/night-of-the-dead-server-hosting/
Ping Perfect: $12.28 /mo.
https://pingperfect.com/gameservers/night-of-the-dead-game-server-hosting-rental.php
G-Portal: $14.00 /mo.
https://www.g-portal.com/en/gameserver/night-of-the-dead-server-hosting
Citadel Servers: $14.54 /mo.
https://citadelservers.com/game-servers/night-of-the-dead-game-hosting
Host Havoc: $15.00 /mo.
https://hosthavoc.com/game-servers/night-of-the-dead
Blue Fang Solutions: $15.00 /mo.
https://www.bluefangsolutions.com/shop/night-of-the-dead/
1G Server Host: $15.00 /mo.
https://1gserverhost.com/night-of-the-dead-server-hosting/
4net Players: $15.01 /mo.
https://www.4netplayers.com/en/server-hosting/night-of-the-dead-server-rental/?referer=https://www.nightofthedead.org/
Logic Servers: $15.72 /mo.
https://logicservers.com/game-servers/night-of-the-dead
Survival Servers: $16.50 /mo.
https://www.survivalservers.com/services/game_servers/night_of_the_dead/
GG Host: $25.25 /mo.
https://www.gghost.games/store/nightofthedead
And of course if you know how to do it, you COULD use the Google cloud or amazon AWS. They have a free 30 day trial but after that it could run you up to like $300 a month.
Or you could also run your own dedicated server if you’ve got the hardware yourself. Follow the guide in the pinned topic about dedicated servers for configuration details.