
Tips for starting the game. Includes light spoilers but no story spoilers and only very limited location spoilers.
Your First Base
A large part of this game centers around building and improving a base, and later, up to three bases. Your base is defined as an area around a Pal Box – this base area appears as a large blue ring around your Pal Box.
You want to situate your Pal Box away from any walls or other obstructions, because when you summon Pals out of your box to your base, they will appear behind your Palbox – if it is situated too close to an obstruction, the Pals may spawn inside the wall.
But where to build your base?
You’re going to need a few resources in large quantities:
- Wood
- Stone
- Ore (used for crafting many, many things in the mid to late game, and required in vast quantities)
- Paladium Crystals (used for many things, but most importantly, making your Pal balls, used to capture pals)
The first two are really easy to find in the starting area, and there are actually base items you can build that allow you to mine these resources infinitely.
The latter two are more of an issue. Paladium Crystals aren’t tremendously important to situate in your starting base (you can craft them from stone, and eventually, you will have so much stone there is little else to use it for) but Ore is a bit trickier – it is the metallic-looking rock formations that are larger than the normal rock. You won’t need it immediately, but you will need it soon, and once you start needing it, you will never stop needing it – it is the primary resource you use to craft things for almost the entire game, and you need massive quantities of it, as you will be using it for weapons, armor, better Pal Balls, and numerous other things.
You only really need one ore node to start out with in your base (you will eventually unlock the ability to build multiple bases, and your secondary base will likely be devoted to farming metal) but it is useful to have at least one starting out. The best place for this is down a few steps from the starting area, where a metal formation is surrounded by some rocks and trees. You can even snag a Paladium Crystal formation, giving you everything you need on easy farm from the get go.
If you want a base with more ore, it is possible to venture further afield and build a very good starting base with access to a large amount of ore.
When you head towards the first tower, you can see an elevated area beyond it with red trees on it. As you approach the tower from the starting area, up and to the left of the tower in that area is a ruined church with a fast travel point, and behind that church is a large number of ore nodes.
Building your first base here will allow you to start out with a very good metal mining base, allowing you to much more easily gather large quantities of ore.
Note that your Pals will not initially be able to harvest the metal on their own; you need a pal with level 2 mining to mine for ore. Still, it is useful to have access early.
In the late game, you will additionally need large quantities of coal and sulfur, but you won’t need to worry about those until you are quite high level; it is advantageous to set up bases to harvest coal at the very least, and sulfur is useful to be able to harvest in the end-game because large quantities are needed to craft end-game ammunition. There are some base locations later in the game that will allow you to harvest at least one of these resources, plus ore, which can be handy.
Capturing Pals
Pals are most easily captured by reducing their hit points to a low level then throwing a Pal Ball at them. Applying status ailments to Pals will also make them easier to catch.
Note that you can prevent your currently active Pals from attacking by using the radial menu (accessed by holding 4 on the keyboard) and telling them not to attack; this is useful for reducing Pals to low hit point totals without killing them. You can also recall your Pal into its ball in order to prevent it from attacking, but the radial menu has the advantage that it will also stop any Pals you have with passive abilities that allow them to attack even when they aren’t your active Pal (like Daedream) from killing the Pal you are trying to capture.
As you progress through the game, you will unlock better and better Pal Balls. Use them! The higher level Pal Balls have a higher catch rate, which is necessary for capturing higher level Pals, and the higher level of reliability is worth the extra resources they cost.
Elements
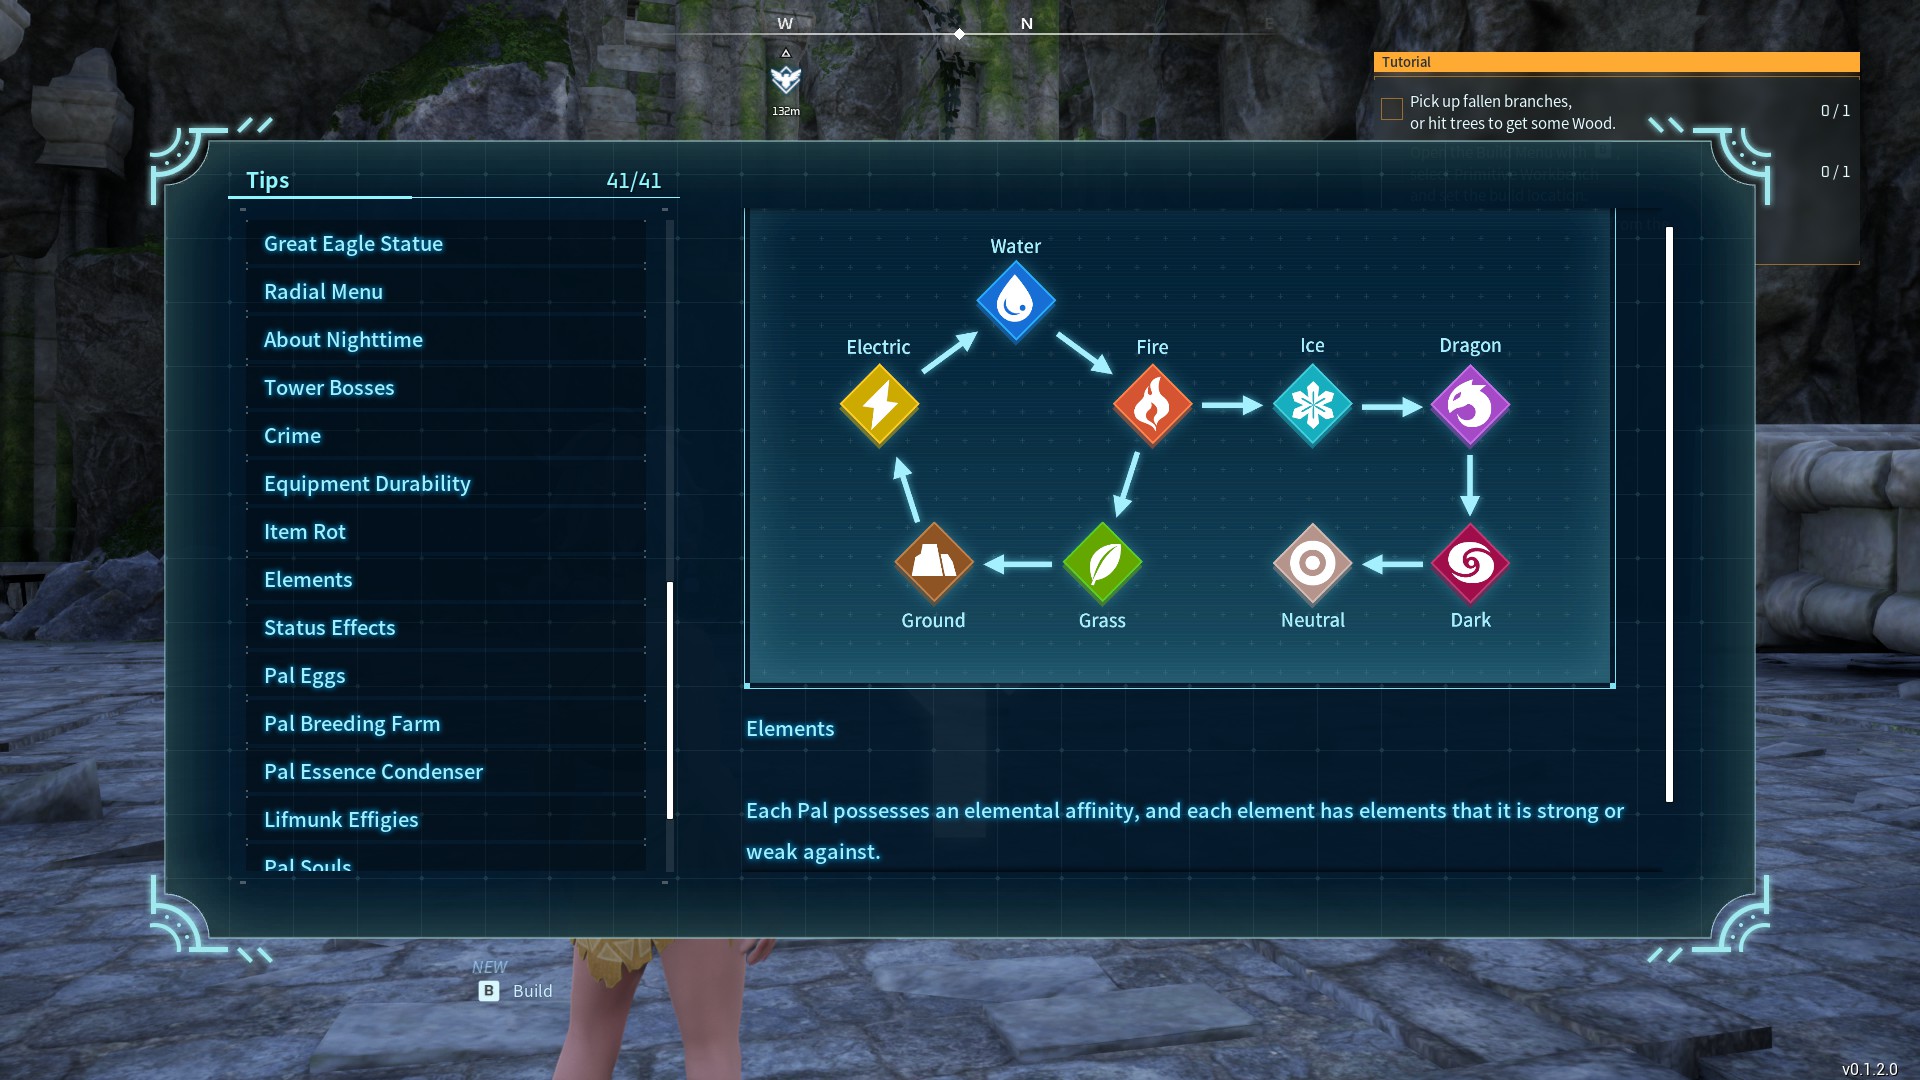
Elemental weaknesses and resistances are important in this game; weaknesses are particularly important, as the damage is very, very high.
The chart is pretty simple – most types have one weakness and one element whose type they exploit. Normal type pals are the worst, as they are vulnerable to dark and nothing is resistant to them.
Note that Pals are resistant both to their own element type, as well as the element type that they exploit.
Pals gain a 20% damage bonus if they are using an attack of the same type as what they are, but they deal double damage if they are using an element type that they exploit – as such, exploiting elements is more important than matching element types, but it is best to do both.
You might think that Fire pals are the best pals – they have only one weakness, but are good against two kinds of pals. This is sort of true, but it is worth noting that there are extensive areas late in the game that are full of fire Pals, where these Pals are not particularly great offensively – though there are also late-game ice areas, where they are excellent.
Having a variety of Pal types – and a variety of attack types – is helpful for making tough fights easier, especially as the game goes on towards the end and you can no longer simply outlevel threats. Exploiting the vulnerabilities of the final boss in the game is almost essential.
Note also that Pals of different types also often have different affinities – for instance, fire pals almost always have kindling, the ability to cook food or smelt iron, while grass pals almost always have planting, and water pals watering. This makes having a variety of different Pal types very important for manning your base as well – however, not all pals are restricted to a single type of work, and some are more versatile.
Automate Your Base
Your Pals can be used to automatically do work around your base. Increasing your base level allows you to put more Pals in your base, which can allow you to automate more things.
Different Pals have different abilities that they can use around your base – some can mine, some can cook food and smelt metal, some can water plants or run water mills, some can charge electrical generators, etc.
Pals with higher skill levels in an ability makes them do that thing faster. It is also possible to
Getting and using the right pals for your base will make your life much, much easier, and will allow you to craft and harvest things way faster.
Early Important Pals
The three most important early game pals are Nitewing, Daedream, and Tombat. Daedream is a floating magical sheep and Nitewing is a large flying bird high in the sky; both of these can be found in the starting areas, with Daedream being a single digit enemy you will be able to capture quite early, while Nitewing is about level 10 or so and a little more dangerous.
Daedream is important because of the Daedream’s Harness, which allows you to have Daedream out helping you fight while you have a second Pal summoned. This is extremely useful, and allows you to have much more offensive firepower than would otherwise be possible.
Nitewing is important because it is your first flying mount; you will end up using them for a long time, until you find a better flying mount. Their ability to fly will help you find eggs, treasure chests, and various important collectibles, as well as much more rapidly explore the map. They also allow you to fly over bodies of water, allowing you to explore other islands.

Tombat is found slightly later in the game, and only at night, in the area around and beyond the tower. This Pal is very useful because it is the first Pal with level 2 mining, which will allow you to have your Pals mine ore automatically.
Pal Fruits
Pal Fruits grow on glowing trees in the environment; as you find them, mark them on your map so you can find them again. These spawn fruit that, when eaten, grant your Pals new attacks, similar to TMs from Pokemon, though they are not reusable. However, the fruits do respawn, so don’t be afraid of using them; as you progress into higher level areas, you will find fruits with higher-level skills in them.
Generating Food
The best ways to generate food is to grow plants using plantations in your base, and to have Pals that generate food items themselves in farms. Chikipi lays eggs, which can be cooked, and Caprity, the goat with a berry bush on its back, will grow berries. You can grow a few different types of plants over the course of the game as well, which can be used for crafting food items at campfires and cooking stations. Cooking food greatly increases its value and some food items will give you bonuses when you eat them.
As you progress deeper into the game, you will unlock more Pals which produce food items.
Note that some Pals will produce things other than food on farms; Lamball, for instance, will produce wool if farmed.
Climbing the Tech Tree
The tech tree is at the center of the game, and levelling up will get you access to new things to craft, which will make your life much easier. Always make sure to prioritize the buildings which are used to build things and the structures necessary to level up your base. Getting a good weapon and good armor is useful for improving your survivability and letting you help your pals more easily.
The main way of gaining experience is capturing Pals; the first ten times you capture a species of Pal, you will get a substantial amount of experience. This means that capturing up to ten copies of Pals is very useful, as it will help you level up rapidly. Once you have captured at least ten copies of a Pal, capturing additional ones is generally less important, but there is a way of combining multiple Pals of the same type later on to make more powerful Pals, so if it is a Pal you’re likely to be using for a long time (such as Daedream or Nitewing, or some other Pal you enjoy using) capturing up to 21 copies of them for the combiner can be valuable.
In addition, you (and your pals!) gain experience by crafting things and by fighting things – if your Pal is in your base while crafting, they will gain experience, and if they are in your party while crafting or fighting things, even if they are not your active Pal, they will gain experience. This is a good way to level up Pals if you have an underleveled Pal you want to use.
Exploration is Important
Not only is finding new Pals important, but finding fast travel points gets you more technology points, while bosses will help get you more lost technology points (a secondary tech tree that contains some useful things). Don’t be afraid to explore – the world is quite large, and there’s a large chunk of it which is accessible to even low-level characters. As you go up in level, you will be able to enter more and more dangerous areas, giving you access to even more stuff.
Beating bosses is also useful because instead of killing them, you can instead capture them and gain strong (and sometimes, unique) Pals. Bosses will also drop lost technology items (not to be confused with the tech points), which are necessary for crafting a number of powerful items, including anything from blueprints and many later items on the tech tree. In some cases, they will also drop blueprints, which can be used to craft better equipment.
Mini dungeons – little caves and similar things around the map – can give you an early power boost, as well as give you access to some new monsters you won’t find on the surface. You will find blueprints in these dungeons, which allow you to build upgraded versions of gear, which can give you a power boost as well, and also allow you to avoid spending technology points on the basic version of the item. As you progress through the game, you will find higher level versions of these dungeons, which give better and better rewards. Each dungeon also has a boss at the end, giving you access to a potentially more powerful version of the pals you would otherwise be capturing. These dungeons can also contain equippable accessories that give you various benefits, like resistance to high or low temperatures, or which boost your stats. Later dungeons give you better versions of these items.
There are little bases full of human enemies, and some of these contain captured Pals – freeing those Pals will allow you to acquire them, which can get you some different Pals which ordinarily you wouldn’t be able to find until later on.
Finally, there are eggs you can find in the environment. These can be hatched to get you additional Pals – some of which might be otherwise difficult to find, particularly those from huge eggs. Moreover, these Pals don’t require you to use Palballs to capture them, which is quite handy. Collecting these eggs and then hatching them can allow you to expand your Pals owned and get you experience for “capturing” new Pals.
Later on in the game, you will unlock breeding, which will give you the ability to create eggs with Pals that have a mix of the traits of their parents, allowing you to make stronger and more specialized Pals.

Craft Pal Gear
Pal Gear gives your Pals extremely useful special abilities. Riding Pals is very useful, as it allows you to choose which abilities to use when, but some of the most useful abilities are the ability to effectively turn your Pal into a weapon or have them use a special weapon – these often allow you to deal very large amounts of damage very rapidly, which is invaluable for rapidly causing damage to more dangerous and powerful Pals.
Note that mounting Pals does have an additional advantage – all of the cooldowns while mounted and unmounted are separate, so if you have a mount with long-cooldown abilities, you can mount them, use those abilities, then dismount, and the Pal will use them again.
If you use a Pal, crafting the appropriate gear to use their special ability will make them significantly more useful to you.
Merchants
There are NPC merchants in this game that sell a variety of different items, or which even sell Pals! Moreover, they also will buy items or Pals from you. Some items, like Nails, are easily crafted and are worth quite a bit of money, so if you are short on cash at some point in the game, it is possible to raise money quickly. Different merchants sell different items, and the Pal Merchants’ stock changes.
There are some merchants that sell significantly better items or Pals than others. Mark their location on your map – you may want to revisit them later.

Don’t Get Stuck
Don’t spin your wheels in the starting area forever; exploring further afield will allow you to gain experience and new Pals more quickly. There’s a lot to find, and a lot of areas that you can explore even as a 1st level character. As you progress, more and more of the map will be safe to explore, so don’t be afraid to venture into new places to see new things and find new Pals!