A guide that will help with catching all the fish in the game.
Introduction
This guide will help you with catching all types of fish for the completion list.
Fish you already caught can be found in [Another Life] section of the completion list. There are four spots for catching fish. Two for sea and two for river fish. There are 29 types of fish in total, but you will also need to catch 10 regular and 1 big tuna for the diligence records.
Catching each fish also gives 10 Virtue (at the base level of the Virtue Cultivation perk). This makes it an okay way to get a bunch of Virtue early on in the game.
Fishing Poles
There are 6 available fishing rods, each with its pros and cons.
- Easy Starter – Your starting fishing pole. The worst one in the game, but is free and available from the start.
- River Classic – Decent for catching fish in the river. Costs 400 Virtue at any shrine.
- Rivermaster – Great for catching fish in the river. Costs 1,500 Virtue at any shrine.
- Sea Classic – Decent for catching fish in the sea. Costs 400 Virtue at any shrine.
- Seamaster – Great for catching fish in the river. Costs 1,500 Virtue at any shrine.
- Peerless Pole – Remember that part when I told you that each fishing rod has pros and cons? Well, I lied. This is the perfect fishing rod, with maxed-out stats in every category. Works equally as amazing both in the river and in the sea. Costs 4,000 Virtue at any shrine.
Considering how fast it is to get 400 Virtue even just by fishing itself, I would highly recommend switching from the Easy Starter as soon as you can. To equip a new fishing rod you need to start the minigame and press ▢ on the Dualshock, X on the Xbox controller or R on the keyboard.
Fishing Bait
Next up is fishing bait. You can catch some even without it, but using it makes fish more plentiful, and rare types of it appear with a higher chance. There are 4 types of bait:
- Bait – 500 mon. Can be bought from a General Goods store or a Baitmonger in Rakunai. This is the cheapest option, but is still better than nothing at all.
- Quality Bait – 1000 mon. Can be bought from a General Goods store or a Baitmonger in Rakunai. This one is sufficient enough to get most of the fish you need.
- Special Bait – 2000 mon. Can be bought from a Baitmonger in Rakunai. It is the second best option.
- Top-grade Bait – 5000 mon. Can be bought from a Baitmonger in Rakunai. Extremely expensive in the early game, but attracts a ton of fish. Extremely helpful with catching the Big Tuna.
Now that you know about both fishing rods and the bait, it’s time to actually catch some fish. You can tell fish apart by its silhouette in water, the speed with which it moves (or if it moves at all), its size, and in which part of the screen it’s located.
Fishing Spots
There are 4 fishing spots, and all of them can be divided into 3 to 5 different sections/zones. (These images are a rough estimate, and are not extremely precise)
Fishing Banks
East Coast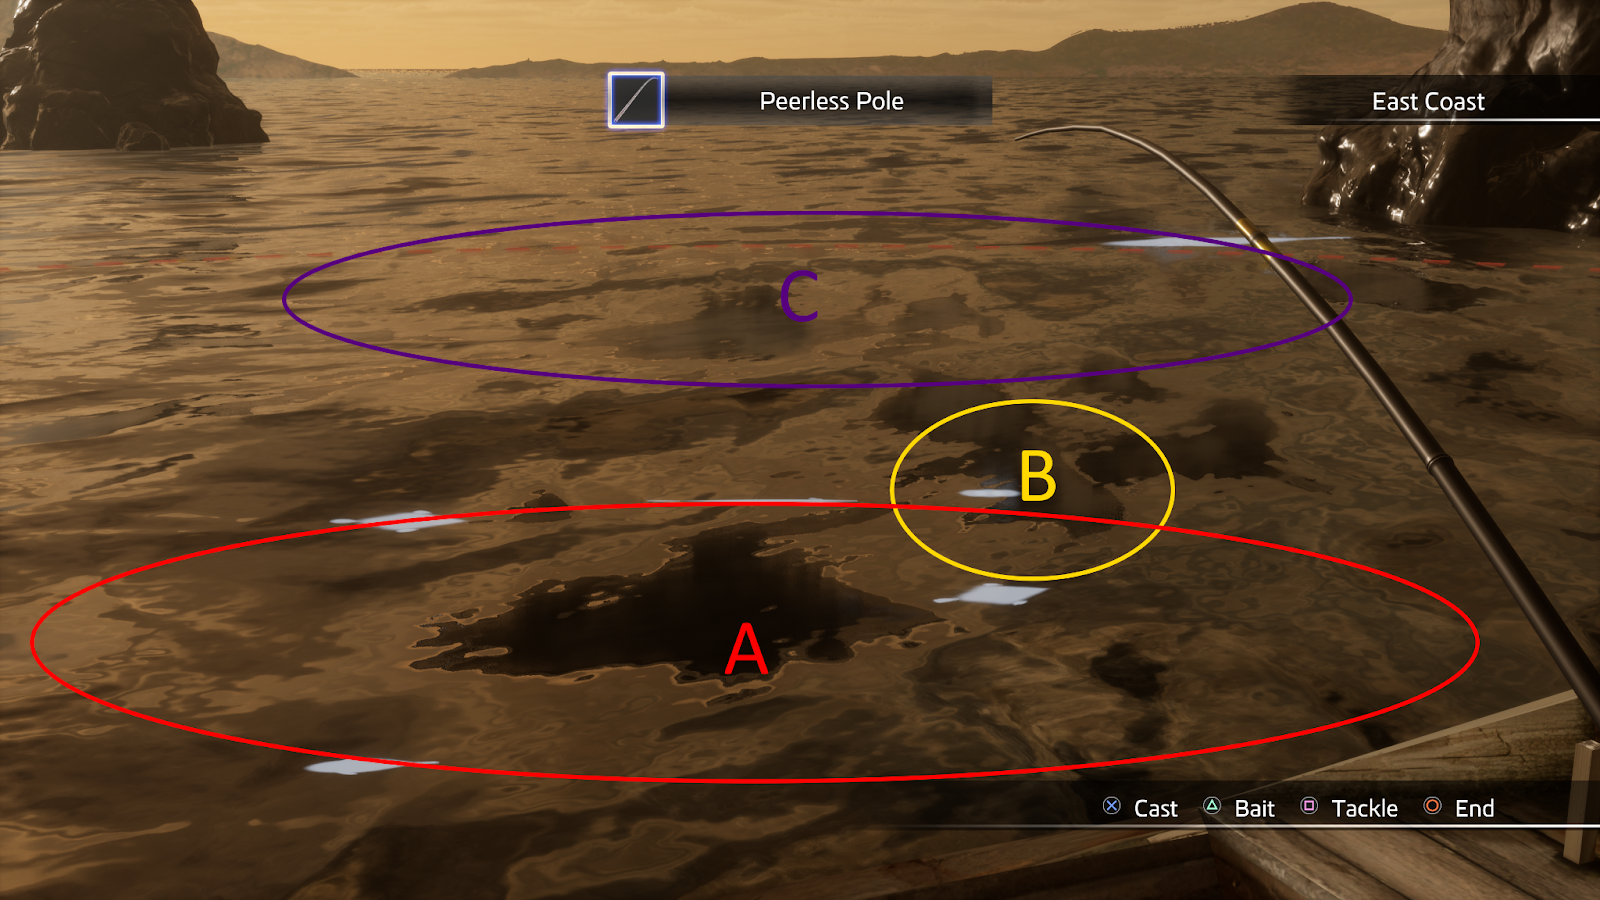
Fushimi River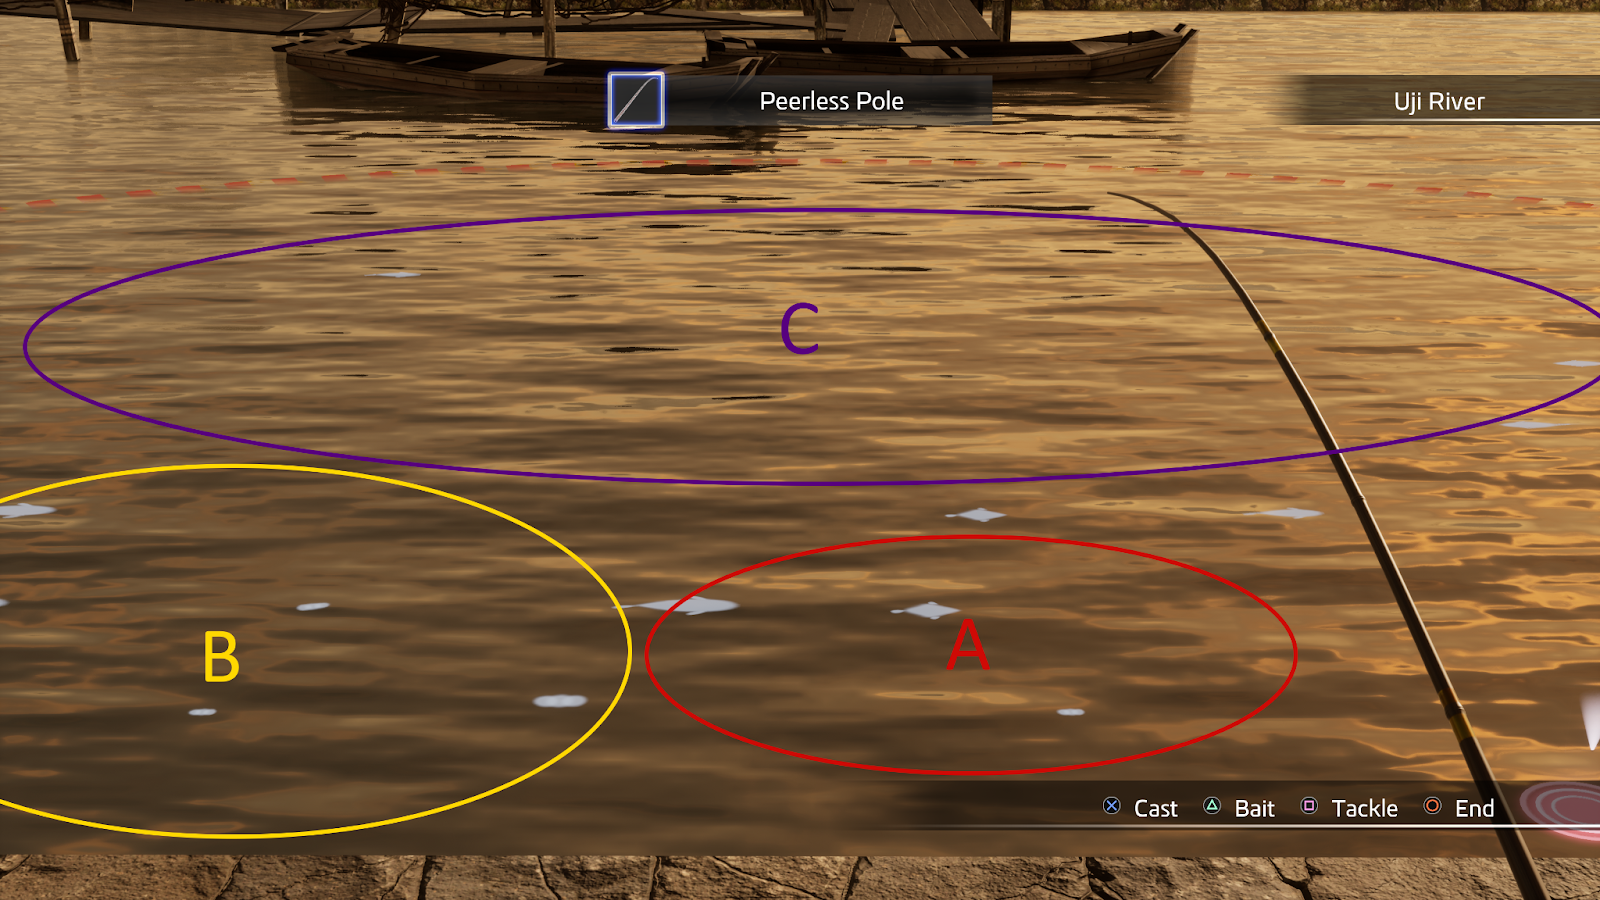
Mukurogai River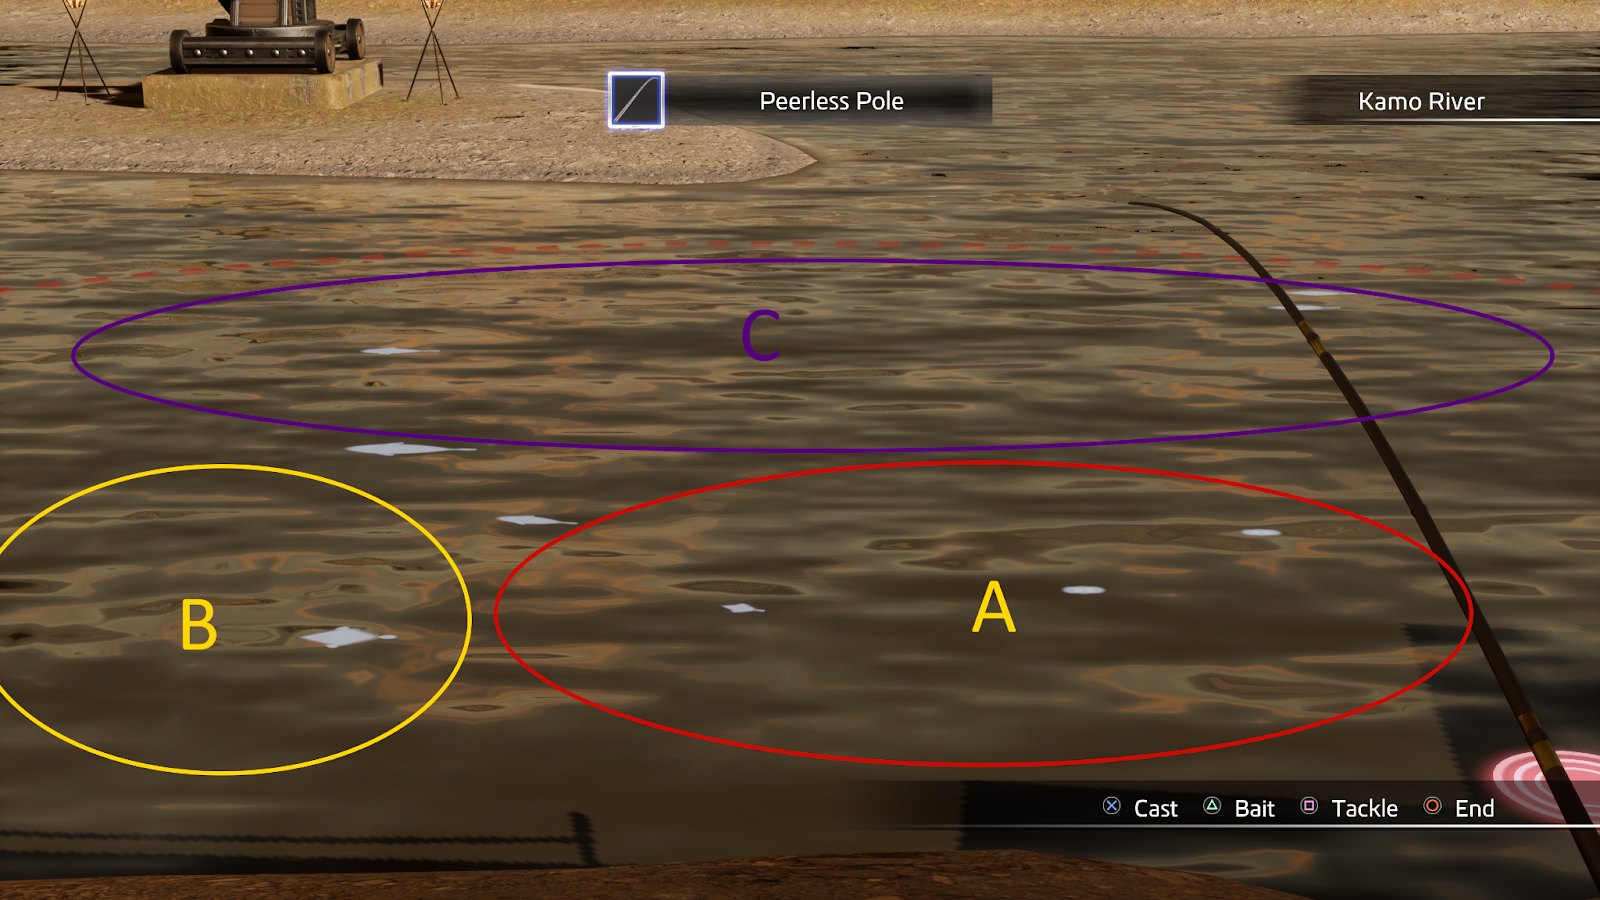
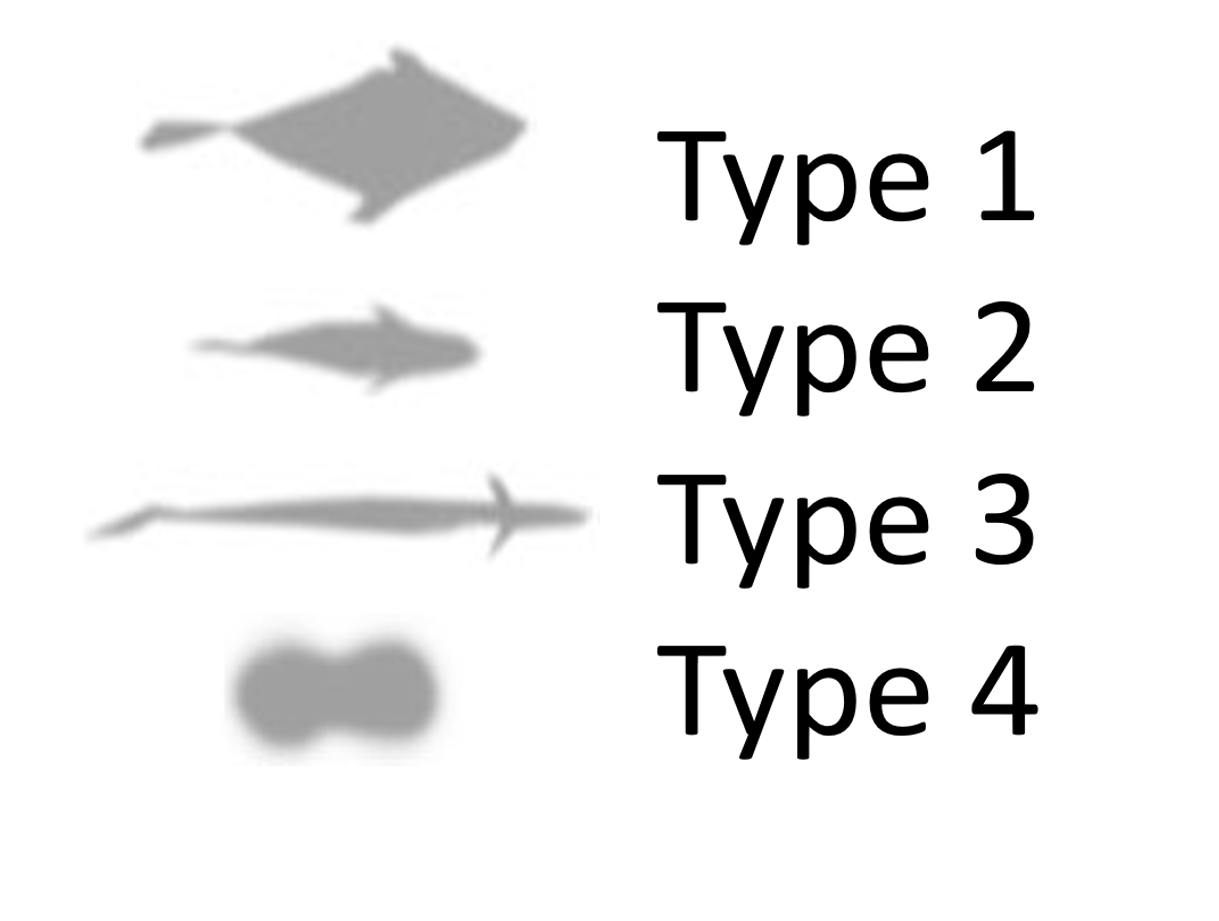
Fish Silhouettes
There are 4 types of fish silhouettes.
Fish List
Now, it’s finally time to get to work. A lot of the information is taken from Japanese resources, with some personal observations. This list is sorted in the same way as it is sorted in the completion list in the game itself, for ease of navigation (use Ctrl+F to search for the fish you need).
| Fish | Where to catch | Zone | Silhouette |
| Crucian Carp | Both rivers | A, B | Type 1 |
| Carp | Fushimi River | A, B | Type 2 |
| Nishikigoi | Fushimi River | B | Type 2 |
| Ghost Koi | Fushimi River | A | Type 2 |
| Electric Catfish | Both Rivers | Fushimi River B Mukurogai River C |
Type 2 |
| Salmon | Fushimi River | C (moves a lot) | Type 2 |
| String Fish | Mukurogai River | C (moves a lot) | Type 2 |
| Rainbow Trout | Both Rivers | Fushimi River C Mukurogai River A, B, C |
Type 2 |
| Softshell Turtle | Fushimi River | A,C | Type 4 |
| Freshwater Eel | Mukurogai River | A | Type 3 |
| Sweetfish | Mukurogai River | C | Type 2 |
| Crawfish | Both Rivers | Fushimi River B Mukurogai River A |
Type 4 |
| Marlin | East Coast | C | Type 2 |
| Bluefin Tuna | East Coast | C, A | Type 2 |
| Squid | Fishing Banks | A | Type 4 |
| Righteye Flounder | East Coast | A | Type 1 |
| Sea Bream | Fishing Banks | A | Type 1 |
| Scorpionfish | Fishing Banks | B, D, E | Type 4 |
| Thread-Sail Filefish | Both Sea Spots | A | Type 1 |
| Tiger Prawn | Fishing Banks | A | Type 4 |
| Conger Eel | East Coast | A | Type 3 |
| Goby | Fishing Banks | A | Type 3 |
| Great White Shark | East Coast | C | Type 2 |
| Oarfish | East Coast | C | Type 3 |
| Spider Crab | East Coast | B | Type 4 |
| Common Octopus | Fishing Banks | C | Type 4 |
| Porcupinefish | Fishing Banks | D | Type 4 |
| Japanese Puffer | Fishing Banks | A | Type 4 |
| Whitebait | Both Sea Spots | Fishing Banks B, E East Coast A |
Type 2 Catching all of these fish will fully complete the fishing portion of the [Another Life] tab in the completion list. |
Diligence Records
There are also 5 fishing-related tasks in Diligence Records, yet again, in [Another Life] tab.
- Apprentice Angler – Catch 25 fish.
- Astute Angler – Catch 50 fish.
- Authoritative Angler – Catch 100 fish.
- Bluefin Beginner – Catch 10 tuna.
- Bluefin Boss – Catch a big tuna.
All of them are self-explanatory, however, catching a big tuna might be tricky. There is only a 10% chance of the big tuna spawning, and if the first tuna you catch isn’t the big one you need to reset the minigame, because none of the consecutive ones will be big either. Use the most expensive bait to maximize your chances.
If you have some corrections please let me know. Happy fishing!