I’ve seen several guides that simply tell you the answers that fill the blanks, but none that go in-depth into the clues the game gives you and how to logically get from a blank canvas to knowing what went on in the case. With this guide, that’s no longer true! Even if you’ve finished the game, you may find something here you missed, or you might have gotten the answers in a way I haven’t covered! Either way there should be something worth reading for anyone.
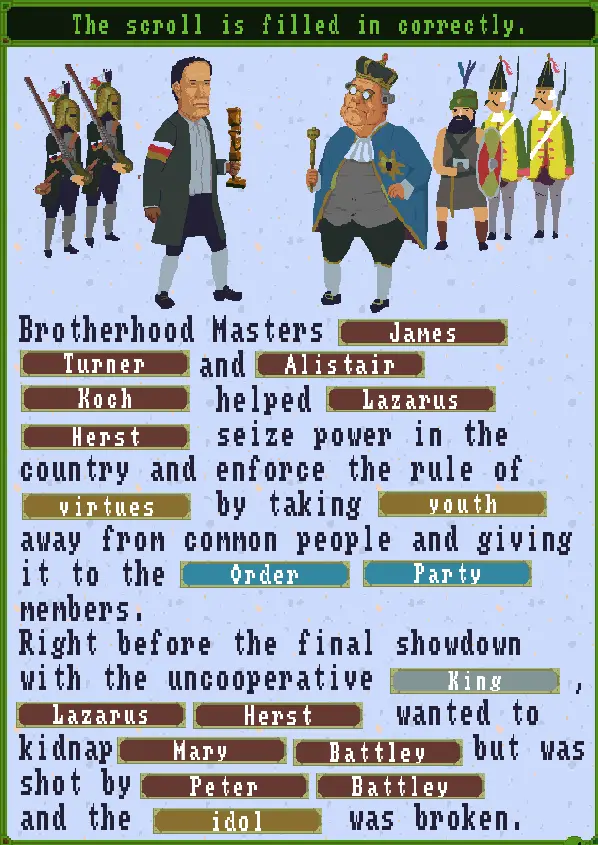
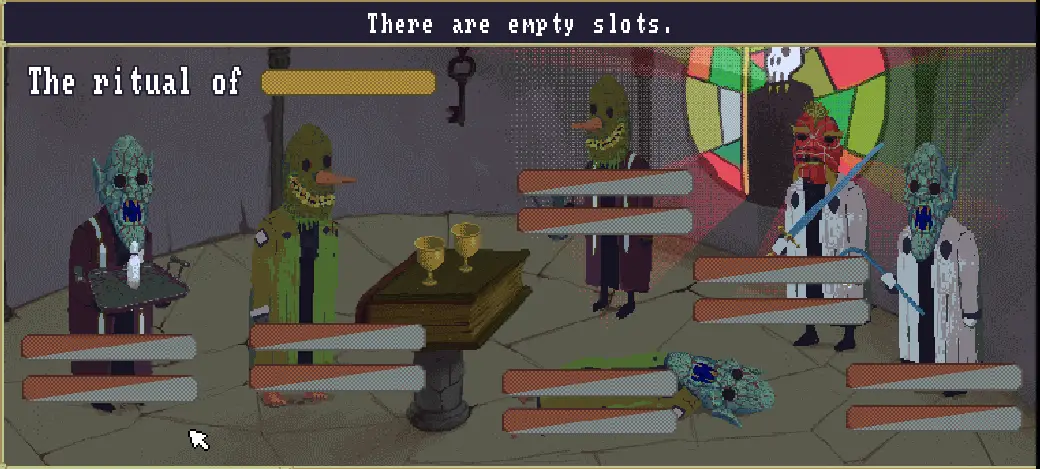
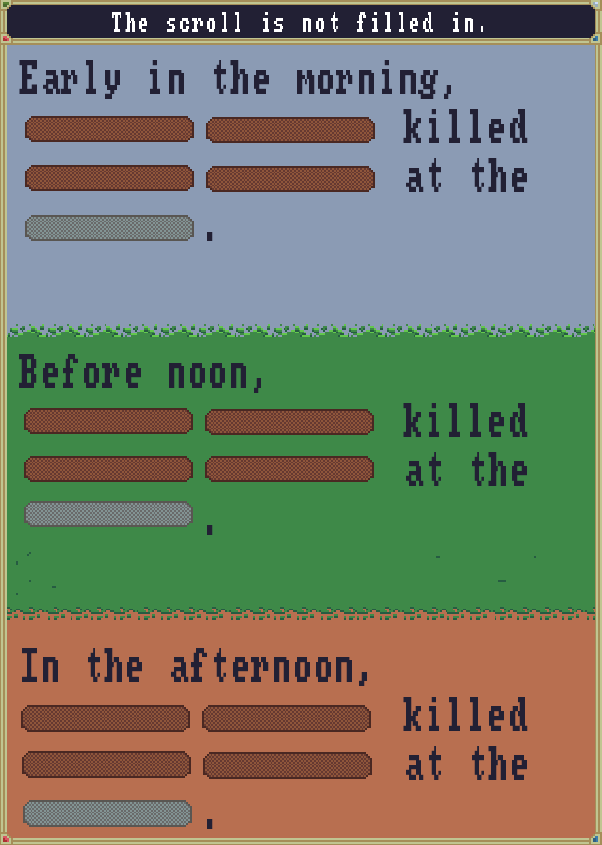
Case I – An Abrupt Termination of Contract (January 5, 1742)
Thinking scrolls:
1. Events
2. Identities
3. Camp location
Terms:
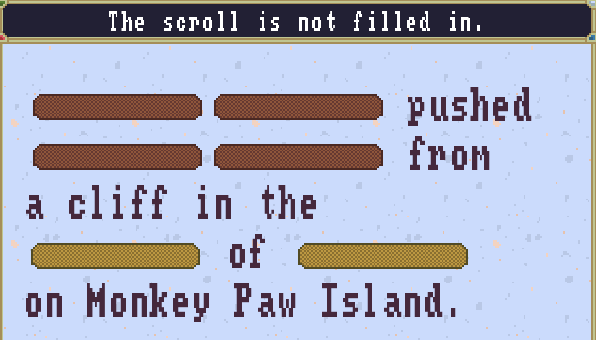
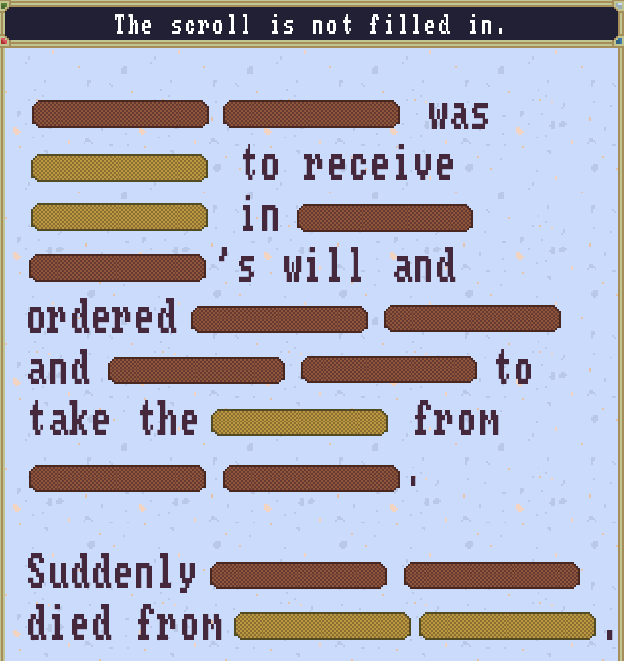
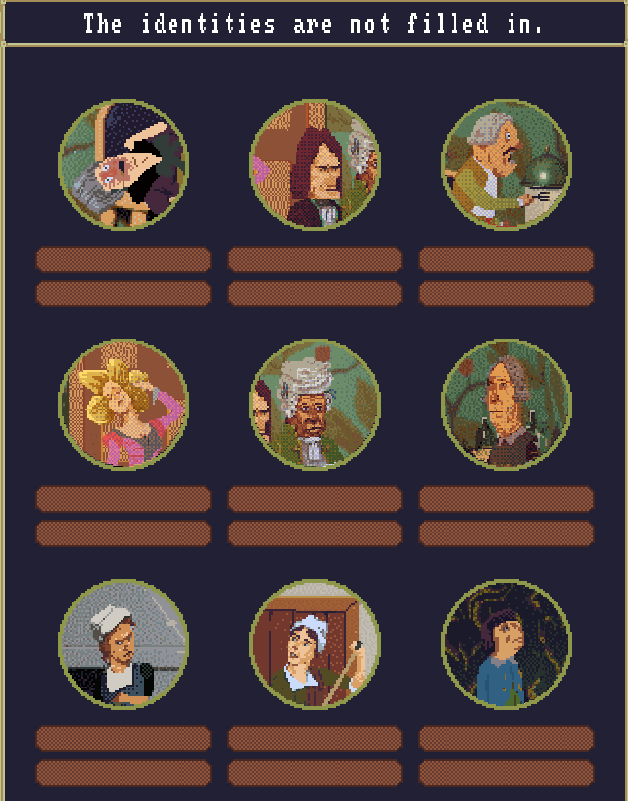
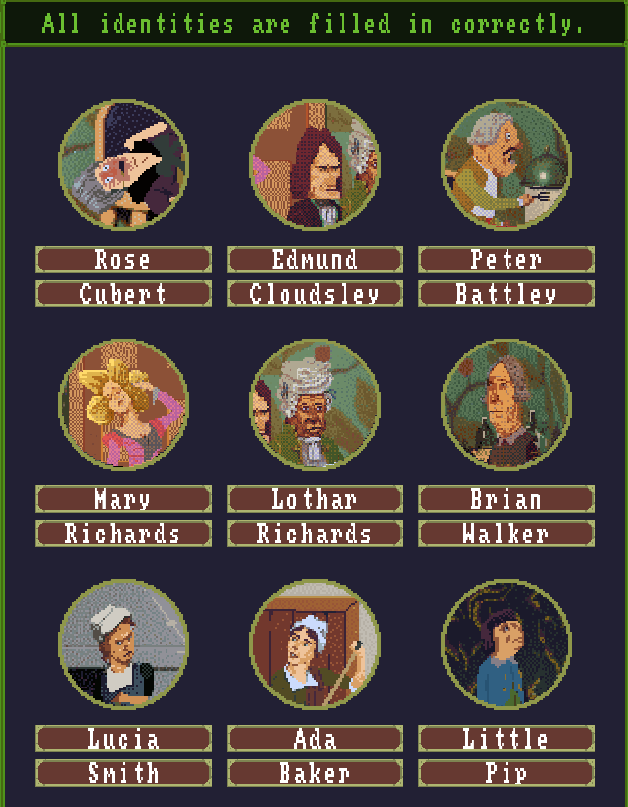
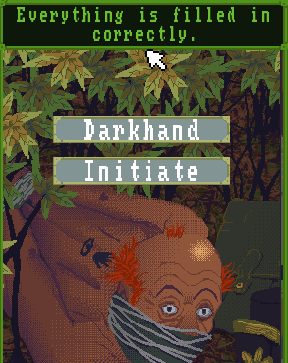
Albert, Cloudsley, Oberon, Geller – letter in inventory of either character
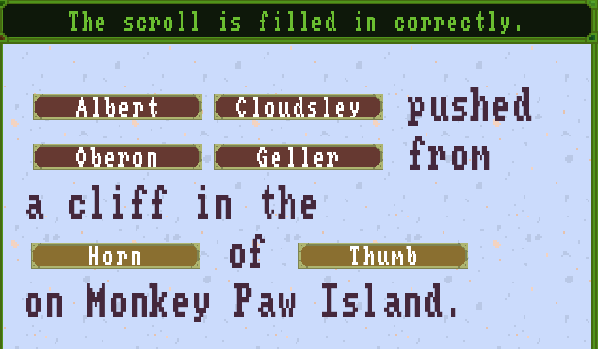
Horn, Finger, Thumb, Ruins, Xenopolis, Bay, Shadows – Map in inventory of man who was pushed
Deduction:
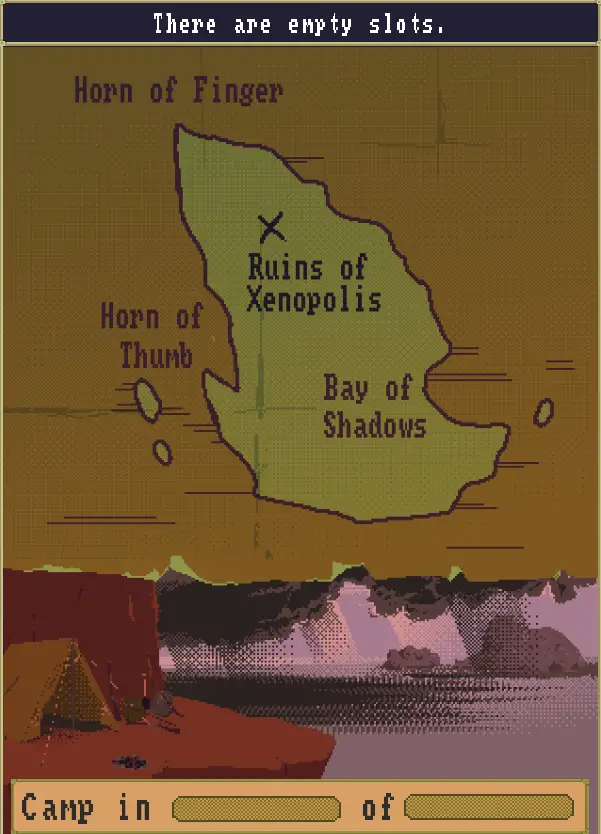
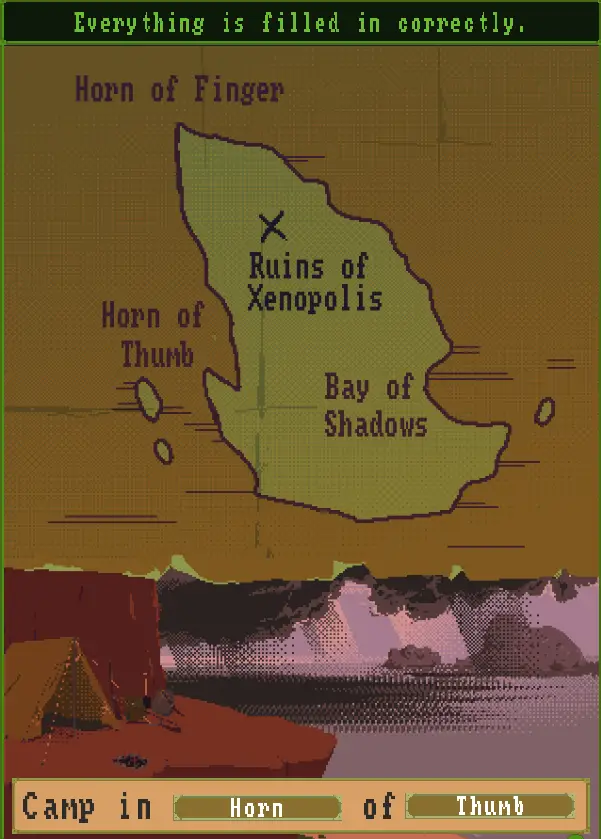
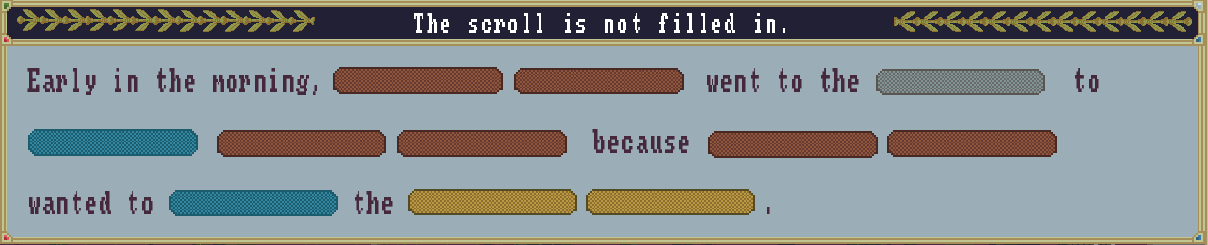
The camp location is probably the easiest scroll to start with. The characters are located at an edge of the main landmass that ends in a part that juts out, meaning it’s either the Horn of Thumb, Horn of Finger or end of the Bay of Shadows. However, if you look in the background there’s a small island behind them, and a slightly larger island next to that. This matches up with the layout of the Horn of Thumb if you rotate the perspective shown in the Exploring mode to that of the map, and so it has to be the Horn of Thumb they’re at.
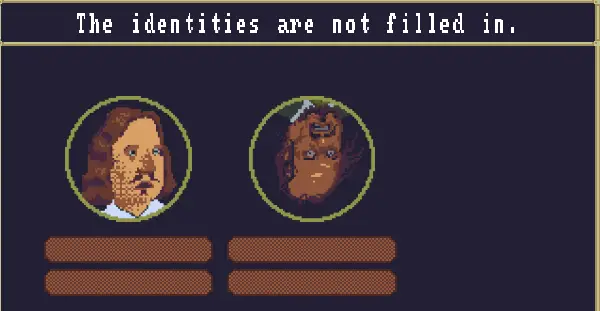
Next up is deciphering who is whom. We have two people going by the letters: Doctor Oberon Geller and Esquire Albert Cloudsley. The letter says that Albert has rights to two thirds of all valuables, while Oberon has rights to one third of all valuables and any golden statues found, for providing the map. This lines up with the contents of the bags, where one has tobacco and two bags filled with coins and gems, and the other has medical supplies, a golden statue with a red stone and a bag filled with coins and gems. The second bag must be Oberon’s since he has rights to the statues and is a doctor, so the other must be Albert’s.
The murderer is carrying a pipe, which matches up to the tobacco in Albert’s bag. Additionally, the victim is carrying the map, a scalpel and a medicine bottle, so must be Oberon. The dagger being carried by Albert has no relevance.
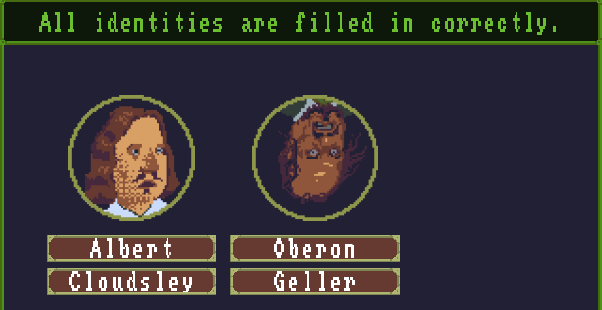
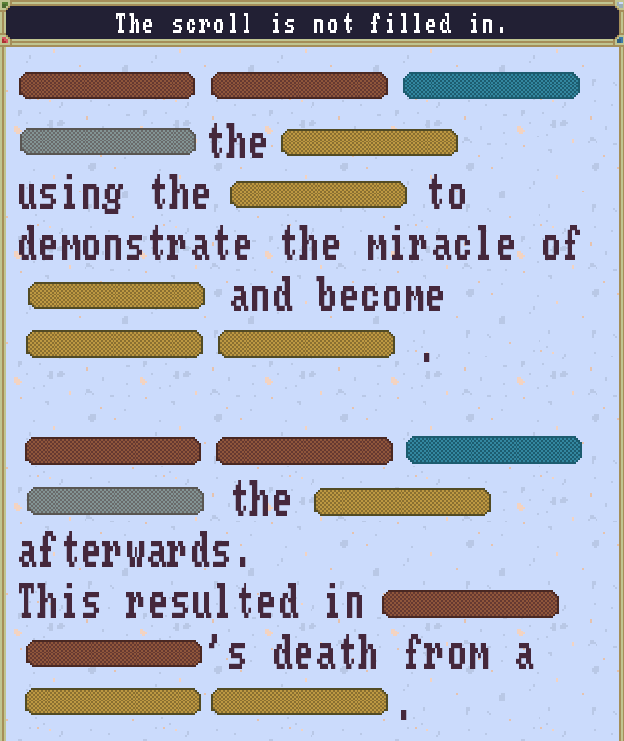
This enables us to fill in the identity scrolls and the events:
Source of date: Letters held by Albert and Oberon
Case II – The Untimely Passing of a Rural Gentleman (August 23, 1786)
Thinking scrolls:
1. Events
2. Identities
3. Attire
Terms:
Horse – Horse running in the background outside
Woodshire, Crowtower, Blackfield – Map on the wall
Spontaneous, Combustion, Sebastian, Cloudsley – Note on the desk
Dining, Hunting, Researching – Diary on the desk
Ladder – Click the ladder
Lead, Poisoning – Blue book jutting out of the shelf
Wound, Head – Click the victim’s head
Deduction:
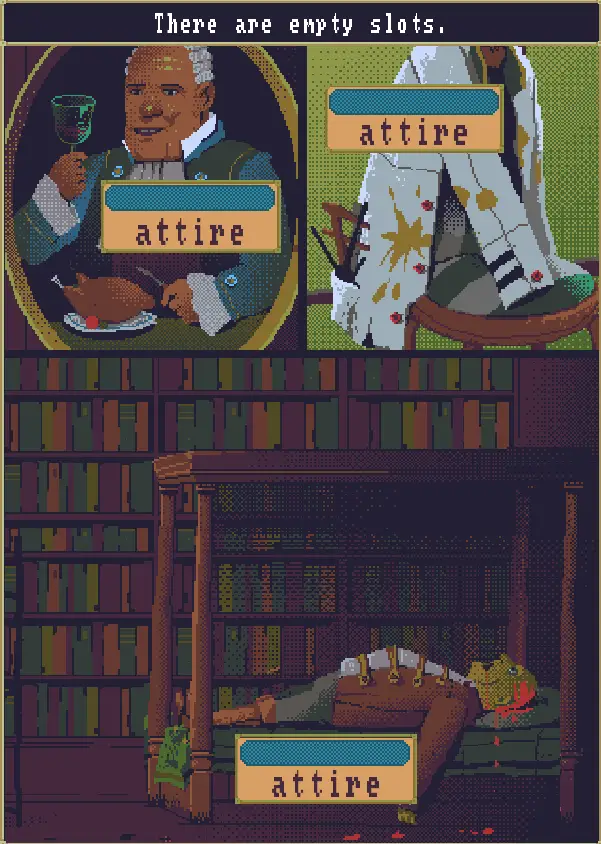
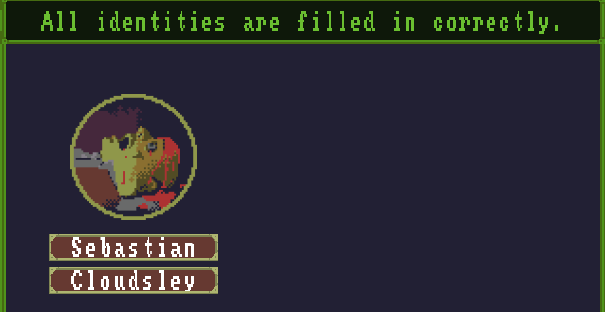
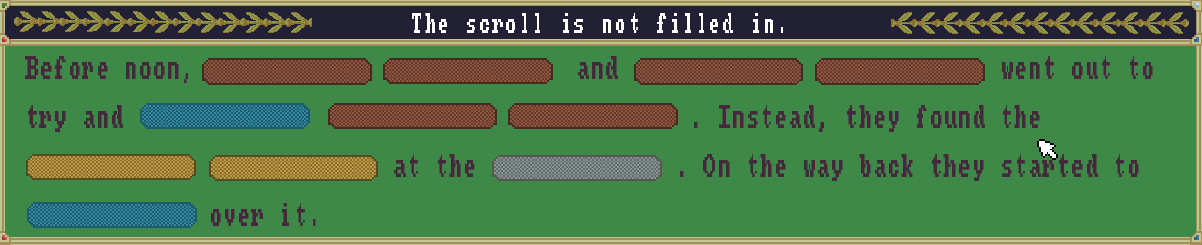
The identity couldn’t be easier: there’s only one first name and one last name, and so only one possibility. Our victim is Sebastian Cloudsley.
Deducing the attires is also straightforward. We have three possibilities: dining, hunting and researching. One image shows him eating and drinking, so it can’t be anything but the dining attire. The outfit next to is is clearly a lab coat covered in stains from experiments and has a measuring device in the pocket, so it’s a safe bet to say it’s the researching attire. By process of elimination, the remaining one in which he was dressed when he died is his hunting attire.
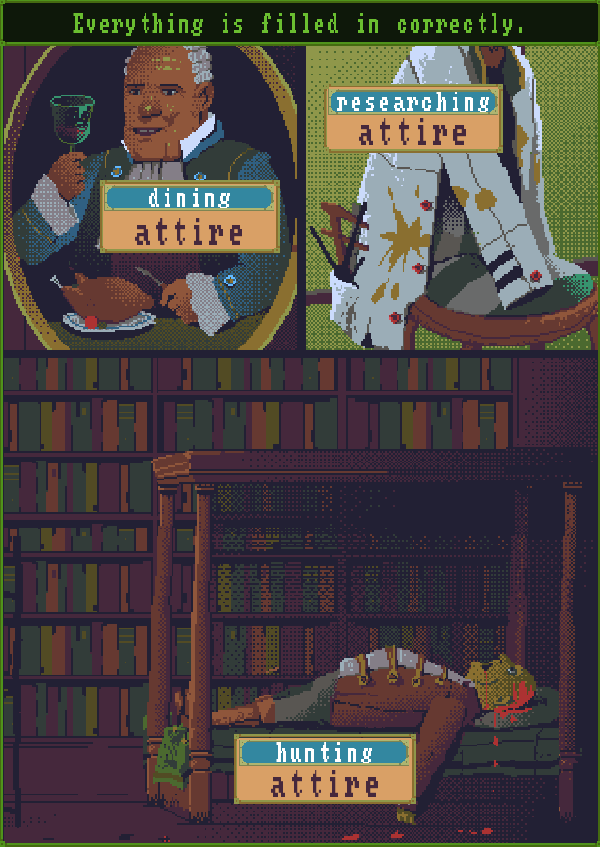
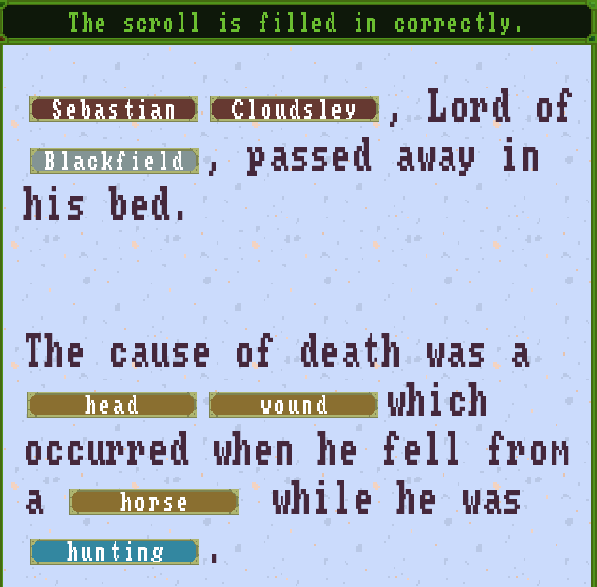
So on to the events. We have the name, so we can just fill in Sebastian Cloudsley. Where is he Lord of? There’s a yacht floating in the river outside. Neither Woodshire nor Crowtower have any water near them, so by process of elimination this must be Blackfield.
For establishing an order to things, it may be tempting to refer to the diary entry. But it’s actually a red herring: it’s dated for the 22nd of August, but the calendar shows that it’s actually the 23rd. The diary only exists to provide the attire terms.
For the cause of death, it’s fairly obvious that it’s a head wound. But there are two possibilities for the thing he fell from: the ladder, and the horse. If he fell from the ladder, he was probably researching. But he wasn’t wearing his researching attire when he died, he was in his hunting gear. The blood trail also leads in from outside, so he must have been outdoors when he sustained the wound. Therefore, the final answer becomes
Source of date: Last diary entry and calendar on wall
The idol and the ring with the ruby in Sebastian’s inventory have no direct connection to the case, but that, the jacket above the bed and the mask on the wall tie in to later events.
There is a short intermission showing three people attending Sebastian’s funeral. It helps to remember what they looked like for the next case.
Case III – The Dramatic Departure of an Outsider (September 7, 1786)
Thinking scrolls:
1. Events
2. Identities

3. Letters

Terms:
Pear – Book in inventory of man next to gate or graffiti inside house
Spontaneous, Combustion, Idol – Note held by man holding idol
Adam, James – Stable rota on the stable door
Edmund, David, Gorran – Letter in inventory of man at the front door
Edmund, Cloudsley – newspaper in inventory of man at the front door
Battley, Cloudsley, Cubert – coat of arms list on wall inside house
Nicolas, Maker – slip of paper on table inside house
Edmund, Cloudsley, Rose, Cubert, Sebastian, Willard, Wright, Peter, Battler – family tree held by man beside table
Aphorisms, Sebastian, Cloudsley, Happy, Upset, Inspired, Scared – book of aphorisms on floor
Willard, Wright, Rose, Cubert – fragments of letter at top left of fireplace
Idol – second letter
Research – third letter
House – fourth letter
Aphorisms – fifth letter
Deduction:
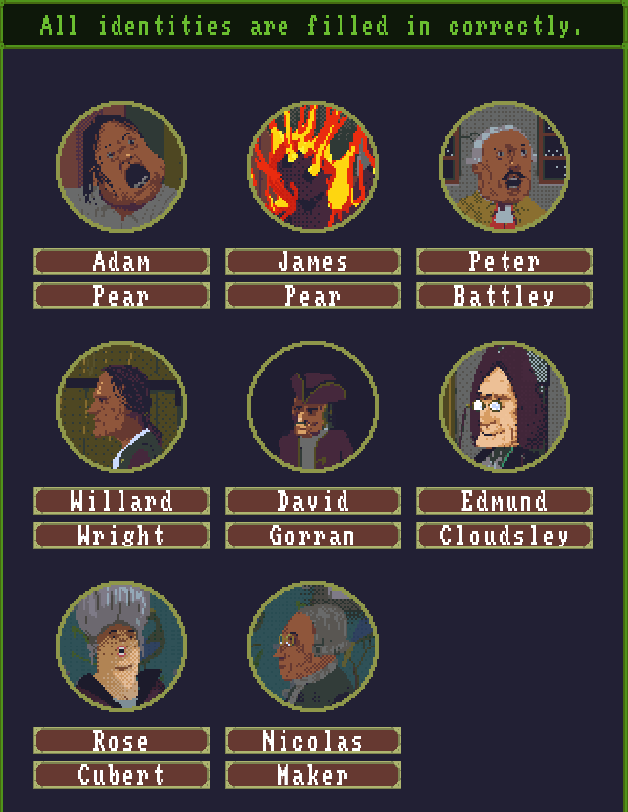
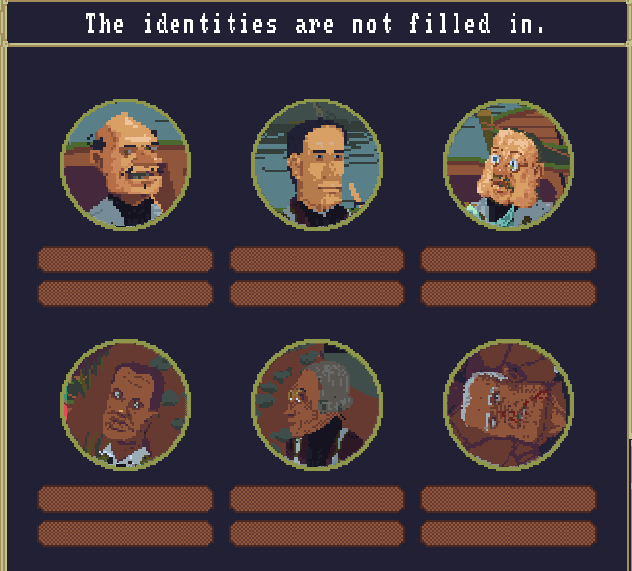
The first thing to note is that three of the people here are the people from the intermission: the man at the front door, the man carrying the betting slip and the woman at the table. Their presence at the funeral points to them probably being inheritors, so this gives us the possible names of Edmund Cloudsley, Rose Cubert, Willard Wright and Peter Battley.
There is only one woman present, and only one woman’s name, so we can conclude that she is Rose Cubert.
We can see that the man at the door carries a newspaper with an article about Lord Edmund Cloudsley’s speech to parliament, and he also carries a letter from someone called Theo that’s addressed to “Dear Edmund” so it’s safe to say this guy is Edmund Cloudsley. This letter also mentions the services of a coachman called David Gorran. The man standing at the stable has a saddle bag with the initials EC and a note saying to prepare the carriage for tomorrow, so we can safely conclude that this is David.
That leaves the gentleman with the betting slip, who has to be either Willard Wright or Peter Battley. A close look at the fireplace points to the answer: there is another discarded betting slip next to a letter from Blackguard and Buck Loans, addressed to one Peter Battley and discussing a debt of 255 pounds. So this man must be Peter. There is another route to figuring this out: the case is called ‘The Dramatic Departure of an Outsider’ and the man with the idol is saying ‘Now, if it’s all the same to you, I will take my leave.’ He is clearly the outsider. And if you look at the coat of arms above the front door and cross-reference it with the list just inside the door, it’s the symbol of the Battley family. Therefore the outsider can’t be Peter Battley, and must be Willard Wright.
Now on to the other non-inheritors. There’s one we can eliminate beside Rose Cubert: the man there is standing next to a note saying ‘Nicolas Maker – Attorney’; looking at his close-up, he’s saying ‘I would not have expected one of your family to treat a legal document in such a way. I am appalled!’ and he’s carrying a note about the reading of Sebastian’s last will and testament with a family tree on it, so this is certainly Nicolas himself.
The man on the far left outside is carrying a book that says ‘Property of Pear brothers’, so there must be two Pears here and he is one of them. There is a stable rota for Adam and James. The graffiti on the wall inside has the brothers sporting the initials A and J, so they must be Adam and James; how do we know which is which? Edmund’s newspaper, which shows that today is Monday, September 7, 1786. On Mondays James grooms the horses and Adam cleans the stable. The man on fire carries a scorched horse brush and a scorched version of the same knife the other one carries, so he must be James Pear, meaning the other man is Adam Pear.
By process of elimination, this leaves the only remaining unnamed character, the man with the idol, to be Willard Wright:
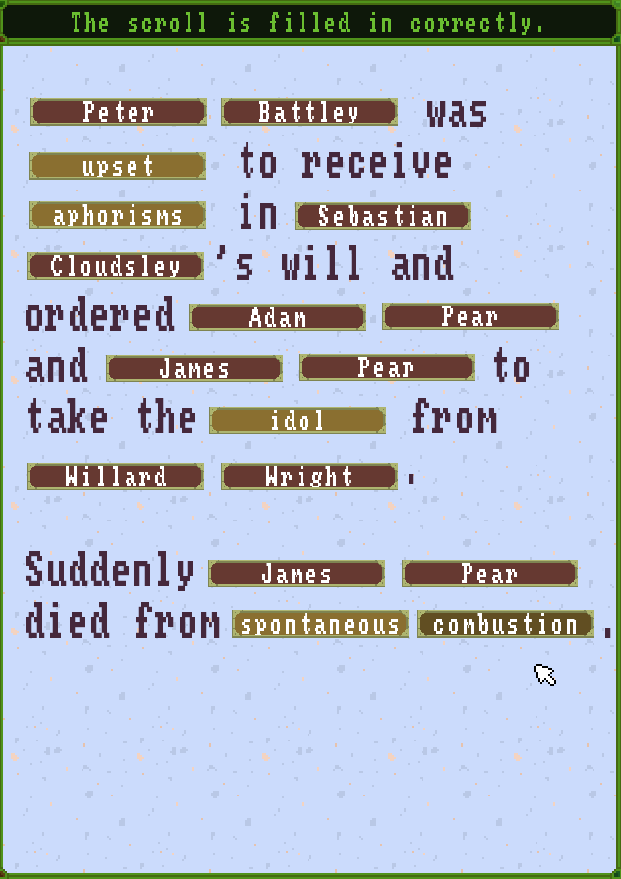
With the identities filled in, we can look at the addressees of the letters.
The first one mentions someone who left for colonies. Checking the inventories, this has to be referring to Rose, who carries Simhasana Battisi by Shamal Bhatt, an oriental fan and an ornamented katar blade. Her dialogue also contains ‘badhir’ (Hindi for ‘deaf’). So Rose was left the savings, land and the Blackfield manor house.
The second letter mentions Sebastian wanting to put the addressee’s mind to a better use than ‘mere politics’, so they must be involved in politics. The only person present who fits that bill is Edmund Cloudsley, who carried a newspaper talking about a speech he made to parliament. Edmund was left the notes from Sebastian’s astronomy research.
The third letter talks about ‘my late sister – your mother’ disclosing the addressee’s financial troubles. So this must be Sebastian’s nephew, and the only one of his siblings who is deceased and a mother is Beatrix Battley, who is the mother of Peter Battley. Cementing this is the fact that Peter Battley is the only character present with visible financial woes. Peter was bequeathed the compilation of aphorisms.
The fourth letter is quite short, and simply says ‘I bequeath to you the golden idol of Xenopolis. You will know what to do with it.’ Since we’ve already covered the other three inheritors, the idol must have gone to Willard Wright.
Now we should have enough information to fill in the events:
The first things we can fill in immediately are the part before ‘s will’ and ‘died from’ with Sebastian Cloudsley and James Pear respectively. Given the options we have for what comes after ‘died from’ it could only logically be ‘spontaneous combustion’, so we can fill that in too. This is supported by the note Willard is carrying, which explains how to perform a combustion trick with the idol in a certain configuration, the symbols of which match what the idol is currently set to.
Now it’s obvious the first name has to be one of the inheritors and the part after ‘receive’ must be what they got, which implies that the blank before that is an emotion they felt. We have four options there: happy, inspired, scared and upset.
Rose Cubert got the house, which she would certainly have been happy about, but her then ordering two people to take something from someone else doesn’t make sense. Edmund got the research, and we have the same issue there. Peter got a compilation of aphorisms, which we saw had been discarded on the floor, so he was almost certainly upset about that. Willard Wright would also presumably have been happy to get the idol. So I think we can safely say ‘Peter Battley was upset to receive aphorisms’.
So then he ordered two people to take something from someone. This was either the house from Rose, the research from Edmund or the idol from Willard. Only the last one makes sense as he’s shown no interest in the research and you can’t steal a house. So we fill in ‘to take the idol from Willard Wright’.
Now, who did he order? If you check the dialogues carefully, one character mentions orders…Adam Pear, who says ‘Spare me, devil! I was simply following orders!’. Given his possession of a knife, presumably he was trying to intimidate Willard into giving the idol up. And who else had a knife and fell foul of the idol in Willard’s possession? James. So the full sequence of events becomes:
A couple of interesting things to note here: first is that David Gorran is carrying “Ash Blair” tobacco; this will be important in the next case. Second is that Willard Wright and Nicolas Maker both have the same ruby ring as Sebastian had in case 2.
Source of date: Edmund’s newspaper
Case IV – The Murder at the Little Mermaid (September 10, 1786)
Thinking scrolls:
1. Events
2. Identities
3. Card game

Terms:
Upstairs:
Window – Click one of the windows
Shear – Examine the shears carried by the man outside the left window
Trapdoor – Click one of the trapdoors
Door – Click one of the doors
Maurice – Examine the watch in the victim’s bag
Spear – Examine the spear of the watchman outside the right window
Henry, Parker – Examine the watchman’s rattle
Downstairs:
Smallsword – Examine the sword of the man on the left
John – In the woman’s dialogue
Annie – Examine the letter carried by the woman
Stiletto – Examine the stiletto carried by the woman
Dagger – Examine the dagger of the man to the right of the woman
Navaja – Examine the navaja of the violin player
Evans – Examine the poster on the left
Robert, Redruth – Examine the poster on the right
Green, Breage, Blair – Examine the tab board at the bar
Willard, Wright, Ash, Blair – Examine the guestbook
Oscar, Boyton – Examine the letter carried by the owner
Knife – Examine the knife carried by the owner
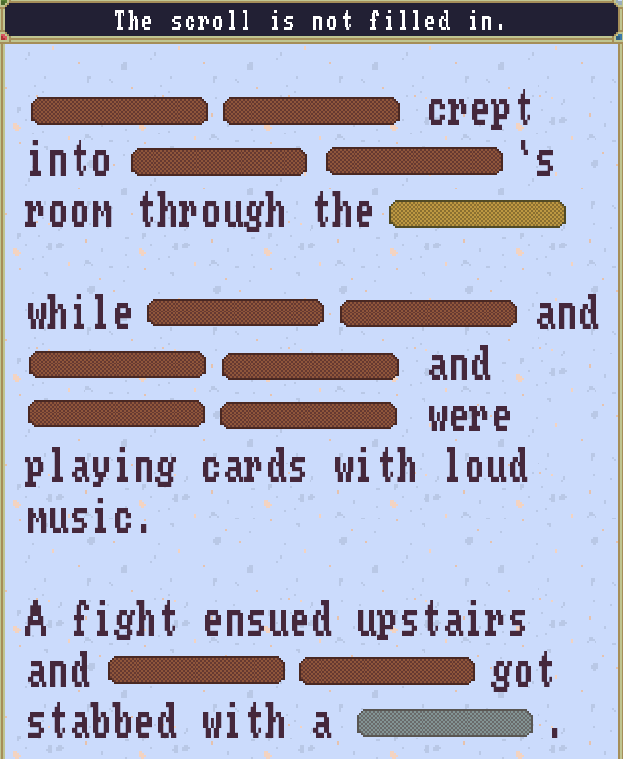
Deduction:
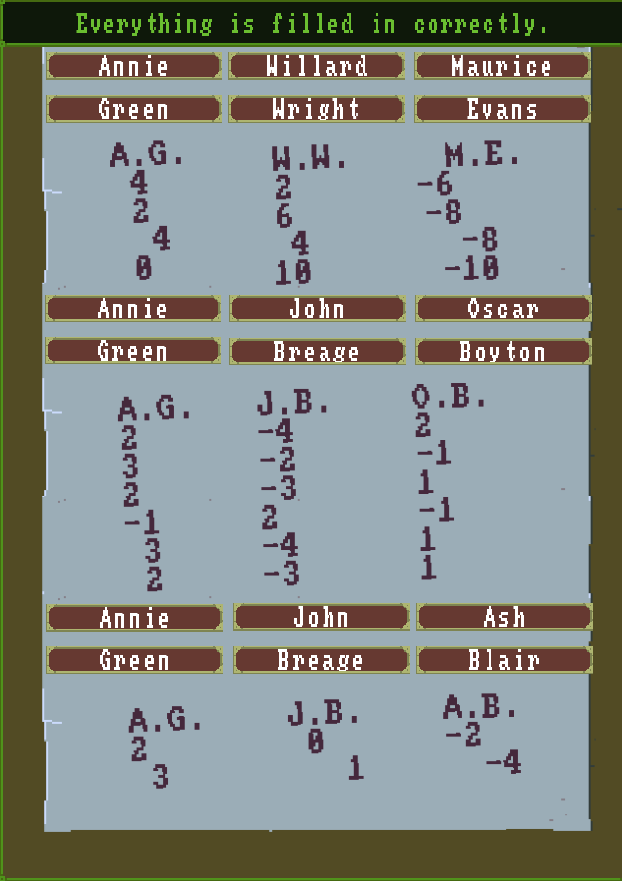
Starting with the card game makes most sense since we can match several of the initials to the only possible answer. The G in A. G. has to be Green since it’s the only G. W. W. has to be Willard Wright. M. E. has to be Maurice Evans. The J in J. B. must be John. The O in O. B. must be Oscar.
The guestbook has ‘Ash Blair’, which must be A. B, meaning A. G. is Annie Green. The owner has a letter addressed to Oscar Boyton. That leaves Breage as the only last name for John.
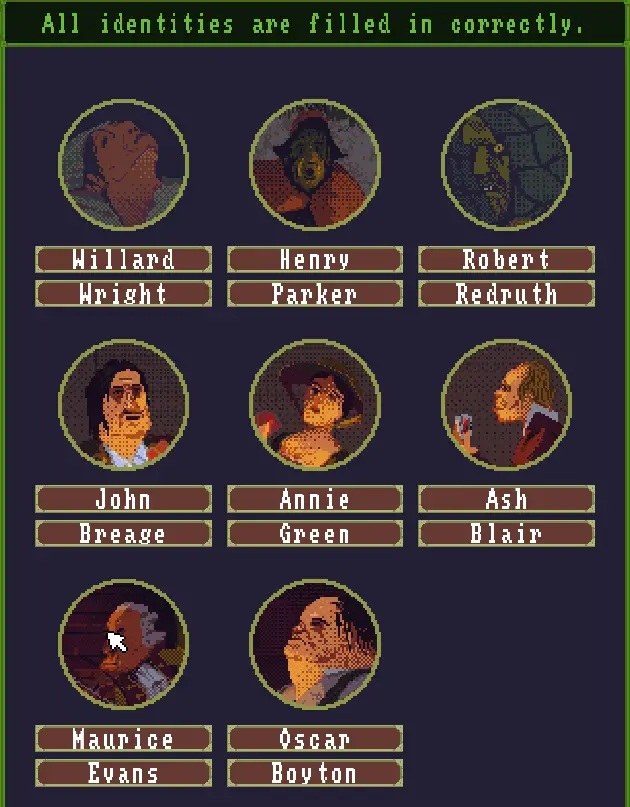
With those details finished, we can start matching up identities. As with the previous case, there’s only one woman, so the one at the table must be Annie Green. We can fill in Henry Parker too, as his name was written on his watchman’s rattle. Robert Redruth can be identified from the wanted poster; he’s the man outside the left upstairs window. We know the man on the left is John Breage because Annie addresses him by name and is answering the question he asked. Oscar Boyton is the owner of the inn, and Maurice Evans is the violin player, as we can see from the poster advertising his performance. That leaves two people, and a number of ways to determine which is which.
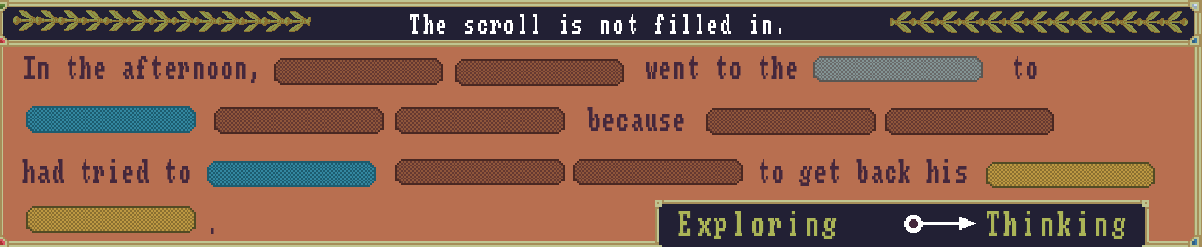
First of all, the victim has a ruby ring, as Willard and Nicolas did in the previous case (and Sebastian in the first). The letter in the victim’s bag mentions that ‘I have attended our departed brother’s send-off and accepted the keepsake that he bestowed upon our Brotherhood in his will.’ It also mentions him sending it tomorrow, September 10; but we know from the advert for Maurice that tonight is the 9th, so he was killed the night before he sent it. It’s also addressed to ‘Proudbeast Master’ and signed by ‘Proudbeast Initiate’, remember these terms for later.
It’s clear that the ‘departed brother’ is Sebastian Cloudsley, and the ‘keepsake’ is the idol, meaning our victim is Willard Wright, and the man downstairs is Ash Blair. Why does that sound familiar? It’s the tobacco brand that David Gorran was carrying in the previous case, and sure enough on closer inspection this man is David Gorran, who’s obviously under an assumed name. The guestbook also proves that the victim is Willard, as he has the Dandelion room and examining the small decoration on the wall in his room shows a dandelion. It also establishes that Ash Blair (David Gorran) is staying in the Forget-me-not room opposite.
With everyone identified, we can start filling in the events.
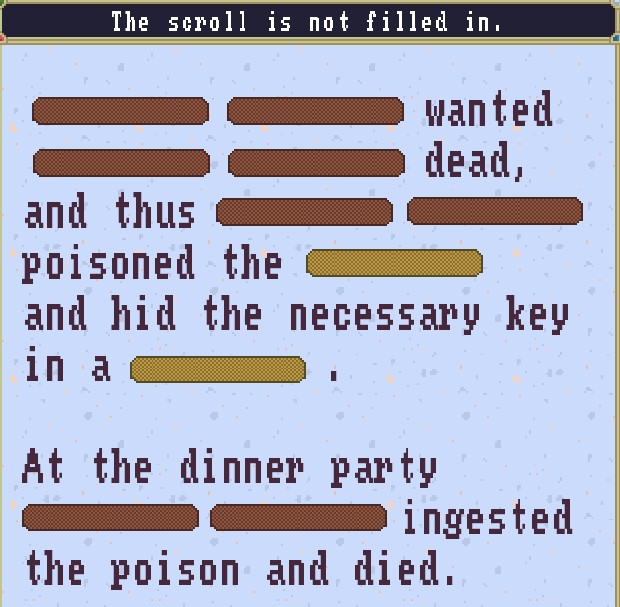
We don’t yet know the murderer, but we know the victim and whose room was ‘crept into’, so we can fill in ‘Willard Wright’ there. We can also fill in his name in the last sentence, though we don’t know the murder weapon.
In the room itself ‘REVENGE R R’ is written in blood, and the only person whose initials fit is Robert Redruth. He’s certainly a believable murderer, especially as he’s an escaped convict. But it can’t have been him: he can’t read, so he couldn’t have written the message, and the door to the street is shut with a latch, ruling out both him and Henry. So this must have been false evidence planted by the real killer.
The bag contains a watch with an engraving for Maurice, which does paint him as a potential suspect.
We know the mode of entry was either a door, a trapdoor or a window. Neither room door opens, so it can’t have been that. And although the window of Willard’s room is broken, the glass is next to Henry, meaning it was broken from the inside. It’s unlikely to have been the other window either, because it’s too high up and there’s nothing outside that would enable entry. Therefore, it must have been the trapdoor.
This answers two questions: first, the person who crept. It can only be the person staying in the Forget-me-not room, because nobody else could get in there. And the person staying there is Ash Blair, or David Gorran. And since presumably each suspect would have used the weapon on their own person, that means Willard was stabbed with a dagger. This must mean Maurice’s watch was a red herring, and sure enough you can see that his dialogue says ‘Oh mother, forgive me. I will never gamble with something so dear to me again.’ implying that he wagered his watch in the card game and lost it to Willard.
There’s actually another clue here in the form of the letter Ash carries: although at first glance it’s related to an agent of a trading company, it’s actually instructions telling him that Willard leaves on the 10th, he must ‘get the client’s product’ (retrieve the idol) and then deliver it immediately with the servant boy. If you look at Oscar’s dialogue he’s wondering where the boy has gone, so presumably this exchange took place shortly before the scene we’re viewing. And the final part of the note says ‘be mindful of our reputation. Our names must remain spotless!’ in other words, it cannot be discovered that David Gorran is there or that he’s connected with the person who sent him.
Now for the card players. We see from the score sheet there were three games that took place: the first one Willard participated in, so he can’t have been killed during that one. Annie Green and John Breage played in both the others, so they can be filled in no matter what. With Ash Blair being the killer, the third player must have been Oscar Boyton, as Willard could only have died during the second game. And so we have our filled scroll:

Source of date: Willard’s letter, year from previous case
Following this case another intermission unlocks showing a mysterious figure wearing a brown hat with a red decoration on it asking about Willard’s death ‘a week ago’, to which Oscar replies ‘a deranged convict did him in.’ implying that Ash’s faked blood message was believed and they thought Robert was the killer. The mystery person then asks for more information on the evening Willard died, saying they’ll make it worth Oscar’s while and producing a coin. Worth noting is that they’re wearing the red ruby ring, which going by previous contextual clues seems to denote membership in the “Brotherhood”.
Case V – The Intoxicating Dinner Party (April 8, 1788) part 1 (scrolls, terms)
Thinking scrolls:
1. Events
2. Identities
3. Dinner places
4. Room assignments

Terms:
Foyer:
Little, Pip, David – Examine the letter held by the young boy
Pocket – Examine the coats
Richards, Edmund, Cloudsley – Examine the brown-sealed letter in the woman’s coat
Mary, Peter, Battley – Examine the green-sealed letter in the woman’s coat
Kitchen:
Brian – In the left-hand servant’s dialogue
Roast, Richards – Examine the note held by the left-hand servant
Smith – Examine the 3-year service cow on the mantelpiece
Smith, Little, Pip, Walker, Baker, David, Gorran – Examine the servant instructions on the wall
Wine – Examine the wine locked in the cabinet
Brandy – Examine the brandy locked in the cabinet
Lucia – In the right-hand servant’s dialogue
Ada – Examine the letter held by the right-hand servant
Mattress – Examine the bed above the kitchen
Monkeyman, Darkhand – Examine the left book in the mattress
David – Examine note in upper-right bedroom storage box
Bag – Examine the bag hanging outside the upper-right bedroom
Study:
Edmund, George, Brydges – Examine top-left letter in bin
Edmund, Cloudsley, Steward – Examine bottom-left letter in bin
Final, Vanguard – Examine top-right letter in bin
Peter, Battley – Examine bottom-right letter in bin
Edmund, Rose, Cubert – Examine top-left letter on desk
Edmund, Mary, Lothar, Peter, Rose, Cubert – Examine bottom letter on desk
Baker – Examine house maid starting note
Tonic – Examine Peptic Tonic in locked cabinet
Dining room:
Water – Examine the water on the table
Roast – Examine the roast on the table
Salad – Examine the salad on the table
Brandy – Examine the brandy on the table
Wine – Examine the wine on the table
Lemonade – Examine the lemonade on the table
Tonic – Examine the tonic on the table
Case V – The Intoxicating Dinner Party (April 8, 1788) part 2 (deduction)
Deduction:
There are several identities, or parts of them, we can solve right from the get-go, either because they’re obvious or because they’re characters we already know.
First is the victim, who is Rose Cubert from case 3. If you can’t remember what she looks like, it’s obvious from her having the fan, rings, and 4 pounds she had at the will reading. Second is Edmund Cloudsley, and next Peter Battley, both of whom were also in case 3.
The young boy is clearly Little Pip, as evidenced by the letter he’s carrying from David Gorran.
For partials, we know the left-hand servant is Lucia as the one on the right addresses her by name, and she herself is Ada, as evidenced by the letter she carries. Lucia mentions hoping ‘Brian’ served everything as instructed, so he must be the butler upstairs. Only Mary is left as a woman’s name, so that must be who the blonde is, and we know from Rose’s letter to Edmund about sending Peter to the colonies that she’s there with her father Lothar, so that must be the first name of the remaining man. This also lets us fill in their last names from Edmund’s letter in the pink coat as it’s addressed to Miss Richards, which must be the last name for both Mary and Lothar.
That leaves the last names of the servants, which we can get from the instructions in the kitchen: there’s only one Mr there, Walker, so that must be Brian’s last name. The other two are Smith and Baker. It’s clear that Mrs Smith is responsible for cooking and Mrs Baker for cleaning, meaning it must be Lucia Smith and Ada Baker.
With all the identities done, we can fill in the last part of events at least: it must be Rose Cubert, but we don’t know the rest yet.
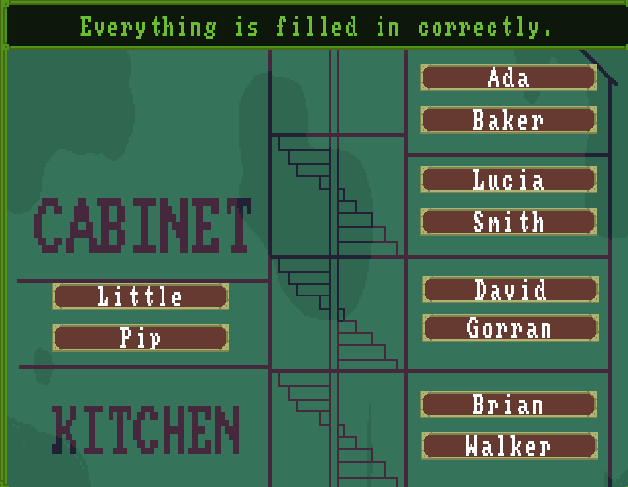
The next logical choice for filling in is probably the bedroom assignment. We can identify one right off the bat: the second one from the bottom has to be David Gorran’s, because the cabinet there contains his Ash Blair tobacco and a note to him from Edmund, as well as his lockpicks and weapons. The bed above the kitchen has children’s books in it, so presumably belongs to Little Pip.
Now for placing the servants: we know from the note in one of the rooms that the staff member who has worked there the longest gets the bottom room. Ada Baker started on August 1 1787 and it’s currently April 8 1788, so she’s only been there for 8 months and a week. The cow on the mantle was given to Lucia Smith for 3 years of service so Ada’s room must be one of the others.
In their conversation, Ada says to Lucia ‘Of course I can give you some candles for your room, Lucia. I assume you are itching to continue reading that scandalous novel.’ to which she replies ‘Thank you, dear! No, I threw it out. I do not read such dirty literature anymore.’ There are therefore two ways we know the second room from the top is Lucia’s: first, it’s the only one without candles in it, and second, the cabinet contains ‘The Laceless Count’, the scandalous novel she ‘threw out’.
This must mean Ada’s room is the top one, and the bottom one belongs to Brian Walker. This is supported by Brian’s note to self, which says if he gets frustrated to remember the tale about the rich lord who married his donkey to feel better, which lines up with the book in his cabinet of ‘Fables about rulers that make you think’.
Now for places at dinner. We know from the note in Edmund’s study that he was advised to abstain from alcohol for the next month and to consider a glass of peptic tonic before eating, so for Edmund’s place we’re looking for one that had tonic and no alcohol. There are only two places that had tonic, and one had wine, so Edmund must have been sitting at the top (bottom right on the scroll).
We know from the letter Lucia has about the party that Mary Richards doesn’t like meat, meaning she must have eaten a salad. There are only two places with salads, and one had a cigar, so Mary must have been on the left of the table (top right on the scroll).
If we look at Brian’s inventory, he has a note from Peter saying ‘Ensure that the beautiful lady sits next to me during dinner and I will slip you a shilling.’ He also has a shilling, meaning he did indeed do this. Since Edmund is to Mary’s left, that means Peter must have been sitting to her right (top left on the scroll).
That leaves Rose and Lothar, Lothar obviously having been the one with the cigar on the bottom right (bottom left on the scroll) leaving Rose to occupy the seat on the right (bottom on the scroll).

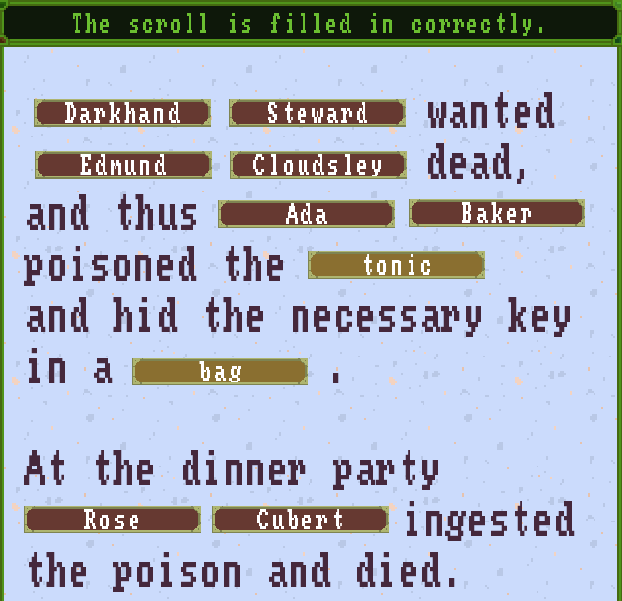
With all of the places figured out, we can determine what was poisoned. Since Rose died, it had to have been the steak, the salad, the wine or the tonic. Peter had steak and wine, and Lothar had salad and wine, and neither died, so it had to be the tonic. Sure enough, Edmund didn’t die because he didn’t drink his. So we can fill in ‘tonic’ in the events.
Now where was the necessary key hidden? The cabinet the tonic is locked in is the one with the blue lock, and the blue key has a square grip with two ridges along it. The mattress contains two keys, but one has no ridges and the other has many. Both Edmund and Brian have that key in their pockets, but you’d expect them to. However, of the two keys in the bag hanging outside David’s room, one of them matches the blue key in shape, so we can fill in ‘bag’ on the events for where the key was hidden.
That leaves us with who wanted someone dead, who was wanted dead, and who poisoned the tonic. Nobody appeared to have anything against Rose, but Edmund also had tonic and was in a lot of trouble with many people, so he’s the logical choice for the intended victim and we can fill him in.
Who wanted him dead? Well, Brian Walker had a motive of years of service without a pay rise; Lucia has some incriminating dialogue where she says ‘I do hope our master’s guests are satisfied and that Brian served everything as instructed.’ and many people threatened Edmund in letters, including George Brydges, Final Vanguard, and Brotherhood of Masks. It’s even possible Peter Battley tried to kill Edmund so that he wouldn’t be a rival for Mary Richards.
But there’s one thing we haven’t factored in yet: in Ada’s cabinet is a note saying ‘Remember to take the fourth one from every row.’ This doesn’t mean much by itself but in the study is Dr Abram Anderton’s ‘Secret Codes’, which gives an example of a cipher where you read the first word of every line, and says it’s extremely unsafe and easy to decode. So what if there’s a letter where a message is hidden in the fourth word of every line? Applying this to most letters yields nonsense, but when performed on the one in Ada’s possession about her no longer being the subject of gossip due to her late husband’s questionable activities, we get ‘Use substance to remove target sincerely dark hand steward”.
Okay, this is too compelling to think the truth lies elsewhere, so Ada Baker must have been the one to poison the tonic, and Darkhand Steward was the one who wanted Edmund dead. This is supported by the Brotherhood of Masks letter saying they would unleash one of their Stewards upon Edmund. So our sequence of events is thus:
As for what happened to the ‘substance’ mentioned in the letter: there’s a syringe inside the statue’s amphora in the lobby with some liquid remaining in it.
Source of date: Lucia’s note, letters in Mary’s coat pocket
Case VI – The Explosive Events in the Forest Cabin (September 15, 1788)
Thinking scrolls:
1. Events
2. Identities

3. Idol symbols
Terms:
Outside:
Billy, Cracker, Hardy, Abe, Little, Jack, Nails – Henchmen for Hire book in the cart
Cabin
Corpse – Beige note held by unconscious man
Shot – Pistol held by unconscious man
Coffin – Examine scarecrow in coffin
Walter, Keene – Examine newspaper in servant’s inventory
David, Gorran, Lucia, Smith, Little, Pip, Black, Bestia, Golden, Doubloon, Edmund, Cloudsley – Examine note on wall
Stabbed – Examine robber’s sword
Cabin 2:
Clubbed – Examine club held by man on left
Vase – Examine vase
Air, Decreased – Examine top note in book held by man hiding in chest
Gold, Seawater – Examine top right note in book
Matter, David – Examine bottom right note in book
Heat, Increased, Exploded – Examine bottom right note in book
Deduction:
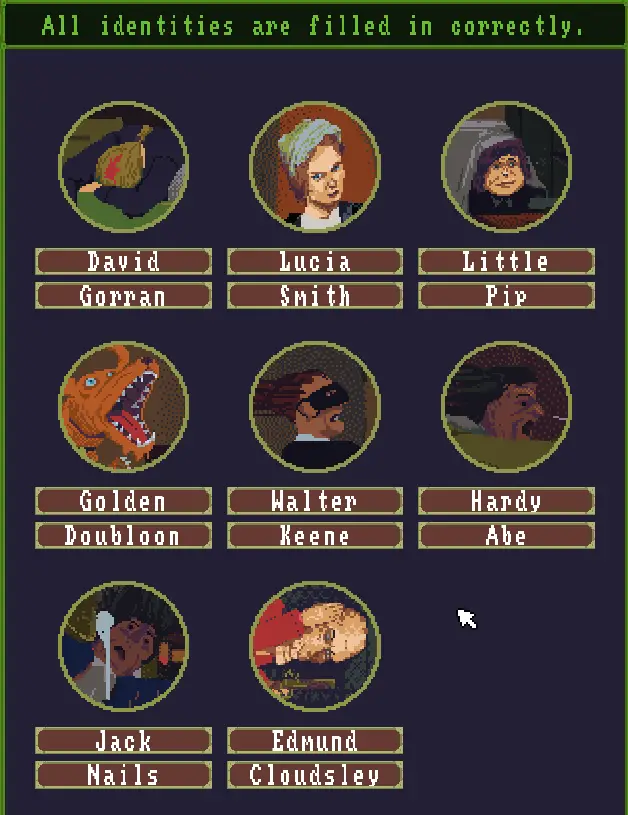
We can, as before, fill in a number of identities from previous cases. The unconscious man, on examination, is David Gorran. The servant is Lucia Smith from the previous case. The young boy is Little Pip. The man in the chest has lost his hair, but is recognisably Edmund Cloudsley. This is supported by him being in possession of the “experiments” he referenced in the note to David in the previous case.
Now the newcomers. The gentleman robber is named in Lucia’s newspaper: Walter Keene. Of note is that he has the ruby ring of the Brotherhood. The dog is presumably either Black Bestia or Golden Doubloon, who according to the note to Pip on the wall must be fed daily. Checking Pip’s dialogue, he’s saying ‘… Go, Coin, go!’ This must mean the dog is Golden Doubloon.
We’re left with the two men in the other room, who must be ‘henchmen for hire’. The cart is from Birkham Workhouse, and the only one from there is Hardy Abe. Sure enough, the book mentions he has a cart. But who’s the other one? Examining the hand of the man in the blue coat reveals a tattoo of crossed nails, so this must be Jack Nails, the burglar and picklock. This is supported by the lockpicks in his inventory, and must mean the man on the left is Hardy Abe.
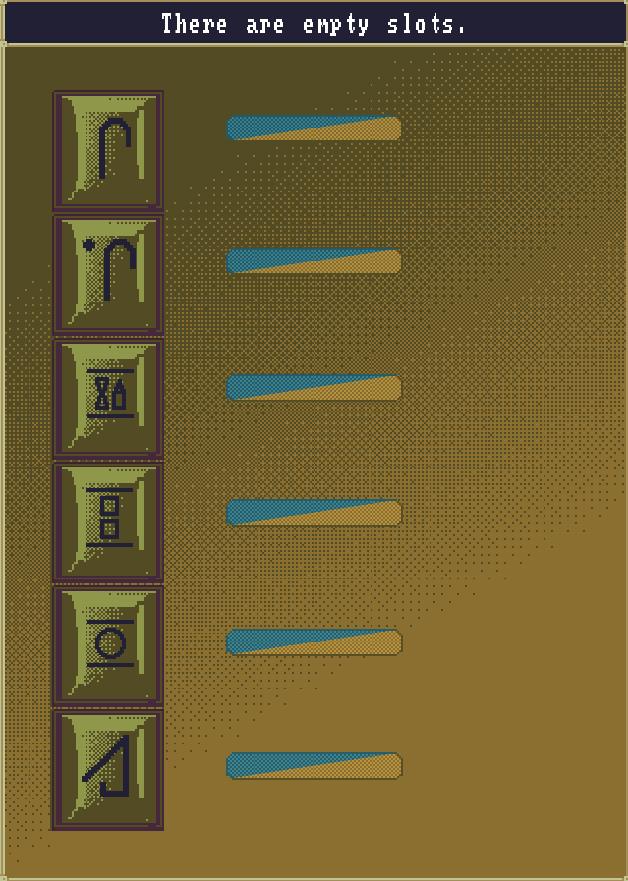
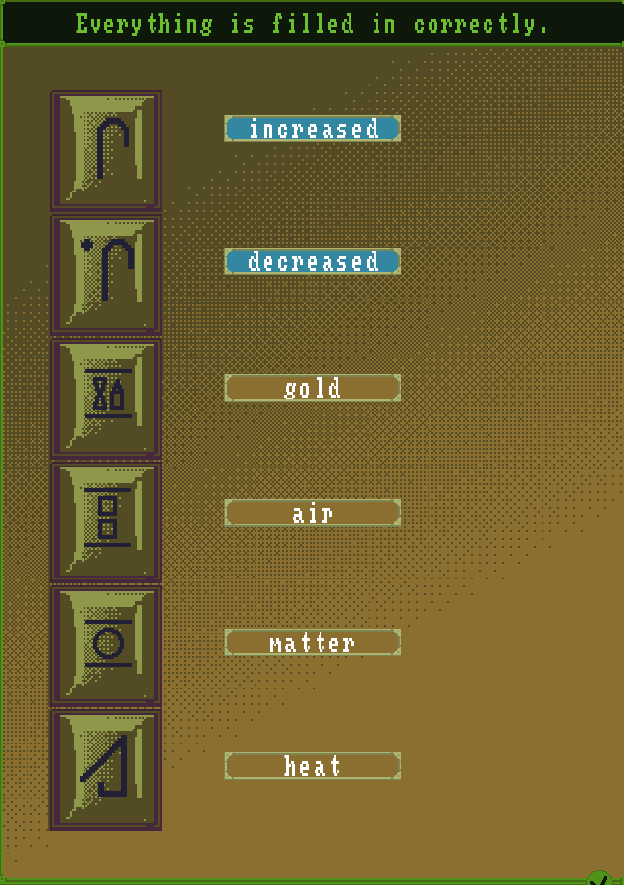
With the identities done, we move on to the idol symbols. The one with the crook and a dot appears in VACUUM V1, VACUUM V2, the first step in GOLD FILTERING, and FREEZING. It’s also mentioned in a note about how the speed at which heat is increased in SPONTANEOUS COMBUSTION appears to be influenced by how strongly he presses the trigger and how long he has performed that symbol before it.
In the first experiment, it caused air and a vessel to disappear. In the second, it decreased air. In the filter, it’s decreasing gold, and in freezing, it’s decreasing heat. So it’s pretty clear that the crook with dot is ‘decreased’.
Conversely, the crook on its own appears in the second part of GOLD FILTERING, UNKNOWN EFFECT, and SPONTANEOUS COMBUSTION. The safety notice mentioning the idol being ready for crook/crook with dot input based on its eye colour implies a connection, so this one is certainly ‘increased’.
The hourglass/pen symbol then becomes fairly obvious: it must be ‘gold’.
The two lines with boxes in them is present in VACUUM V2, and it decreased the amount of air in a vessel, so that one must be ‘air’.
The two lines with a circle between is present in VACUUM V1, UNKNOWN EFFECT, SPONTANEOUS COMBUSTION and FREEZING. The fact that it caused something to disappear when combined with ‘decreased’ points to it being ‘matter’, which fills in the final symbol as ‘heat’, since spontaneous combustion is ‘increased matter heat’ and freezing is ‘decreased matter heat’.
This means UNKNOWN EFFECT is ‘increased matter ?’, but we don’t know that symbol and there’s no slot for it. Keep the notes in mind for later cases, though. The one that’s pertinent here is ‘I must ask David to fetch me a dead body for further experiments.’
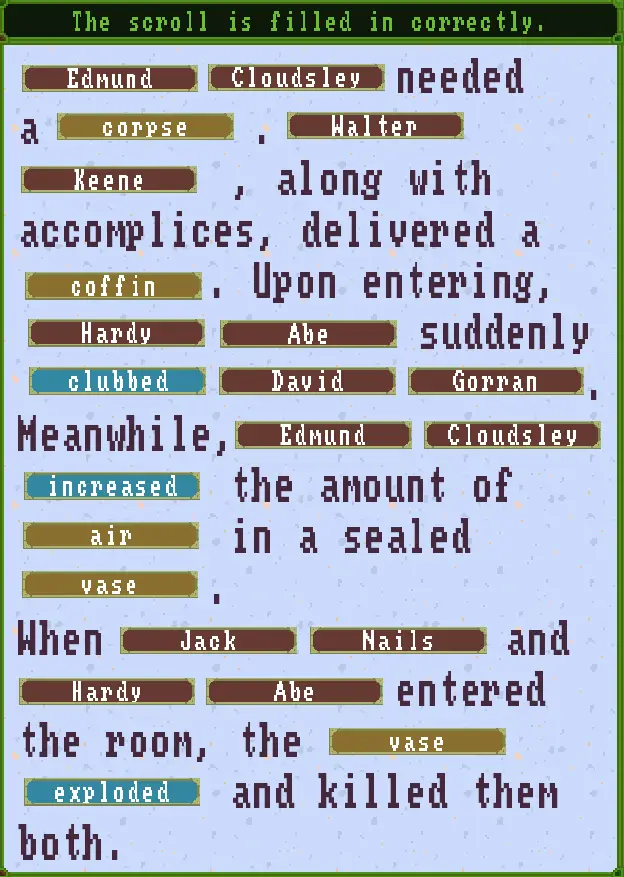
That note along with the ones David Gorran has, where they say ‘Note that I do not want it too decayed. The more recently it has died, the better.’ and ‘I will arrange for a cart to move the corpse if you send me directions’ mean we can quite confidently fill the first part of the events: ‘Edmund Cloudsley needed a corpse.’
We can surmise that the person who delivered something along with accomplices was Walter Keene, since he’s carrying a piece of confectionery from the cart and this resembles the wording in Lucia’s newspaper: ‘Walter Keene, with a number of unnamed associates…’ It’s also clear that what they delivered was a coffin, since that’s what David Gorran is slumped over.
The next parts are a bit ambiguous so we’ll fill in the last sentence and come back for the rest. We know who the two men who are in the room are, so we can fill in ‘Hardy Abe’ and ‘Jack Nails’, and it’s pretty clear that ‘the vase exploded and killed them both.’ so we can fill that in too.
Now where have we seen someone talking about making things explode? In Edmund’s notes, under FREEZING. He notes that freezing the target rapidly can create curious side effects; when he froze water in a sealed bottle, it exploded and the shards flew everywhere. But freezing is ‘decreased matter heat’ and looking at his safety notice, with the idol’s eye currently being blue it must have just performed an ‘increased’ action (since there’s a weight pulling the lever down). There’s no water in the vase, the idol hadn’t taken gold out of anything prior and it isn’t on fire, so the only thing that makes sense is that the amount of air was increased. So ‘Edmund Cloudsley increased the amount of air in a sealed vase.’
For the last part, it must be referring to the attack on David Gorran. He has a head wound and is unconscious but otherwise alive; Walter has a pistol and a sword, so presumably it wasn’t him. Jack Nails only has a pistol and a saw, neither of which would have been suitable. But Hardy Abe has a club, which does line up. So our final sequence of events becomes:
Source of date: Lucia’s newspaper
An intermission follows in which David Gorran is informing a coroner that the bandits ‘accidentally set off my master’s laboratory chemical ingredients’ and that he managed to fend the rest of them off, but Edmund Cloudsley was caught in the blast, which severely disfigured him, and he died soon afterwards.
Case VII – The Strange Practices of a Secretive Society (March 14, 1790) part 1 (scrolls, terms)
Thinking scrolls:
1. Events
2. Masks and robes
3. Top ritual
4. Bound man
5. Bottom ritual
Terms:
Outside:
David – Letter in the green bag next to the bound man
David, Gorran – Pocket watch in the green bag next to the bound man
Entrance:
Darkhand, Proudbeast, Watersnake – Examine red banner
Master, Steward, Initiate – Examine blue banner
David, Gorran, Walter, Keene – Examine the first letter
Lazarus, Herst, Walter, Keene – Examine the second letter
Lazarus, Herst, Walter, Keene, Jeffrey, Sinclair – Examine the third letter
Lower chamber:
Signalled – In the dialogue of the man beside the statue
Inception, Evaluation, Transition, Admission – Examine the scroll on the statue’s neck
Upper chamber:
Drank – Click the top wall poster
Challenged, Poison – Examine the top wall poster
Squabble, Conflict – Examine the bottom left wall poster
Dispute, Discord – Examine the bottom right wall poster
Tray – Examine the tray held by the figure on the far left
Cup – Click the cups in the centre
Tankard – Examine the tankard held by the figure to the right of the table
Sword – Examine the sword held by the figure second from the right
Sceptre – Examine the sceptre held by the figure on the right
Case VII – The Strange Practices of a Secretive Society (March 14, 1790) part 2 (deduction)
Deduction:
Whoo, this one’s a doozy, and we have a lot to fill in. This is also the first case where you can use multiple word colours in a single slot, making it harder to solve by guessing. There are, however, a few things we can figure out before we start.
First is that we only have three blue words: challenged, drank, and signalled. But only one fits the beginning: ‘X was drank to a Y’ and ‘X was signalled to a Y’ don’t make sense, so this one must be ‘challenged’. The other two make more sense in a certain order, but they can still work the other way round, so we’ll come back to it.
The next thing to do is work out what the top ritual is, as this will help us with several other things, and we’ll do that by identifying the required decorations. The Ritual of Squabble requires The Grim Reaper, The Nevertiring Teacher and The Feeder of Mouths. The Ritual of Conflict requires The Nevertiring Teacher, The Keeper of Treasures and The Mirror of the Soul. The Ritual of Dispute requires The Keeper of Treasures, The Nevertiring Teacher and The Grim Reaper. And the Ritual of Discord requires The Speaker to the Blind, The Grim Reaper and The Keeper of Treasures.
Each decoration on the poster has a blue ribbon symbol next to it, and some objects in the room have a similar-looking ribbon tied to them: the window, the table, and the chandelier. They are respectively fashions after Death, a book and a key. The former is certainly The Grim Reaper, so we’re dealing with Squabble, Dispute or Discord. The second fits closest to The Nevertiring Teacher, as we learn from books and they are always available to us. That narrows us to Squabble or Dispute. A key can’t really be anything but The Keeper of Treasures, which tells us that this is the Ritual of Dispute.
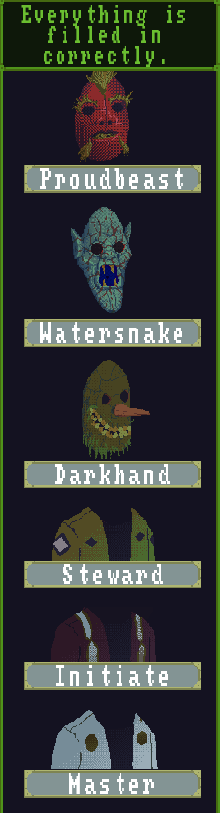
Knowing this, we know that the defender and accuser are Stewards or Masters and cannot be Initiates. The sceptre must be borne by a Watersnake Master. That means the cracked blue masks are Watersnake, and the white robe is Master. That being the case, the green robe has to be Steward, and the brown one must be Initiate.
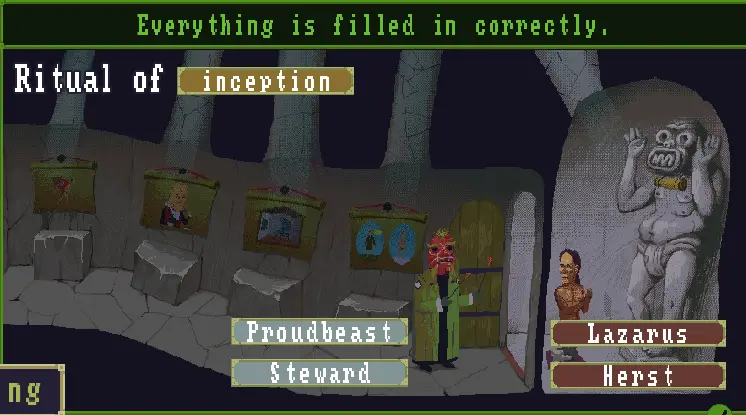
To figure out the other masks, we go down to the lower chamber. The illustrations on the wall help us work out what ritual this is:
A man with a house on his back – what carries its house on its back? A snail. We’re dealing with either Inception or Admission.
A man eating without a mouth – What eats without a mouth? Fire. We’re dealing with Inception.
The other two clues end up being unnecessary, but in case you couldn’t figure out either of those: what is a fish’s house? Water. And what is clothed in green in the sun but naked in winter? A tree.
Knowing this is the Inception ritual tells us that the person administering it is a Proudbeast Steward, so the red mask is Proudbeast and the green one is Darkhand. This provides an interesting but irrelevant tidbit, as we now know that Sebastian Cloudsley was a Proudbeast Steward.
With the route we took, we could have identified the ritual far more easily: we already know from the upper floor that the green robe is Steward, and the only rituals that can be adminstered by Stewards are Inception and Evaluation. Figuring out the snail would tell us immediately it’s Inception.
Something weird, though: if we fill in all the ranks in the top ritual, it says 2 or fewer tiles are incorrect. This means we must need to identify one of those present by name. But how can we know who the impostor is?
Well, we return to the bound man outside. He’s tattooed with a hand and an eye, which we know from the banners in the entrance denote a Darkhand Initiate.
The Darkhand Initiate in the ritual is the one holding the tankard, so this must be our impostor. And if we look at the belongings next to the bound man, we see Ash Blair tobacco and a letter from W. K to David, talking of a plan and a target arriving in ‘full costume’ (and if that weren’t compelling enough, David Gorran’s engraved watch from Edmund is there too). It logically follows that Walter Keene and David Gorran are now working together, and David is the one impersonating the Initiate. Sure enough, we fill that in and everything is green.
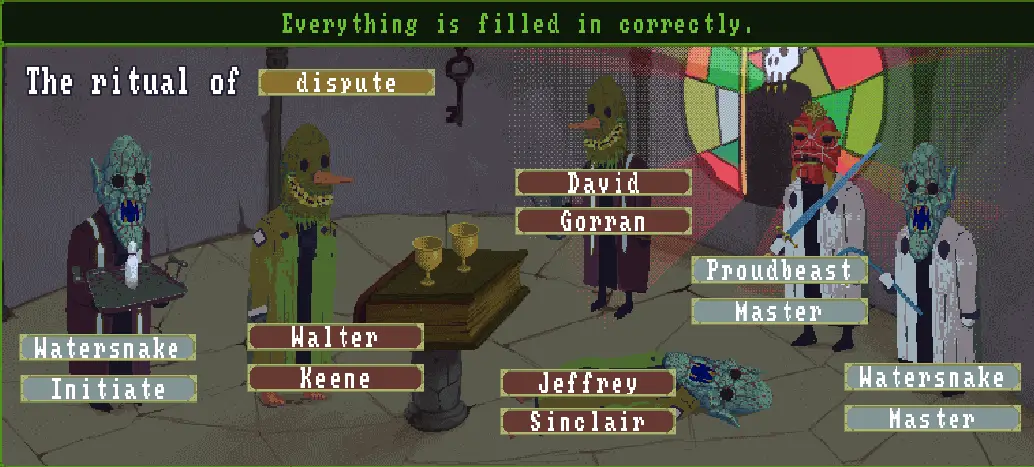
Worth noting that, although not necessary, you can also identify the defender and accuser by name using the clues in the letters downstairs. The defender is clearly Walter Keene, having been challenged by Jeffrey Sinclair, who died. How do we know which is which? Because Jeffrey’s letter identifies Walter as a Darkhand and not a Watersnake.
That leaves the person being subjected to the Inception ritual, and if we read the letters we again get the answer: this must be Walter Keene’s proposed new recruit, Lazarus Herst.
Now we can fill in the events. Obviously, Walter was the one who was challenged, and it was to a dispute ritual. His accomplice is David Gorran, and they ambushed a Darkhand Initiate, so we can fill those in for both sets of following blanks.
“X, posing as Y, drank to Z with a…” doesn’t make any sense, so the second blue blank must be signalled, and the person he signalled to logically has to be Walter Keene. What did he signal with? He’s only holding a tankard, so it must have been that. And we know that the ritual involved Walter and Jeffrey drinking from cups containing a substance, and that depending on the severity of the accusation this would include deadly poison. So he must have been signalling which cup had no poison.
The other blanks following have to be ‘Jeffrey’, ‘Sinclair’, ‘drank’, and ‘cup’. And then, we know that Lazarus Herst passed the inception ritual. But what did he become? The answer is in the inventory of the Proudbeast Steward: The brands he’s holding are of a lion and a single eye, meaning he’s preparing to brand a new Proudbeast Initiate. So the full sequence of events is:
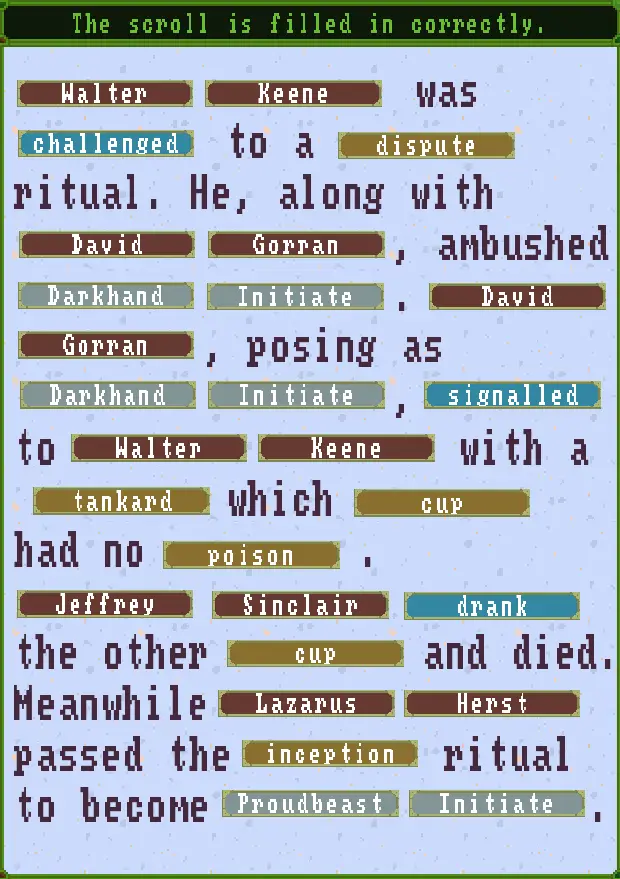
Source of date: Jeffrey Sinclair’s letter, note on ambushed Initiate
Case VIII – The Crowning Celebration by the Lighthouse (June 23, 1791)
Thinking scrolls:
1. Events
2. Identities
3. Blackmail
4. People who had the relic, chronologically
Terms:
Lower level:
Gryphon, Reborn – Examine Rules scroll in the box on the boat
Gryphon, Reborn, Flying, Jumped, Seance, Angus, MacBain, Homunculus, Hypnosis, Hypnotised – Examine History scroll in the box on the boat
Gryphon, Reborn – In the dialogue of the Master on the left
Seal, With – Examine the Master on the left’s inventory
Gryphon, Reborn – In the dialogue of the Initiate on the left
Gryphon, Reborn – In the dialogue of the Master on the right
Oar – Click the oars
Idol – Examine the staff held by the Steward
MacBain, Lazarus – Examine letter held by the Steward
Lighthouse, Angus, MacBain, Alistair, Koch, James, Turner, Walter, Keene, Lazarus, Herst, Nicolas, Maker – Examine green-sealed letter held by the Initiate on the right
Maker – Examine blue-sealed letter held by the Initiate on the right
Head, Wound – Examine the head of the dead body
Cursed, Pushed, Attacked – Examine the blue-sealed letter on the dead body
Lighthouse stairs:
Lighthouse, Alistair, Koch – Examine the poster
Deduction:
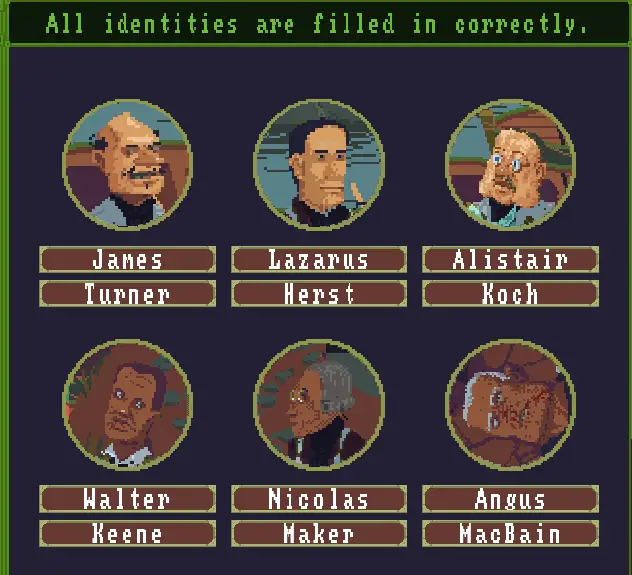
Three of the identities we can do right away, as they’re from previous cases: Lazarus Herst (the Initiate on the left), Walter Keene (the Steward) and Nicolas Maker (the Initiate on the right).
According to Nicolas’s protocol letter, that leaves us with Lord Angus MacBain, Lord Alistair Koch and Dr James Turner.
Where have we seen another reference to a doctor? The green-sealed letter on the dead body, which references ‘a seat alongside me on the Court of Directors at the Seven Seas Company.’ Nicolas also has a blue-sealed letter from Darkhand Master ‘J. T.’ referring to himself as director of that company. So we know one of the Master is James, but which one? The man on the left is carrying a heavy seal, and the design on it is ‘IIV’. But actually, we’re looking at it backwards from how it would stamp on something, so it actually says ‘VII’, or seven in Roman numerals. This is a fairly compelling indication that this is James Turner.
We know from the poster in the lighthouse that Alistair Koch is a General. Where have we seen that before? The blue-sealed letter on the body, from ‘Watersnake Master’, which says ‘Do not toy with the wellbeing of the Empire’s general’. If our body isn’t the General, the other man must be, meaning our victim is Angus MacBain and the remaining person is Alistair Koch. There is another route to discovering this:
Walter is carrying a letter addressed to ‘Master MacBain’ from ‘Darkhand Steward’, which must be from Walter himself because that’s his house and rank. The case makes a point of showing each member’s shoes, which must be important…but how? Well, if we look at the narrow path leading to the body, there are several sets of footprints. One set of a pair of rounded shoes with heels leading away from that area, and two sets to and from the area with the same pointy-toed shoe also with a heel.
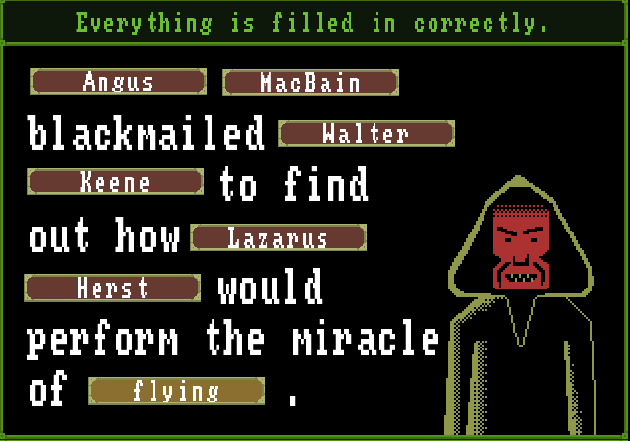
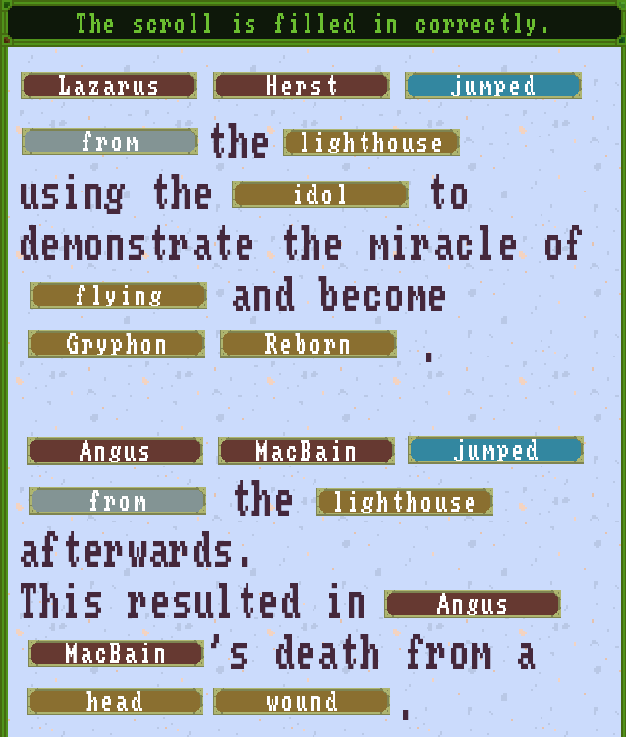
Examining everyone’s shoes and their shapes reveals that the footprints leading back are Lazarus Herst’s, and the sets leading both to and from there are Walter Keene’s. We know from the miracle history that séance, homunculus and hypnosis were already reproduced by Angus MacBain, so the only one that could feasibly be performed by Lazarus is flying. The idol setup seems to support this, as it’s set to ‘increased air’. It seems fairly clear that Lazarus jumped from the top of the lighthouse, performed the miracle of flying, and walked back. But why did Walter go there? To retrieve the staff, which appears to have been broken somehow, as evidenced by the fragment from the base lying next to the body, and the staff Walter is holding having a crack that matches. He also appears to have taken the blackmail response he sent back to avoid it being discovered.
Combined with that response where he reveals the secret of the miracle to Master MacBain, we’ve all but arrived at the identity of the victim. What’s important to note here, and which explains a lot about how the victim died, is that Walter’s letter doesn’t mention point 2 from Lazarus’s miracle preparation list: holding the lever for 10 seconds. So we can, again, conclude that our victim is Angus MacBain, and the remaining man is Alistair Koch.
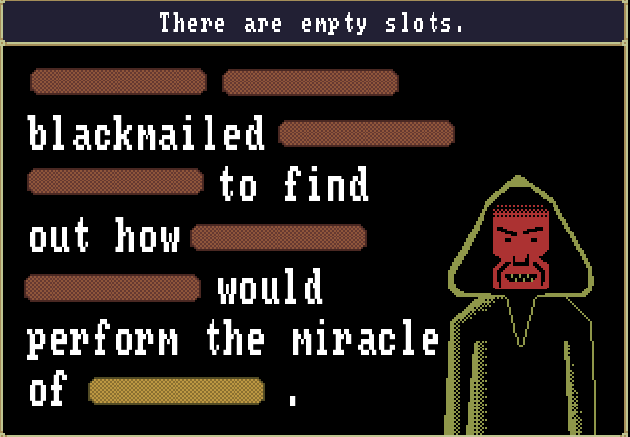
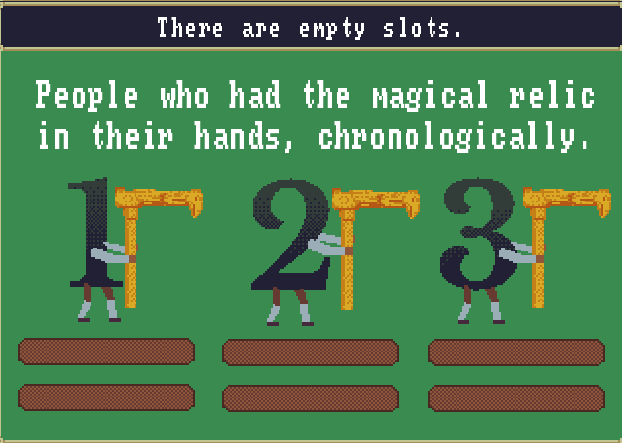
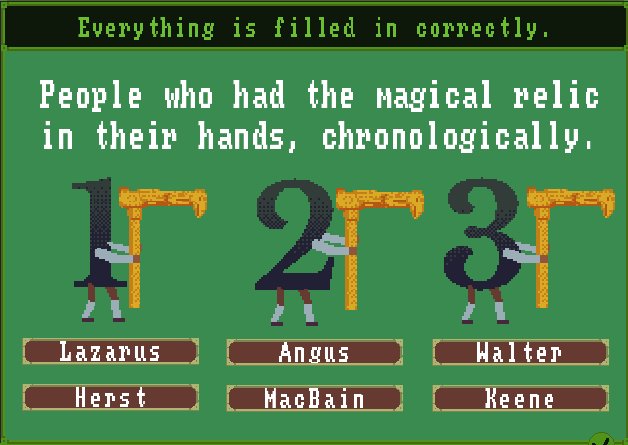
Puzzling all this out allows us to fill in the blackmail and relic ownership scrolls: we know from Walter’s letter that he’s the one who was blackmailed, and since his response is addressed to Angus, he must have been the blackmailer. Lazarus Herst was the one who performed the miracle first, so he’s the next blank, and we already established his miracle is flying.
For the relic ownership, let’s work backwards: the person currently holding it is Walter Keene, so he must be #3. Since Walter took it away from Angus’s corpse, he must have been #2. And obviously before that, Lazarus Herst must have had it to perform the miracle originally, so he’s #1.
So we know that Lazarus performed the flying miracle, and we know from his notes how he did it. We know Angus MacBain would have attempted to perform it as well as he’s done with other claimants in the past, and we know he had incomplete instructions to do so from Walter’s response to his blackmail. It’s still possible he was attacked or pushed, especially since Alistair was threatening to ‘crush your bones’ because he thought Angus was cursing him, so let’s explore that possibility. A closer examination of the lighthouse and footprints discount it: the lighthouse is locked from the inside, so the only way anyone could get down from it after going in would be to jump off, and there’s obviously only one idol, so if he’d been attacked or pushed the killer would still be inside or lying dead next to him. So he must have jumped as well.
Combining all of this information and what we’ve seen, we can complete the events:
Interesting but irrelevant: we can also identify the house and rank of each person present, either from what we already know or from process of elimination.
James Turner is a Darkhand Master, as revealed in a letter Nicolas has.
Lazarus Herst is a Proudbeast Initiate, which we know from the previous case.
Alistair Koch is a Proudbeast Master, as revealed in a letter on Angus’s body.
Walter Keene is a Darkhand Steward, as we know from the last case and is restated in the blackmail letter he carries.
Nicolas Maker is a Watersnake Initiate, as shown by the letter he carries from James and his robe.
Angus MacBain is a Watersnake Master, as we see from the mask and robe on his body, as well as the letter from Alistair.
And sure enough, this matches up with the masks lying on the ground.
Source of date: Protocol document held by Nicolas
Case IX – The Interrupted Weekend at the Doctor’s Salon (May 11, 1792) part 1 (scrolls, terms)
Thinking scrolls:
1. Events
2. Identities
3. Facts of the case
4. Location of suspects
Terms:
Salon:
Tea-house, Chess-house, Field, Library, Salon, Flowerbeds, Fountain – Examine map on wall
Frame, Ptoo, Button – In the dialogue of the third man from the left
Sherry – Click the bottle lying on the floor next to the table
Killed – In the dialogue of the man with the eyepatch
Provoke – In the dialogue of the man in the red coat
Stole – In the dialogue of the young man with blue hair
Seal – Examine the seal held by the man with the beard
Ptoo – Examine the letter held by the man with the beard
Club – Examine the Lemurian War Club held by the man with the beard
Drugged – Examine the poster on the wall
Arthur, Falkner – Examine the constable’s rattle
Leopold – Click Leopold’s testimony in the constable’s inventory
Gideon – Click Gideon’s testimony
Koch, Turner – Examine Gideon’s testimony
Ergin – Click Ergin’s testimony
Bell – Examine Ergin’s testimony
James – Click James’s testimony
Sherry, Blanchard – Examine James’s testimony
Alistair – Click Alistair’s testimony
Turner – Examine Alistair’s testimony
Podrick – Click Podrick’s testimony
Spade – Examine Podrick’s testimony
Billiam – Click Billiam’s testimony
Planted, Augustus, Fountain, Hill – Examine Billiam’s testimony
Boomerang – Click the boomerang next to the body
Outside:
Blanchard, Vallantine – Newspaper on the bench by the fountain
Case IX – The Interrupted Weekend at the Doctor’s Salon (May 11, 1792) part 2 (deduction part 1)
Deduction:
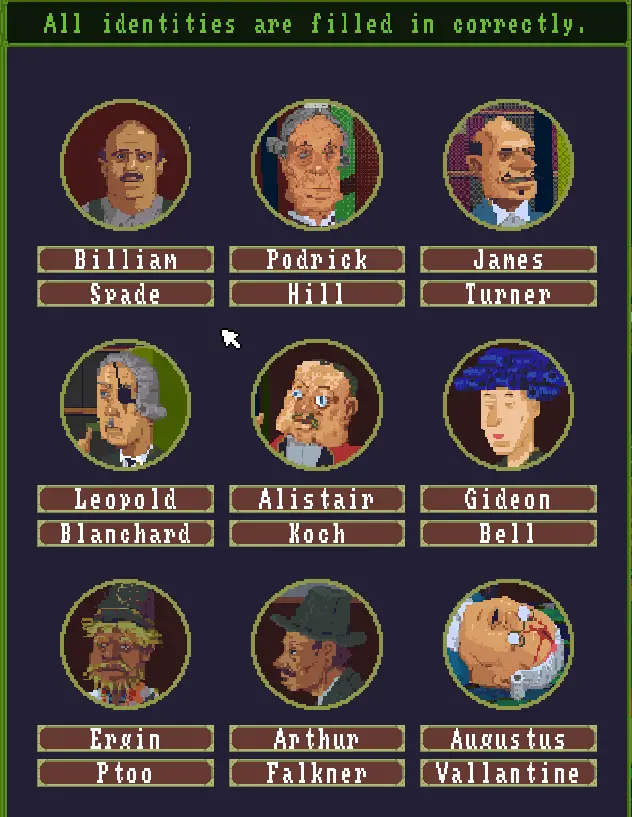
Two identities are solvable from the last case: James Turner and Alistair Koch, the third and fifth men along respectively. They look like they did in the last case, so should be easy to spot. Arthur Falkner can also be filled in as his full name is on his constable’s rattle.
We’ve got a few partials we can fill in: first is that the man with the eyepatch is Leopold. We know this because James addresses Leopold in his dialogue, and that man is the one answering him.
We also know that the bearded man is a Ptoo, as he has a letter from James Turner confirming that.
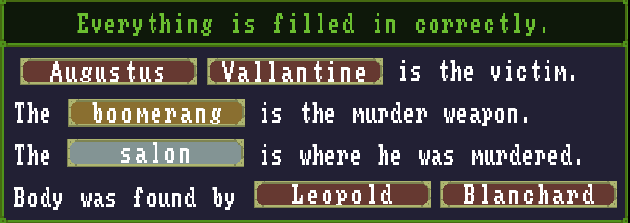
Now here’s a slightly sneaky one. We can see from Arthur’s testimony book that he has statements from Leopold, Gideon, Ergin, James, Alistair, Podrick and Billiam. Who’s notably missing? Augustus, so this must be the victim; can’t give a witness statement if you’re dead, can you?
Now here’s where we have to start cross-referencing clues to figure out some extra identity information. If we look at Ergin’s testimony, there’s a reference to him having challenges with the local language, so he must be the Ptoo prince, and he says that everything young Master Bell says is correct. The only young person here is the blue-haired man. Sure enough, the young blue-haired man is carrying a letter mentioning that he would be meeting and spending time with ‘a Prince from the eleventh clan of Lemuria’, and when we look for the testimony of someone who spent time with Ergin, we find Gideon, which must be his first name.
Now looking at Podrick’s testimony, it mentions him serving Lord Alistair, disposing of spoilt sherry, assisting Mr Spade in the garden and taking away glasses. We can reasonably assume, then, that Podrick is the butler, leaving Billiam as the gardener. Sure enough, Billiam’s testimony discusses planting and pruning. He must also be the Mr Spade Podrick assisted, so Billiam Spade is the gardener’s full name.
Now Leopold’s testimony says the butler raised the alarm. Billiam’s says he continued working until the alarm was raised by Mr Hill, so that must be Podrick’s last name.
James’s testimony says he drank sherry with Blanchard in the library. Podrick’s mentions him disposing of the spoilt sherry that ‘he and Lord Leopold had drunk’, so Blanchard must be Leopold’s last name, leaving our victim to be Augustus Vallantine.
We can extra-confirm this using the newspaper on the bench outside by the fountain: it mentions ‘Loyalist Blanchard’ and ‘Moderate leader Vallantine’. Looking at the cartoon above the article shows a cartoon with a figure depicting the Loyalists who has an eyepatch on and resembles Leopold, and one depicting the Moderates who looks a lot like Augustus (and for even more confirmation that Blanchard is Leopold, Arthur Falkner mentions not feeling comfortable arresting a prime ministerial candidate).
We can also fill in who found the body: it was Leopold, as evidenced by his testimony and the fact that nobody else has a contradictory claim.
The murder weapon is pretty obvious: every possible object that could cause a wound in the head like that is clean, except the boomerang. And the location in which he was murdered has to be where he was found, as there’s no blood anywhere else. Using the map or Leopold/Podrick’s testimony, we know this is the Salon.
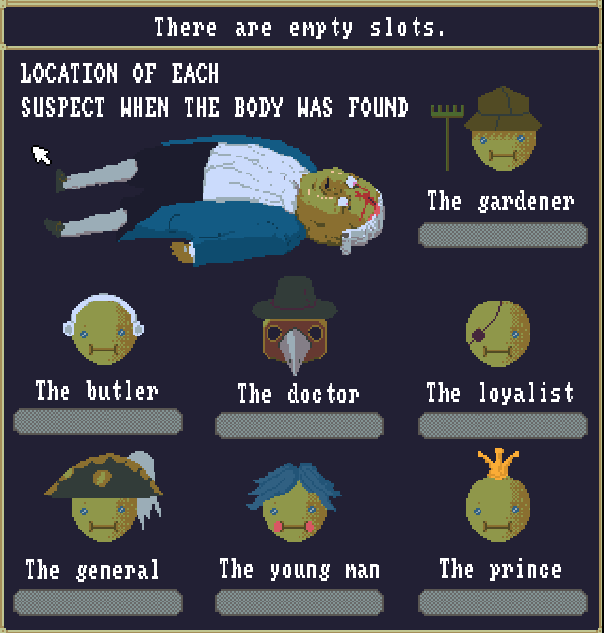
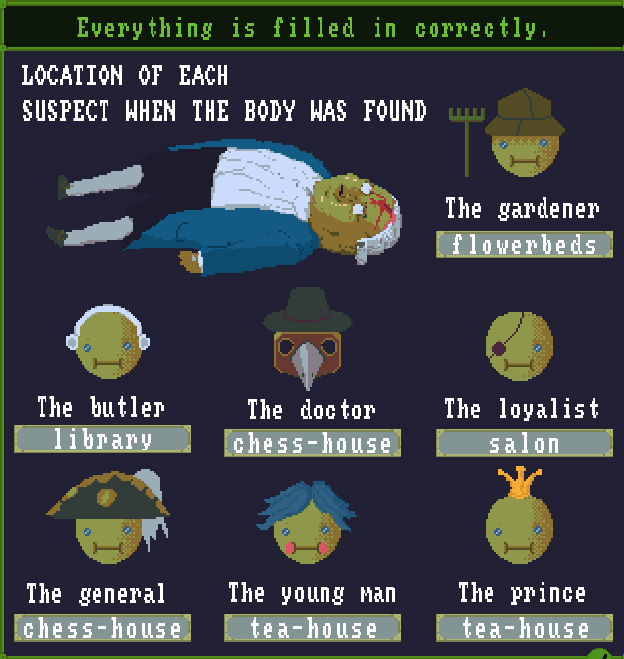
Now for everyone’s location when the body was found: the gardener is Billiam, and according to his testimony he was in the flowerbeds. The butler, Podrick, says he fainted in the library. The doctor, James, was in the chess-house with Alistair, so that was the location for the general as well. The loyalist was obviously in the Salon, since Leopold was the one who found it. The young man says he was drinking tea in the tea-house with the prince, so that’s where the two of them were.
We still don’t quite have enough information to fill in the events: there seems to have been something else going on here besides murder, and besides that none of the testimonies mention going and killing Augustus so someone here is obviously lying. Let’s work through their testimonies to see if we can figure out the contradiction.
James claims to have drank a glass of sour sherry with Blanchard in the library. This lines up with Leopold’s testimony, where he says he had a glass of sherry with James in the library and became drowsy. As he was falling asleep, he mentions seeing the Lemurian observing him through the glass door. This lines up with Gideon’s testimony, as he was playing croquet with Ergin in the morning and the croquet field is just outside the library. This also lines up with Billiam’s testimony, where he says he was planting all morning by the chrysanthemum bush and saw the young gentleman and the foreigner leave the croquet and go behind the manor. This lines up with Gideon saying they got bored and went to drink tea in the tea-house.
As for Alistair, he says he practiced chess in the morning in the chess-house, educating the butler on his lack of military training. This lines up with Gideon saying he saw Alistair lecturing the butler, and James saying he went to the chess-house where he found Alistair and the butler.
James says he ordered the butler to clean up the library and get rid of the bad sherry, and spent the rest of the time playing chess with Alistair until the alarm was raised. Gideon and Alistair confirm that James came and sent the butler away. But Gideon also mentions an interesting detail James and Alistair didn’t: Alistair left the chess-house and returned shortly afterwards. Alistair’s testimony also says he was very close to winning the game, but if you actually look at the board in the chess-house, white and black still have 10 pieces each and neither side is remotely close to even check, let alone checkmate. Something’s fishy here.
While all this was going on, Podrick entered the library and found Leopold asleep. He was suddenly overcome by dizziness and fainted due to his weak heart. This lines up with Leopold saying he woke up and found the butler on the floor, asleep. He woke the butler, which Podrick confirms, entered the salon and found the body, whereupon he deduced from the weapon that the Lemurian was the murderer and instructed Podrick to raise the alarm, which he did.
However, we can see from the dialogue that James believes this to have been a ruse by Leopold to frame Ptoo, citing a missing button as proof that Leopold was the culprit. And sure enough, if you examine Leopold his coat is missing a button, which you can find in the victim’s hand.
We’ve mostly covered the testimony now, but there’s one more interesting tidbit in Billiam’s testimony from when he moved to the rose bush in the afternoon: he saw Augustus leaving the fountain at around noon. There’s no reason to doubt him: the rose bush certainly has visibility of the fountain. Examining the body shows a note that says ‘Listen: apologies for the shouting match yesterday. Let’s continue our discussion at noon. Leo’ which is even more incriminating for Leopold.
However, if Leopold did it, what were James and Alistair up to? Ergin has an interesting line of dialogue: ‘Hmm, I hope the host did not notice me when he was leaning over the sleeping eye-patch gentleman.’ For what reason might James have been leaning over Leopold while he slept, and if Ergin was outside playing croquet why would James noticing him have been a bad thing? He doesn’t mention Leopold falling asleep in his testimony either.
Case IX – The Interrupted Weekend at the Doctor’s Salon (May 11, 1792) part 3 (deduction part 2)
A closer look at Leopold and Podrick might offer a new clue: they both have pink tints to their eyes. Where have we seen that before? The psychoactive plants poster, specifically Black Poppy, which causes sleepiness and the whites of the eyes to get a pink tint. The fact that Leopold fell asleep after drinking the sherry, and Podrick ‘fainted’ when cleaning up the spill, suggests that the sherry was drugged. So why didn’t James fall asleep? If you look at the two glasses, one was untouched. So it seems pretty clear that James drugged Leopold’s sherry, otherwise he’d have drank his own and suffered the same fate. This puts him leaning over Leopold in a new light: why might he have done that? To steal and plant the button! Which explains how he noticed the ruse: because he created it.
There’s still the Lemurian connection in the events text though. A closer look at Ergin shows that he’s carrying a brown stone slate seal, which makes sense as he’s from Lemuria and we can see the seals of the twelve Lemurian clans on the shelf. But on closer inspection, there are only eleven seals there and none of them is the one he’s holding, meaning the one in Ergin’s possession must have been stolen. However, Gideon never mentions Ergin leaving, nor did he fall asleep.
However, if you look at him closely, he is blinking rather rapidly. Another look at the psychoactive plants list shows that Lemurian Lichen causes hyperconcentration on one thing, loss of perception of time, and rapid blinking. Has Gideon demonstrated hyperconcentration on one thing or a loss of perception of time? Yes, in his testimony. He mentions Ergin commenting on the design of the chess-house multiple times. This introduces an interesting question: if he lost perception of time, did Alistair really return ‘shortly’ afterwards, or was it longer?
Either way, we know Ergin wasn’t on the level either, and apparently drugged Gideon’s tea. If we check out the tea-house this is supported by the fact that one cup is almost empty and the other is untouched. And this explains his dialogue: while Gideon was drugged, Ergin must have gone into the Salon to steal the seal.
Ergin’s crime seems to be restricted to that theft, as his note suggests this is an ‘opportunity to reclaim our honor’ and so doesn’t seem to be directly related to the murder. This must mean that James and Alistair are the ones connected to it, and this makes sense given that they’re both in the Brotherhood (as evidenced by previous cases and their ruby rings serve as a reminder).
Can we cement this with a motive? You bet we can. Looking back at the newspaper on the bench by the fountain, we see that Leopold Blanchard and Augustus Vallantine had 32 and 29 MPs respectively, not enough to outstrip the New Order party with 36, but they were going to form a coalition, which would have given them a majority of 61 and put either Blanchard or Vallantine in the prime minister position. And who runs the New Order party? Lazarus Herst, who is in the Brotherhood with James and Alistair. If one of the candidates were to die, and the other turned out to be the murderer…there’d be no opposition left, as the parties would turn against each other and ruin their chances of being in power.
With all of these details in hand, we can finally fill in the sequence of events:

Source of date: Newspaper on the bench by the fountain
What’s interesting about the sequence of events here is that basically James drugged Leopold in order to steal and plant one of his buttons on the future victim to make everyone think Leopold did it, while Alistair killed Augustus with a Lemurian boomerang so that when Leopold found the body he’d think it was Ergin, which then allowed James to point out the ‘frame job’. A genius set of interconnected ruses.
Case X – The Triumph of Order (March 14, 1795) part 1 (scrolls, terms)
Thinking scrolls:
1. Events
2. Numbers (always available)

3. Virtues
4. Punishments

5. Culprit pair 1
6. Culprit pair 2
7. Culprit pair 3

Terms:
Courtroom:
Fashion – In the dialogue of the man on the far left
Lies, Lust, Art – In the dialogue of the second man from the left
Bones, Souls – In the dialogue of the third man from the left
Beauty – In Nicolas’s dialogue (the man at the table)
Diligence – Examine the letter held by Nicolas
Merit – Examine the tribunal schedule on the table
Mistakes – In the dialogue of David Gorran (the man in the raised helmet)
Francs – Examine any Albion franc banknote
Upper chamber:
Francs – Examine any Albion franc banknote
Music, Emotions – In James’s dialogue (the man on the left)
Untidiness – Examine the letter held by James
Secrets – In Alistair’s dialogue (the man on the right)
Fangor, Quinn – Examine the first charge list
Walter, Keene – Examine the second charge list
Lothar, Richards, years – Examine the third charge list
Josh, Bailey – Examine the fourth charge list
Horace, Webb – Examine the fifth charge list
Gideon, Bell – Examine the sixth charge list
Virtue room:
Idol – Examine the idol held by Lazarus Herst (the man on the left)
Truth – In the dialogue of the right-hand man standing
Moderation – Newspaper article held by right-hand man standing
Sloth – In the dialogue of the first sitting man
Indulgence, Literature – In the dialogue of the second sitting man
Case X – The Triumph of Order (March 14, 1795) part 2 (deduction part 1)
For the first time, we have some symbols that we started out with: +, – and the numbers 0-9. These fill in smaller green boxes in slots.
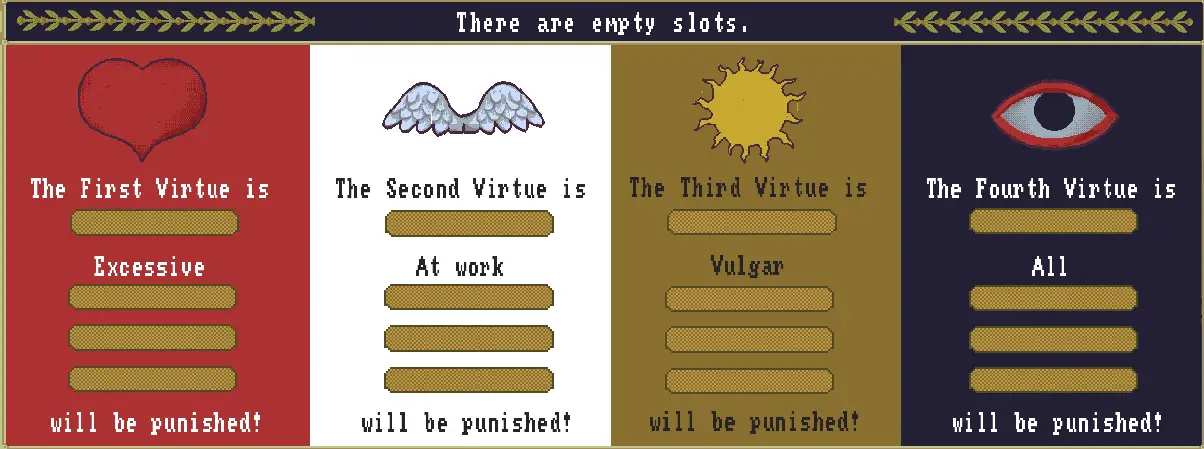
We actually have some fairly easy-to-fill events slots here. The logical thing to precede ‘have passed since’ that starts with a number and has a word following it is a measure of time, and the only yellow time word we have is ‘years’. How many years have passed since the party seized power? We can see from Nicolas’s schedule that it’s currently March 14, 1795. The newspaper in the inventory of the small man next to Lazarus says the party gained a majority in parliament in 1792 (which was just following the assassination of Augustus from the previous case), so the number of years is 3. As for ‘largest X deduction’, we can see the punishments for the virtues is -Y merit, so that must be the blank here.
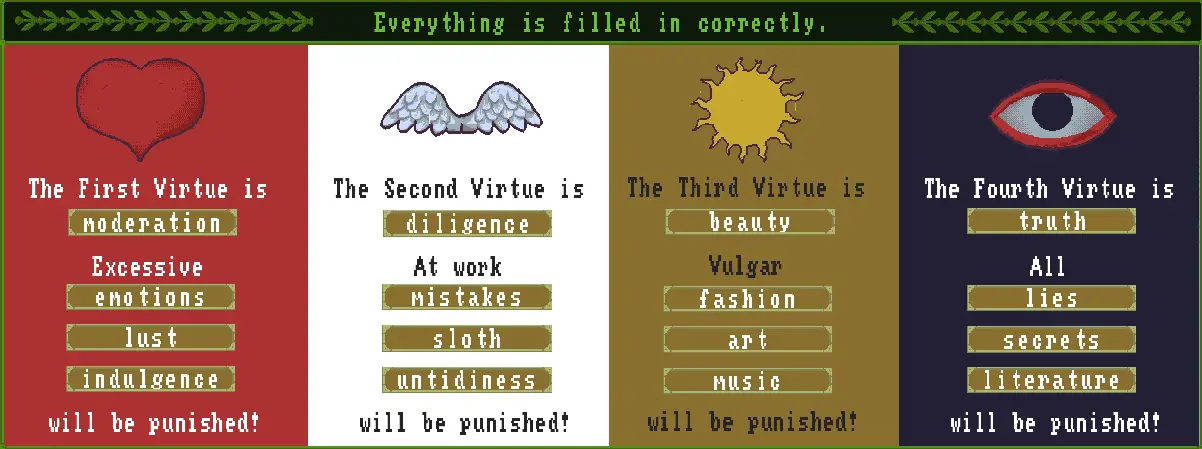
With that out of the way, let’s fill in some virtues. The first man in the tribunal mentions ‘fashion charges’, so we know fashion is against a virtue, but which one? The THIRD VIRTUE! Poster on the wall shows a donkey wearing a ridiculous hat and a gaudy dress, so presumably it’s that one. This lines up with the ‘vulgar’ in the virtue description.
Now Nicolas says something quite interesting: ‘If it were not against the First Virtue, I would feel very happy.’ This implies that excessive emotions are punishable, so in that goes. If we needed another clue for that one, in the upper chamber James says ‘do control your emotions. We as Arbiters of Order must never violate The First Virtue!’ so that confirms that. If that still weren’t enough for you, Alistair, Fangor, Lothar and Gideon all got docked merit for emotional outbursts.
Nicolas also has a note from ‘Your beloved brother’ pointing out that he spent more than 3 shillings on new clothes after being asked for a loan of money and told Nicolas had none to spare. So it seems lies are a Fourth Virtue violation.
Upstairs, Alistair says ‘I would never breach the Fourth Virtue. You know damn well that I keep no secrets!’ so clearly secrets are a Fourth Virtue violation as well.
Alistair’s letter says the regiment’s colonel being ‘with another officer’s wife in a potentially intimate situation’ is a ‘potential flouting of the First Virtue’ so lust must be a violation of that.
James also has a letter saying that his senior assistant Daniel has demonstrated extreme untidiness and breached one of the Virtues, but we don’t have enough information yet to know which.
In the Virtue room, the first locked cabinet contains brandy and opium, so the third violation must be indulgence. The second cabinet contains an invoice where the total doesn’t match the cost plus delivery charge, so mistakes must be a Second Virtue violation. In the third is a violin, a portrait of Gideon and a picture of a naked dwarf, so ‘art’ and ‘music’ round out our infraction list there. The fourth contains books titled ‘Stories’ and ‘Autumn Tales’, and the man on the right says ‘Too bad literature is forbidden’, so we can clearly count literature under the Fourth Virtue and finish that off.
The second man says he hopes sitting there all day doesn’t count as sloth, so that’s clearly a violation and we only have slots left in the Second, so in it goes. And since we only have slots left in the second, we now know that’s where our earlier untidiness infraction went too.
All that’s left now is to name them! The newspaper article mentions a march to the King’s current residence to demonstrate the virtue of ‘moderation’. That lines up with avoiding excessive indulgence, so it must be the First. Lies, secrets and literature have one thing in common, particularly as literature can also be called ‘fiction’, and that’s that they oppose ‘truth’. So this must be the name of the Fourth. Vulgar fashion, art and music can only be an affront to ‘beauty’, so there’s our Third. And Nicolas’s letter gives us the name of the second, which stands against mistakes, sloth and untidness: ‘diligence’.
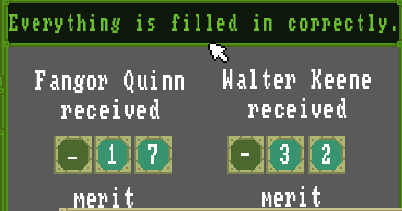
Now to work out merit punishments, we can check the passports. Nicolas had infractions for labelling a protocol as being on a Thursday even though it was a Wednesday, and taking a double-length lunch break in the office. These would both be Second Virtue violations, and since he ended up with a total of +4 after a +10 from loyal service and his deductions total -6, each one must be -3, and this is the Second Virtue penalty.
David Gorran had infractions for having a secret compartment in his office locker, and denying its existence. These are both Fourth Virtue violations, and he ended with a total of +8 after a +10 for loyal service, meaning his total deductions were -2 and each one must be -1, the Fourth Virtue penalty.
James had infractions for drinking a full bottle of brandy at a picnic and keeping the book ‘Legacy of the Rose Dynasty’ in his study. He had a total of +12 after a +20 from loyal service, meaning his total deductions were -8. Since indulgence is First Virtue and literature is Fourth Virtue and that has a -1 penalty, the penalty for First Virtue must be -7.
Finally, Alistair had infractions for slapping a sergeant in anger and listening to marching music in his manor. His total is +11 after a +20 from loyal service, so his deductions total -9. We know he got -7 from the slap as that’s First Virtue, so the Third Virtue penalty must be -2.

Now that we have the punishments, we can work out each culprit’s total.
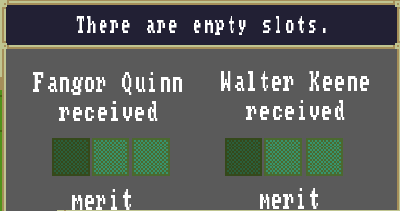
Fangor Quinn claimed he had no wife (lie, -1), has a painting depicting a naked person in his house (vulgar art, -2), broke his wife’s favourite teapot in anger (excessive emotions, -7) and was observed spending a night with his neighbour’s wife (excessive lust, -7). So his total is -17.
Walter Keene flirted 3 times with different married women during the Party convention (excessive lust x3, -21), wore ridiculous headgear at 5 public events (vulgar fashion x5, -10) and claimed he had not betrayed High Arbiter Lazarus during his ritual of ascendence (lie, -1) for a total of -32.
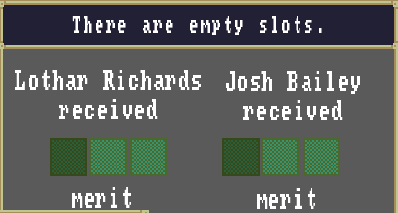
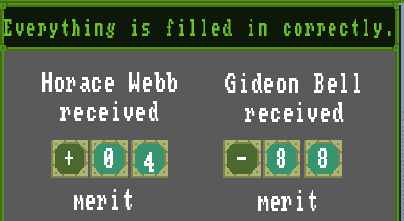
Lothar Richards held a dinner party a few years ago where he offered large amounts of wine to his guests (excessive indulgence, -7) and got angry during the questioning and shouted at the High Arbiter (excessive emotions, -7) but revealed the whereabouts of his hiding fugitive dissident daughter Mary and her husband Peter (+15) for a total of +01.
Josh Bailey left his work at the tannery early (sloth, -3), drank excessive amounts of gin at the ‘Scrawny Cat’ (excessive indulgence, -7), drank excessive amounts of rum at the ‘Old Oak’ (excessive indulgence, -7), approached a married woman with an indecent offer (excessive lust, -7) and denied 4 times during questioning that he had done these acts (lie x4, -4) for a total of -28.

Horace Webb has not held down a job since the new regime, evaluated as 60 instances of non-work (sloth x60, -180), claims he works in his castle, helping his servants clean it (lie, -1) and possesses 15 books kept in his private library (literature x15, -15) but expressed willingness to donate his castle to the Party (+200) for a total of +04.
Gideon Bell wears an outrageous hairstyle (vulgar fashion, -2), broke down in tears 10 times during questioning (excessive emotions x10, -70), has refused to start working, evaluated as 5 instances of job-skipping (sloth x5, -15) and rejected the High Arbiter’s request that he share information of a secret entrance to the castle of his cousin the Sovereign (secret, -1) for a total of -88.
Case X – The Triumph of Order (March 14, 1795) part 3 (deduction part 2)
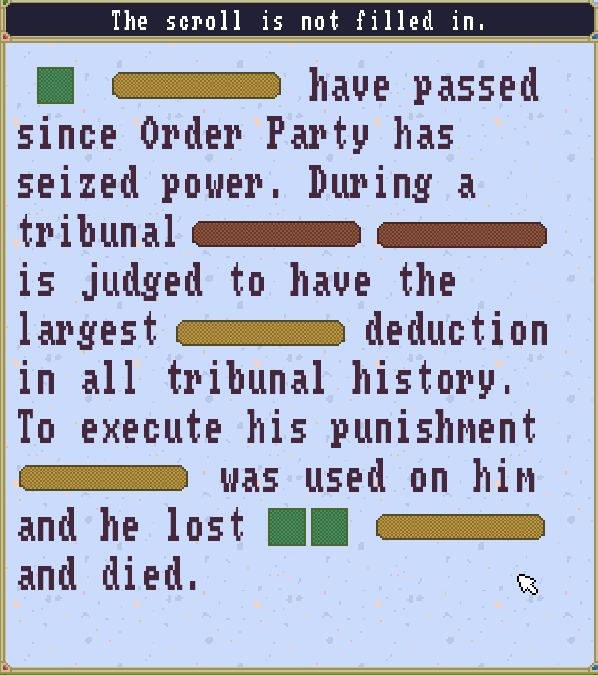
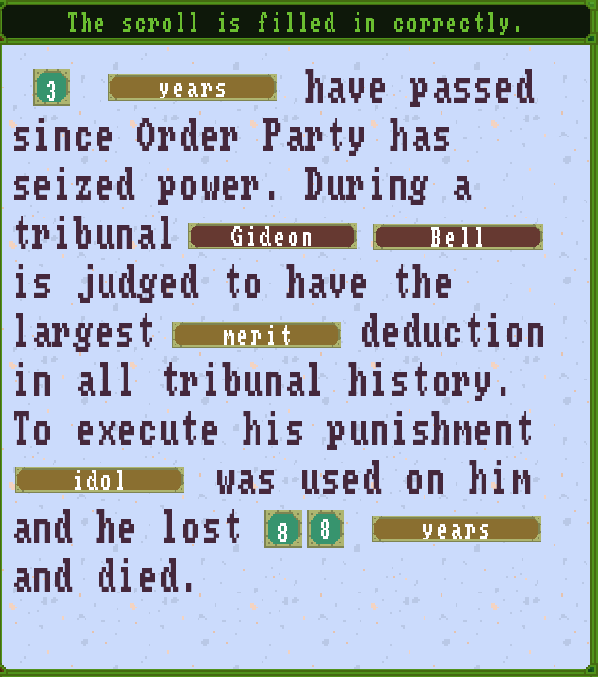
Gideon’s penalty is by far the largest of all culprits, so presumably he’s the missing name from the events. However, only 3 years have passed since the incident at the Salon, and the victim the guards are taking away is an old man. How can this be? What was used on him must have been ‘idol’, as nothing else fits. So what did he lose?
The first thing to take note of is that Lazarus has the idol in the same configuration as Edmund did for his UNKNOWN EFFECT experiment, which if we remember from the cabin case was used to create a healthy green apple and a rotten apple. We know the first two symbols are ‘increased matter’, what might the third symbol be?
If we consider that what rots an apple is the passage of time, it’s logical to conclude that Gideon’s punishment made him older, and what he lost was ‘years’, which may well be what the third idol symbol means. And how many did he lose? The value of his merit deduction makes sense, so 88.
Given his birth year was 1775, adding 88 years to his current 20 would have resulted in him being 108 years old, which is presumably why he died from the punishment.
Source of date: Tribunal schedule
Case XI – The Slight Delay in the Peaceful March to the King’s Castle (May 15, 1795) part 1 (scrolls, terms)
Thinking scrolls:
1. Event 1
2. Event 2
3. Event 3
4. Deaths
Terms:
Clearing:
Golden, Idol – Examine the idol held by Alistair
Crossroads:
Dead, Body – Examine the corpse
Lovers Islet:
Mary, Ideal, Wife – Examine red-sealed letter held by Mary
Fight, Peter, Battley, Mary – Examine blue-sealed letter held by Mary
Kill – In Peter’s dialogue
Party Camp:
Find, Lost – In Nicolas’s dialogue
Castle, Manor, Islet, Crossroads, Camp, Cabin, Inn – Map in tent
Lazarus, Herst – Bust in tent
David, Gorran – Examine D.G. tab in the book in the safe in the tent
Nicolas, Maker – Examine N. M. tab
Alistair, Koch – Examine A. K. tab
James, Turner – Examine J. T. tab
Walter, Keene – Examine W. K. tab
Cloudsley Cabin:
Years – In the dialogue of the Darkhand Steward with the musket
Have – Note attached to bag inside the cabin
Little Mermaid Inn:
Kidnap: In Ada’s dialogue
Blackmail: In Oscar’s dialogue
Case XI – The Slight Delay in the Peaceful March to the King’s Castle (May 15, 1795) part 2 (deduction part 1)
My my, what a lot of death! You’ll notice that in this one, the Thinking panel has links to return to previous cases, which is a fair indication we may need to check information from them to figure things out in this one.
It seems like the first thing to do is figure out where our three victims are, as there are three murders listed. There’s a body at the crossroads, a man in a helmet with numerous cuts on his body. We have a pile of burned and mangled corpses at Blackfield Manor. And there’s a man in the process of dying at Cloudsley Cabin, who’s just been shot.
The man who’s in the process of dying has to have been the most recent victim, so we’ll start at the end and work backwards. Who could he be? There’s actually a clue at the cabin that gives it away pretty much immediately: the man with the musket saying ‘Isn’t it poetic that you have fallen for the same trap as you did all those years ago. Straw men are your bane.’
This is a callback to case 6, when David Gorran was fooled by a straw man in the coffin that was delivered by Walter Keene. And who do we know who’s a Darkhand Steward? Funnily enough, Walter Keene! He looks older than we’ve seen him up until now, but we already know that Lazarus can make people older with the idol.
So Walter Keene killed David Gorran at the Cabin.
Nicolas’s dialogue at the Party Camp gives us a starting point for our next mystery. He says that Lazarus hasn’t returned for several hours, and that Alistair and James have gone to find him.
Alistair is in the clearing trying to make the idol work, but James isn’t there…however, he does have a cut on his ankle, which would explain why the sword has ‘some blood’ on it. That means this corpse must be James, but how do we know whether this happened early in the morning or before noon?
We check the woman washing clothes next to the camp. She has a ticking watch showing 12:15pm, and has a Capital route morning report. At 8, a newfangled insurrectionist carriage passed by. At 8:30, an individual in the insurrectionist uniform passed by, on the new two-wheel contraption. At 10:15, two individuals in insurrectionist uniforms passed on horses.
We know Alistair and James left together, and they’re both wearing insurrectionist uniforms. Alistair is also in the clearing with a horse, so they must have left at 10:15. That means James can’t have been killed in the early morning, and so before noon, Alistair Koch killed James Turner at the Crossroads.
That leaves our mangled and burned corpses at the Manor. The “newfangled insurrectionist carriage” is outside, which points to whoever this is having gone there early in the morning. There’s also an empty cannon in the Manor, which seems to have been what killed them all.
Do we have any clues pointing to the victim or who was responsible? Of course we do! There’s a horse running in the background at Lovers Islet, with a note saying ‘I have some small but pressing business to attend to at the property of our late Brother Sebastian, the previous Proudbeast Steward. I will be back at the camp for our 10 o’clock strategy meeting as planned. Lazarus’ Worth noting as well that the horse is carrying the Seven Seas company seal, so it must be James’s. Remember that for later.
This tells us that not only was Lazarus away in the early morning, he didn’t return for the meeting, and he was going to Sebastian’s property…Blackfield Manor. So it’s a fair bet that Lazarus was the unfortunate victim, but who killed him?
There’s a curious thing on the map: examining the ship docked next to the Little Mermaid inn shows a ship with a cannon missing. In the Inn, Annie is talking to John, saying she ‘heard rumours you lost a cannon while gambling.’ John replies with ‘Nonsense, I am not an idiot!’ but he clearly is, because his ship is down one cannon and we can clearly see it made its way to Blackfield Manor somehow.
Can we find anyone who shows signs of having gambled recently? As it happens, yes! Peter Battley has a horse race betting slip. But did he have a reason to kill Lazarus?
Well here’s where things get interesting. In Mary’s possession is a letter from Edmund Cloudsley, which says ‘I know where your unworthy mate is hiding you! Soon I will free you from his dirty paws and ship him to colonies. While you I will put on a pedestal of sweetest praise and you will become my ideal wife.’ But here’s the thing: it’s dated March 15, 1795…2 months ago. A look at the other letter from Peter from December 10, 1788 shows that Edmund died in a robbery, but if he’s sending letters he can’t be dead. What’s going on?
The first interesting thing is that Edmund knows where Peter is hiding Mary. Who was in charge and knew the whereabouts of Mary and Peter? Lazarus, because Lothar revealed it during questioning. It’s at this point the penny will probably drop, if it hasn’t already, that Edmund Cloudsley and Lazarus Herst are one and the same, and that Lazarus is the result of Edmund figuring out how to decrease age with the idol. And we know Lazarus was going to Blackfield Manor. It seems clear at this point that Peter Battley won the cannon from John and killed Lazarus with it, so early in the morning, Peter Battley killed Lazarus Herst at the Manor.
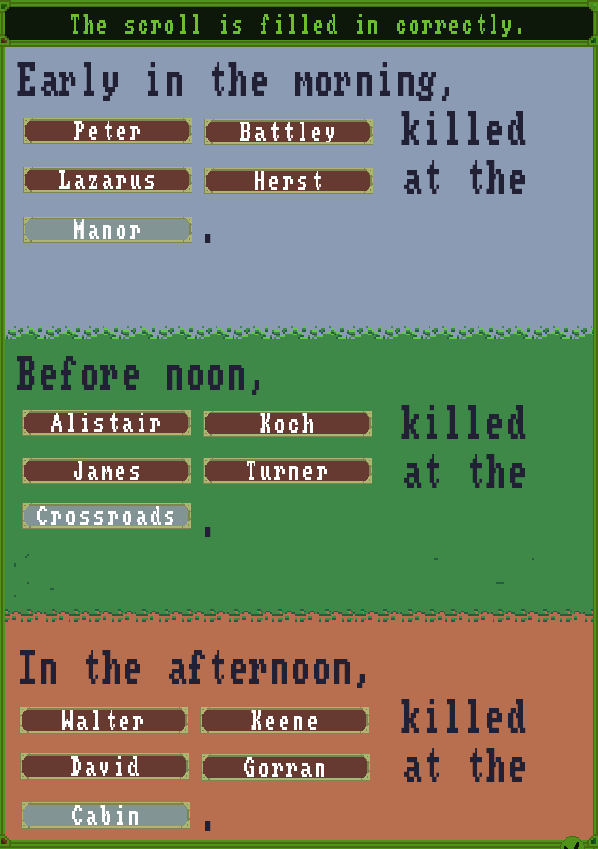
With the details we’ve uncovered so far, we can probably solve the first event scroll:

What may trip you up on this one is that we previously knew Mary as Mary Richards and we don’t have a Richards term, but she’s Battley now because she married Peter.
We can probably figure out the second event too:
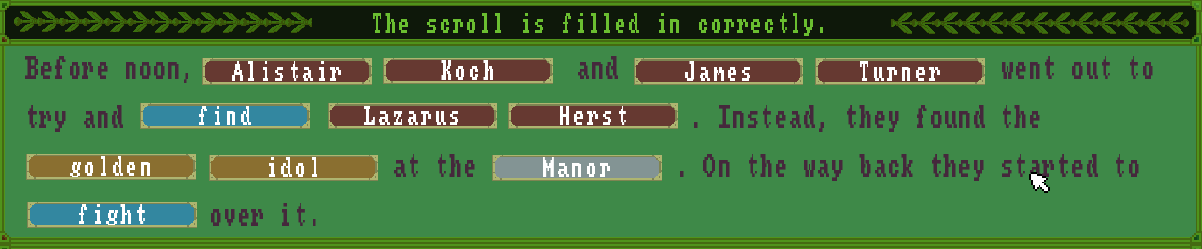
How do we know where they found the idol? Well we know they were looking for Lazarus, and we know they knew Lazarus was going to the Manor because his note was on the horse running in the background at Lovers Islet, and we know from the seal that was James’s horse. And we also know Lazarus generally kept the idol in his possession, so it stands to reason he would have had it with him. There’s another clue to this: the fact that the idol’s eye is cracked and Alistair can’t make it work, suggesting the cannon fire broke it.
Arguably [dead] [body] would have fit too, but with Alistair having the golden idol on him in the clearing, it’s obvious that they did find it. And they’d have no reason to fight over Lazarus’s corpse.
Now we’ve got a bit of work left to do to figure out exactly what went down between Walter Keene and David Gorran.
Case XI – The Slight Delay in the Peaceful March to the King’s Castle (May 15, 1795) part 3 (deduction part 2)
We start at the Party Camp, at the birdcage in the safe in the tent, which has a letter in it:
‘Lazarus! You took 32 things from me. I demand you return them. If you refuse, I will make the story of your true origins known to the other party leaders. At half eleven on May 15, meet me at the place the Idol was stolen from our Brotherhood and poor Willard Wright met his death. Come alone and bring proof, something personal of yours to give to the veiled woman. Tie your reply to the pigeon and release it from the cage. It will find me.’
So we know this was addressed to Lazarus, and it was presumably written by Walter Keene, because the 32 things taken from him have to have been years (hence why he’s so much older now). There’s actually a subtle clue here because 32 was the number of Walter Keene’s merit deduction in case 10, and that points to this having been a punishment that was applied to all the culprits rather than just Gideon.
So let’s follow this letter to its destination: the place the Idol was stolen and Willard Wright met his death. That would be the Little Mermaid Inn, as we saw Willard’s death in case 4.
We know from the washer woman that Lazarus left in the carriage at 8, and David went past on a bike at 8:30.
The veiled woman at the inn is Ada, who is holding another note:
‘I have instructed him to arrive at around half eleven. Most likely he will be in Order Party uniform. If he comes alone, without any backup outside, approach him. If he gives you something that belonged to the one who escaped your tonic, you may proffer him the instruction slip I gave you. Conceal your face. He may recognise you.’
She’s holding Edmund Cloudsley’s handkerchief (as seen in his inventory in case 3 and 5) so she must have given the instruction slip to the person who met her.
Sure enough, the dying man has a slip saying ‘You will find me in the place where we two first met. There we can talk.’
Inside the cabin are two clues: the first is the note attached to the bag, saying ‘I admit I may have treated you injustly after our long cooperation. I will come alone, in peace, so we can discuss your compensation.’ This is obviously the response Lazarus sent back to Walter, and it’s fairly clear he sent David to kill Walter instead. David tried to shoot Walter through the window (hence the empty pistol and hole in the window) but as we see inside the cabin, Walter had set up a scarecrow decoy which got shot instead, and he took David out with his musket from behind.
With this we can fill the final scroll and put and end to the sordid tale of the golden idol:
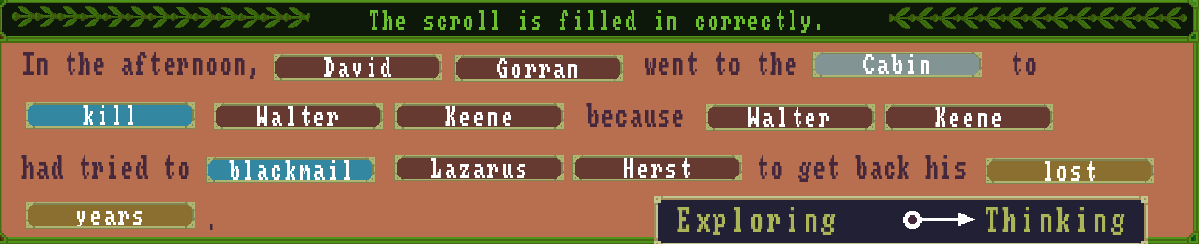
Epilogue – The Grand Vision of a Better World
Thinking scrolls:
1. Event 1
2. Event 2
3. Event 3
Terms:
(All unlocked from the start)
Sebastian, Edmund, Cloudsley, Peter, Mary, Battley, Willard, Wright, David, Gorran, Walter, Keene, Lazarus, Herst, James, Turner, Alistair, Koch
Idol, Virtues, Youth
Brotherhood, Order, Party
Gryphon, Reborn, King
Deduction:
The epilogue is basically a recap of what was going on behind the scenes during the chapters we played through. The interactions are just flavour, filling in blanks like Edmund’s plan for the Brotherhood and Order Party, his thoughts on Mary and Peter’s marriage, the organisational breakdown of the Brotherhood, and a note to David about his arrangements for Edmund’s ‘death’.
The first part is about something being left in a will. Who do we know who left one? Sebastian Cloudsley, who died in case 2 and had his will read out in case 3.We know that Willard took the keepsake that was bestowed upon the Brotherhood in Sebastian’s will from his letter in case 4, and from case 3 we know that keepsake was the idol. Who stole it? David Gorran, under the guise of Ash Blair. And David was working for Edmund Cloudsley, so that must have been whose orders he did it on. Who did he accidentally stab? Willard Wright, the victim of case 4. The Brotherhood tasked Walter Keene to punish Edmund and recover the idol. So our first event is:
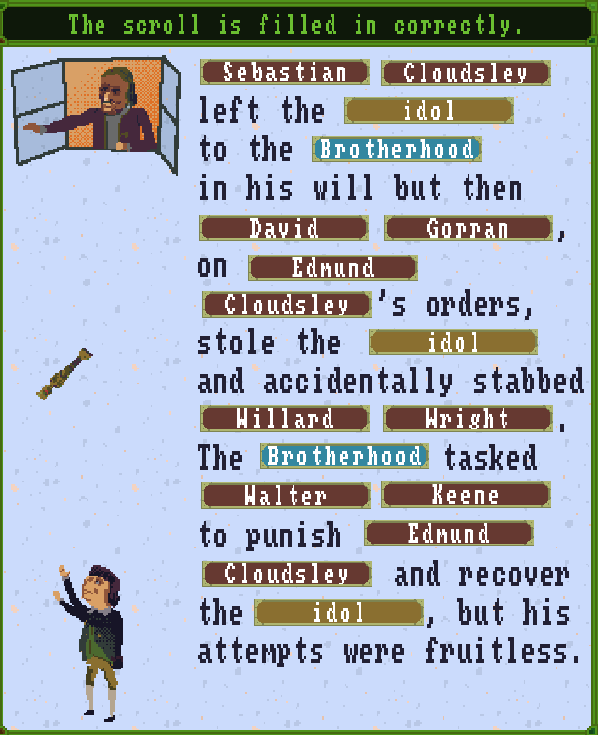
The next part is obviously referring to case 6 at the cabin: who might have been captured there? Walter Keene, and he was convinced to join Edmund’s side. Edmund used the idol to become Lazarus Herst and infiltrate the Brotherhood, where he established himself as Gryphon Reborn and reformed the group into the political party that went on to take power. So second event:
On to event 3.
For who helped seize power, it’s pretty obviously James Turner and Alistair Koch, and Lazarus Herst was who they helped. What kind of rule did they enforce? One of virtues, by taking youth away from common people and giving it to Order Party members.
Who was there going to be a showdown with? The king, as we saw in the newspaper in case 10. And who do we know who wanted to kidnap someone? Lazarus, who wanted to kidnap Mary Battley. He was shot by Peter Battley, which broke the idol. So event 3, and the final puzzle of the main game: