An introductory guide on army composition and unit tactics, designed to assist new players and applicable to all factions, as part of the Art of Total Warhammer guide series.
Overview
This guide marks the commencement of a collaborative series by Bod and Steel, drawing upon our extensive experience playing the Total War: Warhammer series. While there are numerous approaches to playing the game, we aim to provide valuable insights for others.
The purpose of this guide is to equip new players with unit knowledge for constructing an army and instilling confidence in commanding their chosen units during battles. It serves as a preliminary overview, with subsequent guides offering more detailed coverage of the topics discussed here.
The information presented in this guide offers a generic understanding of units that can be applied across all factions. Although there may be faction-specific variations, we consider this approach to be a reliable foundation.
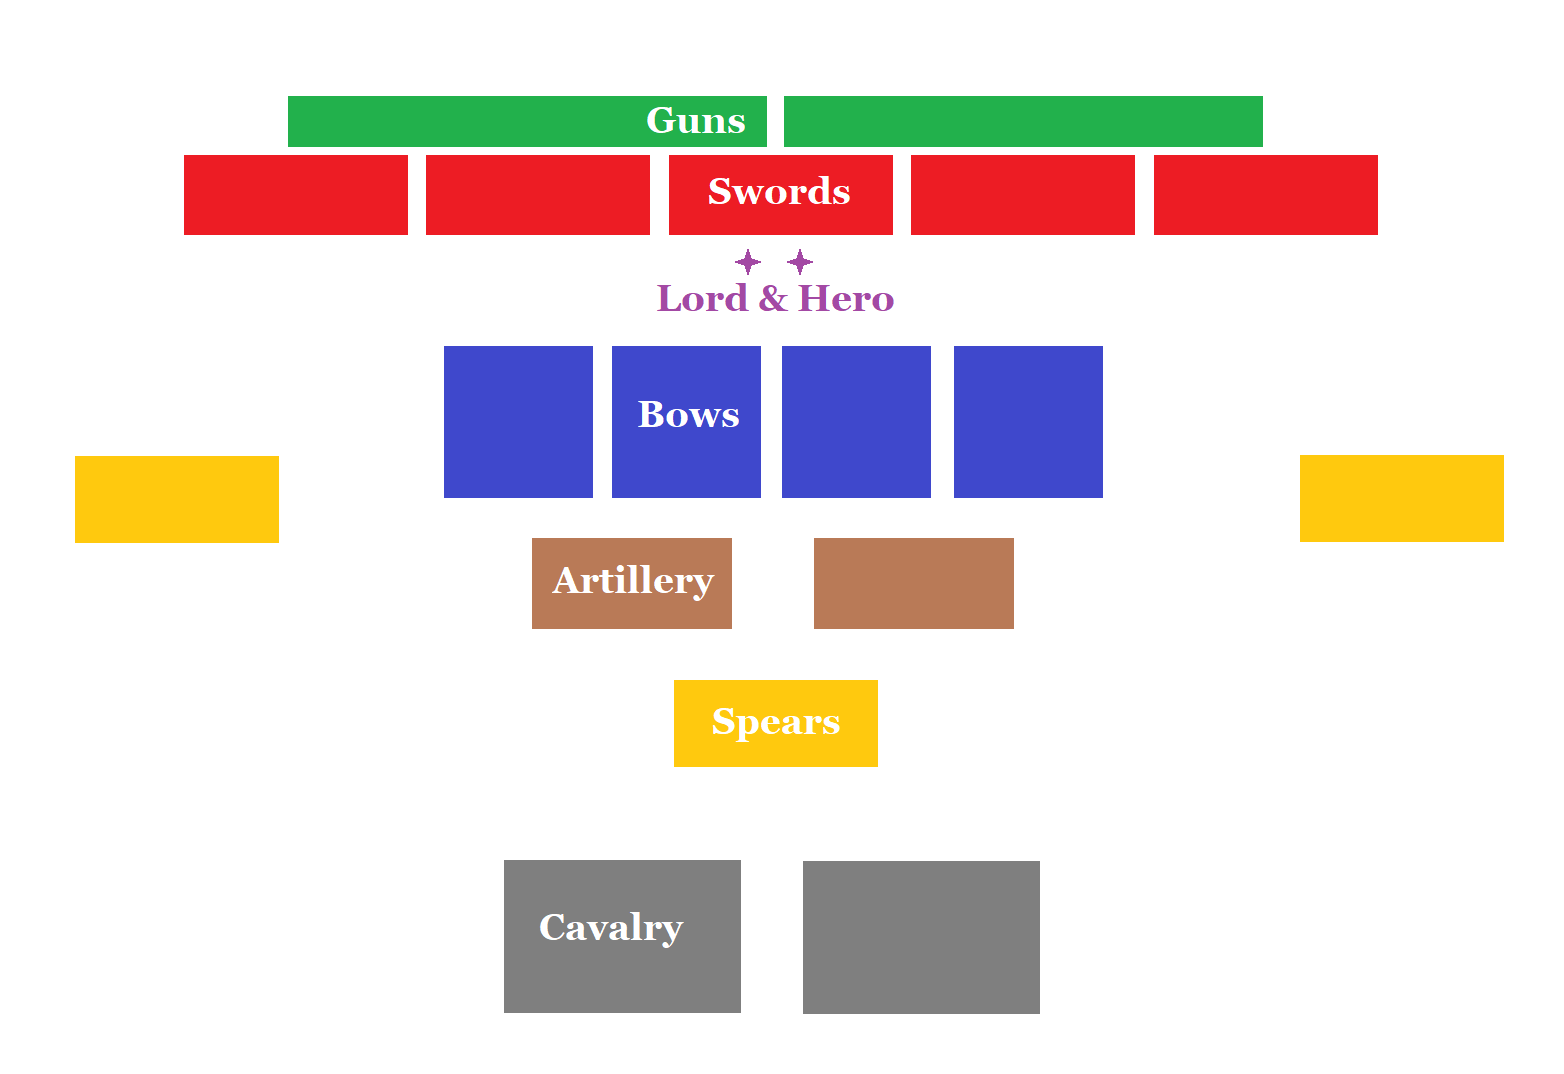
Typically, we categorize an army into four components: lords and heroes, frontline troops, ranged troops, and damage dealers.
Lord and Hero
These individuals are referred to as Heroes and Lords, distinguished leaders of armies and exceptional combatants, each possessing power comparable to an entire infantry unit. It is possible to bestow them with personalized names, befitting their noble deeds or ignoble actions.

Melee:
- Opting for a melee Lord is a reliable choice since Lords possess greater power than Heroes, resulting in superior melee statistics.
- If you have a wizard Lord, it is advisable to include a melee Hero to provide support and protection for the more vulnerable spellcaster.
- Engage in duels with enemy Lords, preferably with your own troops surrounding you rather than the enemies.
- If you possess ranged troops with direct-fire capabilities, utilize your melee-focused character to intercept enemies attempting to reach them. By positioning a single individual amidst a mass of enemies, your lone warrior will minimize the risk of friendly fire.
- As Lords and Heroes progress in levels, many of them unlock the ability to ride mounts. Mounts alter a character’s attributes (e.g., increasing armor and speed but sacrificing shields) and physical size. However, mounted characters are unable to scale walls, although those with flying mounts can land on them.

Wizard:
- It is advisable to acquire a wizard Hero as early as possible to harness the power of the winds of magic, unless your Lord already possesses wizardry.
- Wizards are ill-suited for melee combat, particularly against heavily armed and armored adversaries. Their true strength lies in the spells they cast, so resort to melee combat only as a last resort.
- If you are uncertain about which type of wizard to select, consider opting for the Lore of Metal (if available to your faction). Its initial spell unleashes a barrage of massive, armor-piercing metal shards within a readily targeted area, inflicting substantial damage at a relatively low cost.
- Spells with area-effect damage are the simplest to employ—direct them at large clusters of infantry.
- Direct your damage spells towards enemy troops already engaged in melee to minimize their ability to evade the effects.
- All wizards within an army draw from a shared pool of magic, meaning that adding more wizards to your army will not enable you to cast more spells. However, it will grant you access to different spells on separate cooldowns.
- Certain circumstances, such as overcasting a spell, may entail a risk of miscasting. In such cases, the spell still manifests as intended, but the wizard suffers damage as a consequence.
- Similar to melee characters, most wizard Lords and Heroes gain access to mounts as they advance in levels. In contrast, the swiftest mount is typically the most advantageous option for wizards, as it allows the vulnerable spellcaster to evade melee engagements and swiftly reposition themselves to cast spells where they are most needed.
Other Heroes:
- Bod prefers to eventually include a full set of faction heroes in his armies, particularly for cooperative support roles, although it is not essential.
- Other heroes generally possess less universally applicable abilities, such as buffing allied units or selectively eliminating single enemy targets.
Frontline
These units play a crucial role in determining the battlefield’s location, either by luring the enemy towards your lines or by advancing towards the enemy.

Shieldwall: These units wield shields and weapons such as swords, axes, maces, or whips. Deploying 5-6 squads of shieldwall units is an effective strategy.
- Shieldwall units excel as versatile frontline troops. Sword-based units, or their equivalent weapons, offer faster attack rates compared to spear units. Additionally, shielded units benefit from increased melee defense and protection against missile attacks.
- Unshielded units are generally ill-suited for frontline positions and are better utilized as flankers or damage-dealers. However, certain factions may have exceptions to this rule, such as Beastmen’s Bestigors.
- Surrounding enemies with your troops and avoiding consecutive waves of melee attacks is advisable.
- A useful tactic involves maneuvering other, more vulnerable units through your frontline to divert and disengage pursuing enemies.

Spear (and shield): Typically, 3-4 squads of spears are recommended (6-8 squads for factions lacking shieldwall units) to reinforce your frontline. Shielded spears are preferable, although not all factions have access to them. Halberds and polearms are viable alternatives (and stronger than unshielded spears), particularly when equipped with shields.
- Keep these units in reserve, stationed at the rear and flanks, to defend against cavalry charges and other large units.
- Use them to fill gaps in the frontline.
- When large enemy units are absent, flank and engage the enemy, targeting vulnerable areas.
- It is important to note that while spear troops perform better against larger units such as cavalry and monsters, the most effective way to damage such units is by engaging them with spears to pin them down, allowing your ranged troops to deal damage. Ranged units can easily shoot over the heads of your spears to target mounted enemies or giants, for example.
- Spears can also be employed to divert enemy attention away from softer units.
- When responding to threats with spear units, it is usually recommended to send the closest available squad. In cases where uneven spear coverage may result (e.g., two squads on the left and none on the right), reposition other squads to cover any gaps.
Ranged
When considering the unit classes mentioned above, their primary purpose is to safeguard your backline, whereas ranged infantry constitute the backbone of your backline forces, tasked with dealing damage.
Aim to have approximately 6 squads of ranged infantry. However, not all factions have access to ranged troops, in which case allocating army space to additional frontline troops and other damage dealers is advisable.
Ranged infantry can be categorized into two types: direct fire (guns, flamethrowers, etc.) and arc fire (bows, crossbows, etc.). This differentiation is significant.
Regardless of whether your troops are armed with guns or bows, there are important aspects to bear in mind:
- Avoid shooting your own troops in the back. Only shoot over your own troops into enemies engaged in melee if the enemies are larger targets.
- Prioritize targeting enemy melee infantry as they advance (if they pose a threat), as it is easier to shoot cavalry and monsters during melee engagements.
- Focus on shooting enemies who lack shields to maximize your shots’ effectiveness.
- When the opportunity arises (especially with direct fire, and even more so for close-quarters ranged units), flank the enemy lines to unleash devastating damage. Your melee units’ shields will provide protection.
- Remember that your ranged troops are vulnerable and cannot fulfill their role while under attack, even from a single enemy. Protect them with your melee units against enemy melee threats.
- When a ranged squad overlaps with another squad, their firing effectiveness significantly decreases due to units blocking each other’s line of fire. Avoid this situation whenever possible.
- Activate Guard Mode (via a button on the user interface) to prevent your ranged units from chasing enemies who retreat out of range or line of sight.

Arc fire: This refers to units armed with bows, crossbows, and similar weapons. Position them behind the shieldwall and ensure your archers are protected by your shielded troops.
- Arc fire units are generally easier to handle but lack armor-piercing (AP) damage, except for certain units like Celestial Dragon Crossbowmen and some elf units.
- Targeting enemy archers is effective when most melee units are already engaged in combat.
- Strive to maintain each squad’s formation as close to a square as possible. This allows your archer line to rotate and shoot sideways without overlapping other units.

Direct fire: This includes units equipped with guns, blowpipes, and flamethrowers. Undulating terrain poses the greatest challenge for these units.
- Zoom in behind the squad to ensure they have an unobstructed line of fire.
- When positioning them on a hill, ensure all troops are on the downward slope and not on the other side of the peak relative to the enemy.
- Avoid placing them directly behind your shield troops unless the elevation provides them with a clear line of fire (e.g., if your ranged units are positioned on higher ground) or if the enemy primarily consists of large monsters.
- Utilizing small, single-entity units such as lords and heroes to block for your direct-fire ranged units can be highly effective, as there are numerous enemies to target and few allies in the line of fire.
- Direct fire units are not as proficient at shooting onto city walls compared to arc fire troops.
Damage Dealers
Ranged units, although considered as damage dealers, have their own section in most armies due to their crucial role. Replacing them entirely with other damage dealers can result in an ineffective or challenging-to-play army. It is recommended to allocate 2-4 spaces in your army for army-defining units like artillery, cavalry, giants, and dragons.

DPS Infantry refers to infantry units focused on dealing damage rather than prioritizing survivability. They are typically unshielded and armed with either dual weapons or great weapons. To maximize their effectiveness:
- Engage enemies from the sides when they are already occupied.
- Position them behind your shieldwall near the ends, providing protection while remaining ready to flank if necessary.
- Their lack of shields makes them vulnerable to ranged attacks and lowers their melee defense.
- Dual weapons provide a bonus against infantry, making them efficient against mass, lightly armored troops.
- Great weapons have armor-piercing attacks, making them effective against tougher units.

Skirmishers are ranged units designed to harass enemies without the protection of line troops. They are usually fast and employ loose formations, allowing them to fire in all directions, even while moving. Here are some tips for utilizing skirmishers effectively:
- Prior to the battle lines meeting, skirmishers can be used to shoot the enemy army as they march towards you or vice versa.
- Focus on retreating and avoid melee combat. Skirmishers can still shoot while on the move.
- Enemy ranged infantry poses a significant threat to skirmishers. Keep your skirmishers within range of the enemy but out of range of their archers or gunners.
- Horse archers can be utilized as weak shock cavalry in melee combat. This can be beneficial when they run out of ammunition, against enemy artillery, or to pursue routed enemies.
- Although skirmish mode is intended to help archers and skirmishers avoid melee, manual oversight is often more effective.
- Unmounted skirmishers can only outrun infantry. They perform better against enemy archers and can substitute for some of your ranged infantry squads. However, they should never be deployed unprotected near enemy cavalry, as their loose formation and poor melee stats make them extremely vulnerable to cavalry charges.

Artillery comprises cannons, catapults, mortars, ballistae, and any long-ranged weaponry. In addition to dealing ranged damage, artillery can force the enemy to approach your lines, providing a defensive advantage. Consider the following when employing artillery:
- Keep artillery positioned behind your lines at all times since most artillery is more fragile than ranged infantry and lacks mobility.
- Artillery projectiles often hit multiple enemies in an area, so target high concentrations of enemy troops for optimal results.
- Loose formations and fast-moving enemies like cavalry may reduce the damage inflicted by artillery shots.
- Be cautious of your artillery’s firing arc to avoid friendly fire. Inaccurate shots put allies near the target and along the shot’s path at risk.
- Check if your artillery is specialized against specific enemy types and adjust targeting accordingly. Anti-infantry artillery may perform poorly against single targets, and vice versa.

Cavalry encompasses conventional horsemen, as well as more unique alternatives like monstrous cavalry or fast-moving monstrous beasts. Here are some recommendations for utilizing cavalry effectively:
- Flank the battle lines to target enemy archers and artillery.
- Charge enemy units from the sides and rear when they are already engaged in melee.
- Keep cavalry behind your own lines when not in use to protect them.
- Avoid prolonged melee engagements against enemy infantry or heavy cavalry. If you want your cavalry to keep fighting the same enemy, withdraw them briefly before initiating another charge for increased damage.
- Steer clear of enemy spears, polearms, or halberds entirely.
- Pursue routed enemies to prevent them from rallying. Light cavalry, in particular, excels at this since they cannot sustain extended melee combat like heavily armored counterparts.
- Assess the surroundings before initiating a charge. Charging with cavalry and subsequently being attacked from behind by enemy cavalry or infantry can result in being trapped and sustaining heavy damage.

Chariots are fast-moving vehicles designed to disrupt infantry lines. Consider the following tips when employing chariots:
- Pay close attention to chariots during battles, as they require active management rather than a “fire and forget” approach.
- Charge into enemies, mowing them down, and follow up with a move order on the opposite side to push through effectively.
- Chariots cause damage by running over enemies, so take advantage of this unexpected method.
- Larger chariots are usually halted by larger targets, so it is advisable to avoid engaging such adversaries.
- Choose chariot targets carefully, ensuring there is a clear path on the other side to prevent them from becoming bogged down.
- Some chariots possess missile attacks, which are better utilized against individually tough enemy units such as lords, monsters, or other chariots, rather than numerous but individually weak enemies like infantry.

Flyers are flying units, usually characterized by their high speed. Here are some recommendations for utilizing flyers effectively:
- Employ flyers similarly to cavalry, but exploit their ability to fly over enemies, enabling easy strikes from behind with short notice.
- Exercise caution when engaging airborne enemies unless you possess clear air superiority.
- Landing your flyers among your own troops, especially idle spearmen, can be advantageous when they struggle in aerial combat.
- Flyers need a brief period out of combat before taking off from the ground, which can be problematic if pursued by enemies.
- Flyers are generally vulnerable to ranged attacks, so it is advisable to avoid enemy ranged units unless actively attacking them.
- Certain flyers possess abilities that can only be used while in the air and not in melee, such as dragon breath.

War Beasts refer to animals without riders, offering speed similar to cavalry but weaker in melee combat. Consider the following when utilizing war beasts:
- The realization that war beasts are underutilized has emerged during the creation of this guide.
- While they serve a purpose in chasing down routed enemy troops, one-on-one melee combat against adversaries that fight back often leads to their defeat. Utilizing pack tactics can help compensate for their weaknesses.
- Larger war beasts like lions, spiders, or bears tend to fare better in melee combat but still benefit greatly from numerical superiority. They should avoid direct head-on engagements with enemy melee units.
- Similar to cavalry, they can be deployed effectively, but smaller war beasts are not specifically weak against halberds or spears (although they tend to be weaker overall).

Monsters encompass massive single entities like giants and dragons, as well as monstrous infantry such as trolls and ogres. Consider the following when employing monsters:
- Monsters excel at fighting mass infantry.
- It is advisable to deploy monsters while covered by your own troops, particularly monstrous infantry, as they perform best when overlapping with your shieldwall.
- Monsters have a flexible role and can be utilized for blocking enemies or dealing damage.
- Steer clear of enemy spears and halberds.
- Due to their large size, monsters are vulnerable to ranged attacks as they present prominent targets.
- Their ability to push through infantry makes them exceptional at disengaging from adversaries they can outrun, even when surrounded.
- Some monsters can fly. Advice regarding flyers applies to them as well.
Misc
Consider including one of these options if you have an available slot in your army. However, it is generally not recommended to have more than two of them.

War Shrines are substantial individual entities that provide benefits to nearby allies.
- Their main purpose is to grant buffs, although some also possess formidable attacks and/or significant health pools, especially when mounted on a Mammoth.
- Refer to the small circles located at the bottom of the unit information to identify the buffs they offer.
- While in battle, you can hover over the buff on the unit information to view the range of its influence.
- Aim to position them close to the most intense combat in order to buff as many troops as possible.
- Spear units excel at demolishing shrines, possibly due to their resemblance to chisels on sticks!
- Most war shrines are large and slow, making them vulnerable to enemy missile attacks, even when surrounded by friendly forces. Consider diverting or disabling enemy ranged units, or withdrawing the war shrine from their range if it comes under heavy fire.
- Certain war shrines possess abilities that only function when they are engaged in melee combat. Ensure that they are fighting on the frontlines without allowing them to become surrounded by the enemy.
Final Notes
- The unit images provided are merely examples and not an exhaustive list.
- The game features a wide array of captivating monsters and creatures. The best approach is to experiment with units that catch your eye!
- Make sure to consider a unit’s strengths in combat, whether it excels against large targets or infantry, and utilize it to eliminate foes it is well-suited to handle.
- Units possess “mass,” which means some are more effective at pushing than others. Larger units have greater mass. Troops of the same size cannot easily move through each other, but smaller troops will navigate around larger ones. Larger units are superior at disengaging from melee encounters and disrupting enemy formations.
- If you found this guide helpful, please give it a positive rating to increase its visibility among others! A visual representation illustrating a typical army formation is provided below as a point of reference.