Welcome! This UGCW guide is intended to provide comprehensive information to the player and will focus on management, strategy and tactics. This guide assumes basic knowledge of the game–basic terminology and game mechanics will not be covered (see resources below if you need help with this).
It is geared towards folks that are interested in history, organization, strategy and tactics and willing to invest time into optimizing play and learning the intricacies of this game–it’s is not well suited to casual players. With that said using these techniques and principles you can expect to regularly achieve 4-5:1 battle kill/death ratios on MG difficulty.
I dedicate this guide to my friend Rooster who once upon a time requested this one! This one took a hot minute but I hope returning novices and any new players out there will still find some useful if not interesting content for all!
Career Management
CSA v Union
Two sides play fundamentally similarly; in my anecdotal experience, CSA seems to be stronger in officer and troop quality but tends to struggle with officer, manpower, and equipment availability. Meanwhile, the Union has the opposite strengths and weaknesses. Consider this when planning your career points and how you focus on spending cash.
Career Points
I recommend prioritizing career point assignments as follows, rationale provided. I am not indicating that you need to max out these groups in this order, however; you may find blending in points in a roughly 3:2:1 ratio in these categories according to priority to be a good strategy.
1st Priority:
- Politics– yielding both cash and manpower, boosting politics first lends you significant flexibility to raise troops and buy equipment as needed in the early game.
- Army Organization– fielding the maximum number of brigades in each battle imparts significant advantages in controlling the battlefield. I recommend reaching army organization 6 by Shiloh (20 brigades per corps) and 8 (24 brigades per corps, 4 corps) by Fredericksburg.
- Economy– better quality weapons in the early game enable you to most quickly increase the performance of troops. I cannot confirm this but I also believe that capturing additional equipment in battles depends to some extent on what you bring, so if you bring better quality stuff you may have a better chance of gaining some in your battle spoils.
2nd Priority:
- Medicine and Training– more useful in the later game when your losses will increase and you have more veteran troops that are more costly to replace.
3rd Priority:
- Logistics– There are many ways to manage ammunition. I recommend maintaining your supply wagons at their maximum capacity. If you play aggressively you can also often snag enemy wagons (I once captured fourteen in a single battle!). Lastly, to conserve ammo you can also turn off fire at will for artillery that is not in effective range of targets or if artillery is generally not much needed at a particular moment (artillery tends to consume the most ammunition). Using these techniques I find running out of ammo to rarely be an issue so I don’t find this skill very useful.
- Reconnaissance– assuming you are following the principle of deploying the maximum number of brigades and observing good corps composition and not relying on enemy composition to determine your deployments, I feel there is not much use for reconnaissance. 2 points can be useful at some point for some basic intelligence; if you take 4 then you can monitor troops on the field mid-battle. I would not recommend investing more points than this.
Army Management
Planning
Unfortunately the weakest point in UGCW is arguably the UI for army management since there are no controls to do such tasks as multi-select/modify brigades or move entire divisions around—each brigade needs to be painstakingly managed individually (up to 120 of them…). I suggest to consider using a spreadsheet to more quickly plan out what units you want where in what corps at any given time. I provide an example below for how I have done this that you might like to use as a template.

Reputation
Reputation is a valuable currency and also imparts morale modifiers to your army. Avoid allowing your reputation to drop below 24 points as this will adversely affect army morale. I tend to spend down my reputation to this level especially in the early game especially on rare/expensive top quality equipment such as Richmonds, springfields, long range artillery, 24lb’ers, generals for flavor, etc depending on shortages and which side of the conflict you are playing. Note that not all reputation spends are created equal—you may spend 30 points for $70,000, or just 15 for 1500 Richmonds of similar value—so look for bang for your buck. Banking morale as the game progresses may be helpful to maintain a higher level of morale across the army while you are forced to conduct more hazardous assaults on fortified positions that can cause troop morale to drop like a rock.
Corps Composition
Organize your corps to operate as autonomous combined arms forces including most if not all combat roles. In the early game most of your corps divisions will be some combination of infantry and artillery, while later in the game you may dedicate entire divisions to specific roles (e.g. artillery or cavalry divisions). See the corps management section for details on how to organize a standard corps.
Corps could be subdivided into frontline and reserve corps if you like. A frontline corps may be comprised of more green troops which can benefit from the infantry discipline perk to shore up their poor morale, as well as the trainer commander perk to help them gain experience more quickly. Having a reserve corps of more veteran troops with stamina infantry perk with a commander experienced in tactics is helpful to achieve a foot speed of 10%, helping your incoming troops get into position more quickly; their morale is less of a concern as more veteran units naturally have more sustainable base morale.
Specialized corps are possible, and there are advantages to building them. An artillery corps can achieve 30% ammo plus good cover and reload rate (Strategy, Artillery, Defender). Cavalry corps with a dedicated commander can achieve a blistering +25% speed with the right brigade perks (Tactics, Cavalry, Attacker or Defender).
While potentially powerful, they can be difficult to deploy as you often may not have access to those units until later in the battle, as you would likely want to deploy such a corps as a reserve rather than frontline corps position. However, in a case like Fredericksburg where multiple corps are deployed at once, this could work great (prospect hill, CSA reserve IV corps is deployed at the onset of battle). For the most part, corps including all arms are going to be your best bet.
Training and Veterancy
Expect to afford to maintain steeply diminishing proportions of veteran units as brigades step up to the highest levels of veterancy. I recommend to go for more of a bell curve in terms of maintaining many experienced (1-2 star) brigades rather than shooting for a larger elite (3 star) section. For example a mid-game army might consist of:
20% green
40% 1 stars
20% 2 stars
5% 3 stars
I recommend to avoid paying for veterans especially early on except to maintain levels of veterancy when economical. It is otherwise generally highly uneconomical to spend potentially 10’s of thousands on a handful of crack brigades when you need dozens to perform adequately. Allowing some units to remain at a lower level of veterancy will make it easier to maintain brigade sizes sustainably as you can add troops just until before the brigade experience level drops so much that it’s perk is inactivated.
As you progress through the campaign always shoot to be adding a few new brigades/officers to fight in first corps so you are constantly training some green troops while working up to having a broadly seasoned army in preparation for the final campaign.
Officers
Assign brigade officers primarily based on brigade size. Step up commanders to larger formations as they gain experience. Avoid ramping up brigade sizes beyond the efficiency capability of the most capable available officer. Brigade officers can also increase performance by boosting base brigade XP. Note that Assigning a highly experienced officer can sometimes push a unit from one-star tier to the next while under their leadership.
Target assigning officers as follows:
- Infantry – brigadier generals, colonels
- Cavalry – lieutenants colonels, colonels
- Dedicated skirmishers – majors, lieutenants colonels
- Artillery – captains, majors
Major generals are ideal for leading divisions. Having this rank of general in divisional command can most effectively offset the efficiency penalties of lower-level subordinate officers commanding brigades of larger sizes.
Corps commanders are ideally led by lieutenant generals albeit hard to come by as they can impart three leadership perks to the corps.
Moreover it is an economical choice to choose the right rank of commander for the given brigade size. While you might be tempted to assign a brigadier general to your 3 star skirmisher brigade, you are essentially overpaying since that unit is not likely to perform much better with a colonel in command.
I like to rotate my highest experience officers/closest to promotion into the brigades that expect to see the most fighting in the next battle. While time-consuming, I am not aware of better ways of rapidly developing an experienced officer corps.
Corps Management
Early Game Composition
At the start of the game you will have a small corps comprised of a couple small divisions. I recommend to start with infantry and artillery. Anything from 3:1-1:1 ratio infantry:artillery is quite viable; as your army develops I tend to develop towards the more equal ratio. It helps to maintain artillery batteries attached directly to infantry divisions especially early on when you have fewer divisions on the field that each can operate autonomously. You will want howitzers and napoleons for close support; medium range artillery like 10lb’ers are also nice as they become available and I tend to attach them to reserve divisions. It’s not likely that in the first campaign or two that you will be able to afford or successfully operate more than one or two skirmisher or cavalry brigades so I recommend to focus on infantry for the first few battles.
Late Game Composition
A late-game infantry division might be comprised of 2-4 infantry brigades and 2-3 support artillery brigades. This is usually plenty of infantry for the corps to operate in any circumstance. You might then want to assign the last division to a special purpose, such as a mounted infantry division; suggestions below. When corps size reaches 4 divisions you might adopt the following composition:
1st Division – Frontline green infantry, smoothbore artillery/howizters. Deploy this division first to fight, in the higher-risk, lower-cover positions on the battlefield. Can be good for high-risk operations like taking up more isolated forward positions or flanking attacks that might take place in low-cover areas or that might be at risk of receiving close-range artillery fire.
2nd division – Frontline experienced infantry, smoothbore artillery. Deploy this division in lower-risk, high-cover positions. Good for holding the line reliably in defensive battles.
3rd division – Veteran and elite infantry, medium-range artillery. Hold this division in reserve. Their medium-range artillery can still support the first two divisions when infantry are not engaged due to extended range. Use in the lowest-risk, highest-cover areas of the battlefield.
4th division – Specialty division – sharpshooter, cavalry, and/or artillery reserve. Massing these forces together will help you to maximize their utility in a role, such as providing an autonomously capable mobile force in the case of mounted infantry, or directing overwhelming firepower on a specific point on the battlefield with a large long-range artillery formation.
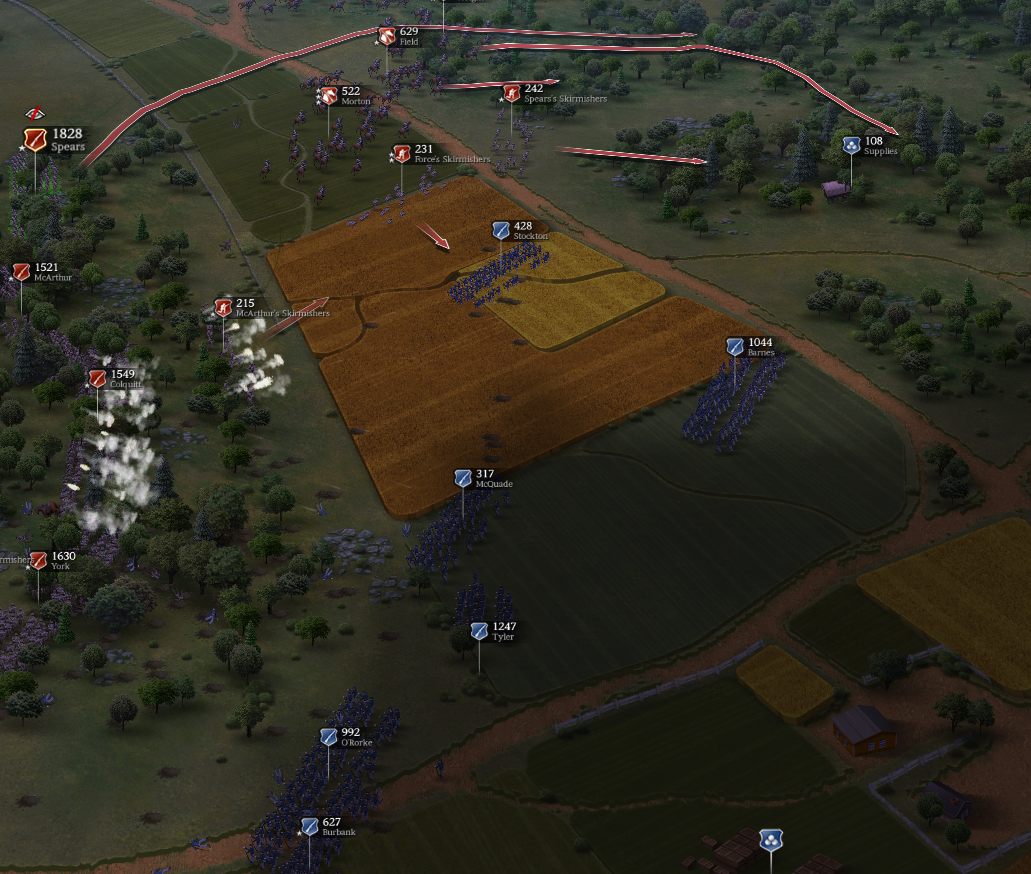
Here is an example corps for quick reference:
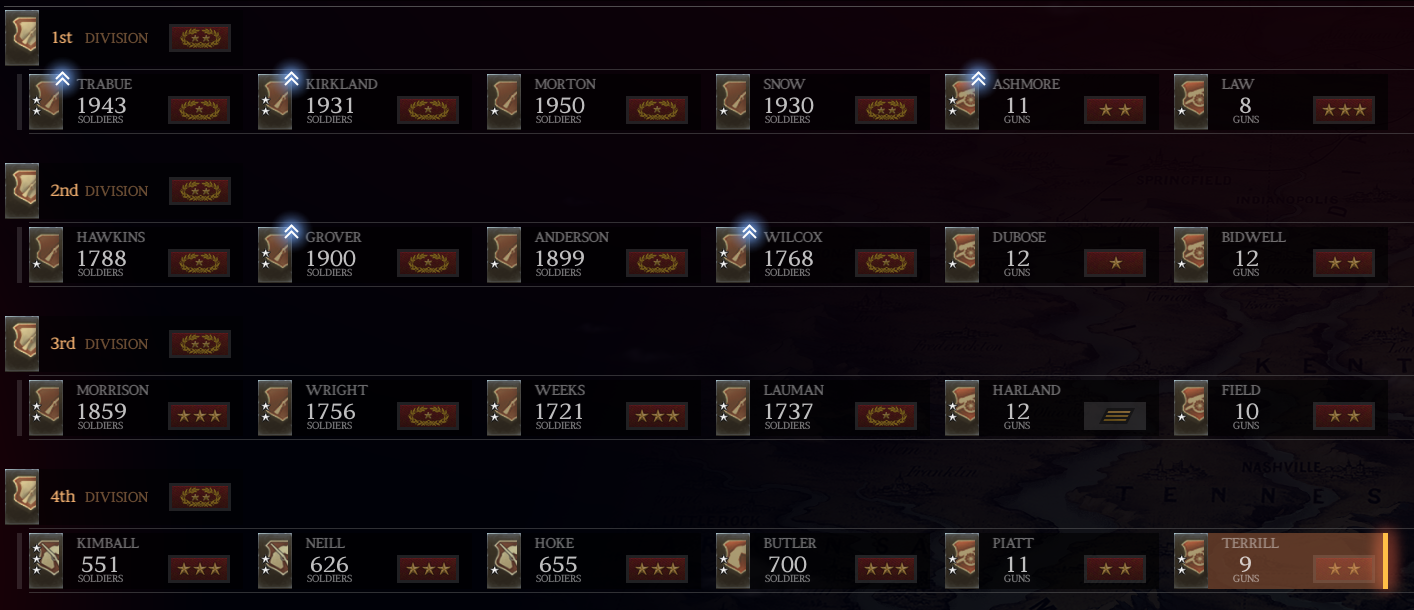
The first three divisions are standard infantry with two support batteries of close-range howitzers and artillery intended to move along with the division. The fourth division is a mounted infantry division with a couple long-range artillery batteries.
Division and Brigade Management
Division Composition
For a standard infantry-based division it helps to standardize if purely for the reason that detail-oriented army management can be extremely time-consuming. I like to group brigades together with similar levels of experience. Here are a few standard division ideas:
Infantry Division – 3-4 infantry bde, 2-3 short/medium range artillery bde
Mixed Inf. Division – 3 infantry bde, 2 short/medium range artillery bde, 1 skirmisher bde
Cavalry Division – 4-6 cavalry bde, 0-2 long range artillery bde
Artillery Division – 4-6 long range artillery bde, 0-2 infantry bde
Brigades
Form brigades (except artillery) at the maximum brigade size and according to the needs of your corps/ expected operations. While the maximum size brigade will at first be a bit more unwieldy and less effective in combat, this will help the unit tolerate punishment and build experience. Below is a discussion of brigade roles as well as recommended brigade sizes as units gain veterancy.
Infantry
Key Roles: frontal assault and defense, fortification, screening, delay, reconnaissance rearguard
Target Range: 1800-2000
Infantry must comprise the bulk of your army, perhaps 50% of any infantry corps. Each infantry brigade has two key components, the core brigade and deployed skirmishers.
Core infantry brigades are used to maintain your main battle line and reserves. The strength of core infantry is their resilience and capability to fulfill virtually any basic operating role, but are slow getting into position.
Detached skirmishers provide intelligence and screening to all unit types, can temporarily take and hold forward battlefield positions and fortifications, and protect your supply train. It’s critical to understand that detached skirmishers have a significantly higher base cover, spotting, and stealth bonus which enables them to excel in these roles over their parent brigades, and in groups, they can effectively hold their own against core infantry brigades. Note that depleted detachments can be replenished by merging them back with their parent brigade.
Skirmishers
Key Roles: flanking attacks, recon in force, infiltration/raiding, harassment, infantry support
Target Range: 400-450
Like detached skirmishers, dedicated skirmishers enjoy higher base cover, spotting, and stealth. Their main disadvantage is their small brigade size and can be challenging to use. For these reasons dedicated skirmishers always make up the smallest minority of my army.
Sharpshooter skirmishers armed with long-range rifles like Hunters and Whitworths enjoy an engagement range beyond the visual range of most opposing units, allowing them to operate quietly and snipe high-value targets like artillery and officers behind enemy lines, but can also very handily help shore up frontlines such as areas that should be defended but are deficient in providing cover. Due to potentially high spotting they can be useful for reconnaisance as well.
Carbine skirmishers (armed with high-rate-of-fire rifles) are perhaps the most difficult type of brigade to use. Historically this type of formation was extremely rare. You are most likely to have success with these units either while supporting detached skirmishers in the field or infantry supporting defending infantry formations (e.g. a second line/reserve defense); or in rare situations defending well-supported positions, or heavy flanking attacks in situations that the brigade can enjoy high cover/relative safety. With that said I have never been able to achieve a high KDR with this infantry type and recommend to keep the proportion of these brigades in the small minority.
Perks:
Sharpshooters: FIREARMS COURSE: +10 Firearms, -10% Reload, -10% Accuracy
RECONNAISSANCE COURSE: +10 Stamina, +10% Spotting, +10% Stealth
SCOUT: +20 Efficiency, +5 Stamina, +10% Spotting, +10% Stealth
Carbine Skirmishers: ENDURANCE COURSE: +10 Stamina, +5 Efficiency, +10% Speed
MARKSMAN TRAINING: +10 Firearms, +10% Reload, +10% Accuracy
SHARPSHOOTER: +15 Efficiency, +5 Firearms, +10% Spotting
Cavalry
Key Roles: strategic flanking, mobile reserve, recon in force, raiding/harassment, skirmishing, infantry support, pursuit
Target Range: 450-550 Mounted Infantry, 750 for shock cavalry
My personal favorite unit type, the exceptional flexibility of mounted infantry (MI) enables them to fullfill practically any role. They can seamlessly transition between roles as lead elements to seize favorable forward positions, harass enemy flanks, supply raiding or acting as mobile reserves. Large formations can even handily hold frontline positions provided good cover is available. Dismount to improve their defensiveness and rate of fire, and mount to relocate or harass in high-risk situations. Their only disadvantage (beyond mediocre brigade size compared to regular infantry) is poor mounted melee capability and high damage susceptibility.
Shock cavalry are best used to take down artillery or skirmishers, counter mounted infantry, or to finish off routing isolated brigades. Melee cavalry are best used in groups of twos or more. For the melee bonus which will enable them to more quickly win a melee combat. Combing shock cavalry with MI can also work well due to complimentary mobility.
Perks:
Shock Cavalry: HORSEBACK RIDING: +10 Stamina, +5 Efficiency, +10% Mounted Speed
CAVALRY TRAINING: +15 Melee, +25% Charge Damage, +5 Stamina
SHOCK CAVALRY: +10 Melee, +25% Charge Damage, +10 Morale
Mounted Infantry: ENDURANCE COURSE: +10 Stamina, +5 Efficiency, +10% Foot Speed
RECONNAISSANCE COURSE: +10 Stamina, +10% Spotting, +10% Stealth (+5 Firearms, +5
Melee, +20% Spotting, +20% Stealth)
MOUNTED INFANTRY: +10 Firearms, +10 Morale, -10% Reload, +25% Cover
Artillery
Key Roles: counter battery, bombardment, and close infantry support
Target Range: 10-14 guns (long range-howitzers)
Artillery can achieve exceptional kill ratios and can break up enemy divisions due to their morale shock. Often underappreciated advantages of artillery is the ability to concentrate batteries/firepower in a small area than infantry (you could fit 2-4 artillery brigades in the same space as a single infantry brigade), and their ability to quickly shift and concentrate significant firepower on a priority target. Do not skimp on artillery. Some disadvantages are their slow deployment and lack of self-defense in close combat.
Use short-ranged smoothbore artillery (howitzers [e.g. 24lbers] and standard smoothbores [e.g. napoleons]) in a close support role and keep them close to your division at all times for support. These are very effective in defense but more challenging to use on the offence as they need to be moved up along with your infantry in order for them to maintain an effective range. Move them along right behind your infantry brigades for optimal performance.
Medium and long range rifle artillery (10 lbers, whitworths, James and 20 lbers) are good for attack as due to their range they need to relocate less often to maintain fire. Medium range artillery is useful on both the attack and defense. Long rage artillery are suited to divisional reserves for counter battery fire as their range allows them to reach enemy battery targets.
Perks:
All artillery:
LOGISTICS: +50% Ammo, +5 Efficiency
Howitzers and smoothbores:
TACTICAL TRAINING: +50% Rotation Speed, +25% Cover, +200% Stealth;
SHORT RANGE TRAINING: +20 Efficiency, +15 Firearms, +50% Canister Damage, -10% Reload
Medium range:
GUNNERY TRAINING: +10 Firearms, -10% Reload
SHORT RANGE TRAINING: +20 Efficiency, +15 Firearms, +50% Canister Damage, -10% Reload
Or:
LONG RANGE TRAINING: +20 Efficiency, +15 Firearms, +25% Shot/Shell Damage, +10% Accuracy
Long range:
SHOOTING TRAINING: +10 Firearms, +10% Accuracy
LONG RANGE TRAINING: +20 Efficiency, +15 Firearms, +25% Shot/Shell Damage, +10% Accuracy
General Tactics
Maneuvers
Brigades function most effectively coordinating and mutually supporting at the divisional level. In contrast, individual brigades have limited capabilities and risk becoming isolated and defeated in detail. The game supports this by enabling you to move an entire division simultaneously by clicking the desired division bar using the army UI at the bottom of the screen. As such I recommend to plan out your battle at the outset and maneuver at the divisional level. Which divisions will hold the line or assault? Which divisions will be reserved?
When maneuvering divisions maintain spacing between brigades. Standing overlapping brigades will automatically move to create space for themselves, often into places where you would not prefer. Overlapping brigades also have a significant speed malus, which can severely delay the execution of maneuvers.
Artillery Support
A division comprising infantry and support artillery can accomplish virtually any basic operation with which it is tasked. Artillery accompaniment (particularly close support guns) multiplies the capabilities of the standard infantry division. Artillery can provide the necessary punch to help dislodged defending infantry, or more quickly break up enemy attacks with canister fire. As such keep support guns as close to your divisions as possible (for example, maintain howitzers immediately behind infantry).
Cover and Stealth
Cover and Stealth are critical to the preservation of your units, and therefore ultimately the success of any operation. Always move divisions from cover to cover, wherever possible. Plan your maneuvers around cover availability. It’s valuable to become intimately familiar with the level of cover and stealth that different types of terrain provide. Be wary of fortifications/houses and as the amount of cover they can provide can be widely variable (e.g. from 25%-90%)!
Excellent: dense forest
Above Average: wheatfields, forest
Average: mud, scrub, fields,
Poor: roads, grass
Terrible: water, bridges
Screening
Screening, the tactic of using light troops to form a perimeter around your forces, yields critical intelligence and imparts both operational protection and flexibility to the division. Seldom a situation arises where you should not be screening your forces with detached skirmishers. Use them to screen infantry, dedicated skirmishers and cavalry (when practicable).
Skirmishers move very quickly while detached . Due to their base cover and stealth bonus they present a very low risk when reconnoitering and encountering opposing forces, potentially on unfavorable terrain. Aside from their inherent protection, screening also further protects their parent brigades (or others for that matter) by complicating the enemies’ capability to spot the troops that they are protecting and therefore can diminish or even prohibit their ability to direct artillery fire against your more vulnerable troops.
Screening also multiplies your forces’ presence on the the battlefield. because of their speed and positioning, detached skirmishers can present unlimited opportunities to exploit the situation that would be otherwise unavailable. For example, skirmishers placed on flanks can minimally extend your lines and obstruct enemy attempts at flanking, but at best offer you an opportunity to flank your foe.
Here is an example of a well-screened infantry division in formation where parent brigades can advance enjoying the protection of both their sides and flanks.
Melee Combat
Melees can easily be won and more quickly by ensuring you have numerical superiority in terms of active units. This is due to the fact that when more than one brigade enters into melee with an enemy brigade, their combined effectiveness is significantly increased. Always take advantage of this mechanic when trying to dislodge large/heavily fortified enemy brigades.
Offensive Tactics
Flanking and Envelopment
Flanking, the act of attacking the enemy from directions that differ from their facing, is the principal fundamental technique you must use to win engagements both locally and strategically. This is accomplished by pinning an enemy unit in place and then maneuvering forces to their side or rear to join the combat.
Units receiving flanking/enfilade fire will lose morale and break rapidly. The type of unit used to perform the flanking is not particularly important, although different types of units may be more suitable than others depending on conditions and your intentions.
At minimum flanking may be used to break up enemy attacks and in so doing protect your own. At best, you may have the opportunity to roll up an enemy’s line, resulting in the rapid collapse of divisions or even an entire corps.
Detached skirmishers can always perform basic flanking and even despite their small size can yield good results. Troops armed with rapid fire weapons like carbine skirmishers, mounted infantry, or rapid fire specced infantry can also work well. Lastly some flanking fire can be achieved by artillery–it can sometimes be wise to place long range artillery on your own flanks rather than centrally to achieve this effect.
Hit and Run
Hit and run, hit and fade, shoot and scoot, whatever you prefer–this can be an effective tactic of wearing down enemy forces over time when your local forces are not strong enough to mount a more vigorous attack, or when cover is particularly unavailable. Mounted infantry and skirmishers excel at this as their AI automatically directs them to fall back when targeted. Use this tactic against distracted/supported targets pinned by your main forces including artillery. As they rotate to meet your raiding party they will be exposed to flanking fire from your pinning forces, only to find themselves without a target.
Reconnaissance in Force
Reconnaissance provides early information on the enemy disposition, enables you to react more proactively and favorably with your main force, provides more opportunities for counter-battery operations, and generally promote battlefield control. RIF magnifies the capability of a reconnaissance by including sufficient forces to conduct further operations should opportunities arise.
Advance a large (e.g. division-strength) force of mobile troops e.g. skirmishers, potentially supported by dedicated skirmishers/cavalry units towards priority battlefield locations such as victory locations, defensible positions, prospective enemy flanks, etc. When the enemy is encountered, you may form a defensible line and examine the enemy’s response. You can either hold the force in place in a delaying action, fall back if the position is untenable, or even escalate the engagement to an offensive if practicable. Perform RIF both in offensive and defensive scenarios. Here is an example of this operation in action:
In the bottom left foreground Confederate forces are pinned in the woodline engaging a number of enemy infantry brigades. A mounted infantry division screened by a contingent of detached skirmishers is reconnoitering the north/east area of the battlefield seeking a flanking position on the opposing force. An isolated Union infantry brigade is handily pinned down by the skirmishers while the MI advance ahead. The force has identified undefended favorable terrain (plus a bonus supply wagon) where they will dismount and have the option to either hold position in good cover, dividing the enemy force, or even conduct a counterattack. The force is followed by regular infantry (Spear’s and McArthur’s brigades) to reinforce the position if practical.
Assault Column
A general frontal assault on a fortified position can result in catastrophic casualties and at worst may fail in a mass rout. The best way of dealing with such positions is to turn a flank so that forces can deliver enfilade fire into the fortification, which can rapidly cause the position to collapse. Sometimes this may not be possible, due to battlefield or time constraints.
In this case you can consider using a supported assault column to achieve a breakthrough. concentrate a division of infantry assembled in column and assault a vulnerable part of the enemy line 1-2 brigades width, without stopping to shoot, and converge into a melee with the defending brigade as quickly as possible. Large formations of melee specced infantry with high melee weapons are ideal for this tactic, illustrated below:
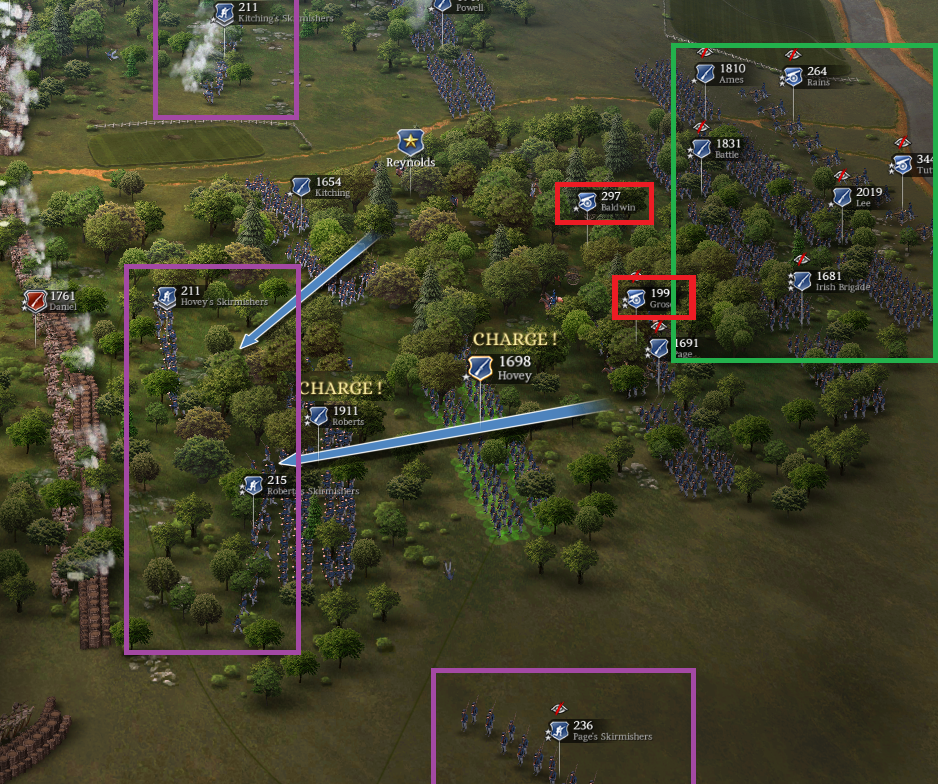
The location of this assault was selected due to the dense forest providing excellent cover to the 1st division column (Roberts, Hovey and Page). Prior to the assault skirmishers (purple) are deployed at point blank range in front of the fortification to screen the approaching column, as well as to the left and right flanks of the column to draw fire from adjacent fortifications. Kitching is positioned just north of the column and will provide supporting fire into the impending melee. Baldwin and Groves’ batteries (red) are positioned in the gap behind Kitching to provide close artillery support while long-range batteries (off-screen) are also directed to focus fire on the Confederate brigade. The general (Reynolds) is moved into position to boost the morale of the column to help prevent routing.
Roberts and Hovey are ordered to charge the confederate position, in short order overwhelming the defenders. The center skirmishers may also join in the assault at this point, or you may reattach them to their parent brigades. The enemy’s position melts against this assault. Meanwhile second division (green) is ready to follow up and take up a defensive position in the opening or press the attack depending on the outcome of the assault and ensuing circumstances.
A key element of a successful flanking attack is achieving local force concentration. The more units that can be deployed to attack the target from multiple directions the more quickly that unit will route.
Defensive Tactics
Defense in Depth
Defense in depth involves establishing a set of mutually supporting, successively stiffer defensive lines. This configuration delays the enemy advance and enables inflicting maximum casualties. This can be most simply described by establishing a light outer perimeter of skirmishers, an interior line, anchored by reserves and artillery in a central position. This tactic maximizes the area of defensive coverage, minimizes enemy spotting and maximizes the time artillery can fire at point blank/canister range the farther the enemy penetrates. Reserve forces can be used to block flanking, counterattack and pursue if practicable. Notice in the below example there are three lines of defense (green, yellow, and red):
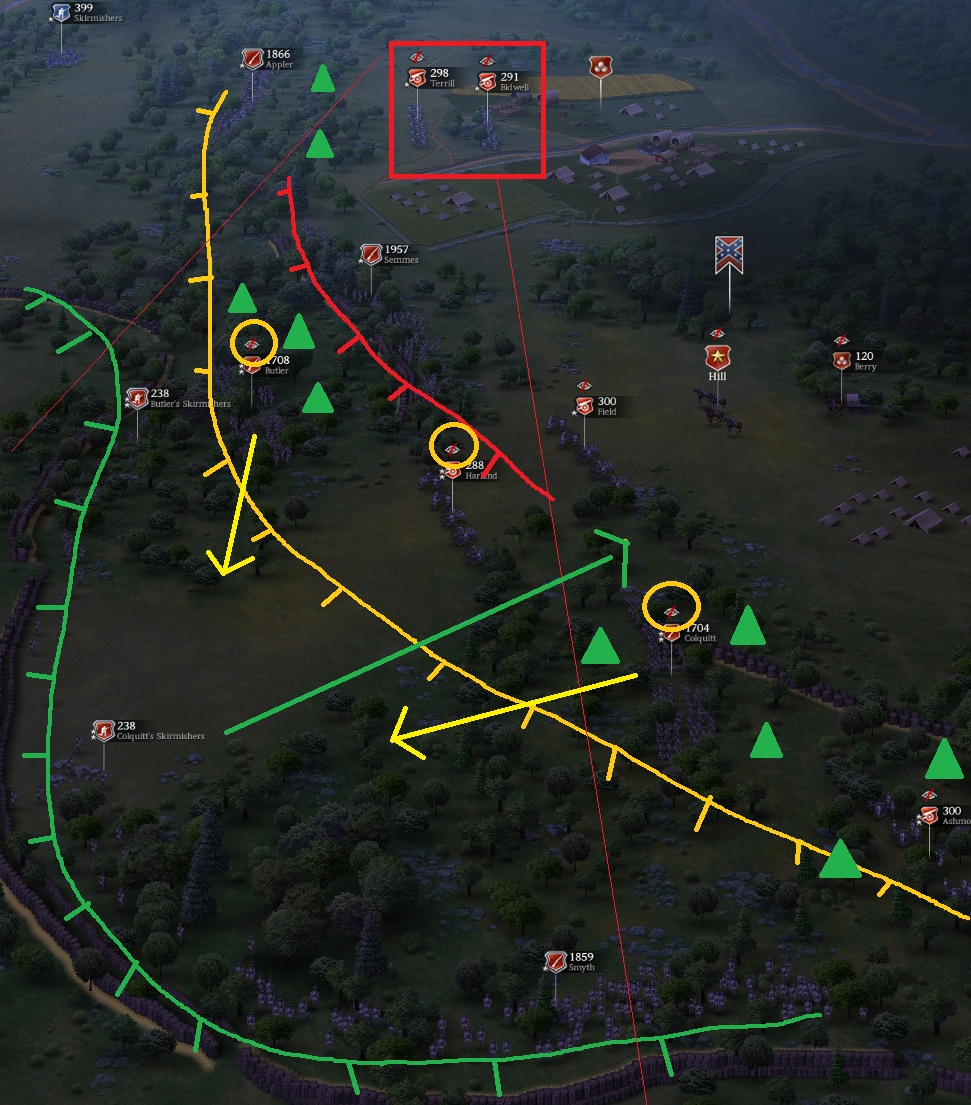
The outer line (green) is manned only by skirmishers that can handle minor attacks by larger forces. They will be less suceptible to artillery attack due to their high base cover, and when not engaged they can be detached from the fortifications to enjoy the cover bonus of the woods. Their sight range advantage over parent brigades will help spot enemy movements and spot artillery for counter-battery fire.
In the second line (yellow), brigades are positioned just behind the main line in cover (green trees) to quickly respond to a more determined attack. These forces can ward off melee attacks either by covering fire when the melee commences which lifts the “blocked” modifier, or by directly joining the melee. They are joined by close support howitzers.
The shorter third (red) line is manned by an additional supporting brigade that can contribute to the defense if necessary, or serve as a fallback position if the forward holdings become untenable. They are joined by medium and long range artillery. Notice the long range artillery is placed in an enfilade position that can deliver flanking fire to an attack that breaches the salient (red cone).
The green and yellow arrows highlight how brigades will respond if the salient is breached (Colquitt’s skirmishers manning). Colquitt can fall back in cover (green arrow) and enemy brigades at that location will immediately sustain flanking fire from the supporting brigades (yellow) and artillery as they begin to pursue. When the attack faulters Colquitt can then reform the detachment as needed and resume their position to continue the defense.
A key feature of brigades’ positioning is that they are in cover and hidden. They cannot be seen by the enemy (see the yellow circles highlighting the “hidden” icon). This is a critical element of the defense as this means these forces cannot be targeted for bombardment by enemy artillery except temporarily when the enemy closes to point blank. Note that forces manning fortifications are easily spotted, therefore when not engaged you may want your outlying perimeter to detach from the fortifications so they can also remain hidden as long as possible.
Tactical Withdrawal
This can be useful during battles like Shiloh where your force is divided and/or your defensive objectives change as the battle progresses. This can be accomplished all at once or by planning multiple successive defensive fallback positions.
The simplest technique to do this would be to deploy skirmishers along your entire frontline (hopefully in good cover) to screen while parent brigades redeploy. Utilize dedicated skirmishers and mounted infantry to bolster the line to be abandoned if necessary.
Prior to executing, start moving artillery to their new position so they can get a head start and might provide cove fire to your when your line moves. Begin the withdrawal at double speed and when infantry brigades begin to evade visual contact with the enemy, reduce to walking speed to conserve their condition.
Counter Battery
Enemy artillery can be easily overlooked because their bombardment typically inflicts casualties at a slow rate but can take a heavy toll over time, and at worst, demoralize your troops causing them to abandon their positions. Prioritize tasking your mid and long-range artillery with firing on enemy artillery batteries whenever they are revealed, prioritizing any batteries that are likely to deliver short range/canister fire to your troops.
Closing Advice
Time Management
You may feel pressured to meet schedules based on the timers, influencing you to take risky maneuvers or expose your forces in order to push an objective. Take your time. You often have much more time to meet objectives than what is allotted for the initial timers.
Protecting and Preserving Your Forces
Maneuver your divisions in an organized and methodical manner for best results. Rotate your reserve divisions into battle and maneuver tired divisions into safe positions to rest to spread out experience, distribute casualties and help troops maintain a high condition for combat readiness.
Even when on the attack, assume a defensive posture using elevation and cover to increase your advantage. Using this practice you can fend off a larger force, freeing up units to conduct counterattacks.
Envelopment and Force Concentration
Seek opportunities to defeat the enemy in detail by surrounding, cutting off brigades or even entire divisions. Keep in mind that brigades will retreat in the direction of least resistance so keep this in mind with regards to how you may want to corral the enemy when going for the kill. Always seek to achieve a concentration of force against individual targets. Wherever possible aim for a numerical brigade advantage against enemy brigades (2+vs. 1) to more quickly rout and win combats, and in cases where your troops need to fend off multiple enemy brigades, ensure they are in excellent cover and present the smallest flank profile to attacking opposing forces.
Achieving Objectives/Battle Conclusion
For the best campaign outcome always win every battle (don’t accept draws or defeat). Even a minor net positive in cash/manpower is going to help the overall war effort. With that said, if your disposition is unfavorable in a particular battle, it is wasteful to attempt to meet all objectives to win a battle. Always be aware of the minimum requirements for victory and stick to them if it would otherwise be costly to pursue more of them. Also note that it’s not necessarily to hold objectives for the duration of a battle to win. It can often be beneficial to temporarily cede difficult to defend objectives to the enemy to take up a more defensible position until time is running short and/or you have been able to bring up enough units to better control the location.