This guide will cover absolutely everything you need to know to get stared in Call of the Wild.
Introduction
The Hunter: Call of the Wild can be an intimidating game when your first start out. Some things are pretty well explained to you, but many others are not. I remember when I first started, I was very confused by many things about the game and it took a while for me to learn everything. In this guide, I want to try and clear everything up so you can avoid a lot of the frustration I experienced and have all the information you need to be successful.
If you want to suggest ways to improve this guide let me know. I really want this guide to be as helpful as possible.
HUD
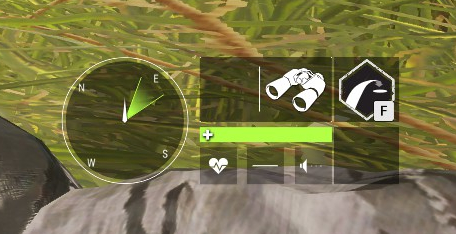
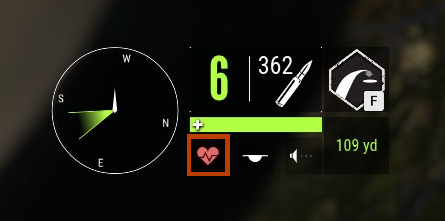
First of all, let’s take a look at the HUD which is displayed in the bottom right corner of the screen:

Now let’s take a look at all the elements of the HUD and what they tell you:
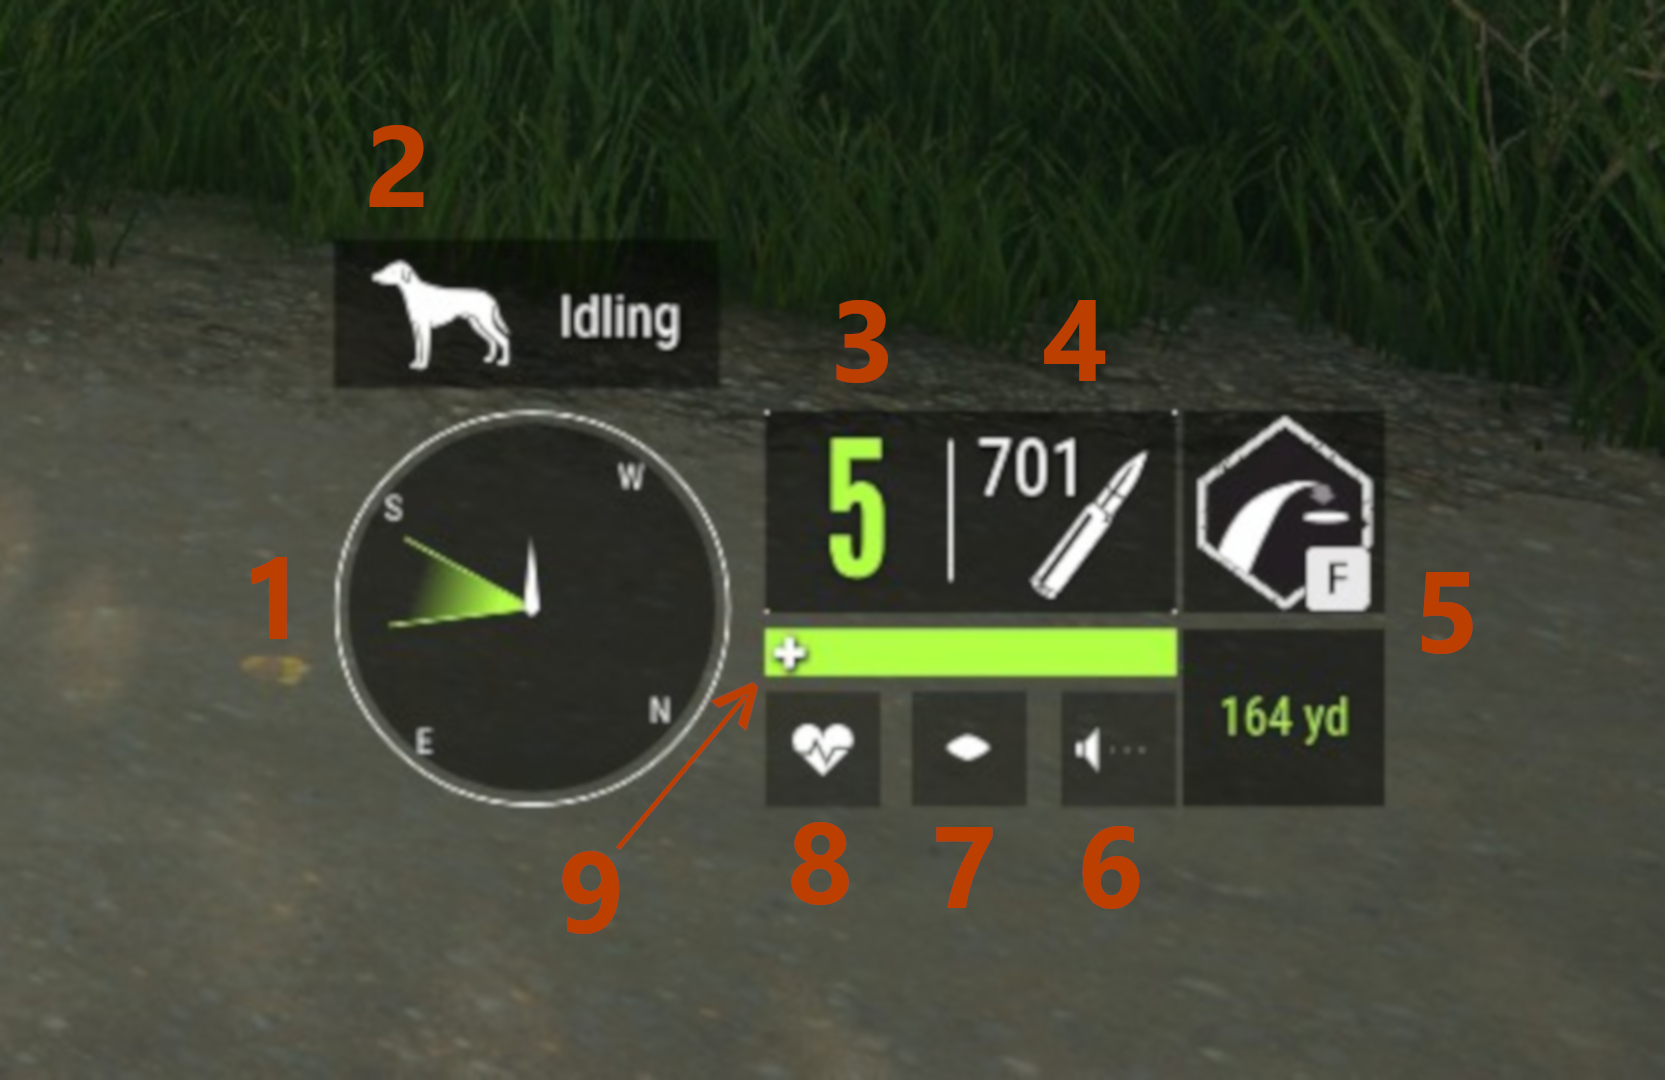
- 1. Wind Direction – Shows you which way the wind is blowing and by extension, which way your scent is going.
- 2. Dog State – Shows the current state your dog is in. This only appears in the HUD if you have a hunting dog with you.
- 3. Ammo in Magazine – Shows the current amount of ammo in your weapons magazine. Alternatively, if you have a consumable like first aid kits equipped, this will show how much you have in your inventory.
- 4. Total Ammo – Shows the total amount of ammo you have for your current weapon. Alternatively, this will also show which piece of equipment or consumable you have equipped.
- 5. Zero Distance – Shows the current zero distance for your weapon (Requires you to have the zeroing perk from the rifle perk tree)
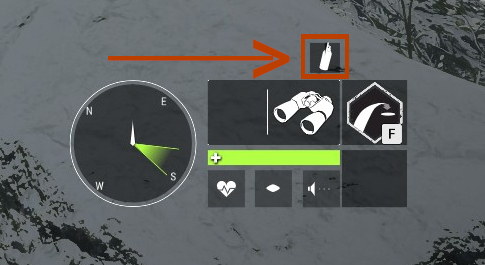
- 6. Noise – Shows how much noise you are making.
- 7. Visibility – Shows how visible you are to animals.
- 8. Breath – Shows how out of breath you are.
- 9. Health Bar – Shows how much health you have. If this reaches zero, you will be knocked unconscious and respawn at the nearest unlocked outpost.
The Huntermate
While you can see the map from the menu at any time by pressing M, this isn’t always convenient to do and this is where your Huntermate can come in handy:
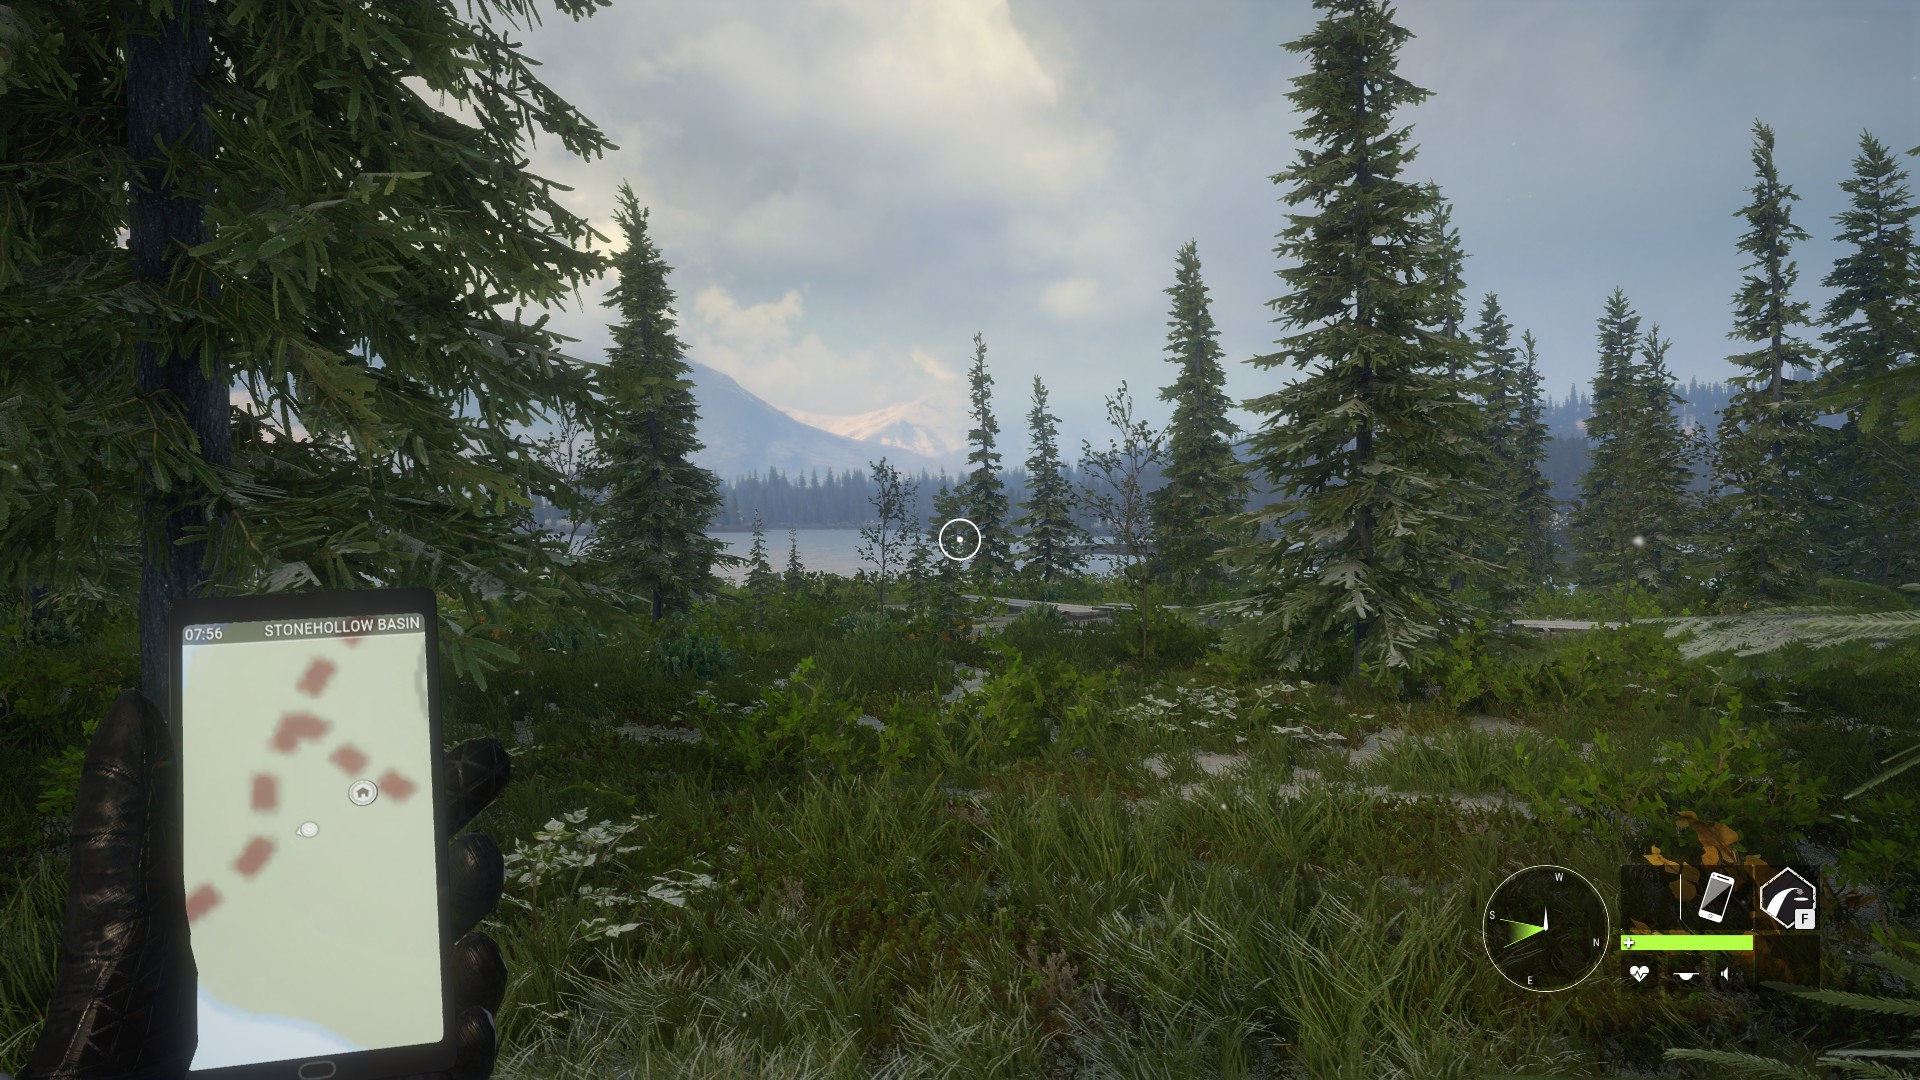
The Huntermate is a small tablet like device that you have on you at all times and you can pull it out whenever you like by pressing TAB. It will will show you the part of the map you’re currently traversing and most things that would be shown on your map will also be shown on your Huntermate, including any animal tracks that you’ve picked up nearby. It will also give you information about any mission that you currently have active.
Outposts, Watchtowers And Tents
Outposts and watchtowers are two of the most useful things you will find on each map, helping you reveal more of it and providing you a place to rest and change out your weapons.
Outposts
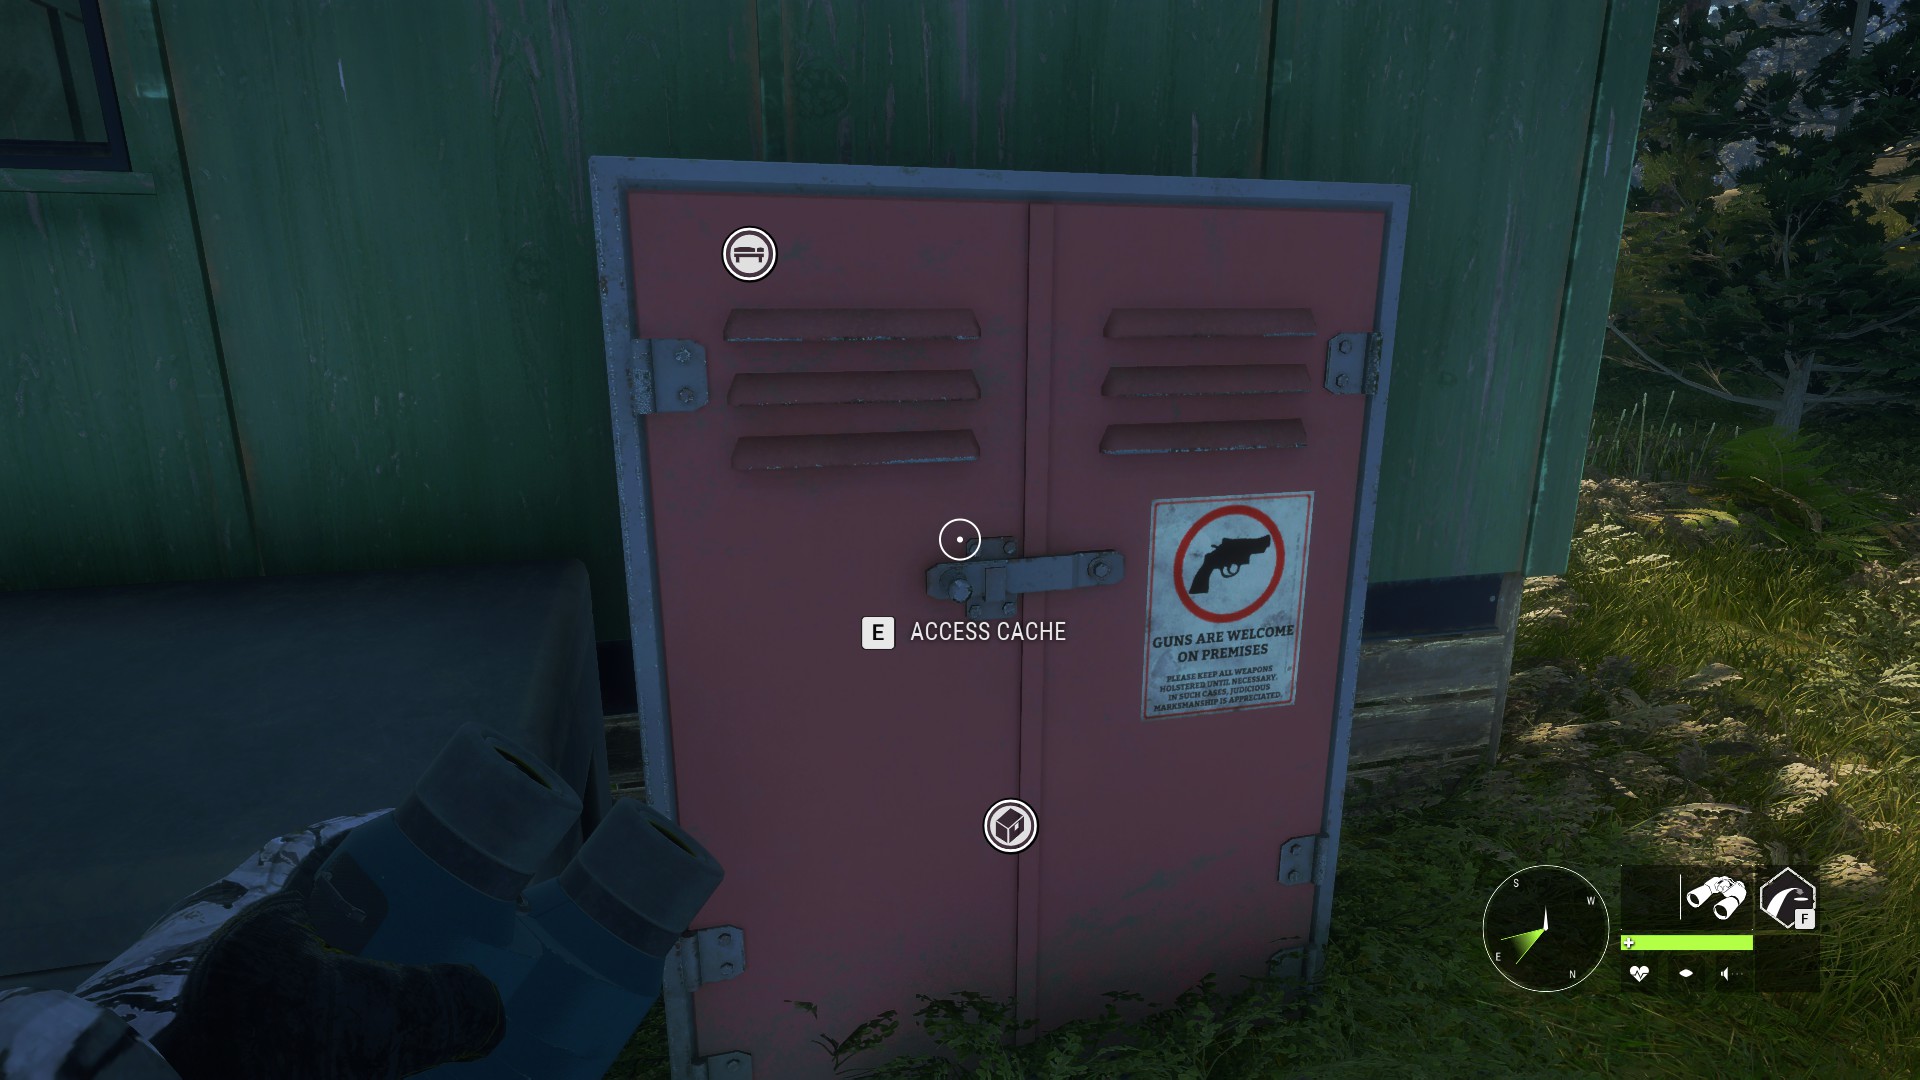
Outposts should be a top priority for you to discover on each map. In order to unlock them, you need to reach them and then interact with the nearby flagpole. They will be marked on your map with a small house icon:

Once unlocked. outposts will provide you a fast travel point that you can use at any time, a cache where you can purchase weapons and ammo and change your loadout as well as a bed to rest in and change the time:
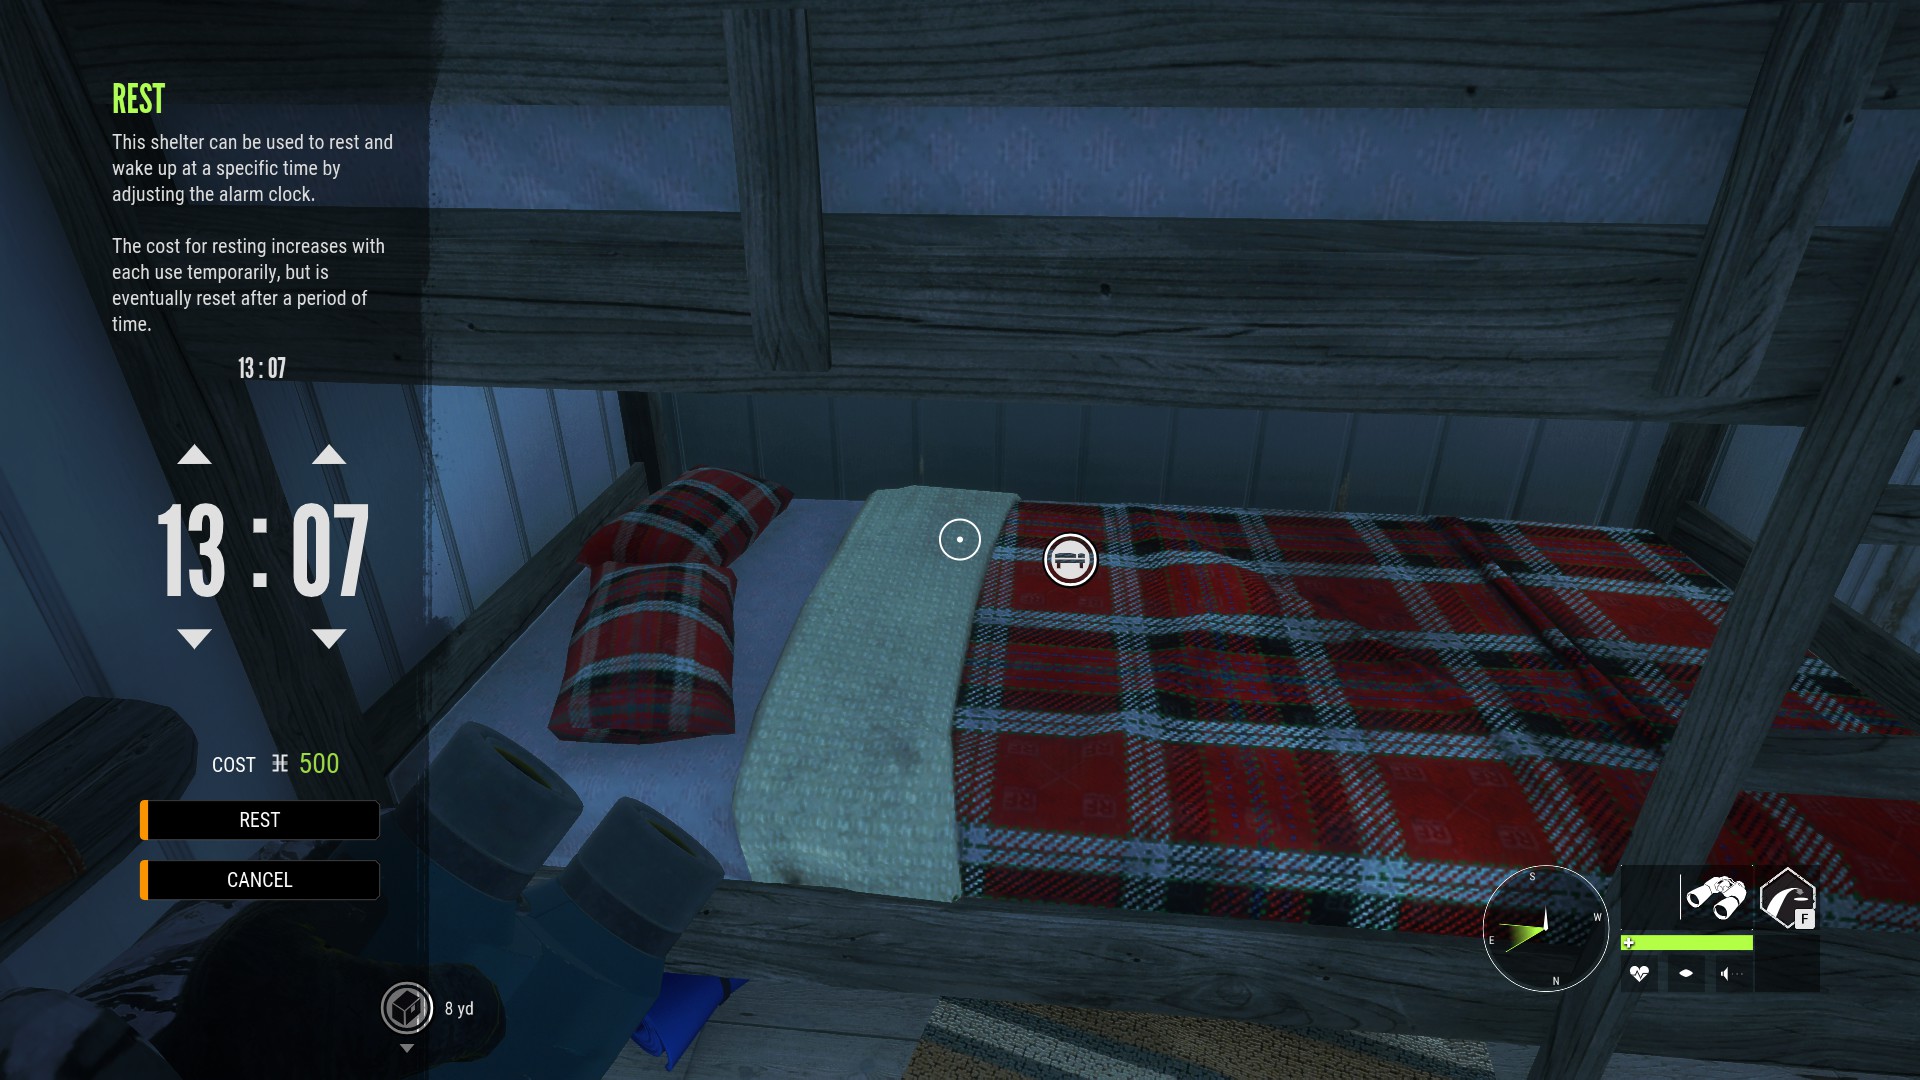
Resting at an outpost will allow you to change the time to whatever you like and will also refill your health (your health can also be refilled by using first aid kits that you can buy from the cache). Resting however will cost you a fee of 250 in game cash and if you try to rest multiple times in quick succession, this will fee will gradually increase each time until it caps at 2500 in game cash. It will then gradually decrease over time if you don’t rest for a while until it eventually falls back down to 250.
Watchtowers
While not as big of a priority as outposts, watchtowers are still very useful for you to discover. They will be marked as a binoculars icon on your map:
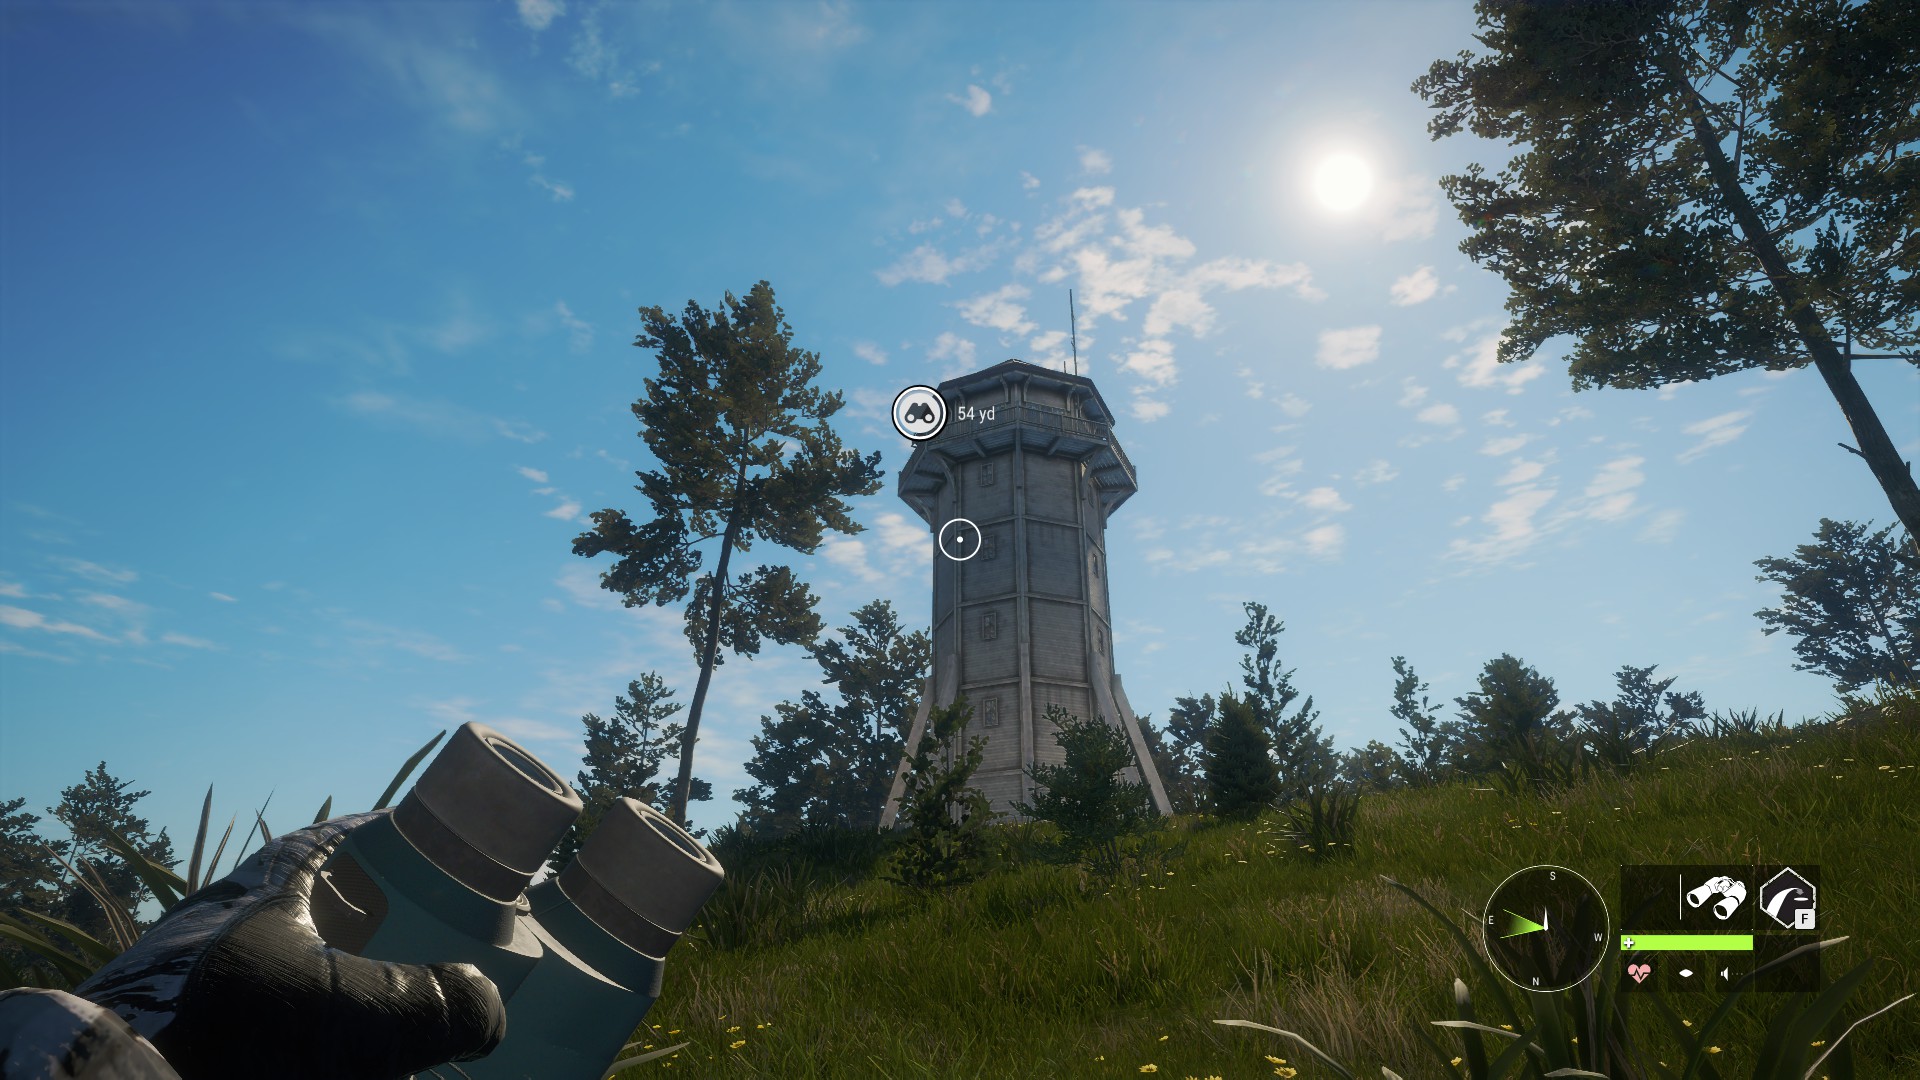
Climbing to the top of a watchtower and interacting with the lookout point will allow you to survey the area which will reveal a portion of the map around the watchtower:

If you unlock all of the watchtowers, then the map will be fully revealed for you.
Tents
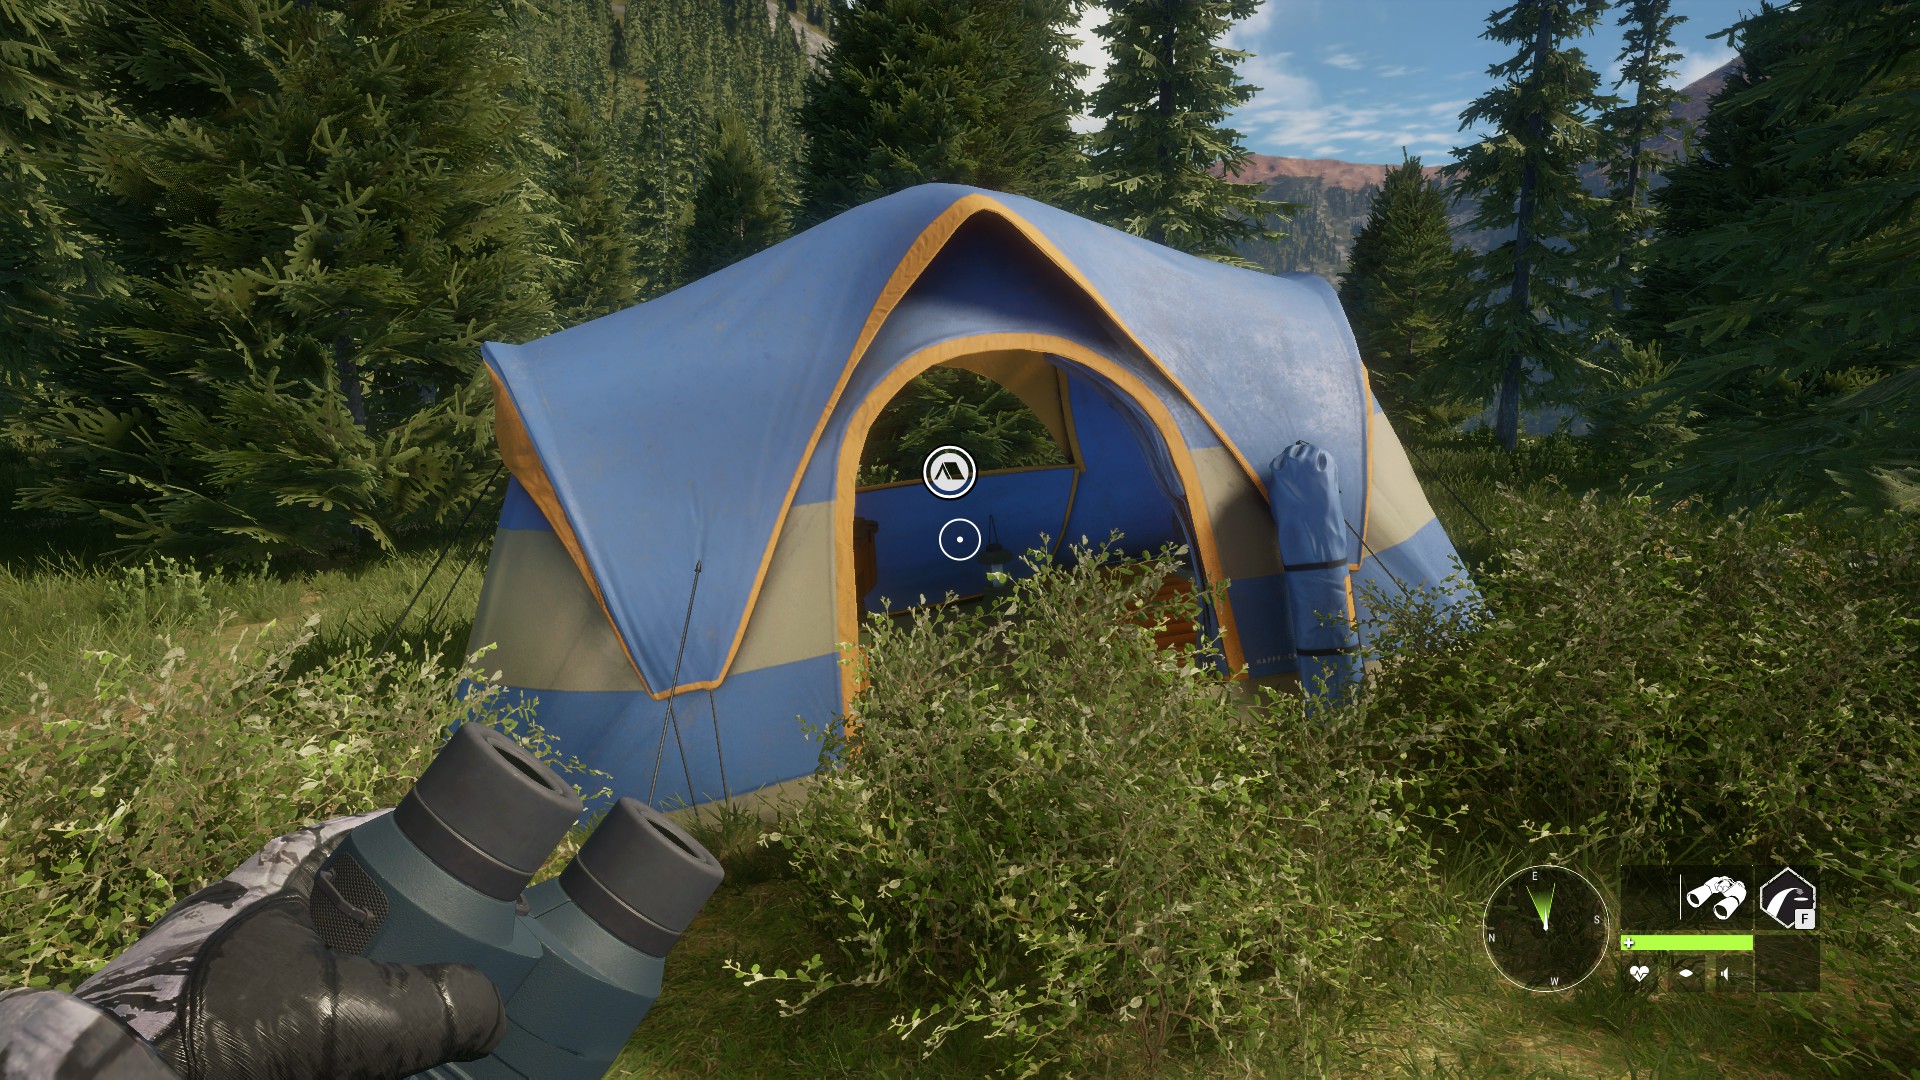
Tents are another very useful tool for you to use. They essentially act as mobile outpost that you can set up almost anywhere you like and provide you with all the same services that an outpost does. As a bonus, resting in a tent costs 25% less money than resting at an outpost. You can only set up tents if you own the tents and ground blinds DLC. You can also only set up a maximum of 16 tents on any map: Tents & Ground Blinds DLC
Purchasing Equipment, Earning Money And XP And Unlocking Better Gear
While you will get a few weapons free of charge when you start the game, eventually you will need to buy some better gear. To purchase new weapons, ammo or equipment, go to an outpost or tent, open up the cache and select the store tab:
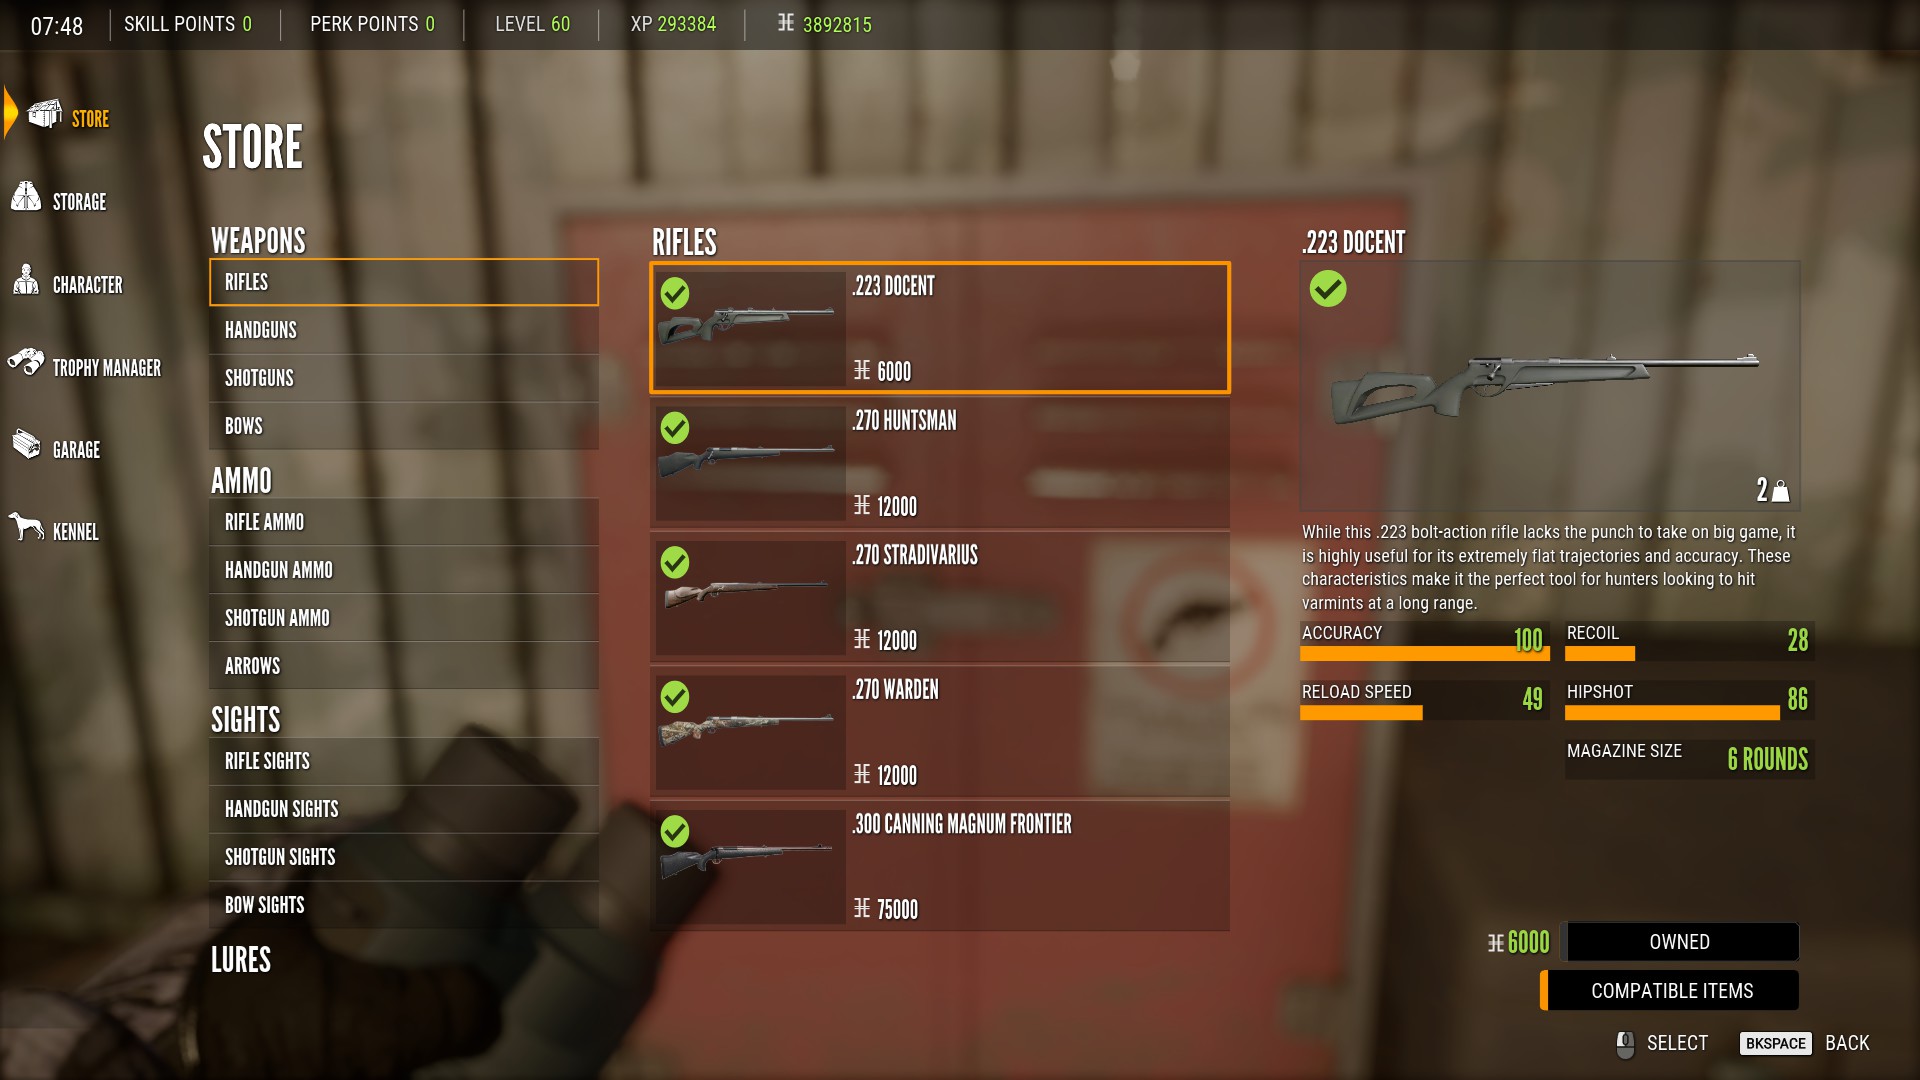
Anything you purchase from the store will automatically be sent to your storage and you’ll have to equip it if you want to use it. We’ll go over how to do that later. You can also claim any weapons from DLC weapon packs you’ve purchased for free in the store.
Earning Money And XP
The main way you earn money and XP is by hunting and harvesting animals. At the start of the game. money is going to be very tight so you shouldn’t be too picky about what you hunt. Try to take anything that your weapons and ammo are appropriate for. There are also missions you can do on every map to earn money and XP which are completely optional. If you want to just focus on hunting, you can turn the missions off in the settings menu under gameplay:

How To Harvest Animals
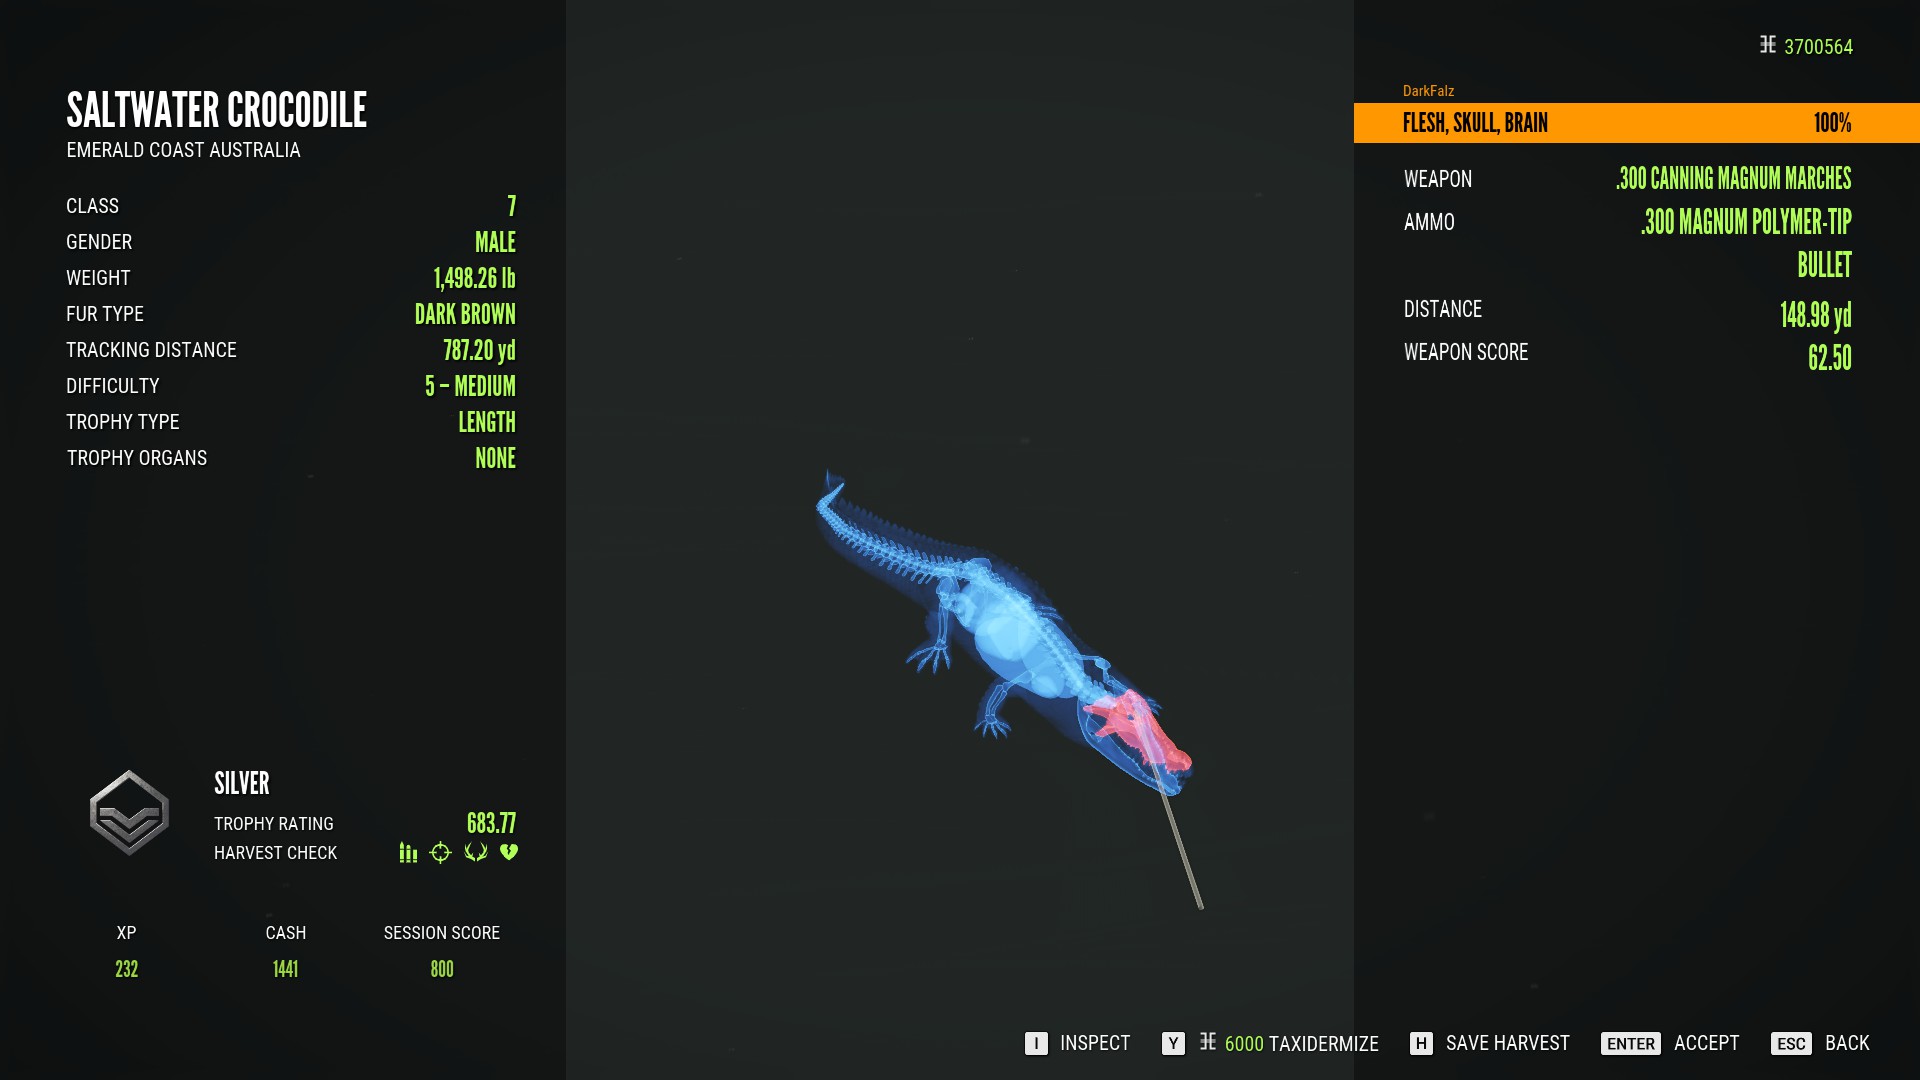
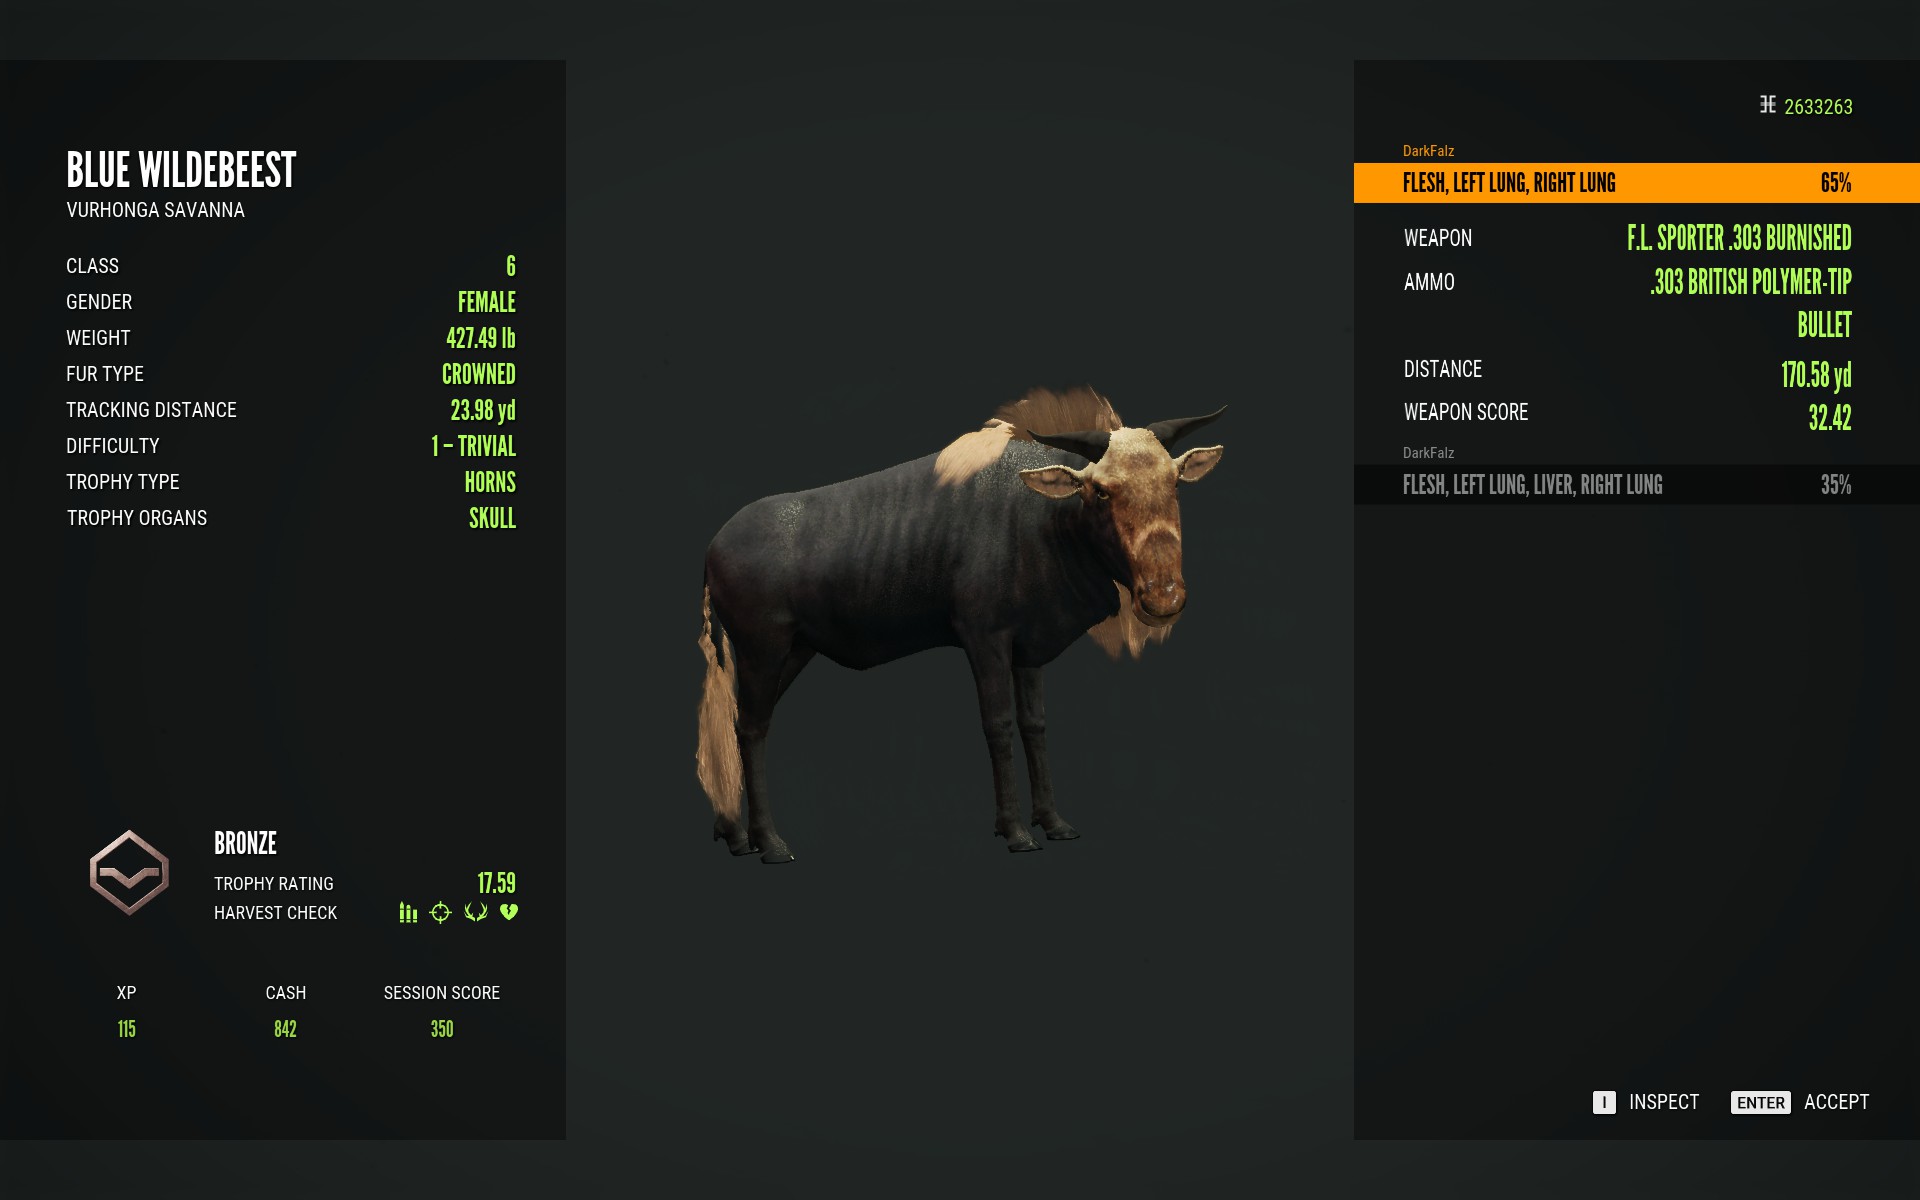
Once you’ve successfully killed an animal, you’ll need to track it down and harvest it. Harvesting it will open the harvest screen where you can see how much money and XP you’ve earned:
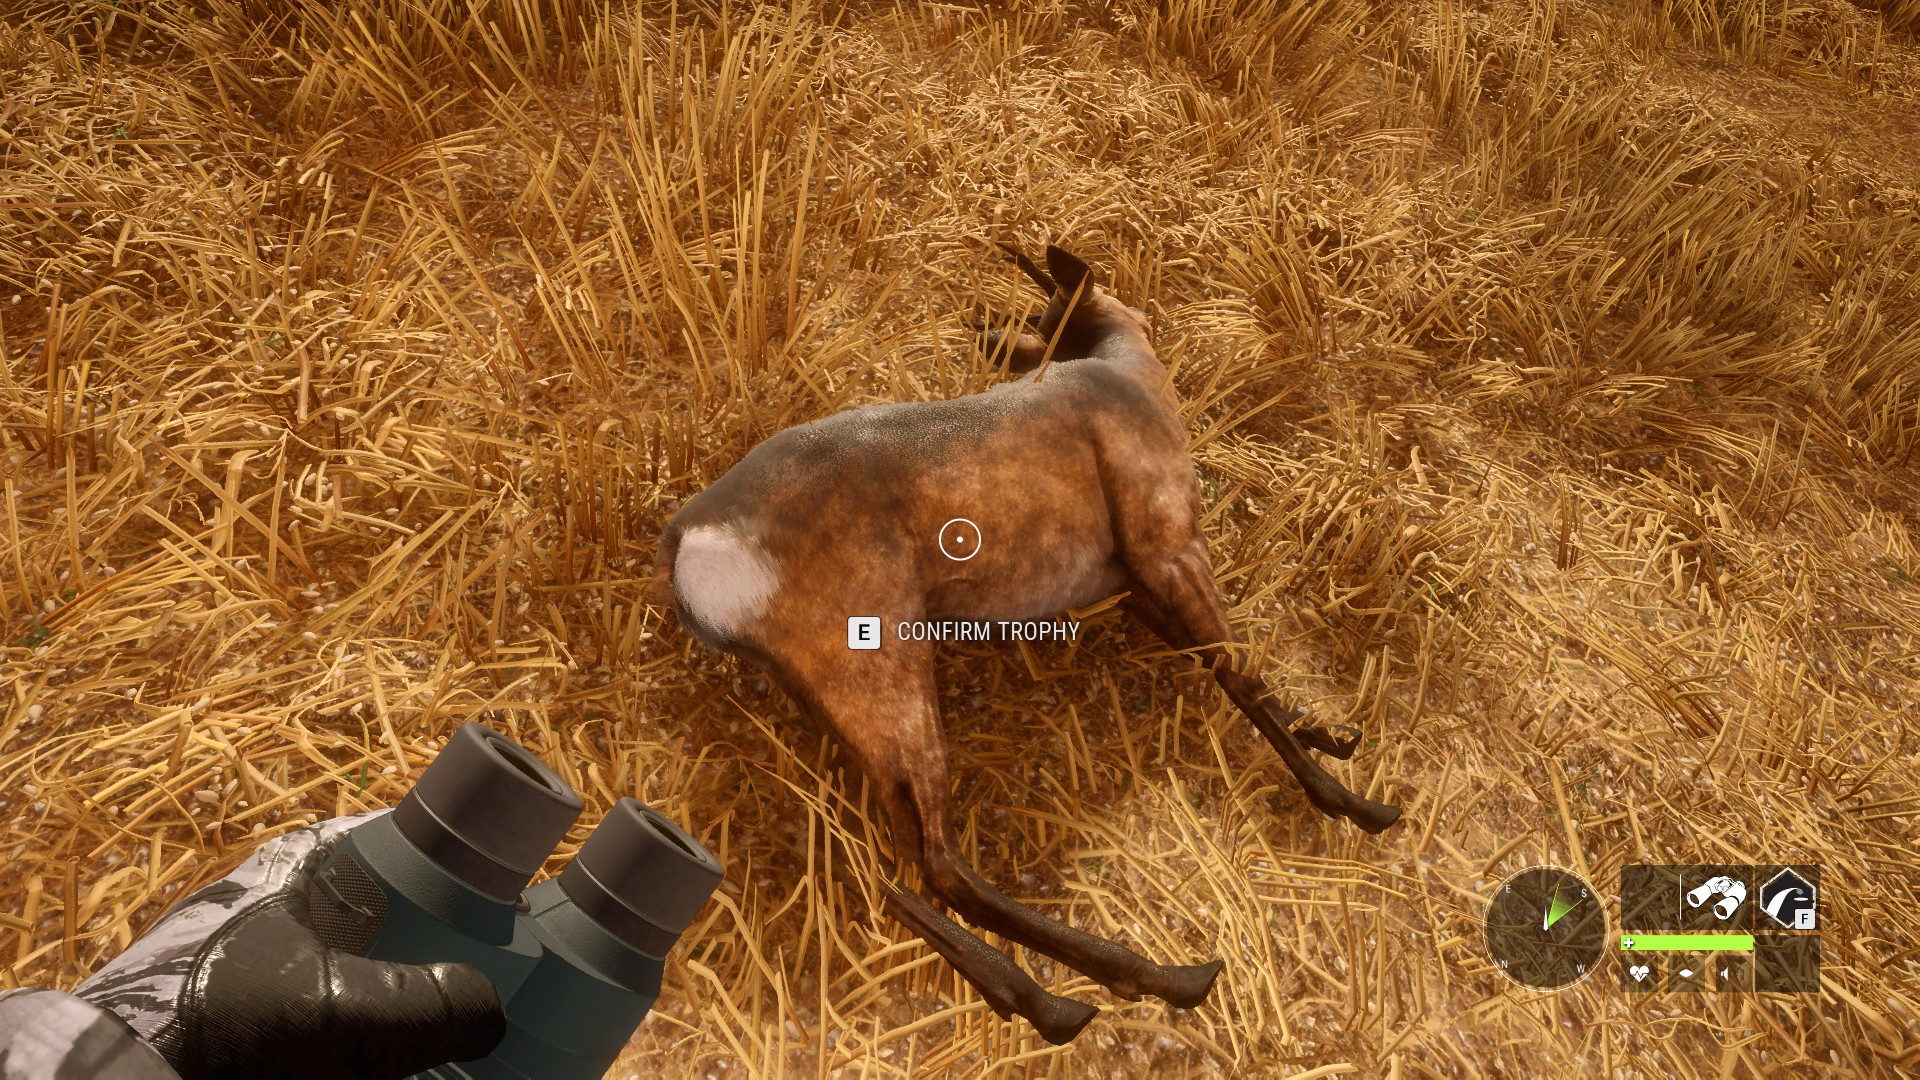
To get your money and XP for the harvest, just press enter in the harvest screen to accept it. Occasionally however, you’ll find animals that you might want to keep for your trophy lodge, In this case, you’ll still get paid for the harvest but you need to make sure you either save or texidermize the animal before you accept it. Again, we’ll go over how to do this later.
Unlocking Better Gear
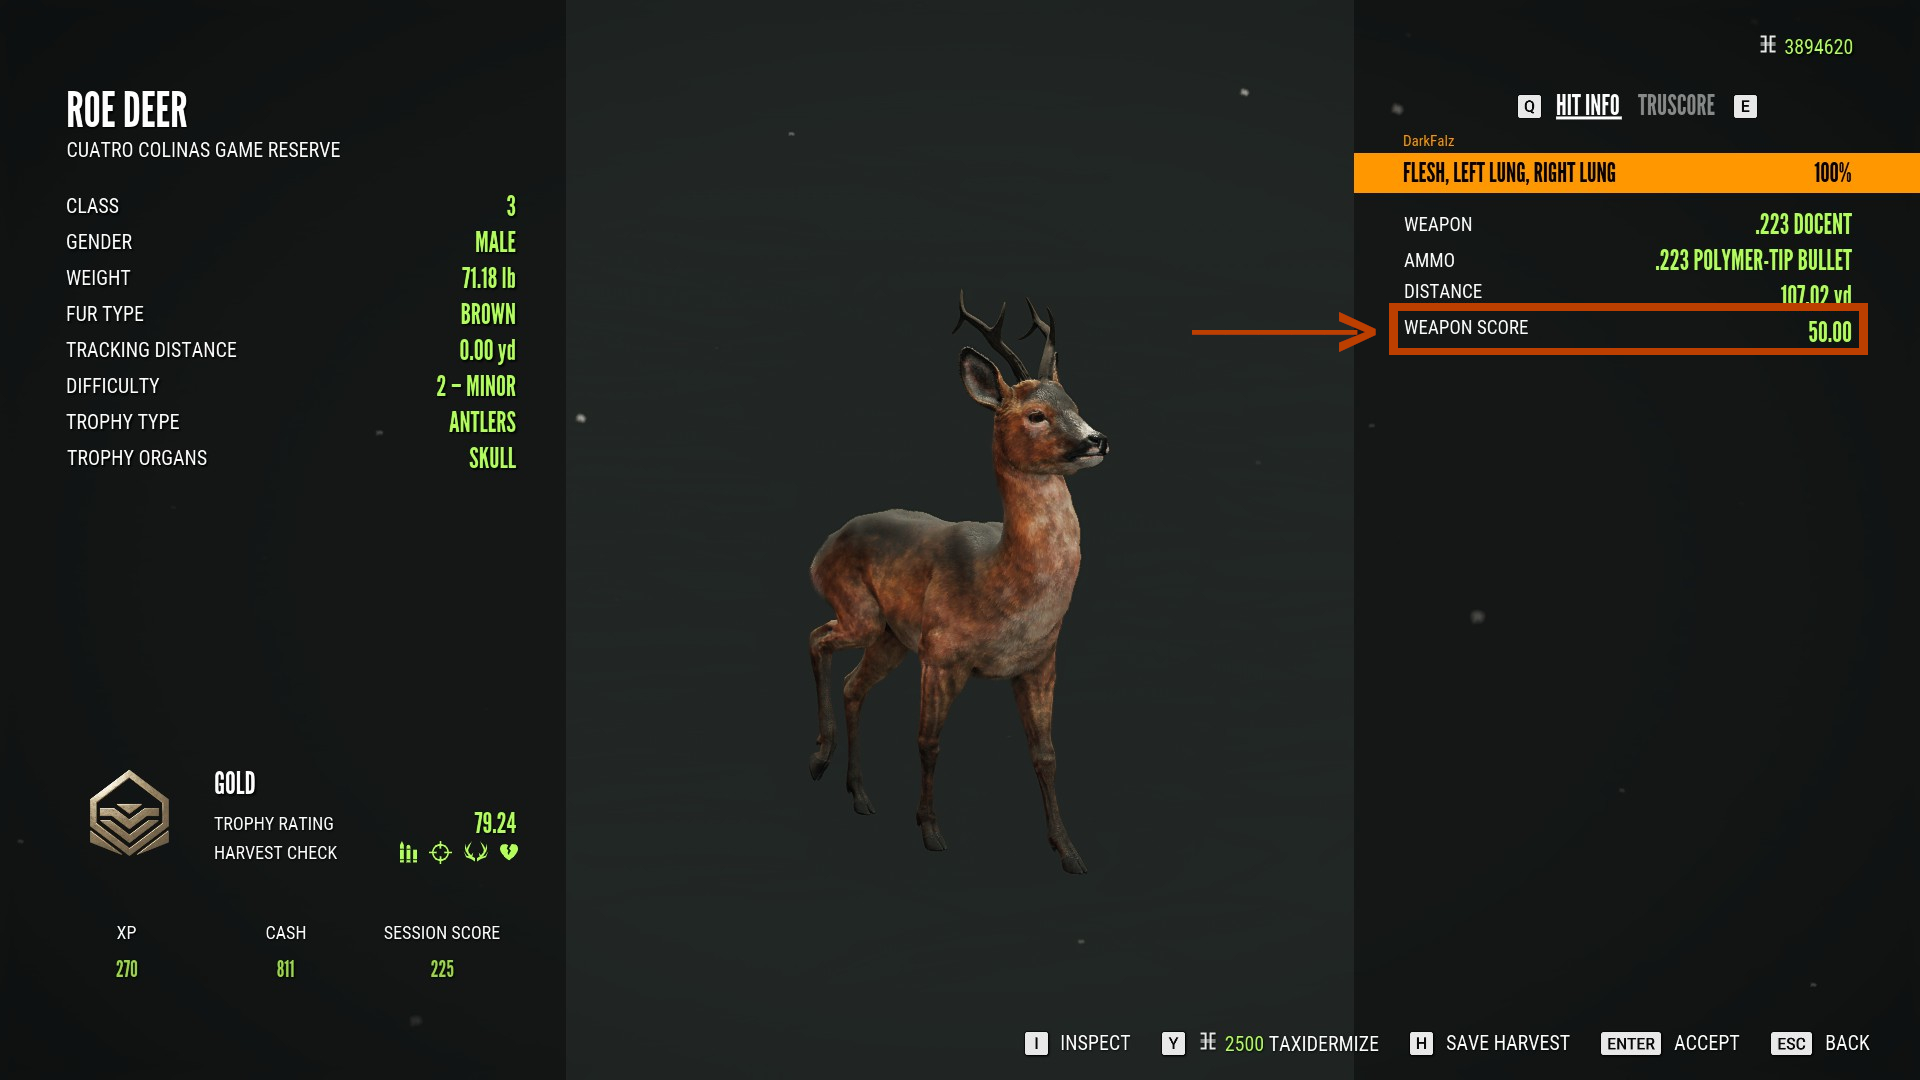
Initially, a lot of weapons, ammo and equipment will be locked. In order to unlock them, you’ll need to level up and improve your weapon scores. There are 4 weapon scores that are tracked independently:
- Rifles
- Handguns
- Shotguns
- Archery
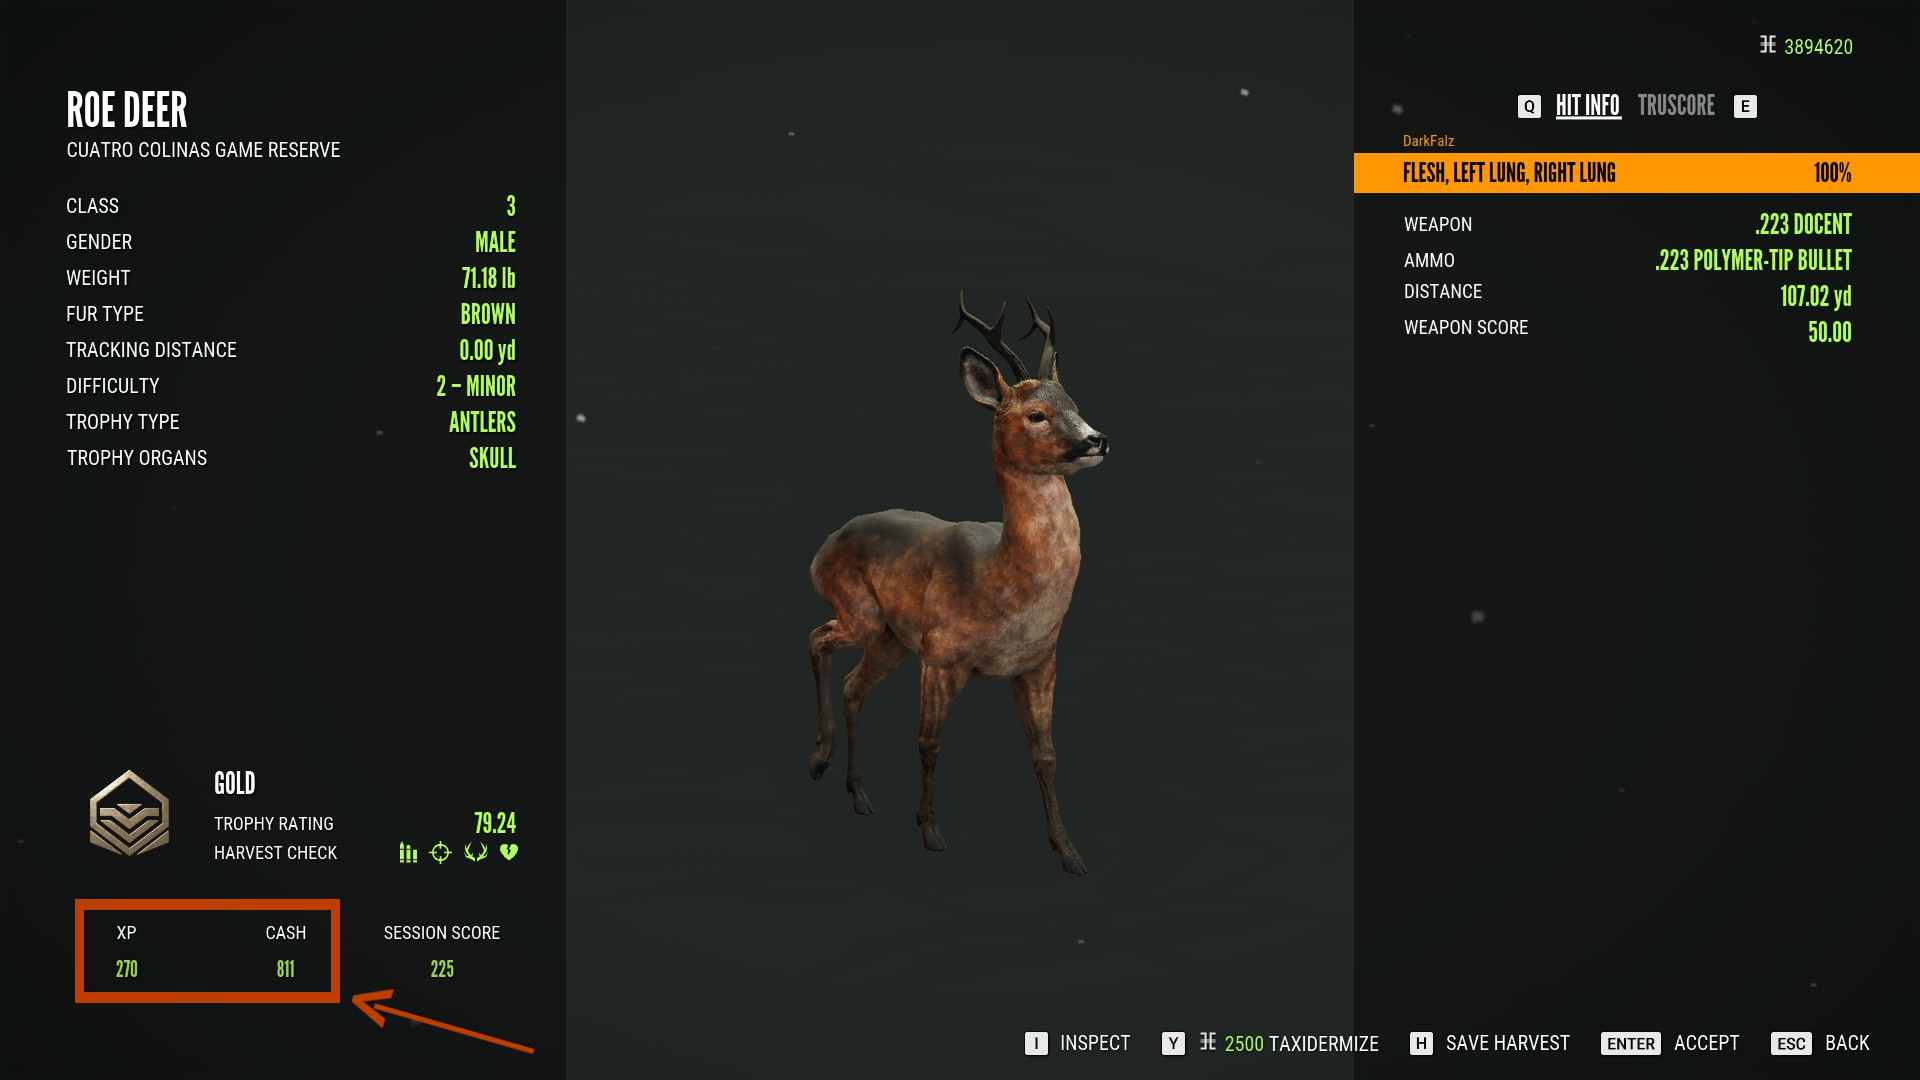
You gain score in each of these categories whenever you successfully kill and harvest animals with weapons from that particular class, You can see how much weapon score you’ve earned in the harvest screen:
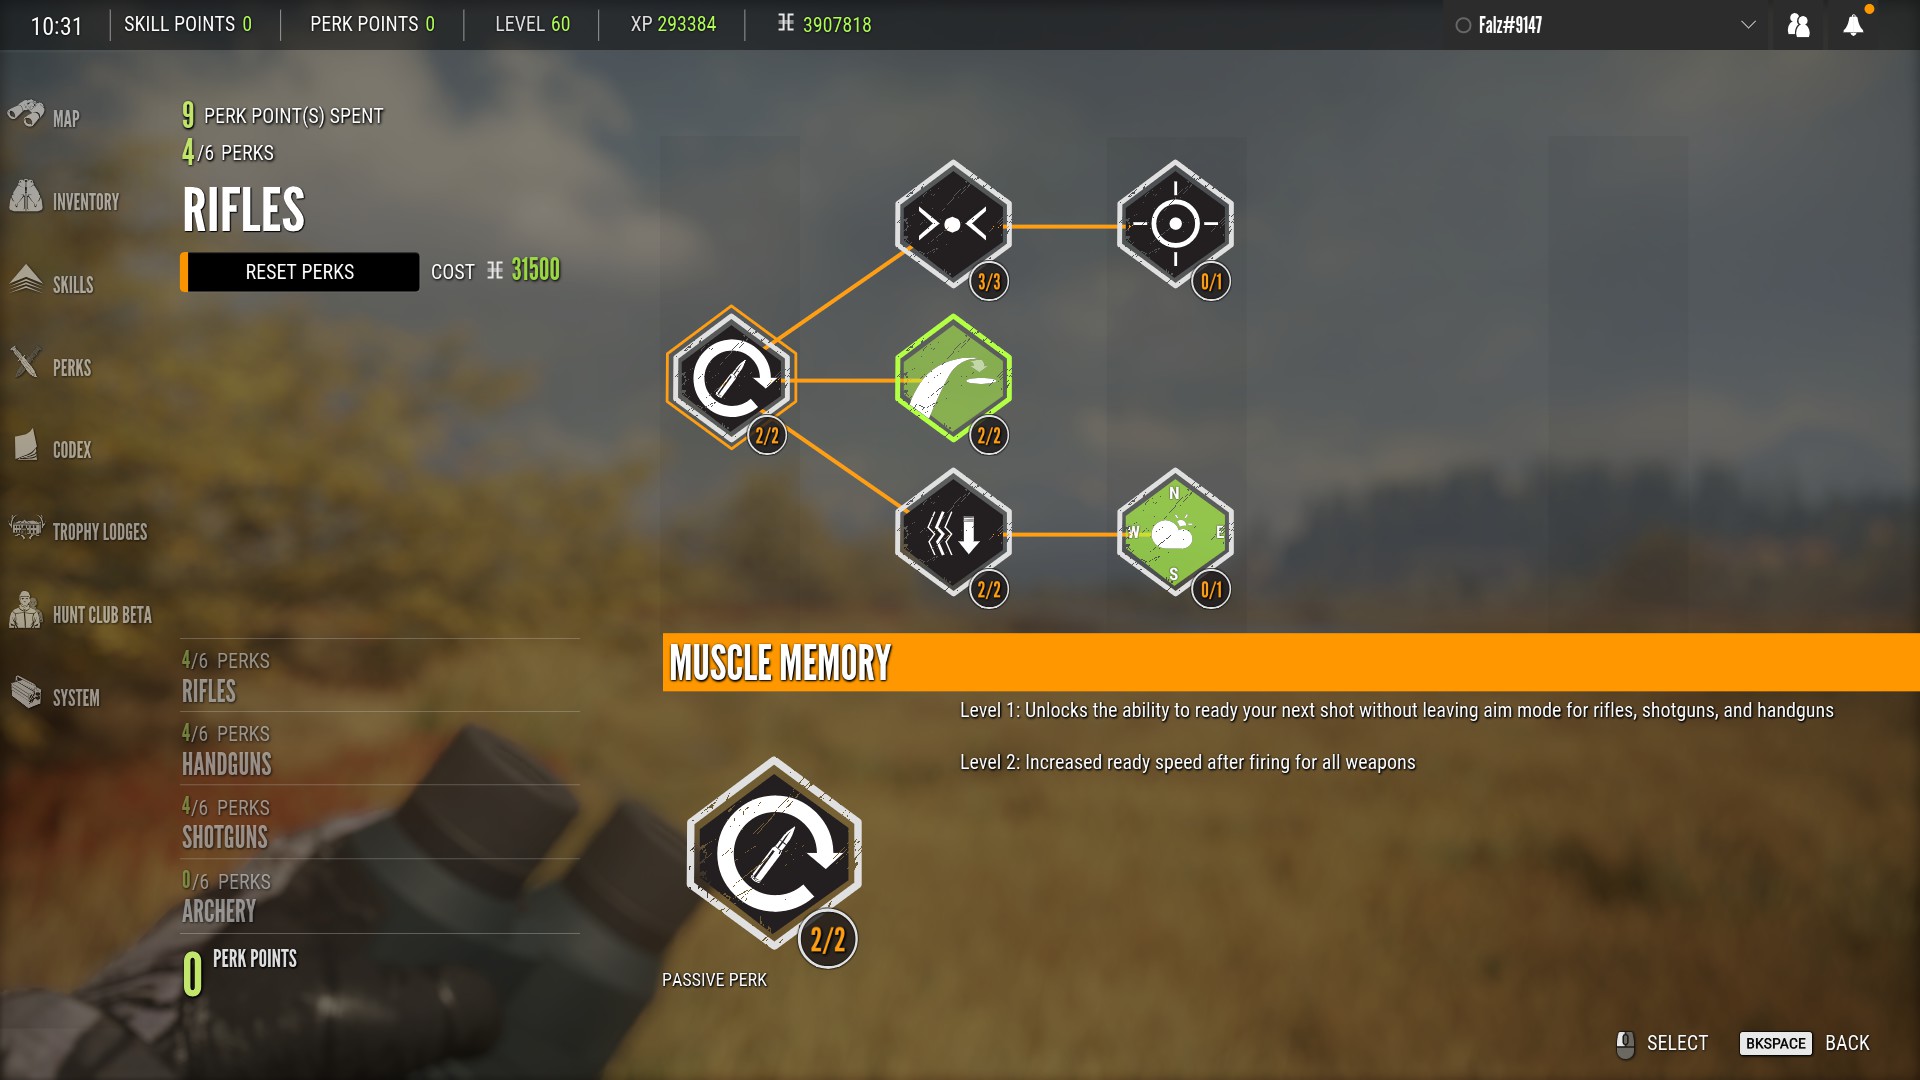
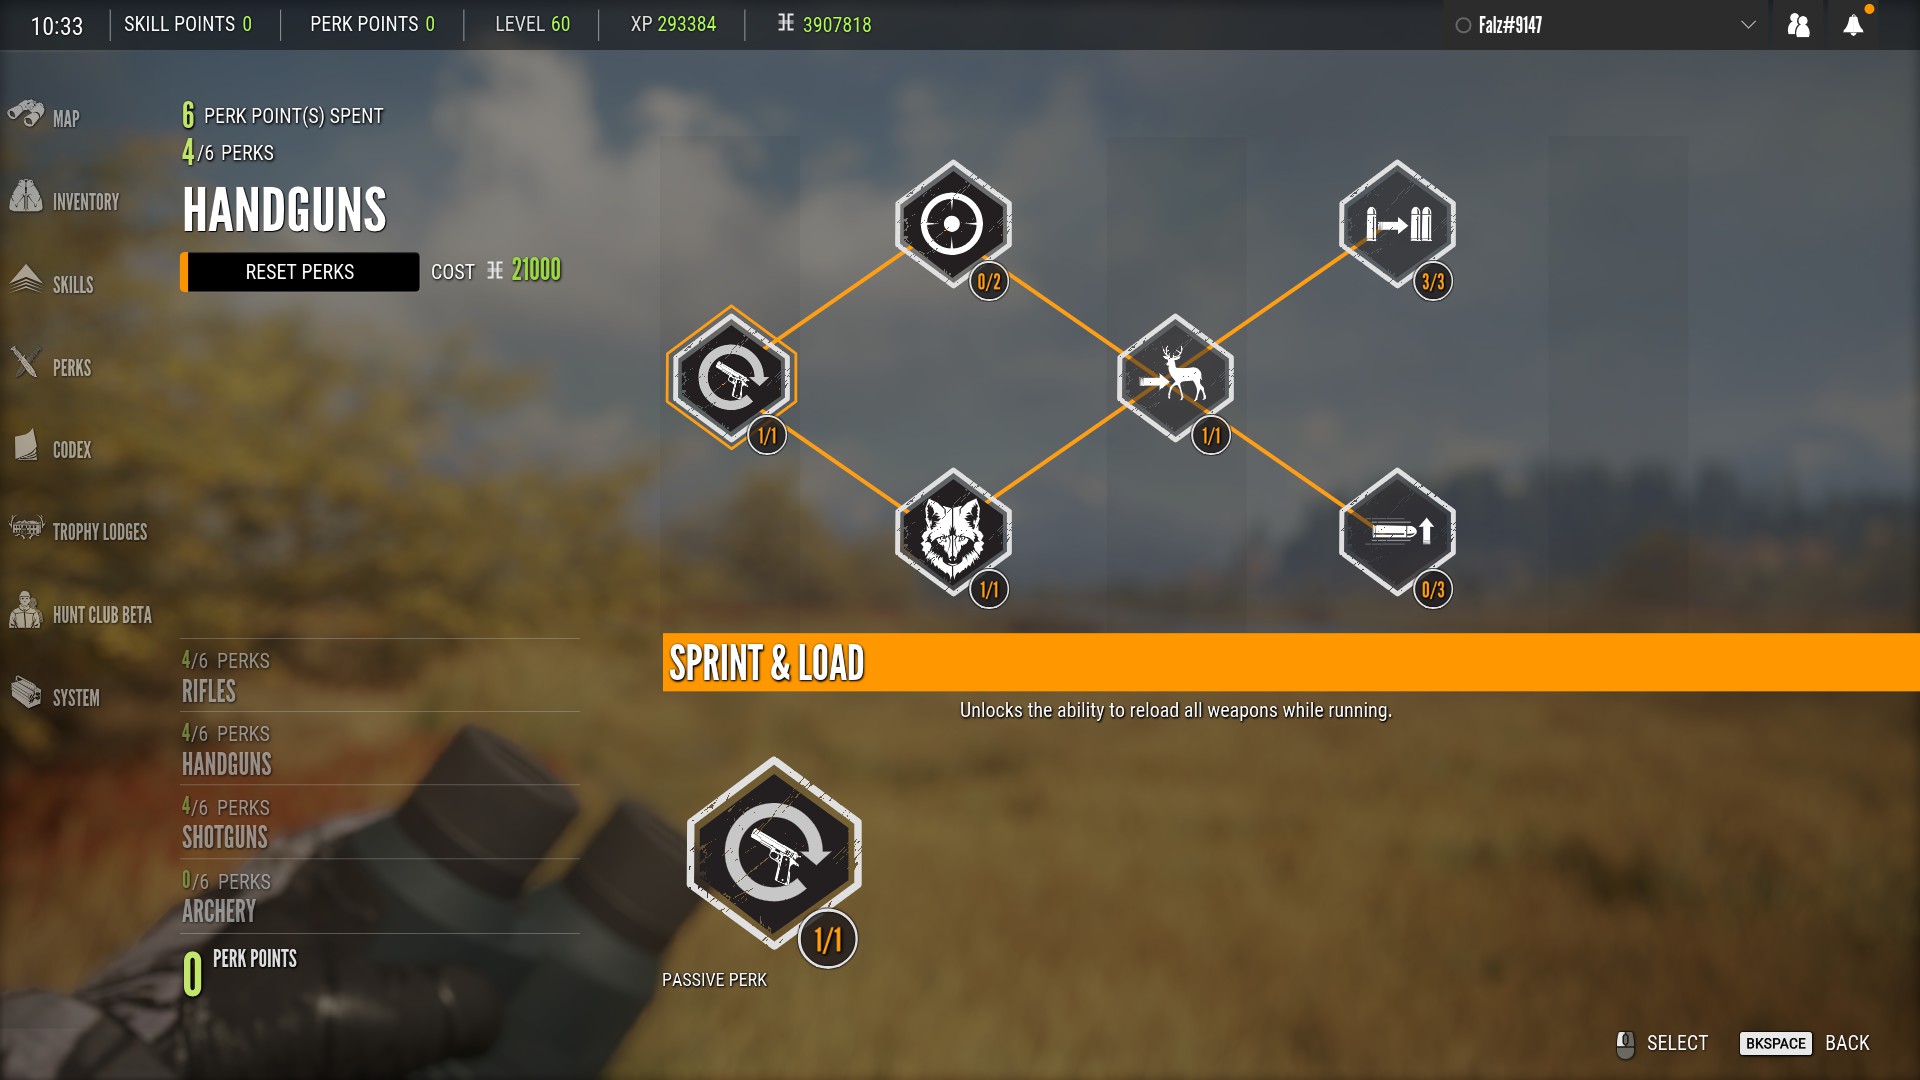
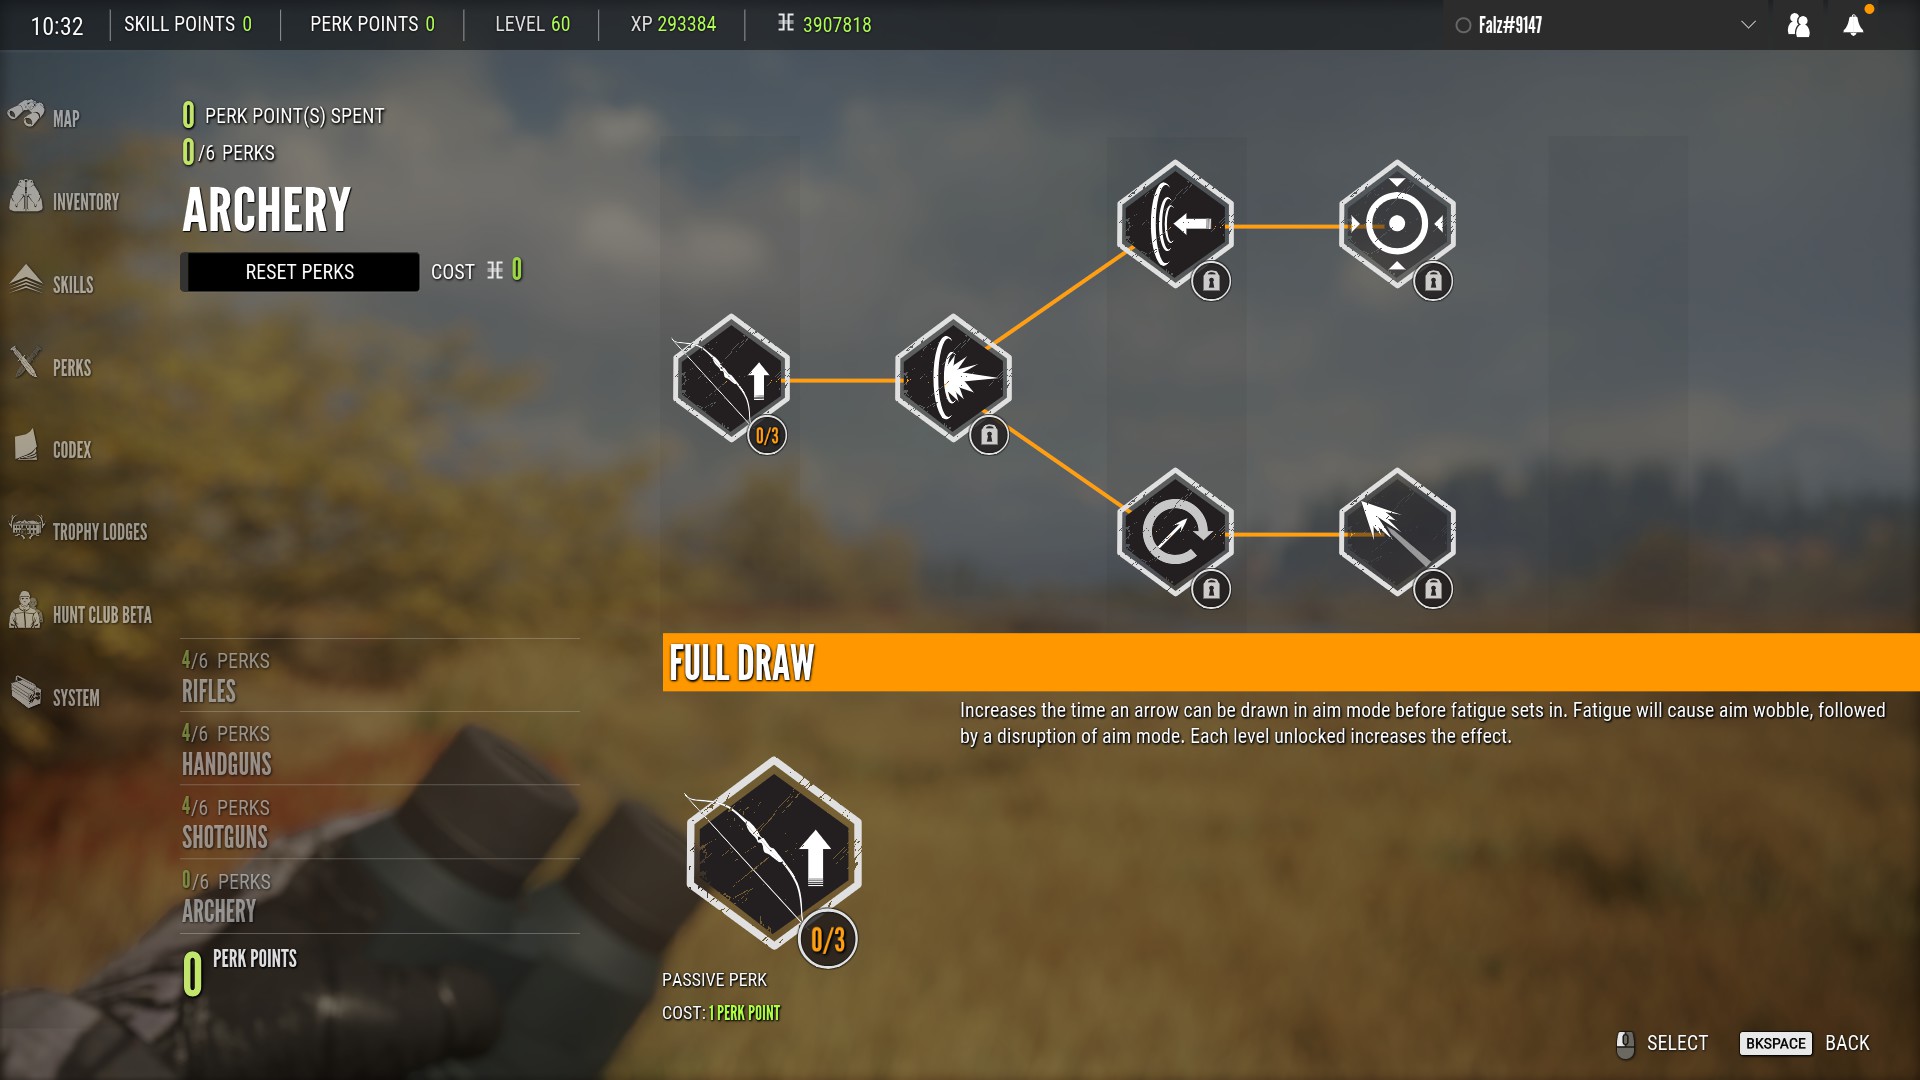
Skills And Perks
As you level your character up, you’ll earn skill and perk points to spend in the skill and perk trees. At the maximum level of 60, you’ll have 22 skill points and 22 perks points to spend which is not nearly enough to unlock everything so make sure you spend your points carefully since resetting is expensive.
Skill Trees
The 2 skill trees are stalker and ambusher.
The stalker skill tree is focused on helping you track down animals:

The ambusher skill tree is focused on helping you remain hidden from animals:

Perk Trees
The 4 perk trees are rifles, handguns, shotguns and archery. Each one is focused on making you more proficient with that particular class of weapon. There are however some perks in each tree that will affect every weapon:

Active Perks And Skills
One thing you might have noticed about the perk and skill trees is that some of them are green. The green ones are active perks and skills. The difference between these and the other perks and skills is you must activate these ones after you unlock them in order to get the benefits from them. In order to activate them, click on them after unlocking them and select activate. Note that you can only have one active perk or skill from each tree at any time. If you try to activate another perk or skill from a tree where you already have one active, then the one that was previously active in that tree will be disabled.
Equipping Your Loadout
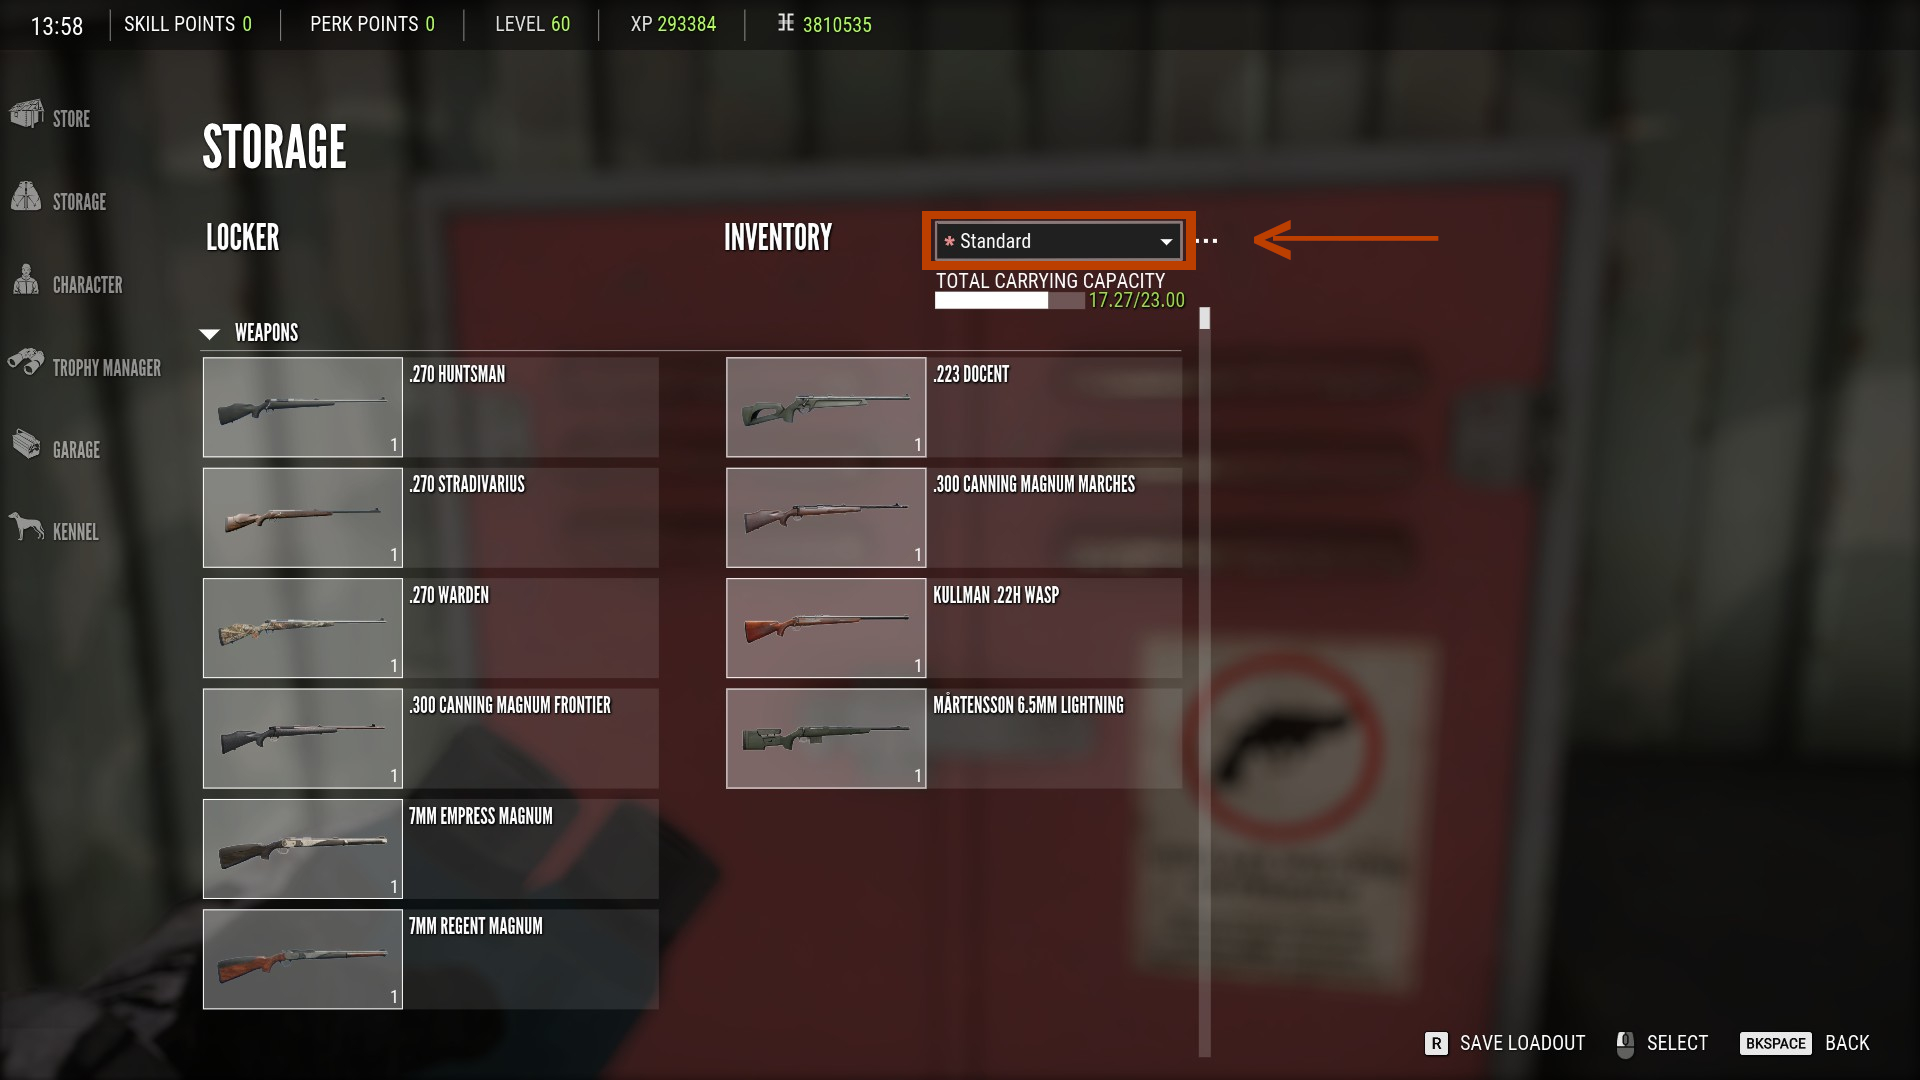
Before you can go out hunting, you’ll need to grab your weapons and equipment which you can do from the cache at any outpost or tent. First. open the cache and go to the storage tab:
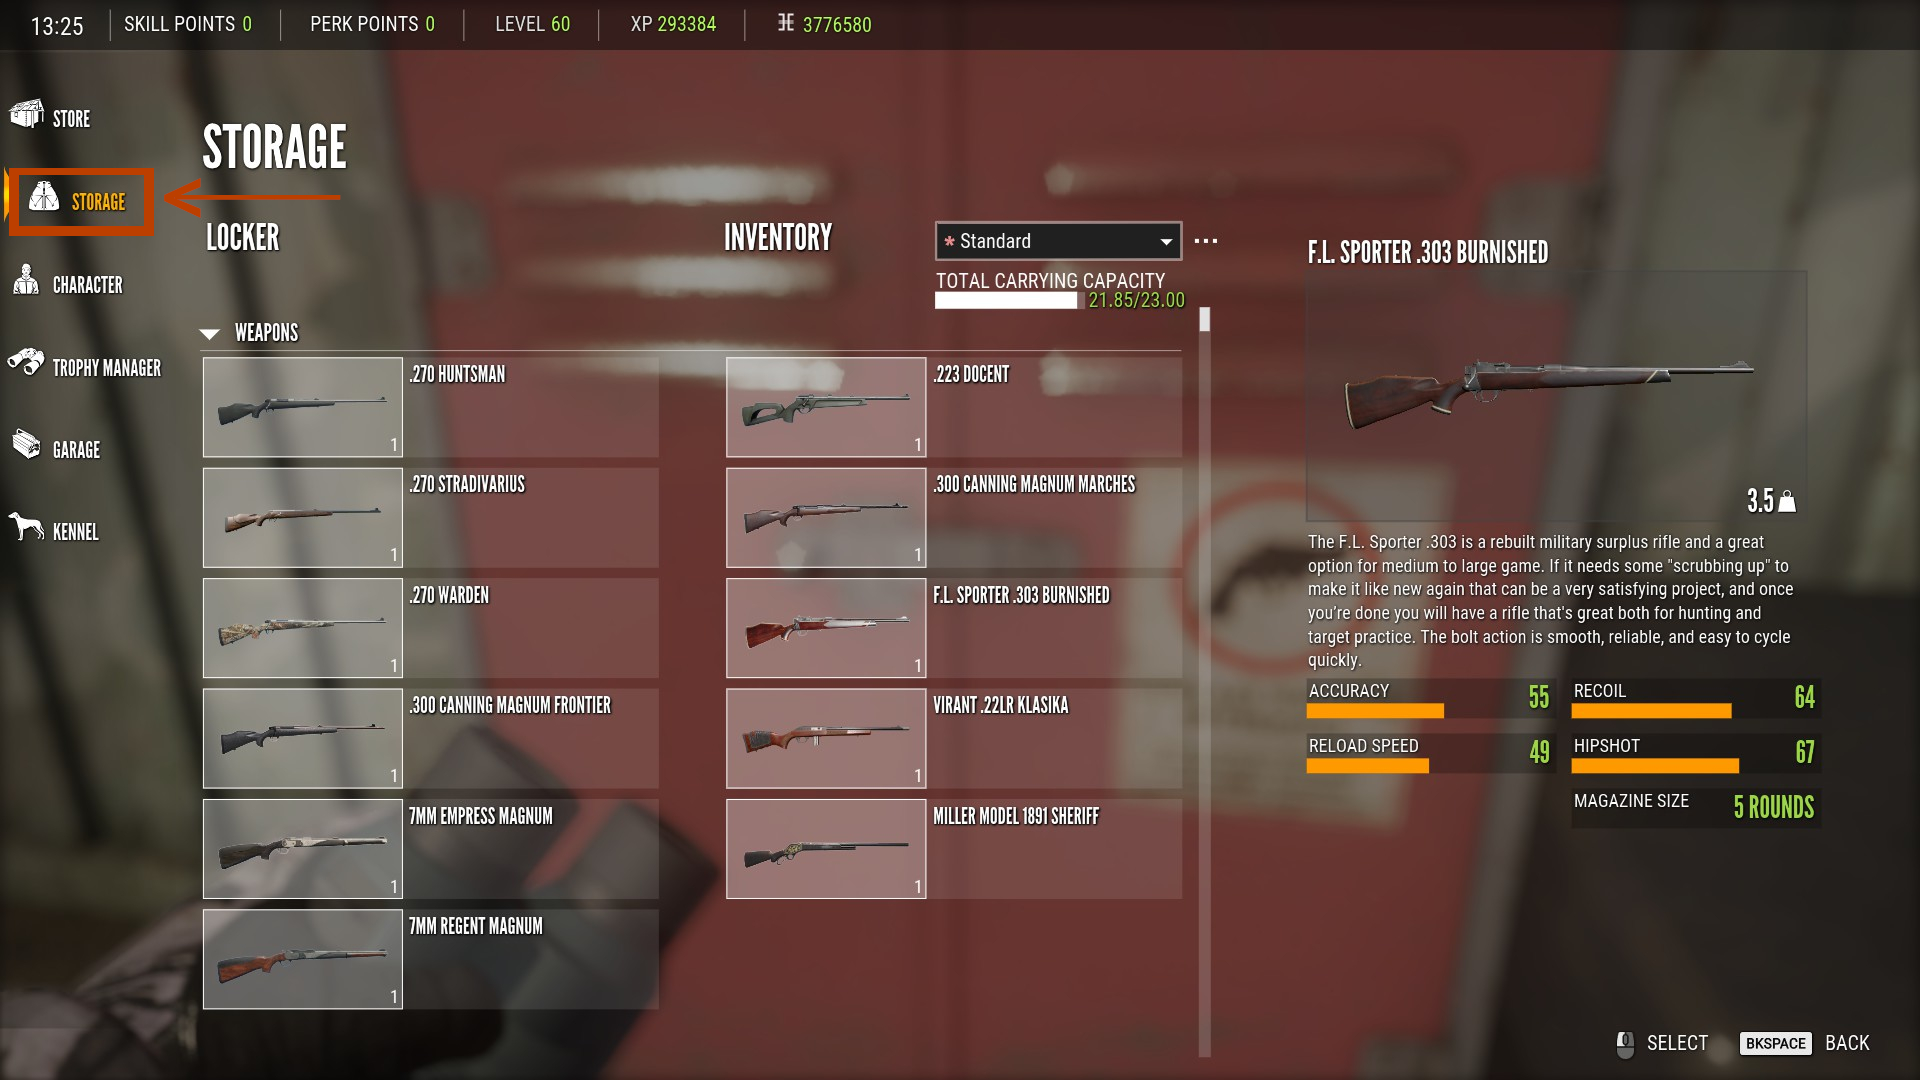
Here you will have all of the weapons, ammo and equipment you have purchased. To put something from storage into your inventory, select it from the locker tab and then drag it over to your inventory. Do the reverse if you want to take something out of your inventory and put it back into storage:
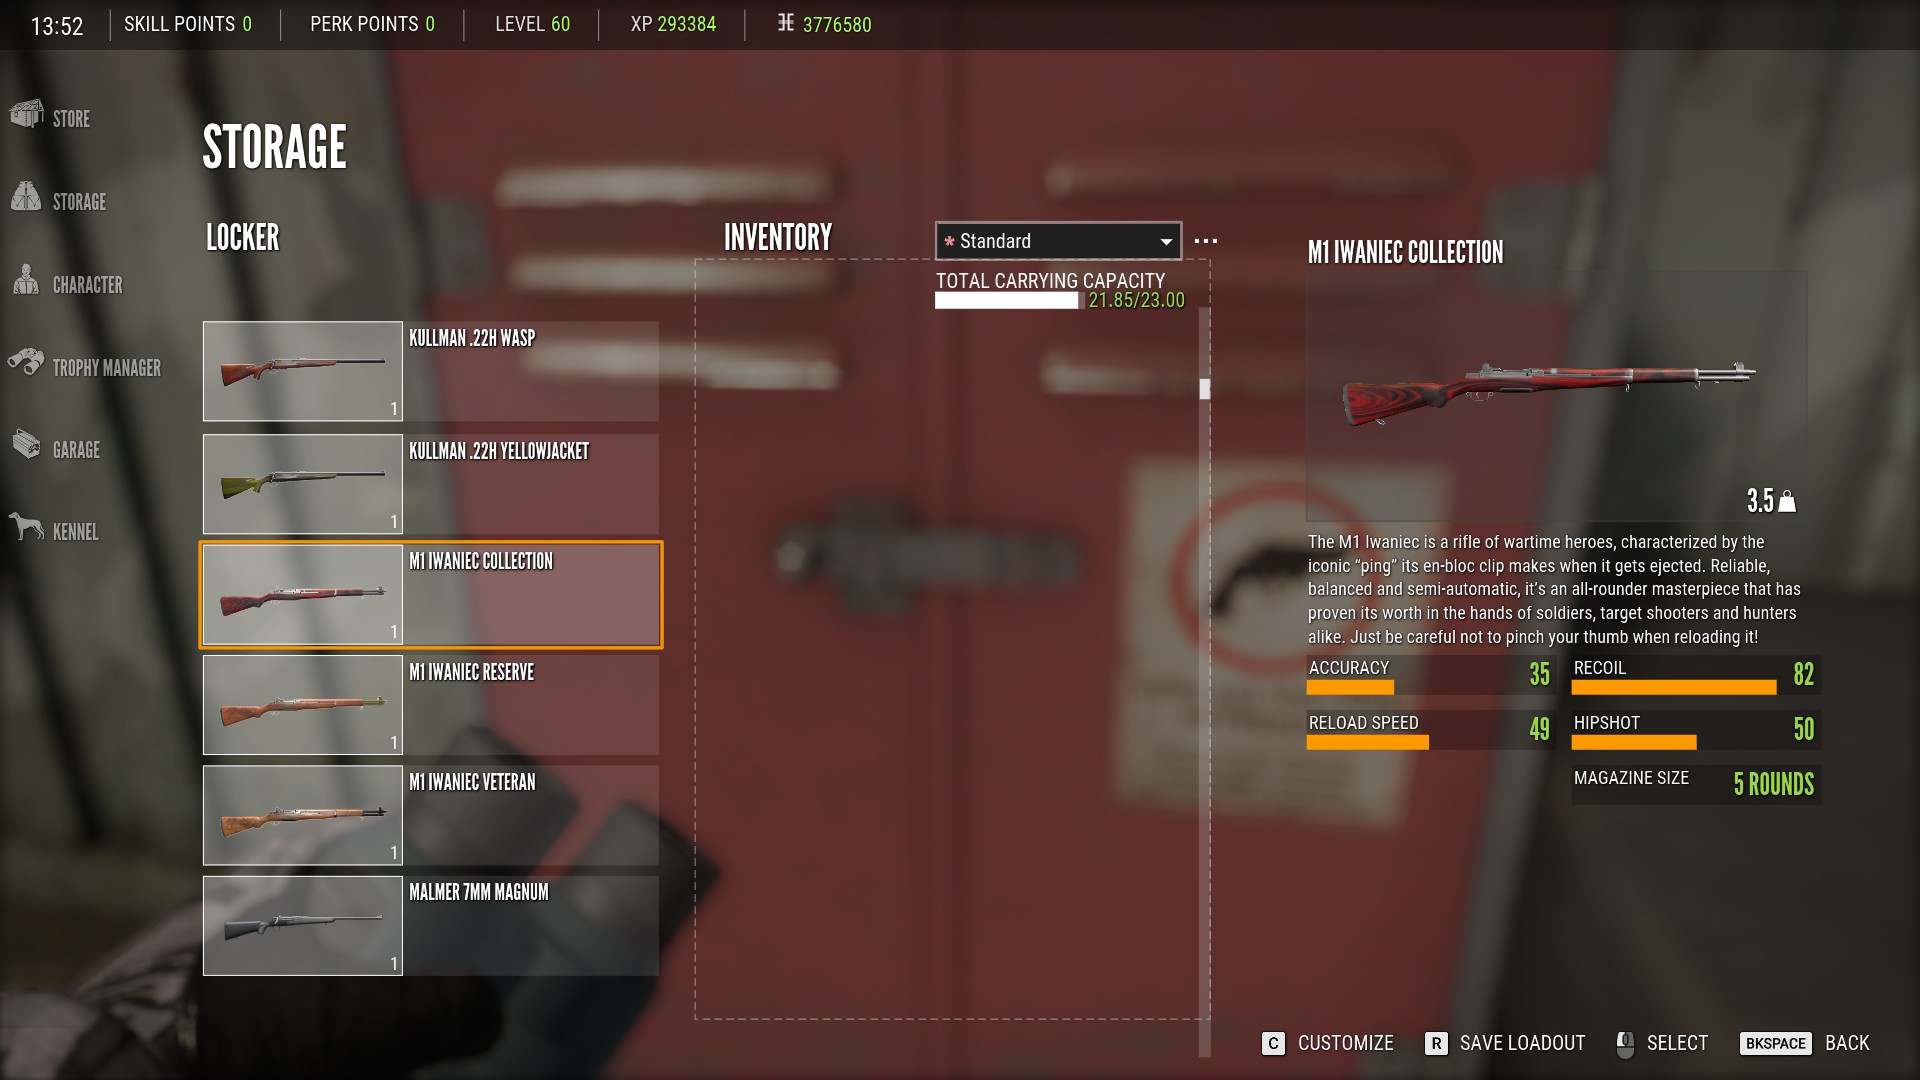

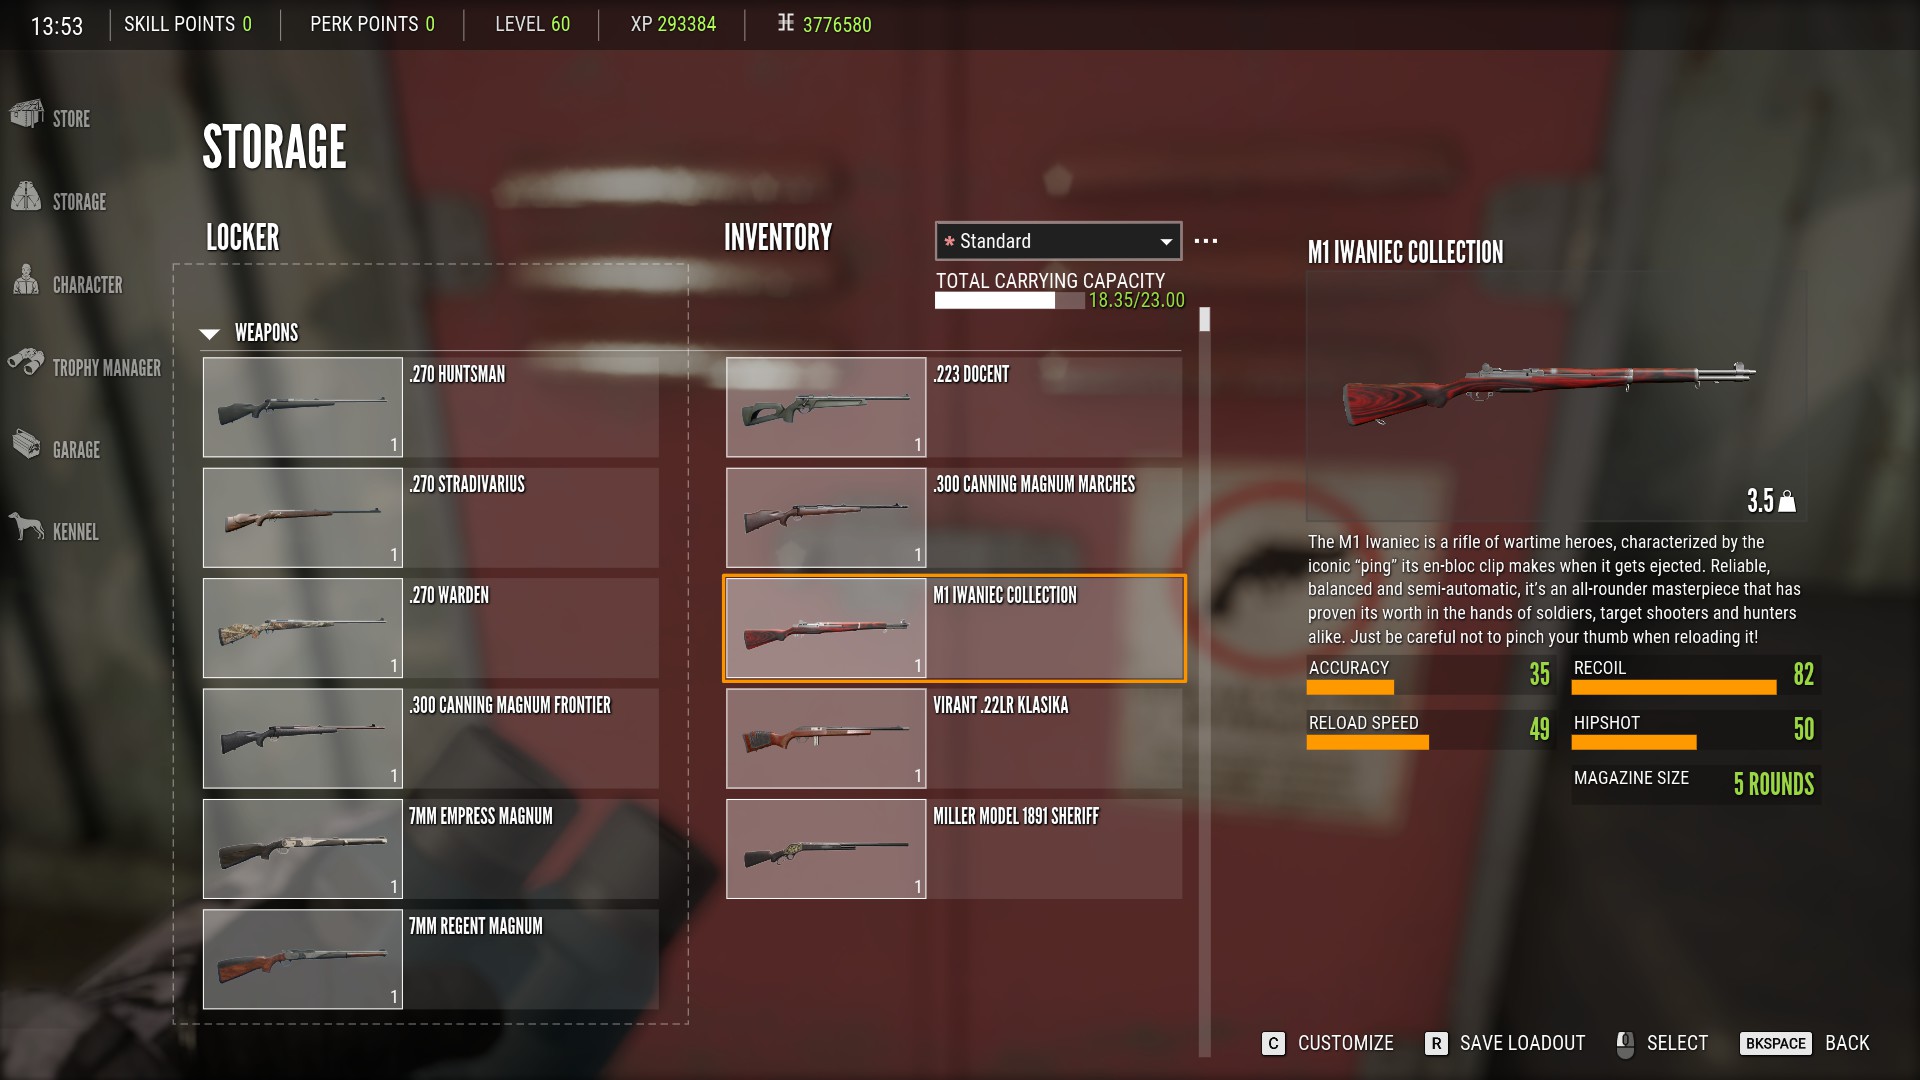
While there is no limit to how much you can have in storage, there is a limit to how much you can carry in your inventory. By default, you will be able to carry a maximum of 20kg of equipment. You can see how much you’re carrying by looking at the total inventory capacity bar:
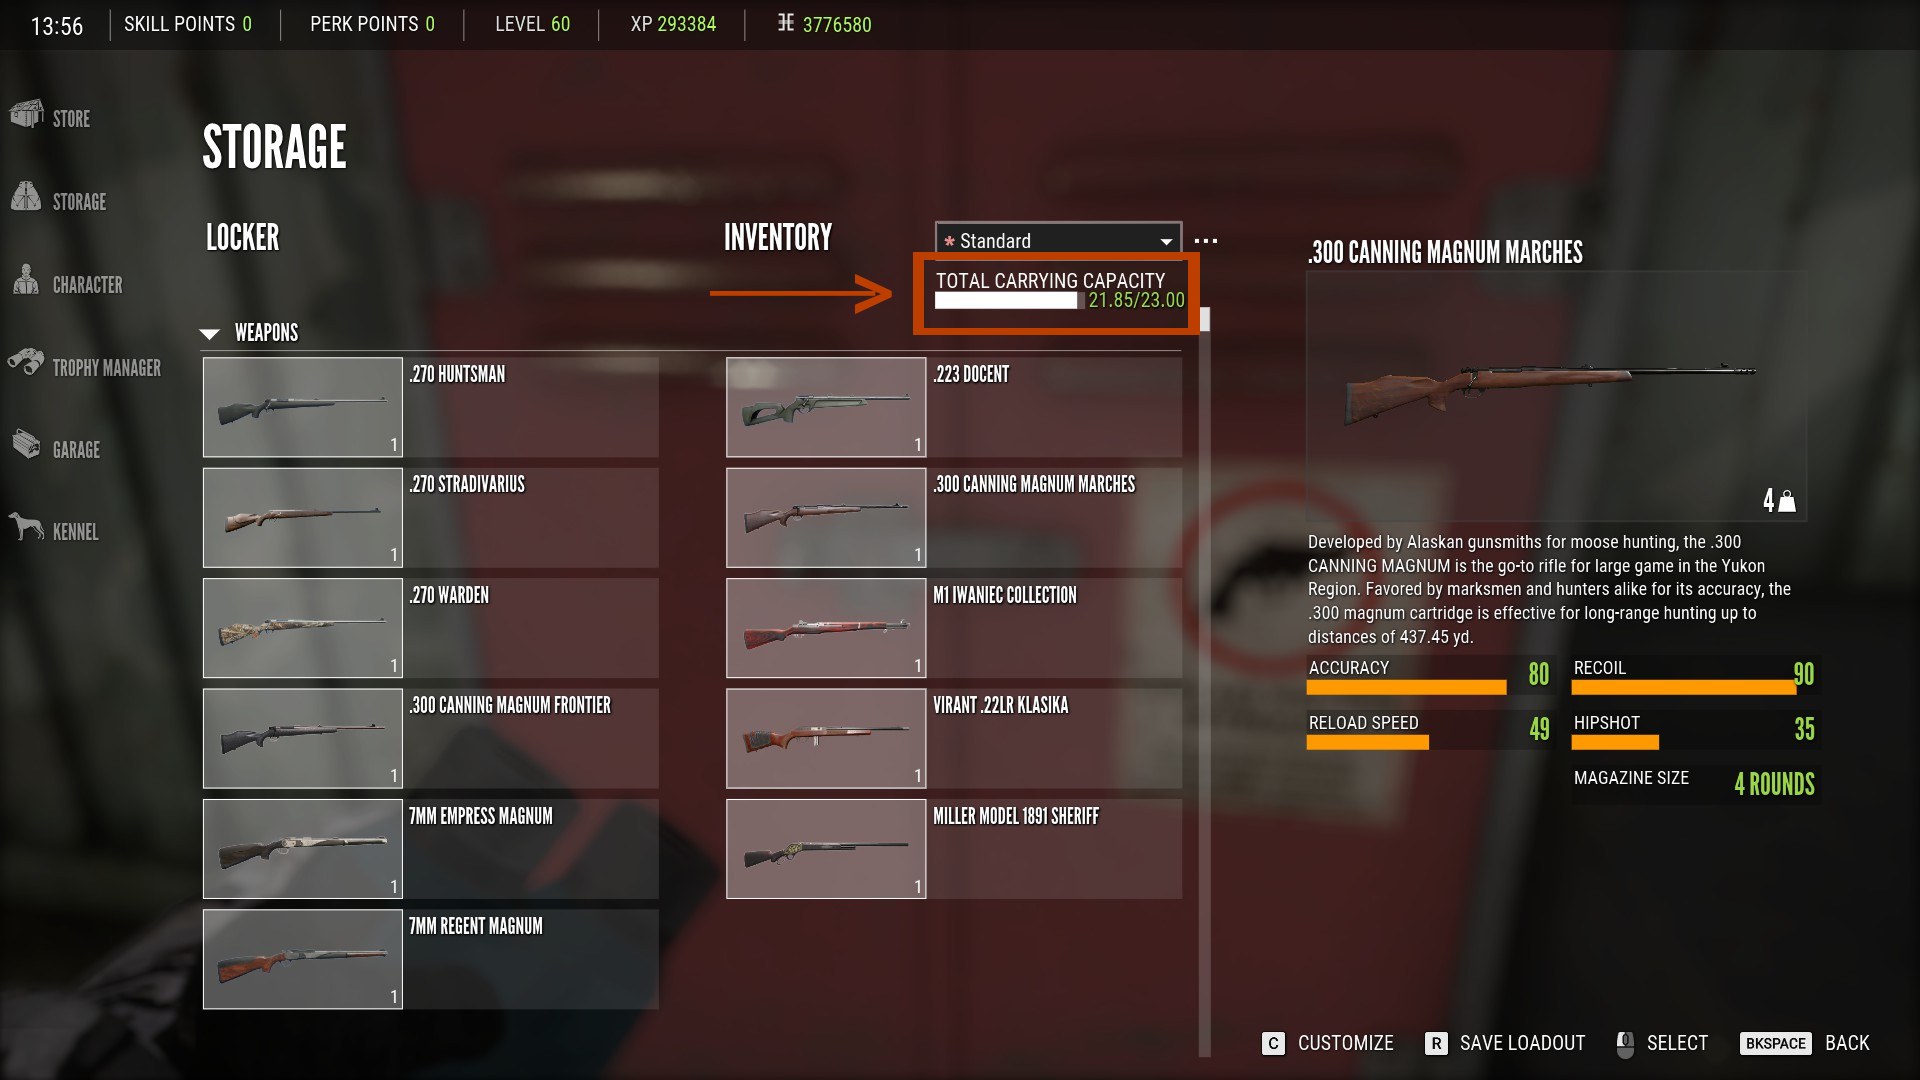
You can also see how much weight each piece of equipment takes up in the bottom right corner of its image:
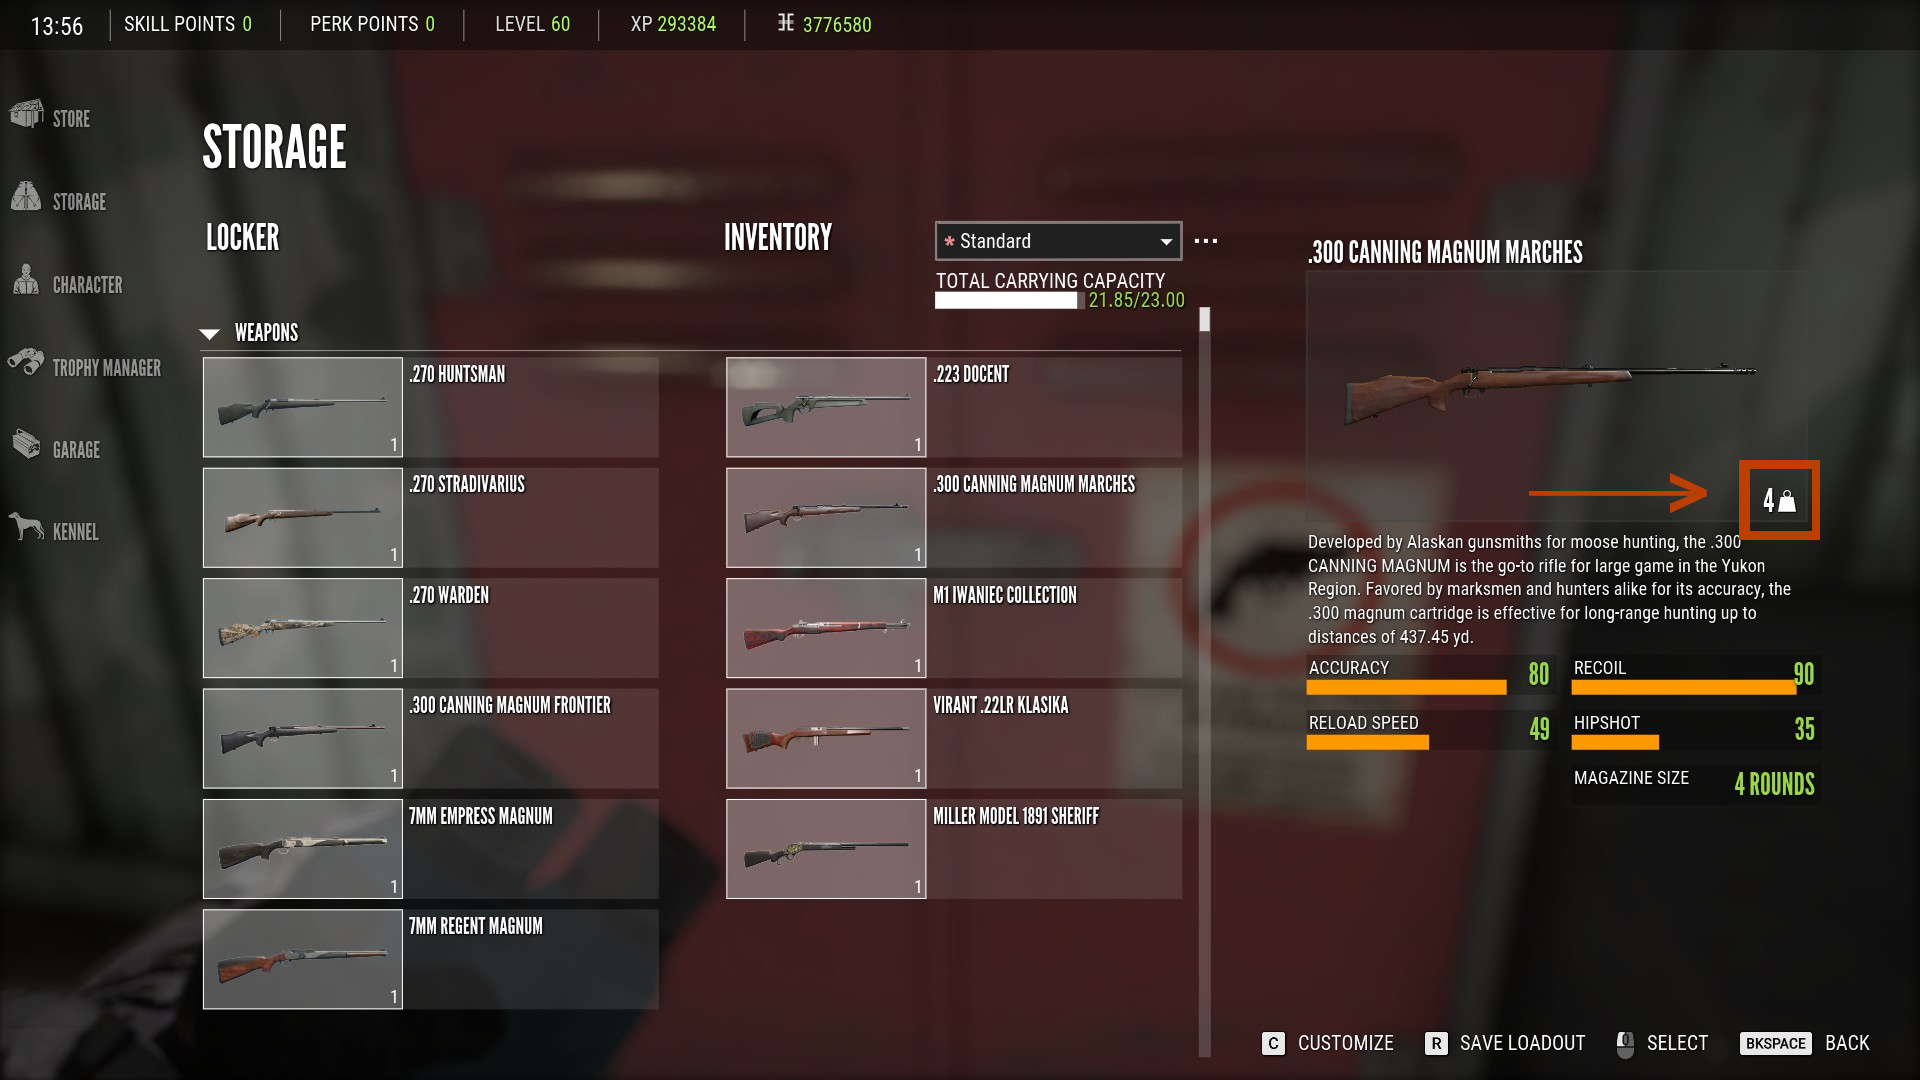
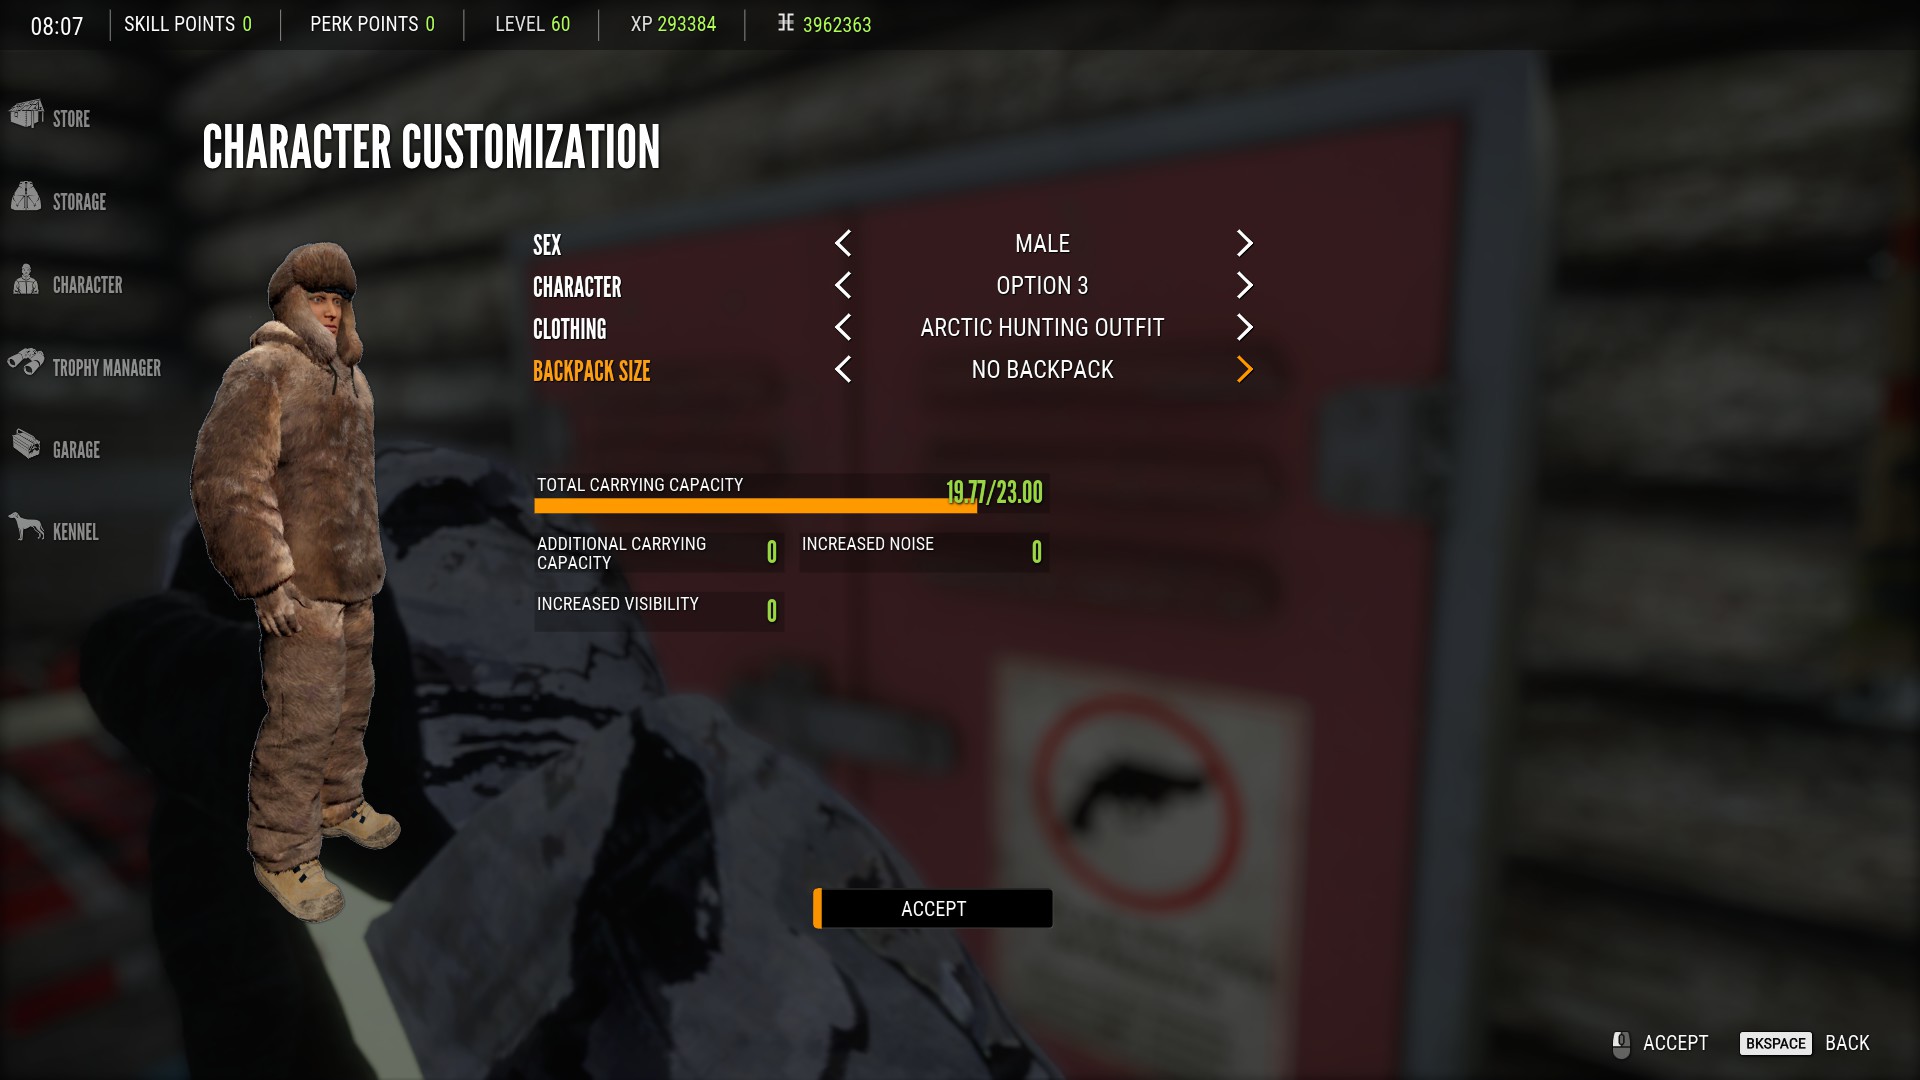
Your maximum carrying capacity can be increased to 23kg if you have the pack mule skill from the ambusher skill tree. You can also purchase and equip backpacks from the consumables section of the store to increase your carry weight but this will also greatly increase your visibility and the amount of noise you make so I would not recommend it.

If you want to equip a backpack that you’ve purchased however, you can do so from the character tab in the menu:
Placing Items In Your Weapon Wheel
Now that you have everything in your inventory, you need to equip it into your weapon wheel. Press the escape button to open the main menu and select the inventory tab:
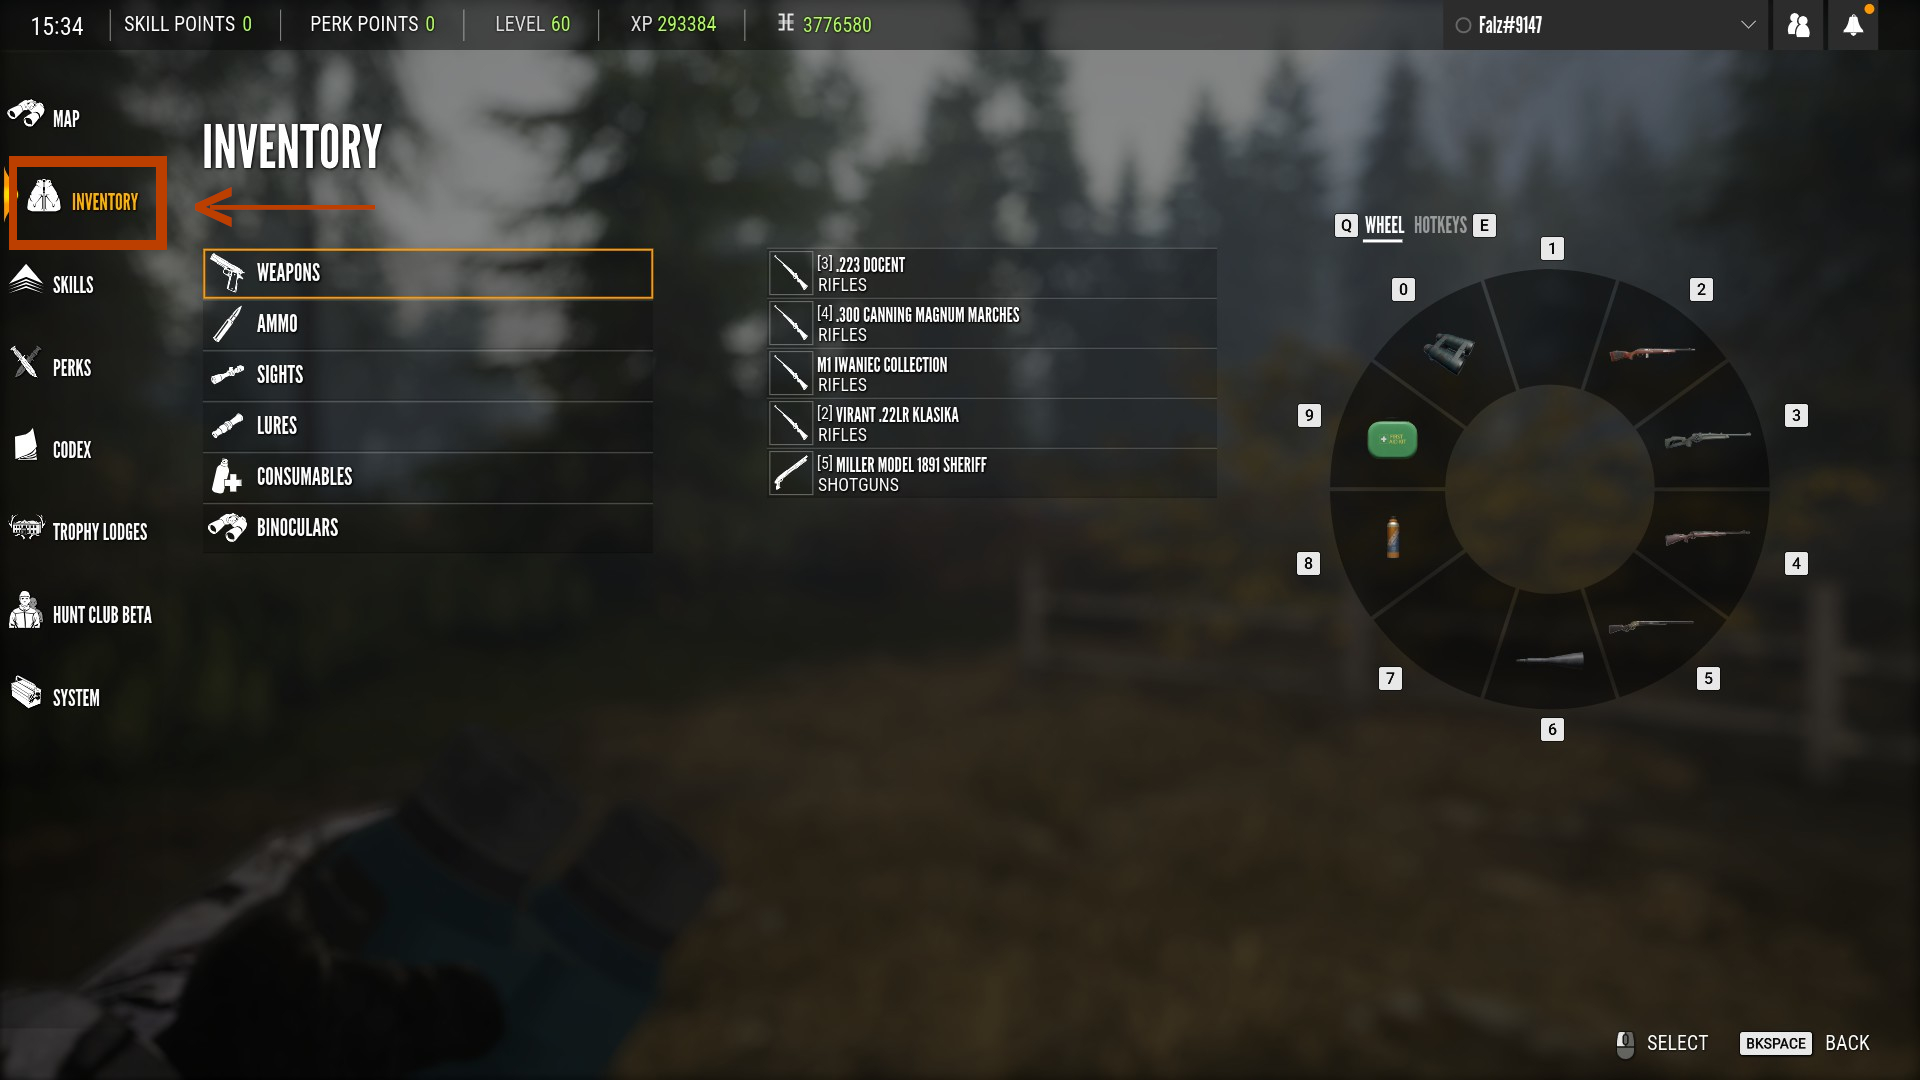
Go to the weapons tab, grab the weapon you want and then drag it over into one of the slots in your weapon wheel:
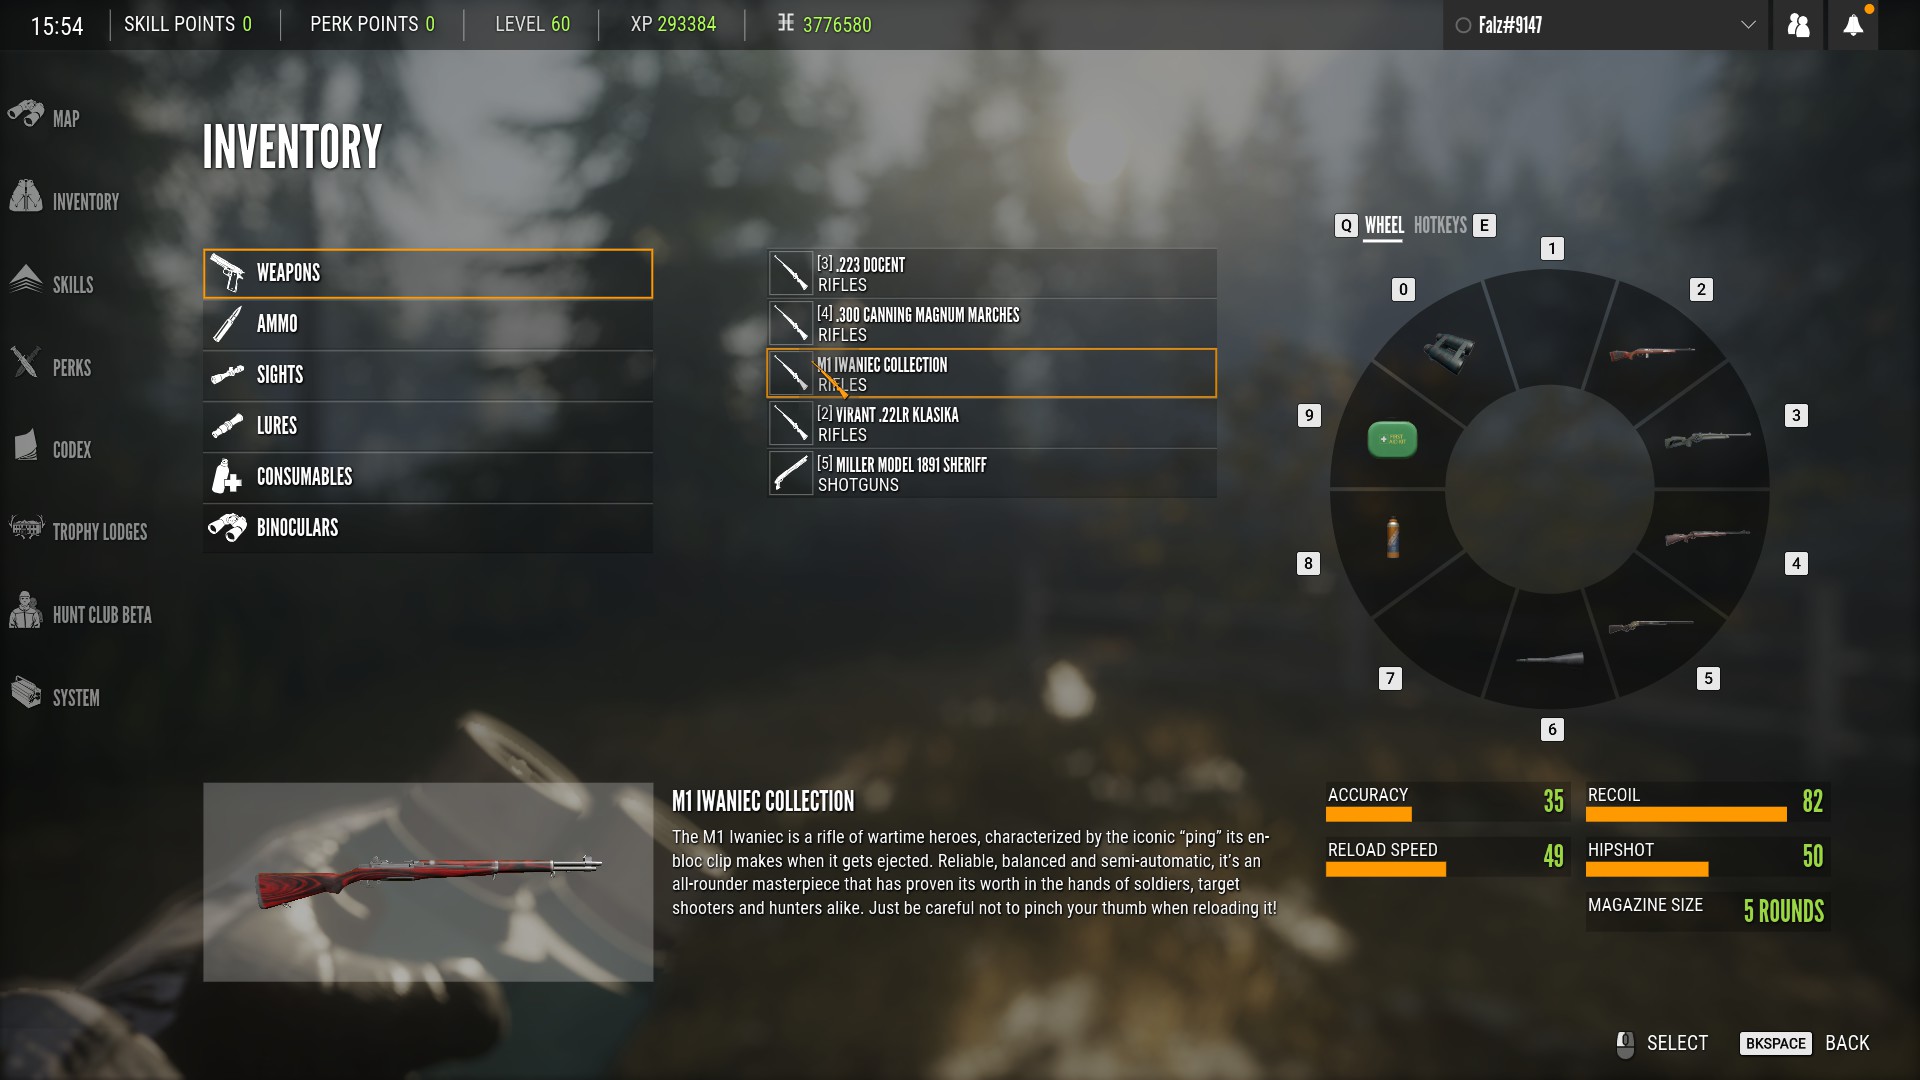
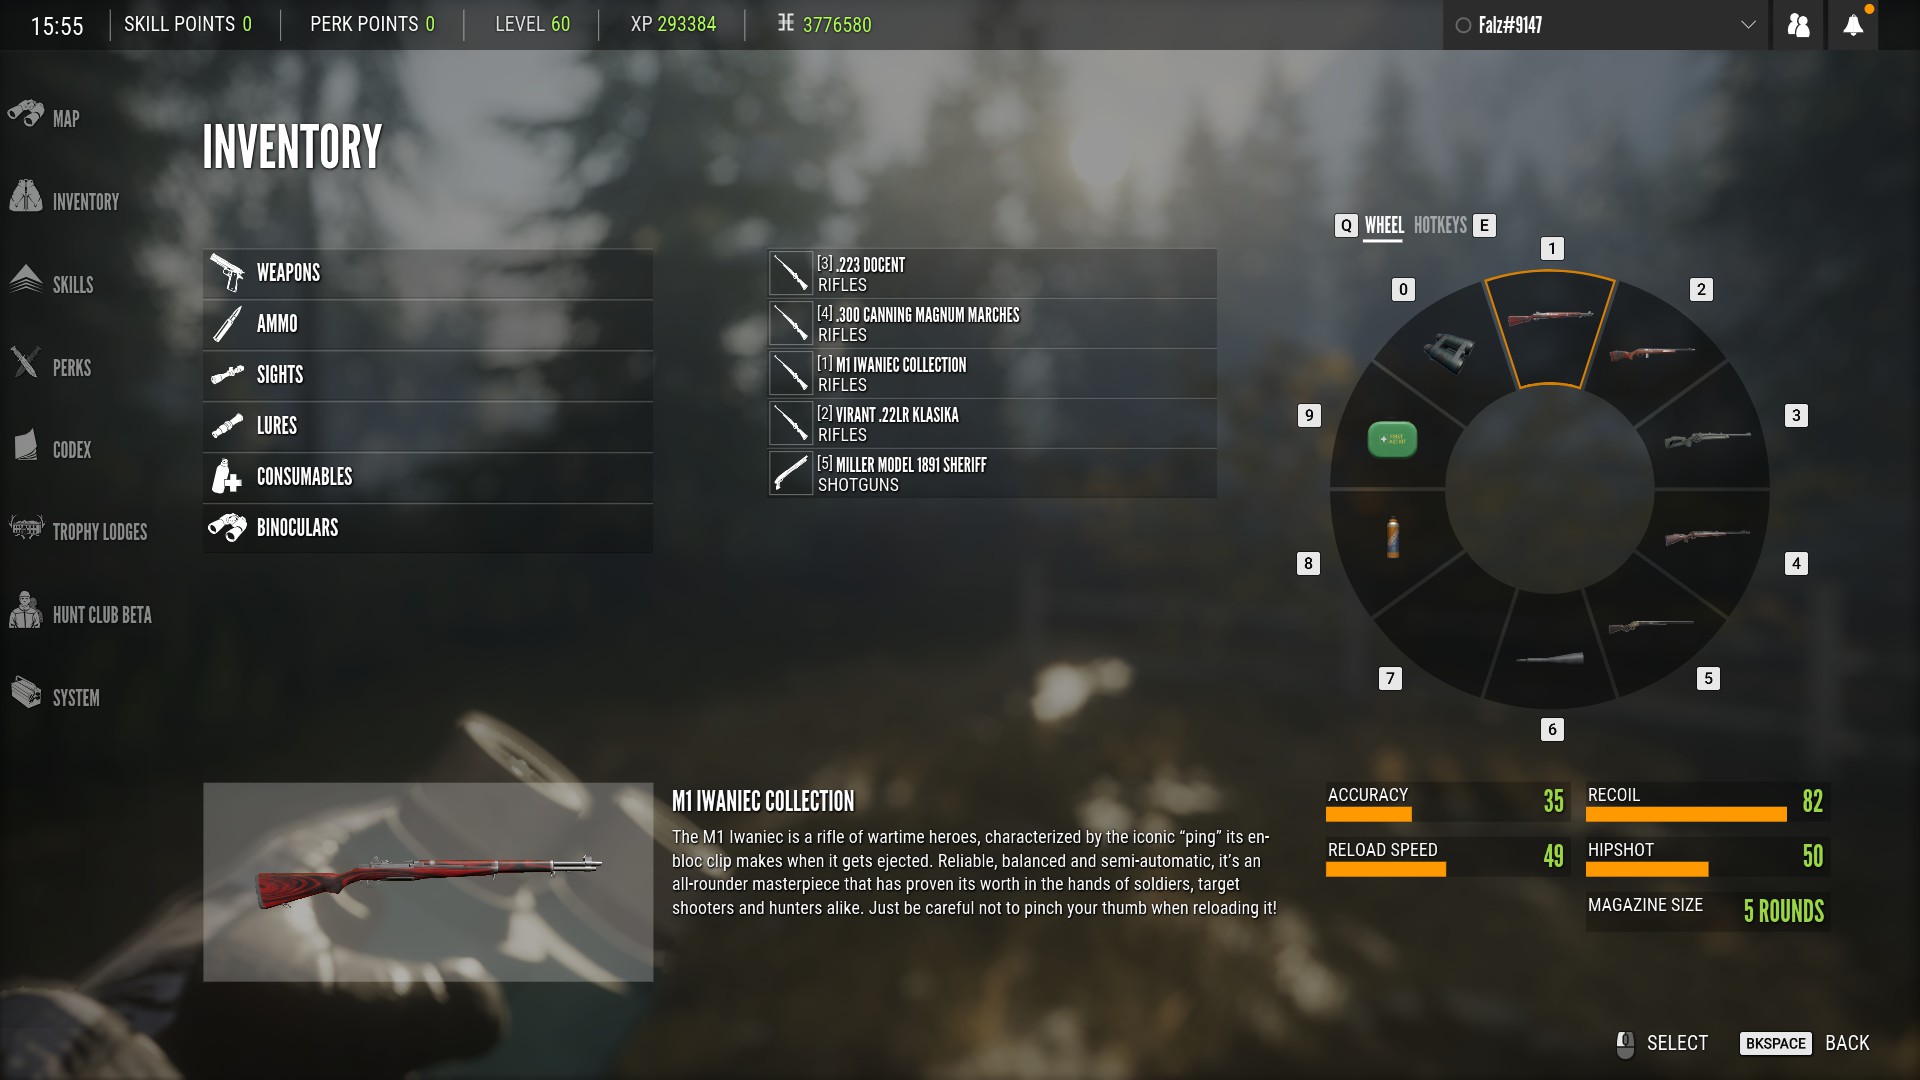
We’re not quite done yet. What good is the weapon going to do you if isn’t loaded? In order to load your weapon, go to the ammo tab and search through your ammo. Later on in the guide, I’ll discuss how you can tell which ammo goes with which weapons though in this case, Call of the Wild will help you out by highlighting any weapon that is compatible with the ammo you have selected. Once you’ve found the appropriate ammo for your weapon. grab it and drag it over to the weapon in order to load it:


Now lastly, let’s put a sight on your weapon. This is optional of course and you can just use the iron sights if you want. But if you’re going to be shooting at any sort of an appreciable distance, a scope will be very helpful. Go to the sights tab and find the sight you want. Once again, Call of the Wild will help you by highlighting any weapons that are compatible with the sight you have selected. Grab the sight and drag it over to your weapon to equip it:

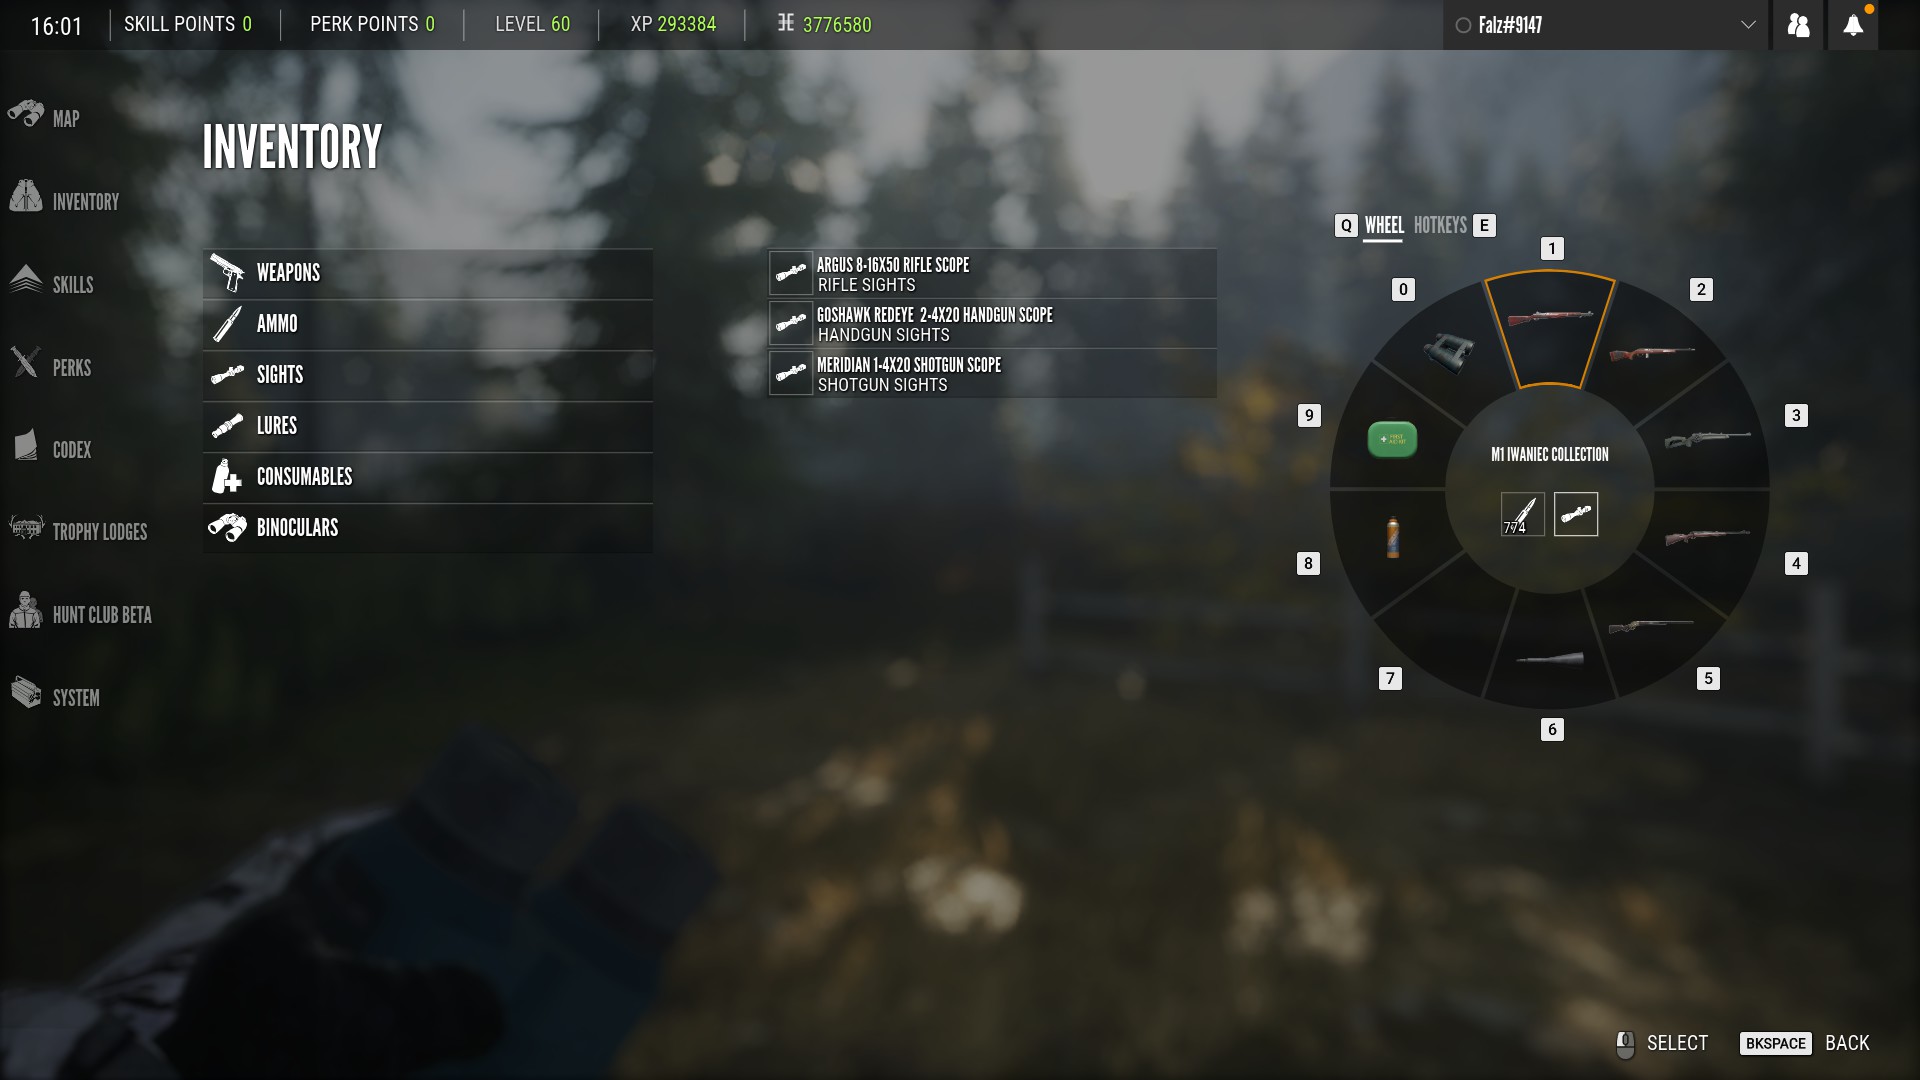
And that’s all you really need to know. Putting equipment or consumables in your weapon wheel is the same process. Just go to the appropriate tab, grab the item and drag them into one of the slots in your weapon wheel. Once you have everything equipped, you can hold down the middle mouse button to open your weapon wheel a select your weapons and equipment directly from it. Alternatively, you can also just press the number key that corresponds to one of the slots in your weapon wheel in order to pull out the item that is in that slot.
Saving Your Loadouts
If you have a loadout that you’re fond of or if you want to have multiple loadouts for different maps, you can save your loadout so that it can quickly and easily be equipped in the future. Once you have a loadout set up that you want saved, press R to save it in the slot you have selected:
In total you can have up to 10 different loadouts saved and they can be renamed by clicking the 3 dots next to the box when you have your loadout selected:
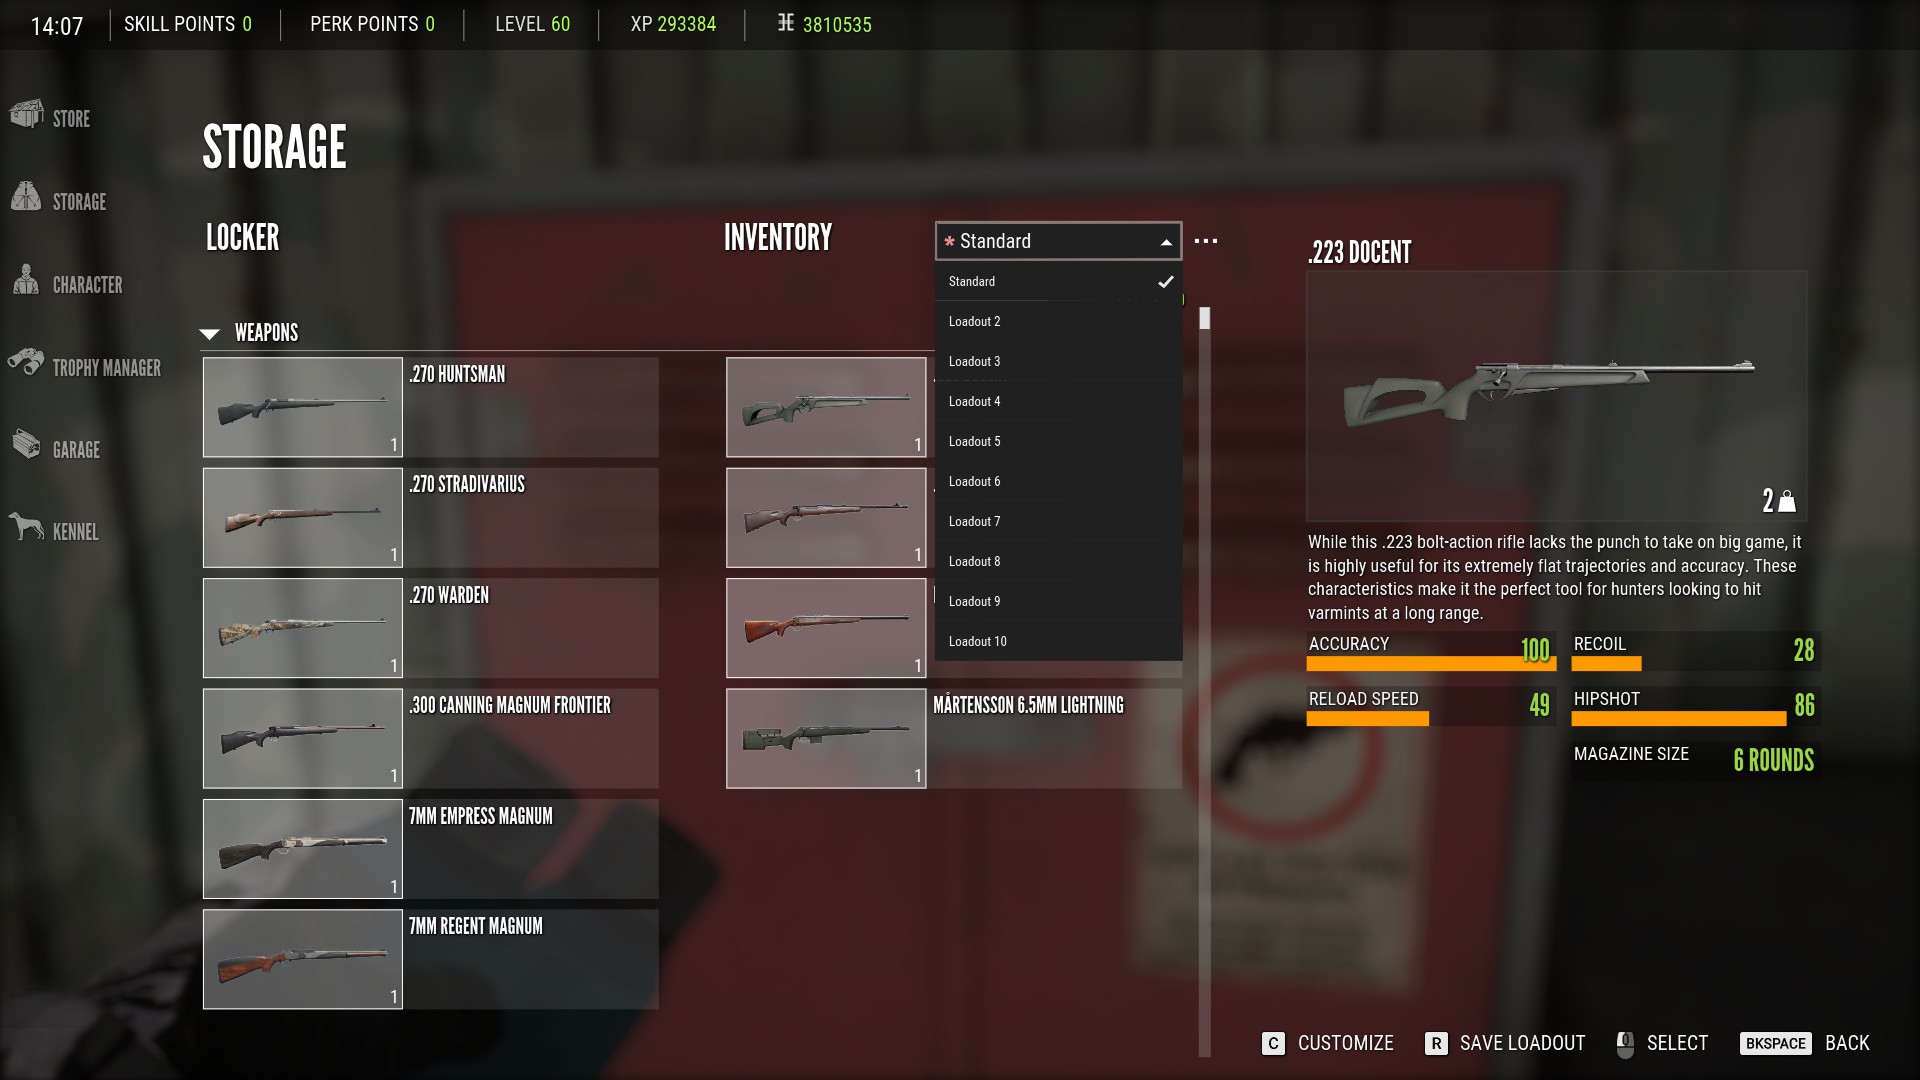
When you first start, you will only have 5 slots available to save loadouts in and the other 5 you will have to pay to unlock. In total, it will cost you 15,000 in game cash to unlock all the slots.
Rifle And Handgun Ammo – Soft Points Vs. Polymer Tips
Something you’ll notice about rifle and handgun ammo is that it often comes in 2 types: soft points and polymer tips (or something similar):
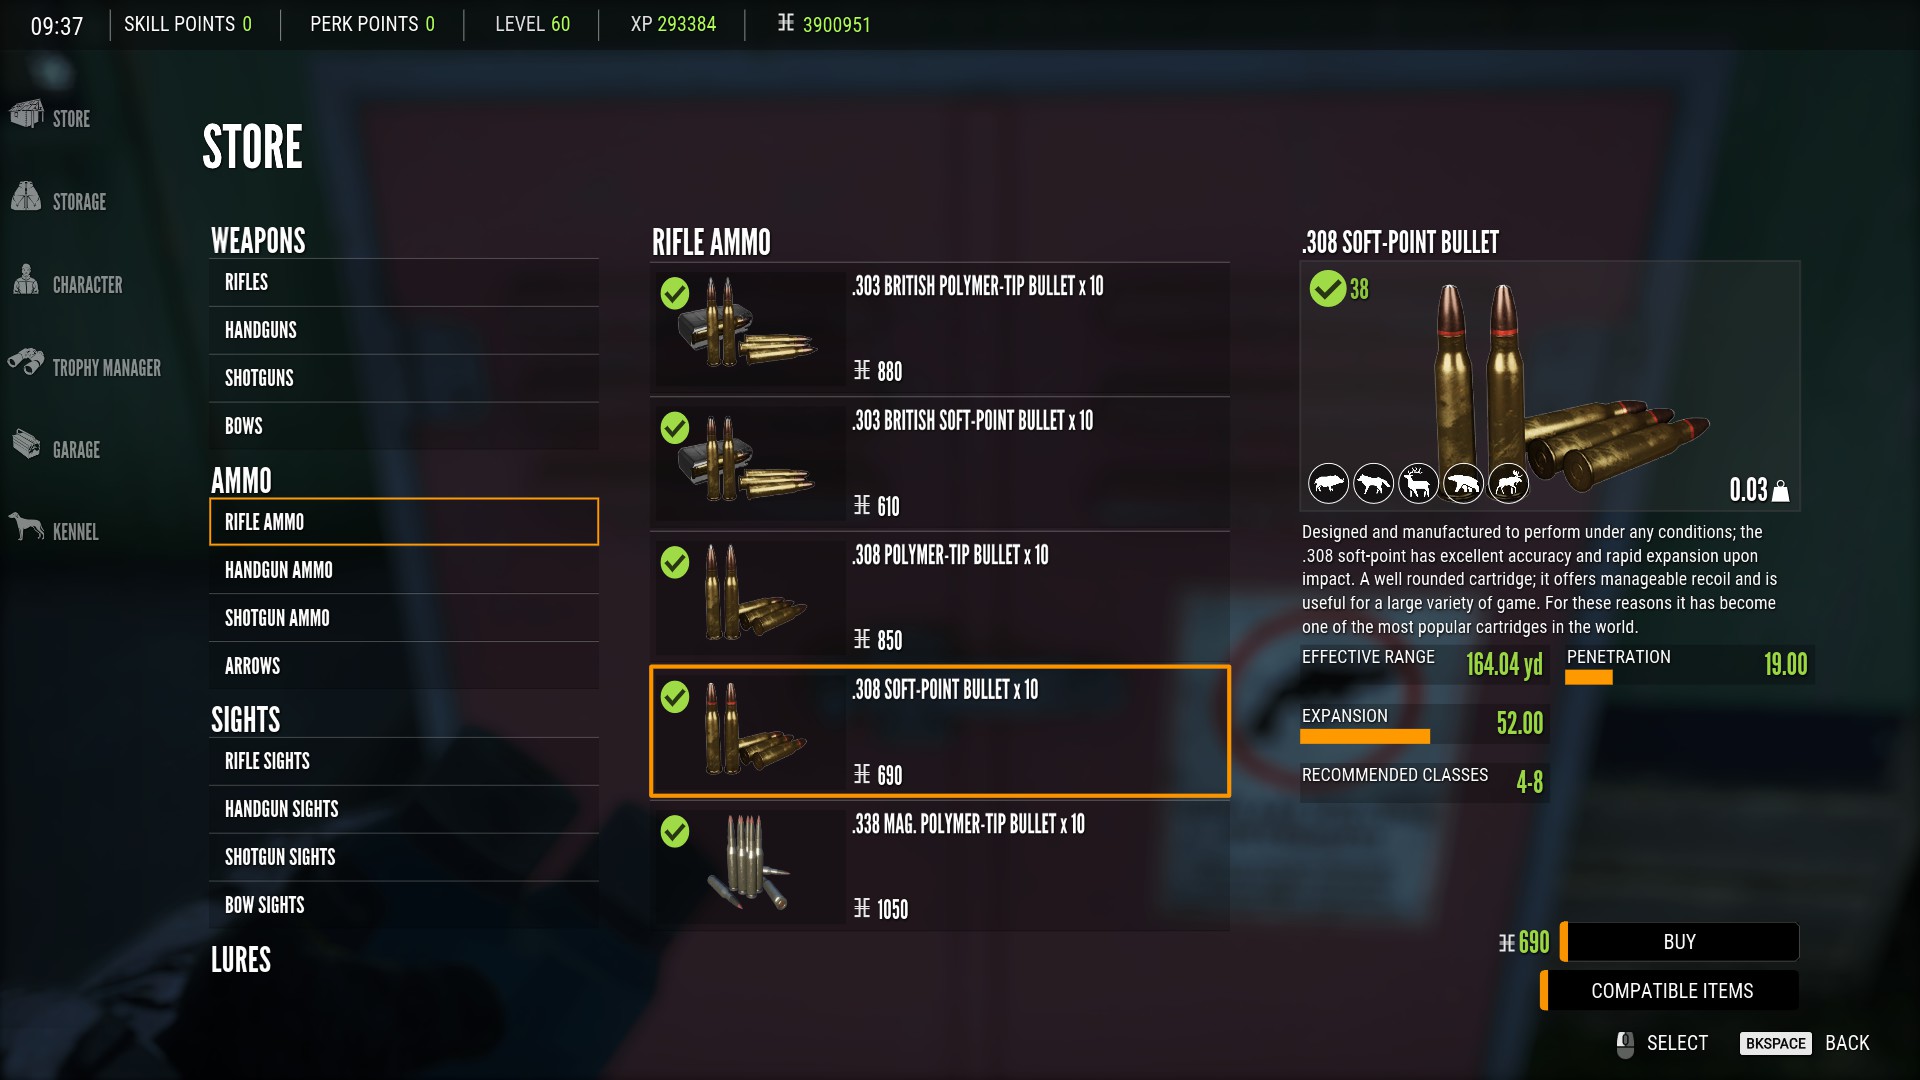
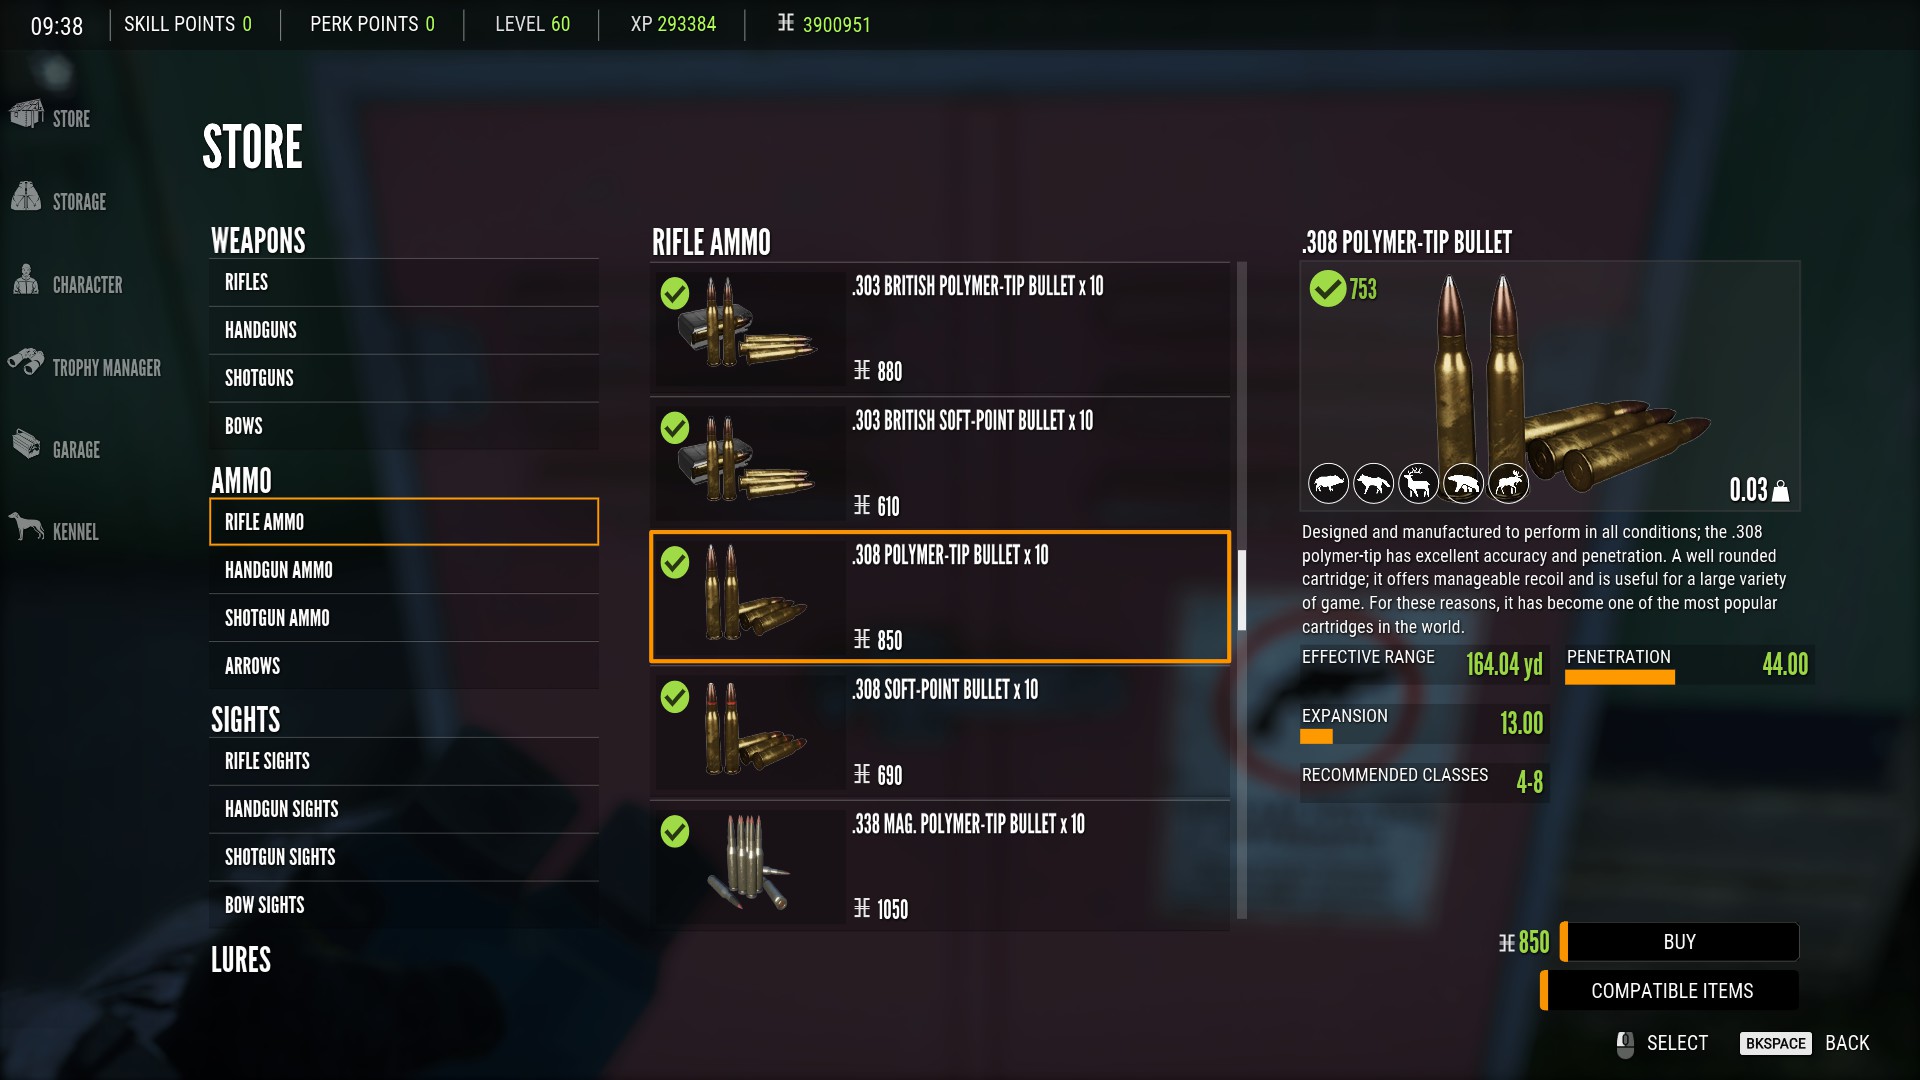
Soft points will offer better expansion and worse penetration meaning they won’t penetrate very far into your target but they will cause more damage to any organs they do hit. Polymer tips on the other hand offer better penetration but lower expansion so they will penetrate deeper into the target increasing the chance of hitting multiple organs but causing less damage to to any organs they hit. I prefer to use polymer tips in pretty much everything and that seems to be the general consensus of most other players. However, you’re of course free to experiment and decide which ones you think work better.
Tracking Animals
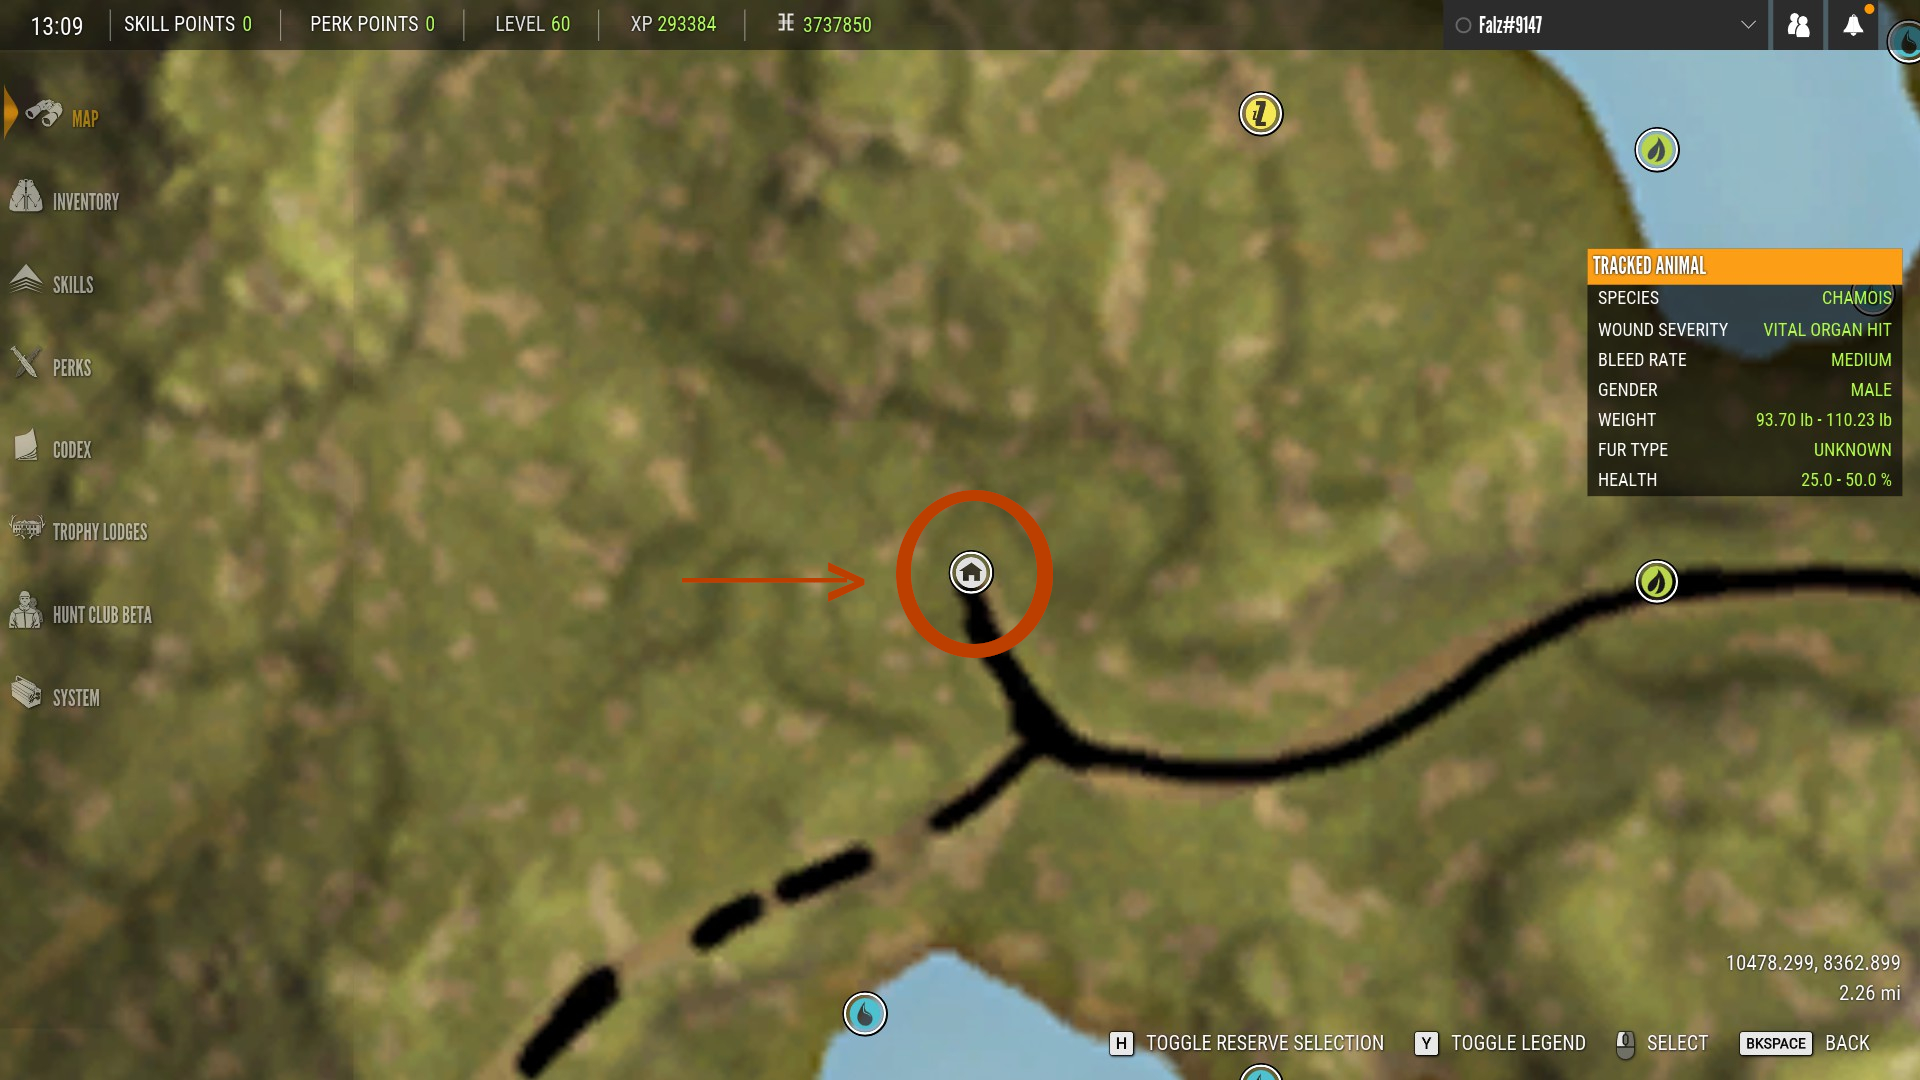
While you can certainly just stumble across animals as you wander across your map, it is a lot more effective to follow tracks which will lead you directly to animals and also need zones. Animals will leave behind several different types of tracks for you to follow. Whenever you examine a track from an animal, it will become the animal you are tracking and any other tracks from that specific animal will be automatically highlighted for you. You can see which animal you are currently tracking by opening up your map. The map will also show you the locations of any tracks that you’ve previously examined:
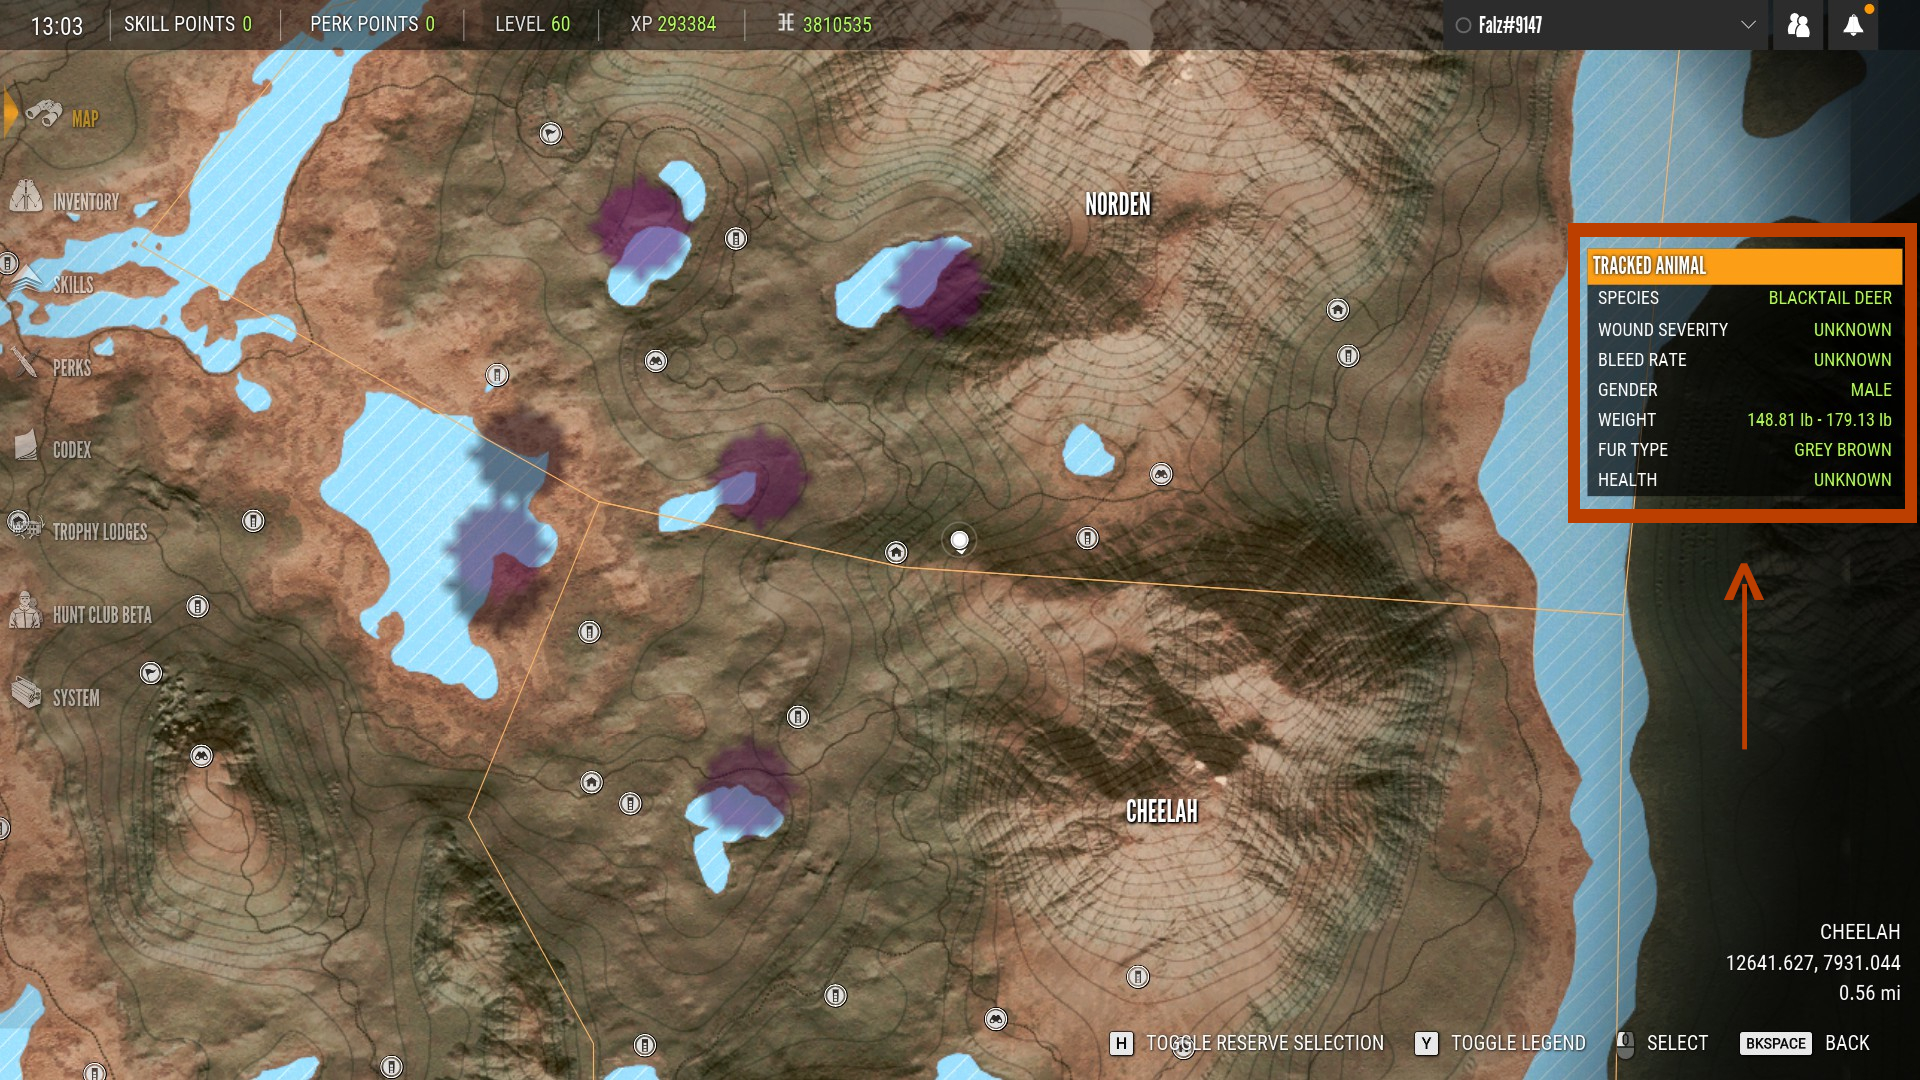

You can change the animal you are tracking at any time by either examining a different set of tracks or spotting the animal you want to track.
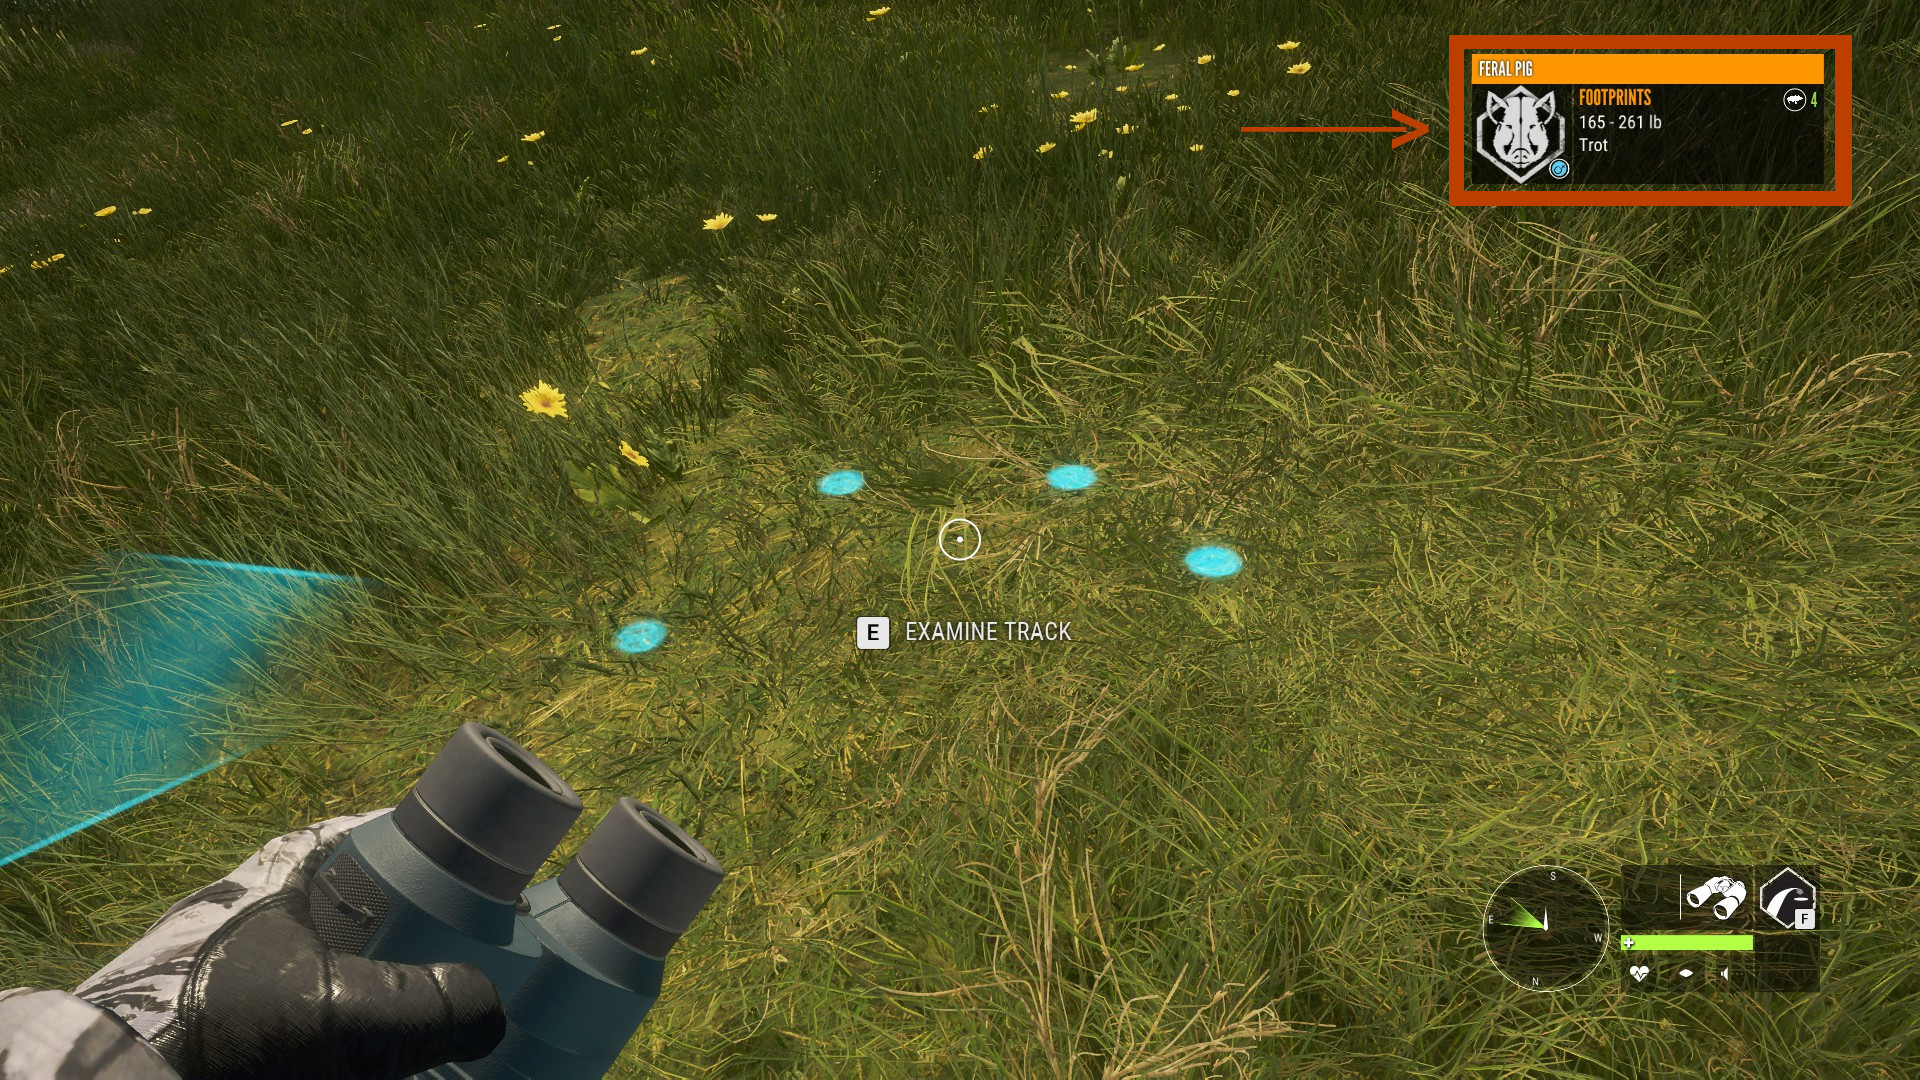
Footprints
Footprints are the most common track you will find. Examining them will display a cone which shows you the direction the animal is traveling. It will also open an information box in the top right of your screen that displays the animals species and how quickly it was moving when it made the tracks (either walking, trotting or running). If you have the track knowledge level 1 skill from the stalker skill tree, you can also see the animals gender and having level 3 of the same skill will also show you an estimate of the animals weight:
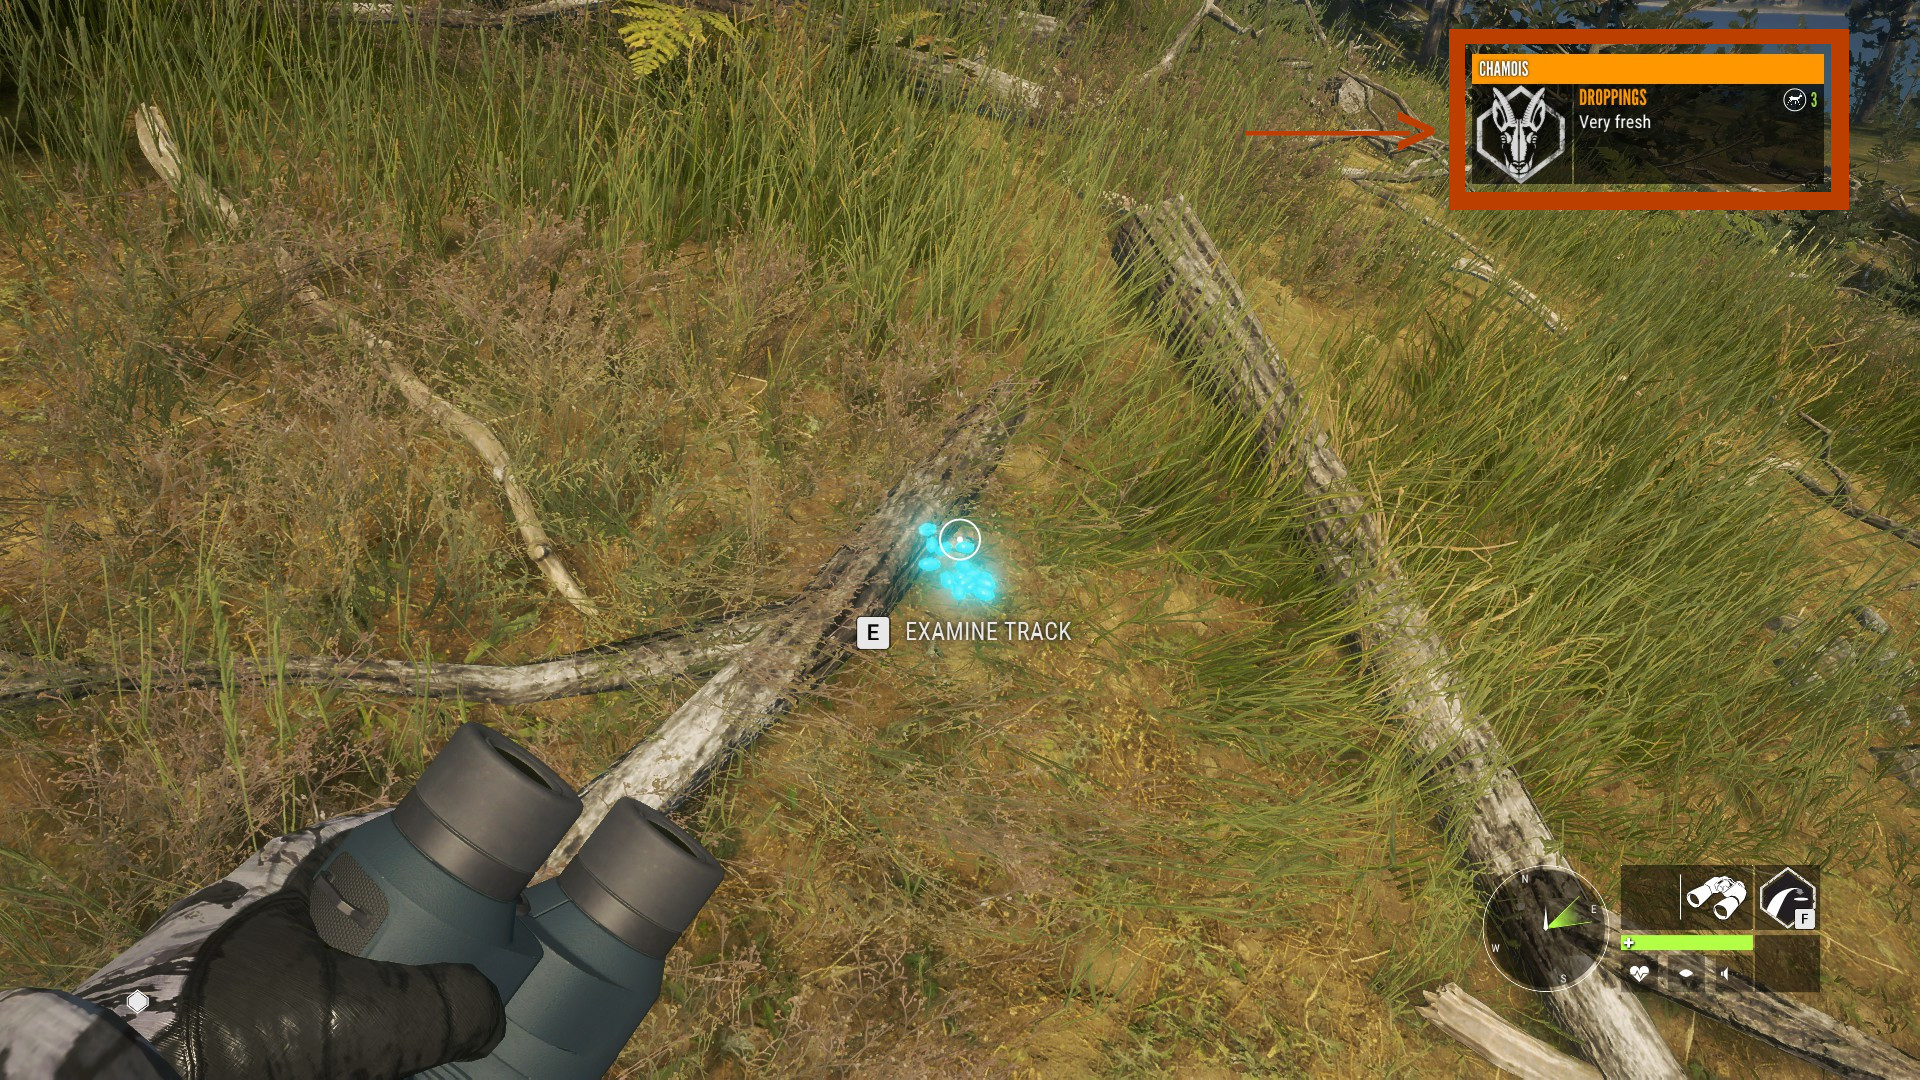
Droppings
Droppings will often be dispersed in between footprint tracks and examining them will show you how old they are. The can be either be:
- Just Now
- Very Fresh
- Fresh
- Old
- Very Old
This will give you an idea of how far away the animal is:
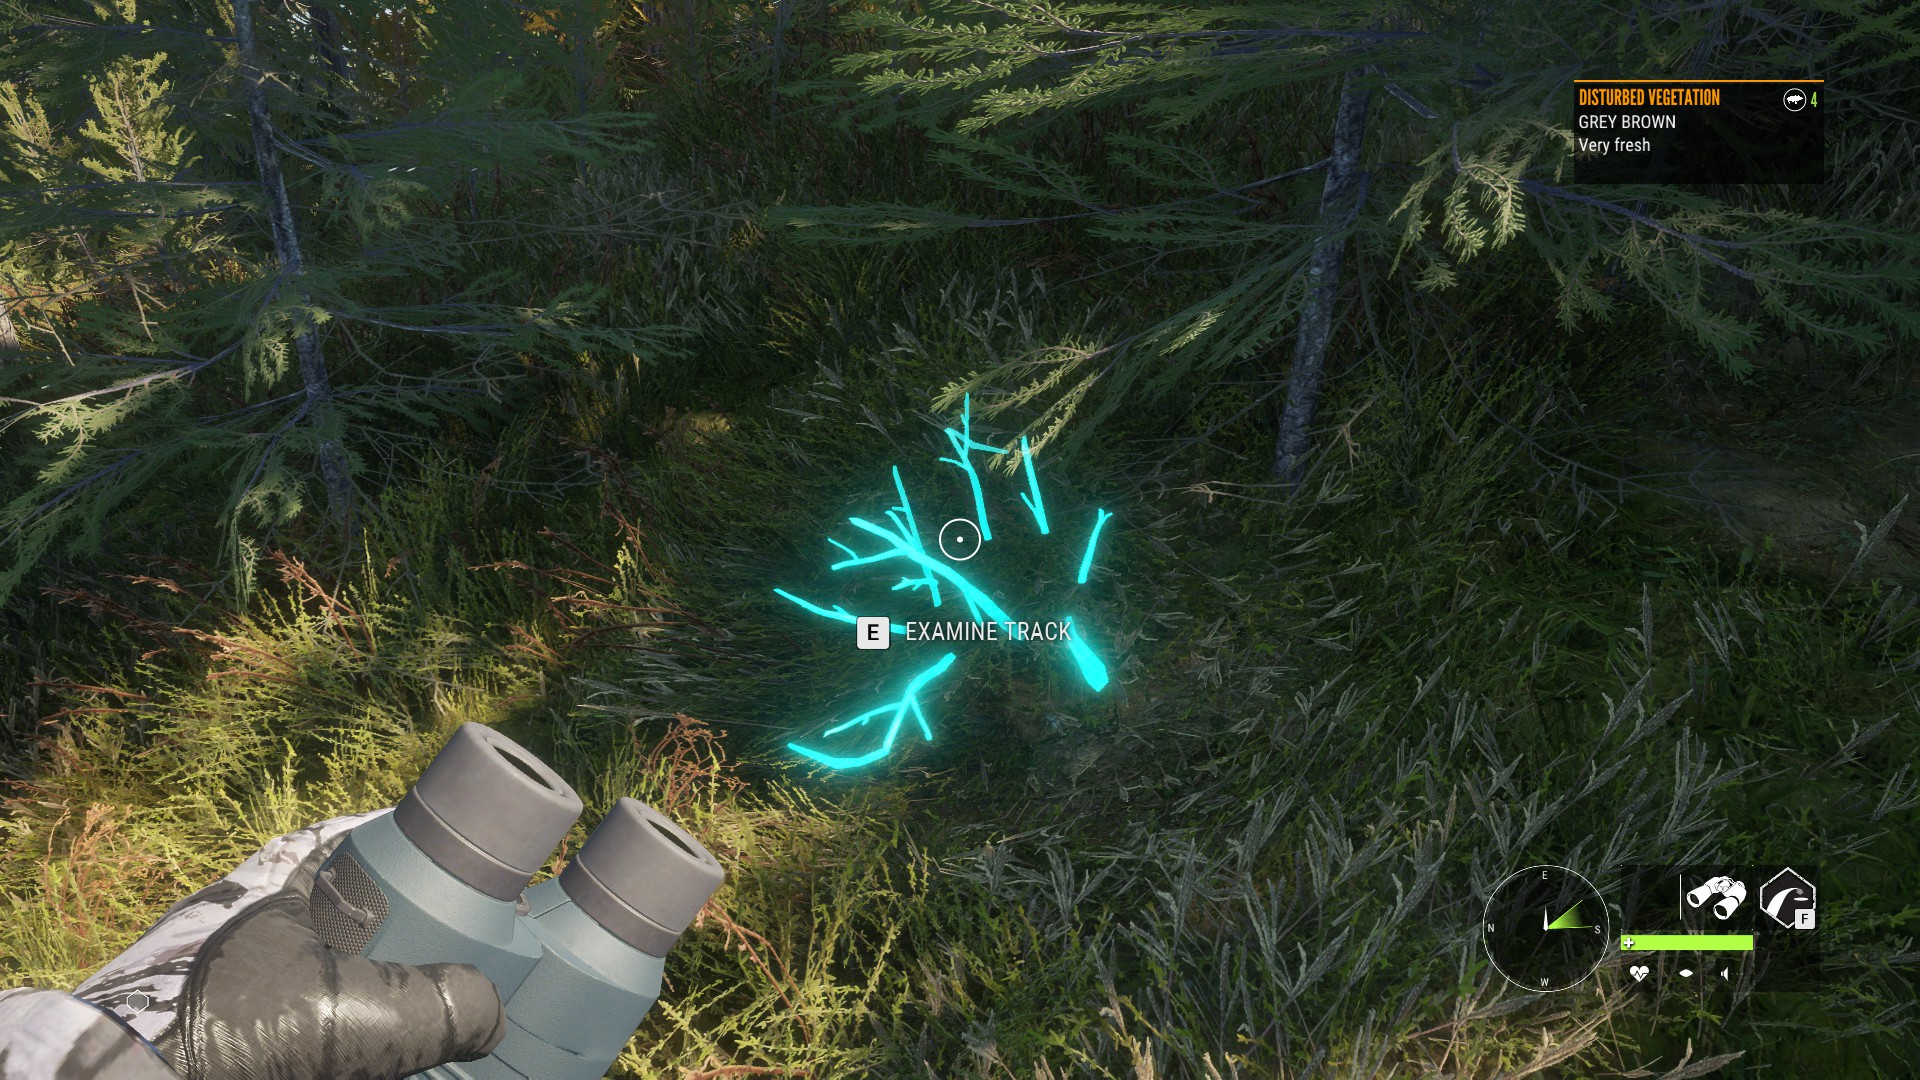
Disturbed Vegetation
If you have the disturbed vegetation skill from the stalker skill tree, you’ll also be able to see disturbed vegetation tracks. Like droppings. these will show you how old the tracks are and therefore how far away the animal probably is. However if you also have the track knowledge level 3 skill from the stalker skill tree then this track will also show you the animals fur type which is very useful if you’re looking for animals with rare furs:
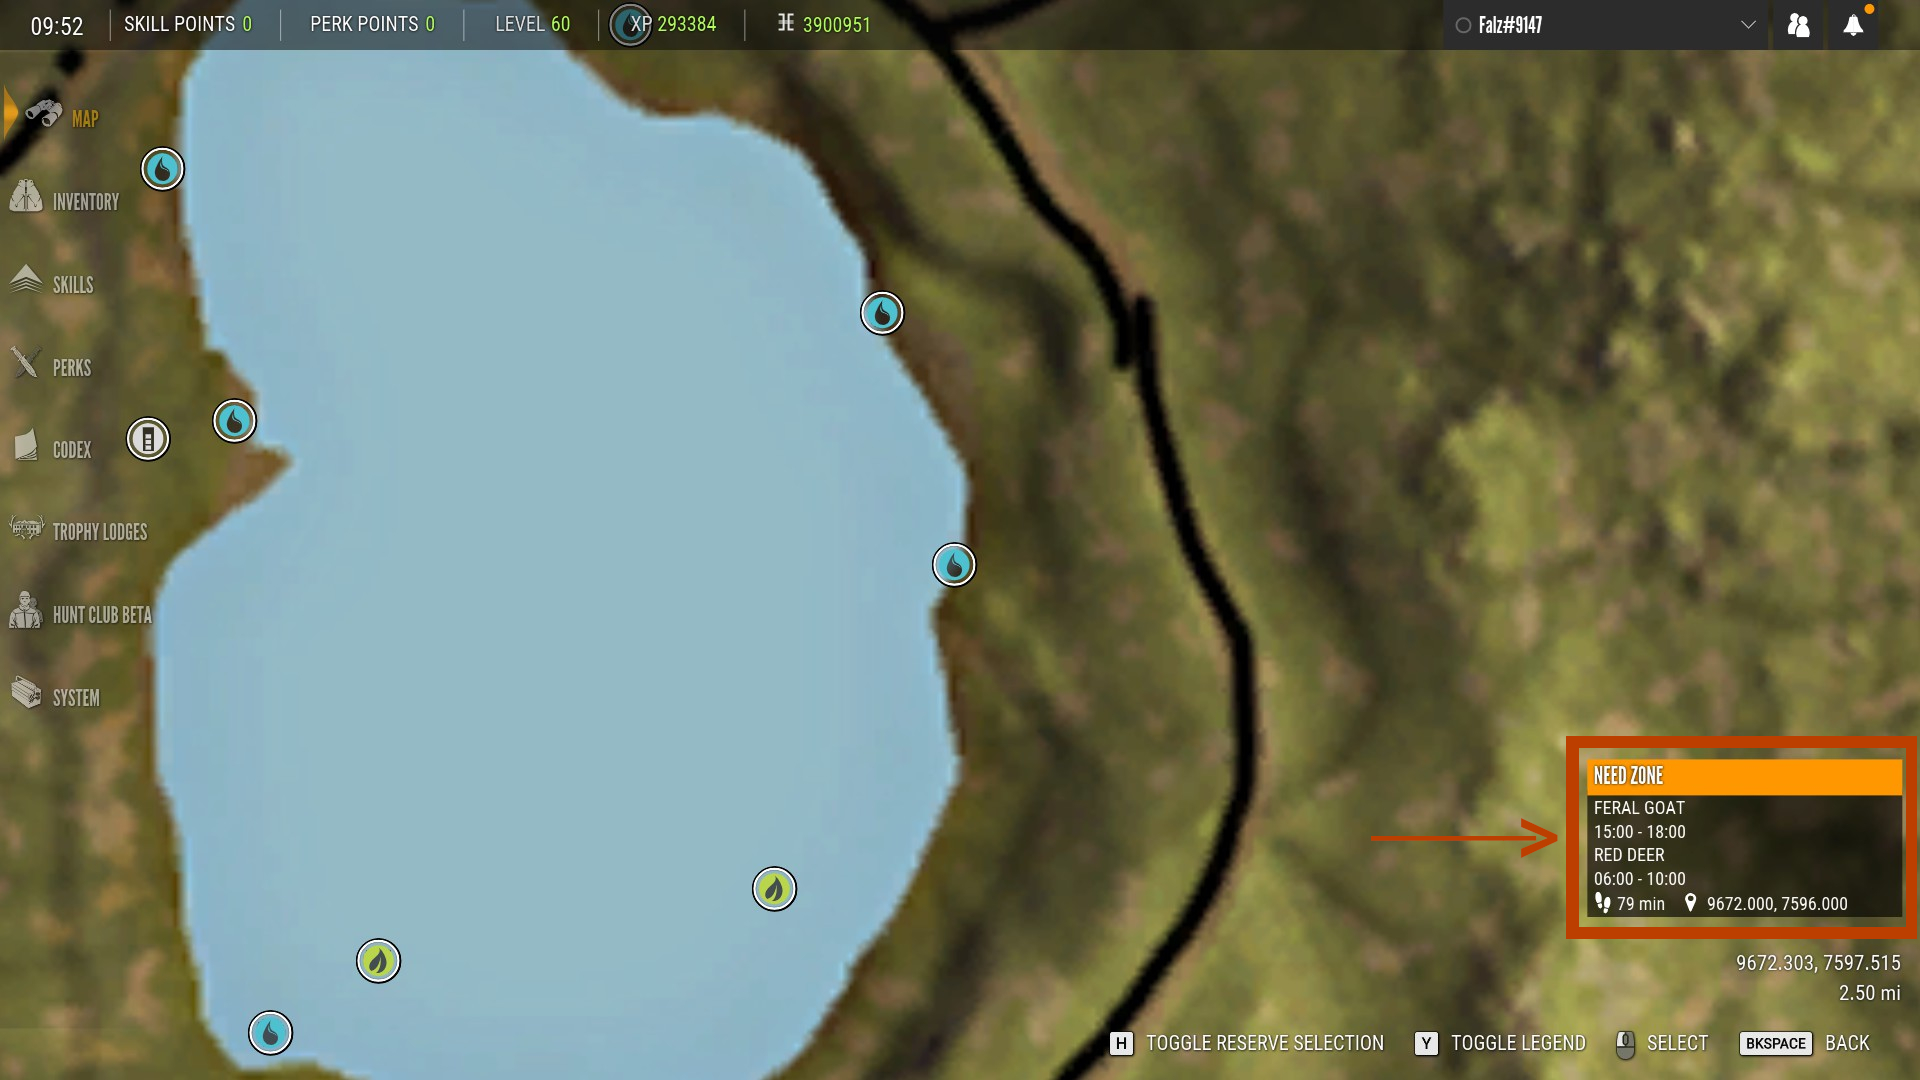
Need Zones
While you’re exploring each map, need zones are one of the most important things you should be looking for and discovering. Every animal in the game has need zones that they rotate through during the course of an ingame day. So whenever you discover need zones, you’ll know an exact location where you can find those animals at certain times of the day. There are 3 different types of need zones: feeding, drinking and resting and you can discover them either by examining the zone directly or spotting animals when they are using it. Examining the zone will open an information box in the top right of your screen that shows you which species uses the zone and and at what times. If you have the track knowledge level 2 skill from the stalker skill tree, you can also see the size of the herd that uses the zone:

Feeding Zones
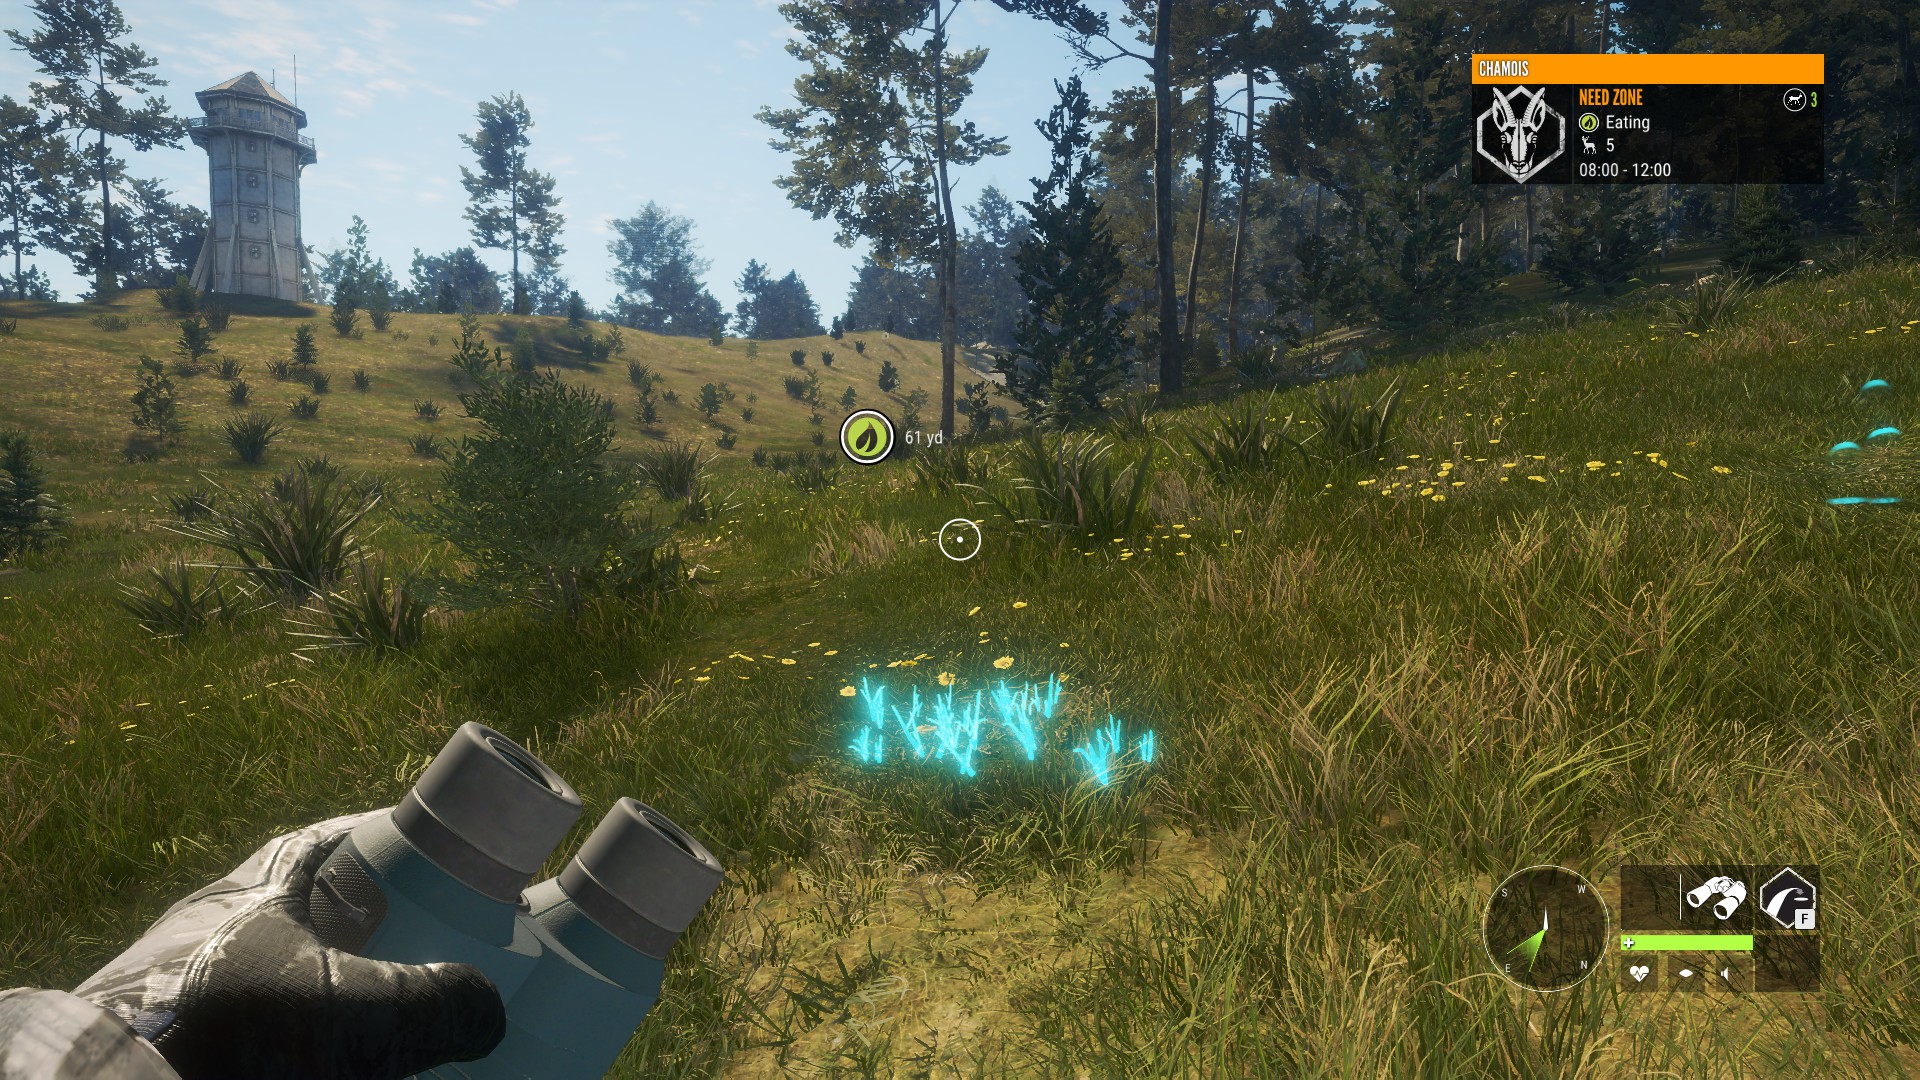

Feeding zones will be marked by either patches of grass for herbivores or partially consumed carcasses for predators. Once discovered, they will be marked on your map with a green leaf icon.
Drinking Zones
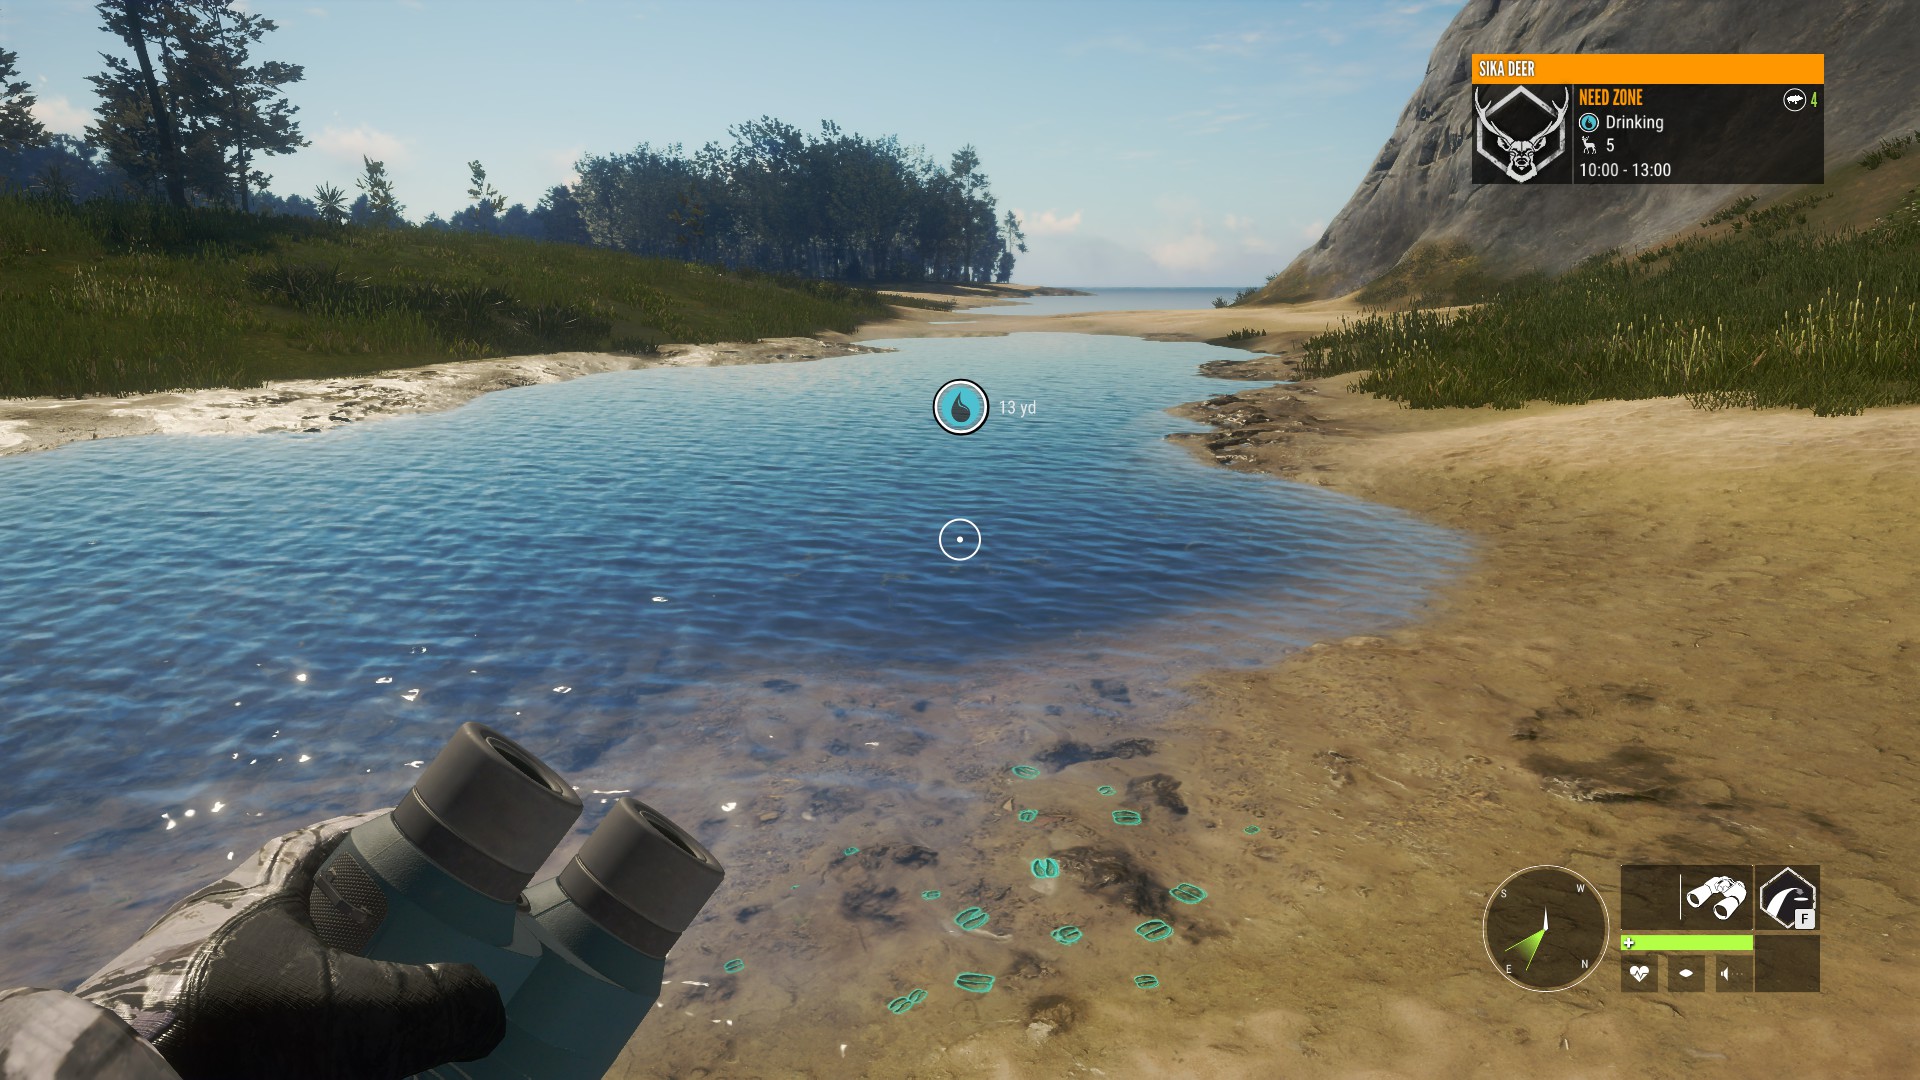
Drinking zones will be marked by a tight grouping of footprints near the edge of water. Once discovered, they will be marked on your map with a blue water drop icon.
Resting Zones

Resting Zones will be marked by flattened patches of grass. Once discovered, they will be marked on your map with a yellow Z icon.
Zones With Multiple Species
It is possible for multiple different species to use the same zone at different times. In this case, you can see a listing of all the different species that use a zone when you examine it on your map:
Animal Calls
When animals are close to you, you might hear them giving off calls. An animal call will be marked by a soundwave animation coming from the direction of the call:

If you look in the direction of the call, you can track it to see what sort of call it is, what species of animal is making the call, approximately how far away it is and if you have the track knowledge level 1 skill from the stalker skill tree, you can also see the animals gender:
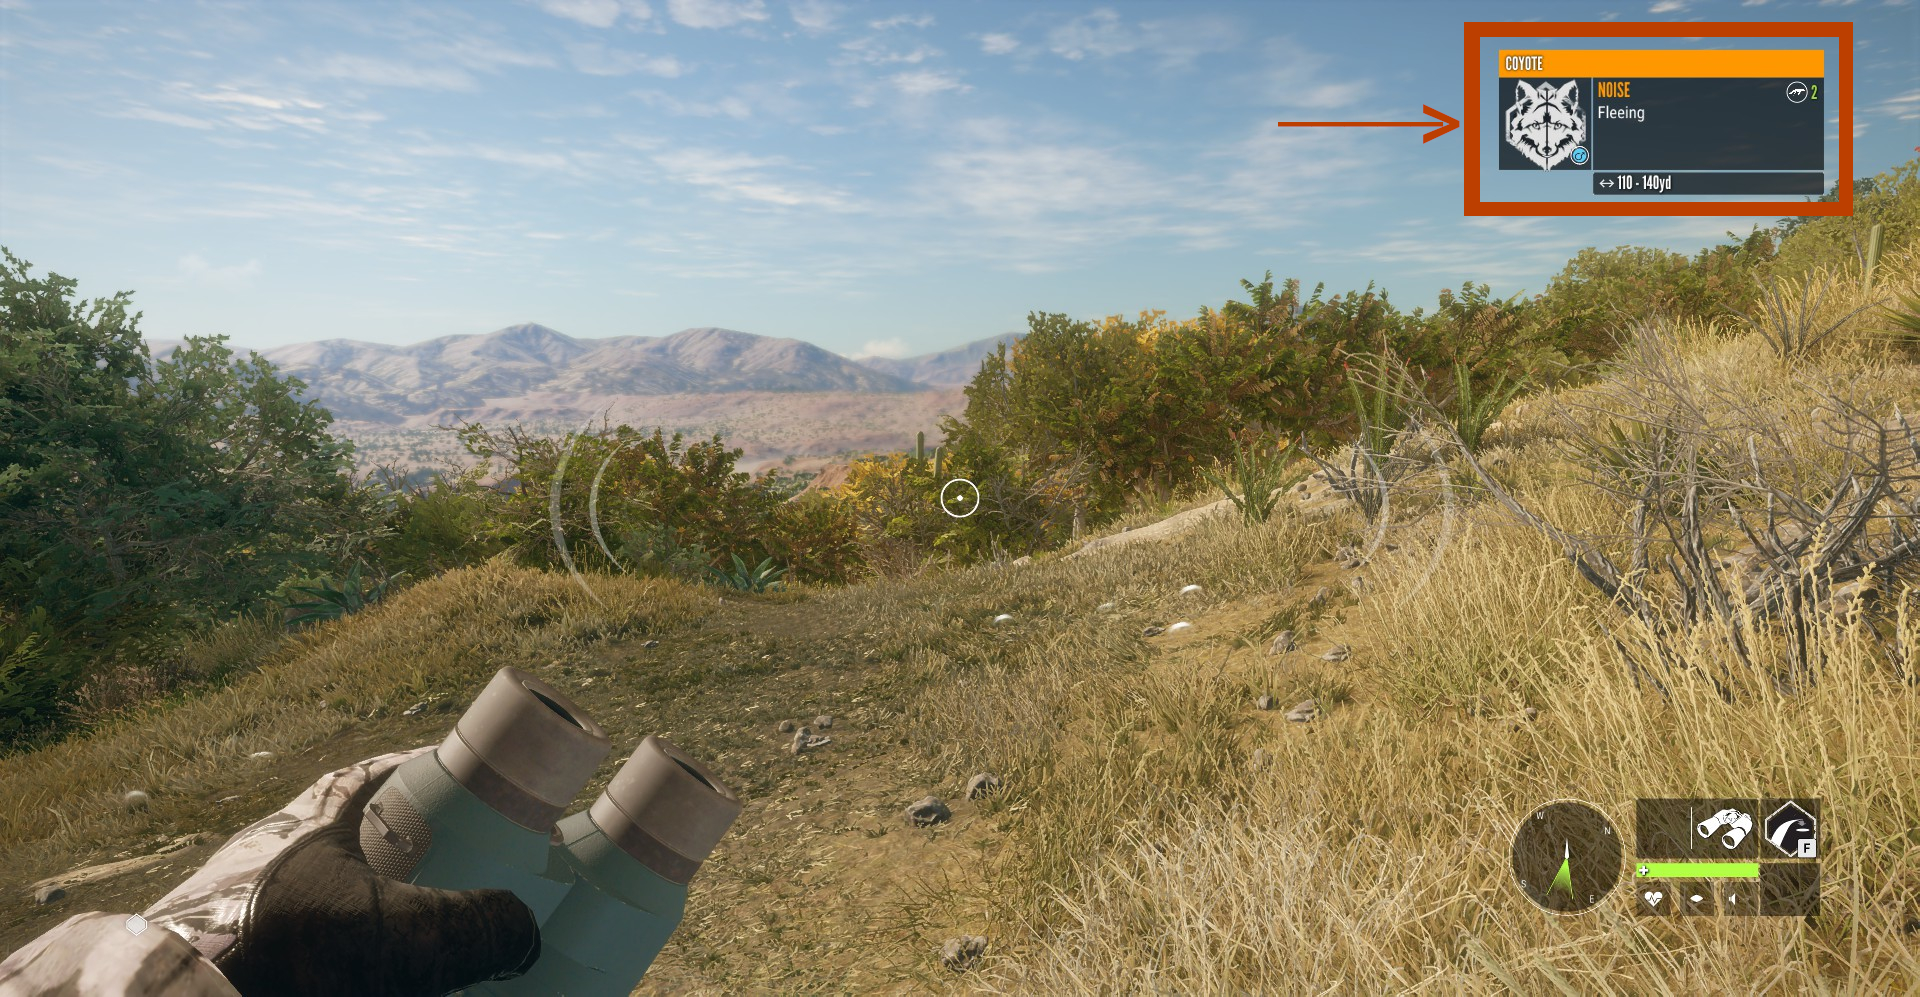
There are 4 types of calls that animals can make. Mating and chasing calls will indicate that the animal is calm and unaware of your presence. Warning calls indicate that the animal is alert and aware of you and fleeing calls indicate that the animal has spooked and is running away.
Sneaking Up On Animals – Wind Direction, Noise And Visibility
Animals have multiple ways they can detect you. The most common way is hearing noises that you’re making but if you have a bad wind (that is, a wind that is blowing away from you and towards the animals) they can also pick up on your scent or if you’re running out the open, then they could also just see you. If you want to avoid spooking off the animals you want to hunt, you’ll need to pay attention to those 3 indicators in your HUD that I pointed out earlier. Let’s go over them in more detail and look at the information that they give you.
Scent
The wind direction indicator in you HUD will show you which way the wind is blowing, If it’s blowing towards the animals you’re trying to get close to, there’s a good chance that they will pick up your scent if you get too close. If possible, try to reposition yourself so that the wind is blowing towards you and away from the animals.
Scent Eliminator
You might also be wondering about the scent eliminator spray that you can purchase from the store:

It can definitely help you if you can’t reposition to get the wind blowing away from the animals but you need to remember that it does not completely get rid of your scent. It just reduces the range at which animals can detect your scent. When you put on your scent spray, a small timer will appear in your HUD to show you how long you have until it wears off:
Noise
The speaker icon in your HUD will show you how much noise you’re making:
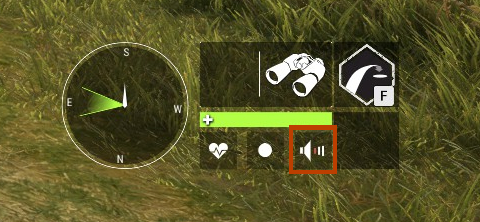
As you make more noise, you’ll see more bars coming from the speaker and if they start to turn red, you’re making a lot of noise and animals will be able to hear from a long distance. You make the most noise if you’re running and especially if your running through any bushes or trees. You can reduce the amount of noise you make by slowing down to a walk and reduce it even more if you crouch down by pressing CTRL. If you want to make the least amount of noise, then you need to go prone by pressing Z. While crouching or going prone, you can also slightly speed up your movement by holding the sprint key (shift). This will cause you to make a little more noise though so be careful with it if you know animals are very close to you.
Visibility
The visibility indicator in your HUD will show you how easily animals will be able to see you. As the circle in the indicator gets larger, animals will be able to see you from further away. You are most visible when you are running out in the open:

As the circle gets smaller and becomes more of a line, you become less visible and animals will have to be closer to see you. You can become less visible by slowing to a walk, crouching and going prone:


Hiding in vegetation or in ground blinds is the most effective way for you to reduce your visibility and is the only way you can become fully hidden which is represented by your visibility indicator showing absolutely nothing:
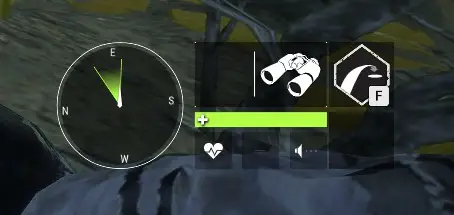
When fully hidden, animals won’t be able to see you no matter how close they get. And before you ask, the clothing your character is wearing has no impact on your visibility. Even if you put on one of the ghillie suits, you won’t be any less or more visible.
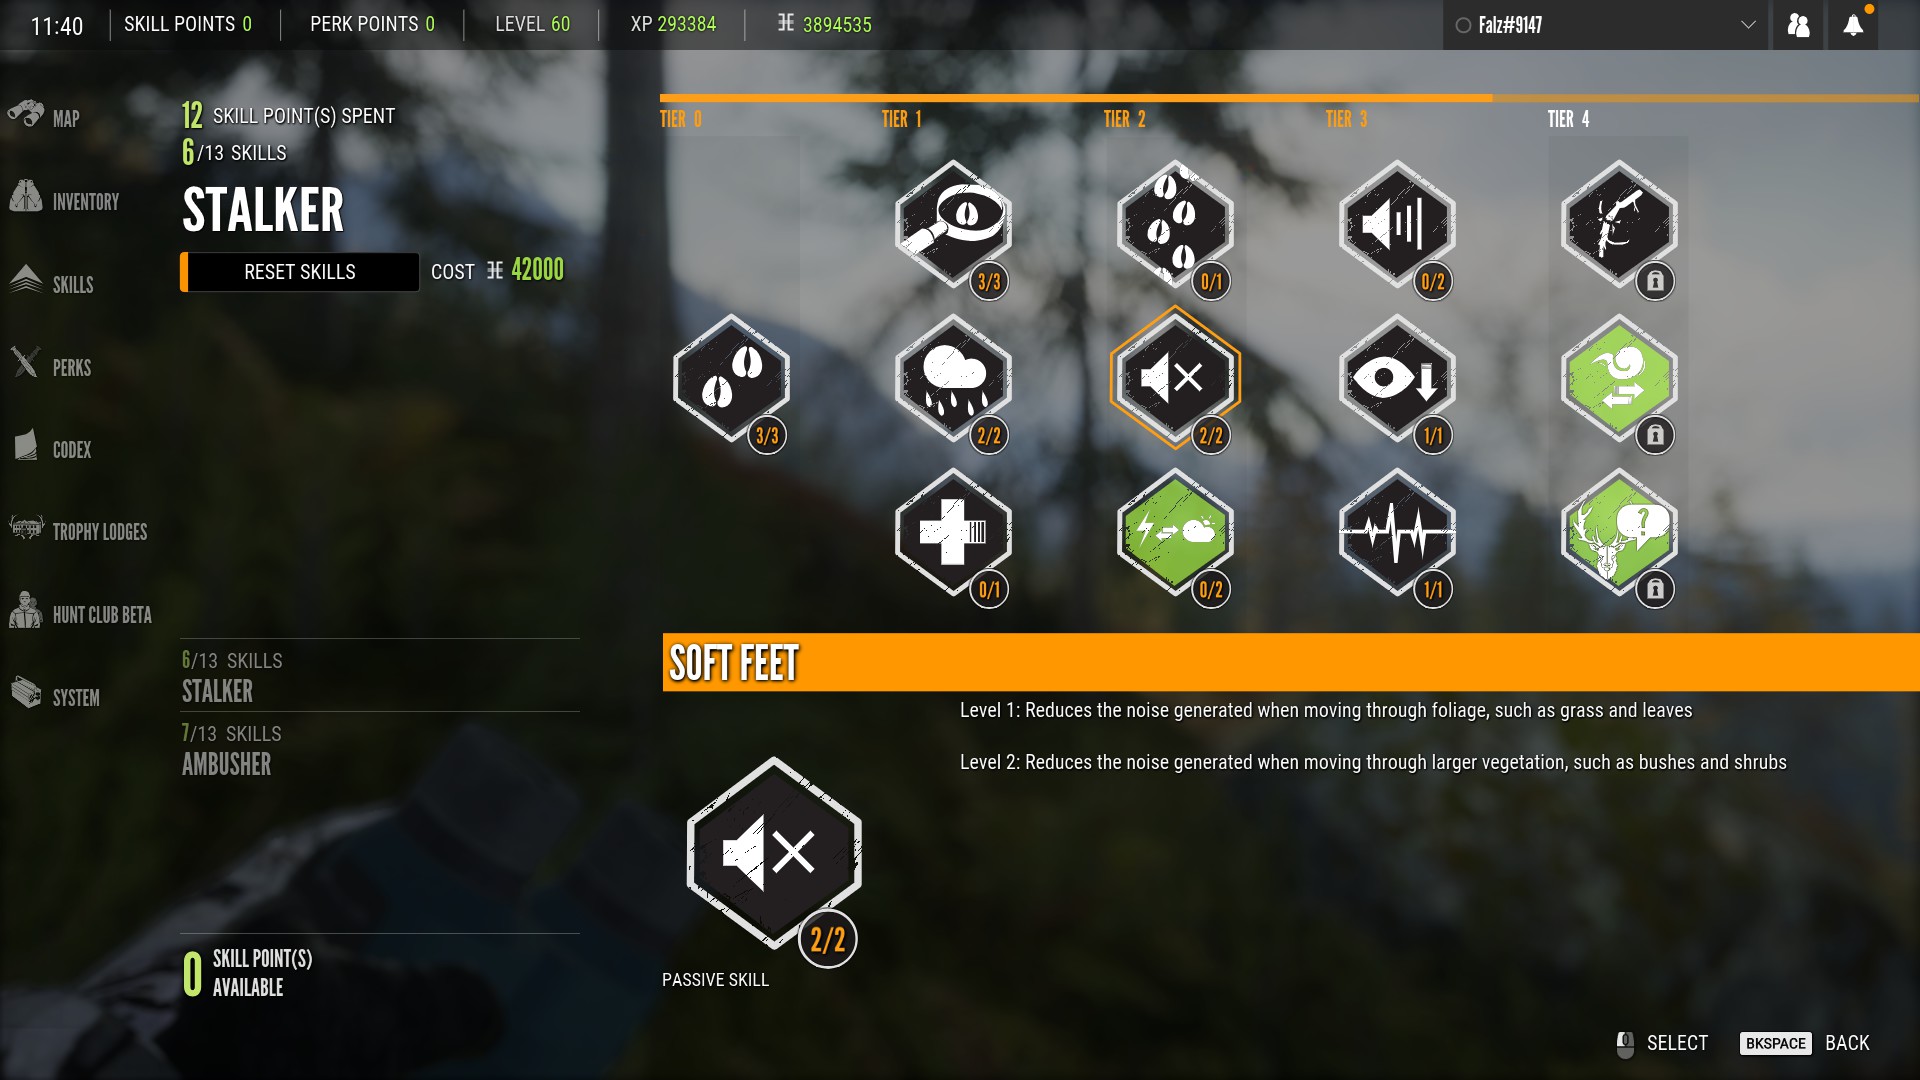
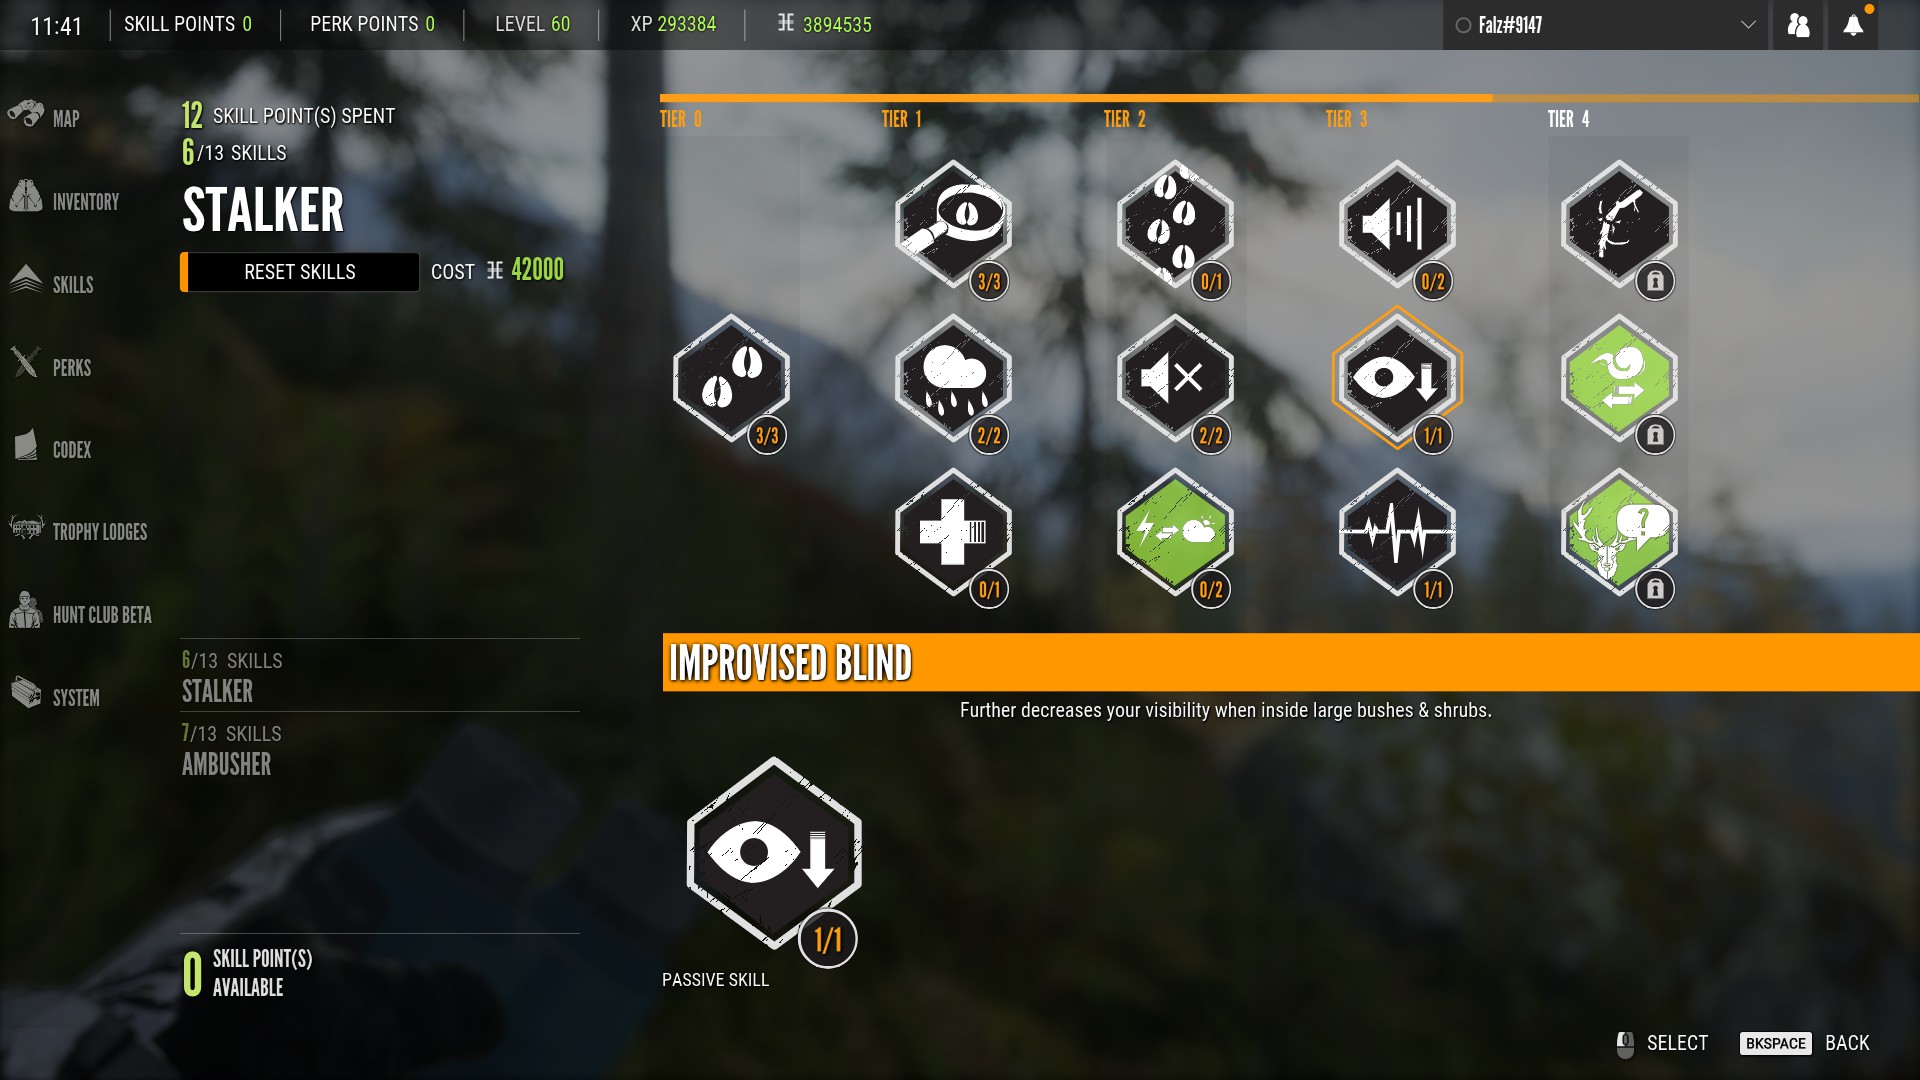
Perks To Help You Stay Hidden
The two most important perks you can get to help with staying hidden are Soft Feet which reduces the amount of noise you make when moving through bushes and trees and Improvised Blind which makes you less visible when hiding in vegetation:
Bringing Animals To You
There will be times where animals just won’t present a good shot opportunity for you or will be in a spot where you can’t get to them without potentially spooking them. In this case, it can be a lot better to get them to come to you by using a caller to bring them in or using scent lures. This is especially useful if you are hunting with bows or handguns.
Callers
Every single caller has different species that they affect and a different range in which they are effective. You can see this information by examining the caller either in the store or in your inventory:
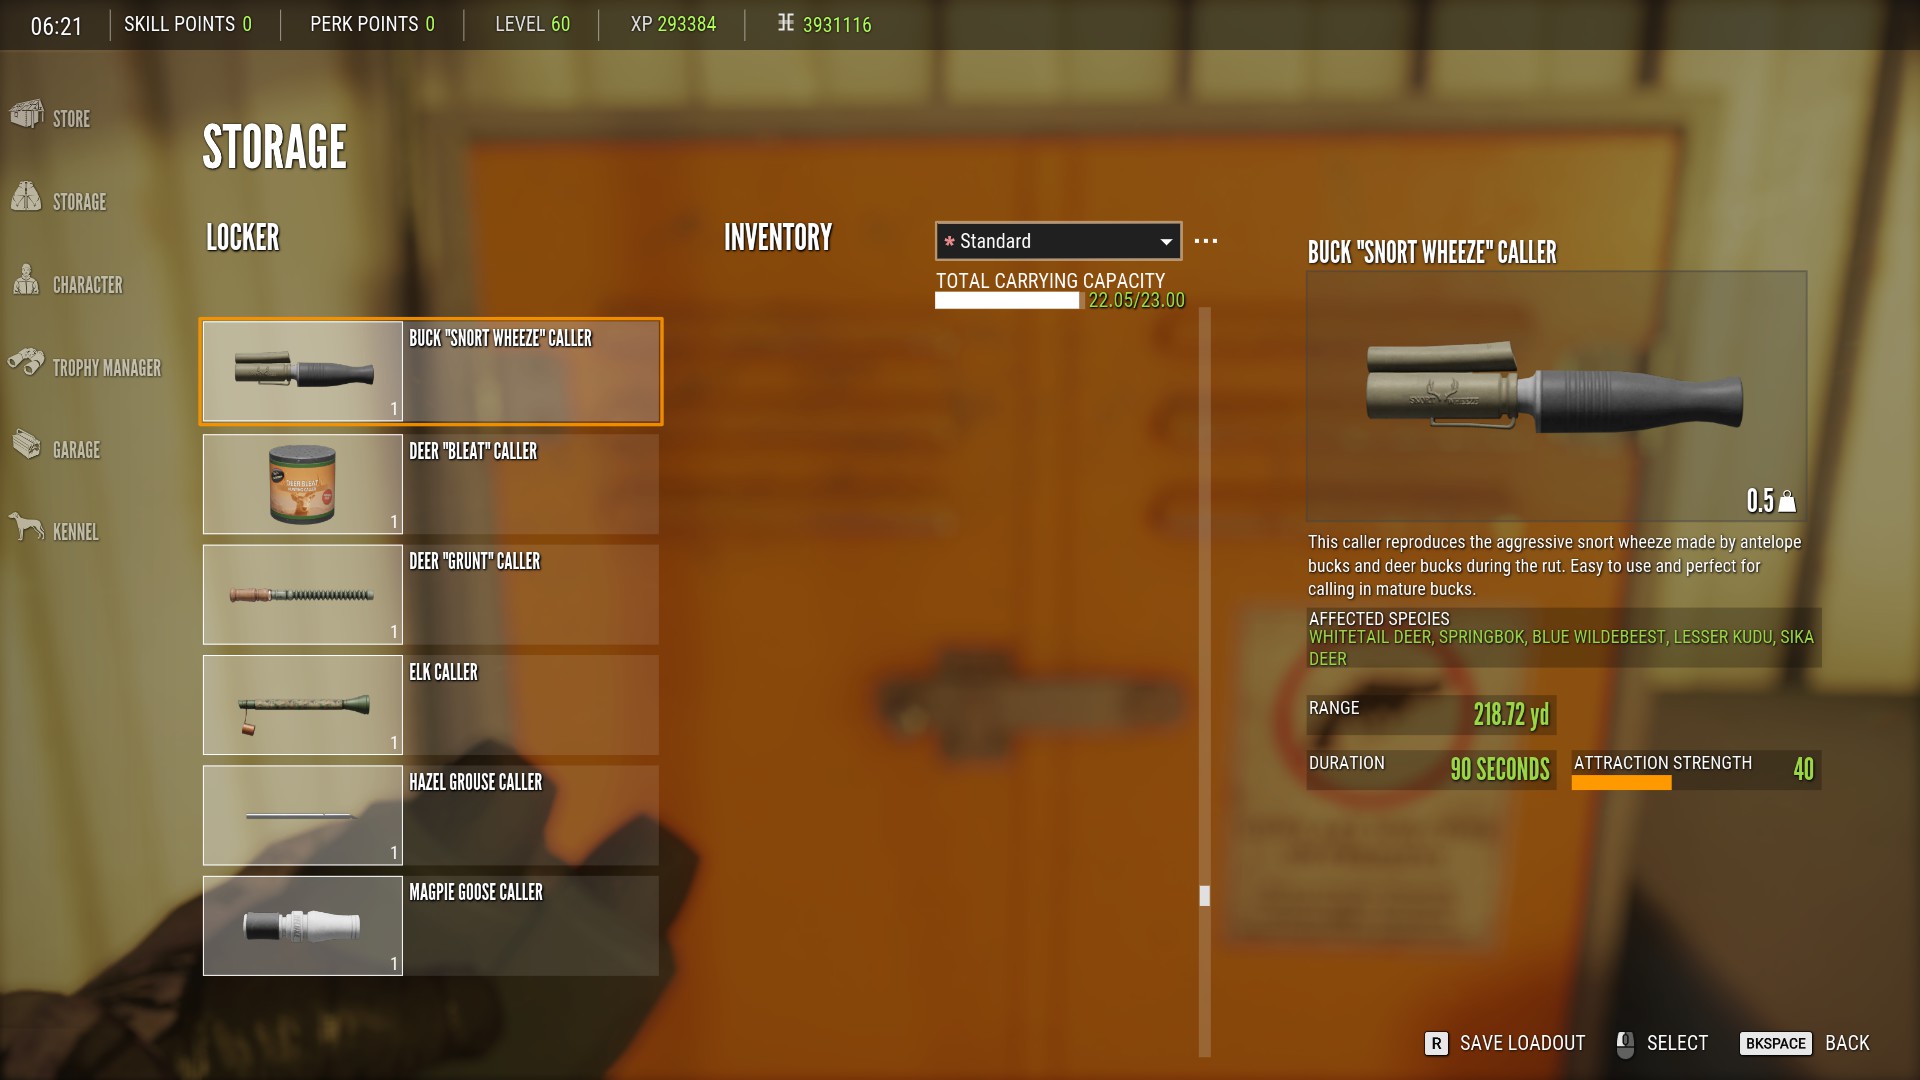
Remember however that callers will only work on animals that are in a calm state. If the animal is alert or if it is nervous from being spooked recently, then it will not respond to calls.
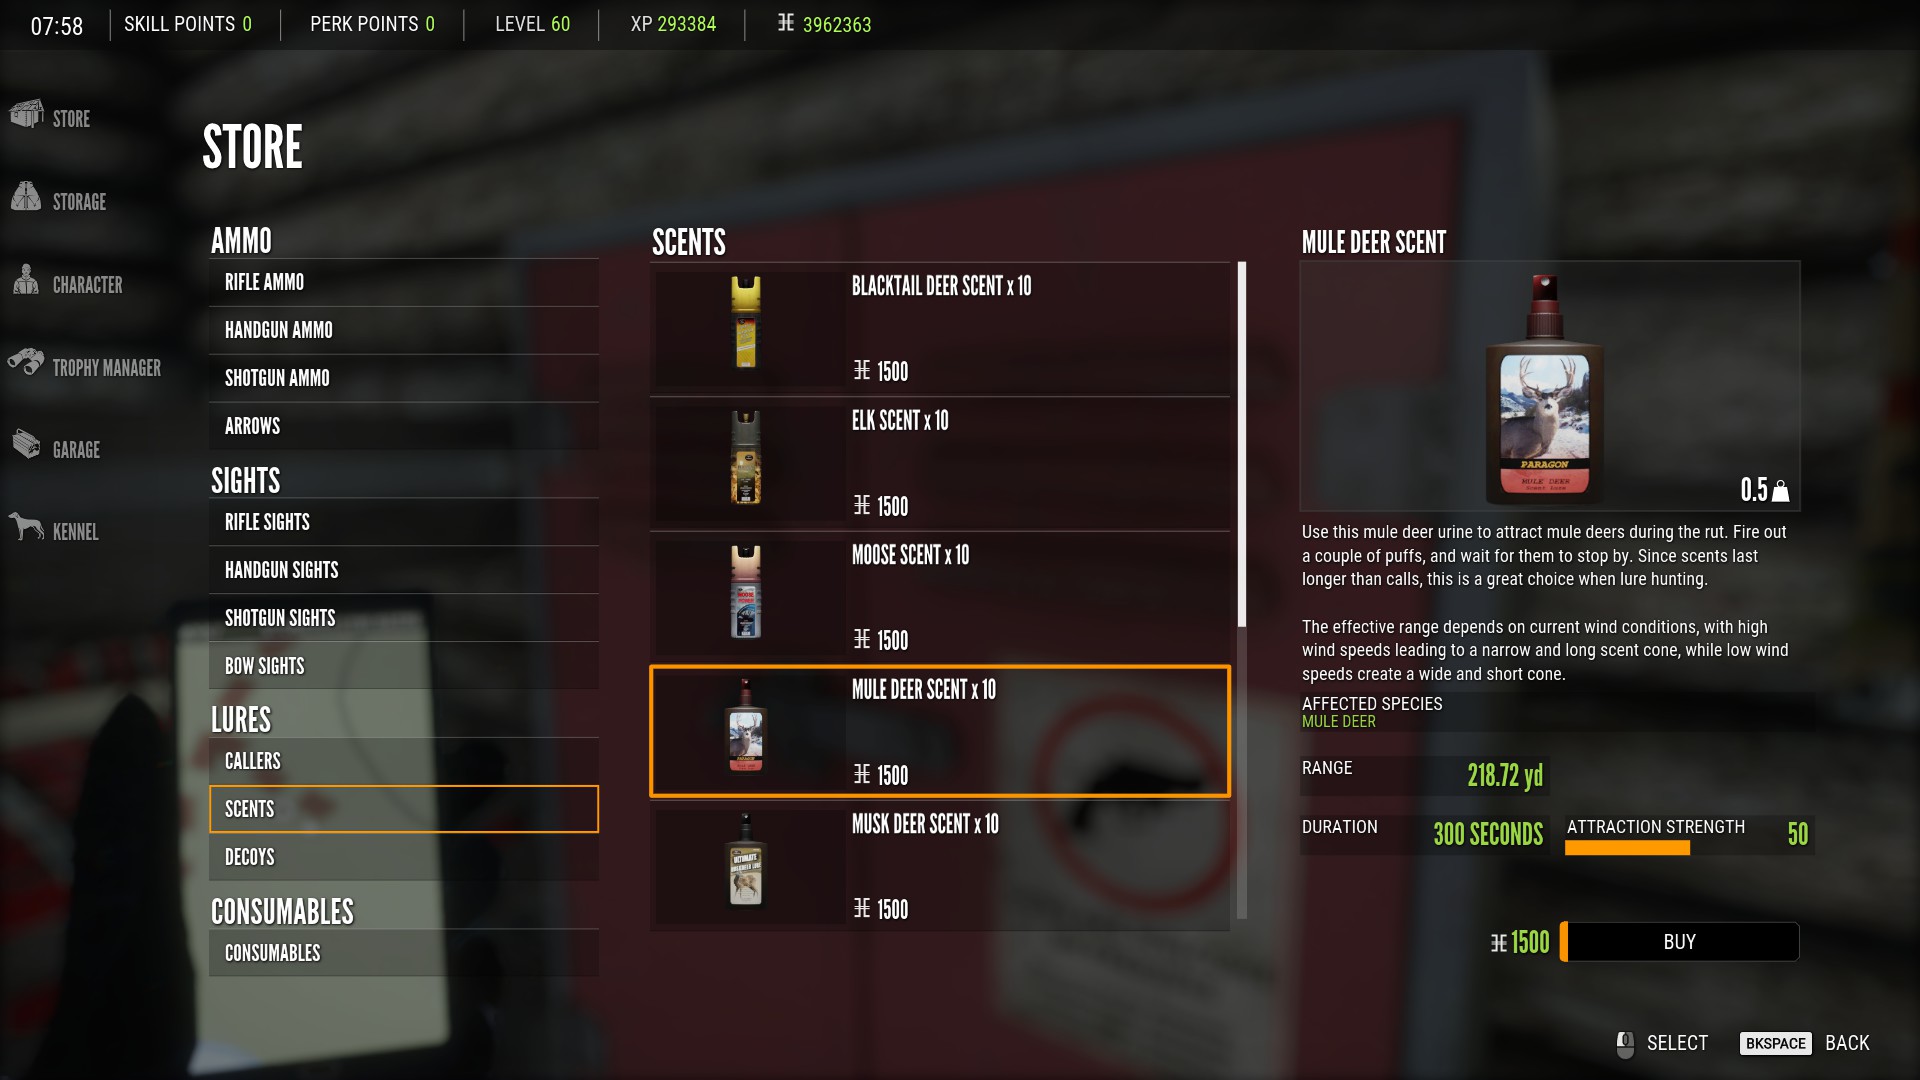
Scent Lures
Scent lures are another option you have for attracting animals and how effective they are is dependent on wind conditions. In higher winds, the scent will have more range but will affect a smaller area and in lower winds, they will have less range but will affect a wider area. Once again, you can see which animals are affected by scent lures by examining them in the store or in your inventory:
Decoys For Waterfowl
When it come to hunting waterfowl (ducks and geese), the most effective option you have is to set up decoys and then wait in either a ground blind or tripod until a flock of the birds you’re hunting is attracted to your setup. You’ll also want to have an appropriate caller on you in order to help bring the flock in. A shotgun loaded with birdshot is the most effective choice of weapon for waterfowl but you can also use any .22 caliber rifle or handgun:

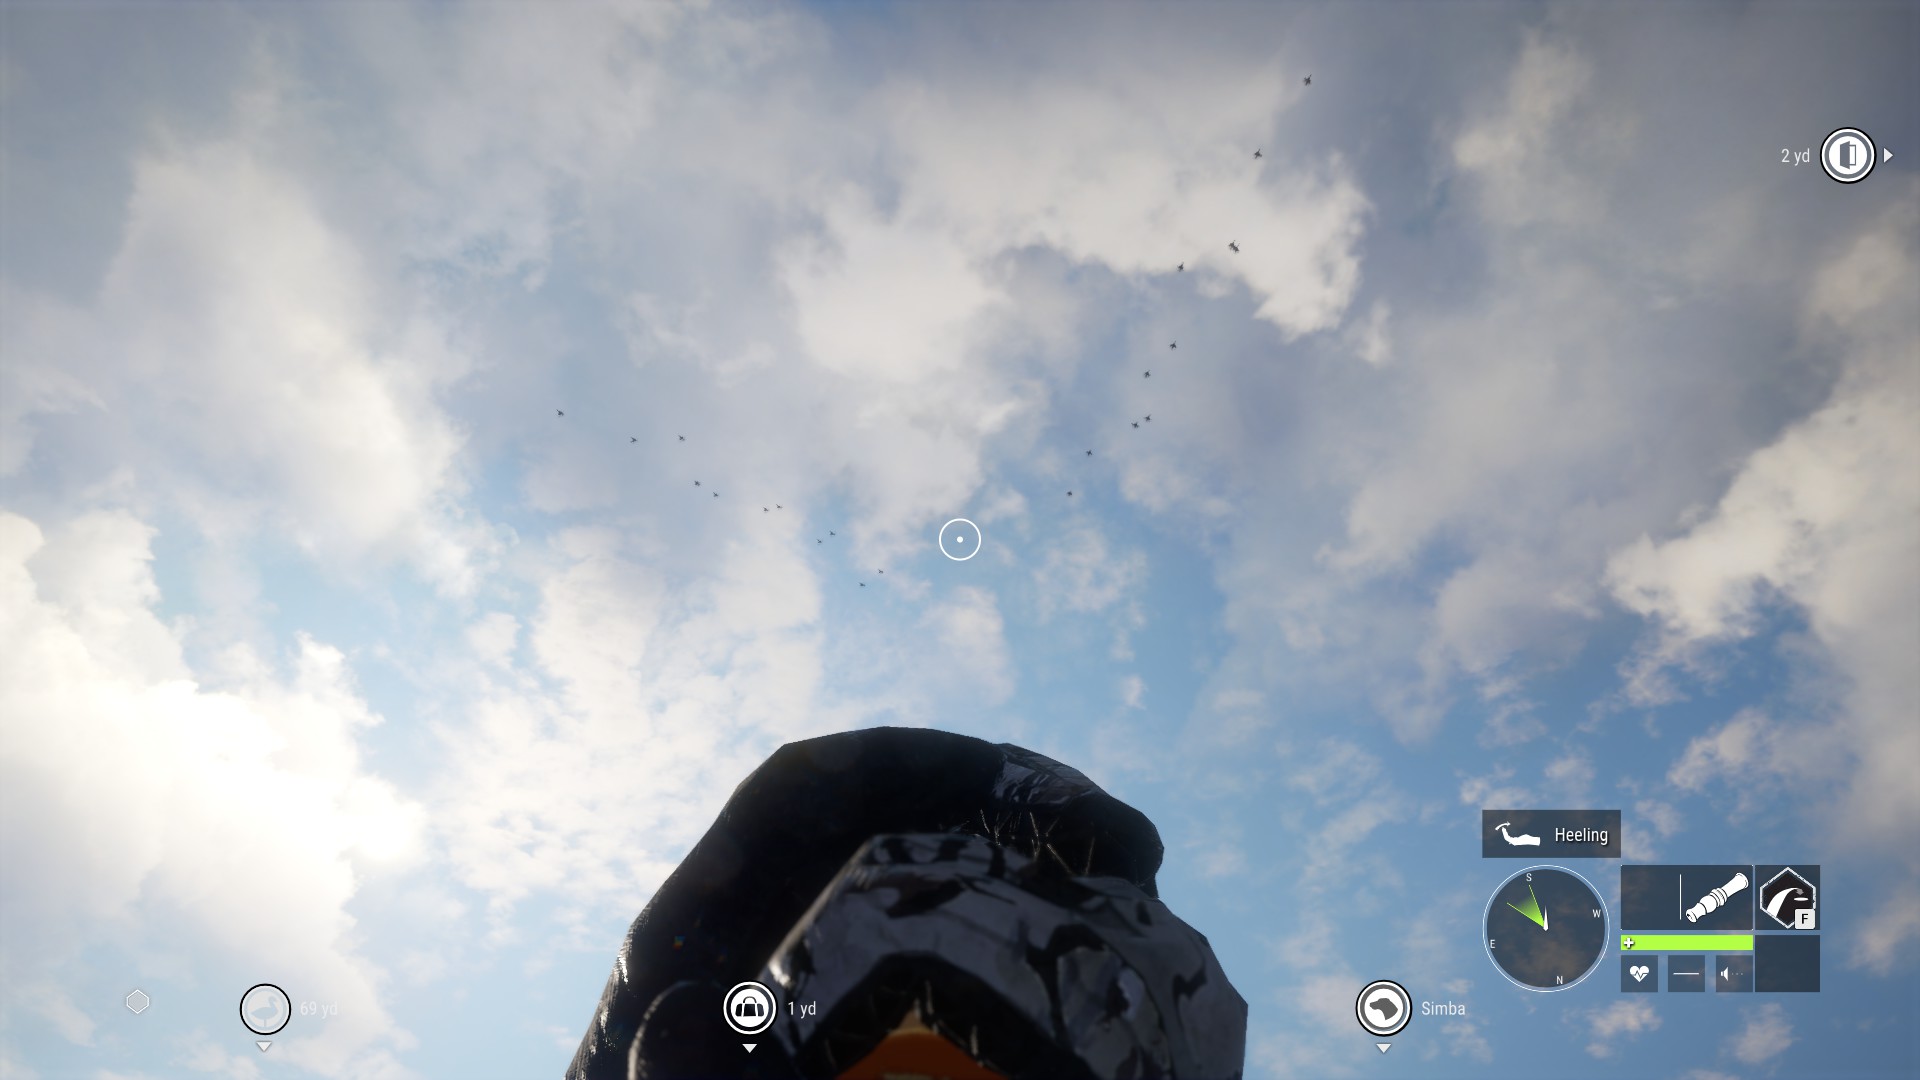
Make sure that you set up your tripod or blind around 50 to 70 yards away from your decoys so that no ducks or geese land too close to you and get spooked off.
The base game has decoys for mallards and turkeys which you can purchase at the cache. Furthermore, any DLC reserve you purchase that has a new species of waterfowl will also include new decoys for that species. You can also purchase the Duck And Cover DLC which includes a ground blind specifically for waterfowl hunting: Duck and Cover Pack DLC
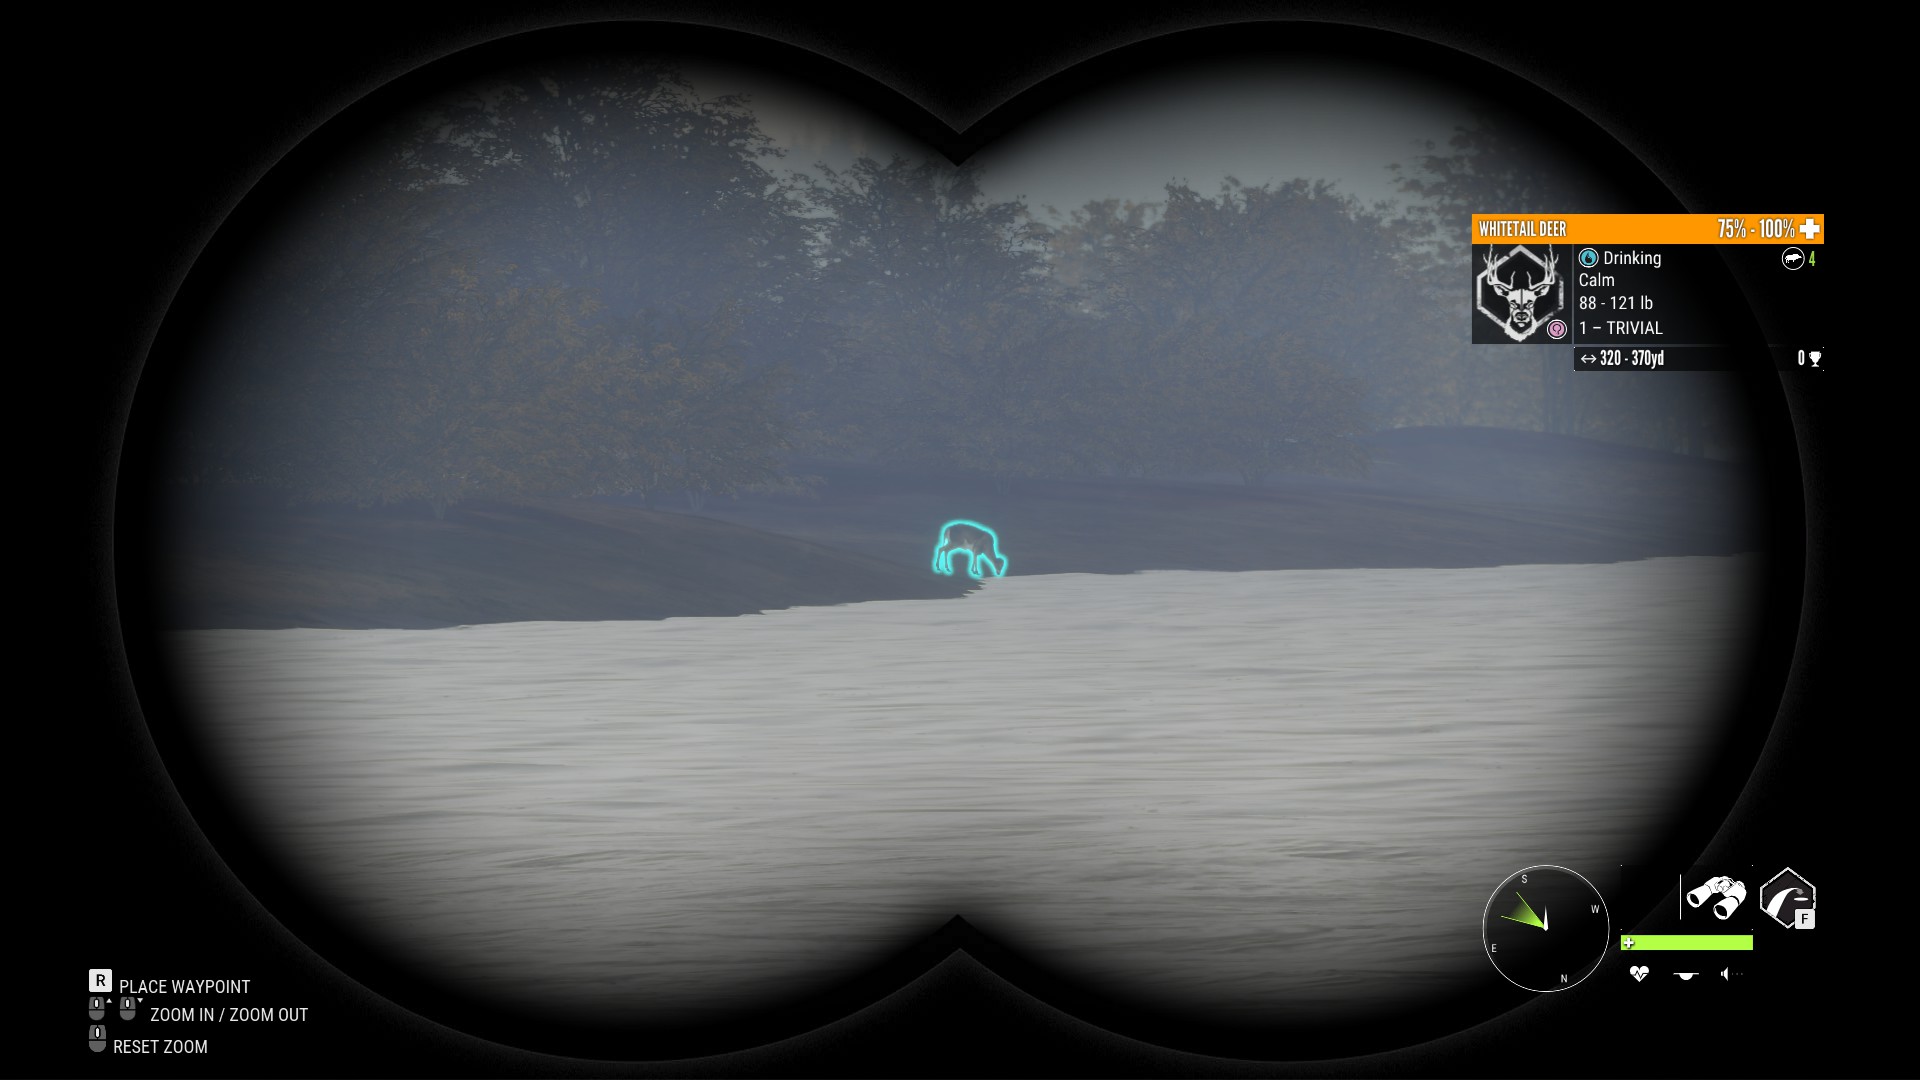
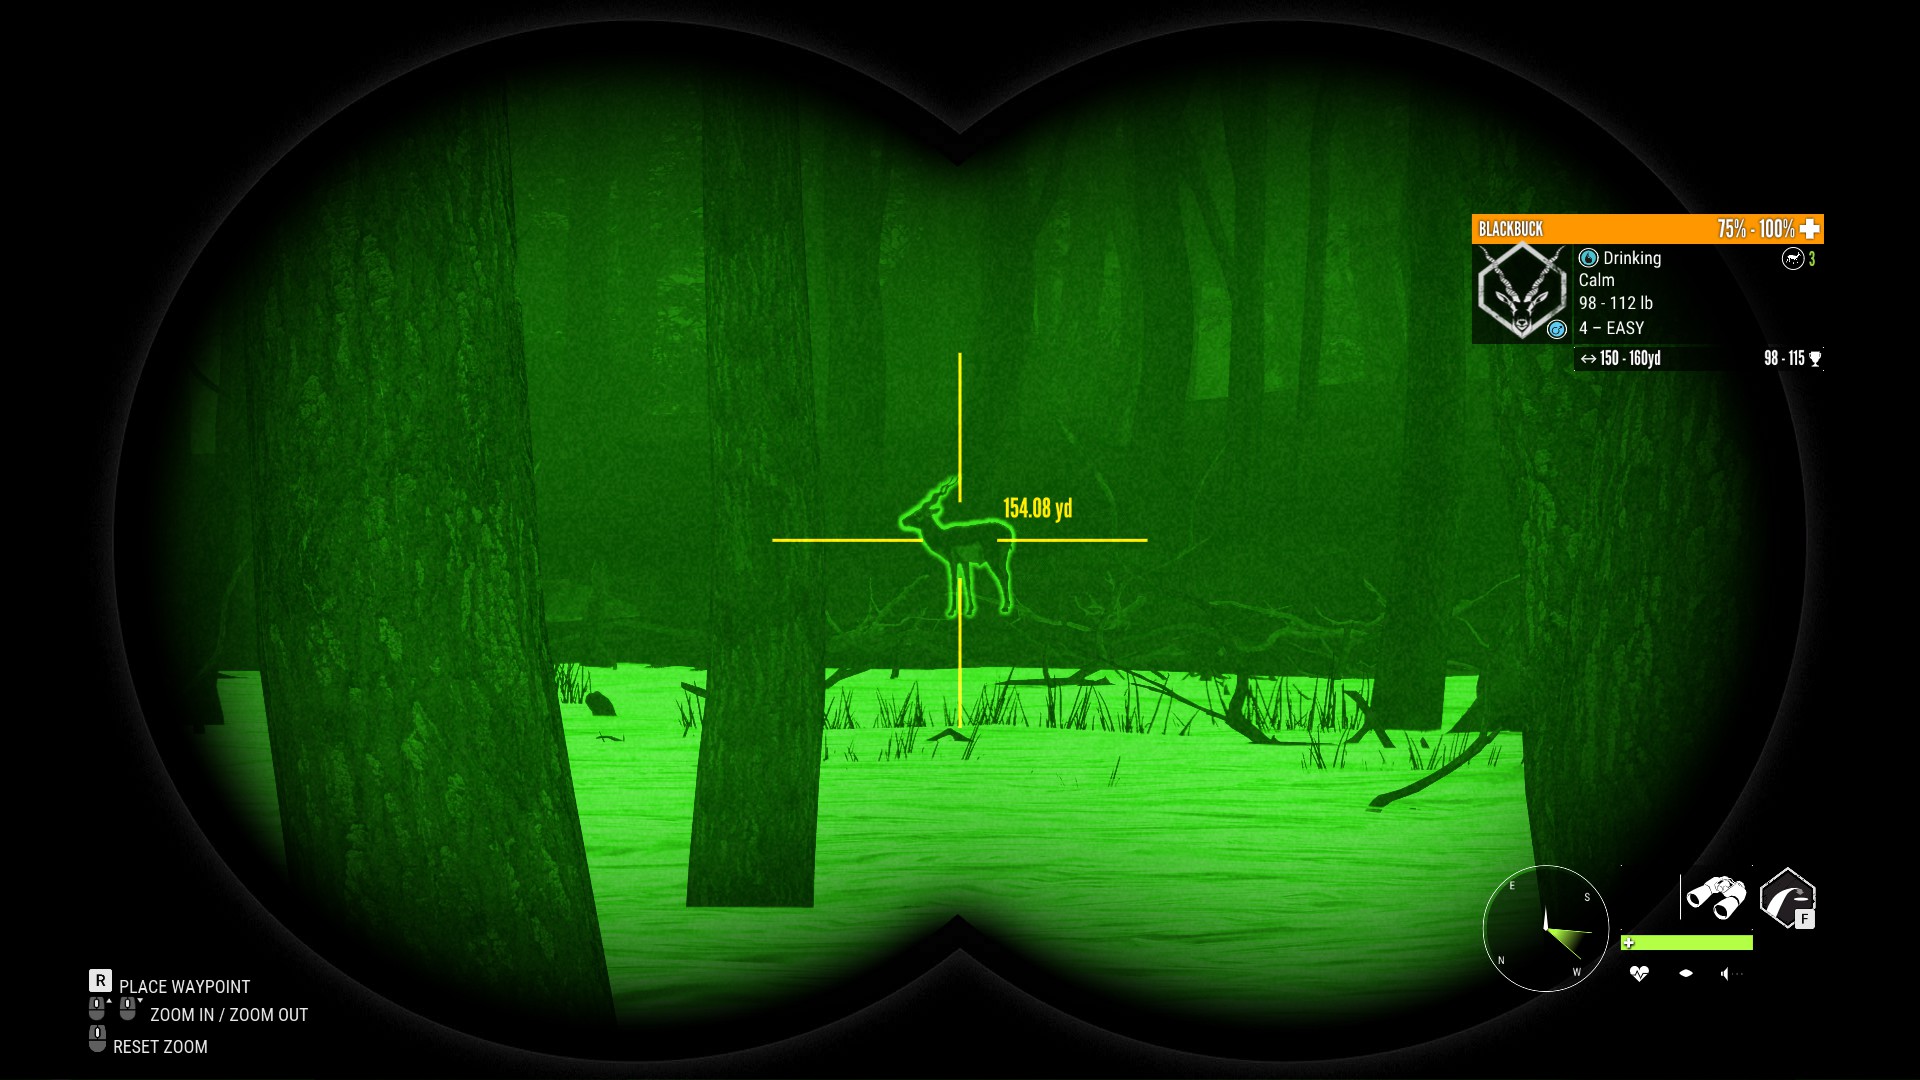
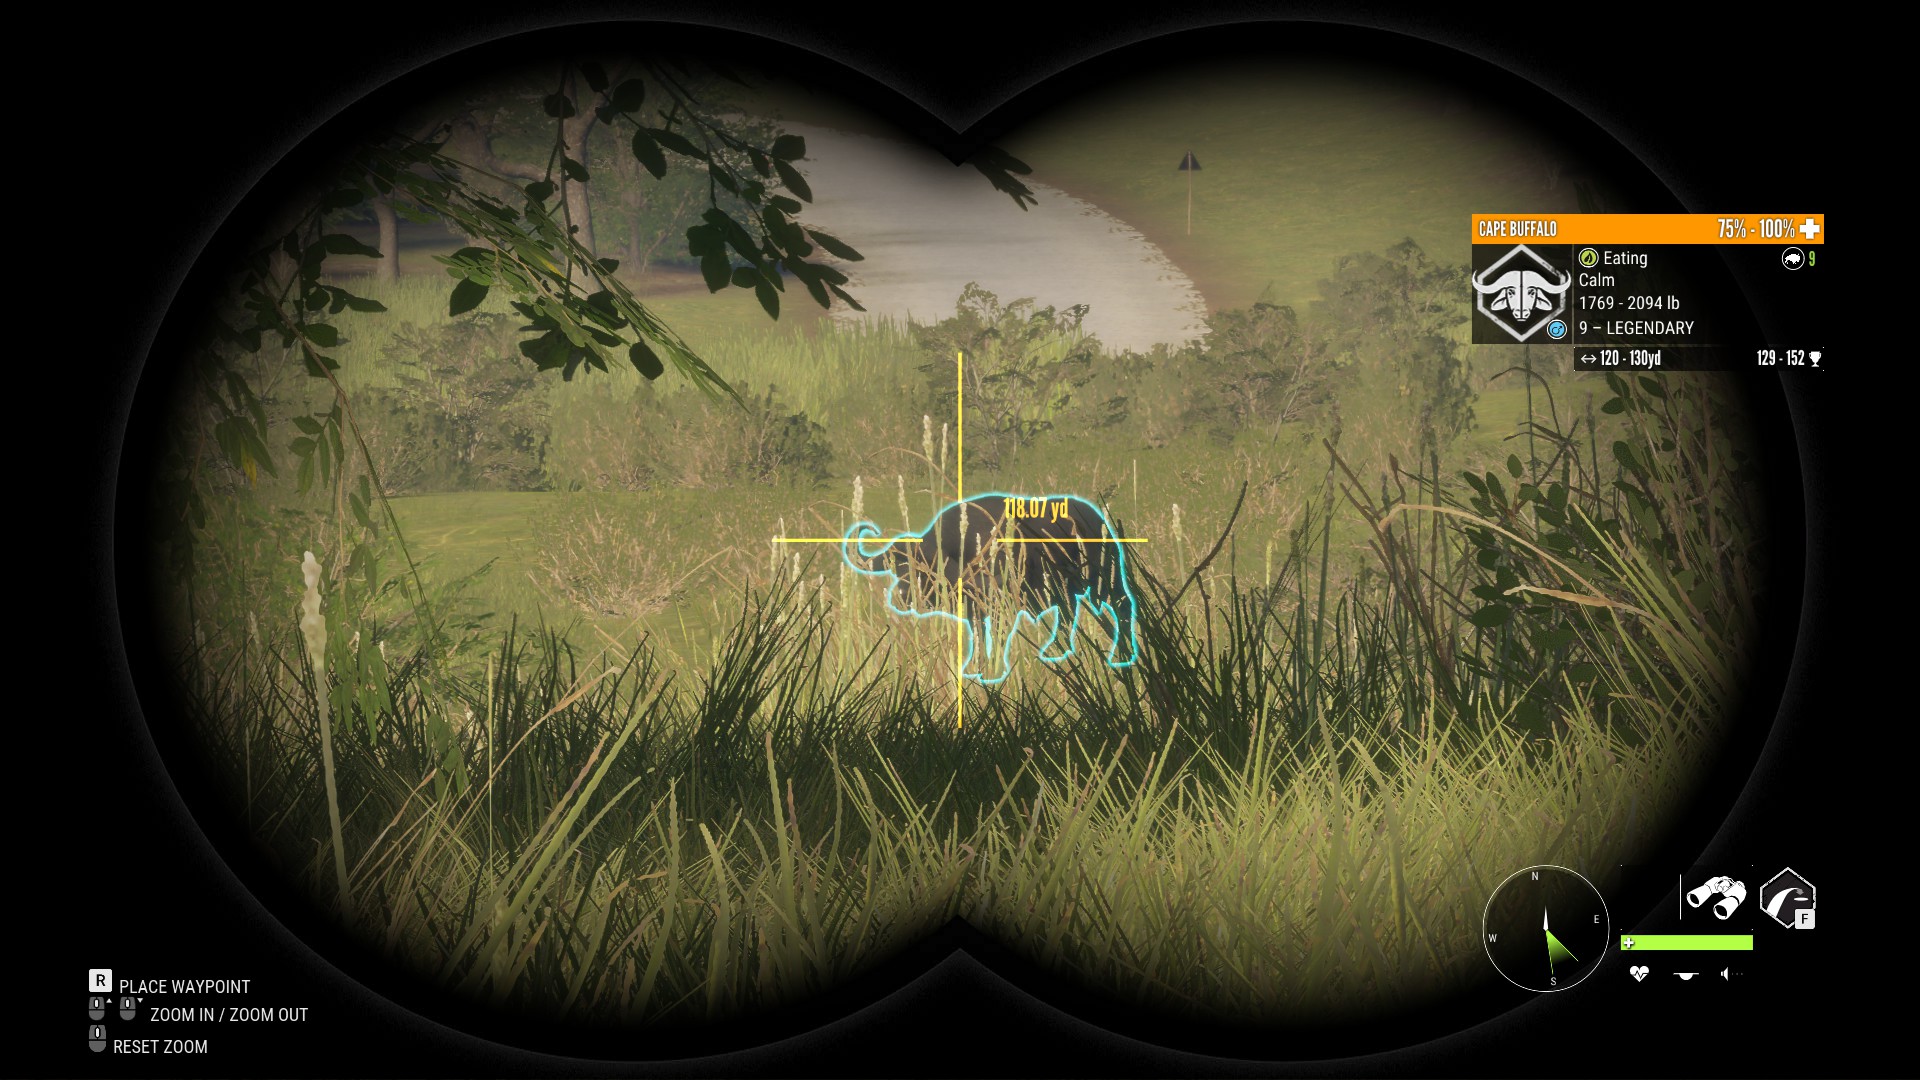
Spotting Animals
When you point your binoculars at an animal, it will be briefly highlighted and you will see a prompt to spot it by pressing E. You can also spot animals while looking down the sight of your weapon if you have the sight spotting skill from the ambusher skill tree:
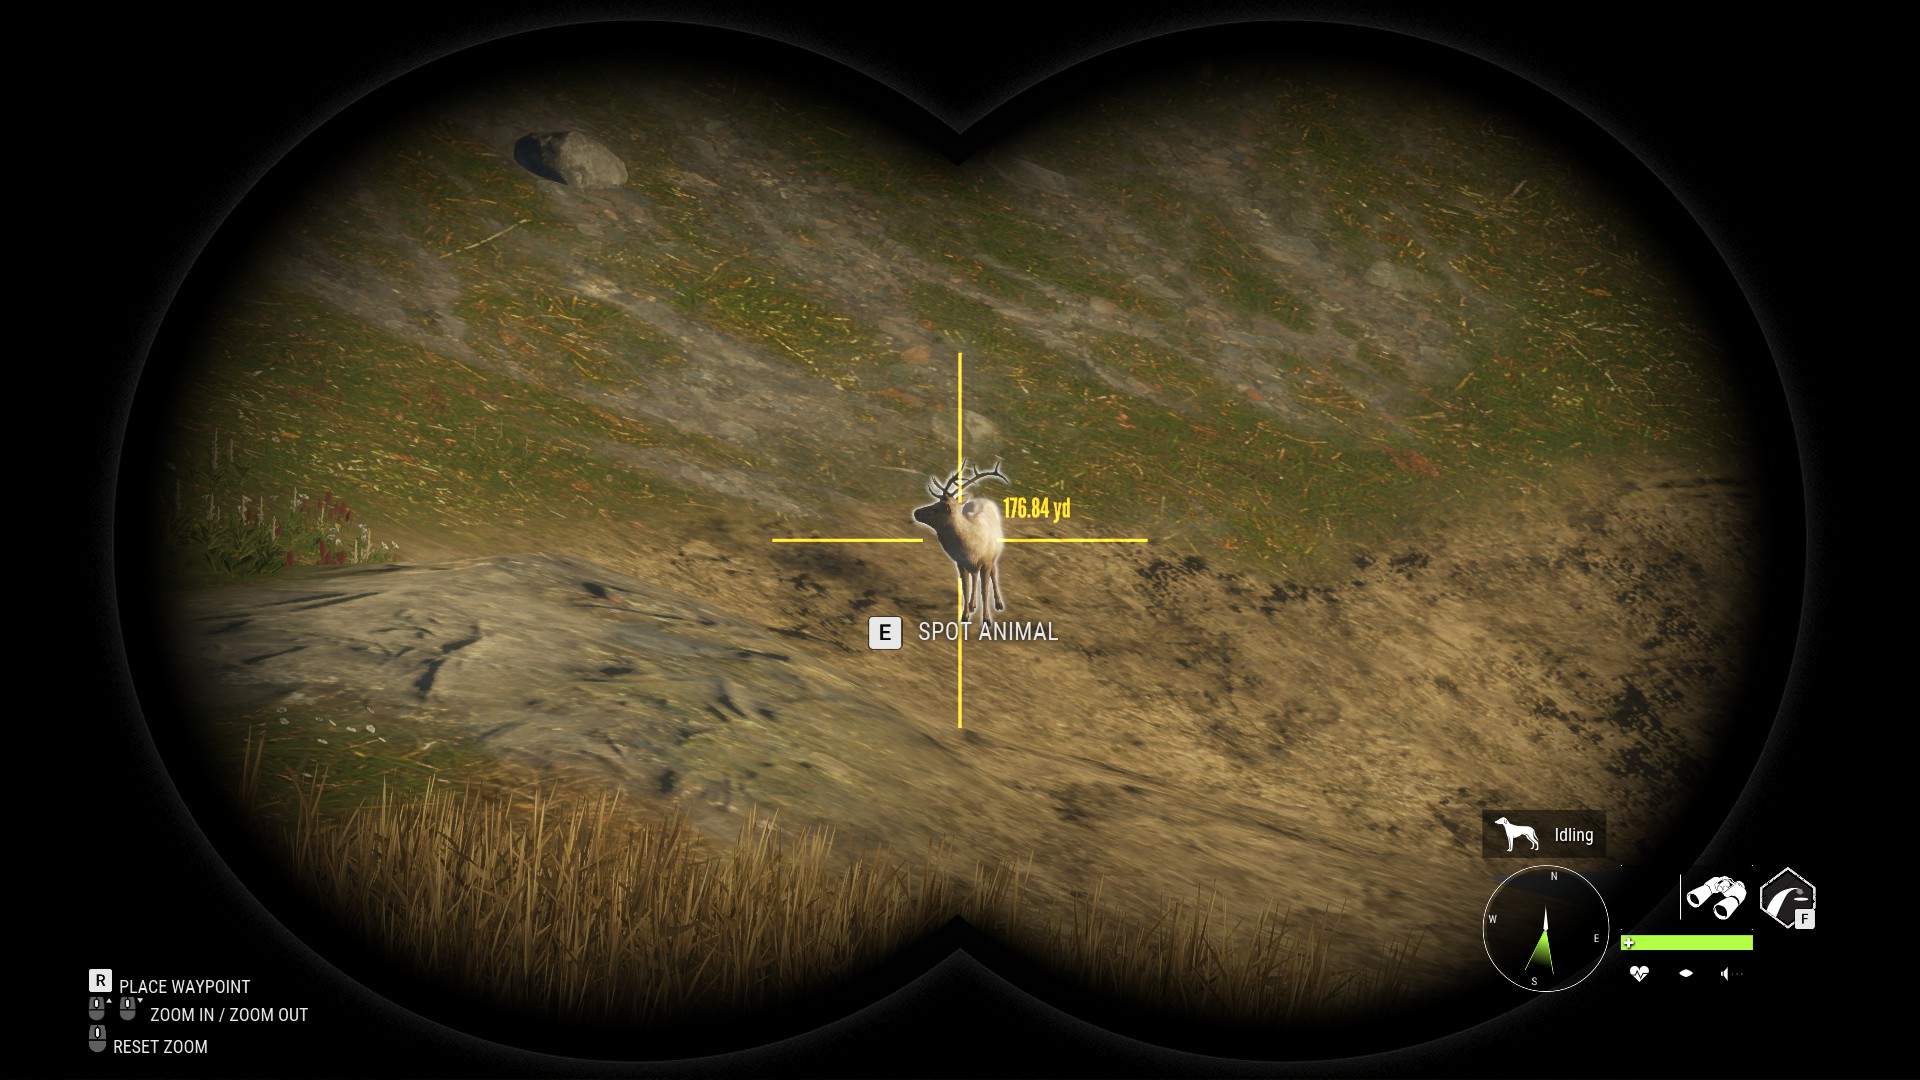
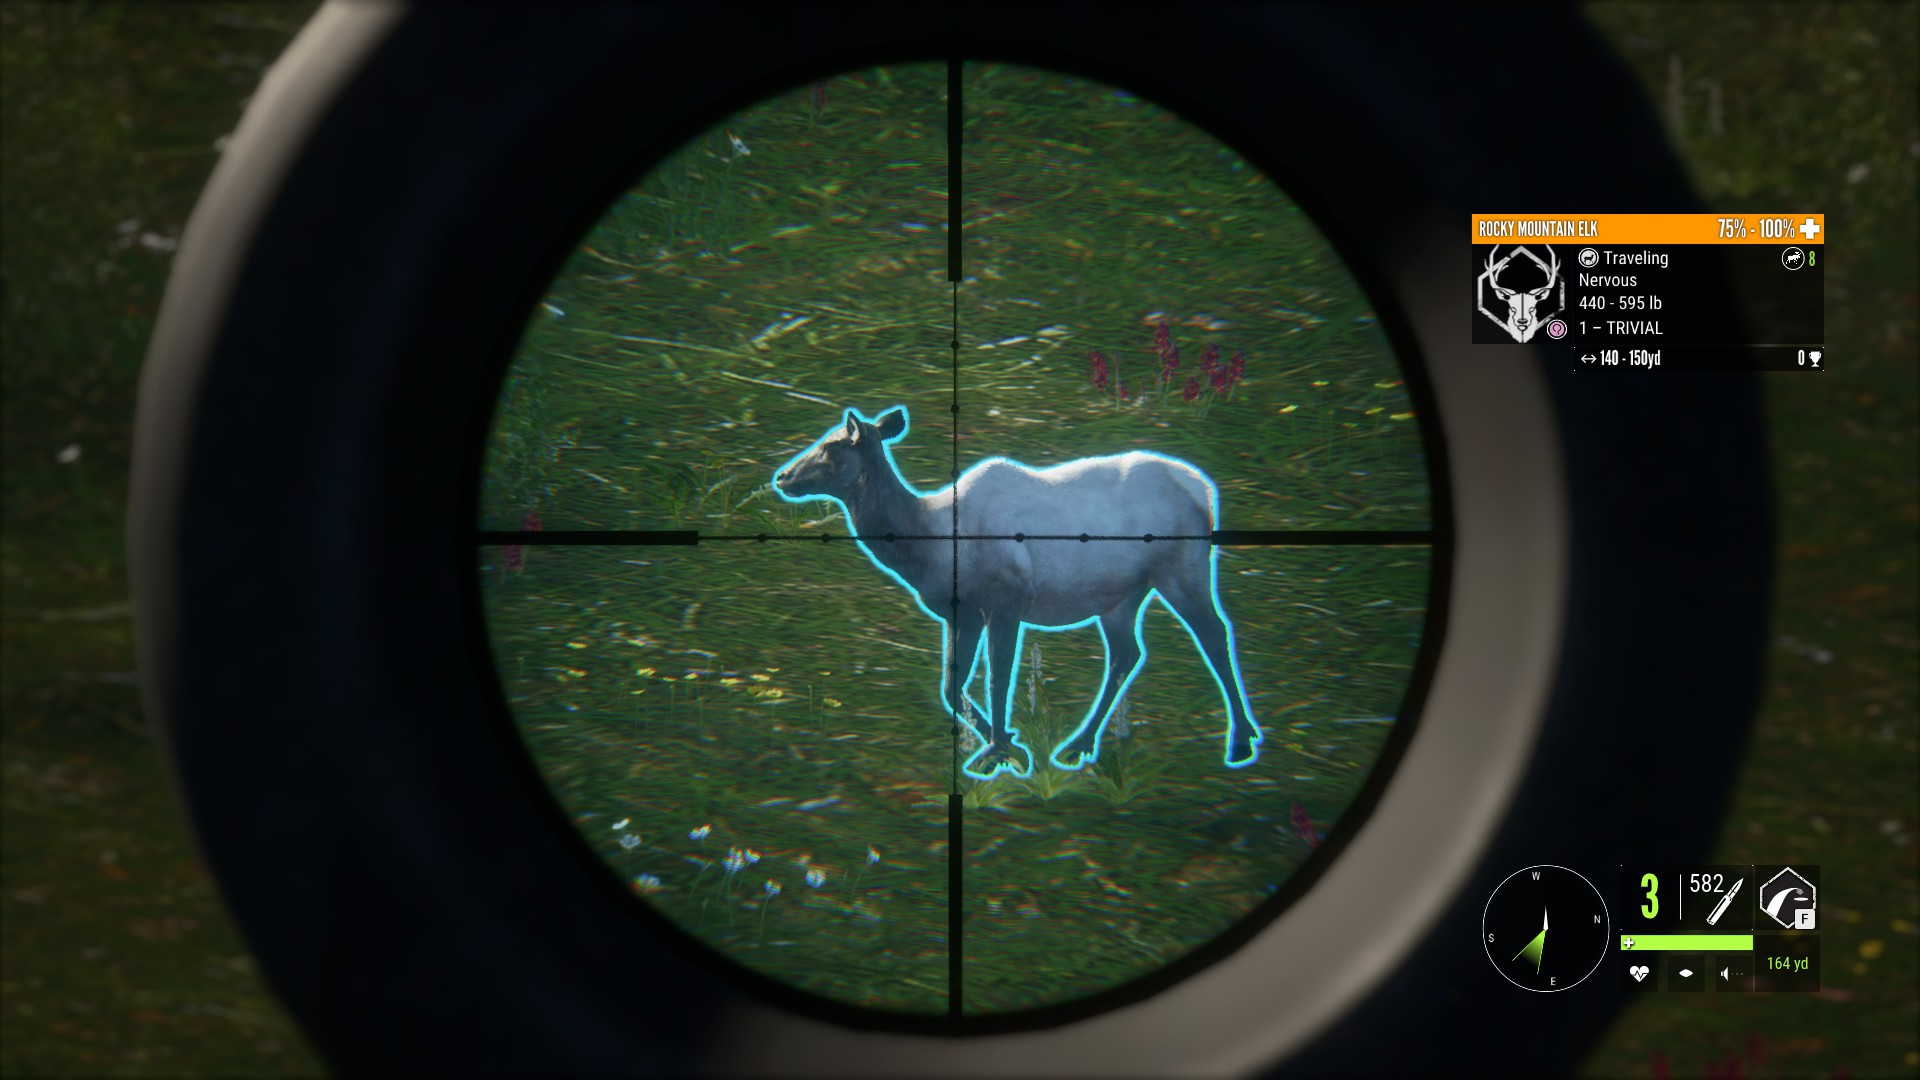
Spotting the animal will highlight it with an outline and you will see a small box appear in the upper right corner of your screen that contains information about it:
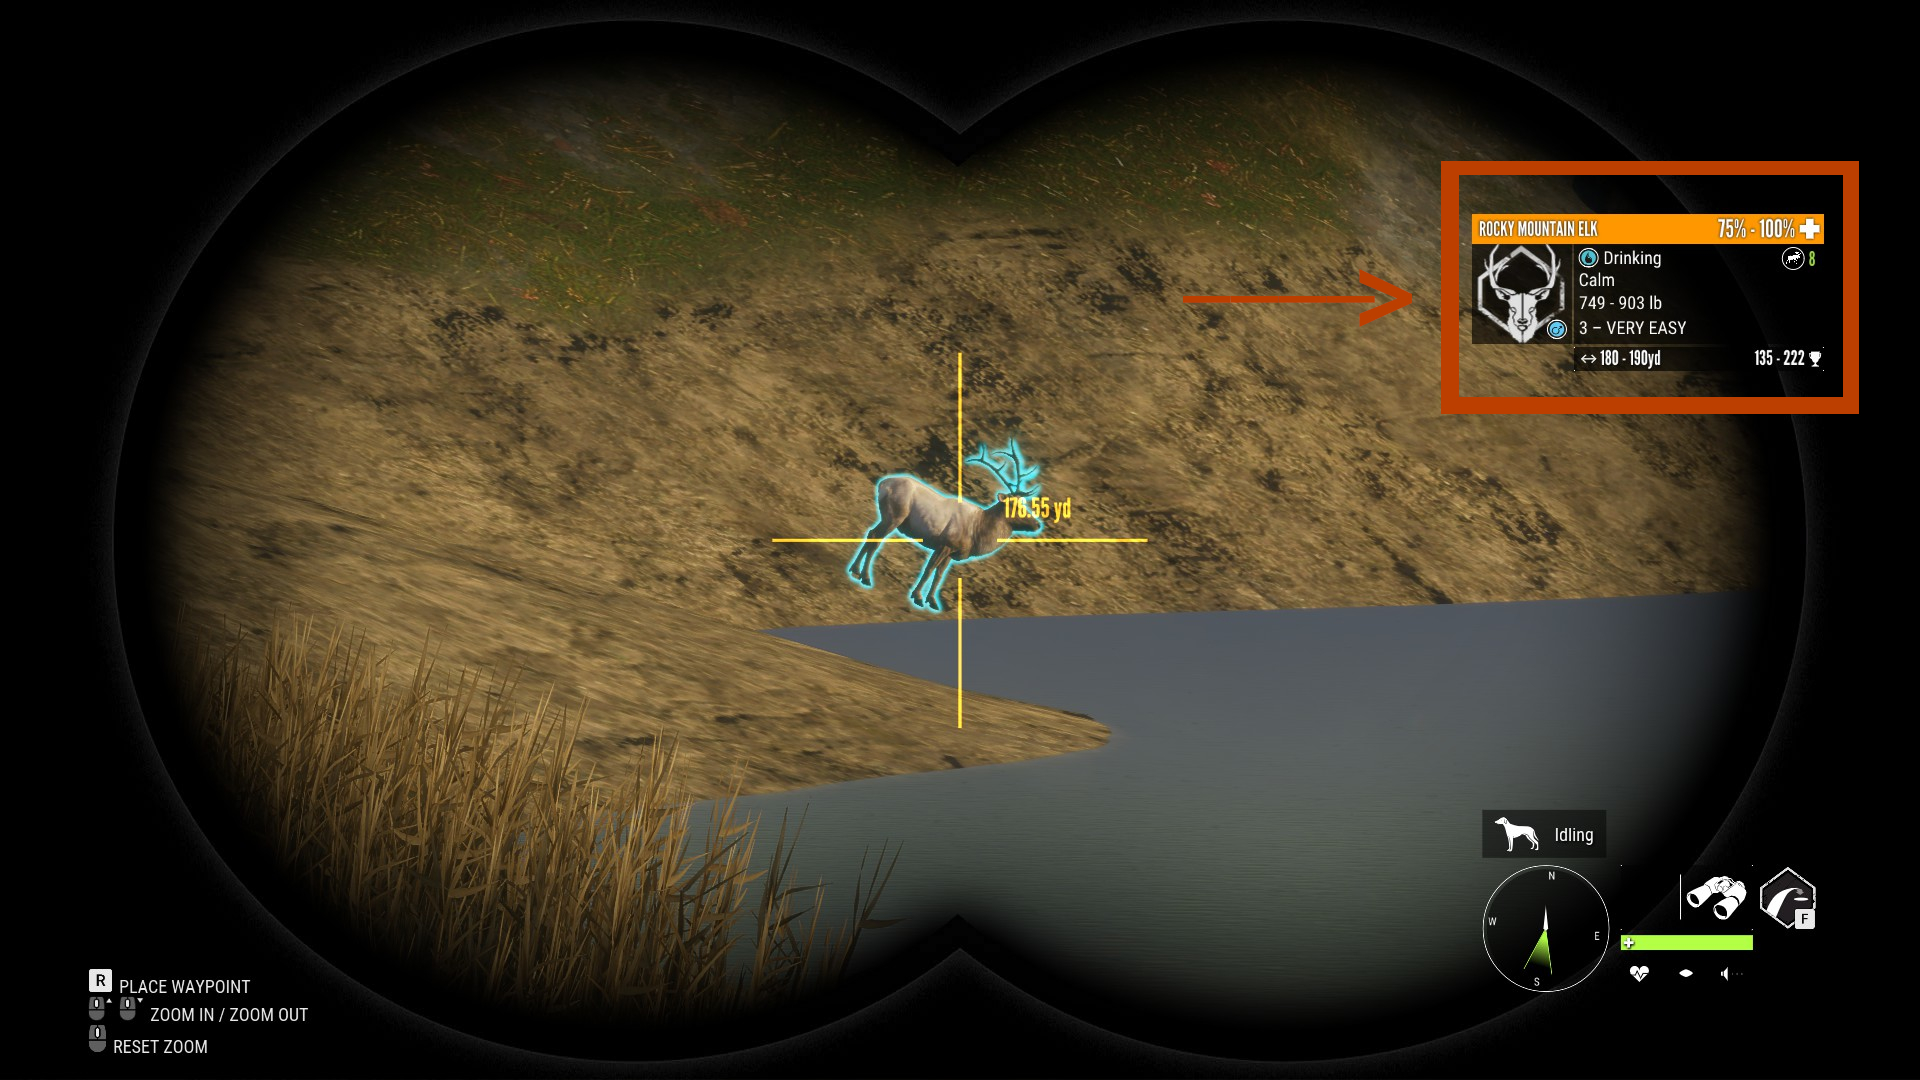
Let’s take a closer look at this box and the information it gives you:
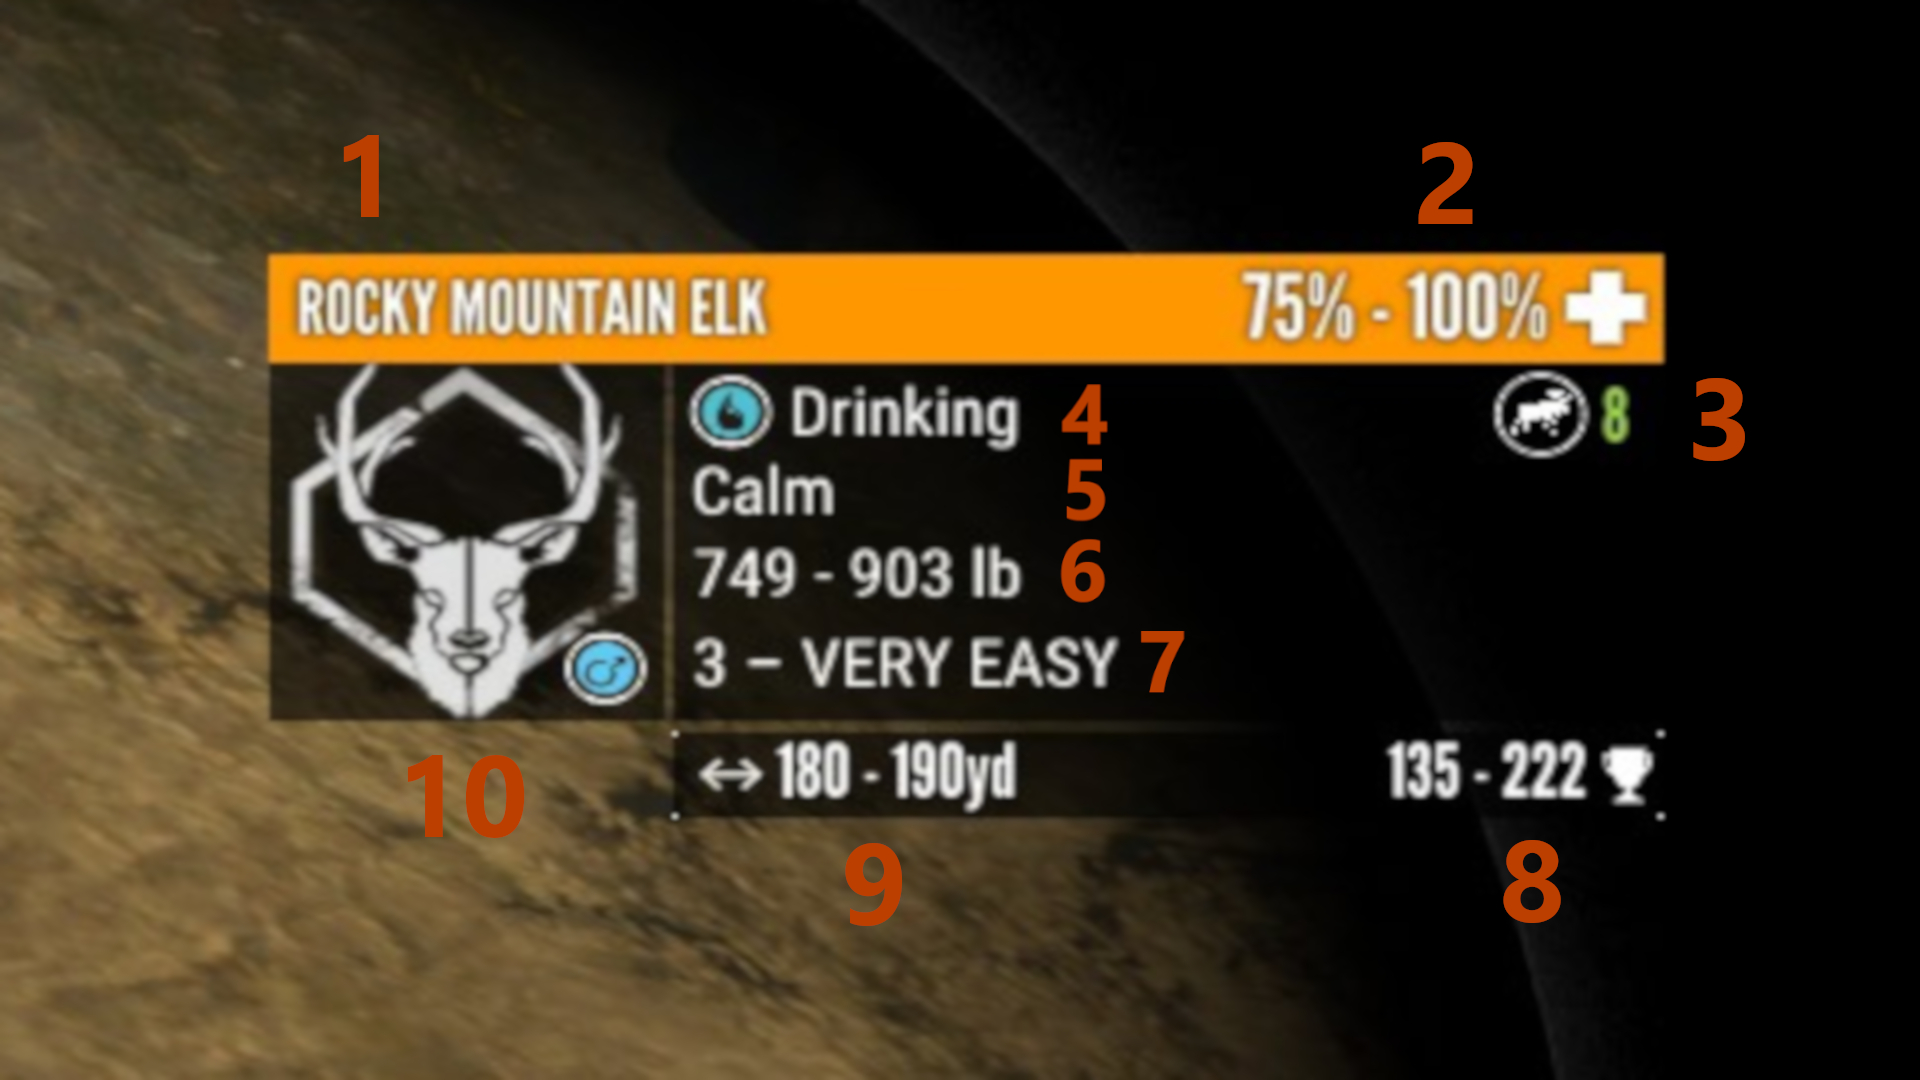
- 1. Species – Shows the animals species.
- 2. Health – Shows approximately how much health the animal has (Requires spotting knowledge level 2 from the ambusher skill tree).
- 3. Class – Shows the animals class. This determines what ammo you should use on it.
- 4. Status – Shows what the animal is currently doing, This can be either traveling, drinking, feeding or resting.
- 5. Awareness – Shows you how aware the animal is of your presence or the presence of other threats. This can be either calm, attentive, alert, alarmed, fleeing or nervous. (Requires spotting knowledge level 1 from the ambusher skill tree).
- 6. Weight Estimate – Shows an estimate of the animals weight (Requires spotting knowledge level 3 from the ambusher skill tree)..
- 7. Difficulty Level – Shows the animals difficulty level which ranges from 1 to 10,
- 8. Trophy Rating Estimate – Shows an estimate of the animals trophy rating (Requires spotting knowledge level 3 from the ambusher skill tree).
- 9. Distance – Shows the approximate distance between you and the animal.
- 10. Gender – Shows the animals gender.
Animal Classes
Something I just mentioned in the spotting animals section is animal classes and that it determines what ammo you should use on them. Let’s elaborate on that further. In total there are 9 classes for the animals in the game and as I showed in the spotting section, you can see what class an animal is whenever you spot it.
How Do I know What Ammo I Should Use?
Let’s look at that rocky mountain elk again as an example:

When we spot it, we can see from the information box that this is a class 8 species. Now if I open up my weapon wheel, I can examine the weapons I have on me and see what is good for class 8:

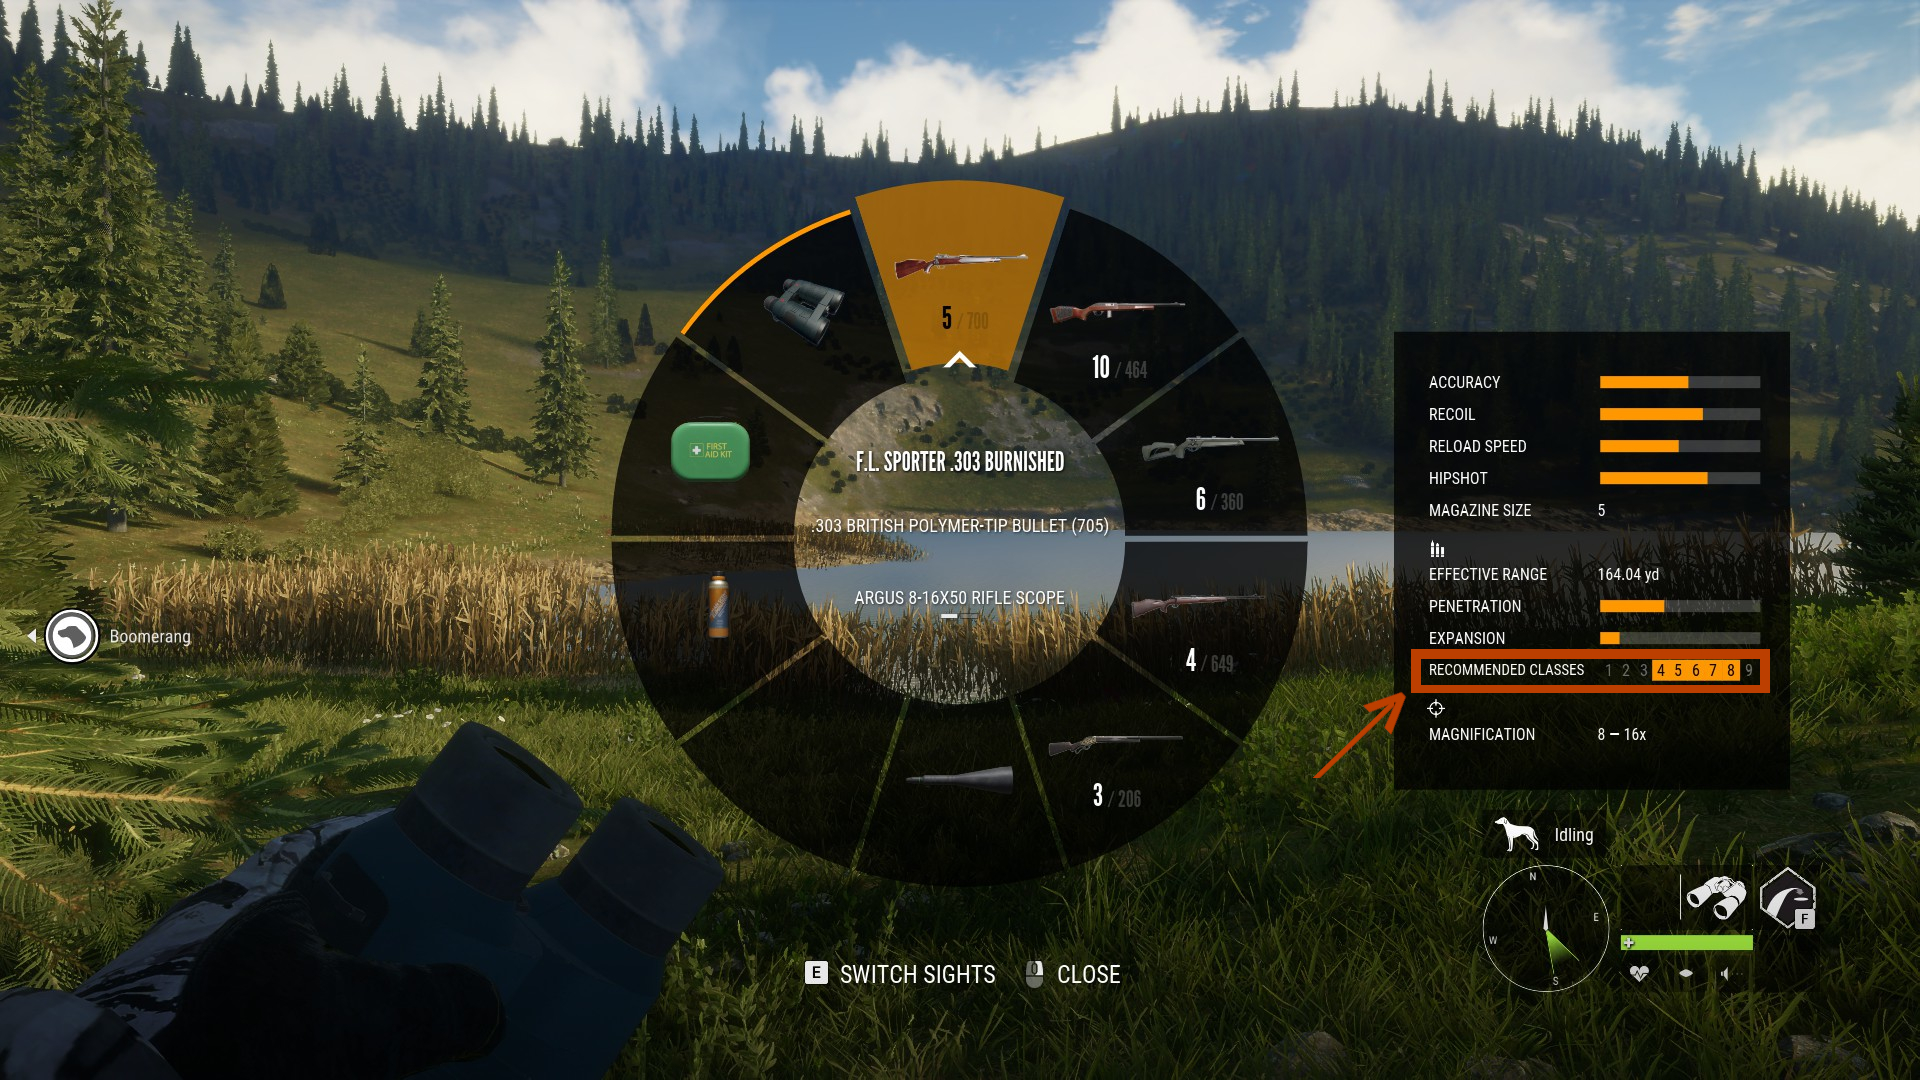
We can see that I actually have two guns, the FL Sporter .303 and the .300 Canning Magnum which cover class 8 so I could use either one of them on this elk.
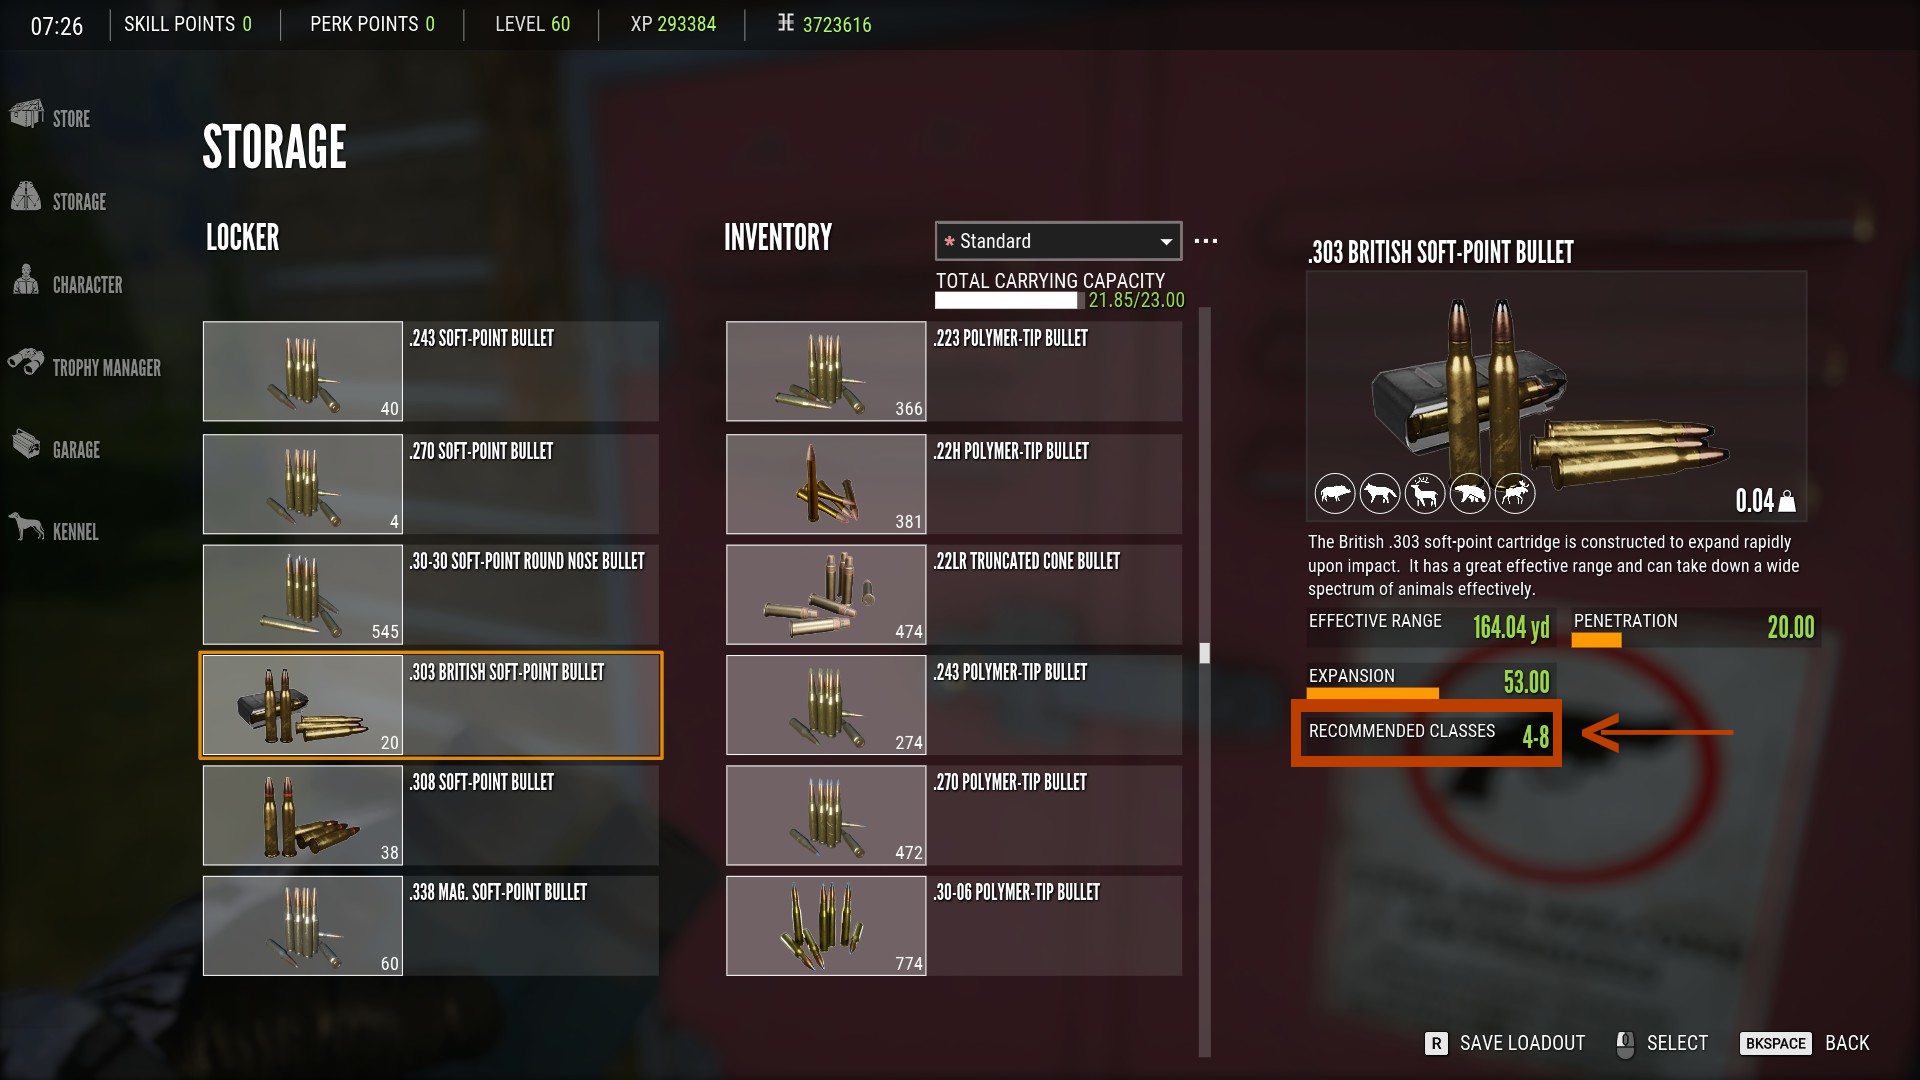
You can also see this information by examining the ammo in your inventory or in the store:
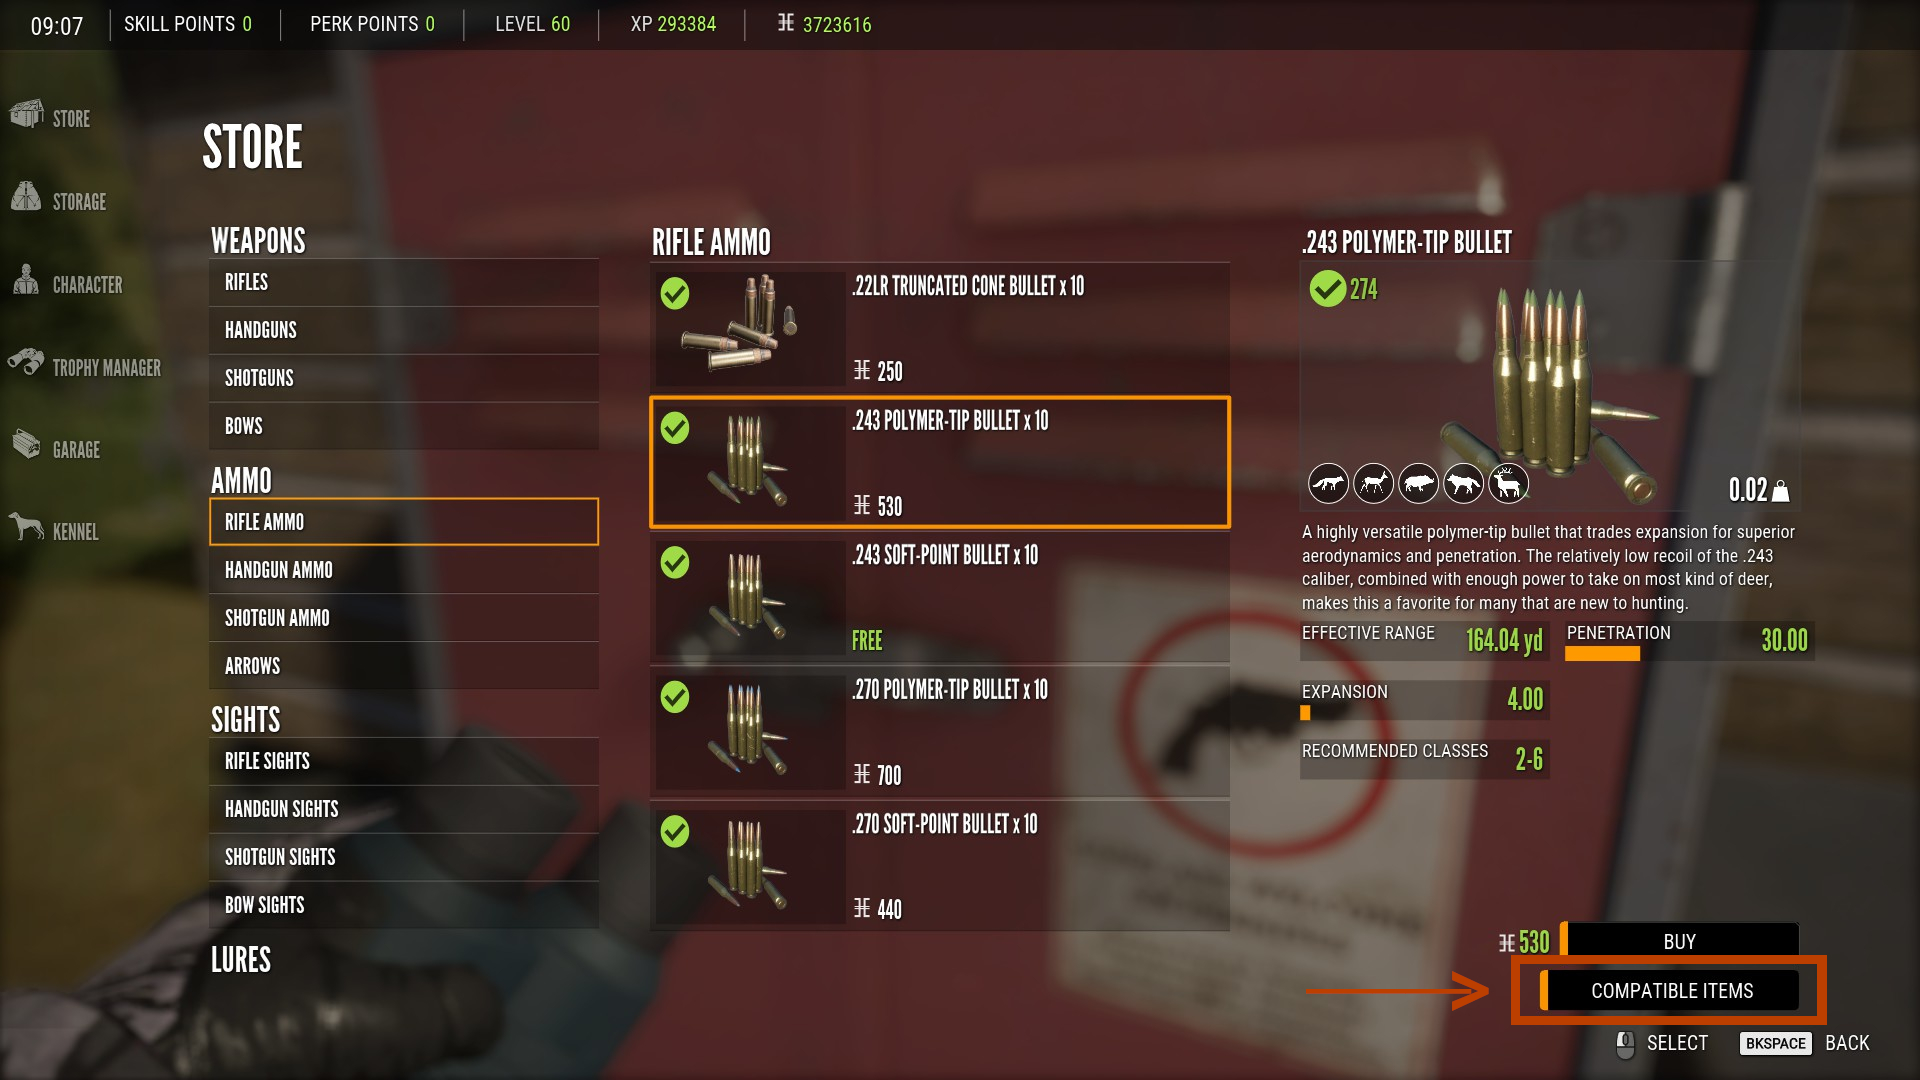
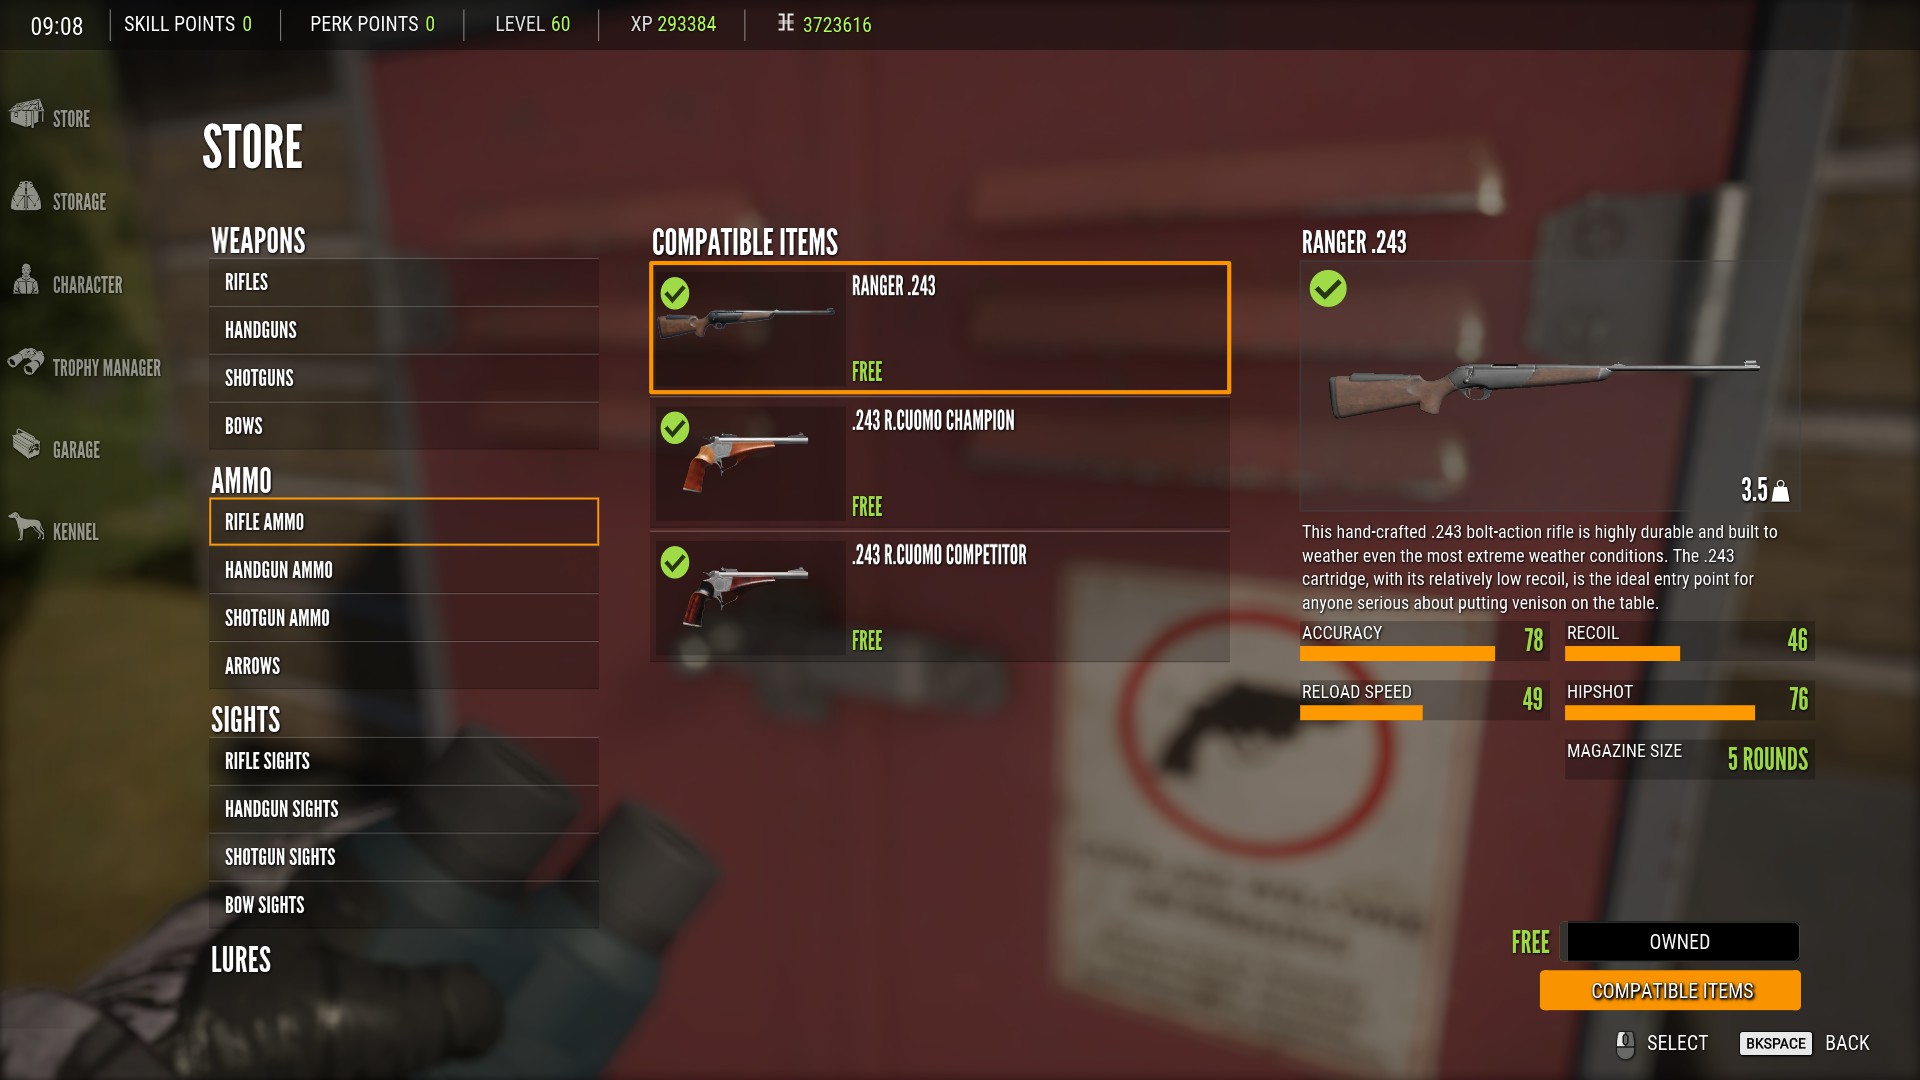
How Do I Know What Ammo Goes With What Weapons?
You can see this in the store when purchasing ammo or weapons. Just select the compatible items option to see what weapons you can use the ammo in or what ammo goes with the weapon you’re purchasing:
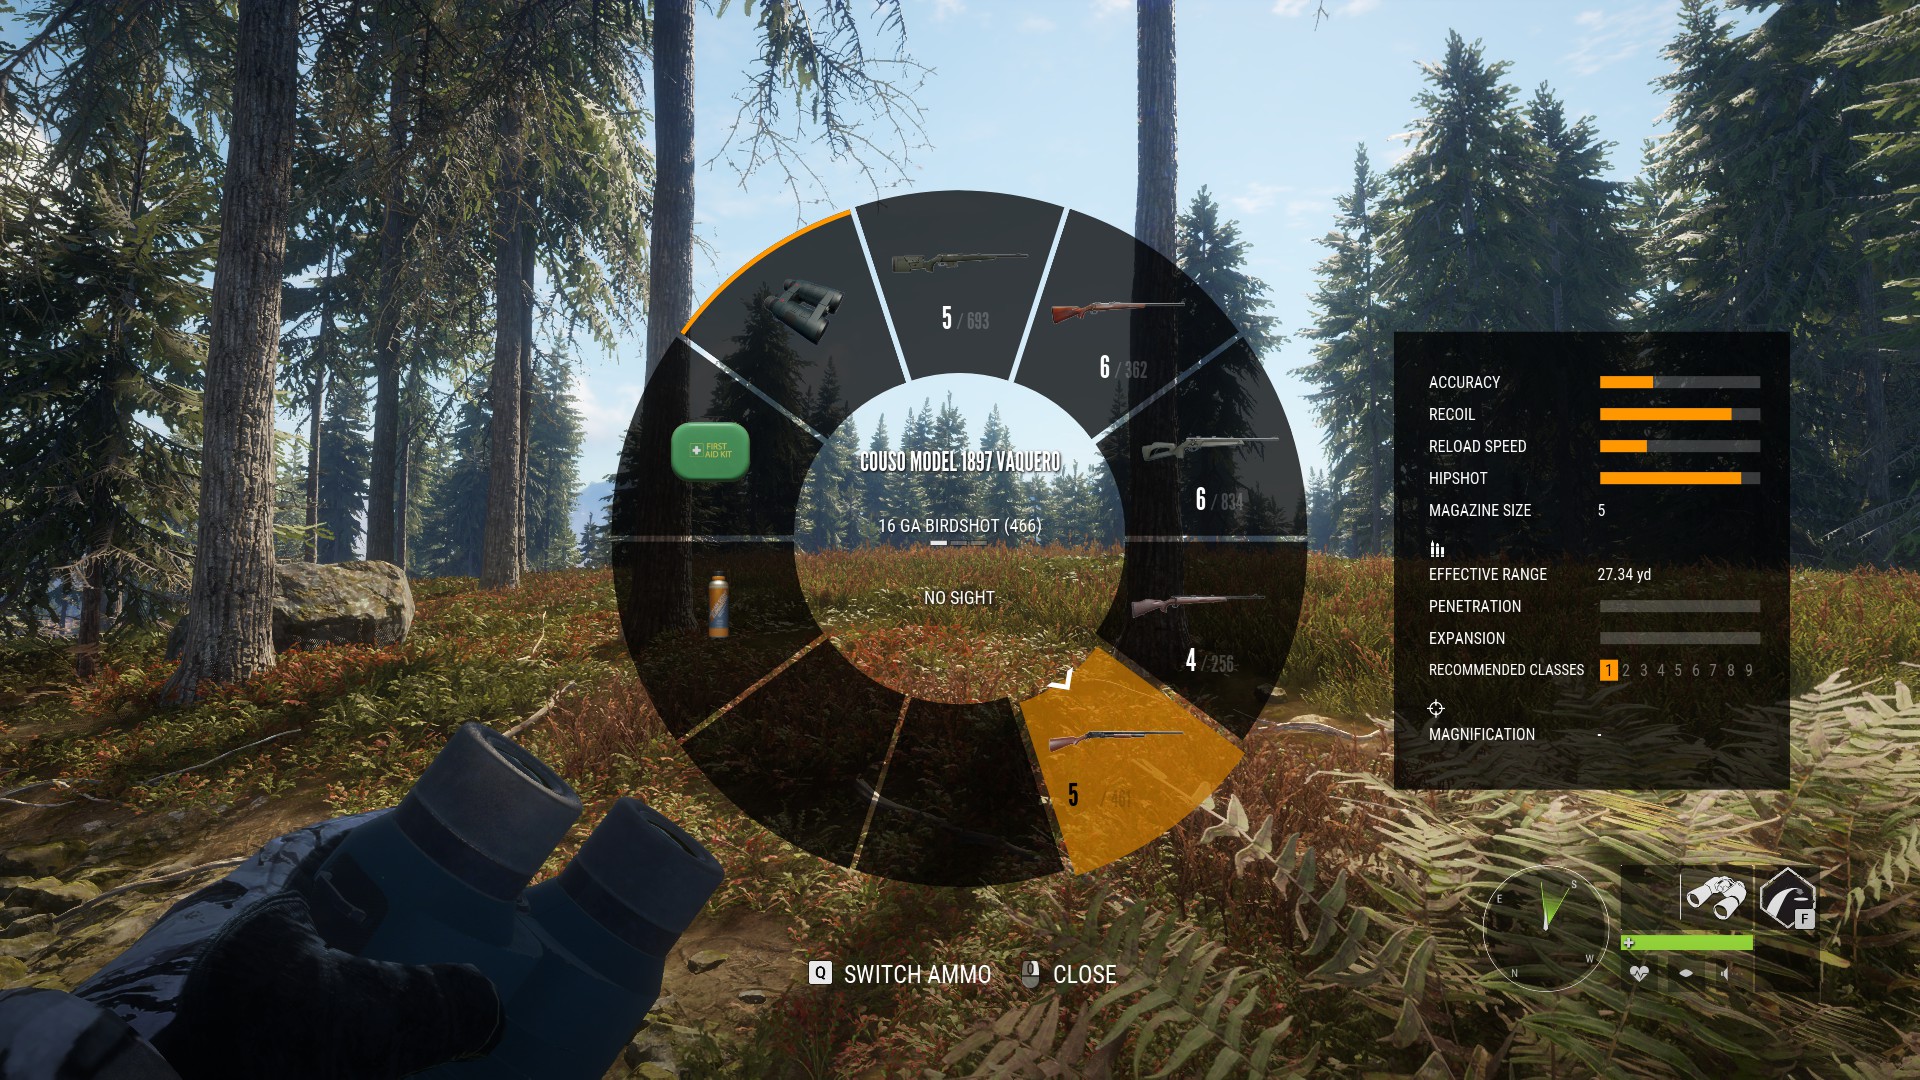
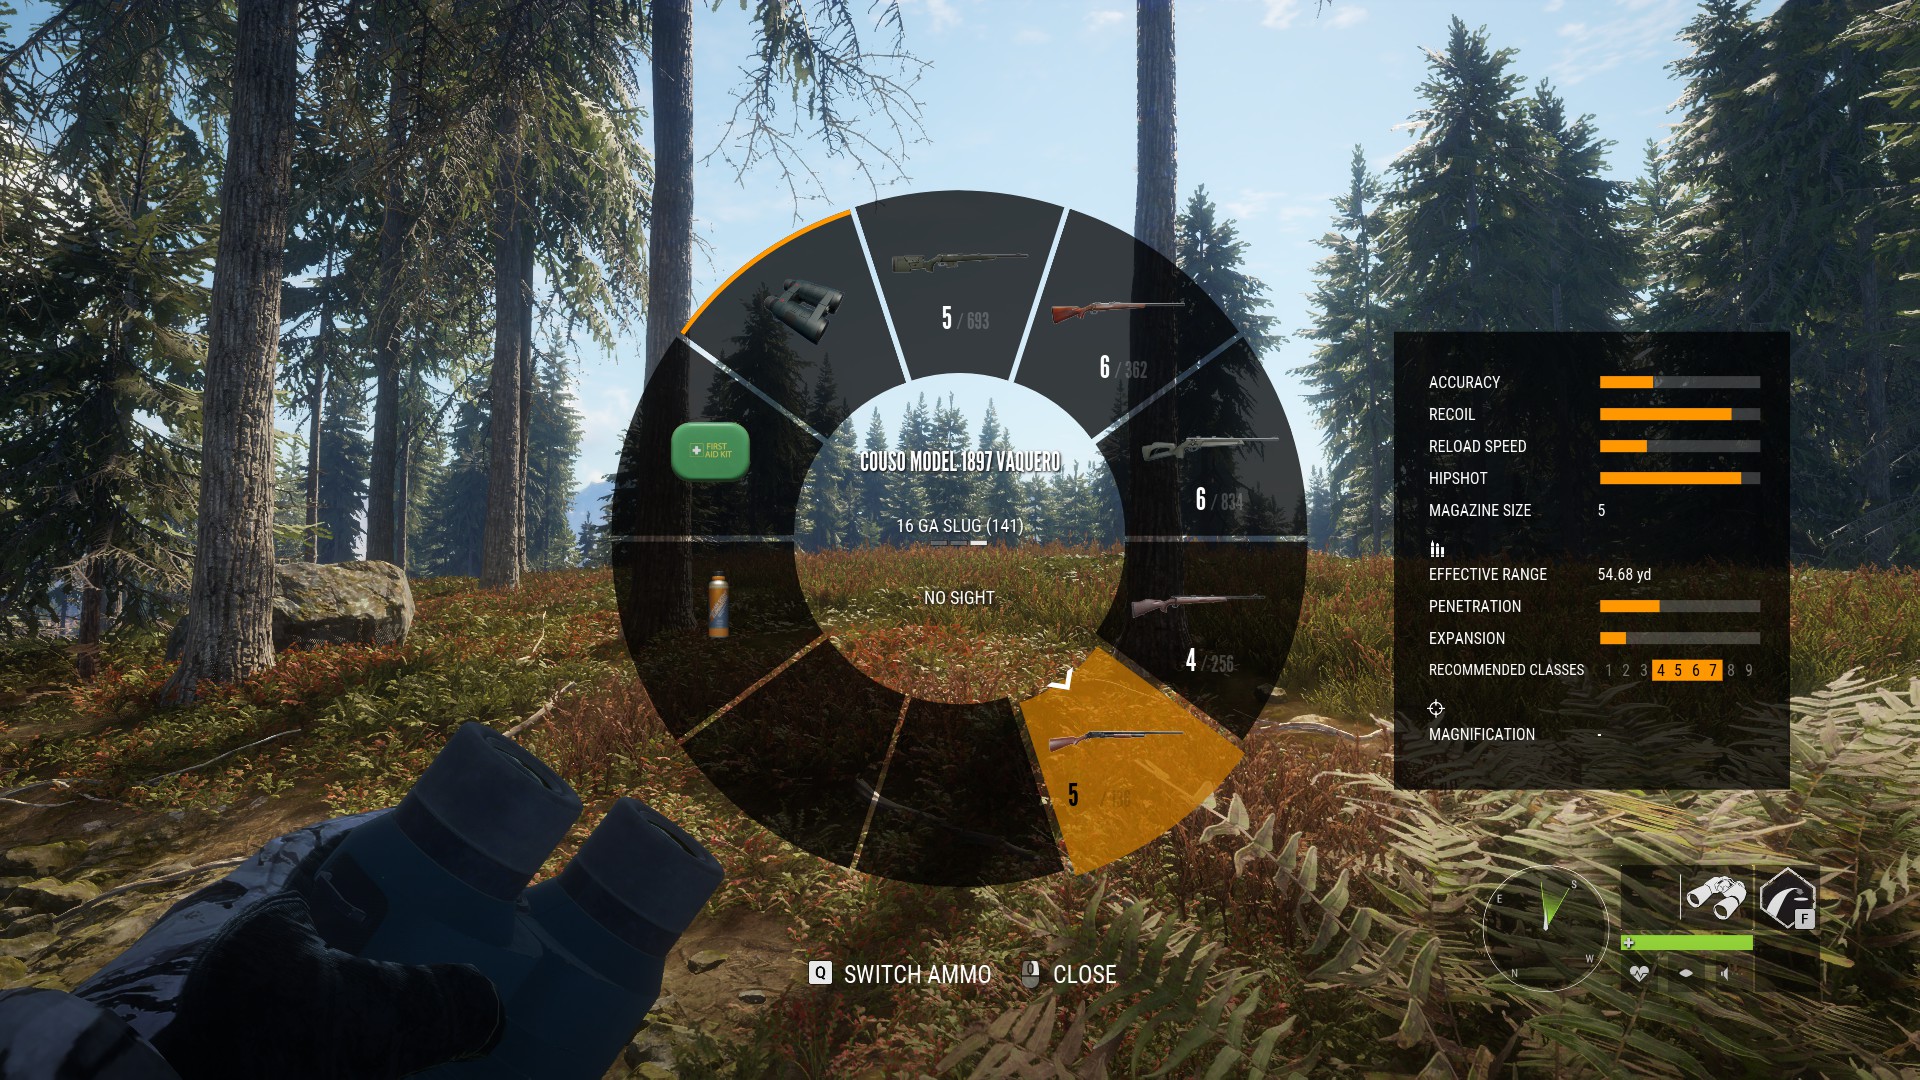
Weapons With Multiple Ammo Types
Some weapons like bows and shotguns can use multiple ammo types that are good for different animal classes. If you have multiple ammo types for one of these weapons in your inventory, you can quickly switch between them by opening your weapon wheel, highlighting the weapon and pressing Q:

Where Do You Aim?
Shot placement is critical if you don’t want to ruin your trophy. To ensure a clean kill, you should always be aiming for vital organs. The vital organs are:
- Lungs
- Heart
- Neck
- Liver
- Brain
Most of the time, the best vital organ to aim for is the lungs since they are the largest and most exposed. So if you want to play it safe, that is what you should aim for. Now let’s take a look at the different types of shots you will have to make on animals.
Broadside Shots
The most ideal situation you can find yourself in is the animal standing still and giving you a broadside shot. This means that you are looking side on at the animal and it’s lungs are a very easy target. In this situation, you want to aim for the crease right behind the animals shoulder and about halfway up the body:

Quartering Shots
Unfortunately you’re not always going to find yourself in the ideal situation I described above and you will have to take shots on animals that are angled either towards you or away from you. These are known as quartering shots and you will have to adjust your aim to hit vital organs. If the animal is quartering towards you, aim just in front of the shoulder. You might need to slightly adjust your aim depending on the angle of the shot:

If the animal is quartering away from you, aim behind the shoulder instead. Again, adjust your aim as necessary depending on the angle:

Heart Shots
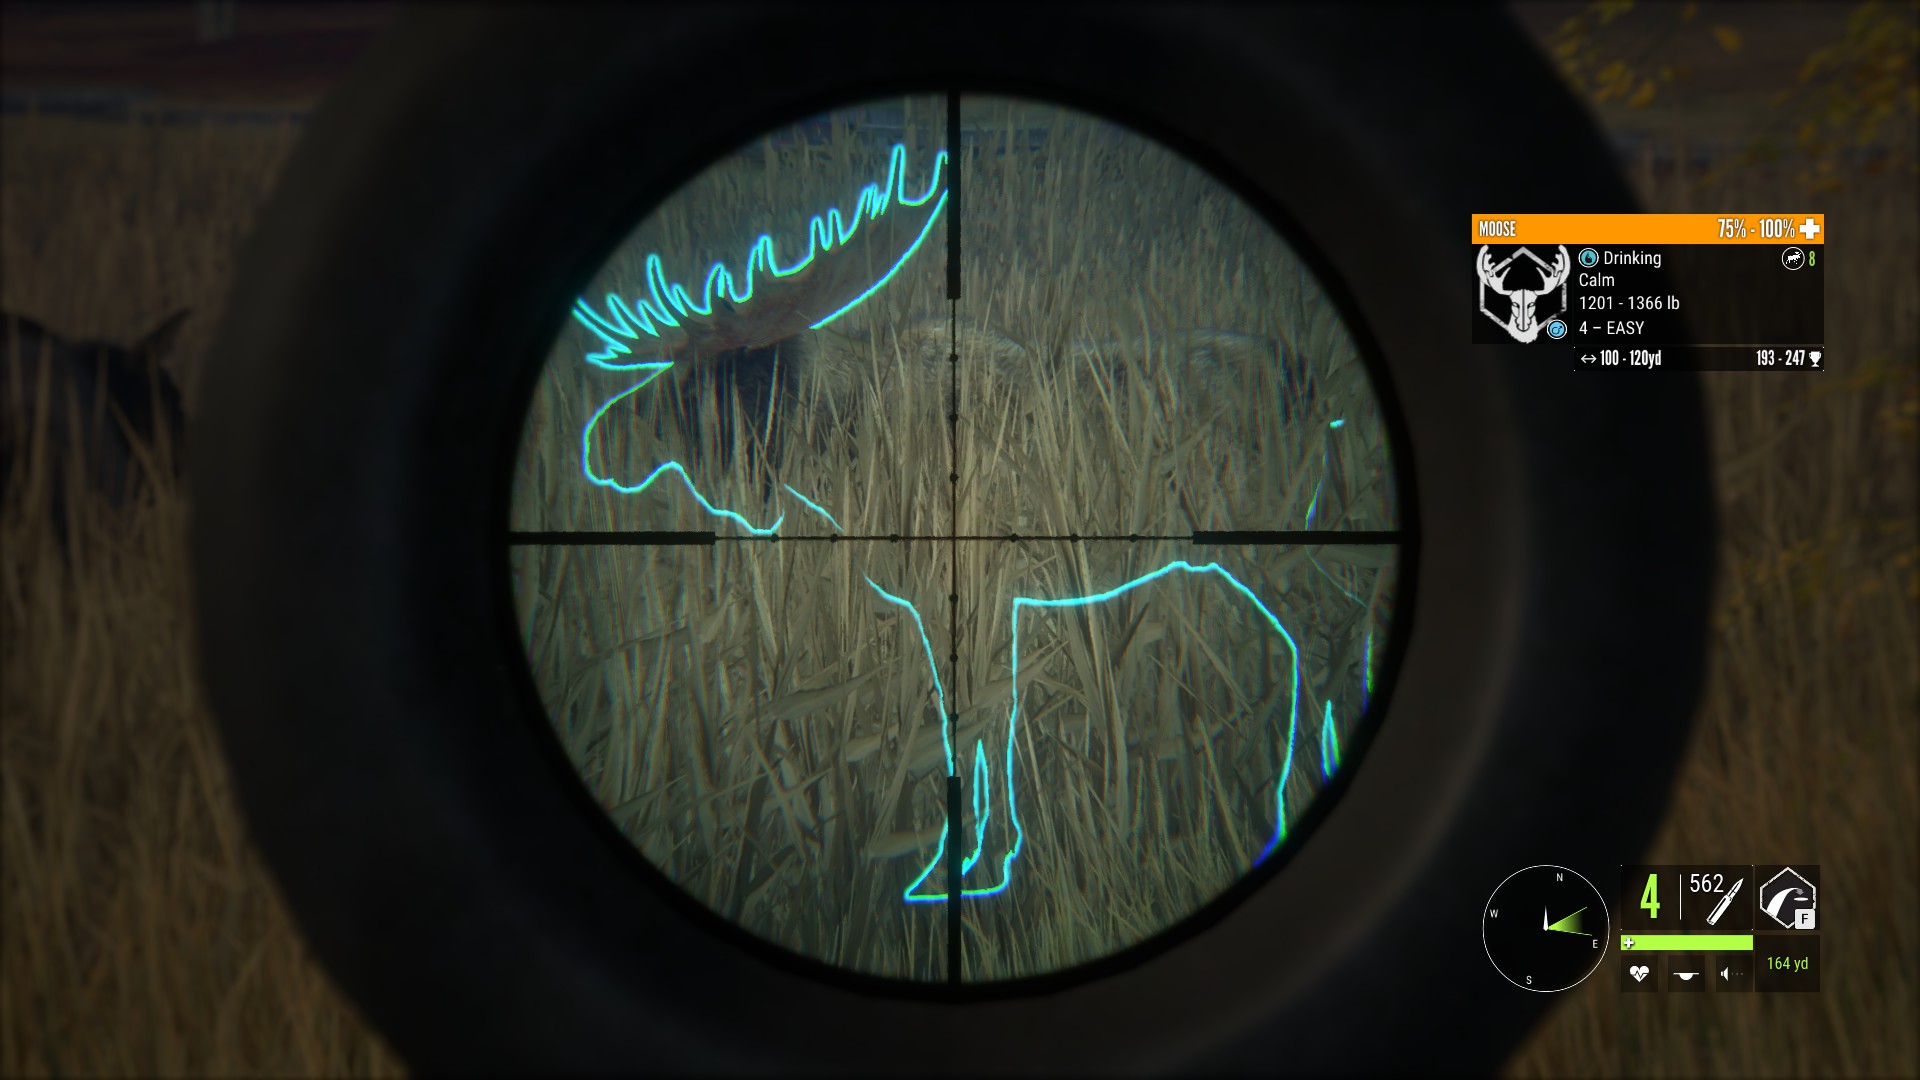
As you get more confident in your aim, you can attempt to hit animals in the heart. This is much more difficult since the heart is a small target but if you can hit it, then the animal will drop almost instantly saving the trouble of having to track it down. Another good thing about heart shots is since the heart is positioned very close to the lungs, you’ll likely hit a lung even if you miss the heart. The easiest animal to practice your heart shots on is the moose since they have one of the largest hearts. The best way to hit the heart on a moose is a frontal shot. Aim for the center of the chest and a bit low. Your aim can be off a little bit and you’ll still hit the heart since it is so large:

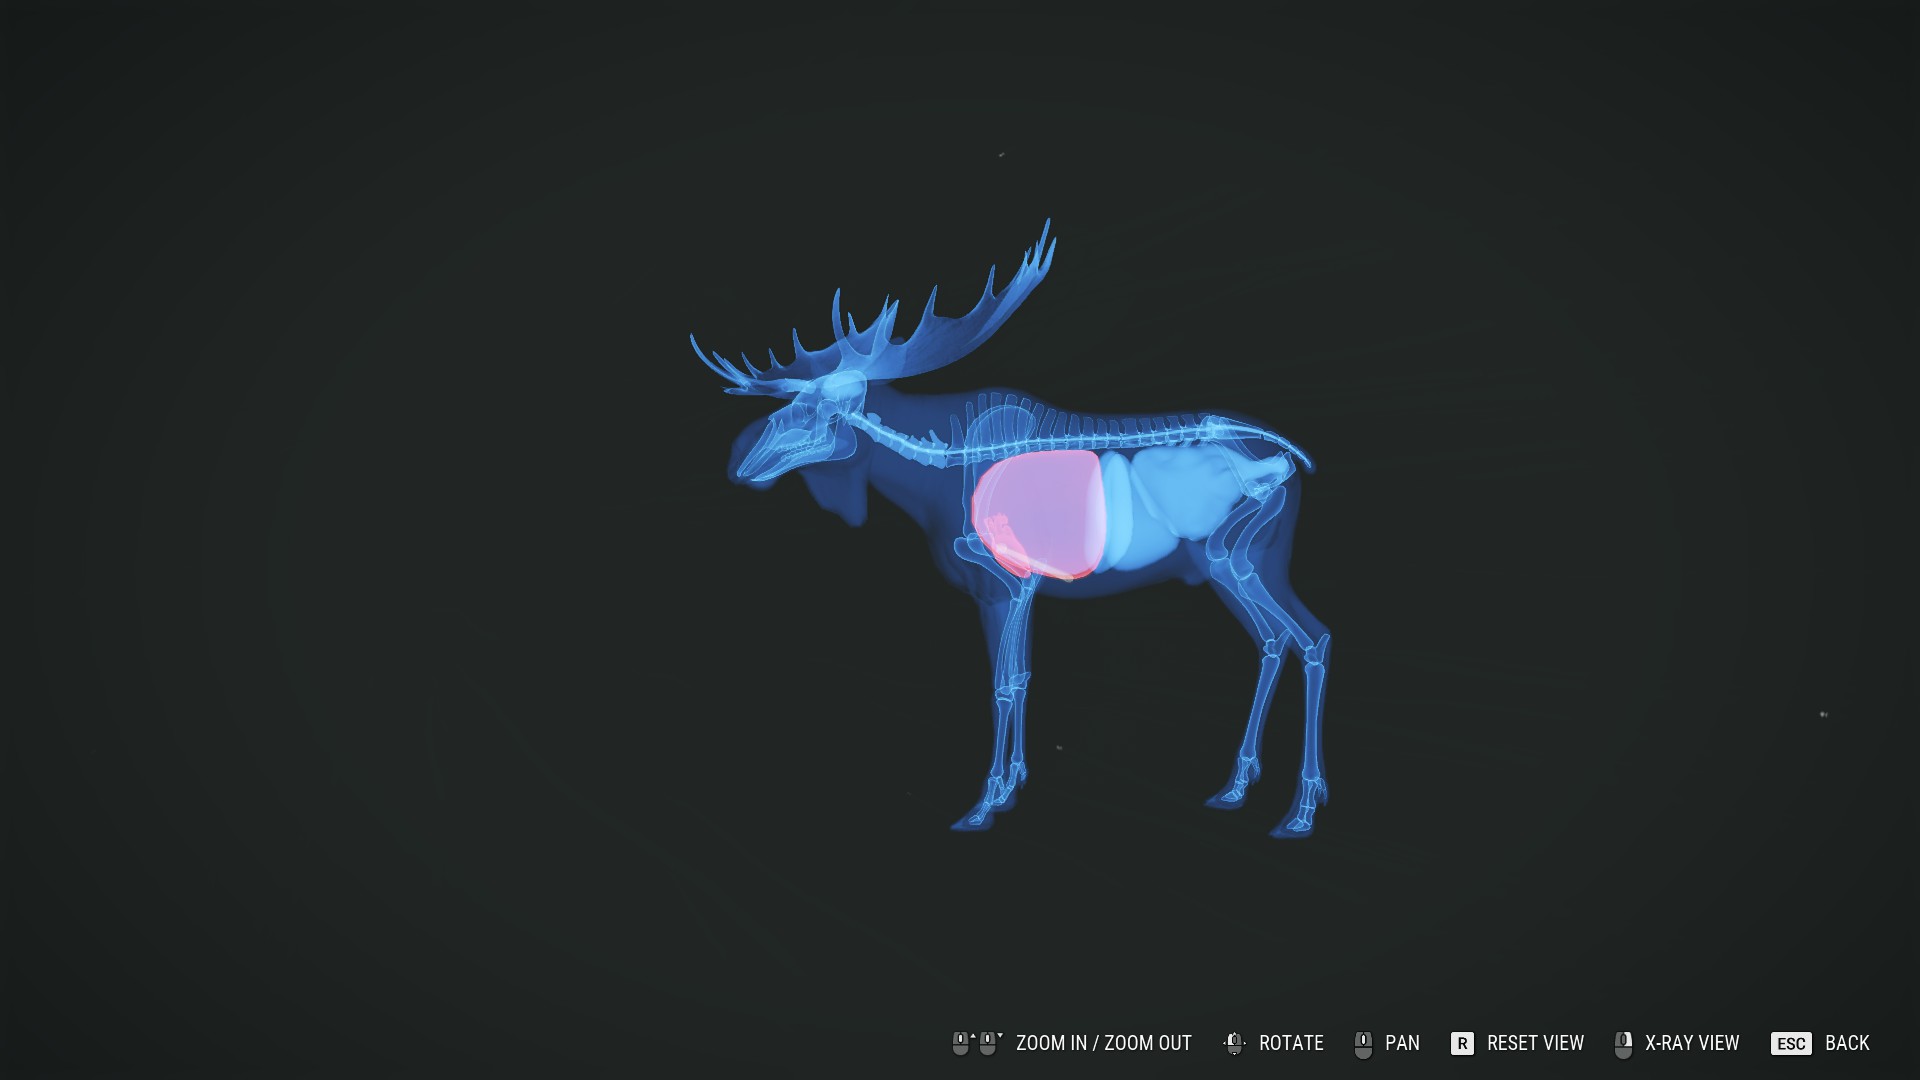
You can also attempt a broadside heart shot if your weapon has enough penetration. Aim just a little bit above the top of the leg:
Once you get comfortable landing heart shots on moose, give it a try on some other animals.
Liver And Neck Shots
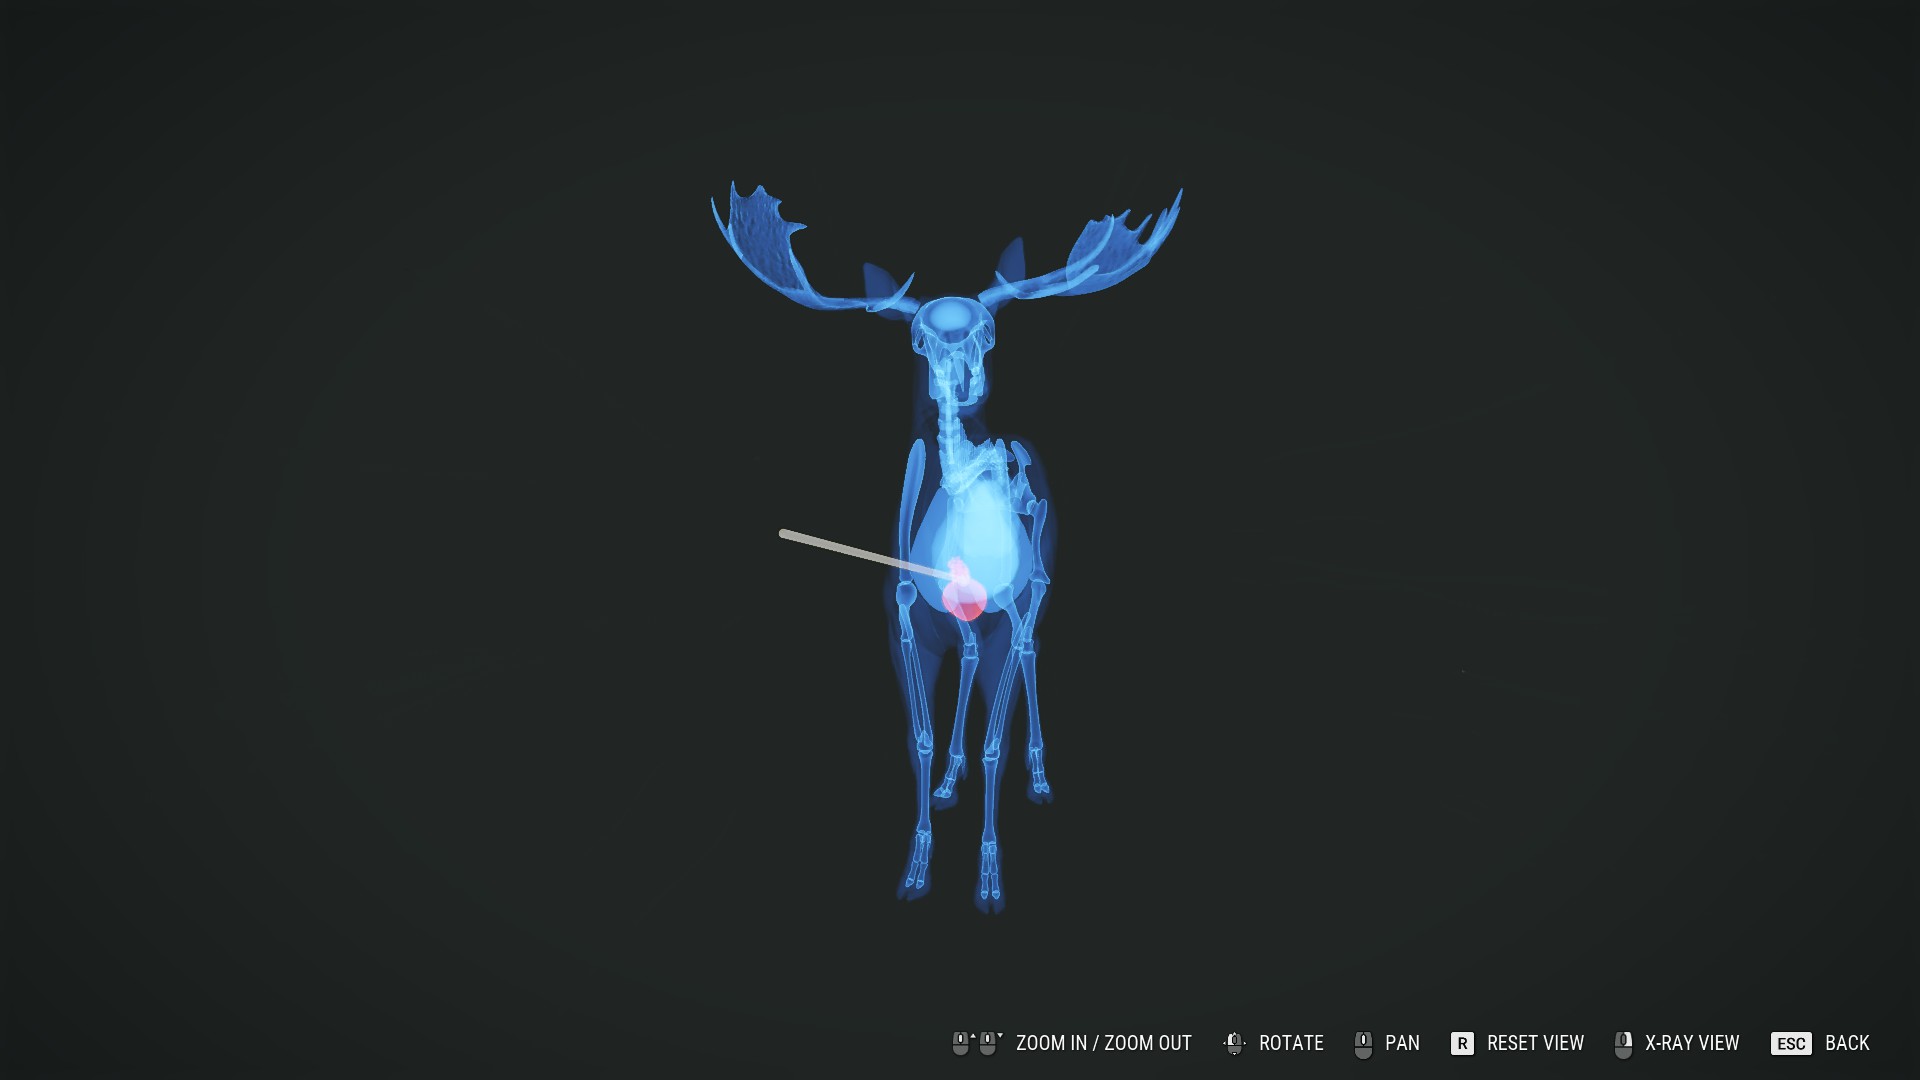
For the most part, I would not recommend that you deliberately try to hit hit neck or liver shots because you have to be very precise to hit them. Almost every one of my shots that hit the neck or liver were pure luck and I was always aiming for the lungs or heart instead. And unlike heart shots, if you miss the liver of neck you’ll likely get a flesh hit or hit a non vital organ which can ruin your trophy. But if you want to try either of these shots, then aim directly behind the lungs to get a liver shot:
For a neck shot, it’s going to be a little different for a lot of animals so I would suggest you examine a few X-ray views of the animal before you attempt it. You can see the X-ray view in the harvest screen by right clicking your mouse. You can hit any part of the neck and it will count but your aim has to be perfect:

What About Brain Shots?
Although the brain is considered a vital organ, it isn’t viable to aim for it in most cases. This is because for most animals, their skull is considered a trophy organ. And you cannot hit the brain without shooting through and damaging the skull. The only exceptions to this are all class 1 animals as well as alligators and crocodiles. Class 1 animals as well as alligators and crocodiles have no trophy organs so brain shots are completely viable on them:
Zeroing, Compensating For Wind & Distance And Leading Shots
The zeroing of your weapon indicates the distance at which the bullet or arrow will land directly where you’re aiming. By default, every weapon is set to the medium zero distance. The means for example that the Ranger .243 you start the game with will automatically be zeroed for 164 yards (150 meters) so if you shoot at a target that is 164 yards away from you, then the bullet will hit almost exactly where you are aiming:
Like I’ve mentioned before, you’ll need the zeroing perk from the rifles perk tree in order to change the zeroing of your weapons. Once you have this perk, you can press F to change between your weapons different zero distances:
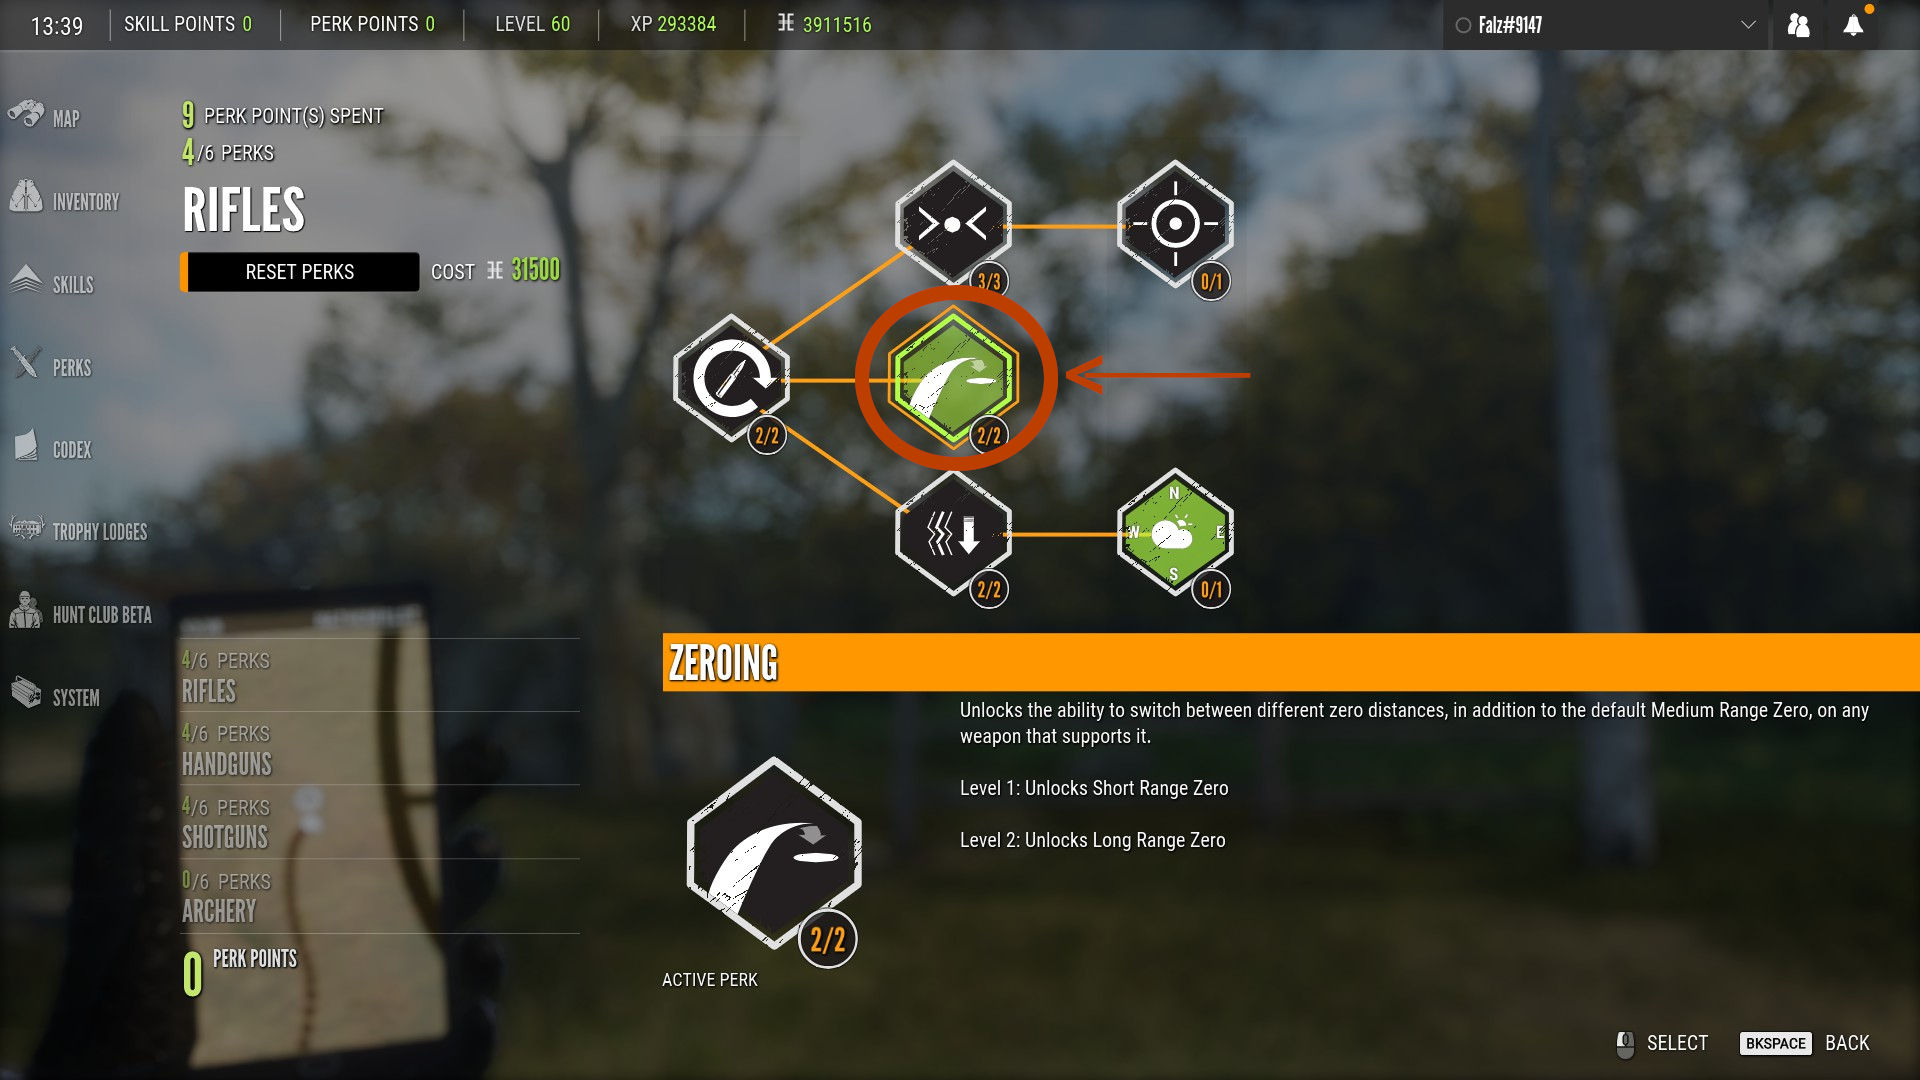
If I unlock level 1 of this perk, I can now change the Ranger .243s zero distance to either 82 or 164 yards (75 or 150 meters). Then if I unlock level 2 of the perk, I can now zero to either 82, 164 or 328 yards (75, 150 or 300 meters). The zeroing distances are not going to be the same for every weapon however. For example, the Variant .22LRs zero distances are 54, 109 and 164 yards (50, 100 and 150 meters). Make sure you familiarize yourself with the zero distances for all weapons you intend to use before you go hunting with them.
Compensating For Distance
Having animals perfectly at your zero distance is not something that will happen very often so you need to get used to compensating for distance. As your target moves further out from your zero distance, you’re going to have to aim above the point where you want the bullet to hit in order to compensate for the bullet drop. The further out the animal is, the higher you need to aim. You also need to take the weapon you’re using into account since weapons like handguns and bows will have greater drop over distance than rifles will:

Conversely, if the animal is closer than your zero distance, you should aim a little lower than where you want to hit the animal since the bullet is going to hit above your point of aim:
Compensating for distance isn’t as important when the animal is closer to you since it’s a larger target. But if it is further out, it could make difference between hitting the animal in the lungs or hitting it in the spine.
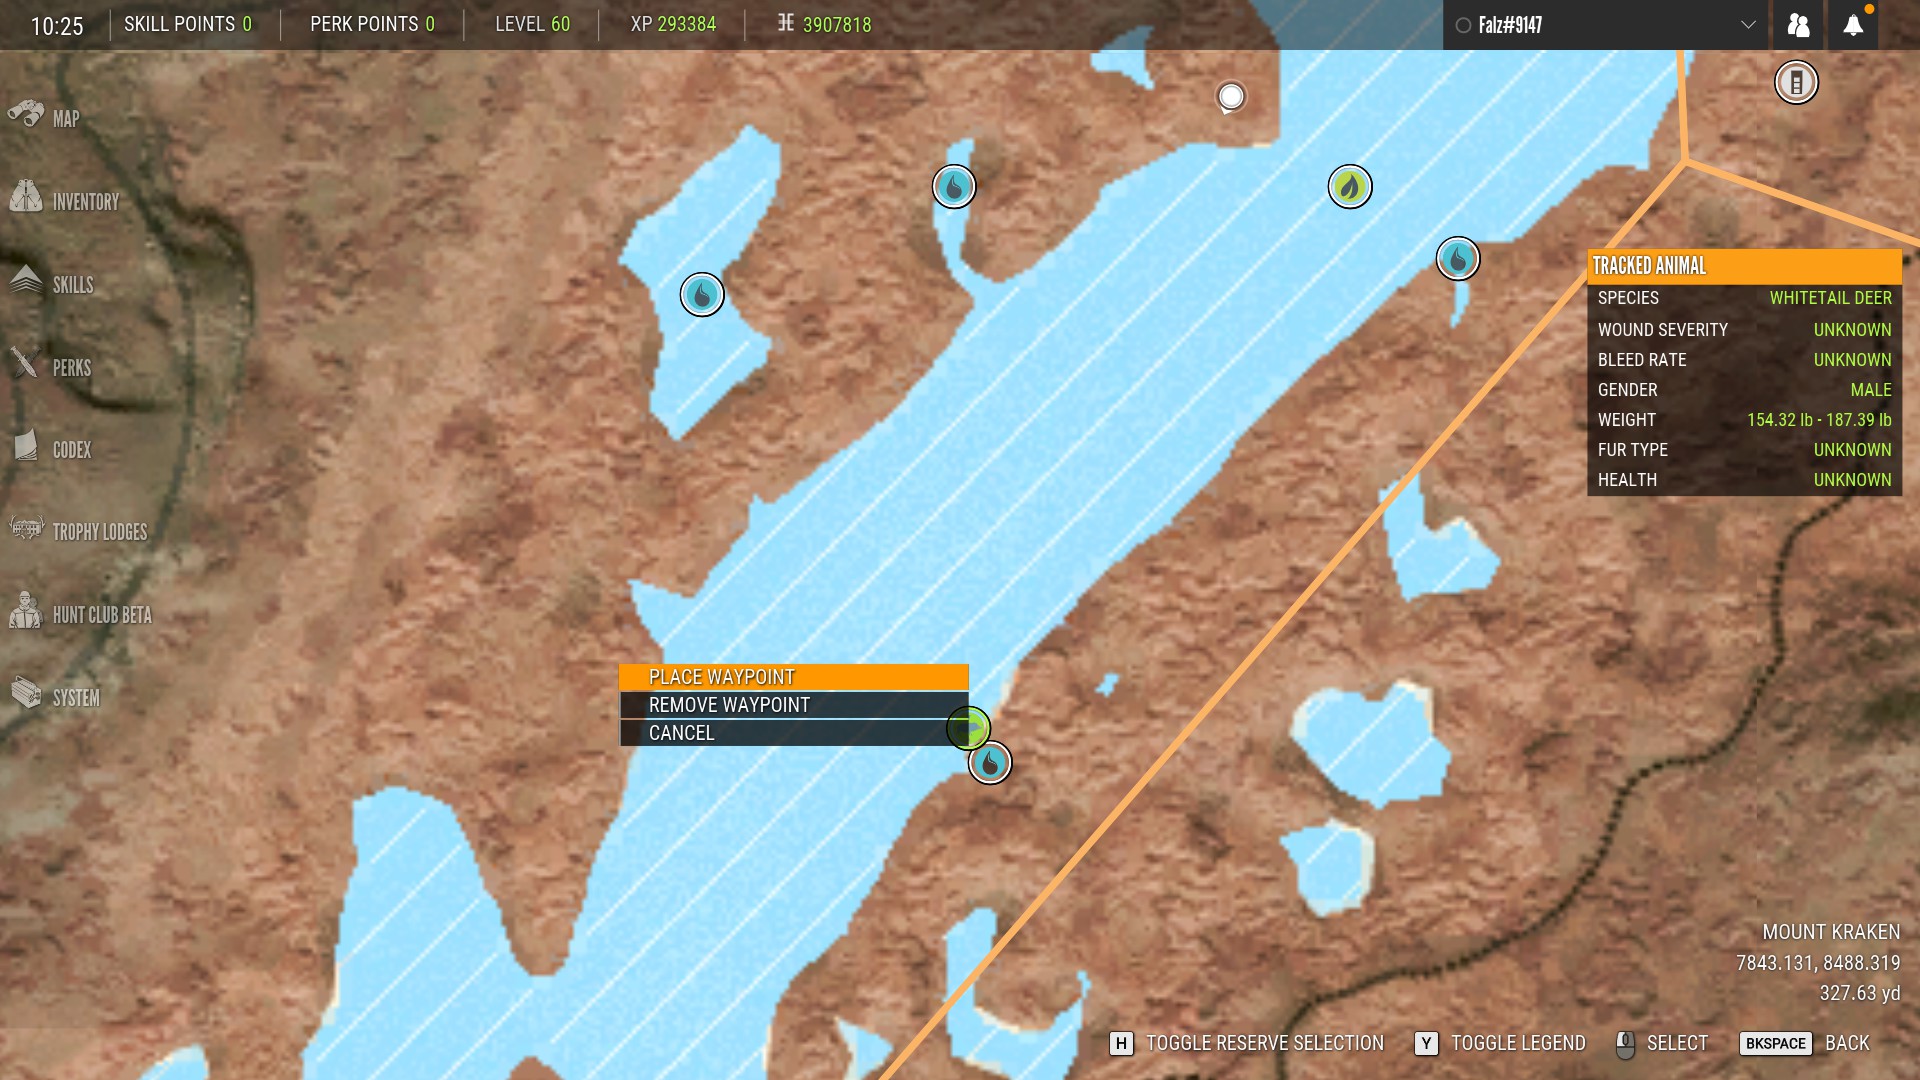
How Can You Tell How Far Away An Animal Is?
Later on in the game, you’ll be able to unlock the rangefinder and also binoculars with a built in rangefinder which will make this pretty easy. But until then, you’ll need a better way to gauge distance than just the estimate when you spot an animal and fortunately, there is a trick you can use. First, spot the animal you want to shoot and then open up your map, You’ll see a marker on your map showing the location of the animal you spotted:
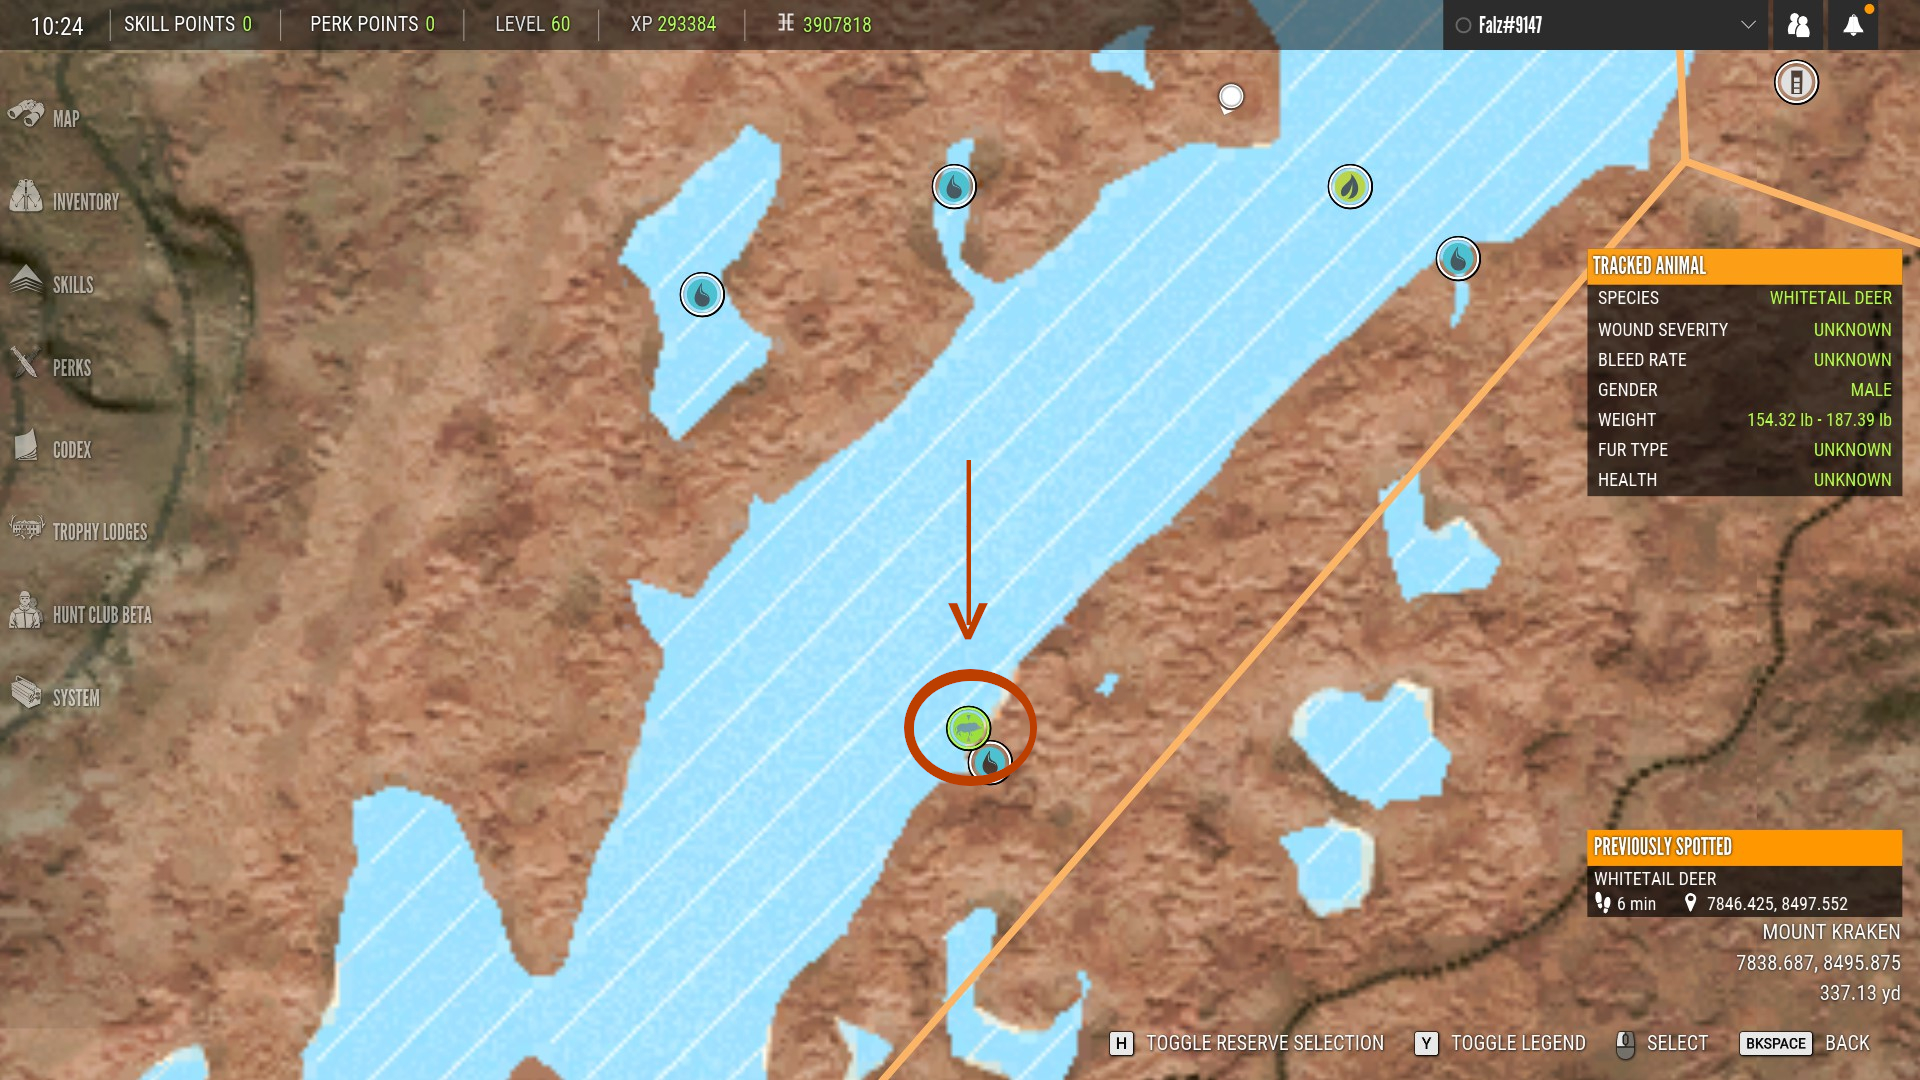
Now click on the marker, put a waypoint on top of it and then exit out of the map. You can now see exactly how far away that animal is from you:

Bows – Where To Aim And Compensating For Wind
If you’re hunting with a bow using pin sights, remember that your point of aim is directly above the top of your sight:

You also need to pay attention to the wind direction indicator on your HUD and take this into account. For instance, if the wind is blowing to the east, you want aim your shot a little to the left so the wind blows the arrow into your target. This applies to crossbows as well:

How much you need to compensate for wind direction depends on how far away you are from your target when you take your shot. The closer you are, the less you need to compensate.
Steadying Your Aim
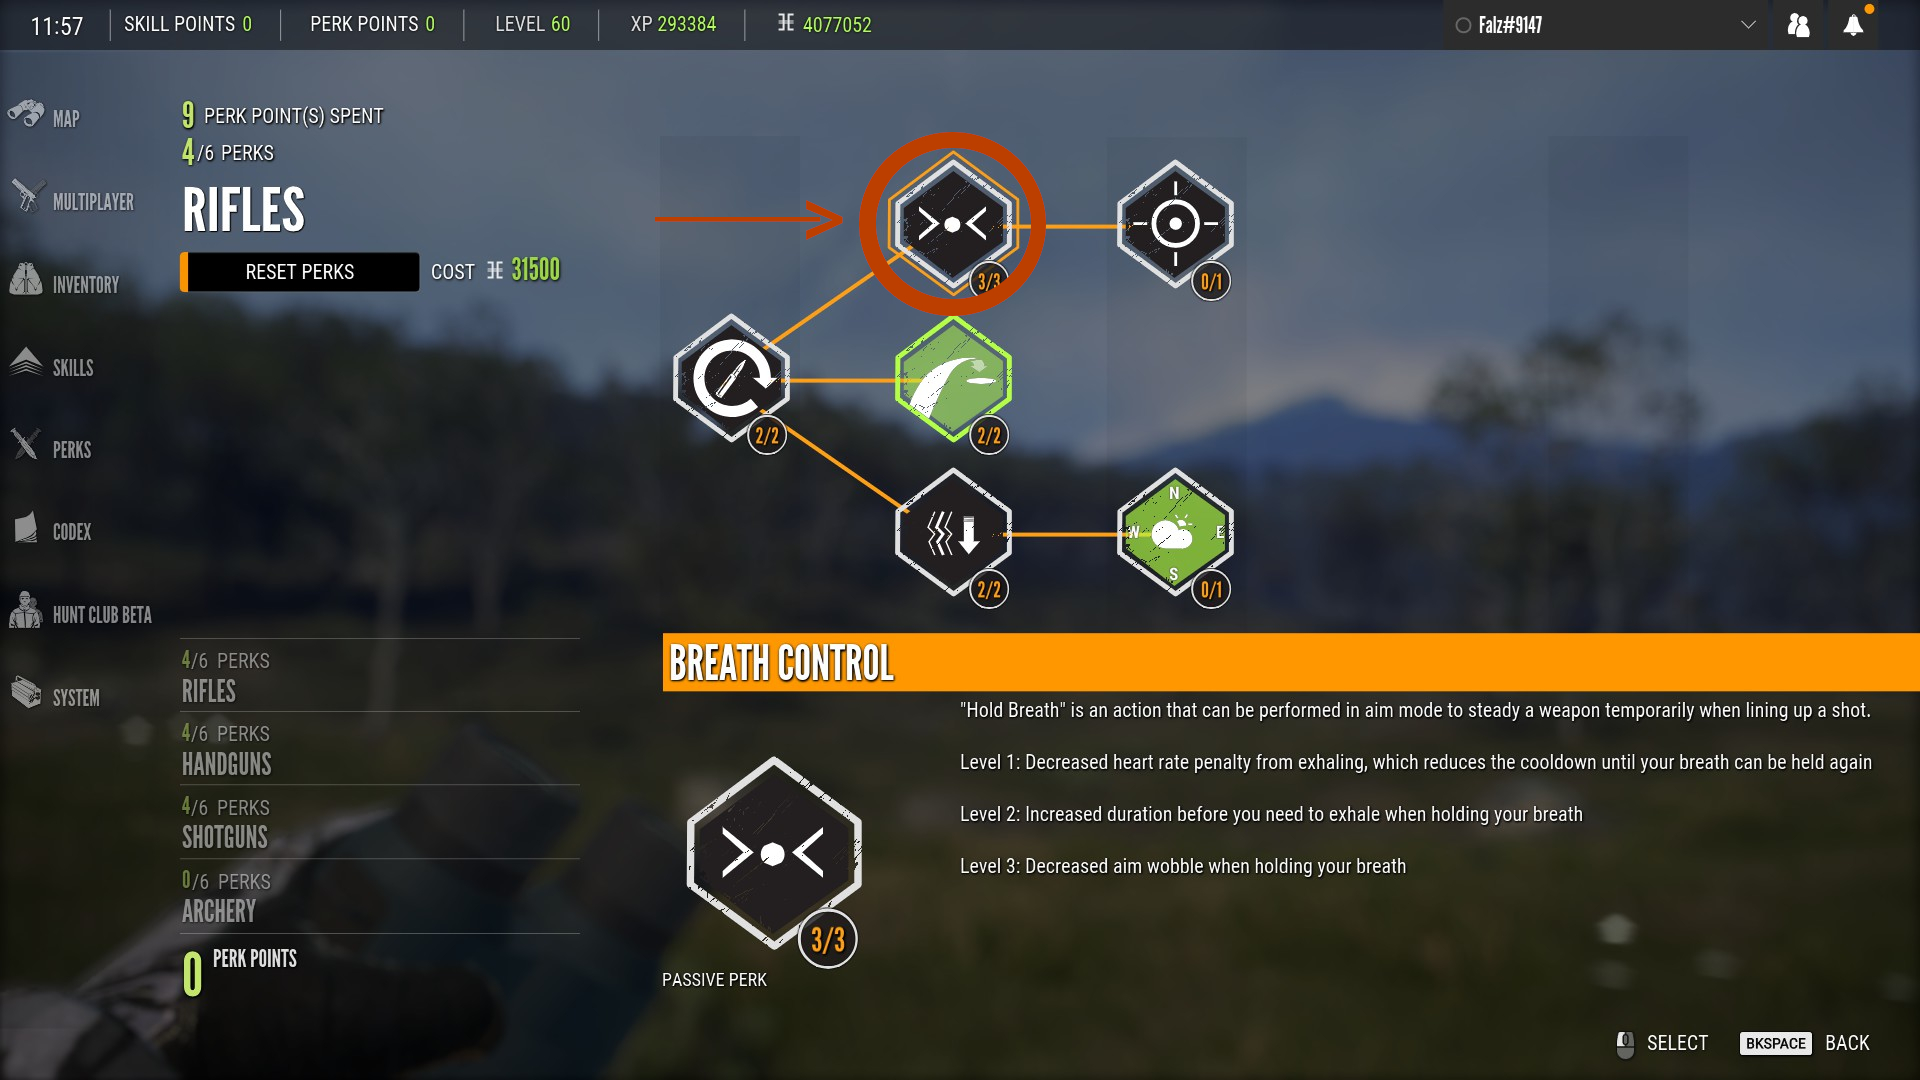
When you initially aim down the sight of your weapon, it is going to be swaying a significant amount which will make getting a precise shot very difficult. To steady your weapon, hold down the shift key to hold your breath. It will still sway somewhat, but it will be much easier to place the shot where you want it. Bear in mind however that you can only hold your breath for a limited amount of time so keep an eye on the heart icon in your HUD. When it starts to turn red, this means you’re about to run out of breath:
You can also run out of breath by sprinting for too long. If you try to aim while out of breath, your weapon is going to be swaying even more severely and you’ll have to wait a few seconds before you’ll be able to hold your breath again.
There are a couple of perks you can unlock from the rifles perk tree that will allow you to hold your breath longer and reduce the weapon sway. These are Breath Control and Steady Hanfs:
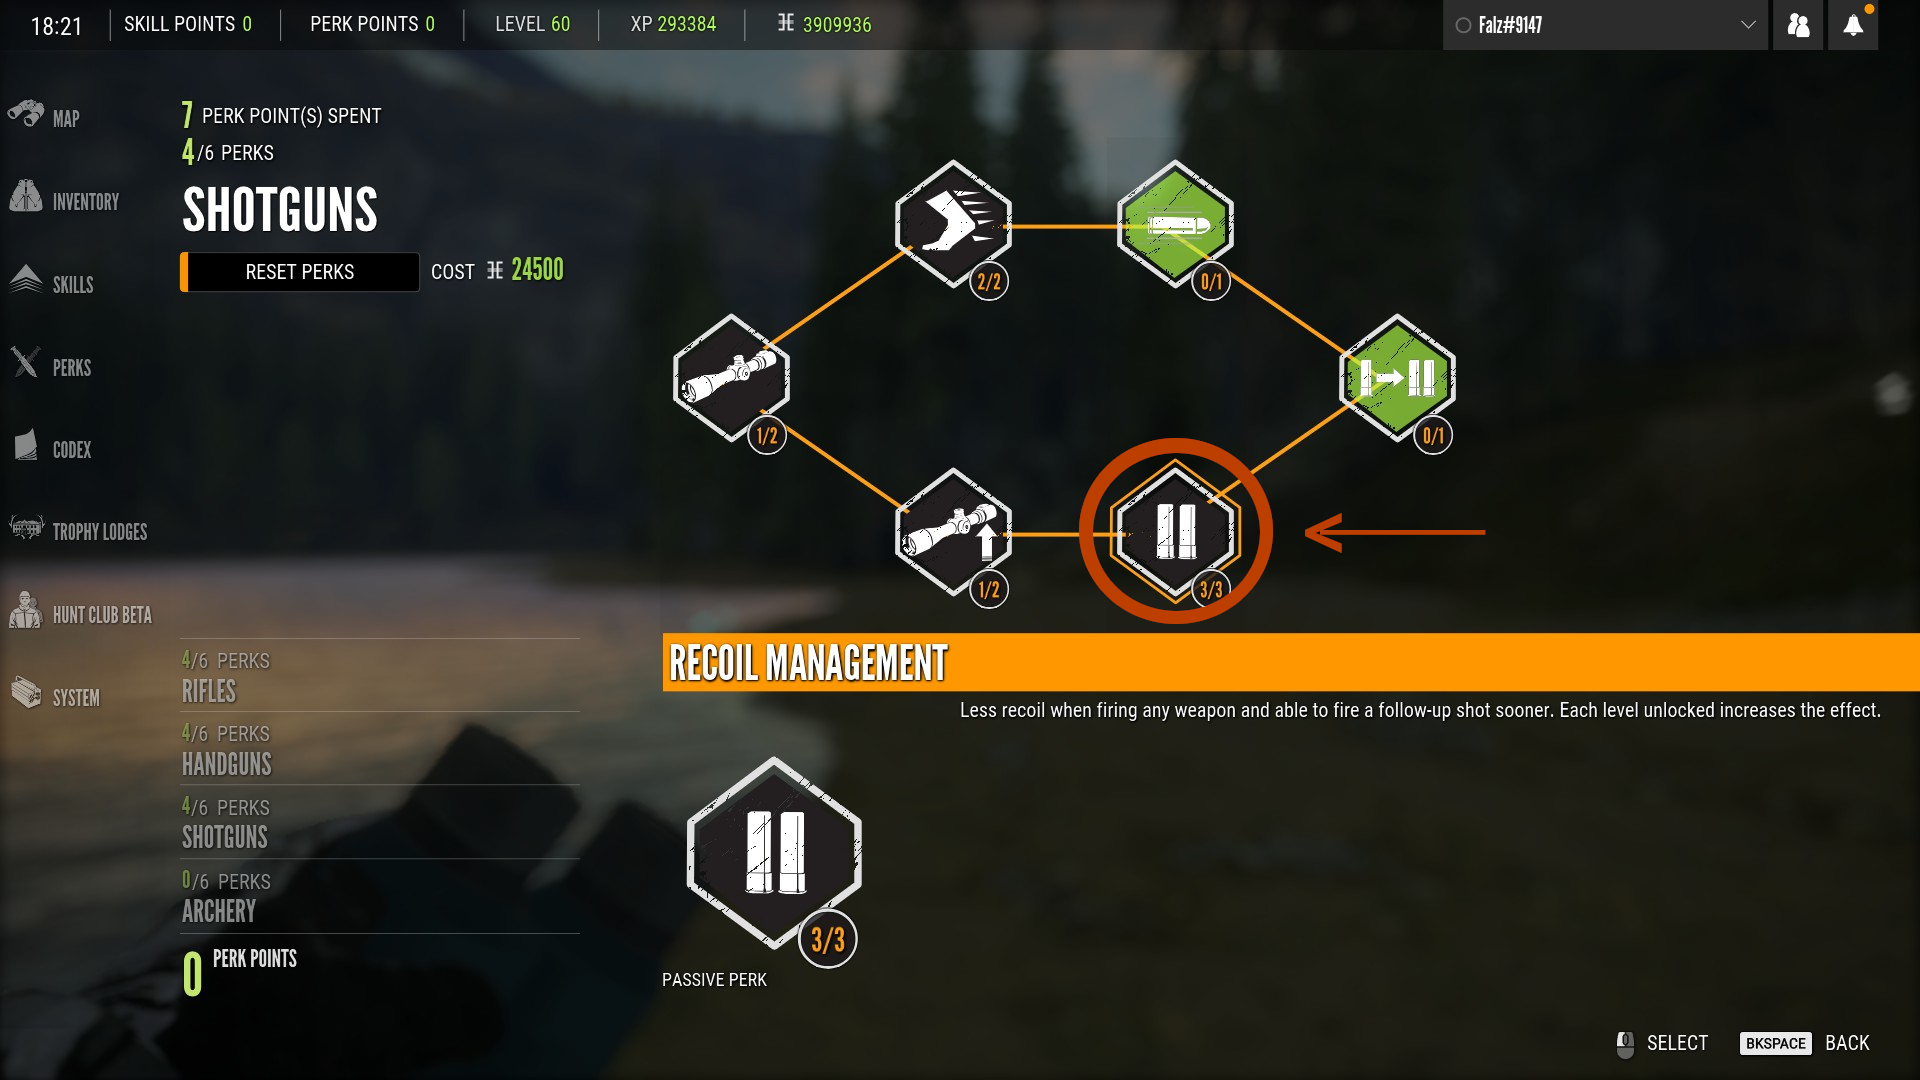
The Recoil Control perk from the shotguns perk tree can also be very helpful for when you need fast follow up shots:
Leading Shots
If the animal you want to shoot at is moving, you’ll need to compensate for this by leading your shot so that the animal walks into it:
How much you need to lead your shot depends on how far away you are and how fast the animal is moving. It will also depend on which weapon you’re using. For instance, rifle bullets often travel faster than handgun bullets so you won’t have to lead your shot as much with a rifle as you would if you were using a handgun. Leading shots is very tricky sometimes and it’s something you’ll just need to practice doing until you can get a feel for it.
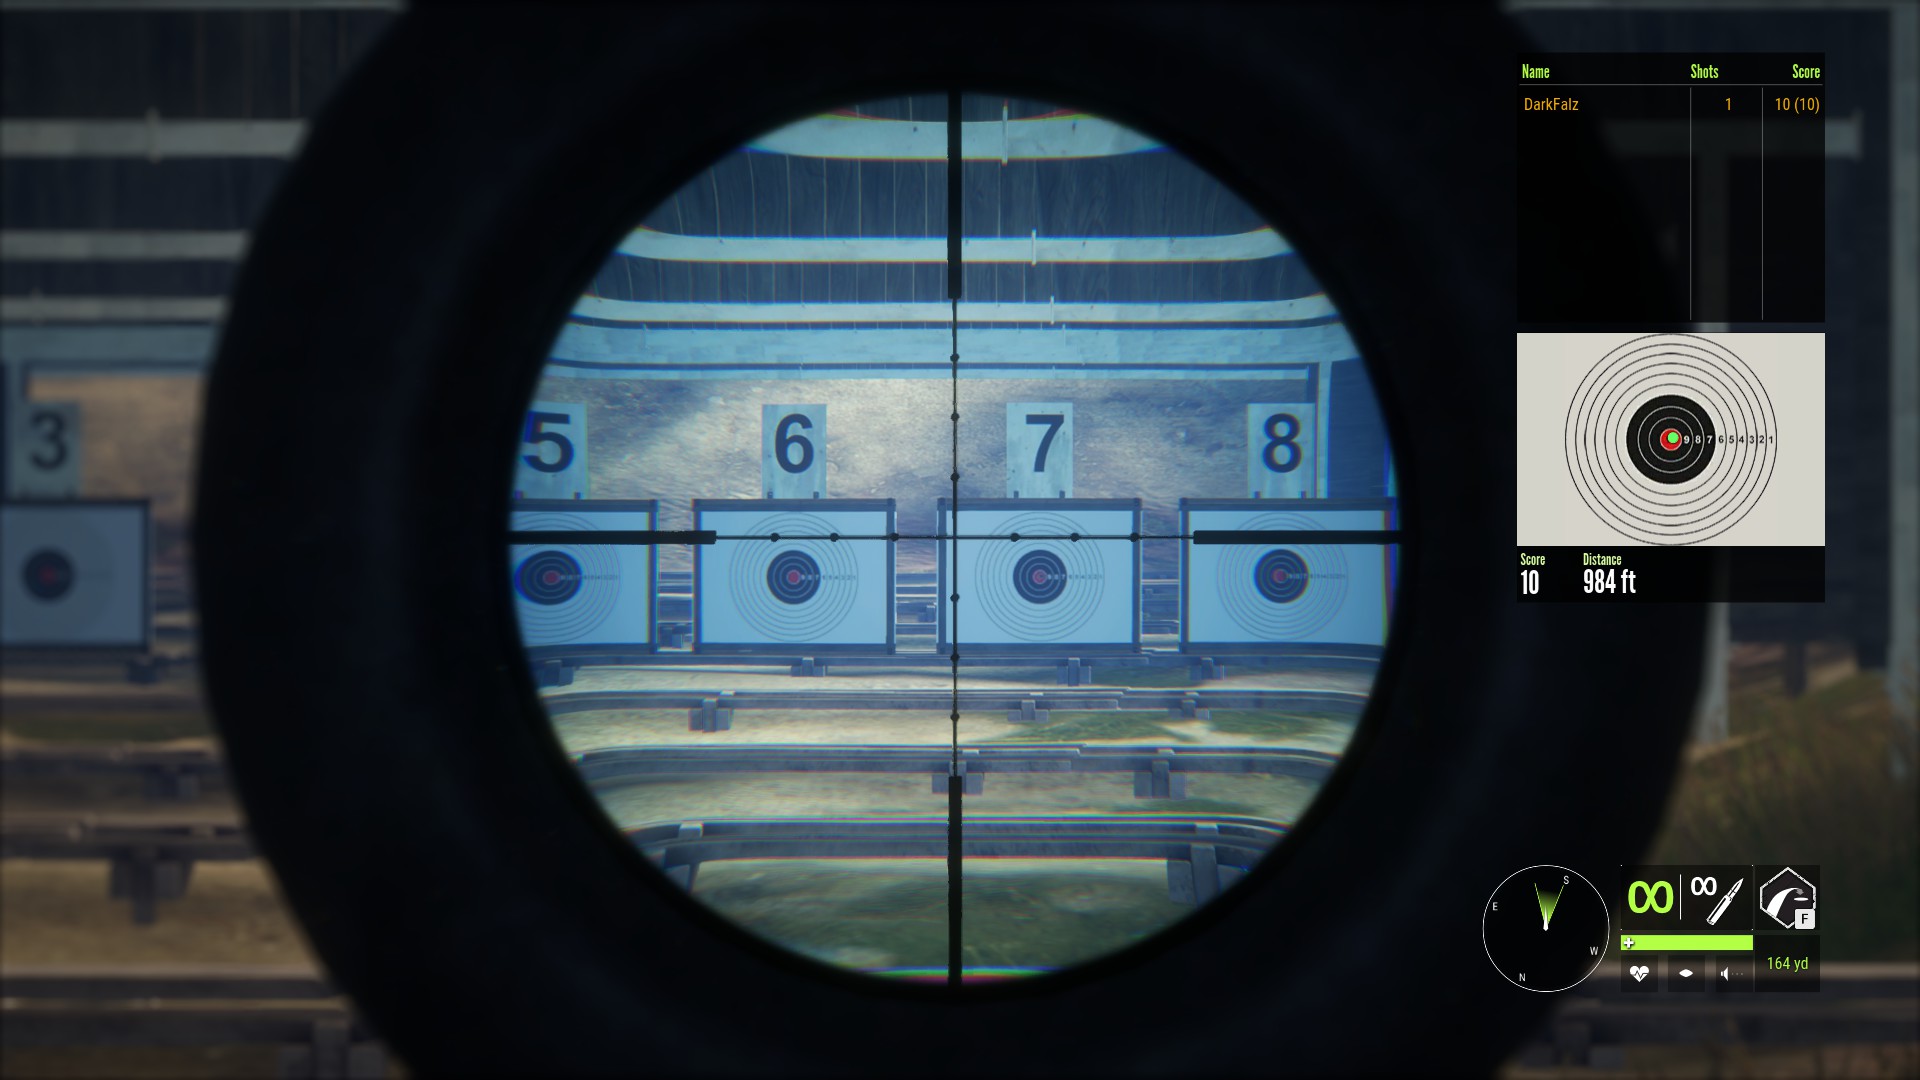
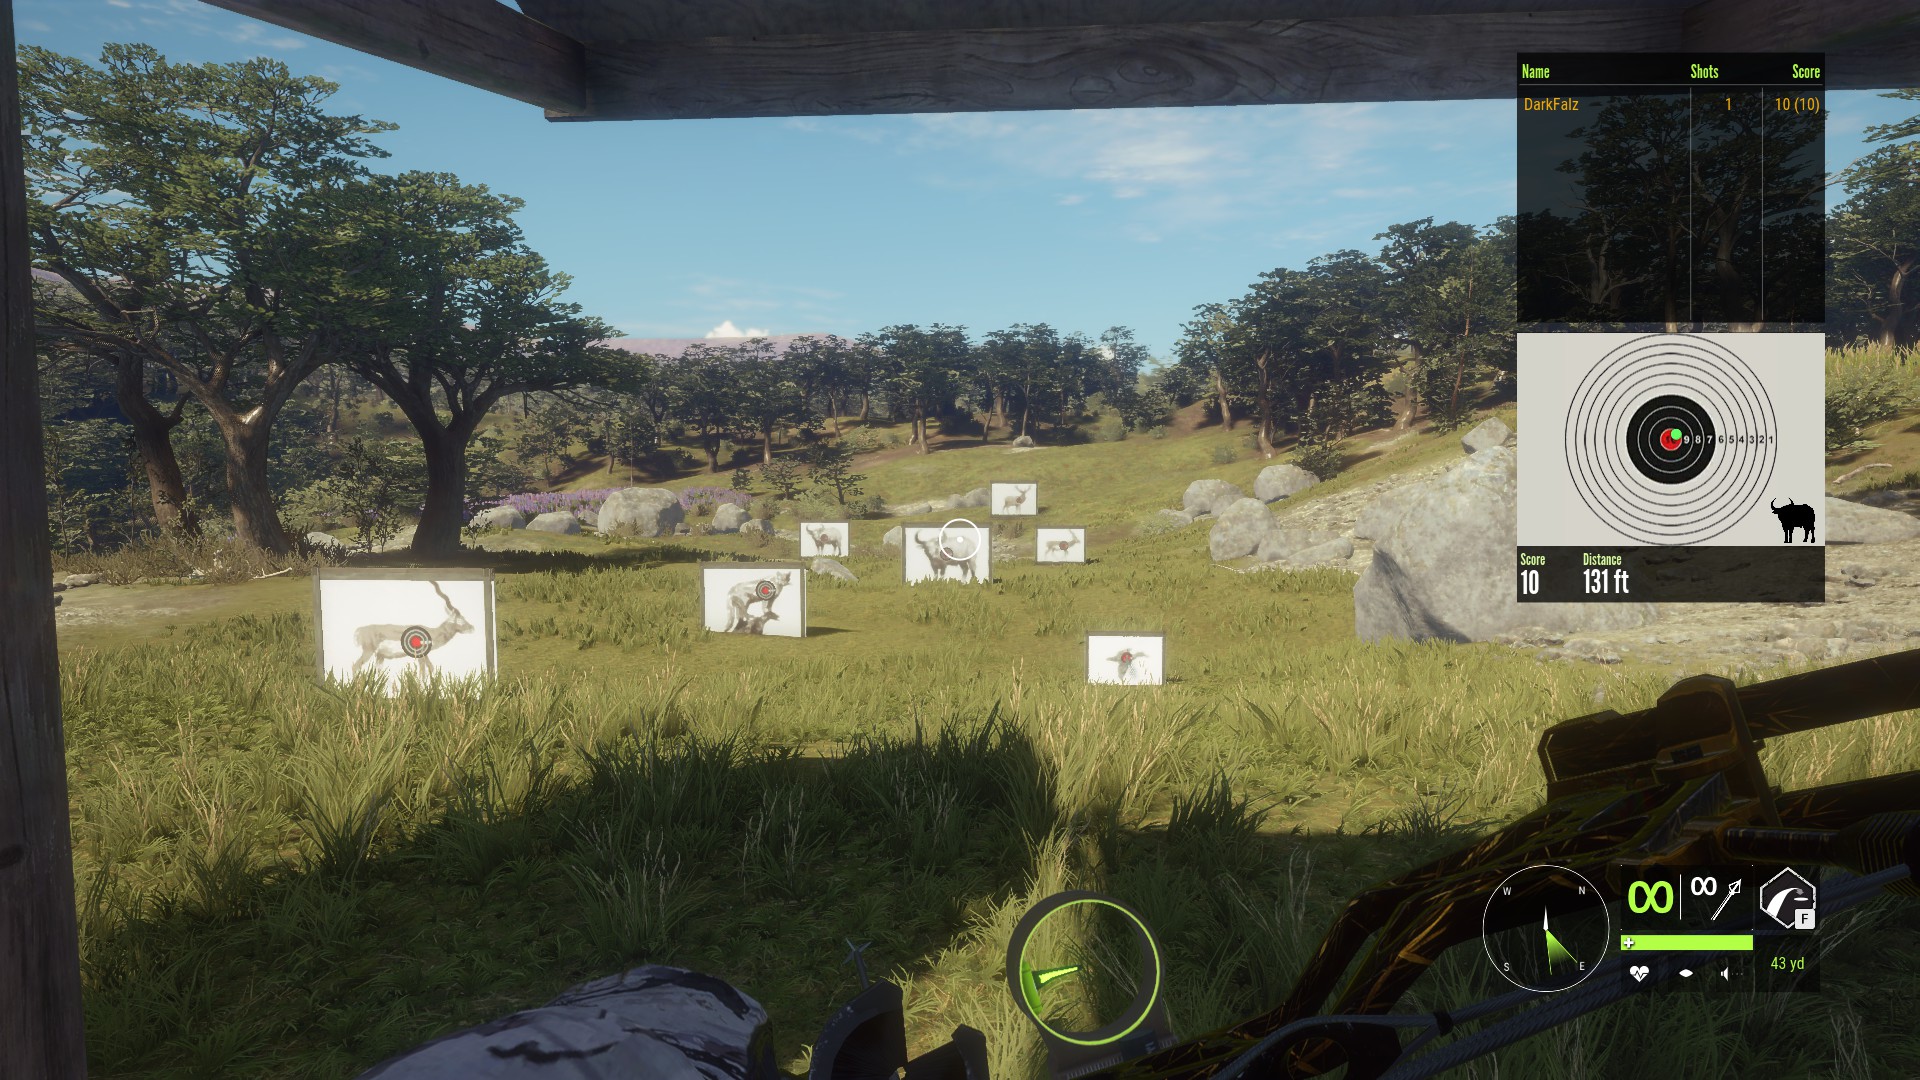
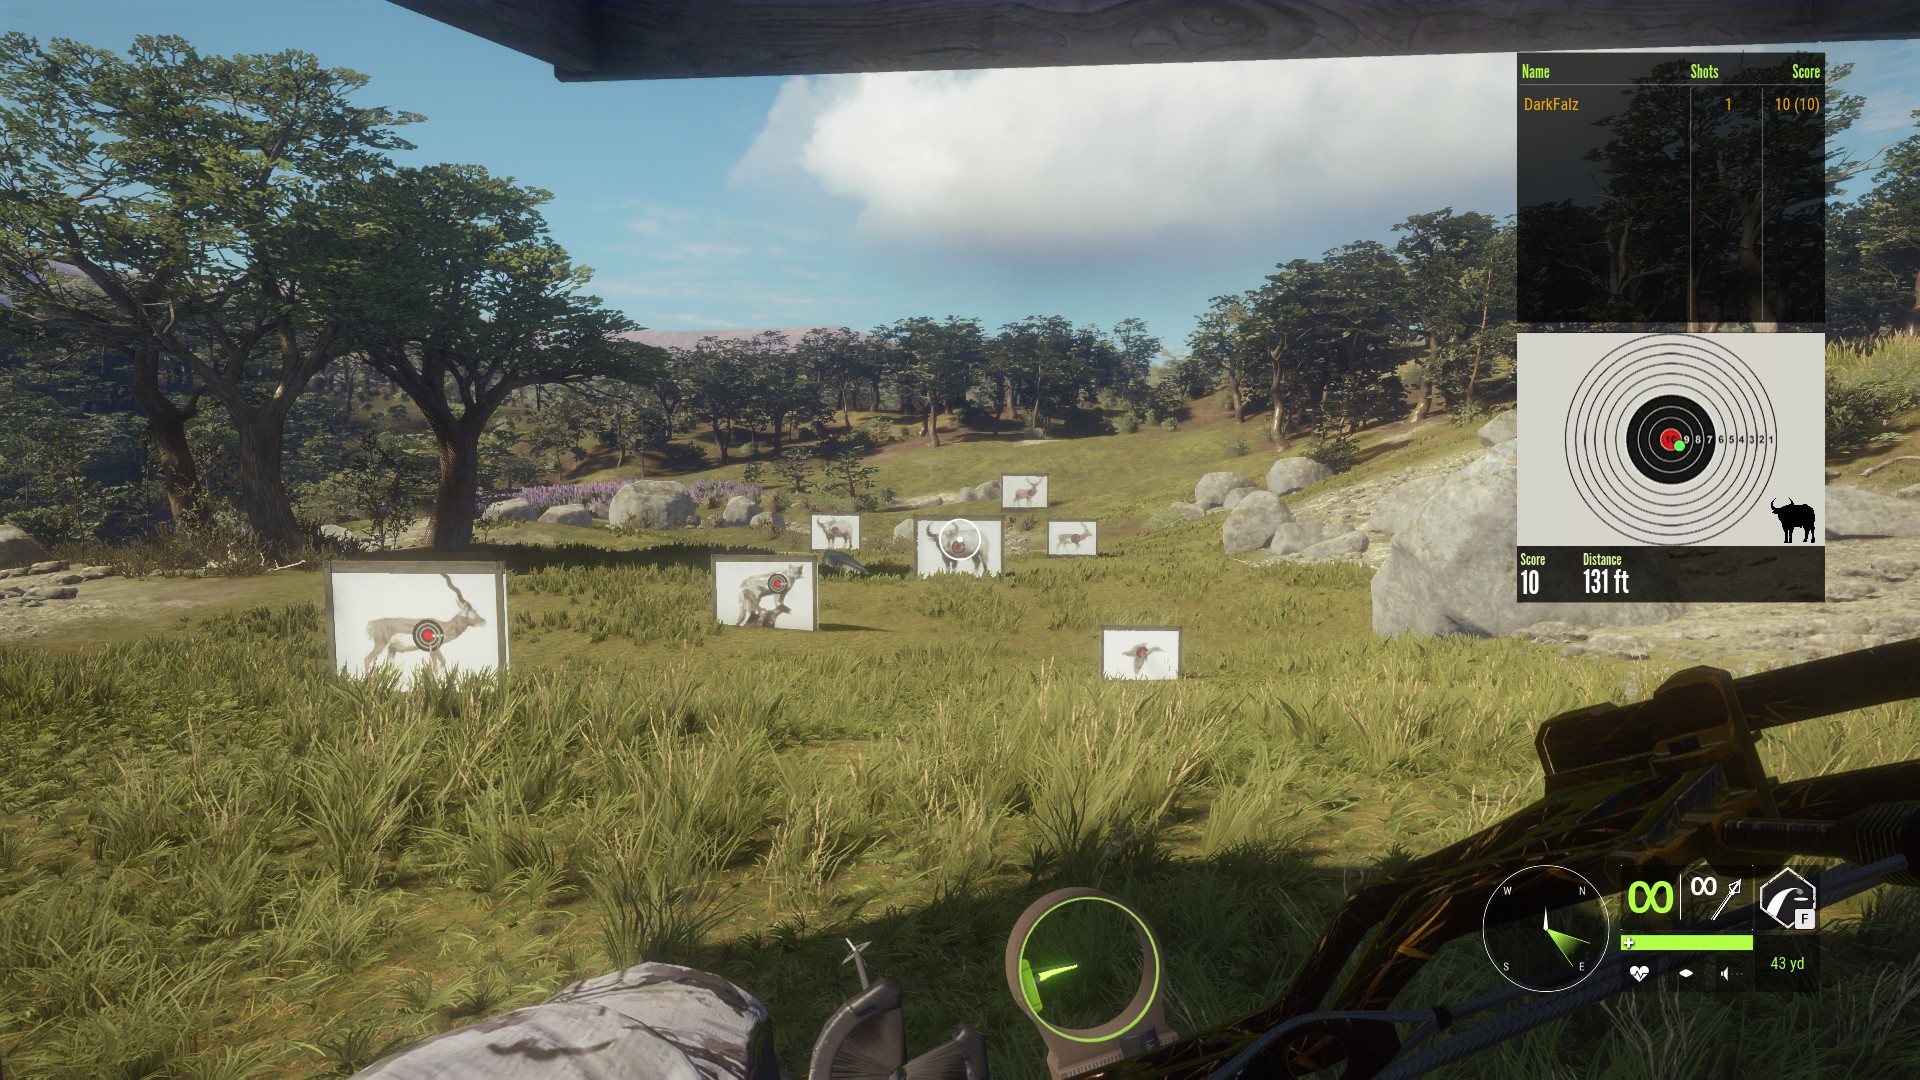
Practicing Your Aim
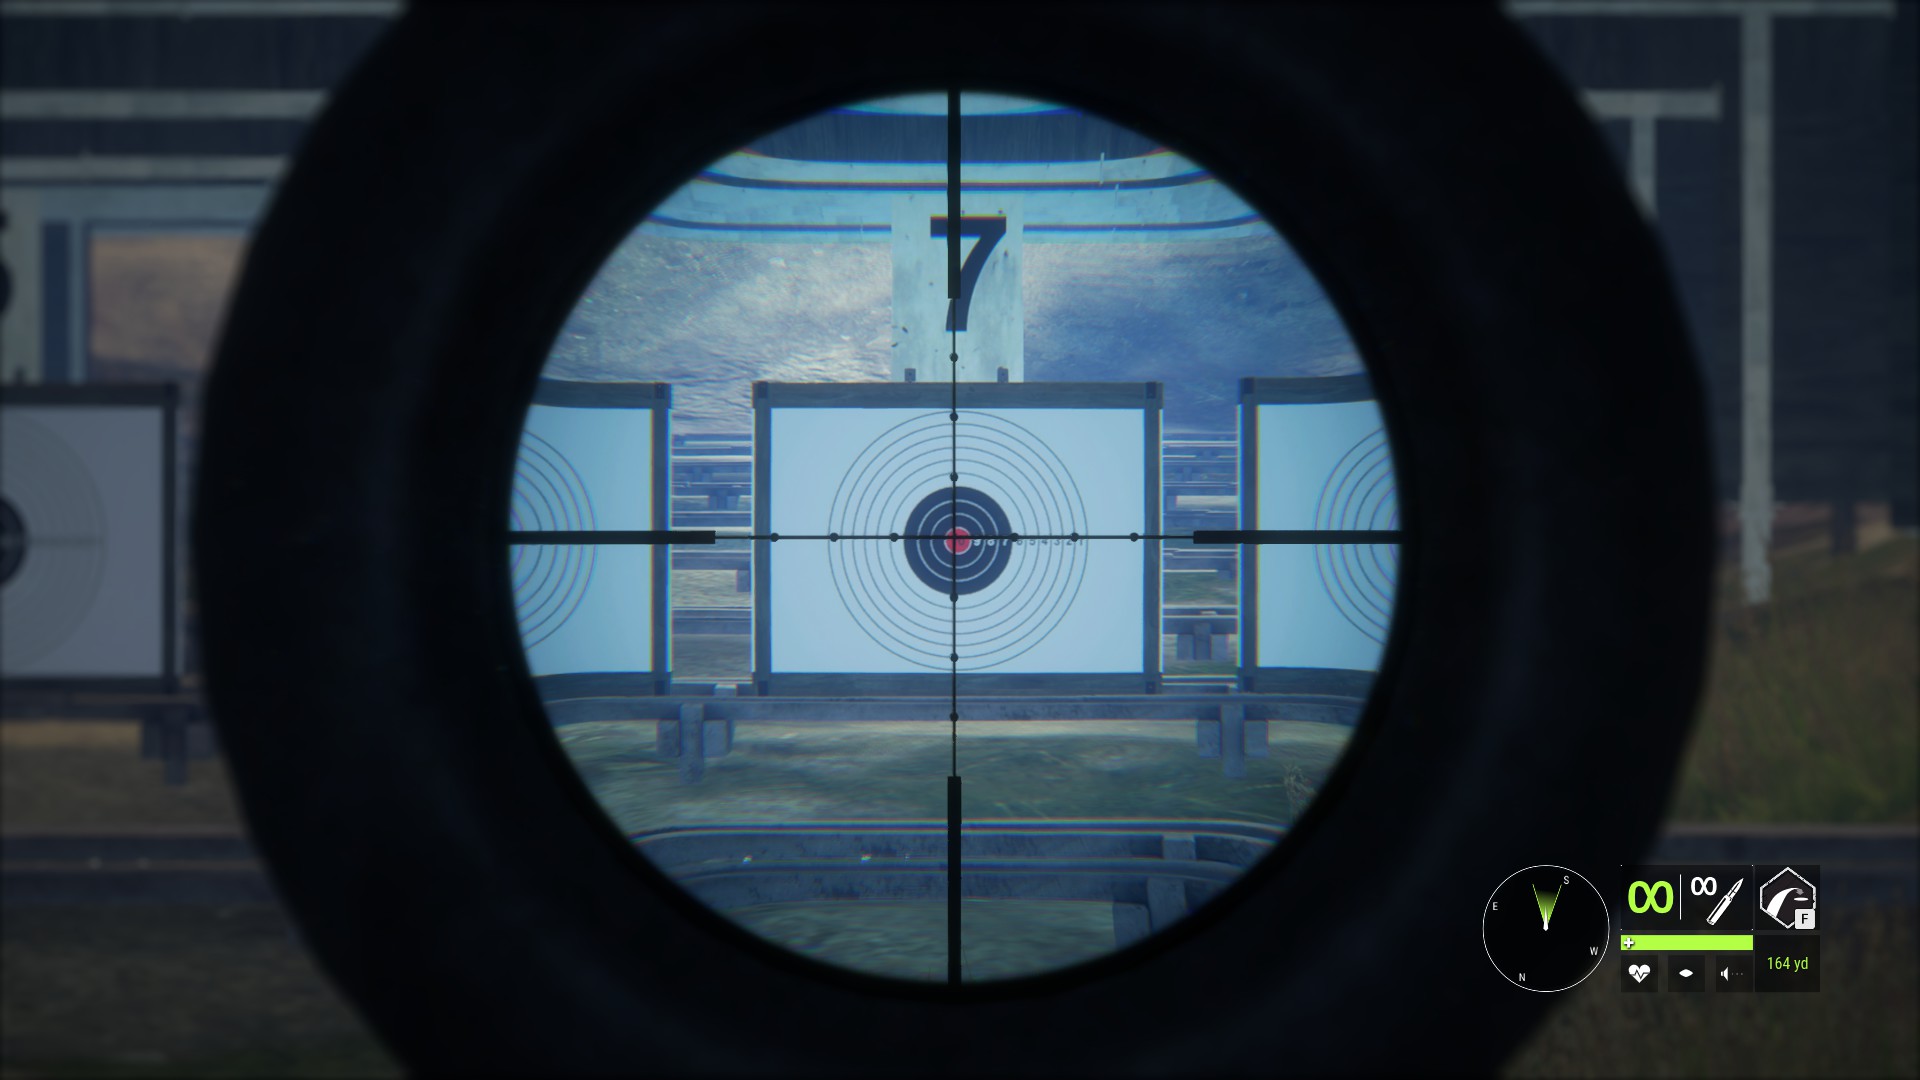
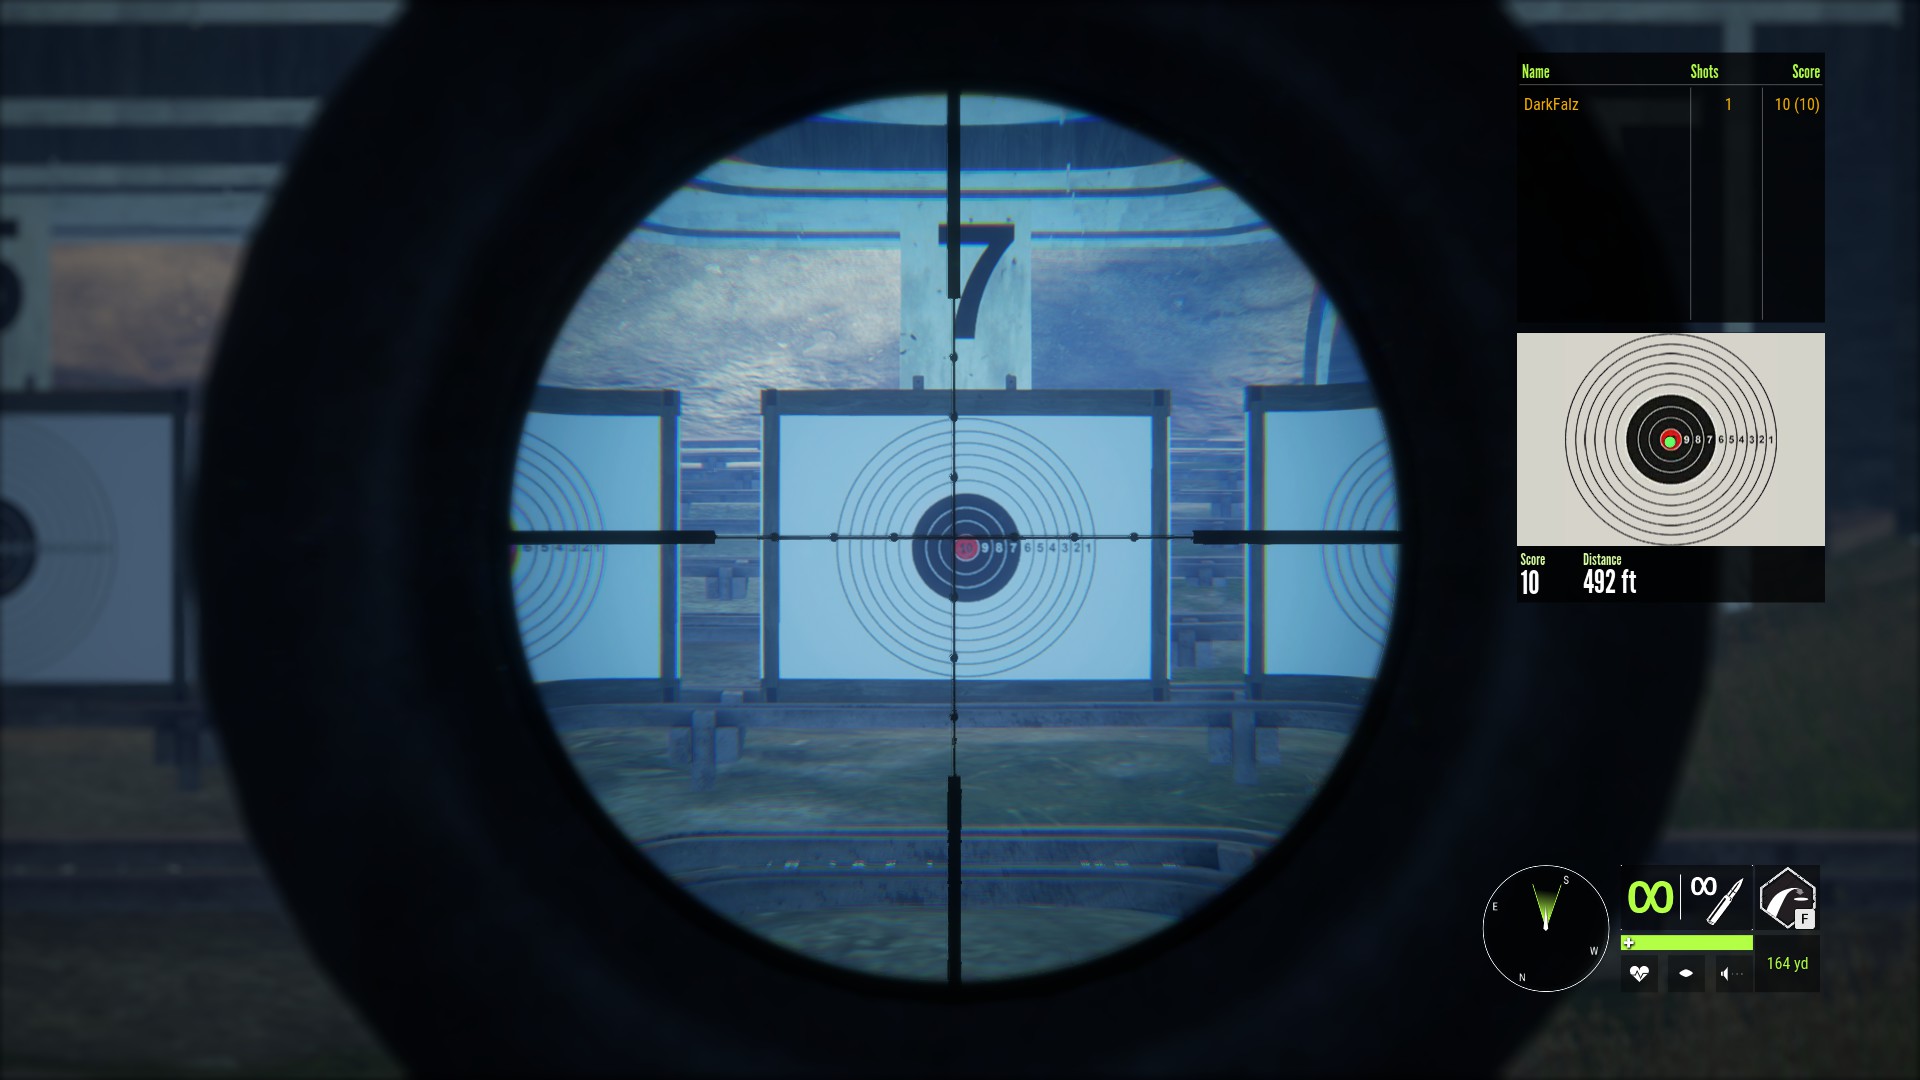
The Hirschfelden map comes with a shooting range where you can practice your aim. You don’t need to worry about ammo here since you will automatically be given infinite ammo for every weapon you have on you when you enter the range. The range is located very close to your initial spawn point on the map and you can even fast travel to it once it is discovered:
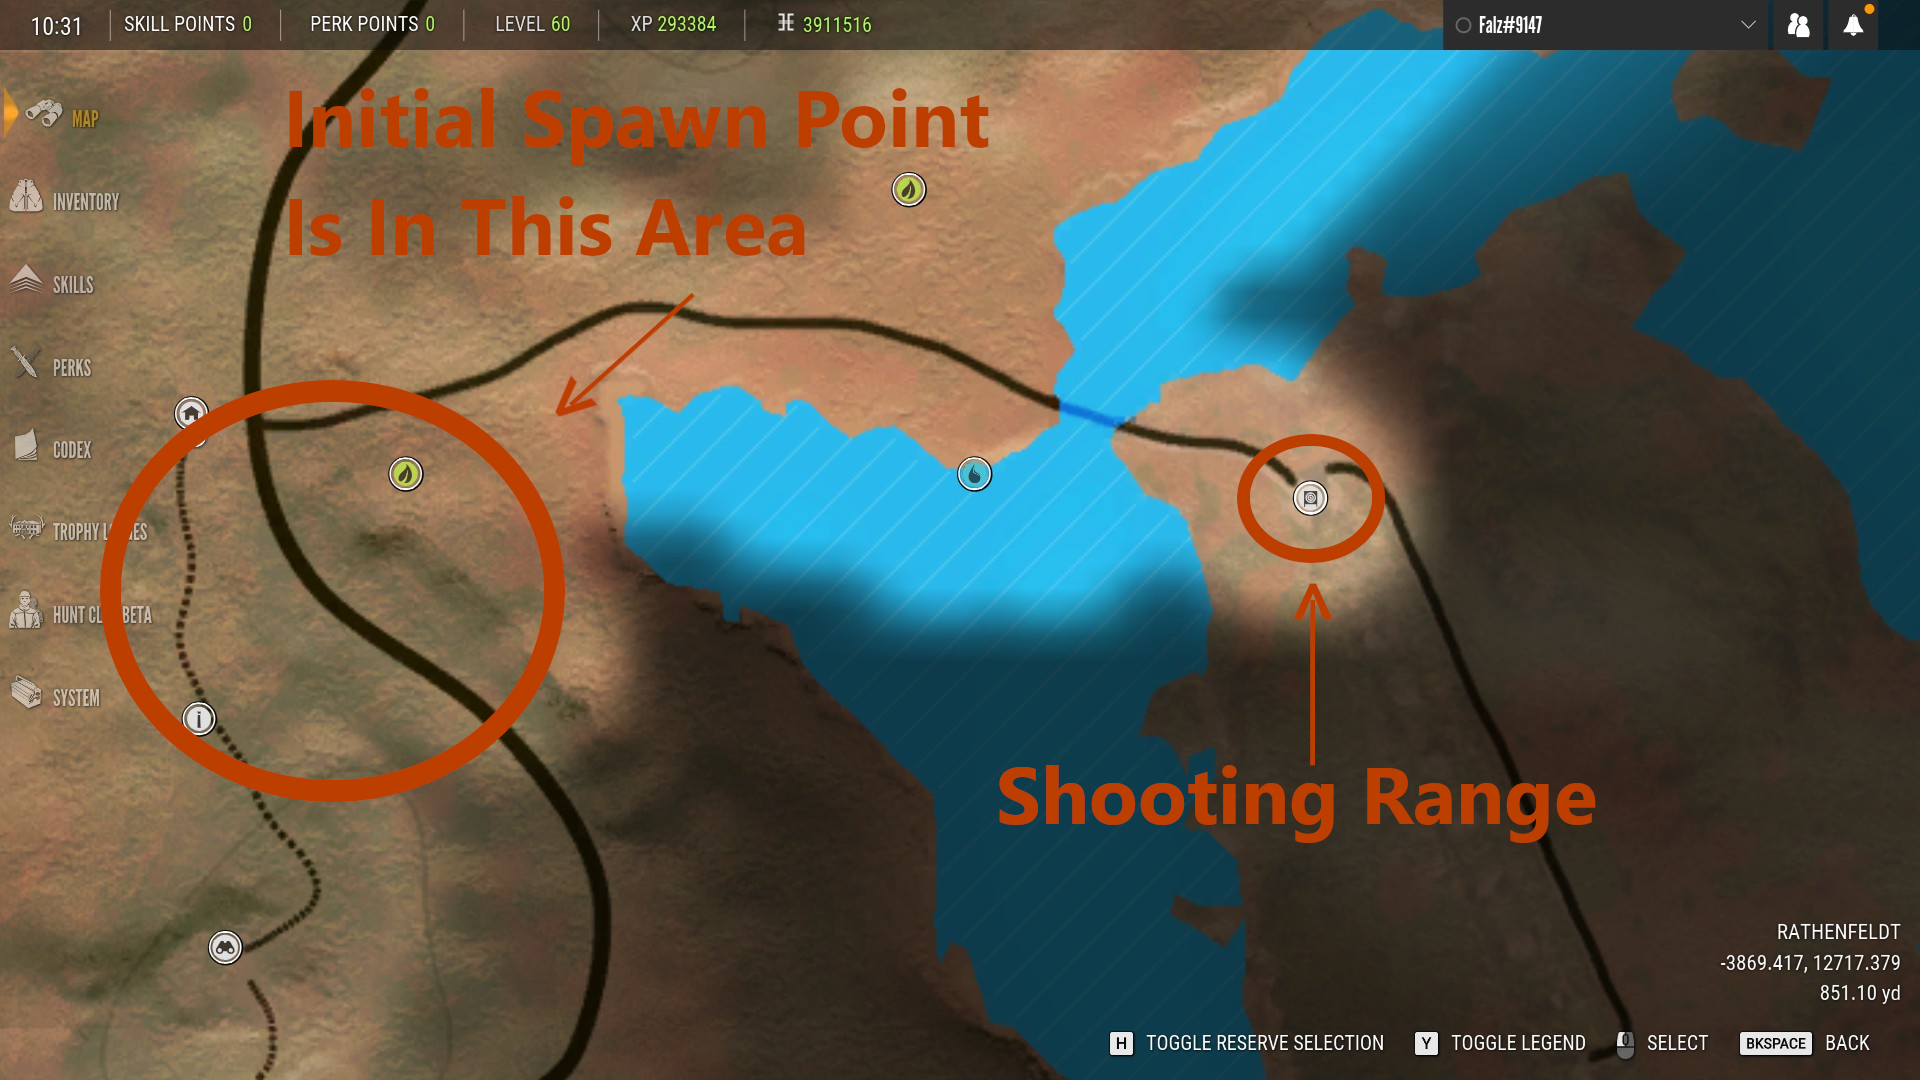

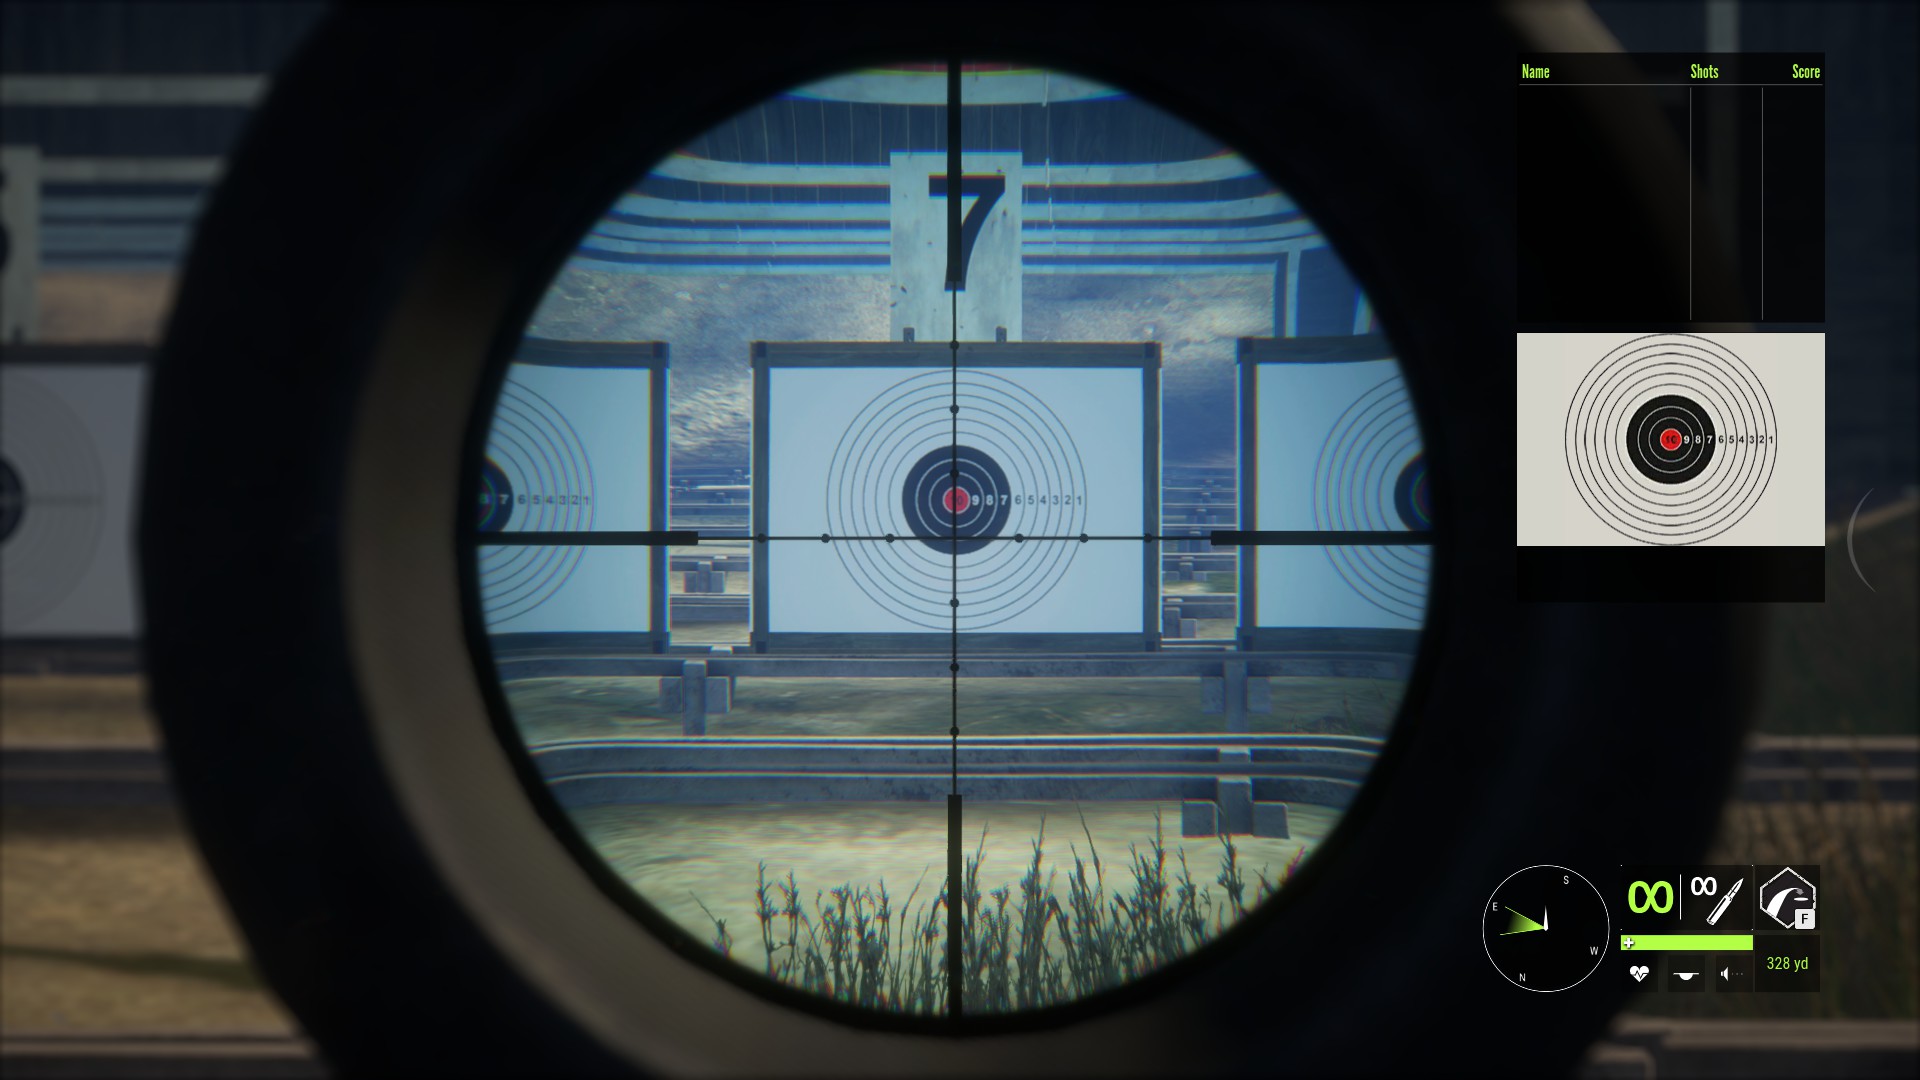
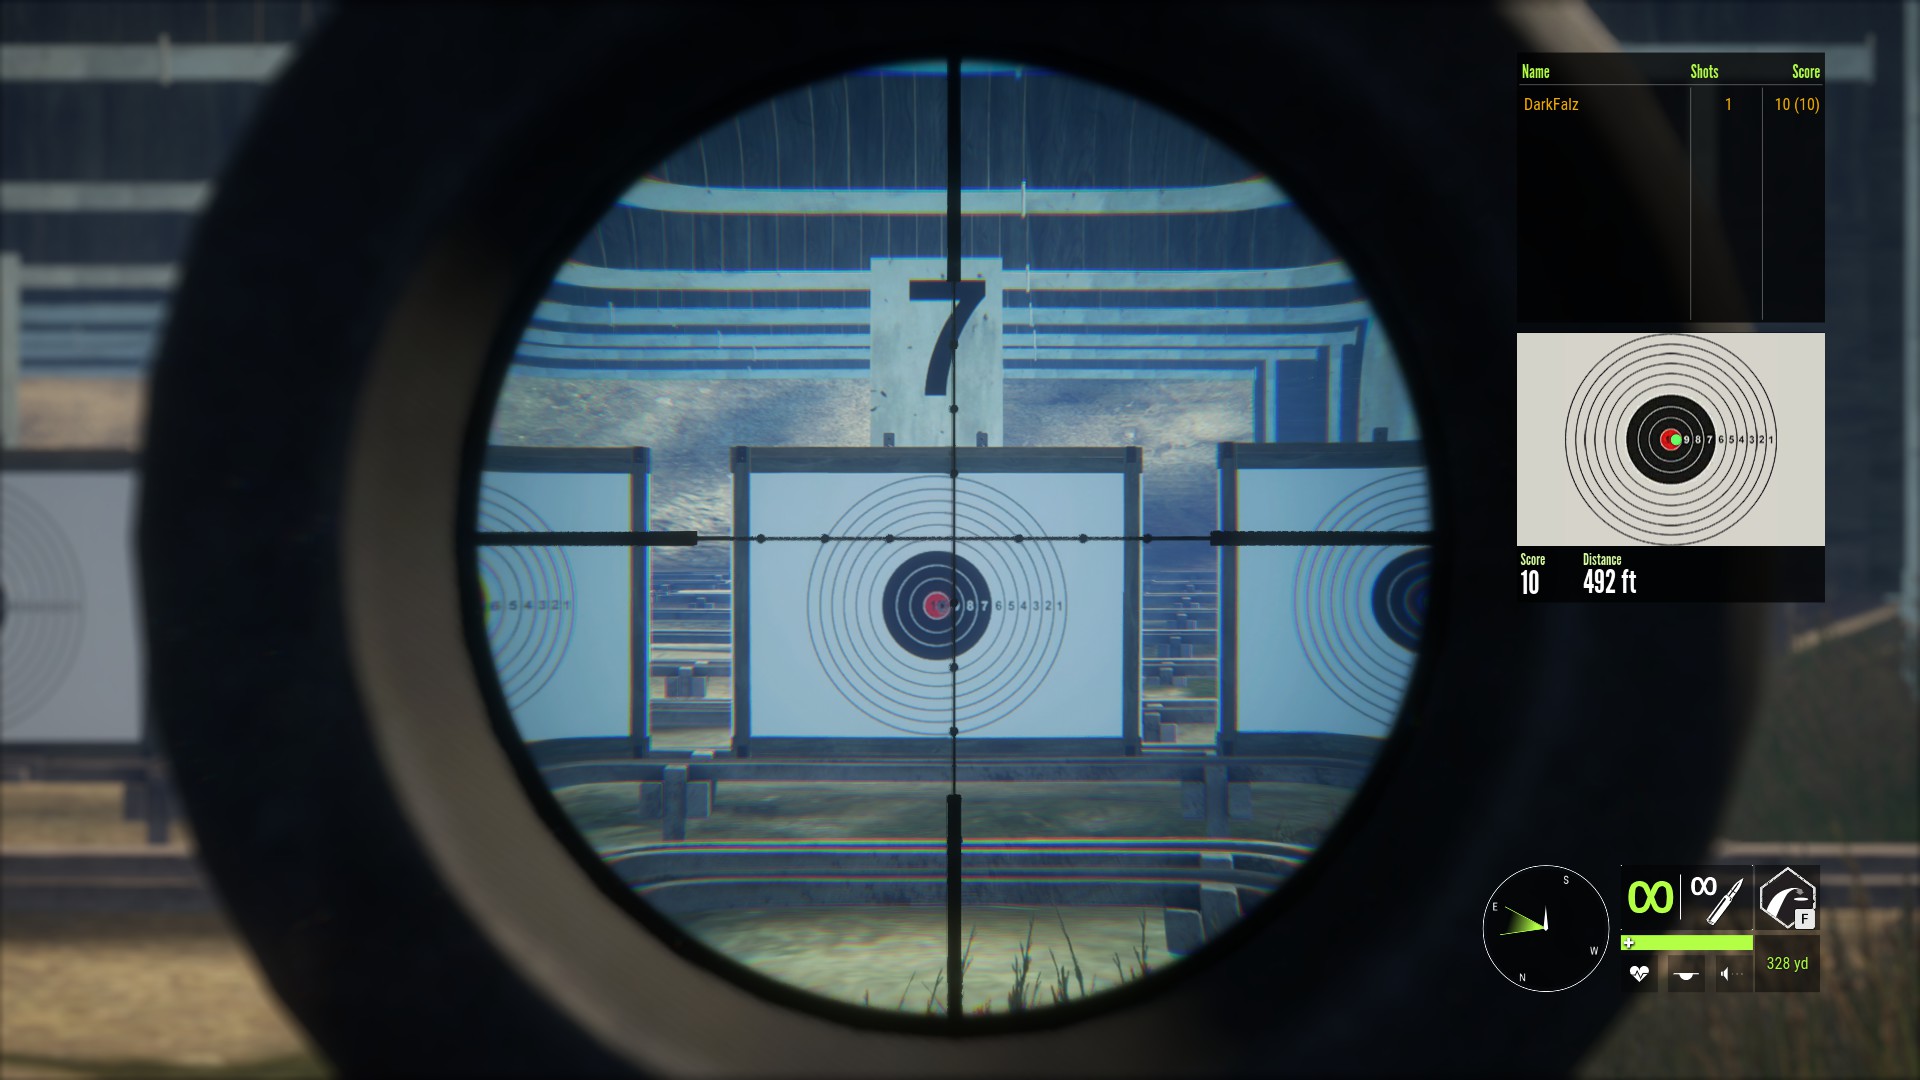
The Parque Fernando map also comes with a shooting range that is geared more towards handguns, shotguns and bows. Once again, you will have infinite ammo when you enter the range. This one will not be marked on the map but it is located very close to one of the outposts here:


Tracking An Animal You’ve Shot
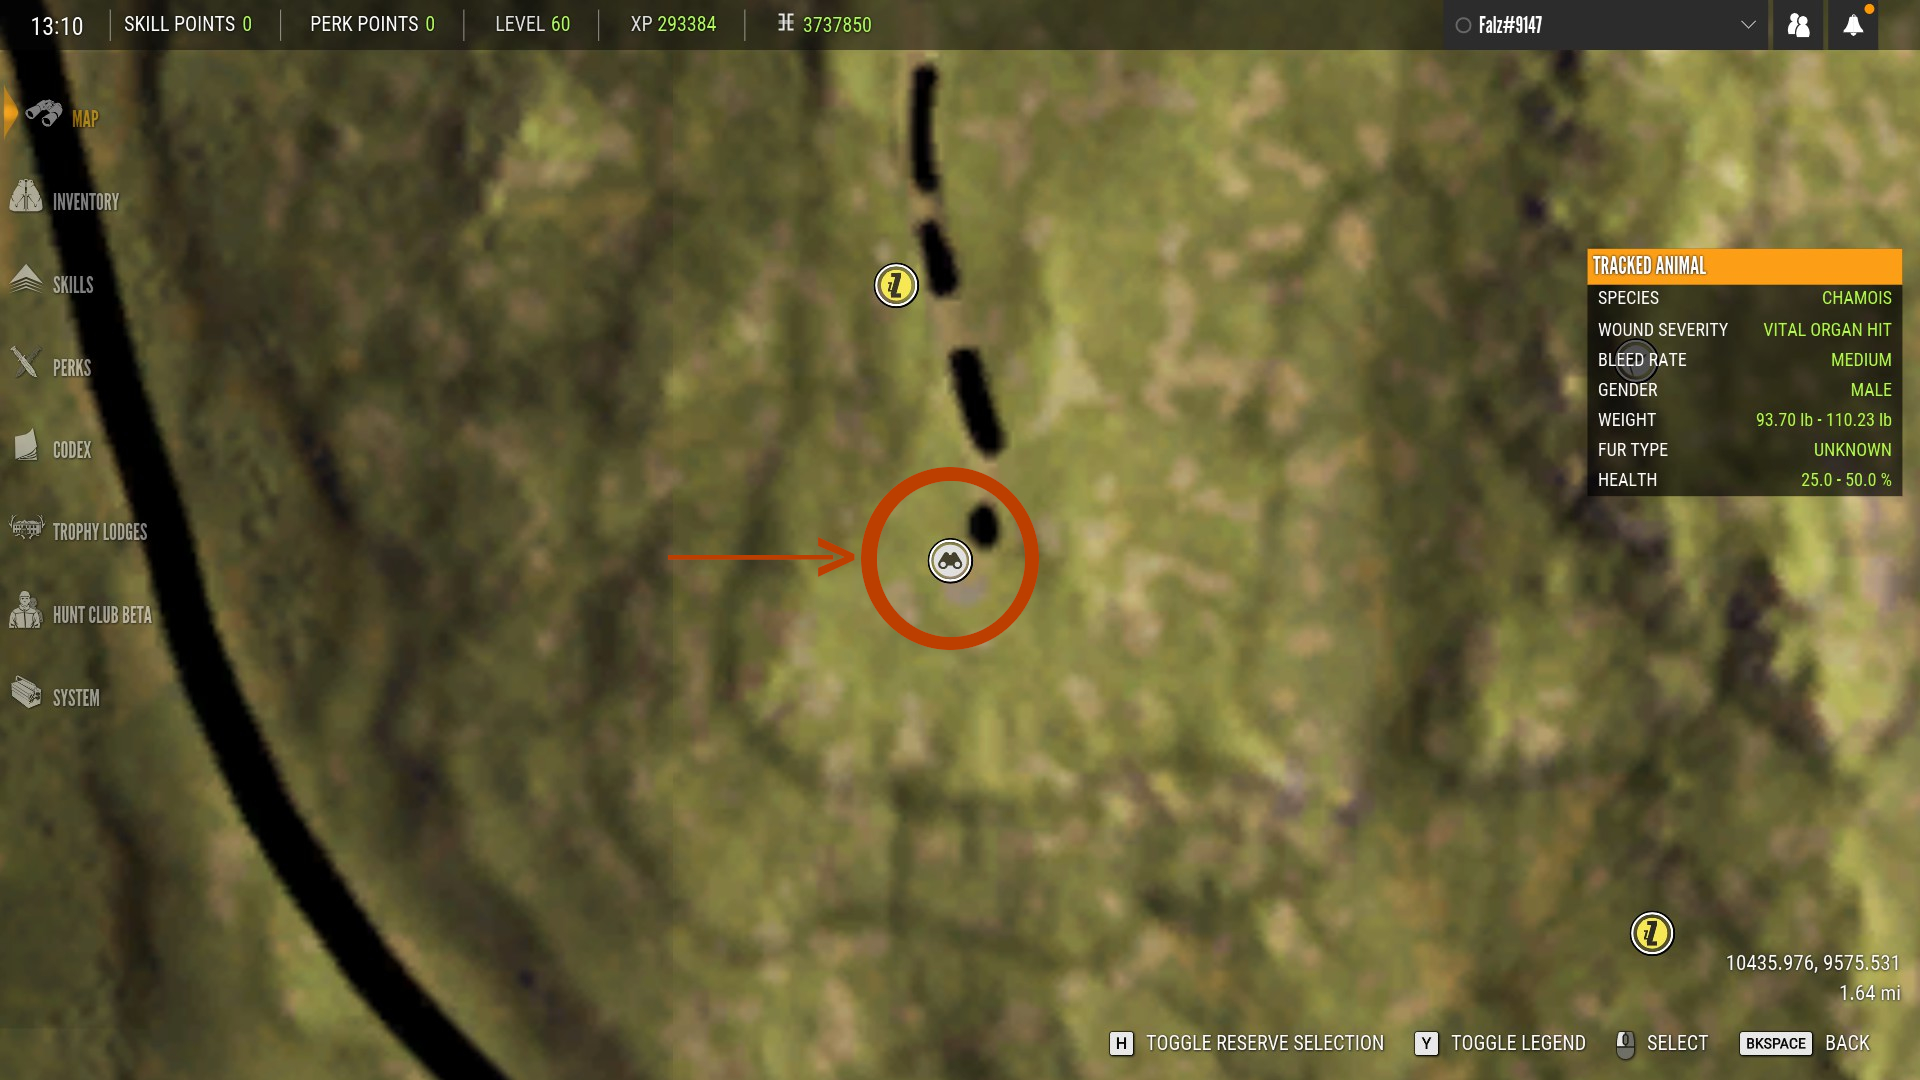
Once you shoot an animal, it will leave behind a blood spatter at the point it was shot and then a blood trail as it runs away. Like the other tracks we discussed before, examining a blood splatter or blood trail will mark the animal you shot as the one you are tracking and all of its tracks will be automatically be highlighted for you.
Blood Splatters
There are 3 types of blood splatters that animals can leave after being shot and the size of the blood splatter will tell you how good your shot was:

If you see a large blood splatter like this one, then you hit a vital organ. A vital hit will always be fatal and assuming you used ammo that is appropriate for the animal, it usually won’t run very far before it bleeds out.
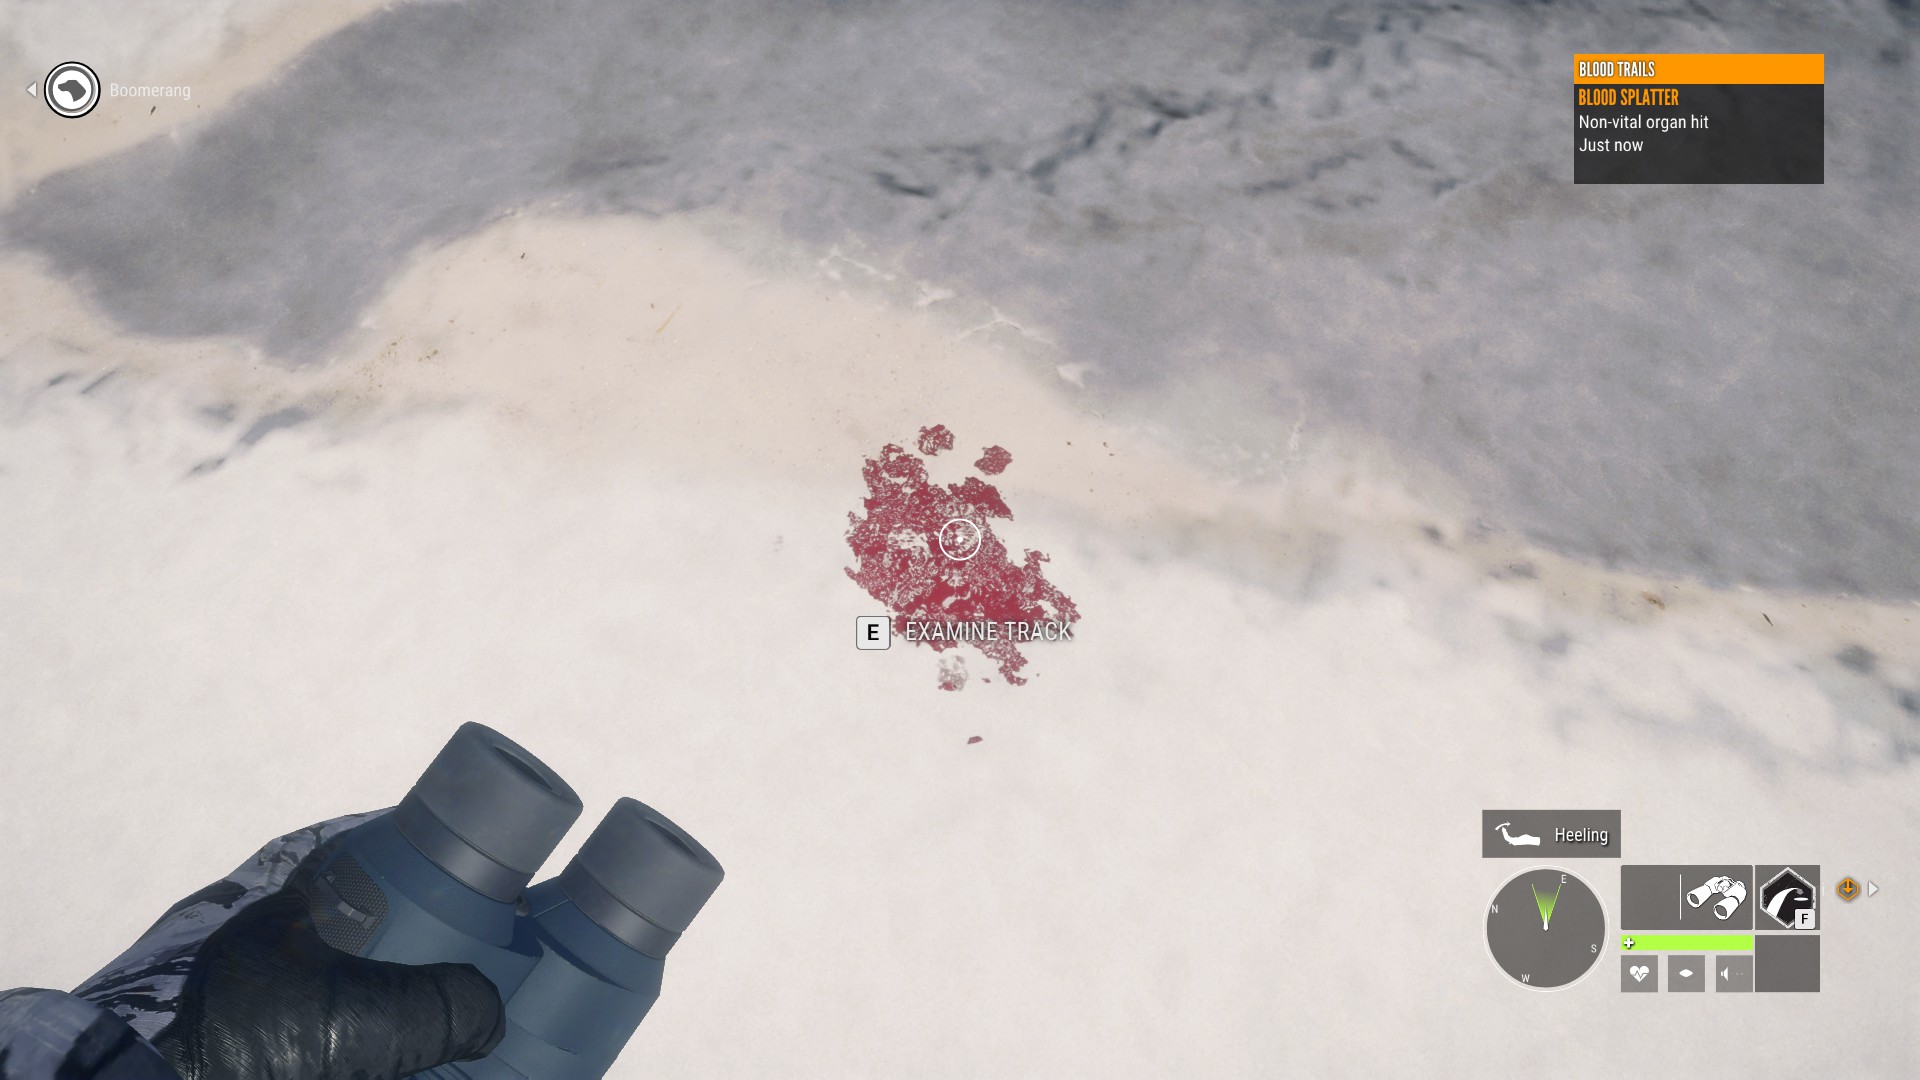
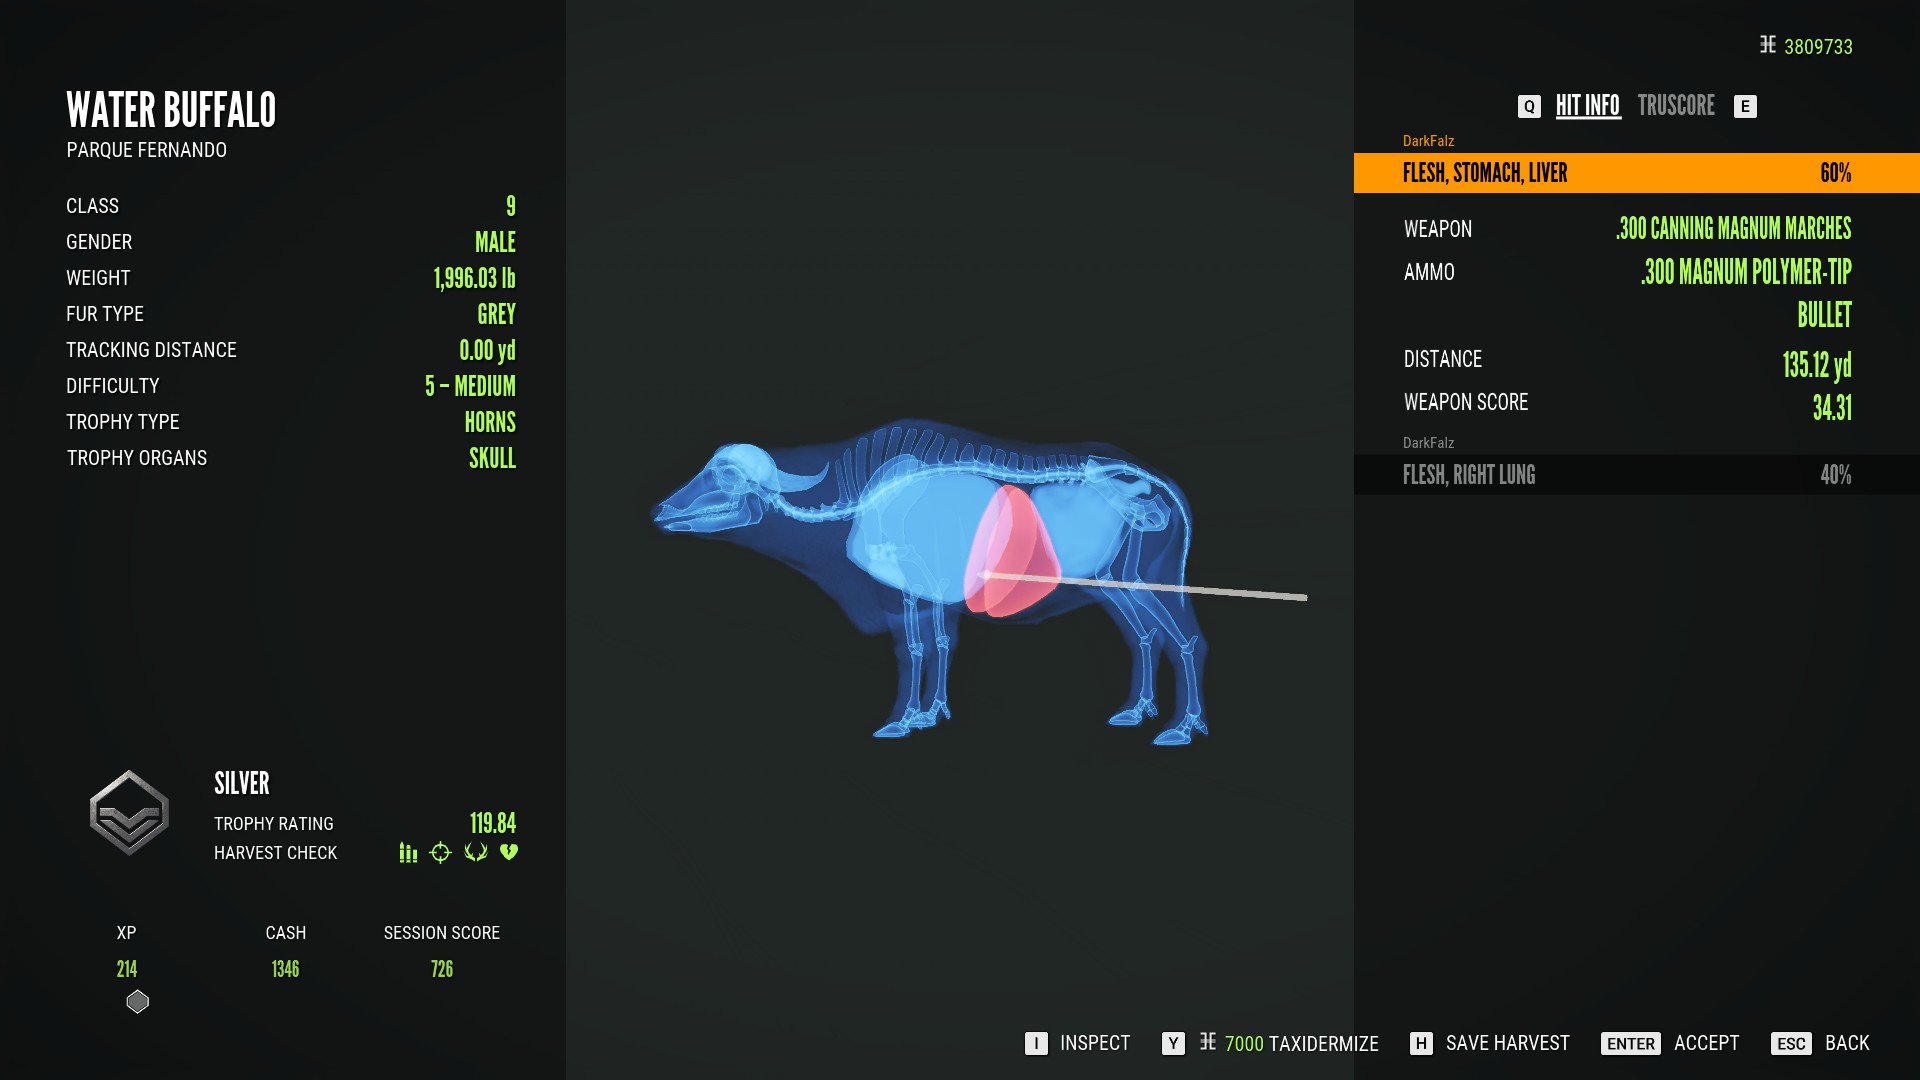
If you see a medium blood splatter like this one, then you hit a non vital organ (either stomach or intestines). A non vital hit will always be fatal but will result in a lower bleed rate than a vital hit so the animal is going to run further before it bleeds out.

If you see a small blood splatter like this one, then you only got a flesh hit. Whether or not a flesh hit will be fatal largely depends on the animal itself and what weapon you used. Regardless, flesh hits typically do not bleed very quickly and so if the animal does die from it, it’s going to run for a long distance before it does.
Blood Trails
Examining the blood trail the animal leaves behind will show you how quickly it is bleeding and if you have the track knowledge level 2 skill from the stalker skill tree, you can also see approximately how much health it has left. There are 5 different bleed rates:
- Very Low
- Low
- Medium
- High
- Very High
The higher the bleed rate is, the faster the animal is going to bleed out and die:
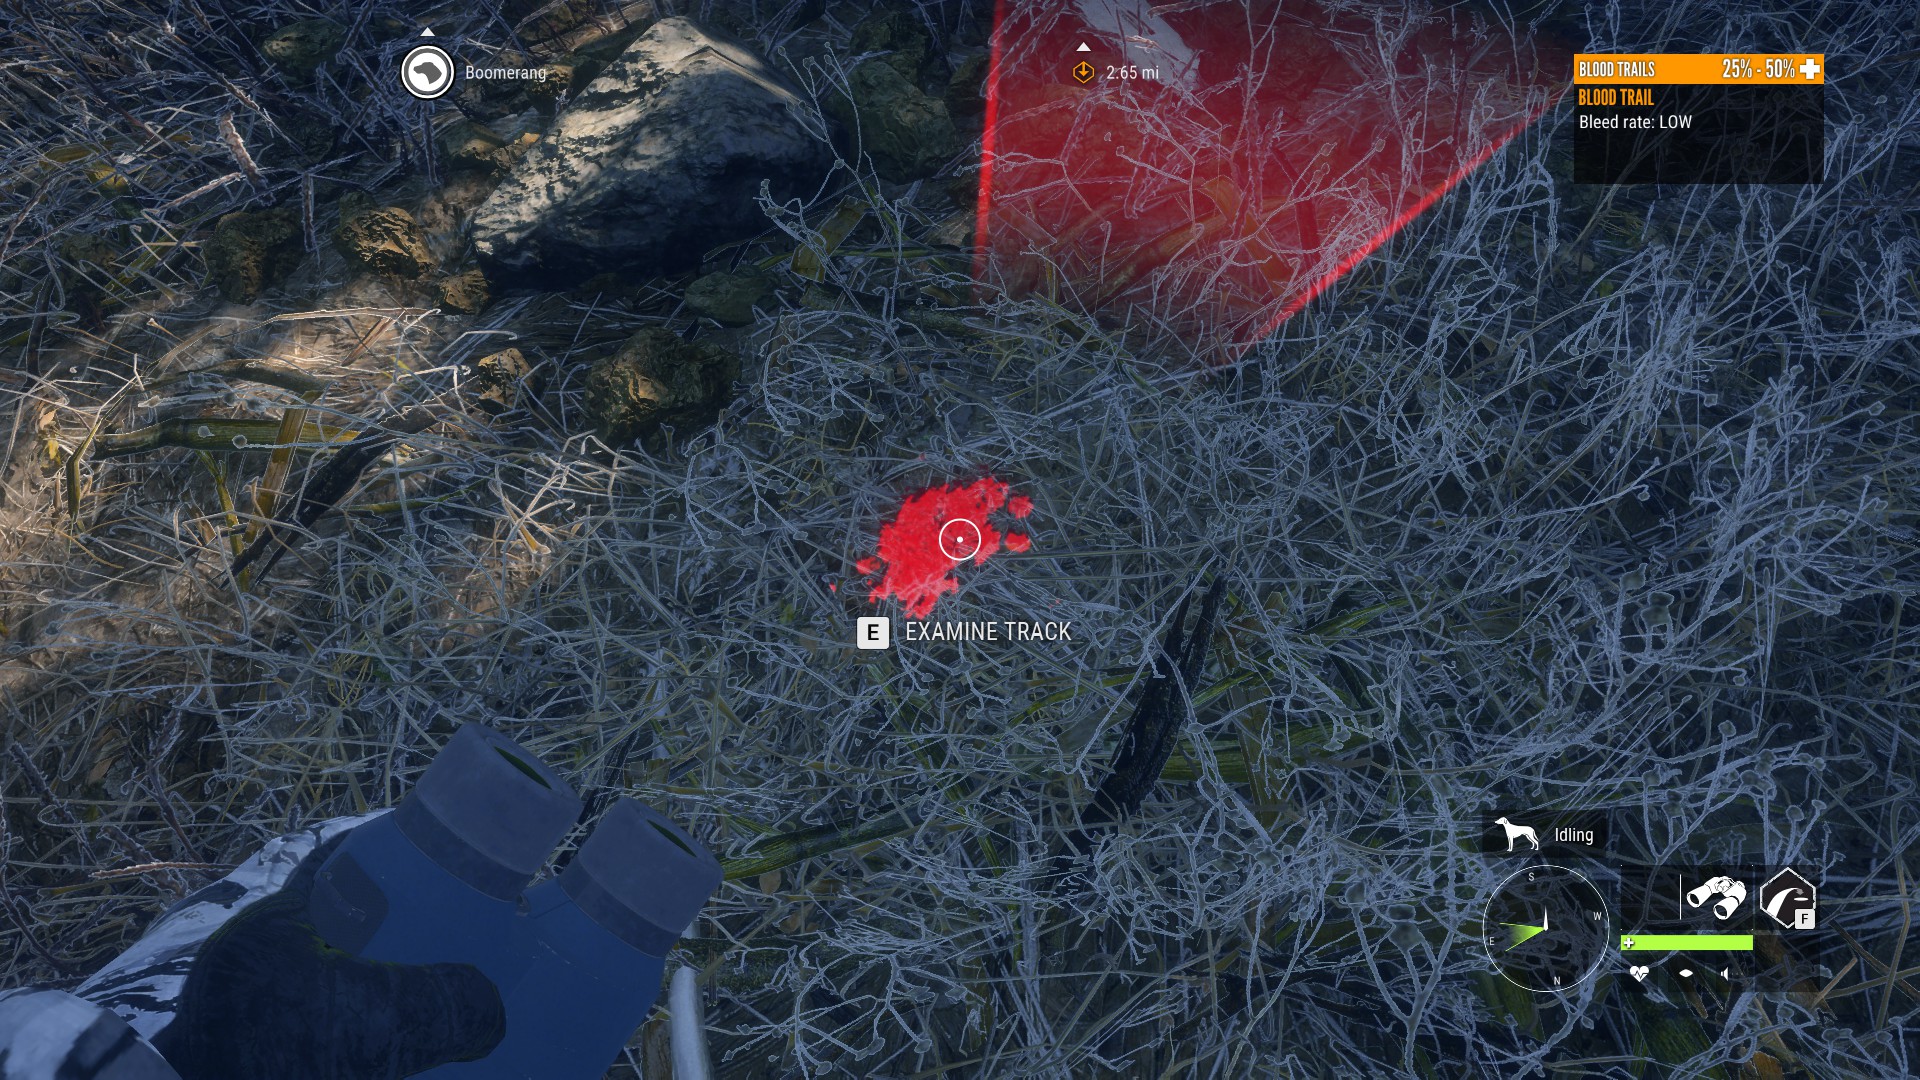
A very low bleed rate is the only one that an animal could potentially survive from. Anything above a very low bleed rate is always fatal.
Hunting At Night
Understandably, you’ll probably want to do the majority of your hunting during the day. However, there are some animals that are easier to hunt during the night (usually because this is when they are drinking):
When hunting at night, you’ll need to turn on your flashlight (press L to turn it on) in order to see animal tracks and need zones: The flashlight will not spook animals so don’t worry about leaving it on. Be a lot more careful about when you take shots since it’s a lot harder to see any potential obstacles that could be between your and your target:

You can also purchase the High-Tech Hunting Pack to get access to night vision equipment which will make hunting at night much easier:
Hunting Pressure
After you have killed an animal, you will notice that purple markings will appear on your map in the spot where you shot it. This is called hunting pressure:

Hunting pressure isn’t something you need to worry too much about unless you start to build up a lot of it in one area. Killing more than 3 animals in the same spot will create enough hunting pressure to delete any need zones in the affected area. If this happens. the animals that used the deleted zones will relocate to a different part of the map and establish a new need zone that you will have to rediscover.
How Do i Get Rid Of Hunting Pressure?
Once hunting pressure is on your map, it will never go away. However, you can move the hunting pressure around by killing animals in different parts of the map. As you create new hunting pressure in different areas, the old hunting pressure will gradually fade away until it disappears completely.
Reducing Hunting Pressure
You can also greatly reduce the amount of hunting pressure you generate by hunting from the buildable hunting stands on the map or using the ground blinds and tripods that come in these DLC packs:
Hunting with a bow or crossbow also generates significantly less hunting pressure than hunting with rifles, pistols and shotguns. By using these structures or hunting with bows, you will be able to kill up to 15 animals in one spot before you delete any need zones.
How Hunting Pressure Can Help You
Hunting Pressure isn’t all bad. Not only will it confirm you’ve actually killed an animal, but If you shoot an animal and you’re having trouble locating its blood trail, just go to the middle of the hunting pressure that was generated by the kill. This marks the exact spot where you fatally shot the animal making it very easy to find the beginning of their blood trail.
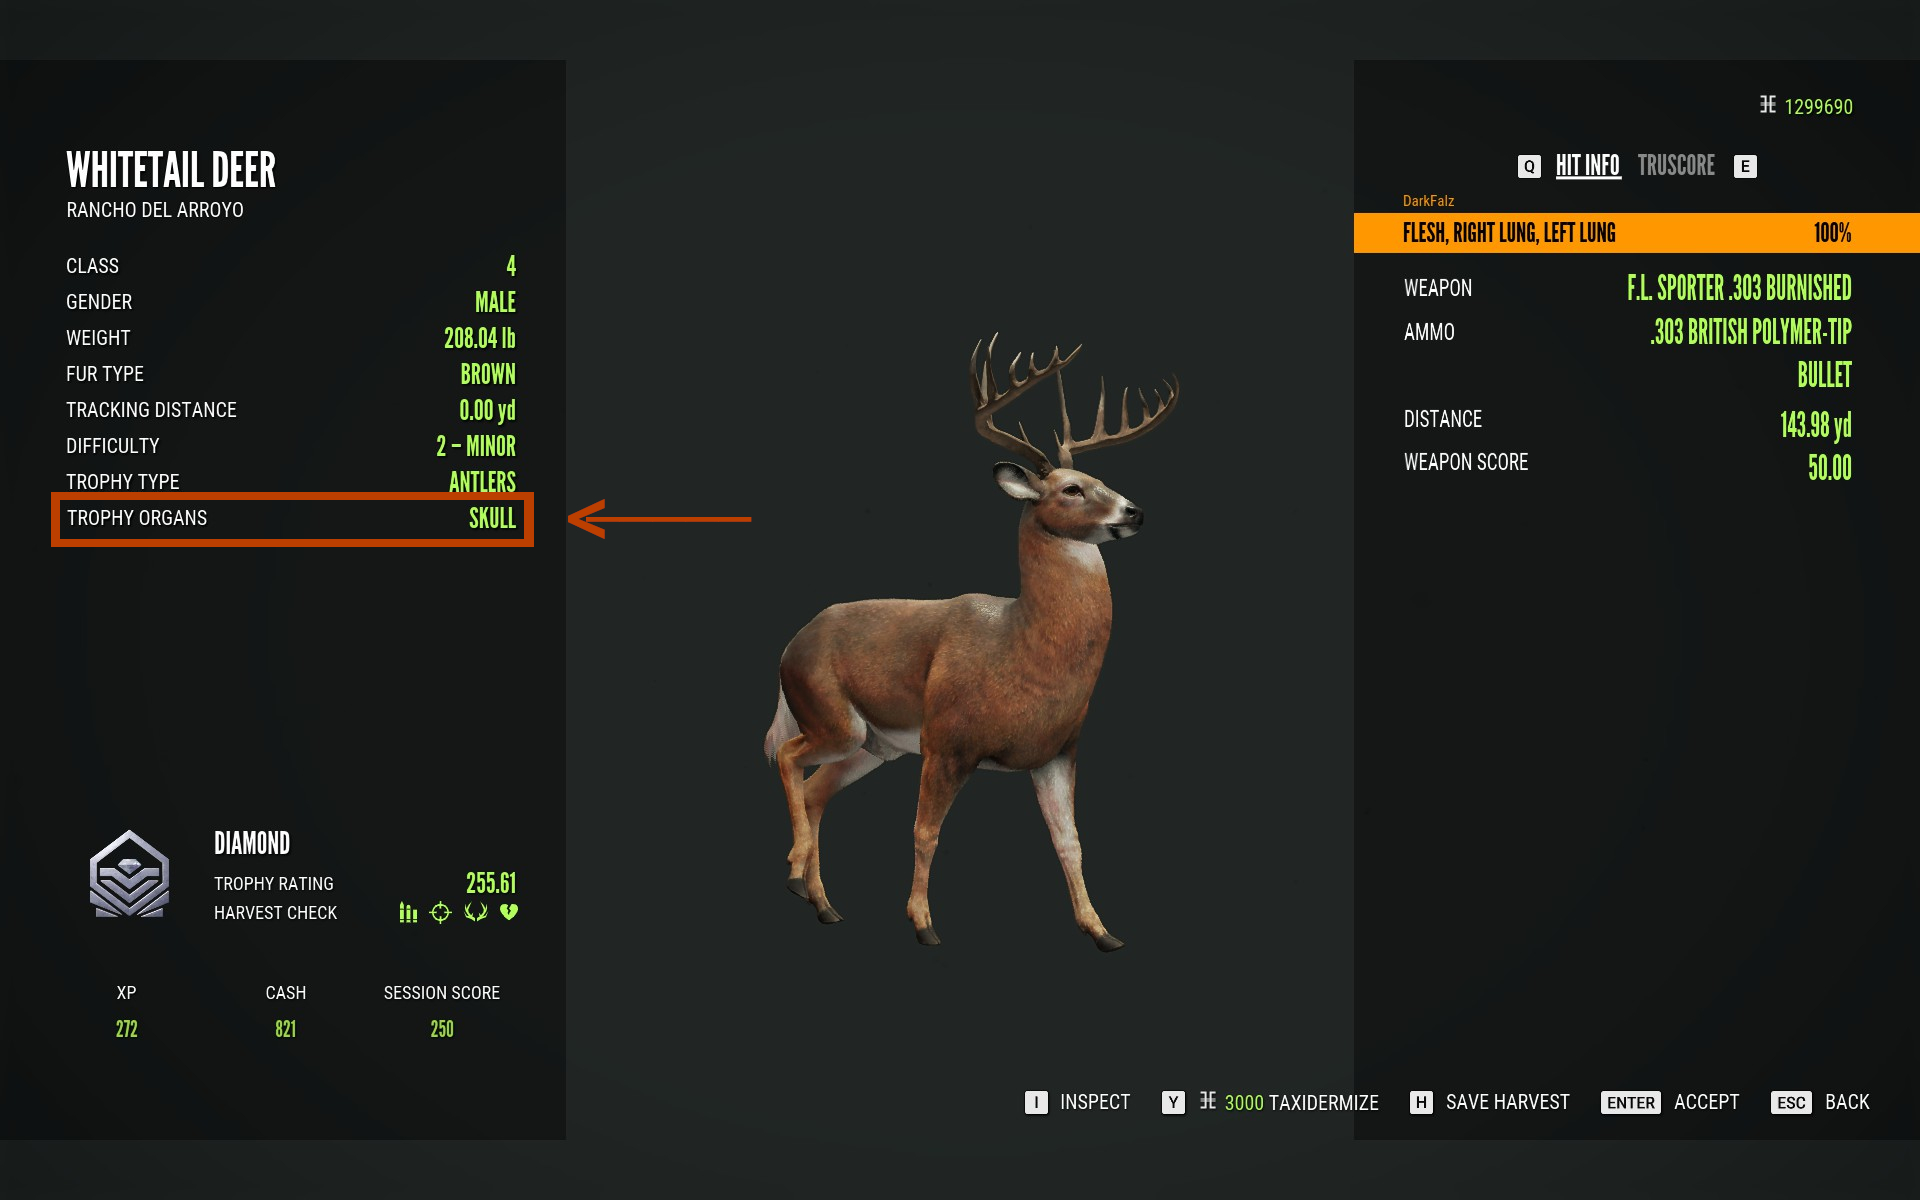
Harvest Check
In order to get full score for your trophy, you need to pass the harvest check which consists of 4 parts:
- Trophy Organs Intact
- Proper Ammo Used
- Animal Shot 2 Times Or Less
- At Least One Vital Organ Hit
Failing any part of this check will cause the animals medal to be downgraded by one rank. So if you fail it on an animal that would’ve gotten a gold medal, it will now get a silver medal. The amount of money, XP and weapon score you receive will also be reduced if you fail the harvest check. You can see the harvest check in the harvest screen when you claim the animal:

If you passed it, all 4 parts will be green. If you failed any part of it however, then the parts that you failed will be red.
Passing The Harvest Check
Trophy Organs Intact
You can see in the harvest screen what the trophy organs are for that particular animsl.. As we’ve discussed before. most animals have the skull as a trophy organ. You must avoid damaging the trophy organs when you shoot the animal:
Proper Ammo Used
As we discussed in the classes section, all animals fall into one of 9 classes and you must make sure you’re using ammo that is appropriate for the animals class.
Animal Shot 2 Times Or Less
Very self explanatory. Just make sure you don’t shoot the animal more than 2 times.
At Least One Vital Organ Hit
Again very self explanatory. You must hit at least one vital organ when you shoot the animal. This part of the harvest check does not apply to class 1 animals. So long as your shot hits them, it doesn’t matter where it hits as long as it kills them.
Trophy Rating
Whenever you harvest an animal, it will be given a trophy rating that determines which medal it gets. There are 5 medals that your trophy can be given:
- None
- Bronze
- Silver
- Gold
- Diamond
You can see the animals trophy rating next to its medal in the harvest screen:

You can also hover your cursor over the trophy rating in order to see what the minimum rating for each medal is for that species:
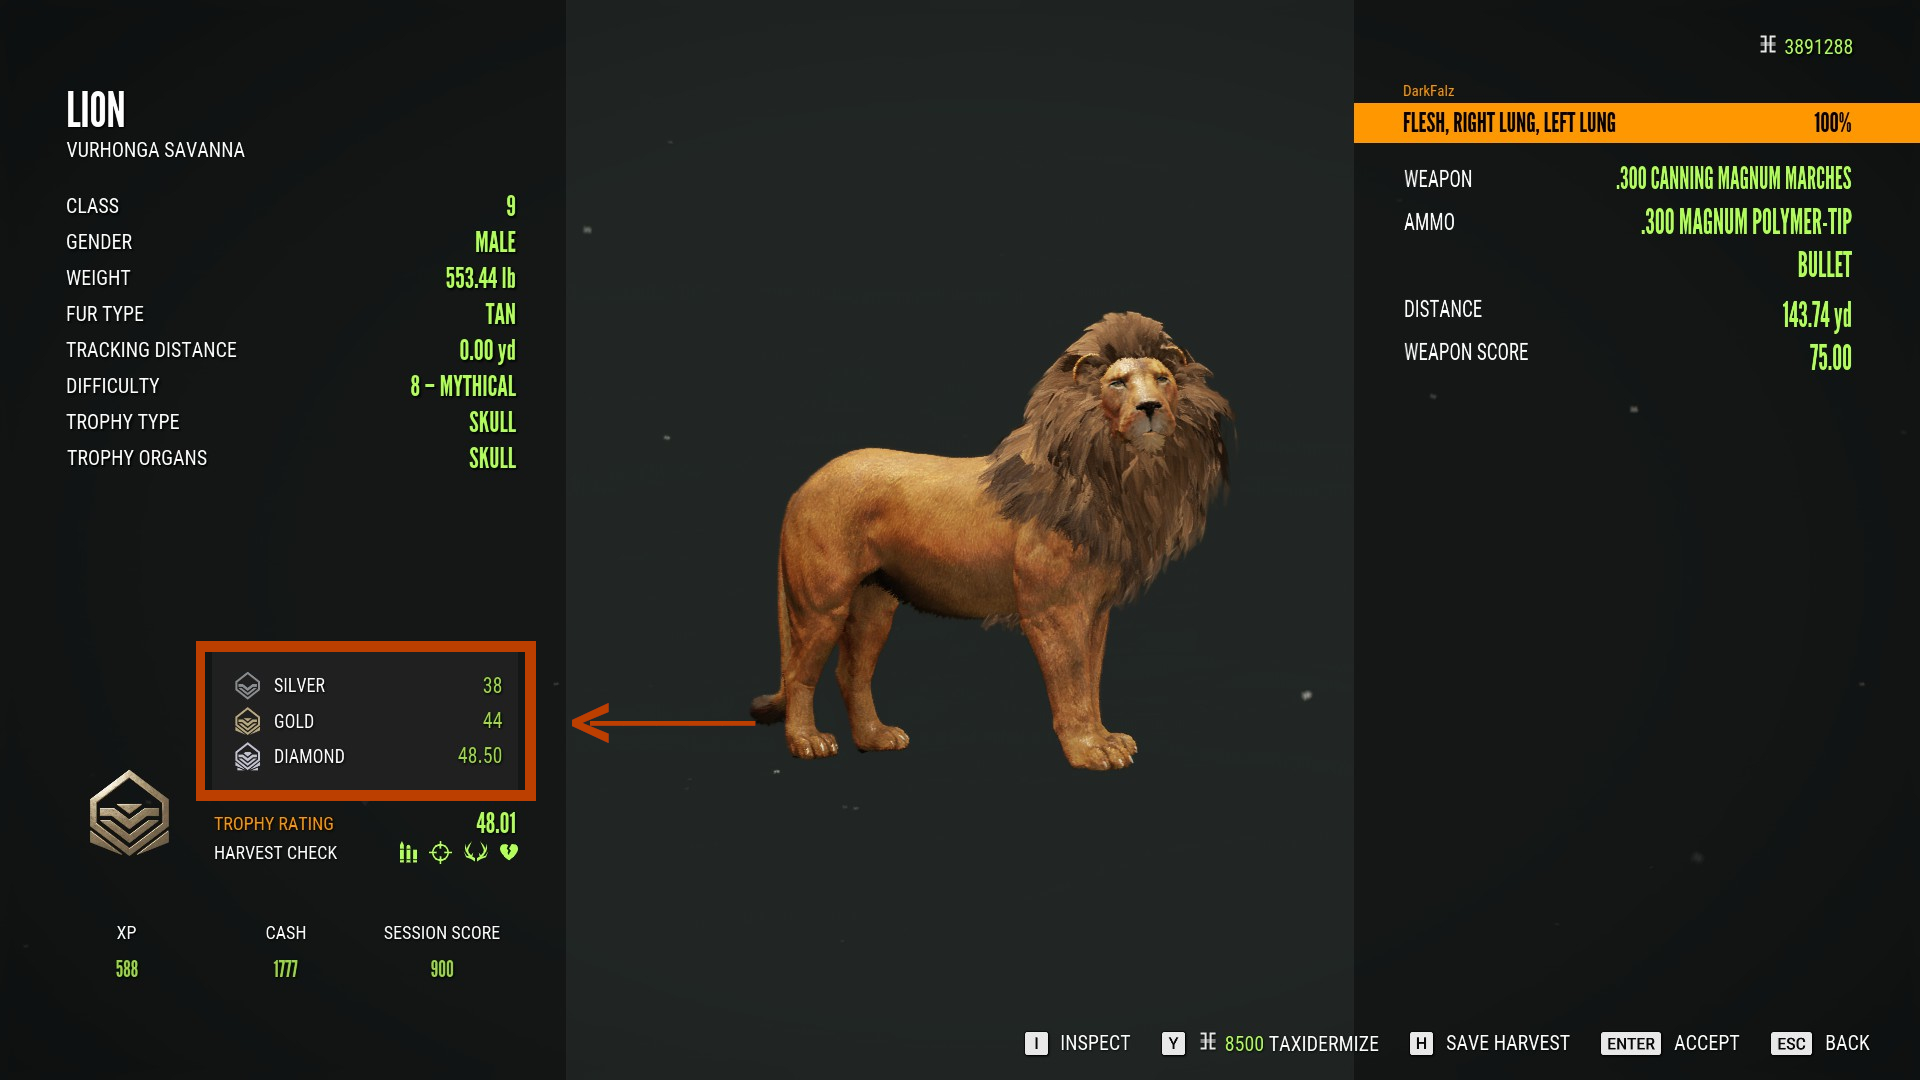
The animals trophy rating will always be the same regardless of if you pass the harvest check. The only thing that can change is the medal being downgraded if you fail the harvest check.
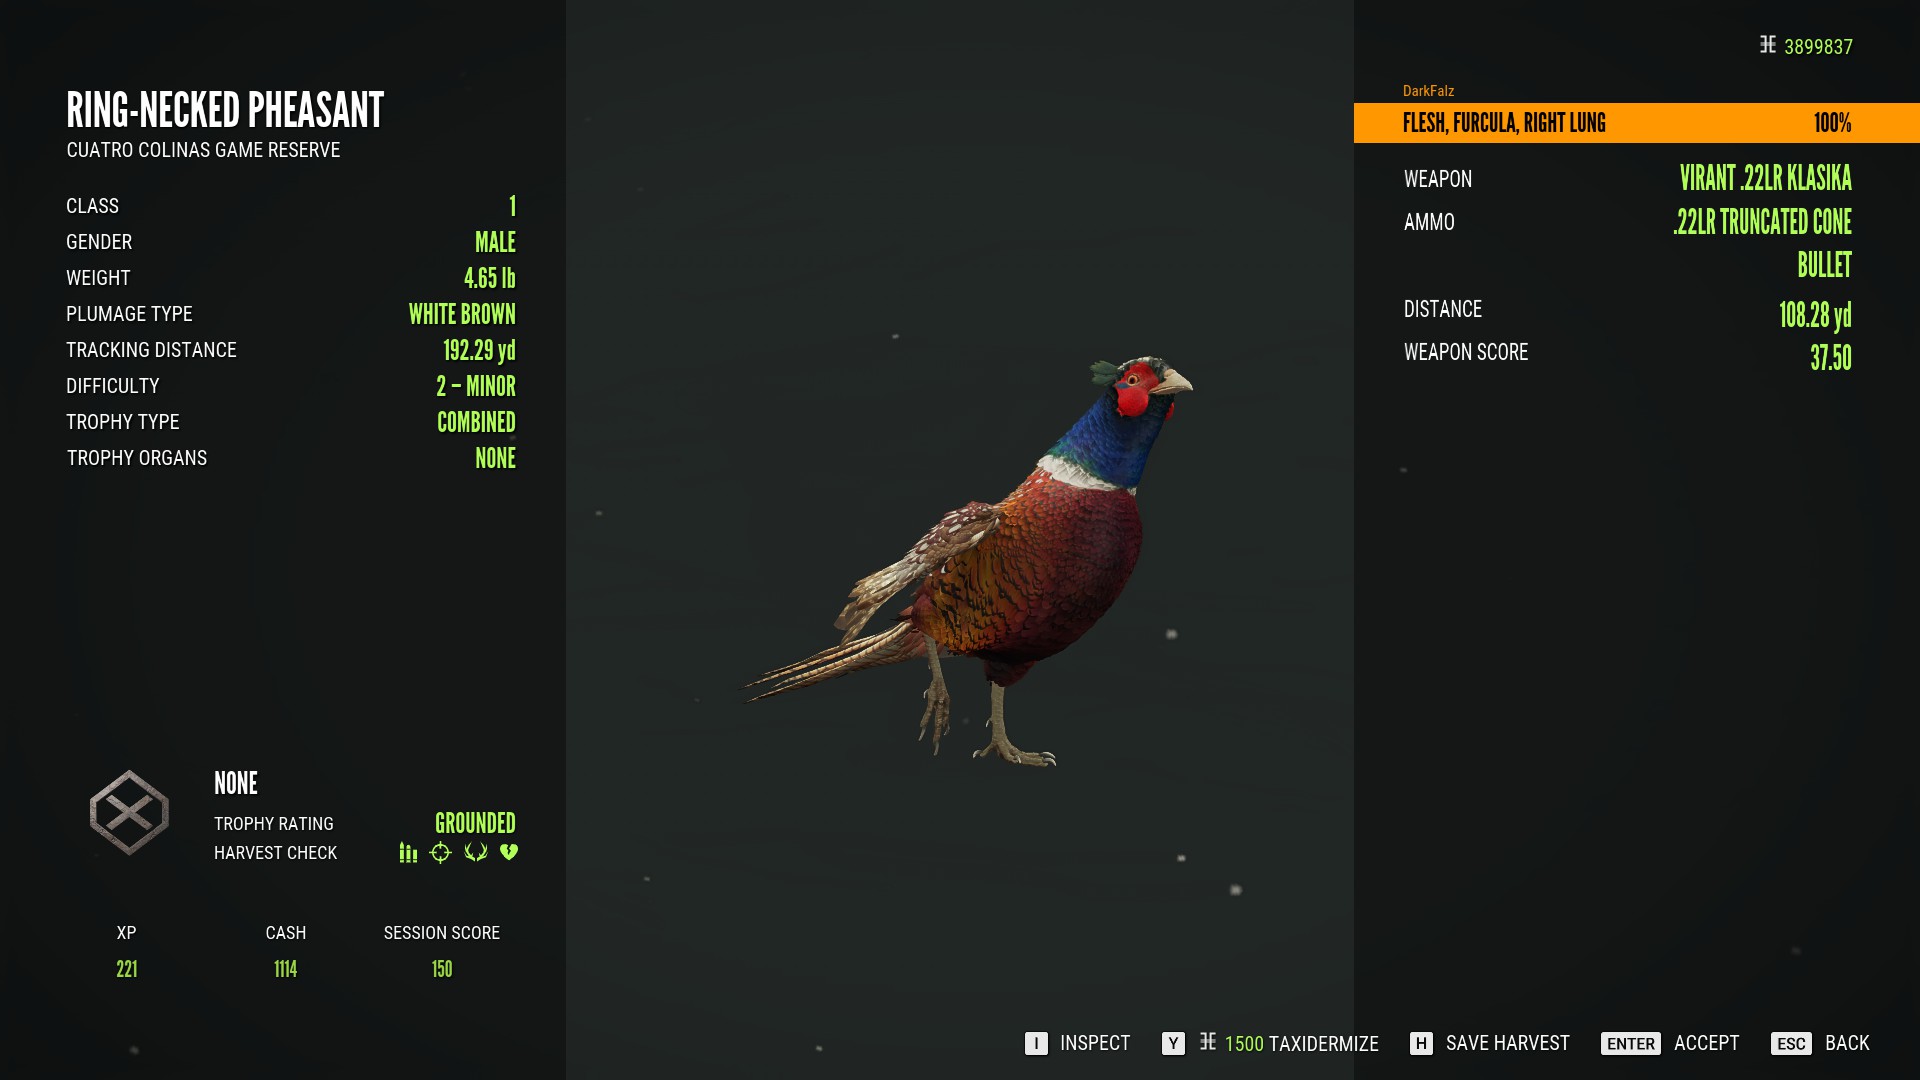
Birds – Grounded Vs. Flying
When hunting birds in Call of the Wild, there are certain species that must be shot out of the air in order to get full score. These are:
- Bobwhite Quail
- Ring-Necked Pheasant
- Rock Ptarmigan
- Stubble Quail
- Willow Ptarmigan
If you shoot any of these birds while they are on the ground (or in the process of landing), they will be given a grounded rating and no medal will be awarded:
Great Ones
Great ones are a special class of diamonds and are very rare to find. You will immediately know if you see a great one because they are the only animals that get the maximum difficulty level of 10 – Fabled. And unlike all other animals, a great one will always get the great one medal regardless of its trophy score:
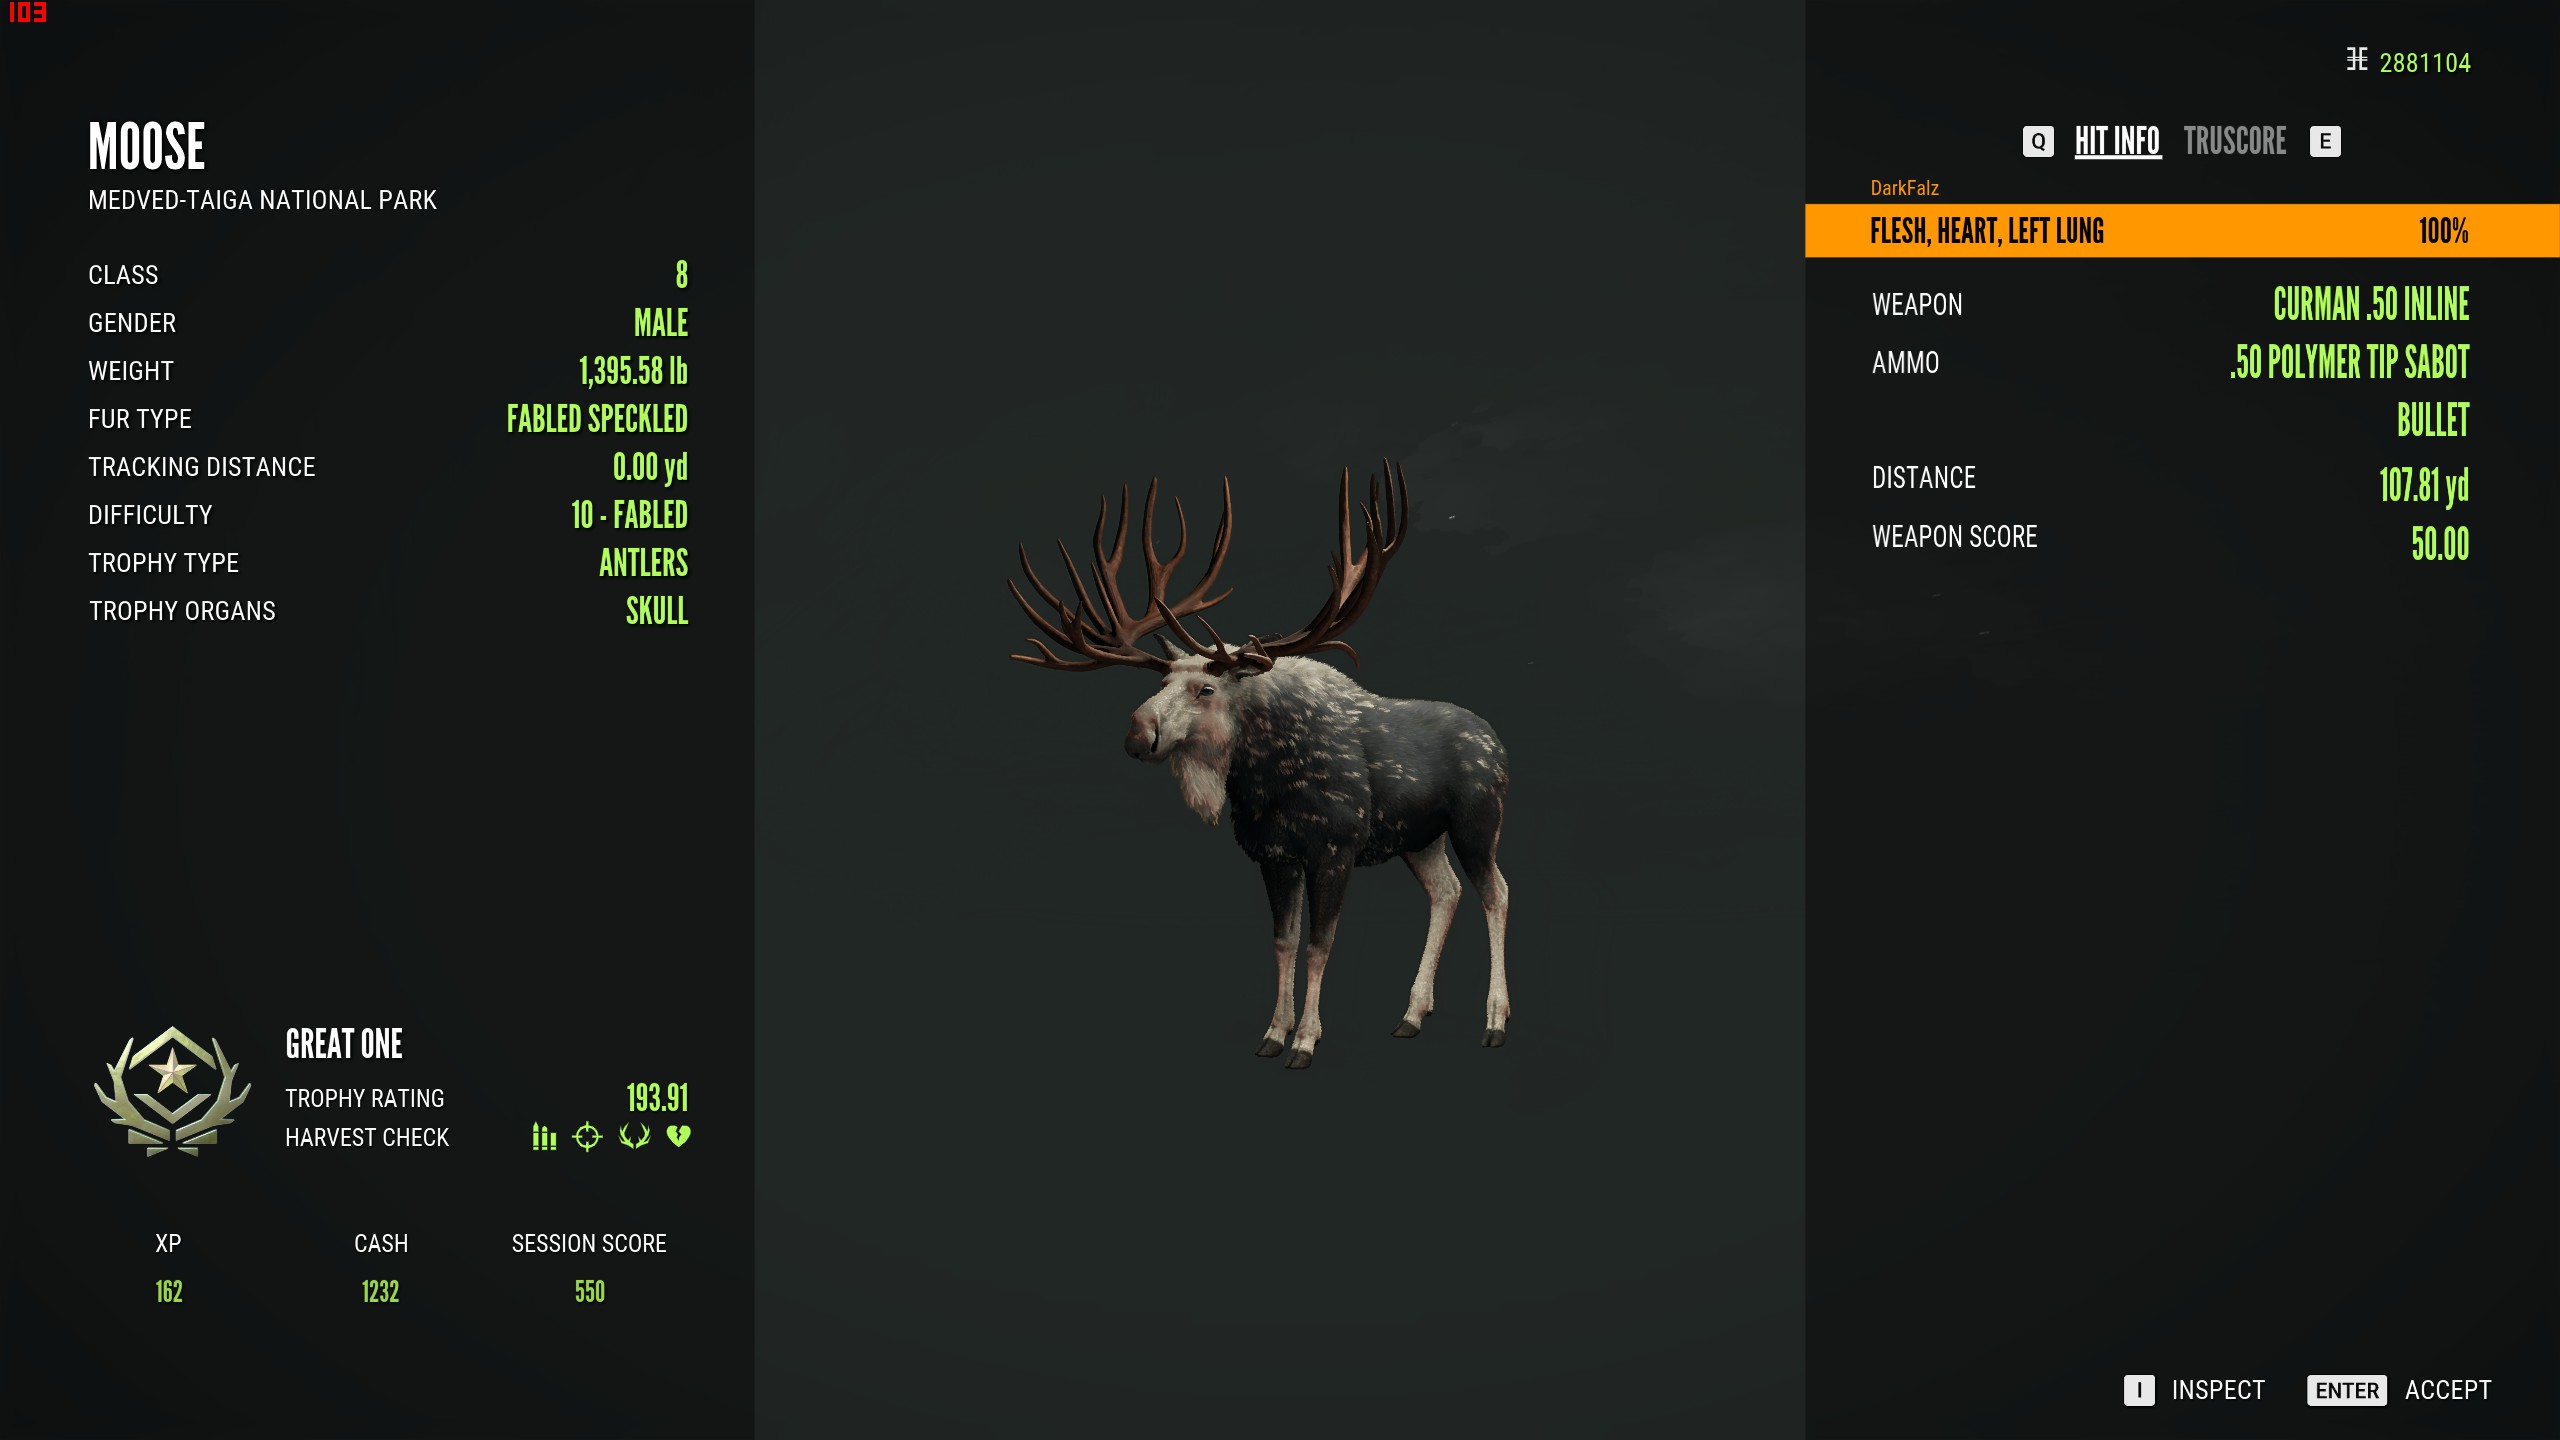
Currently, only 5 species can spawn as great ones:
- Whitetail Deer
- Fallow Deer
- Red Deer
- Black Bear
- Moose
If you want to find a great one, you’ll usually have to commit to grinding for one and it can take thousands of kills before you get one to spawn. On the upside however, great one grinding is one of the best ways to make money in Call of the Wild and depending on how long your grind takes, you can end up making hundreds of thousands or even millions of in game cash. I won’t be covering how to do a grind in this guide but if you’re interested in it, this video will tell you pretty much everything you need to know:
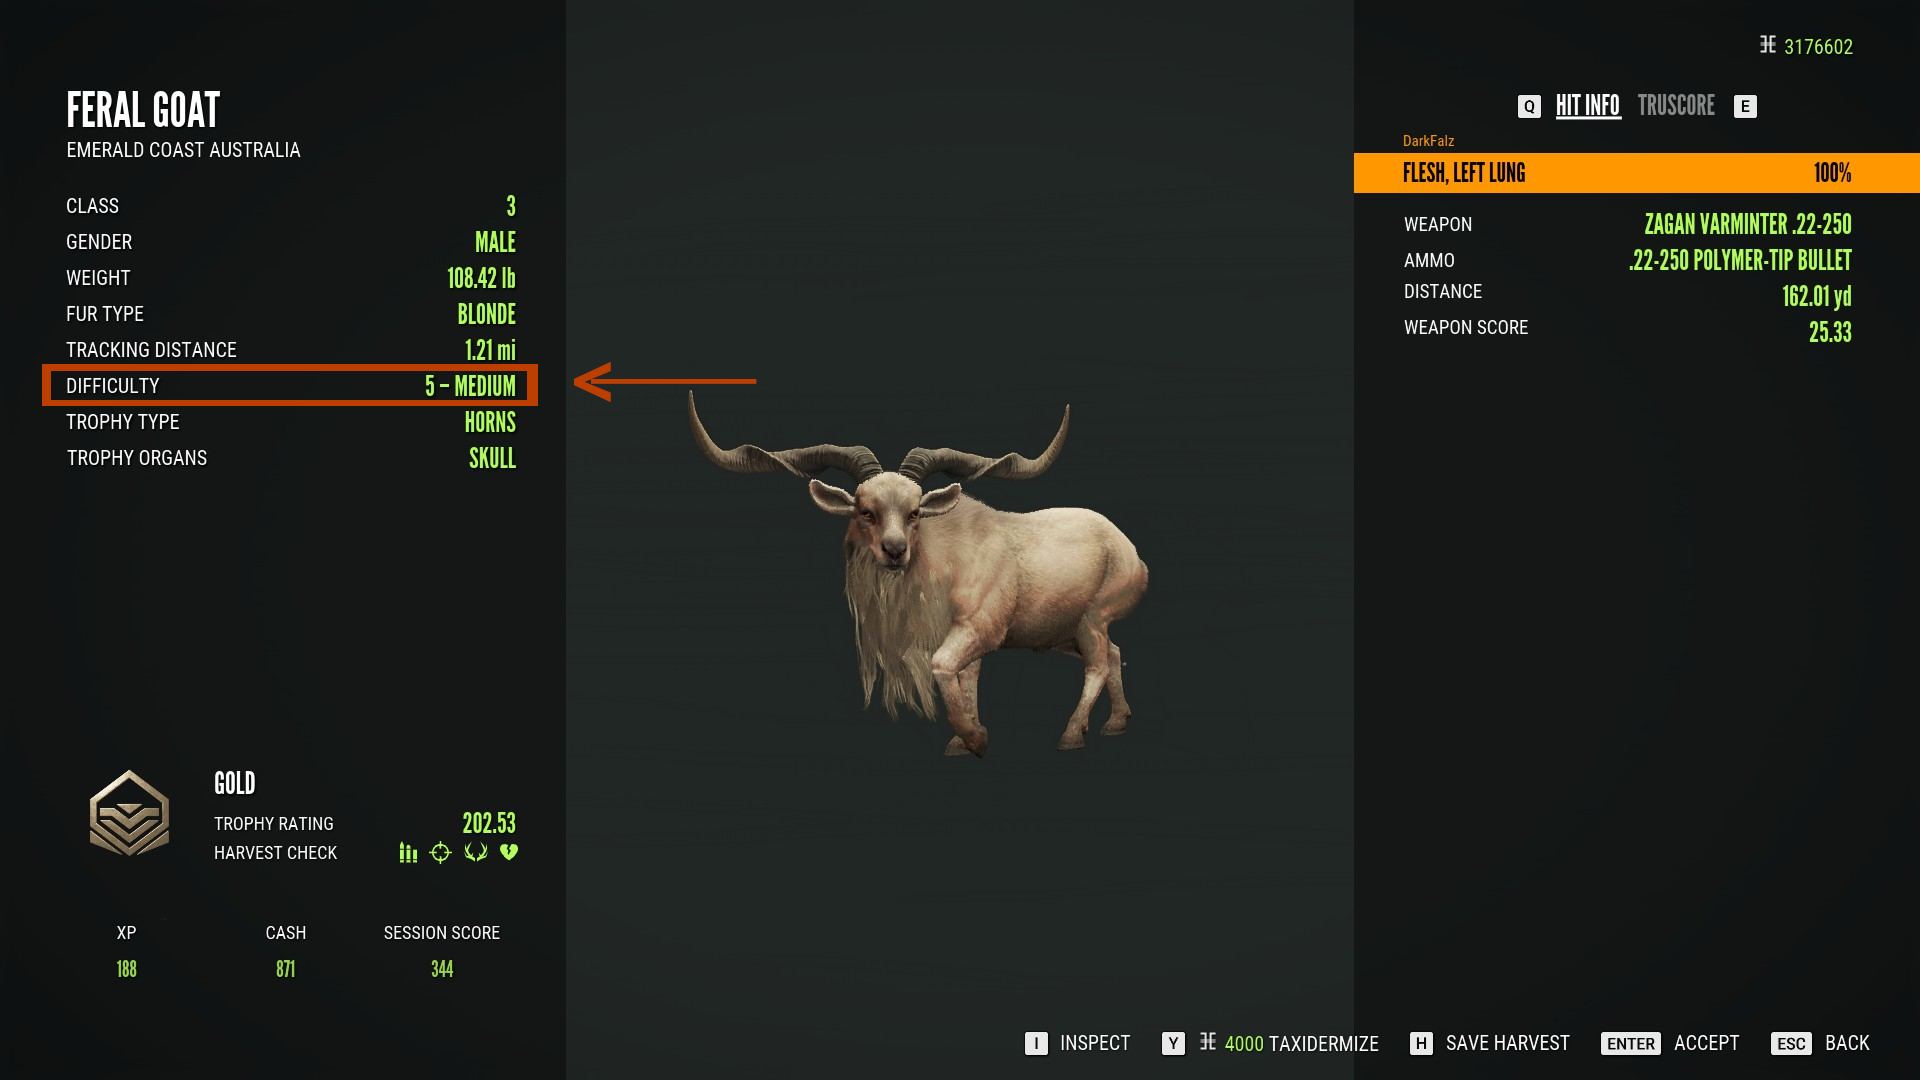
Difficulty Levels
Another thing I briefly covered in the spotting animals section was difficulty levels which range from 1 to 10. Every animal has it’s own difficulty level which is a measure of how keen its senses are and how aware it is of its surroundings. Animals with a higher difficulty level will be able to notice you from further away and will often be the first ones to flee. When fleeing, they will also run further before they calm back down. A higher difficulty level on the animal also often correlates to a higher trophy rating. The 10 difficulty levels are:
- 1 – Trivial
- 2 – Minor
- 3 – Very Easy
- 4 – Easy
- 5 – Medium
- 6 – Hard
- 7 – Very Hard
- 8 – Mythical
- 9 – Legendary
- 10 – Fabled
Maximum Levels
Every species in the game has a maximum difficulty level it can reach and seeing animals that are the maximum level for their species is a fairly rare occurrence. The maximum level for each species can be either 3 – Very Easy, 5 – Medium or 9 – Legendary. Here is a list of the max level for every species in the game:
Animals That Max At 3 – Very Easy
- Antelope Jackrabbit
- Bobwhite Quail
- Cinnamon Teal
- Eurasian Wigeon
- Black Grouse
- Eastern Cottontail Rabbit
- Eastern Wild Turkey
- European Hare
- European Rabbit
- Goldeneye
- Green Winged Teal
- Harlequin Duck
- Hazel Grouse
- Mallard
- Merriam Turkey
- Mountain Hare
- Ring-Necked Pheasant
- Rio Grande Turkey
- Rock Ptarmigan
- Roe Deer
- Scrub Hare
- Siberian Musk Deer
- Stubble Quail
- Tufted Duck
- Western Capercaillie
- Whitetail Deer
- White-Tailed Jackrabbit
- Willow Ptarmigan
Animals That Max At 5 – Medium
- Axis Deer
- Banteng
- Beceite Ibex
- Bighorn Sheep
- Blackbuck
- Blacktail Deer
- Blue Wildebeest
- Canada Goose
- Caribou
- Chamois
- Collared Peccary
- Common Raccoon
- European Bison
- Fallow Deer
- Feral Goat
- Feral Pig
- Gemsbok
- Gredos Ibex
- Greylag Goose
- Hog Deer
- Iberian Mouflon
- Javan Rusa
- Lesser Kudu
- Magpie Goose
- Moose
- Mountain Goat
- Mule Deer
- Plains Bison
- Pronghorn
- Reindeer
- Rocky Mountain Elk
- Ronda Ibex
- Roosevelt Elk
- Sambar
- Sika Deer
- Southeastern Spanish Ibex
- Springbok
- Tundra Bean Goose
- Warthog
- Wild Boar
- Wild Hog
Animals That Max At 9 – Legendary
- American Alligator
- Bobcat
- Black Bear
- Brown Bear
- Cape Buffalo
- Coyote
- Eastern Gray Kangaroo
- Eurasian Lynx
- Gray Fox
- Gray Wolf
- Grizzly Bear
- Iberian Wolf
- Lion
- Mexican Bobcat
- Mountain Lion
- Puma
- Raccoon Dog
- Red Deer
- Red Fox
- Saltwater Crocodile
- Side-Striped Jackal
- Water Buffalo
Trophy Rating, Not Difficulty Level Is What Matters For Diamonds
As we discussed above, higher difficulty levels often correlate to higher trophy ratings and max level animals will often be diamonds but this is not always the case, Sometimes you will find animals that are max level but fail to make diamond. These are commonly know as trolls:
Conversely, you can also sometimes find animals that make diamond at one level below their max difficulty level:
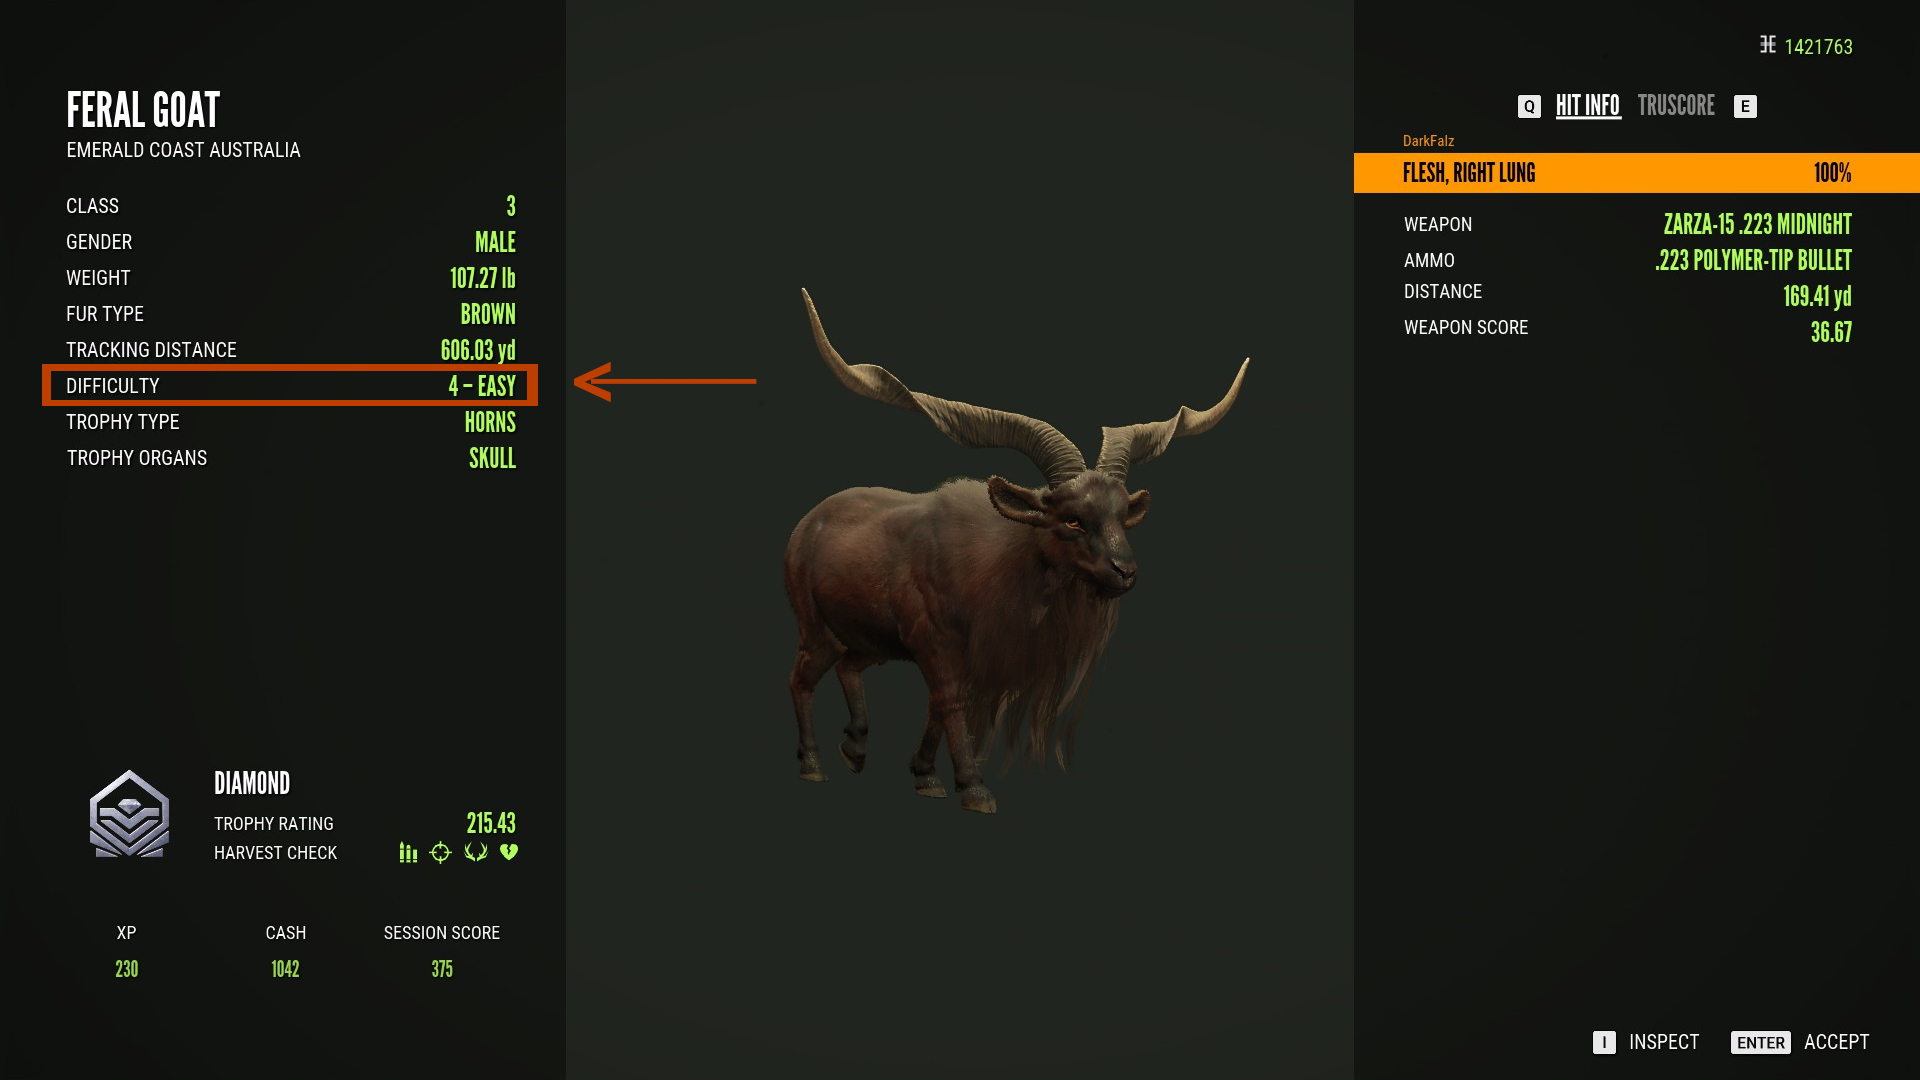
So how can you know if an animal you’re looking at might be a diamond? Well remember in the spotting animals section, I showed that with the right skills, you can see an estimate of the animals trophy rating when you spot it. If the diamond trophy rating for that species falls within the animals estimate, you know you’re looking at an animal that might make diamond.
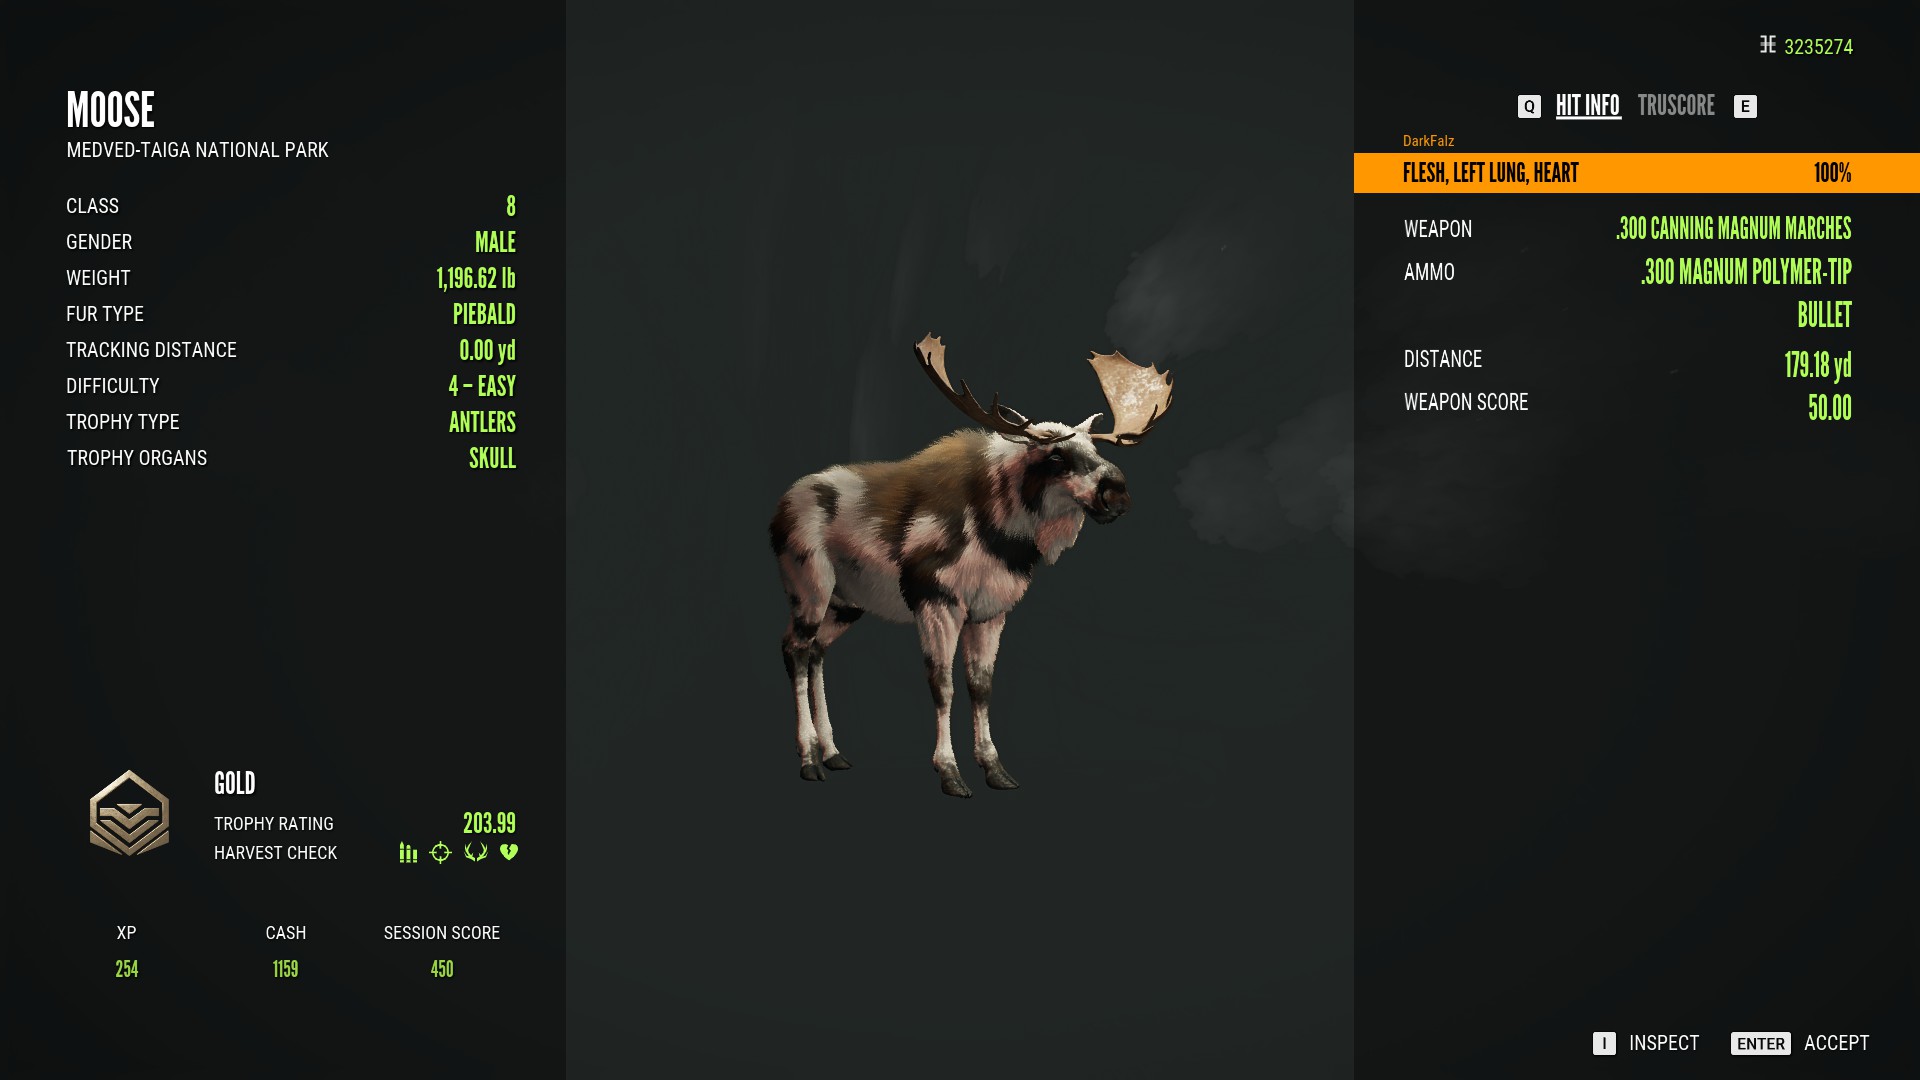
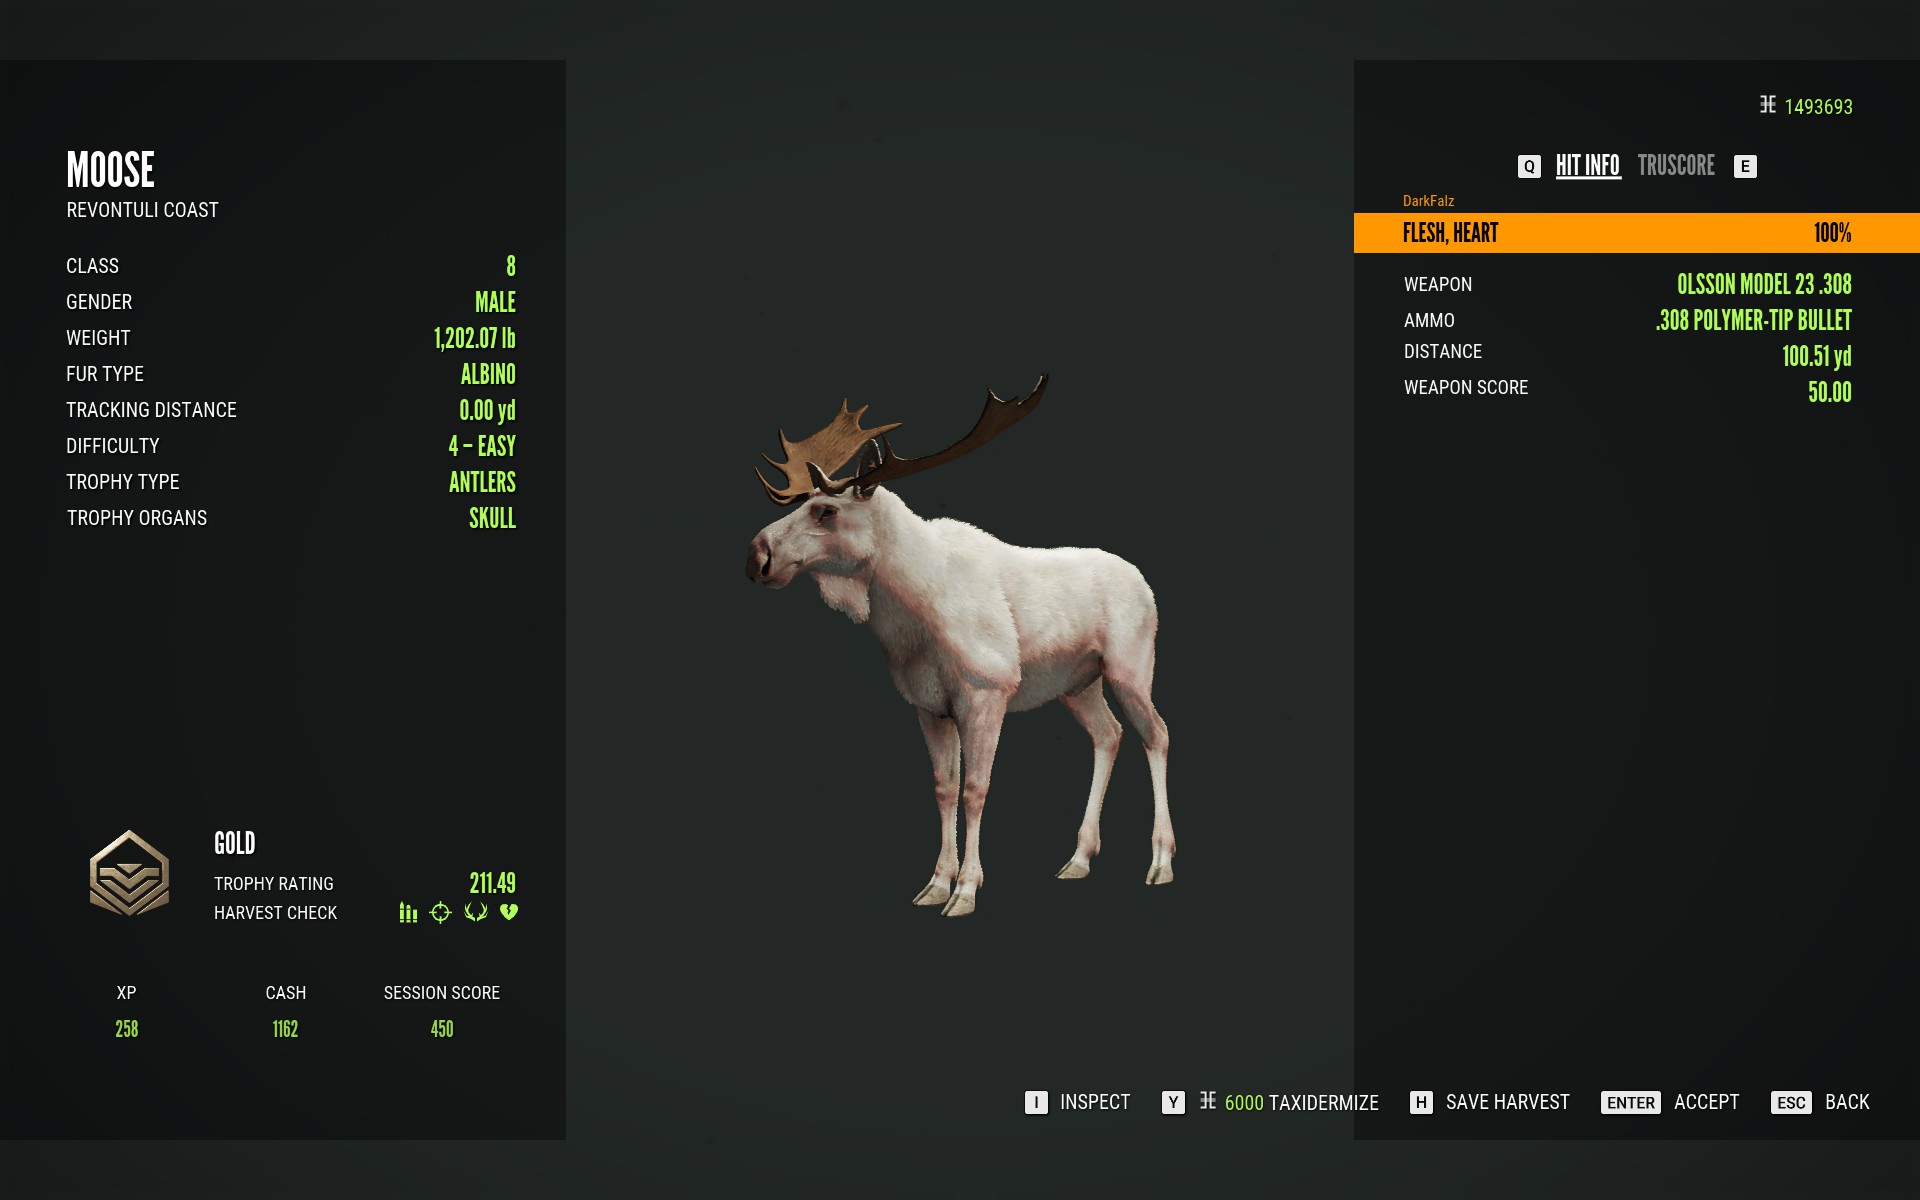
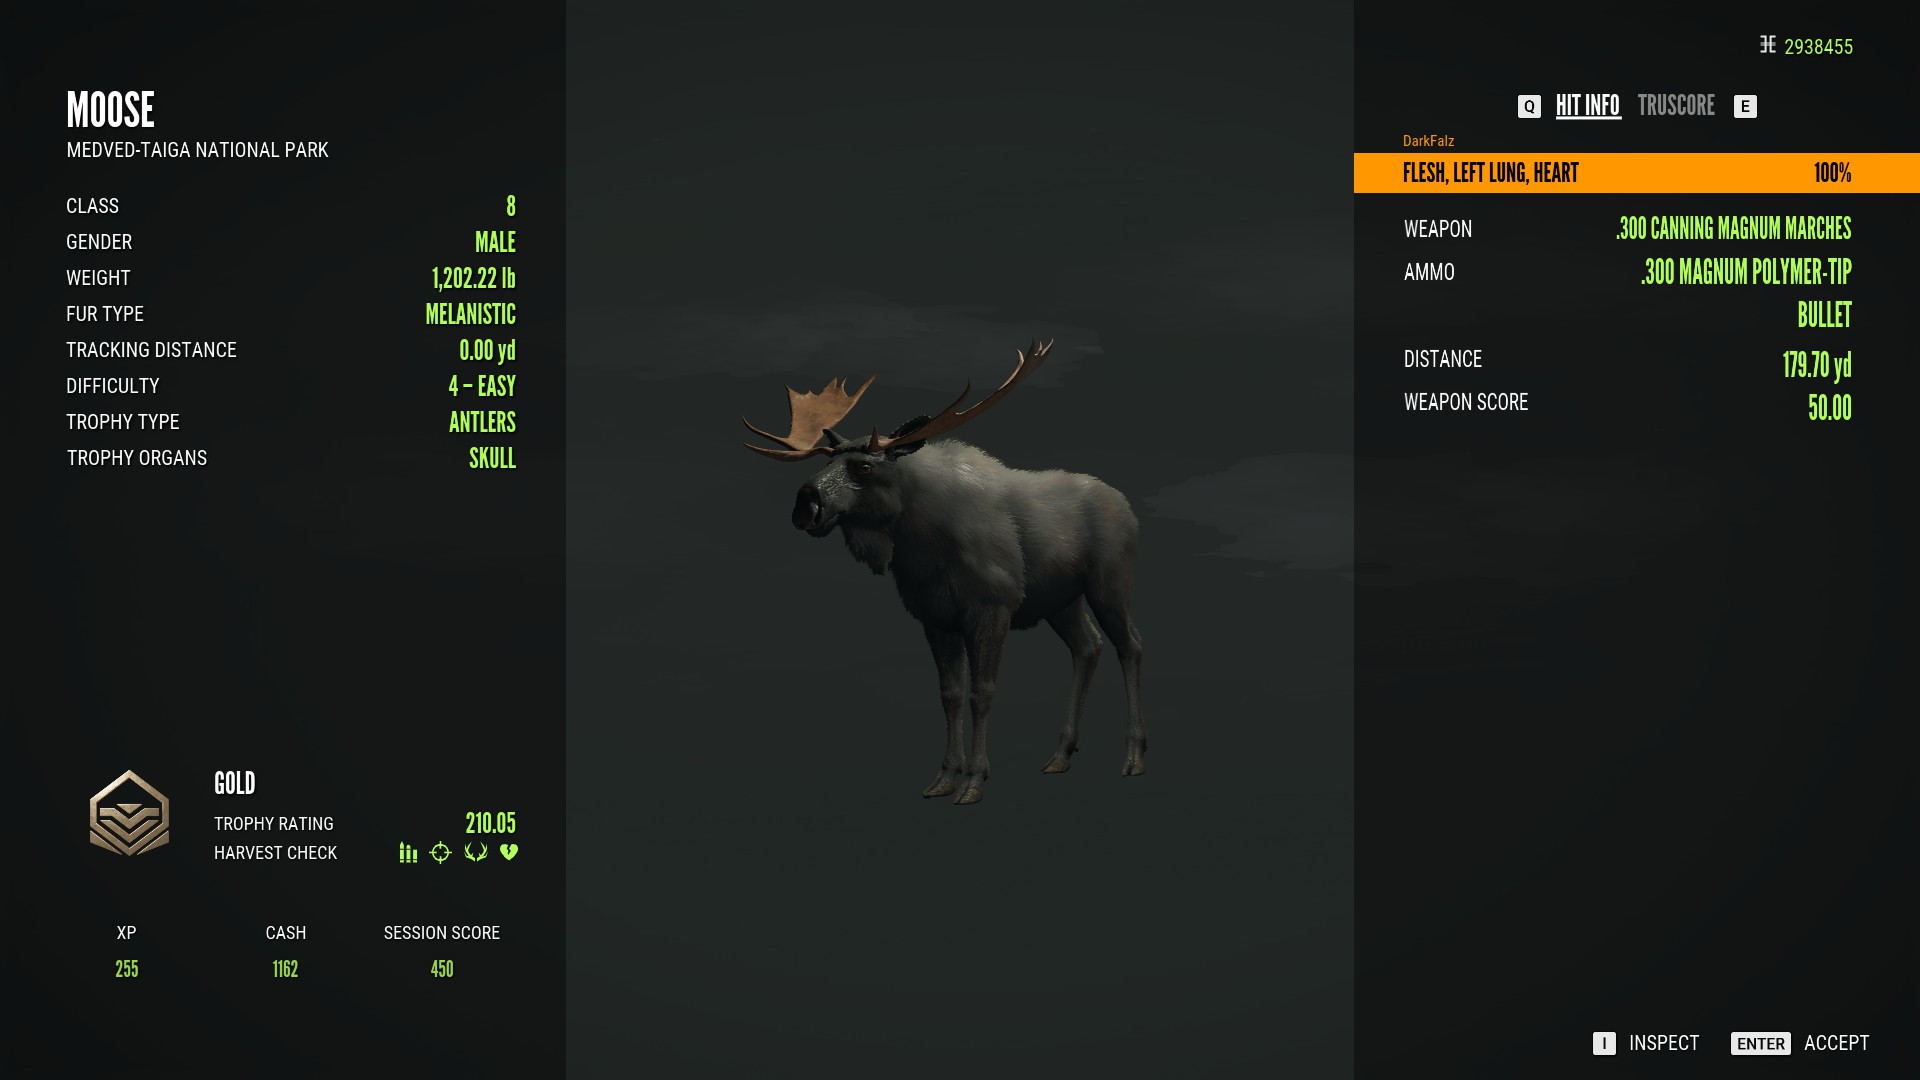
Rare Fur Types
Something that can be even rarer than diamond scoring animals is animals with rare fur types. In many cases, these animals will stand out pretty easily when you see them although this will not always be the case so pay attention to the fur type section in the harvest screen when you claim the animal:
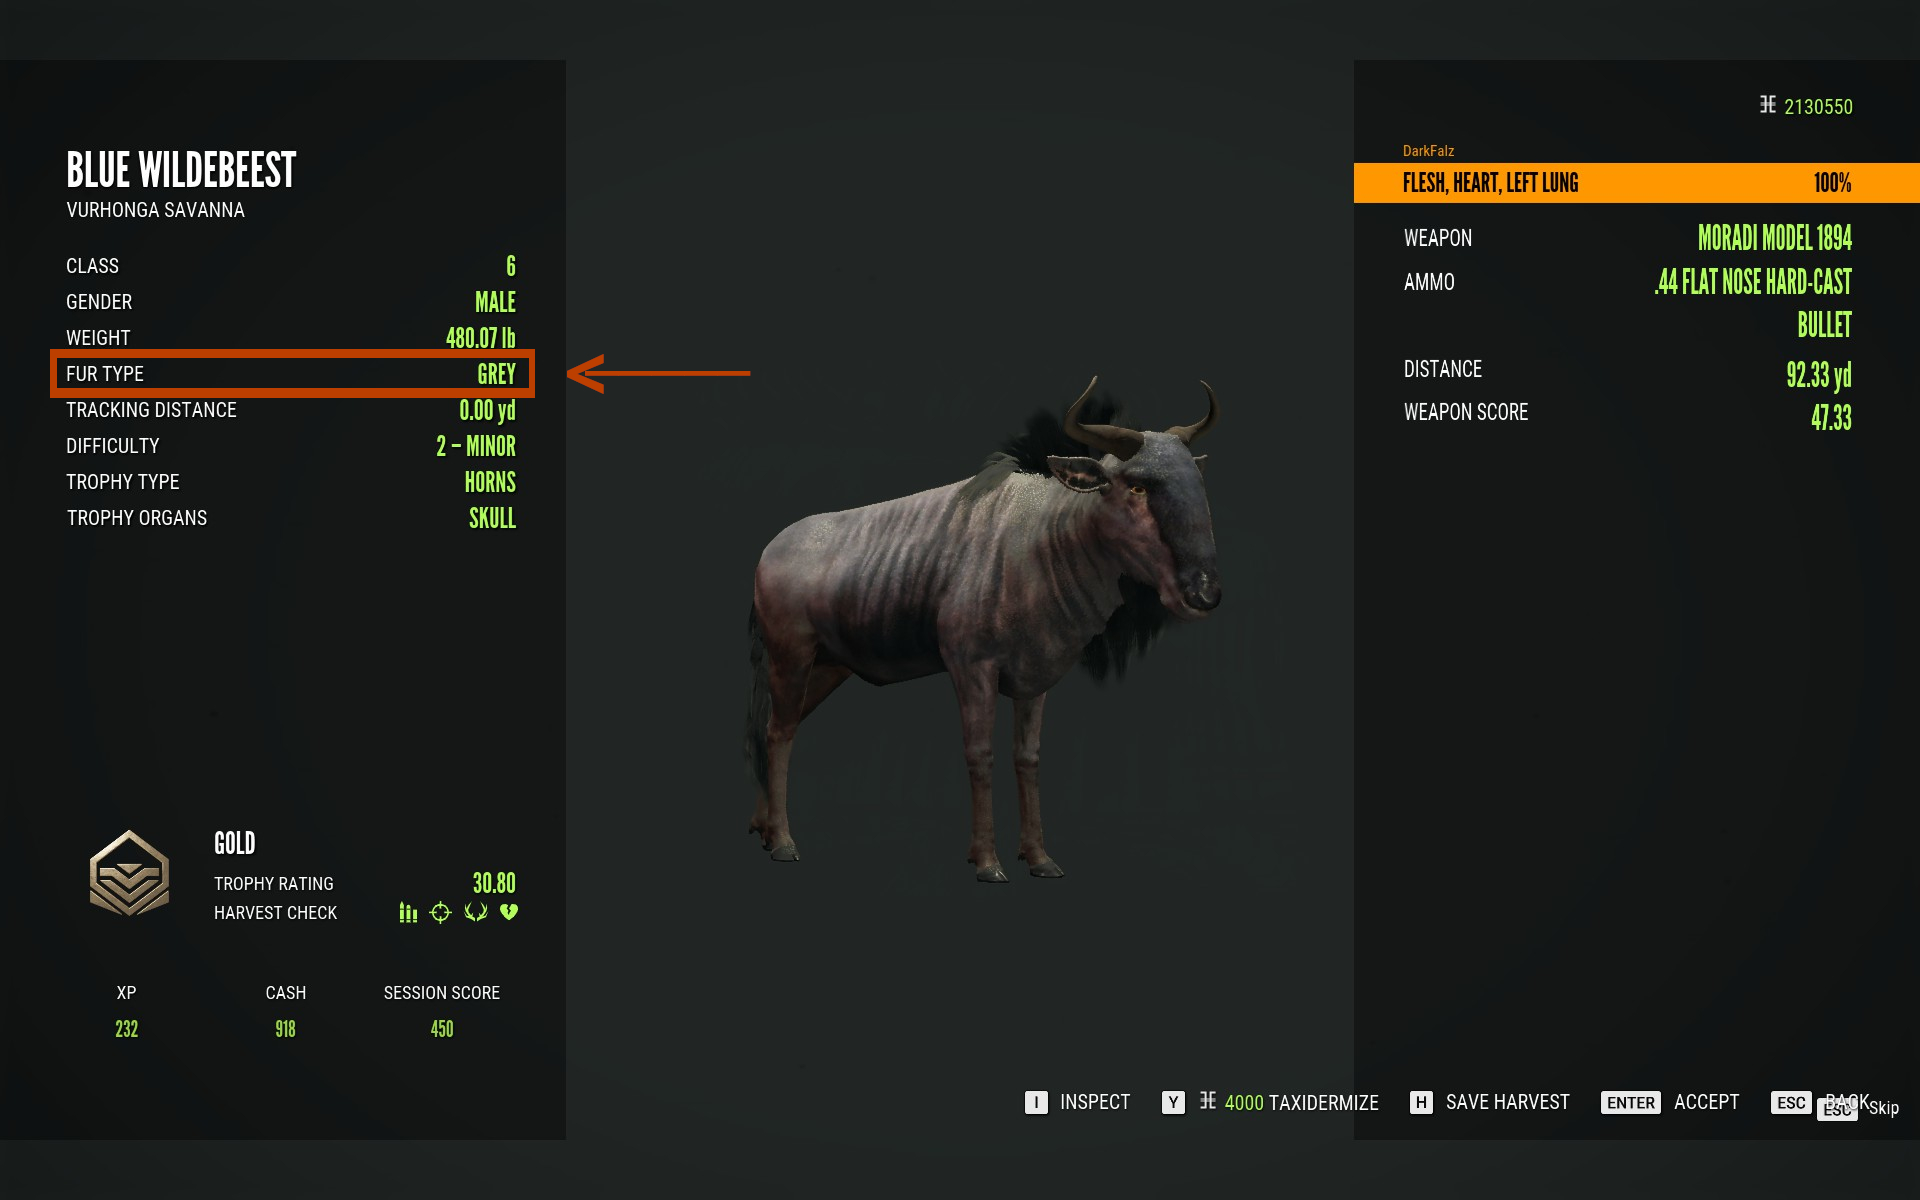
The three rare furs that many species in Call of the Wild have are piebald, albino and melanistic:
However, some animals also have rare furs that are completely unique to them and may even be unique to a single gender such as crowned for blue wildebeest:
At the end of the guide, I will have a link to another guide that will tell you what the rare furs are for every species in the game.
Hunting Dogs
If you have the appropriate DLCs, then you can bring a hunting dog along with you. Currently there are 2 hunting dogs to choose from: the bloodhound and the labrador retriever, both of which have different specializations to help you.
The Bloodhound
The bloodhound specializes in picking up on blood trails and helping you track down your kills.
The Labrador Retriever
The labrador retriever specializes in retrieving your small game kills for your even if they are in water. Any class 1 animal can be retrieved.
Purchasing Your Dog And Bringing It Out For A Hunt
To purchase a hunting dog, go to the cache at any outpost or tent, select the kennel tab and go to purchasable dogs:
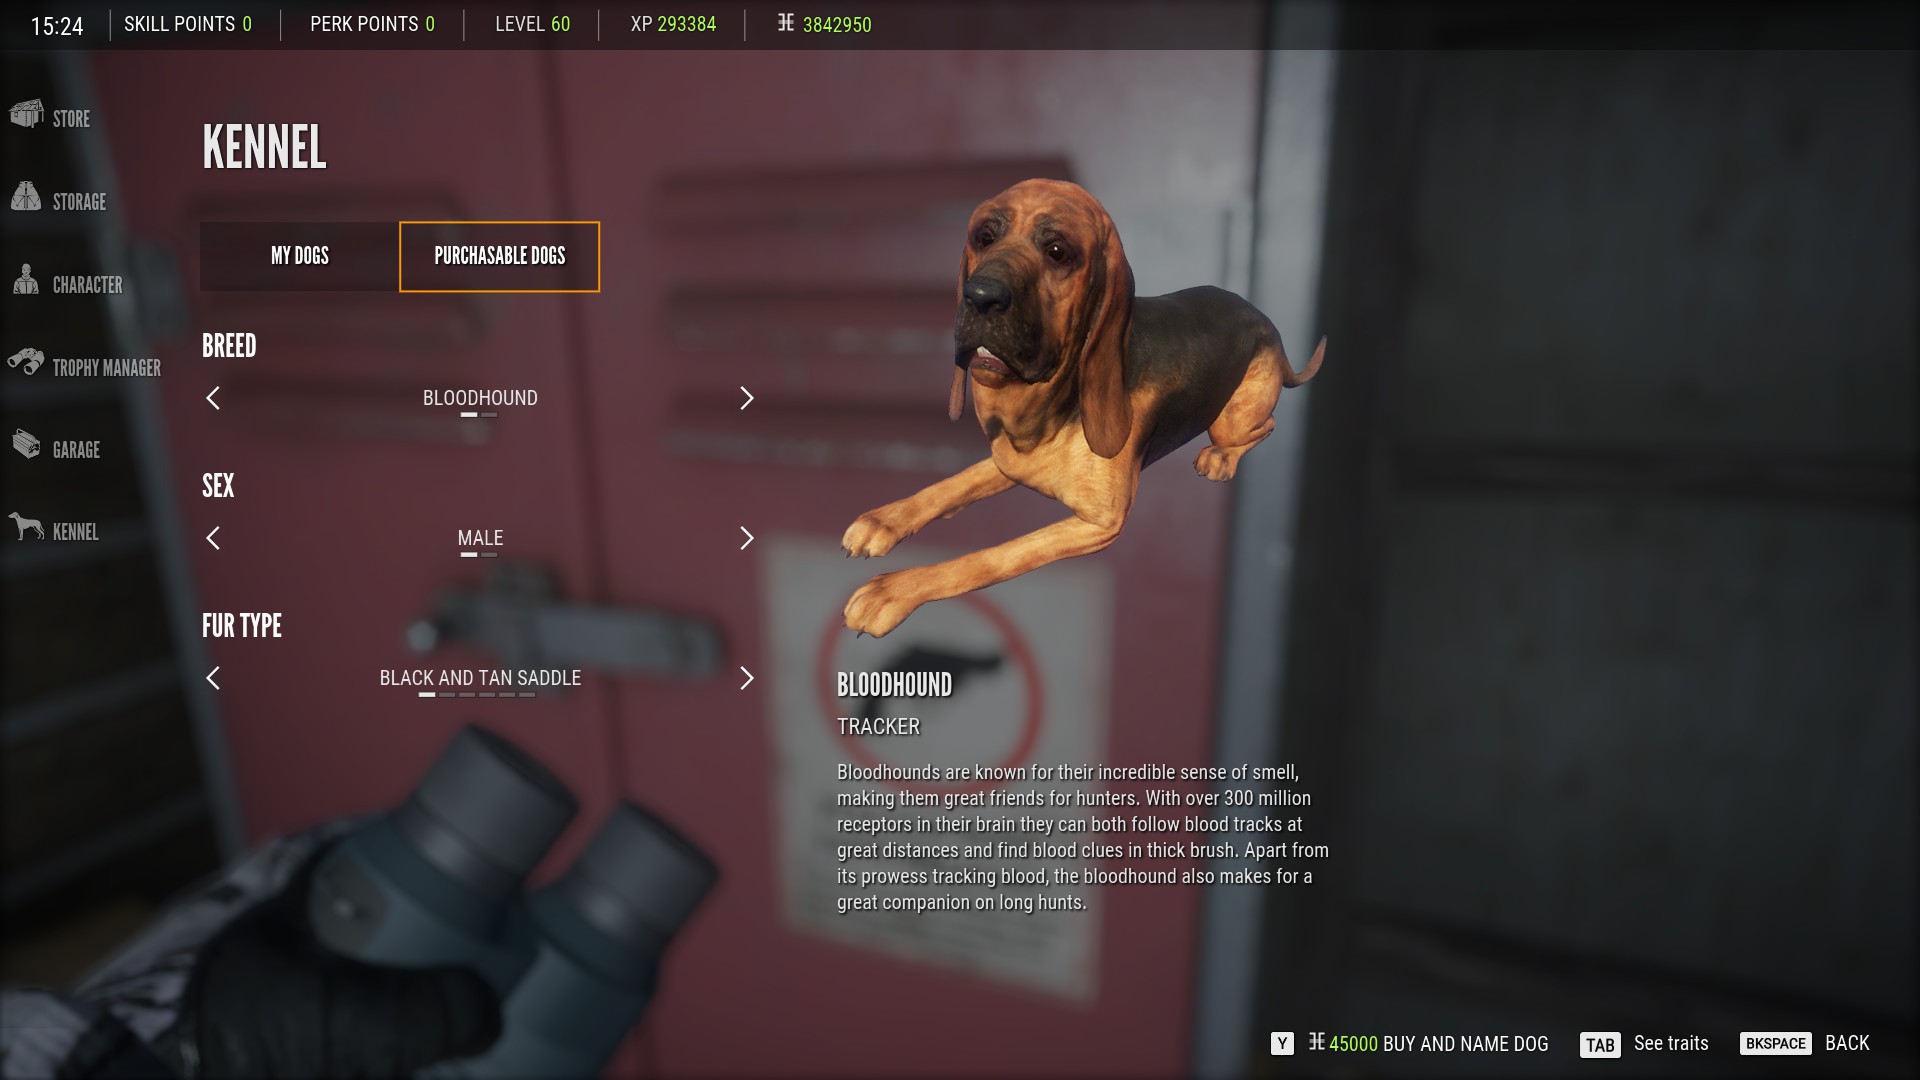
Your very first bloodhound and retriever can be purchased for free and then any dogs you want to purchase afterwards will cost you 45,000 in game cash. Once you have your dog purchased, you can take it out of the kennel by going to the my dogs tab and selecting the set as active option for the dog you want. You can only have one dog active at any time:
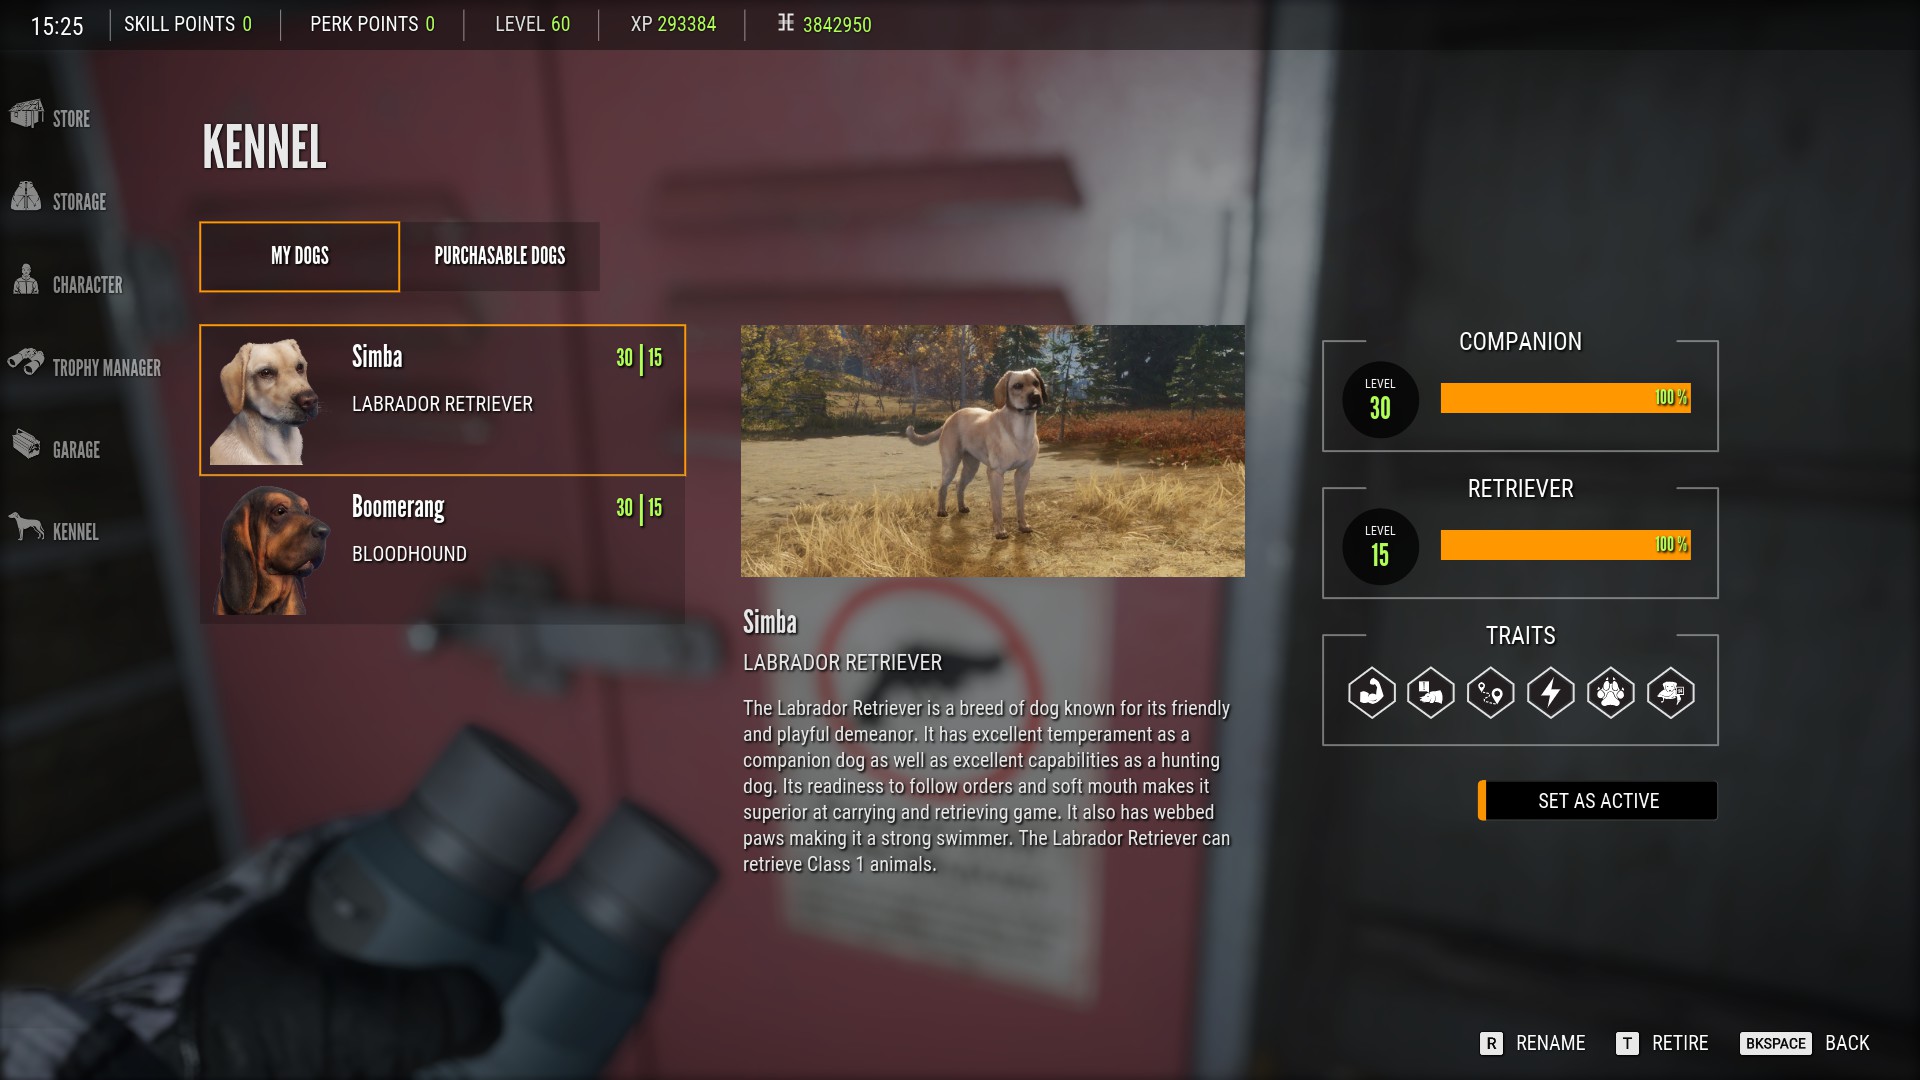
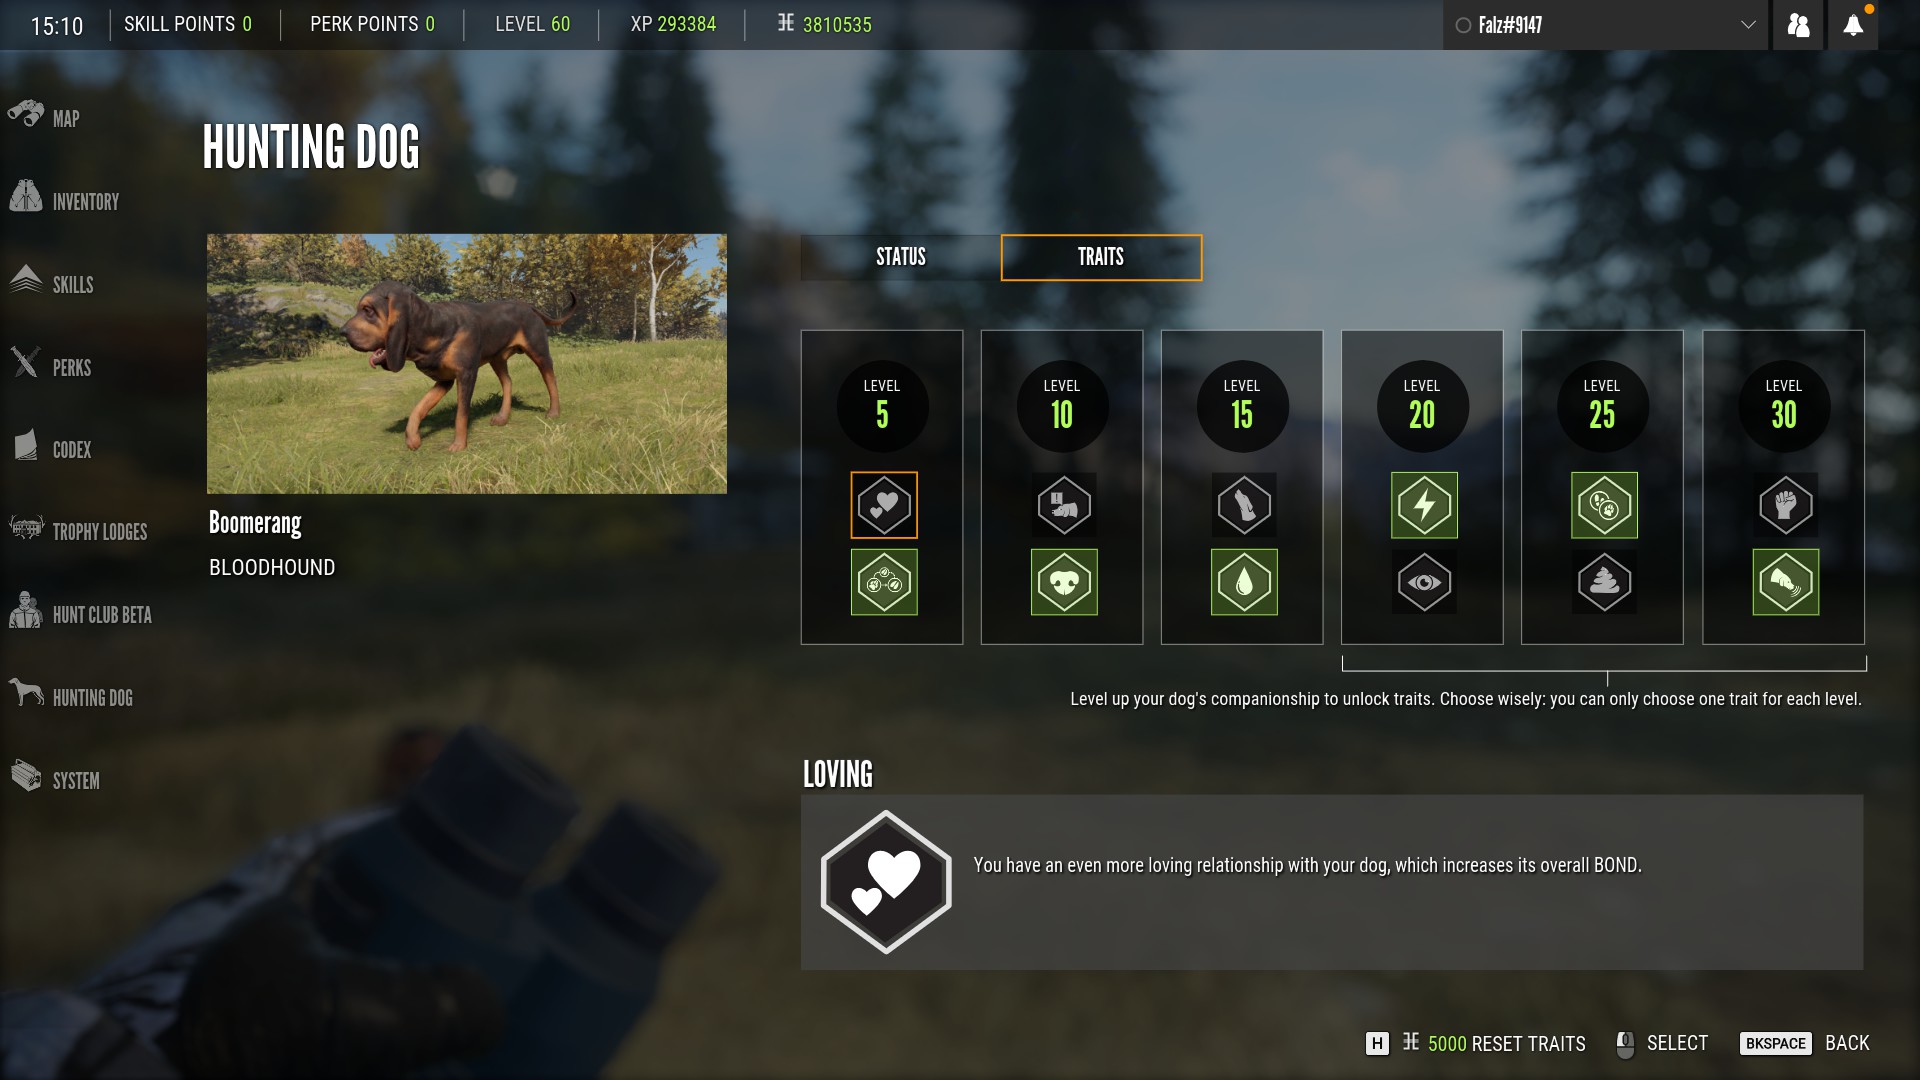
Traits
Both the bloodhound and labrador retriever have their own separate set of traits. After every 5 companion levels, you’ll have a choice between two traits to give your dog to make them more proficient. To see your dogs traits and unlock new ones, go to the hunting dog tab in the menu and select traits:
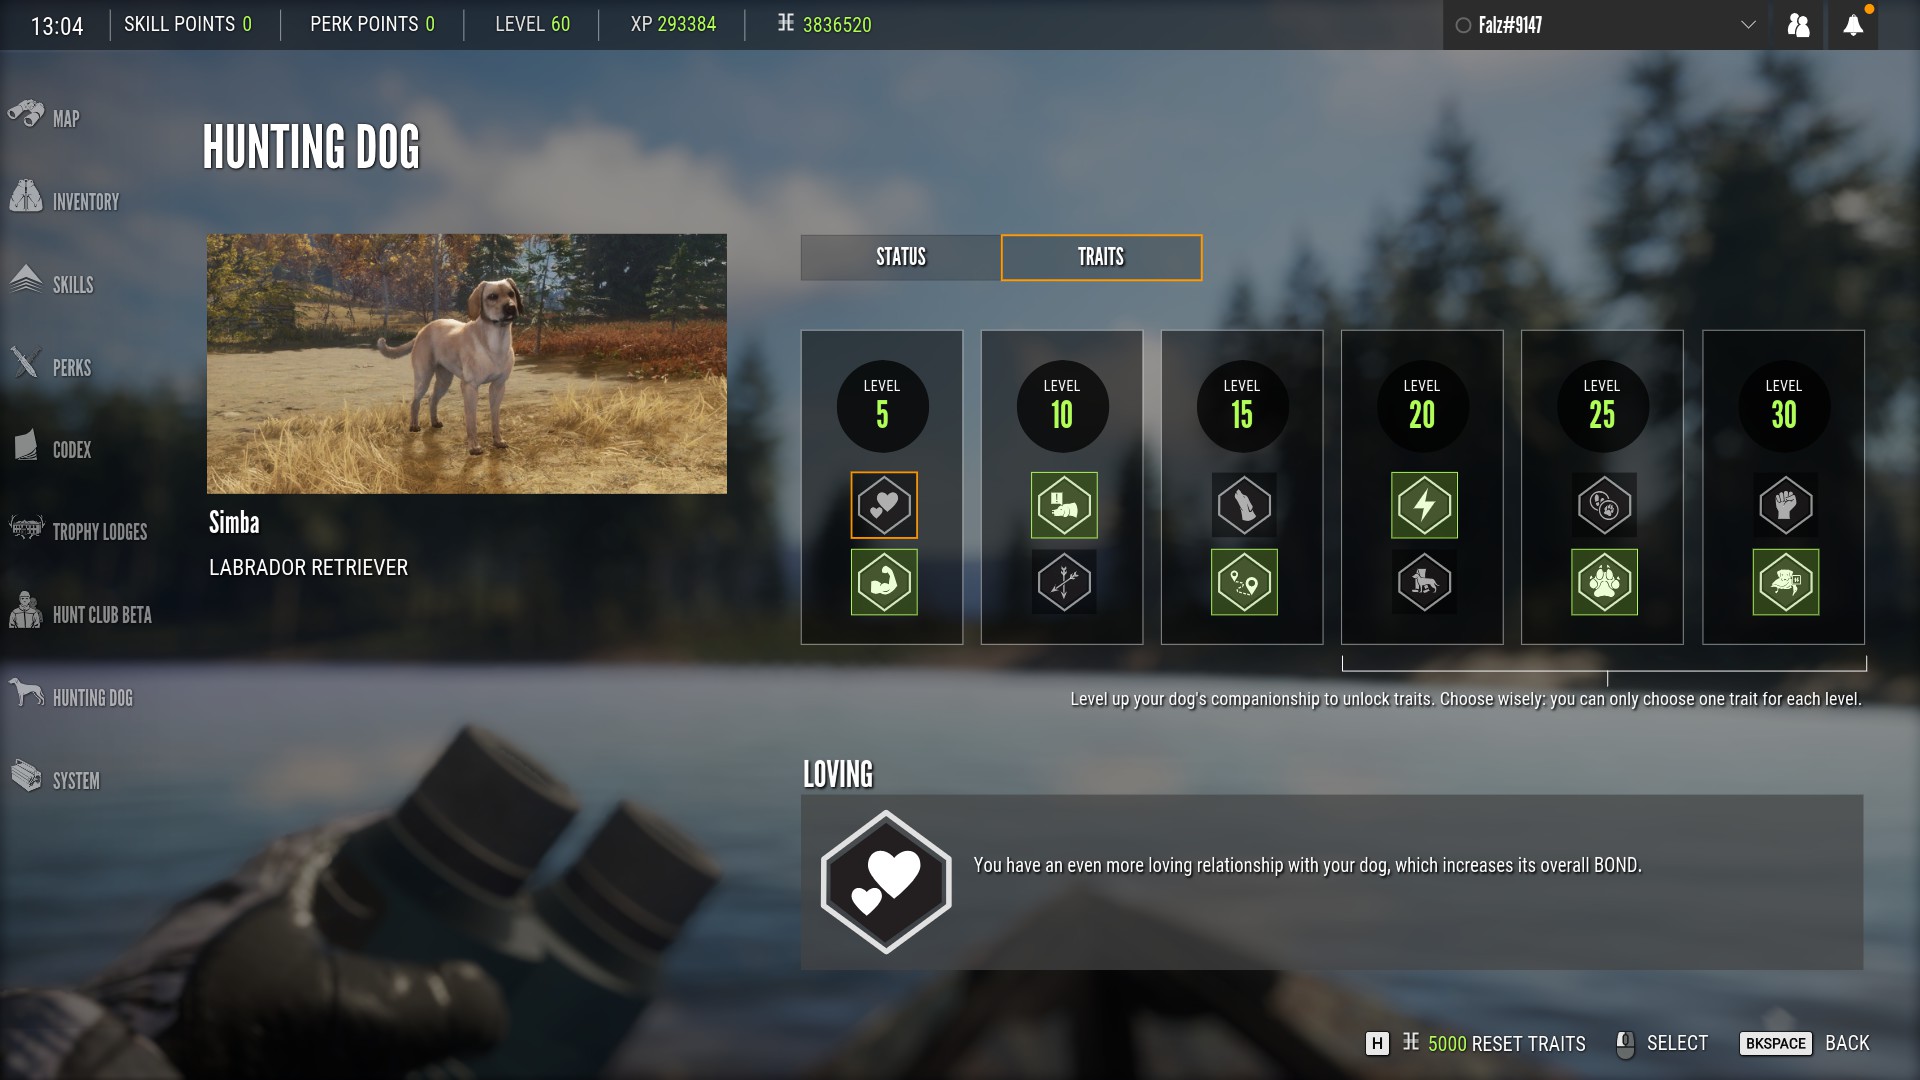
Your dog will also naturally become more proficient in its specialty as its tracking or retrieving level increases.
Commanding Your Dog
When you have your dog active, you can hold down the B key to open up a wheel and issue commands:
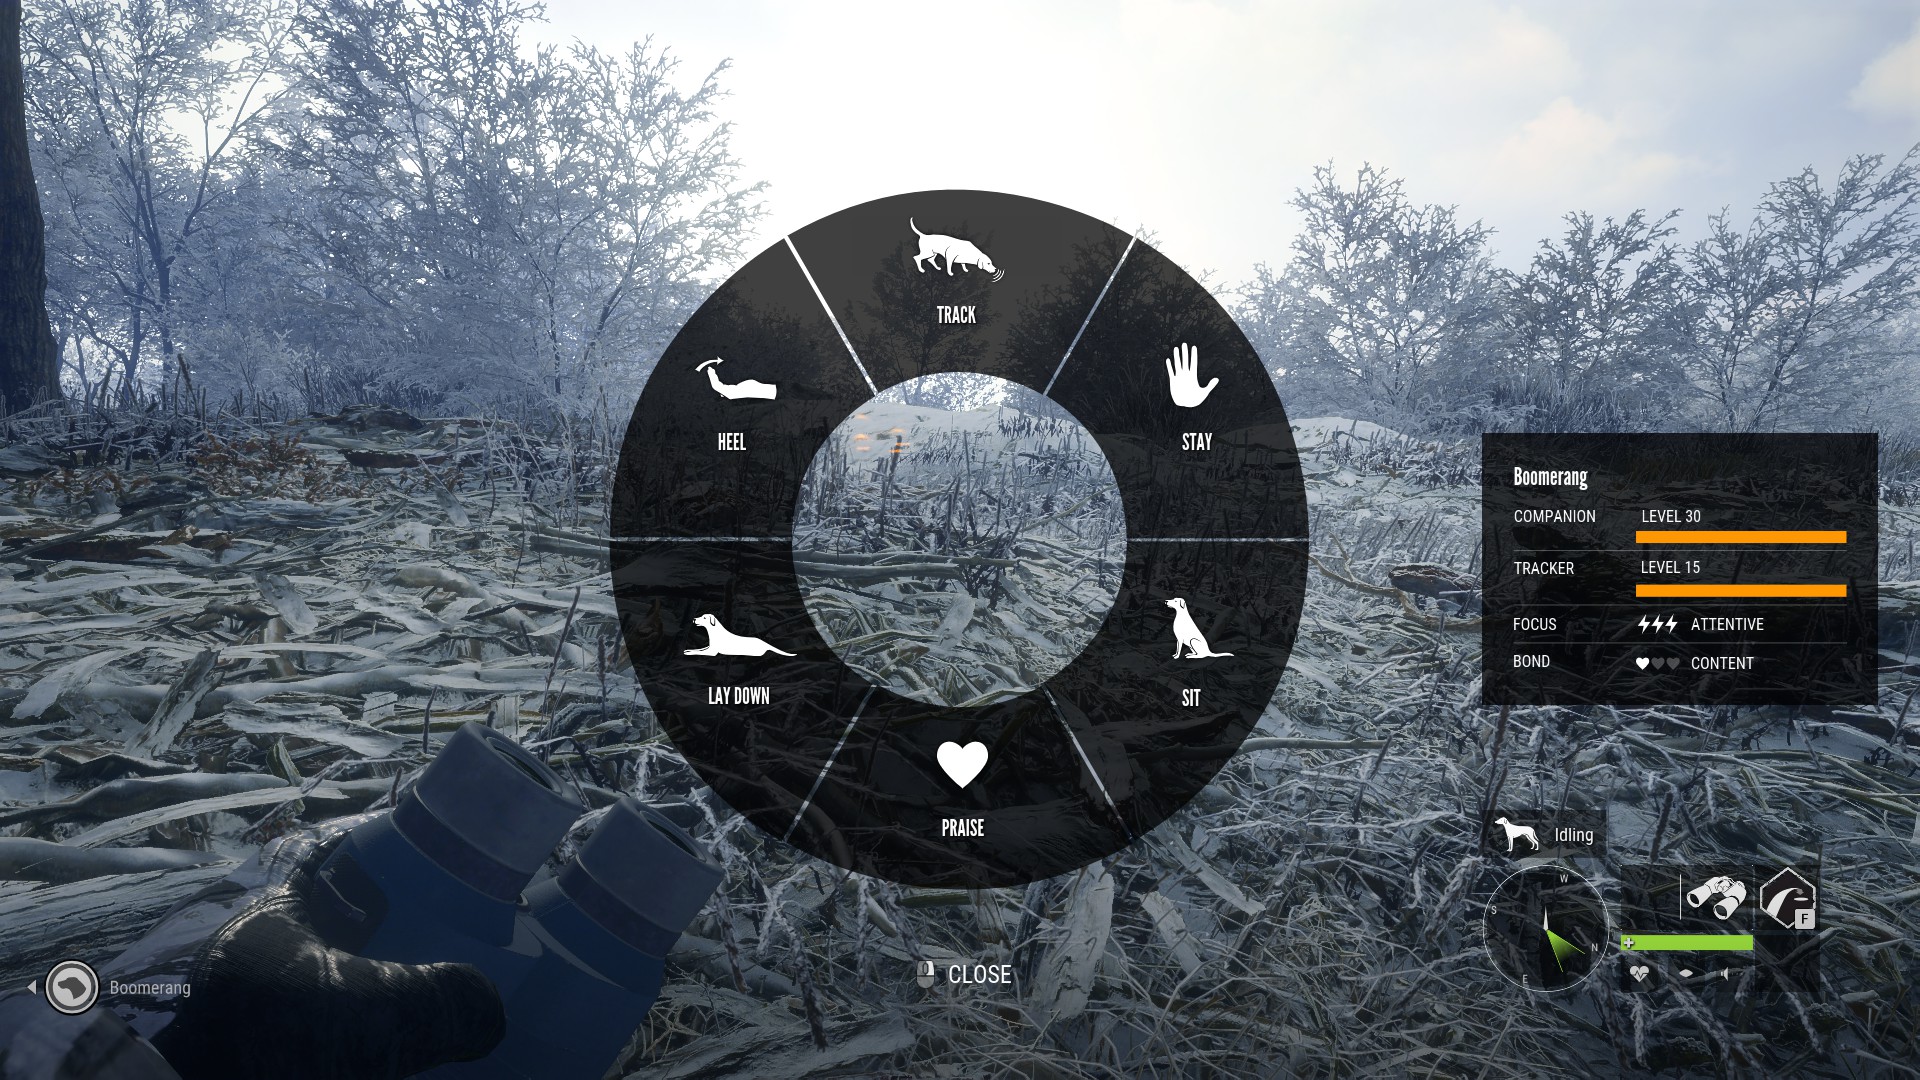
You can also quickly issue a couple of commands with the B key. Pressing it once will tell your dog to heel and quickly pressing it twice will tell your dog to either track if is a bloodhound or retrieve if it is a retriever.
Building And Maintaining A Bond With Your Dog
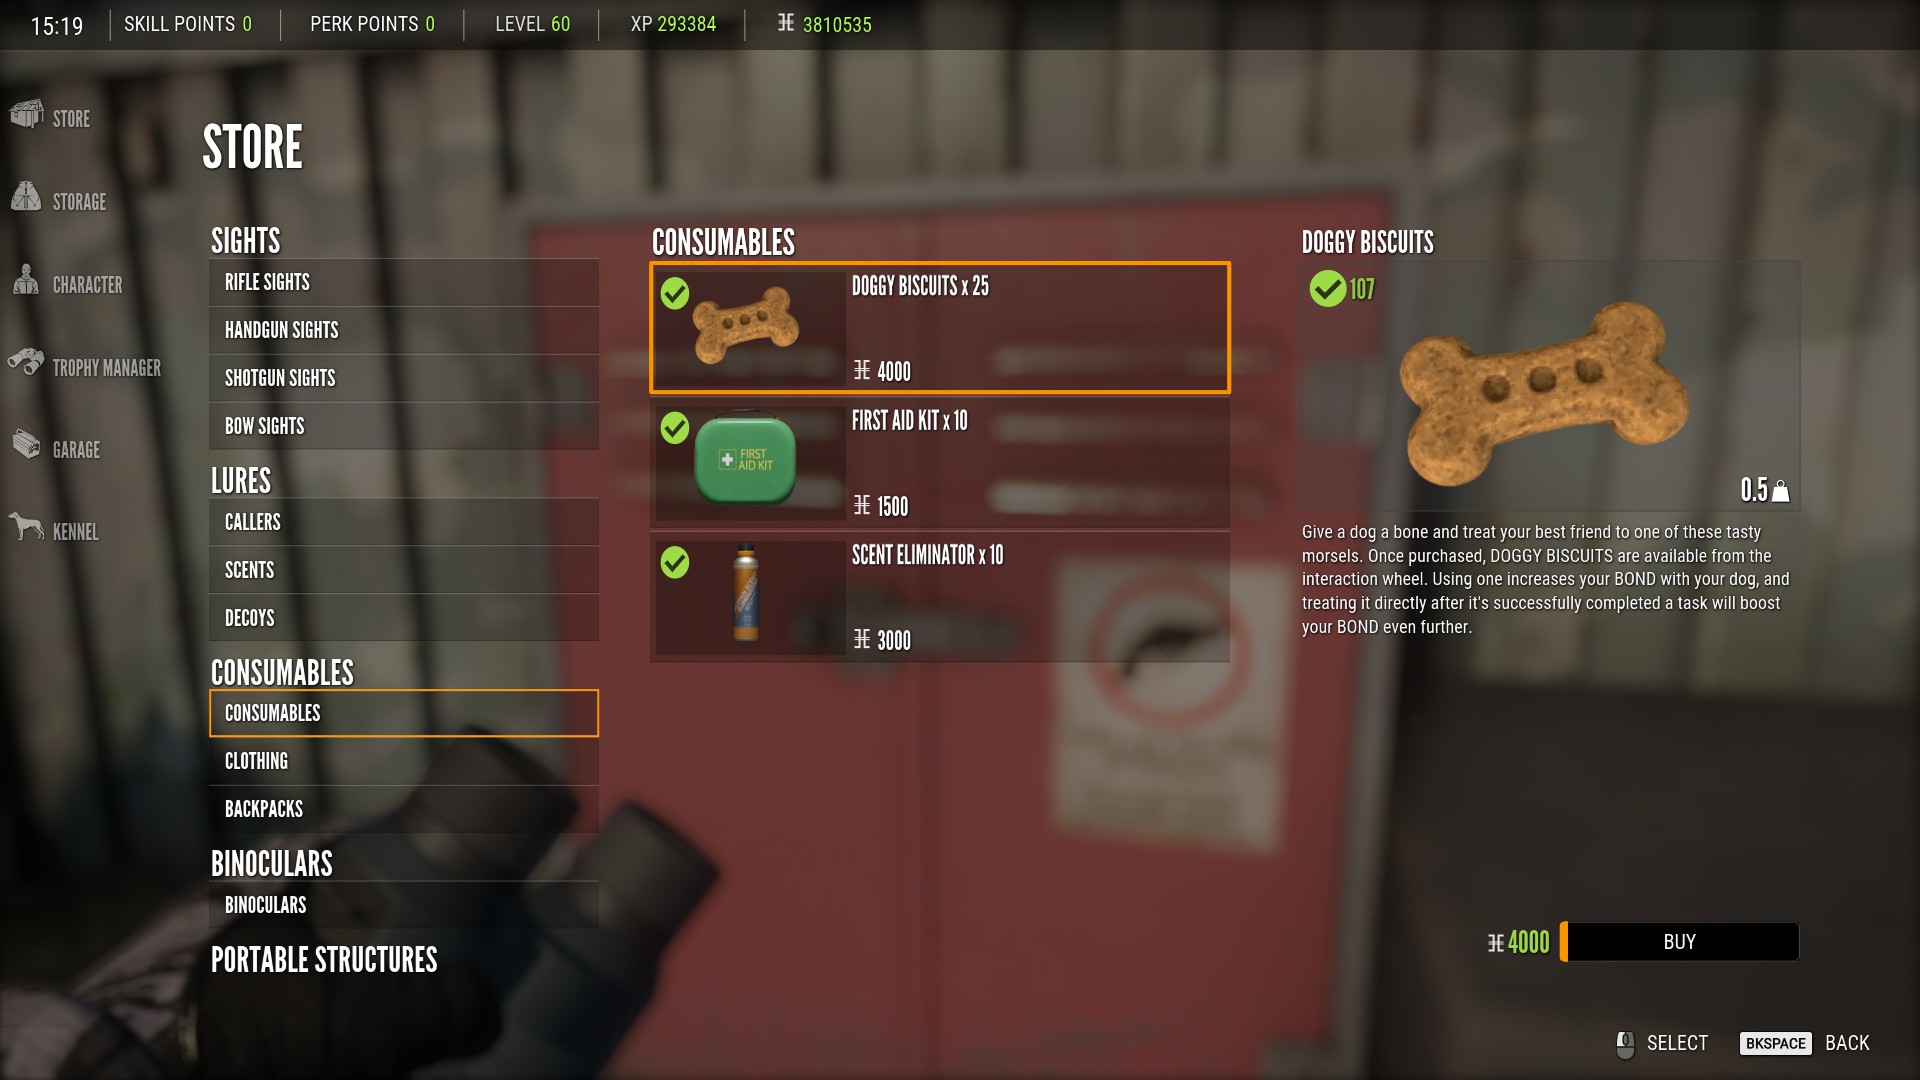
Creating a bond with your dog is very important. If your dog has little to no bond with you, then it will lose focus very quickly and will be very slow to respond to and follow your commands. Your dog can also become tired and lose focus if you try to give it too many tasks without enough time to rest in between. In order to improve your bond, you can interact with your dog and either play with them or pet them. You can also purchase treats from the store to feed your dog:
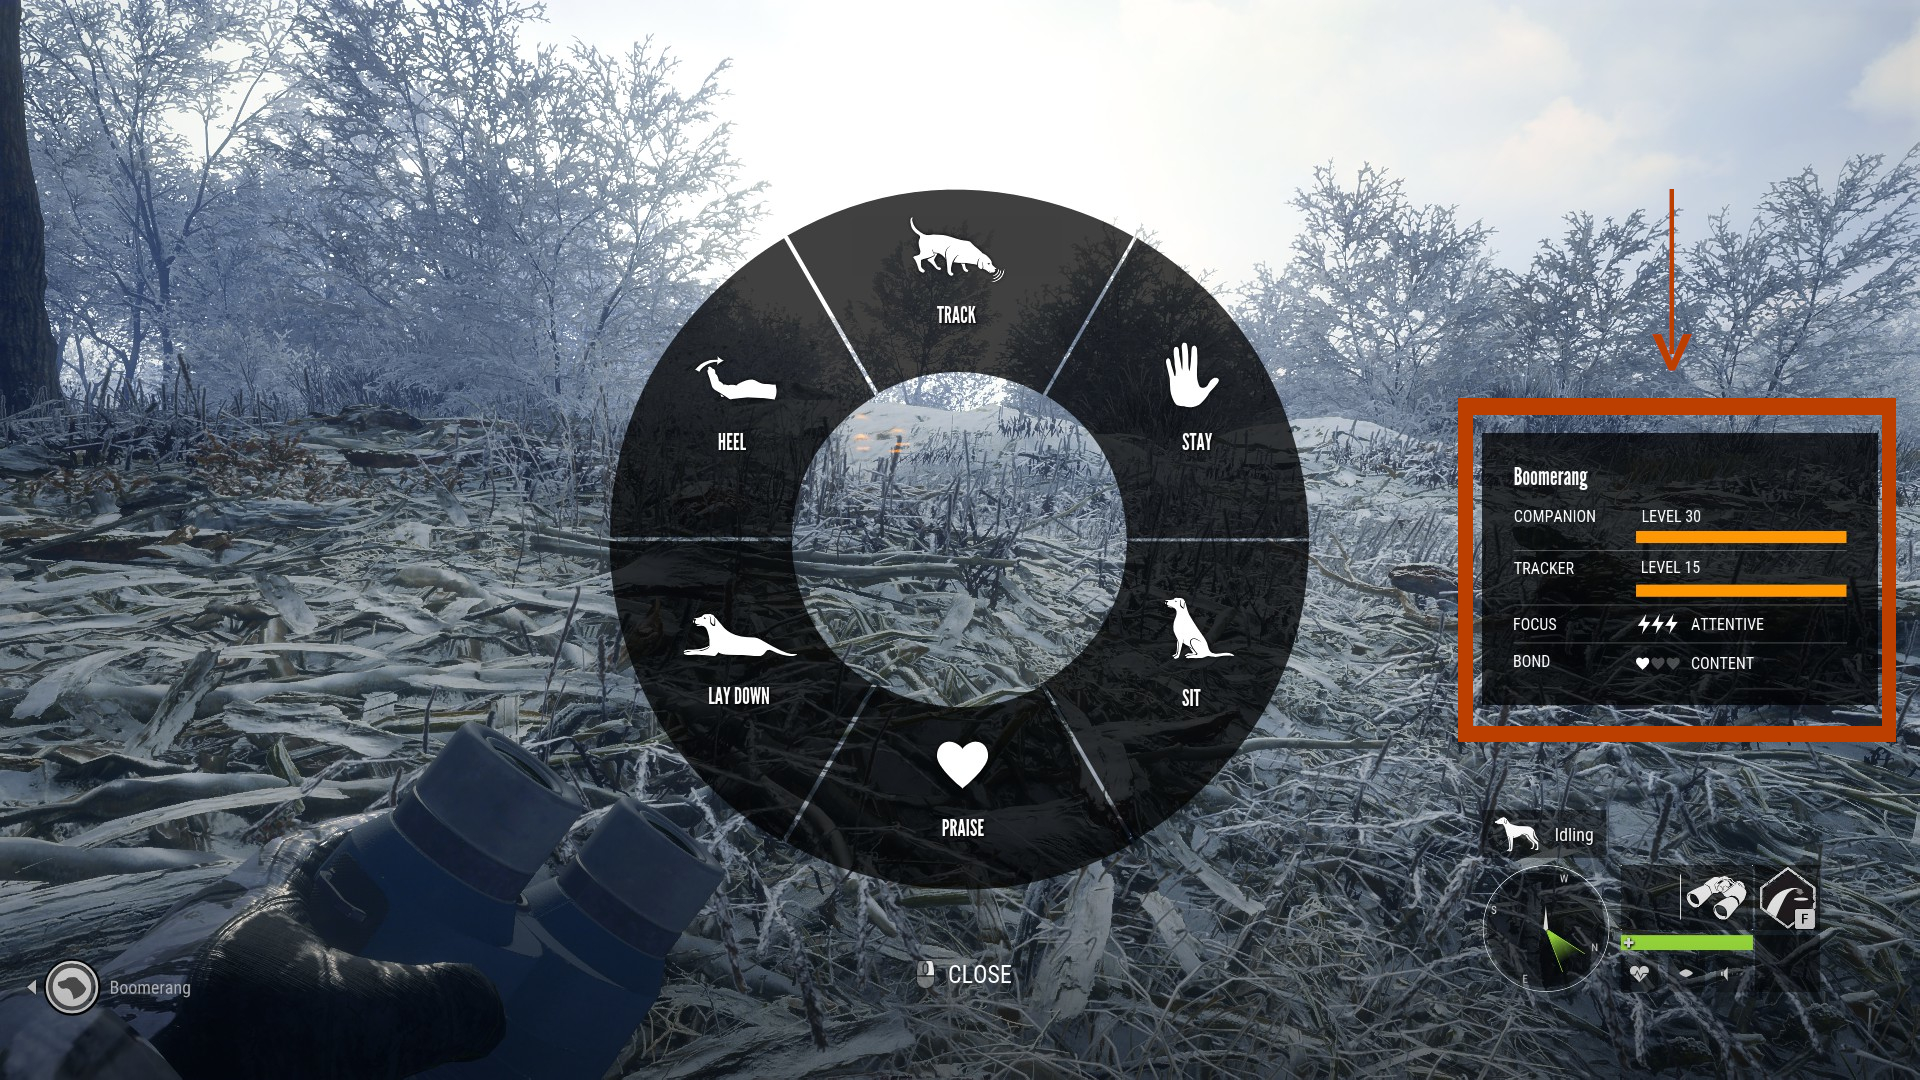
You can maintain your bond with your dog by praising them whenever they successfully carry out one of your commands and giving them the occasional treat as well. You can see how strong your bond is with your dog and how focused your dog is when you open the command wheel:
Taxidermizing And Saving Trophies
While the majority of the animals you harvest won’t be worth keeping, there will be those rare animals that you want to save for your trophy lodge (mainly diamonds and animals with rare fur types). If you harvest an animal that you want to save for your trophy lodge, select the taxidermize option in the harvest screen. Be aware that this will cost you a fee that will vary from animal to animal:
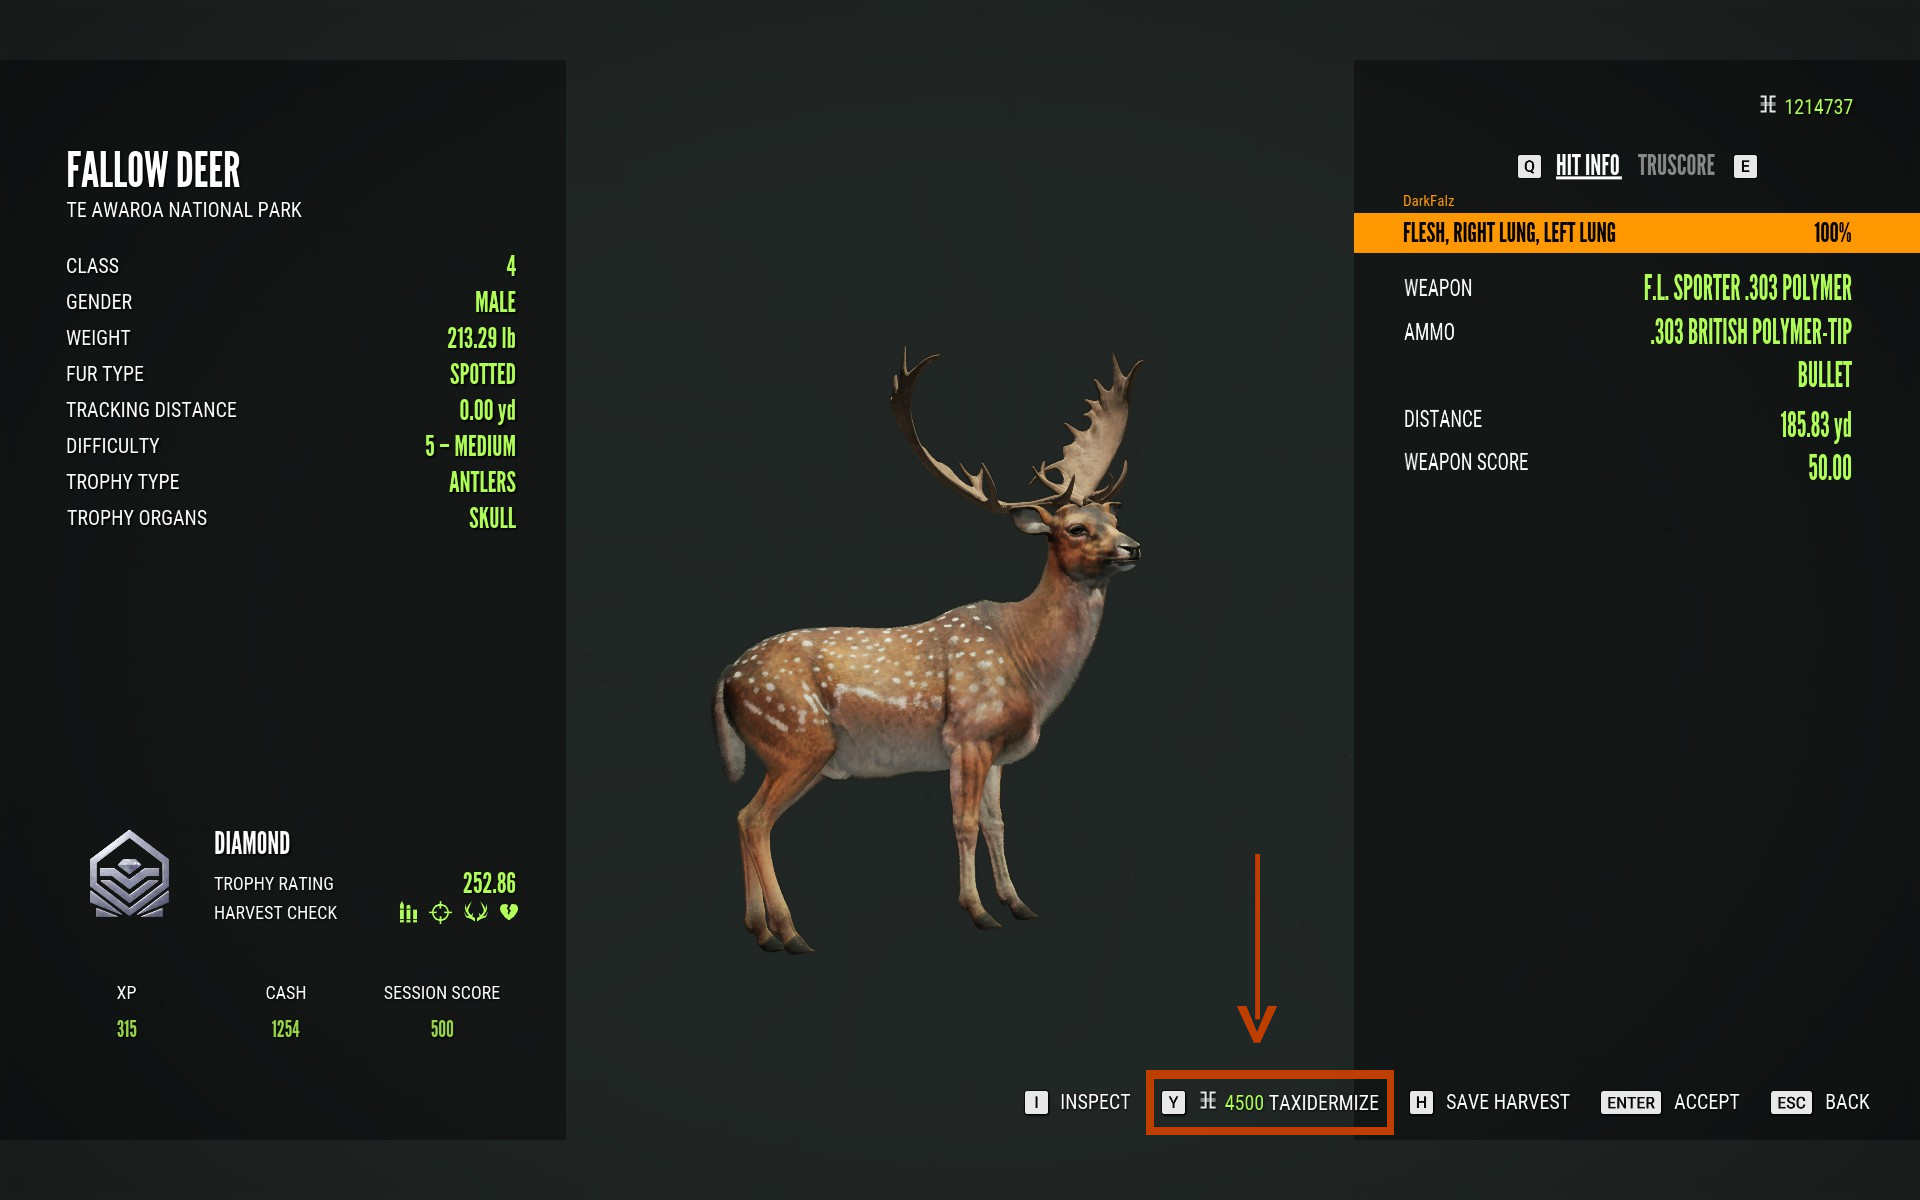
After being taxidermized, the animal will be available in your trophy manager whenever you go to your lodge.
What If I Can’t Afford To Taxidermize My Trophy?
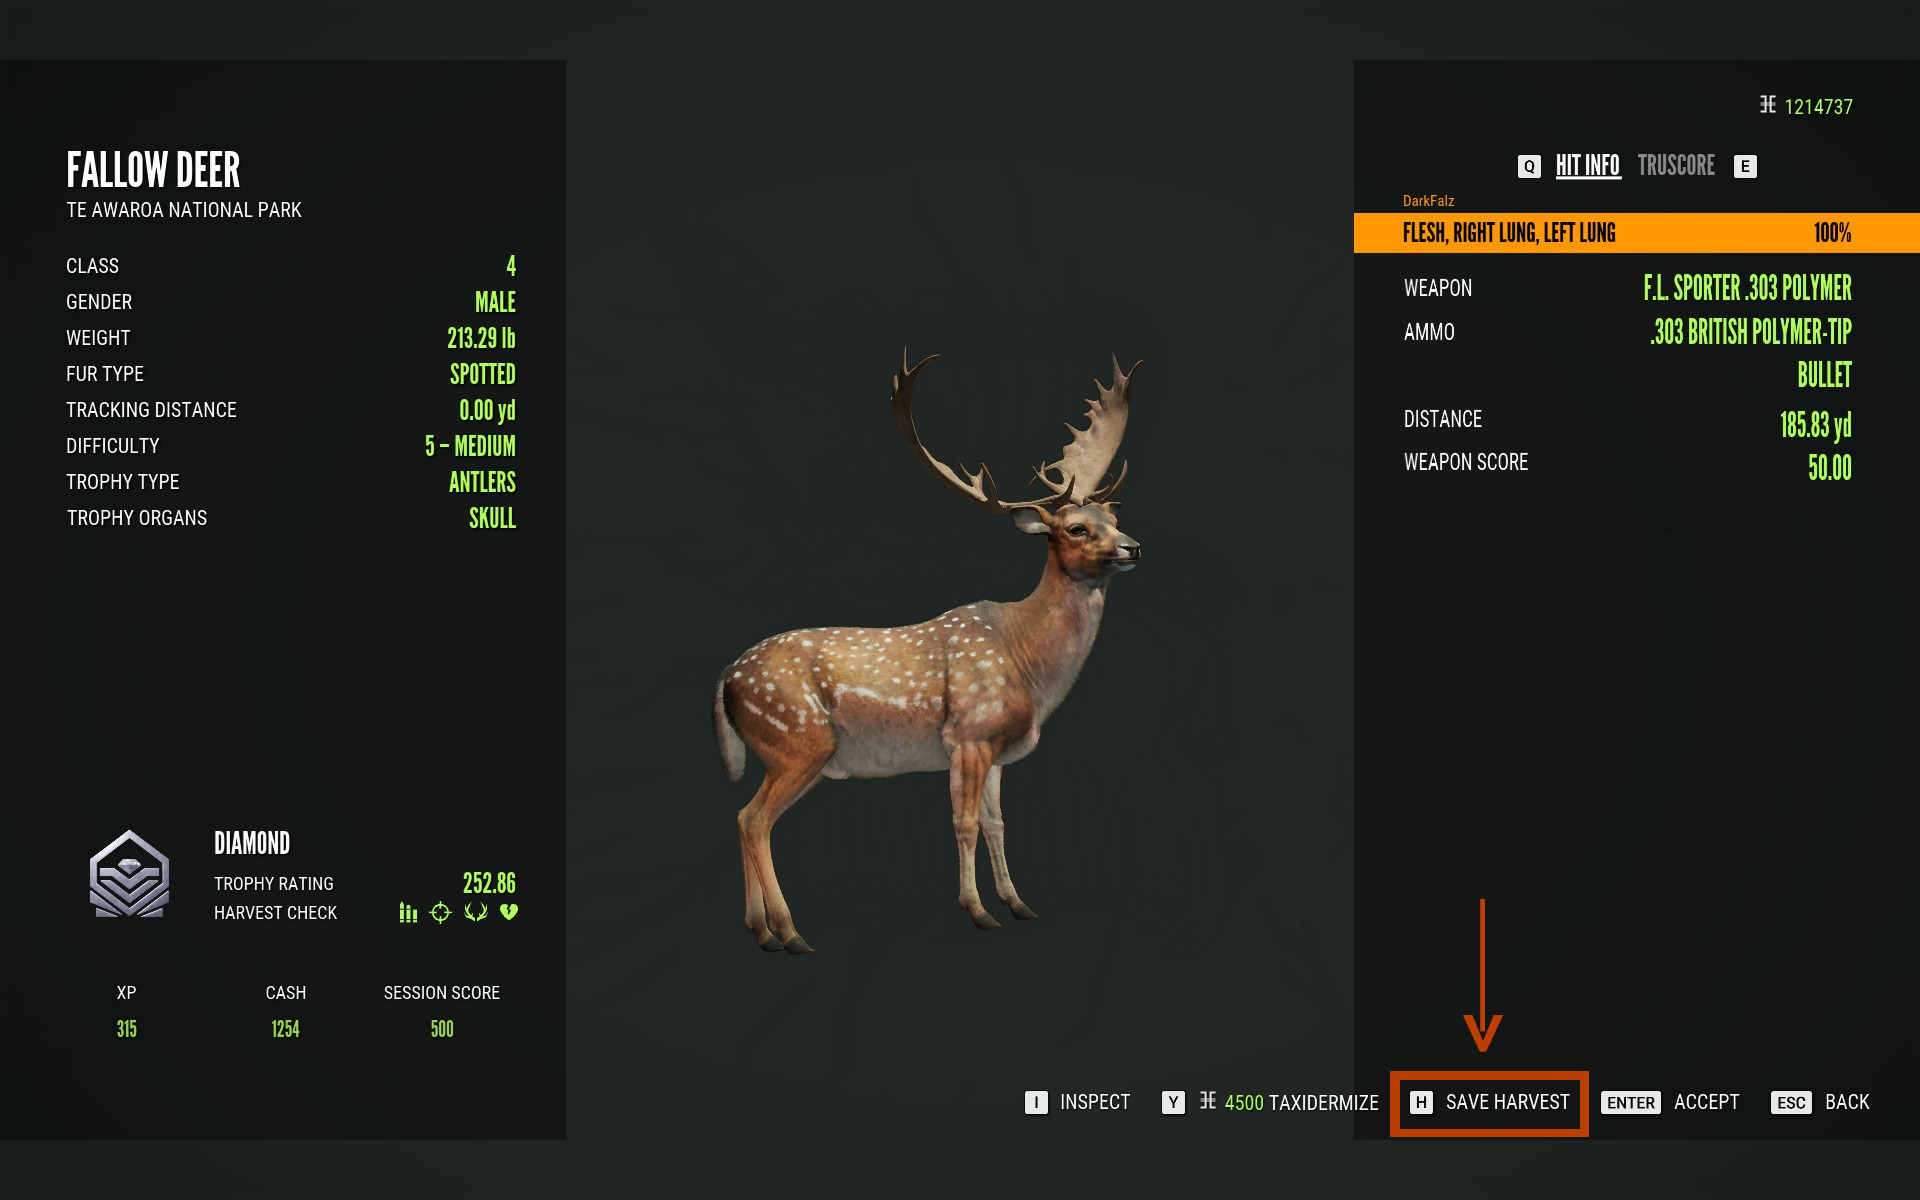
If you don’t have enough money to pay the fee, then don’t worry because you do have another option. You can instead just save the harvest and then taxidermize it later once you have enough money. To do this, select the save harvest option when you’re in harvest screen:
There is a limit to the number of harvests you can have saved so try to get them taxidermized before you reach it.
I Accidentally Harvested An Animal I Want To Keep Without Saving It. What Can I Do?
I think everyone has done this at least once. If this happens to you the first thing you need to remember is DO NOT HARVEST ANY MORE ANIMALS. Go directly to one the outposts or one of your tents, open up the cache and select the trophy manager. Once here, you will see an option to save or taxidermize your most recent unsaved harvest:
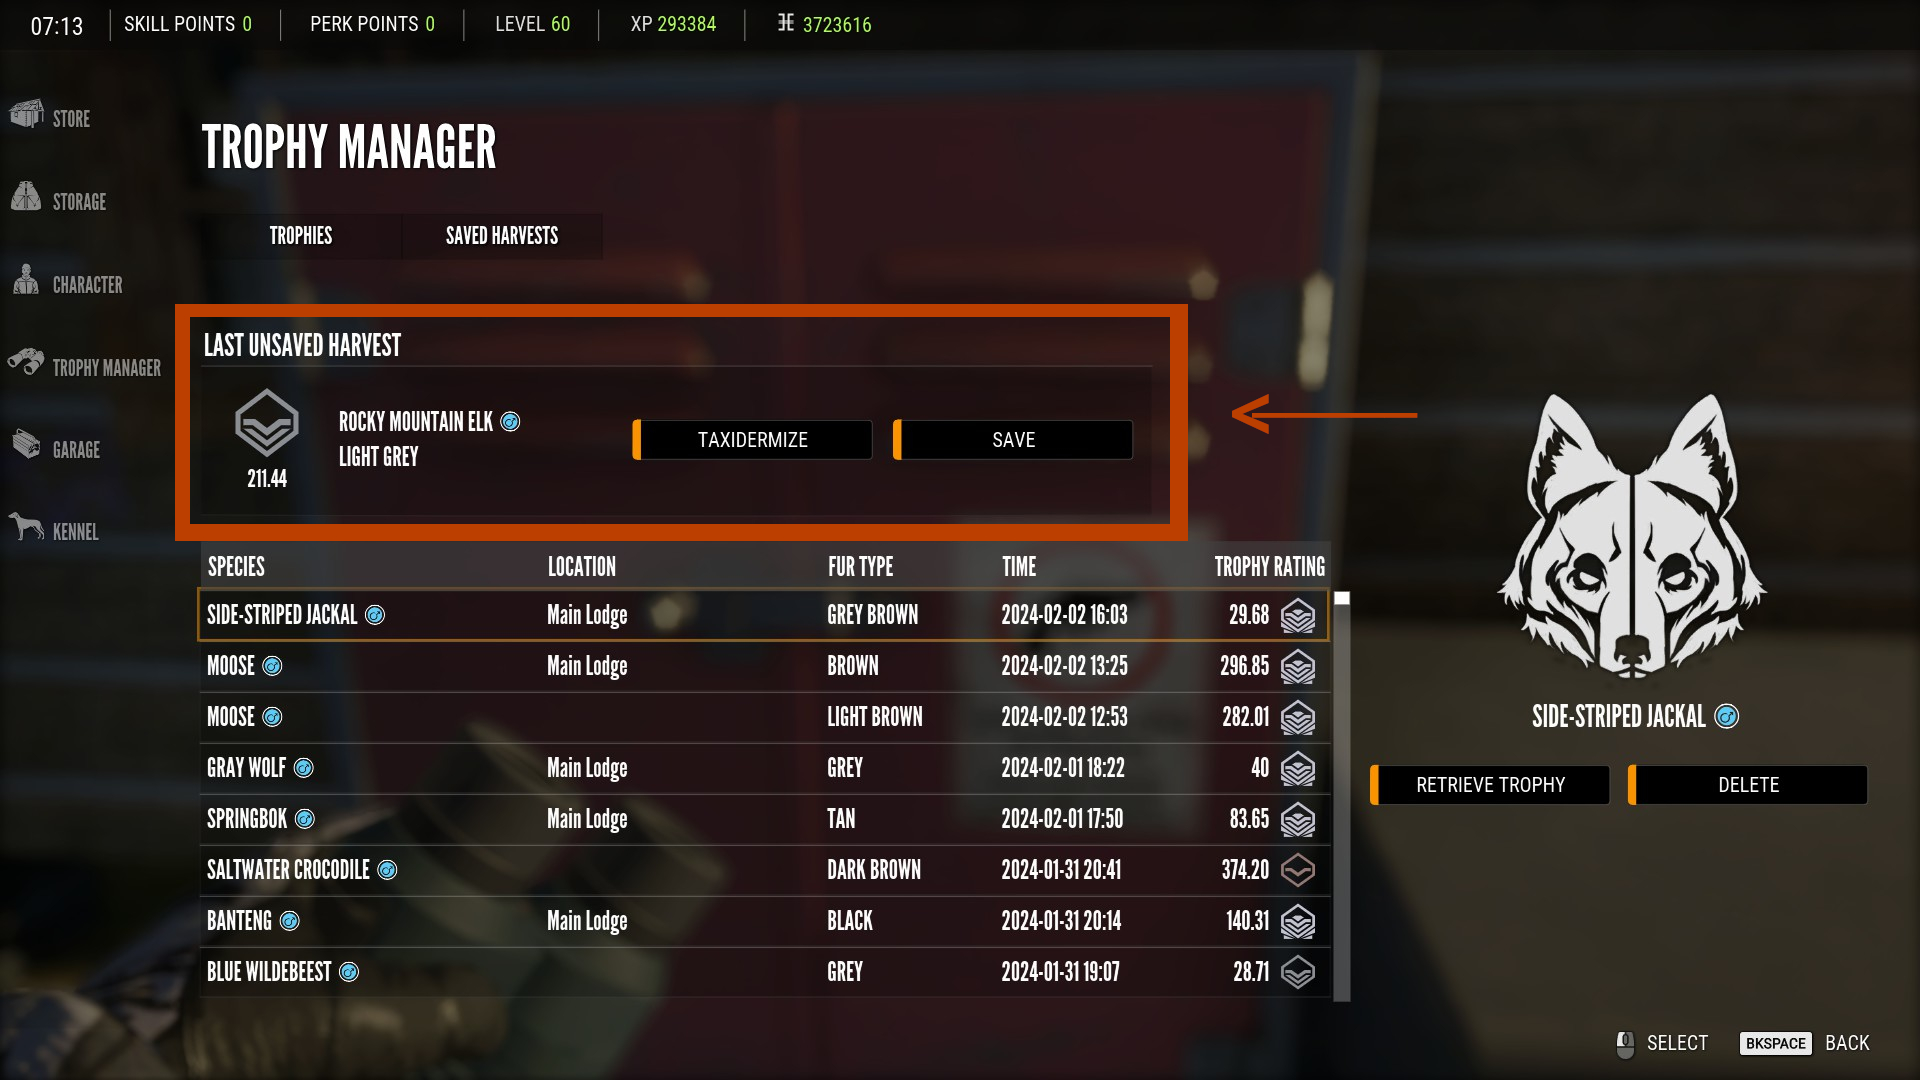
This is the only way you can recover your trophy. If you’ve harvested anything else since claiming it, then unfortunately it’s gone for good.
Displaying Your Trophies In A Lodge
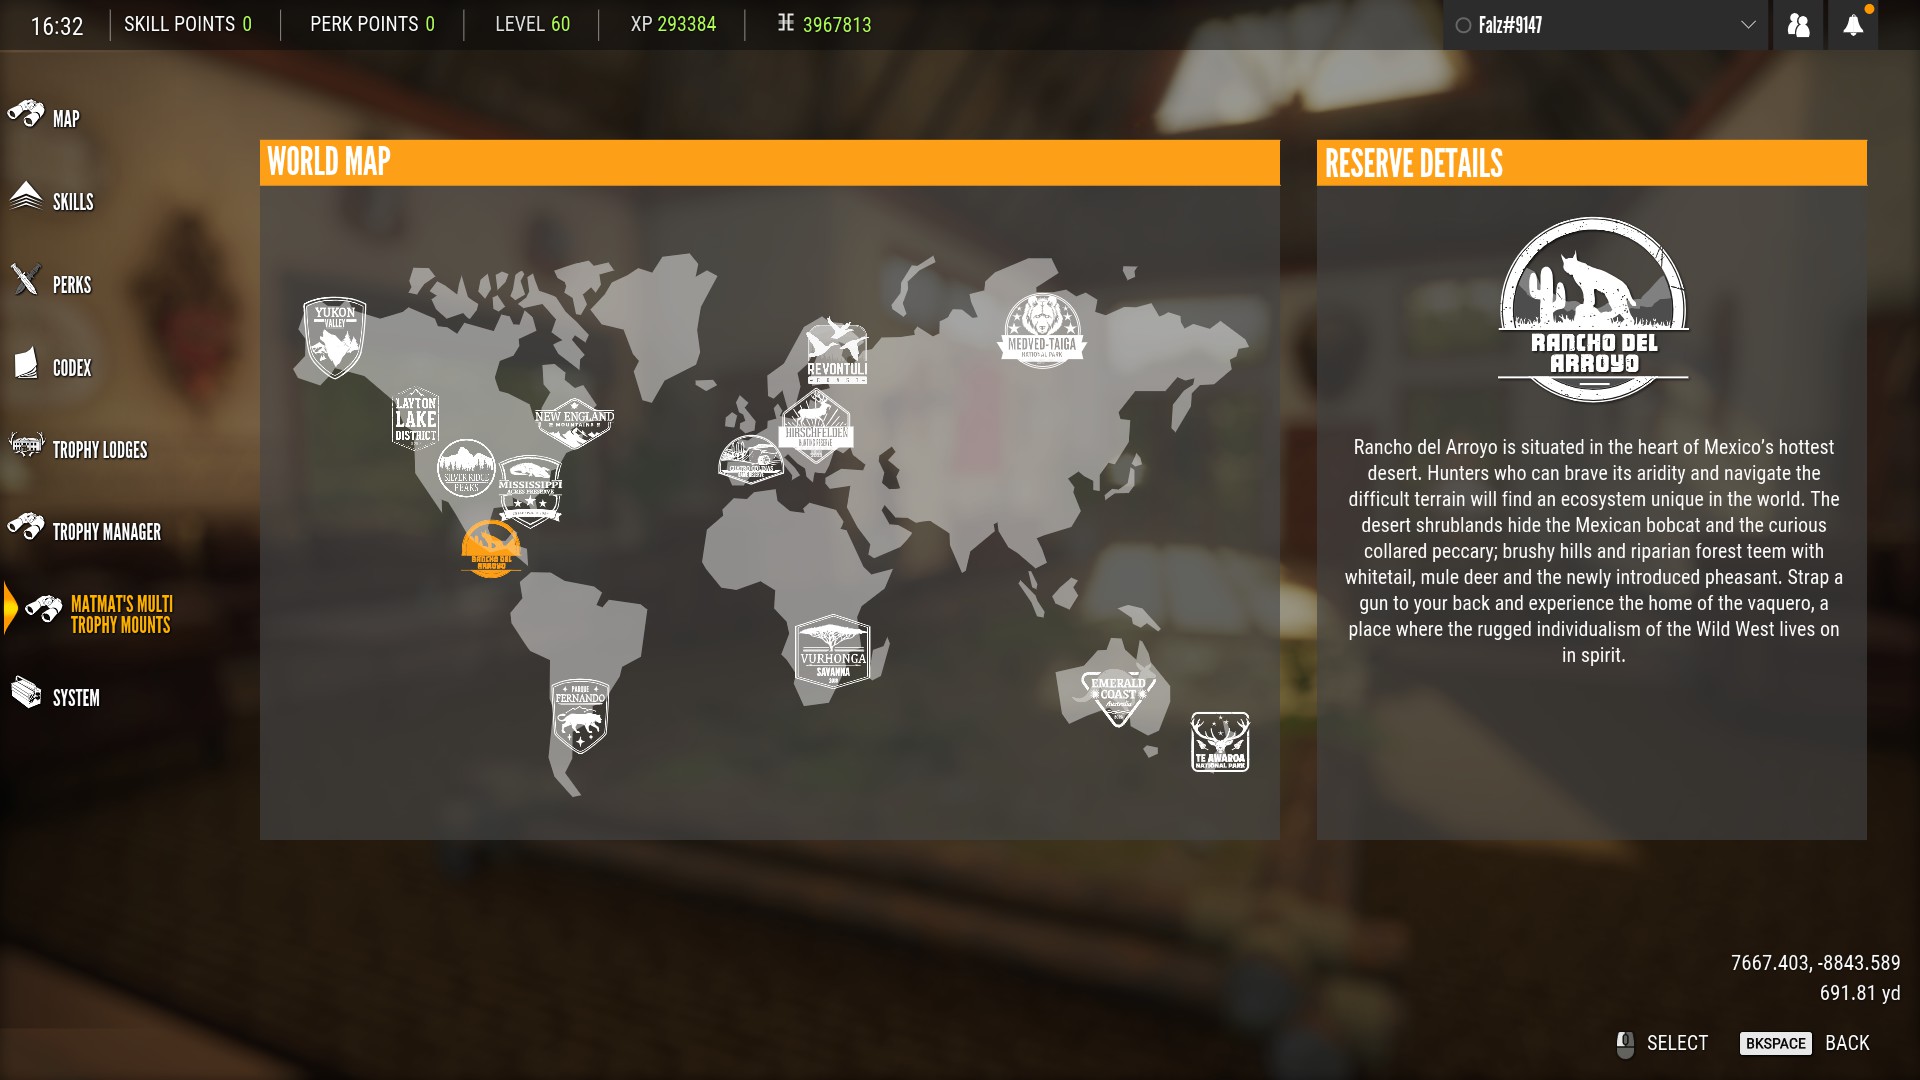
Once you have some trophies taxidermized, it’s time to get them set up in a trophy lodge. First, you’ll need to create a lodge by selecting the trophy lodges option from the menu:
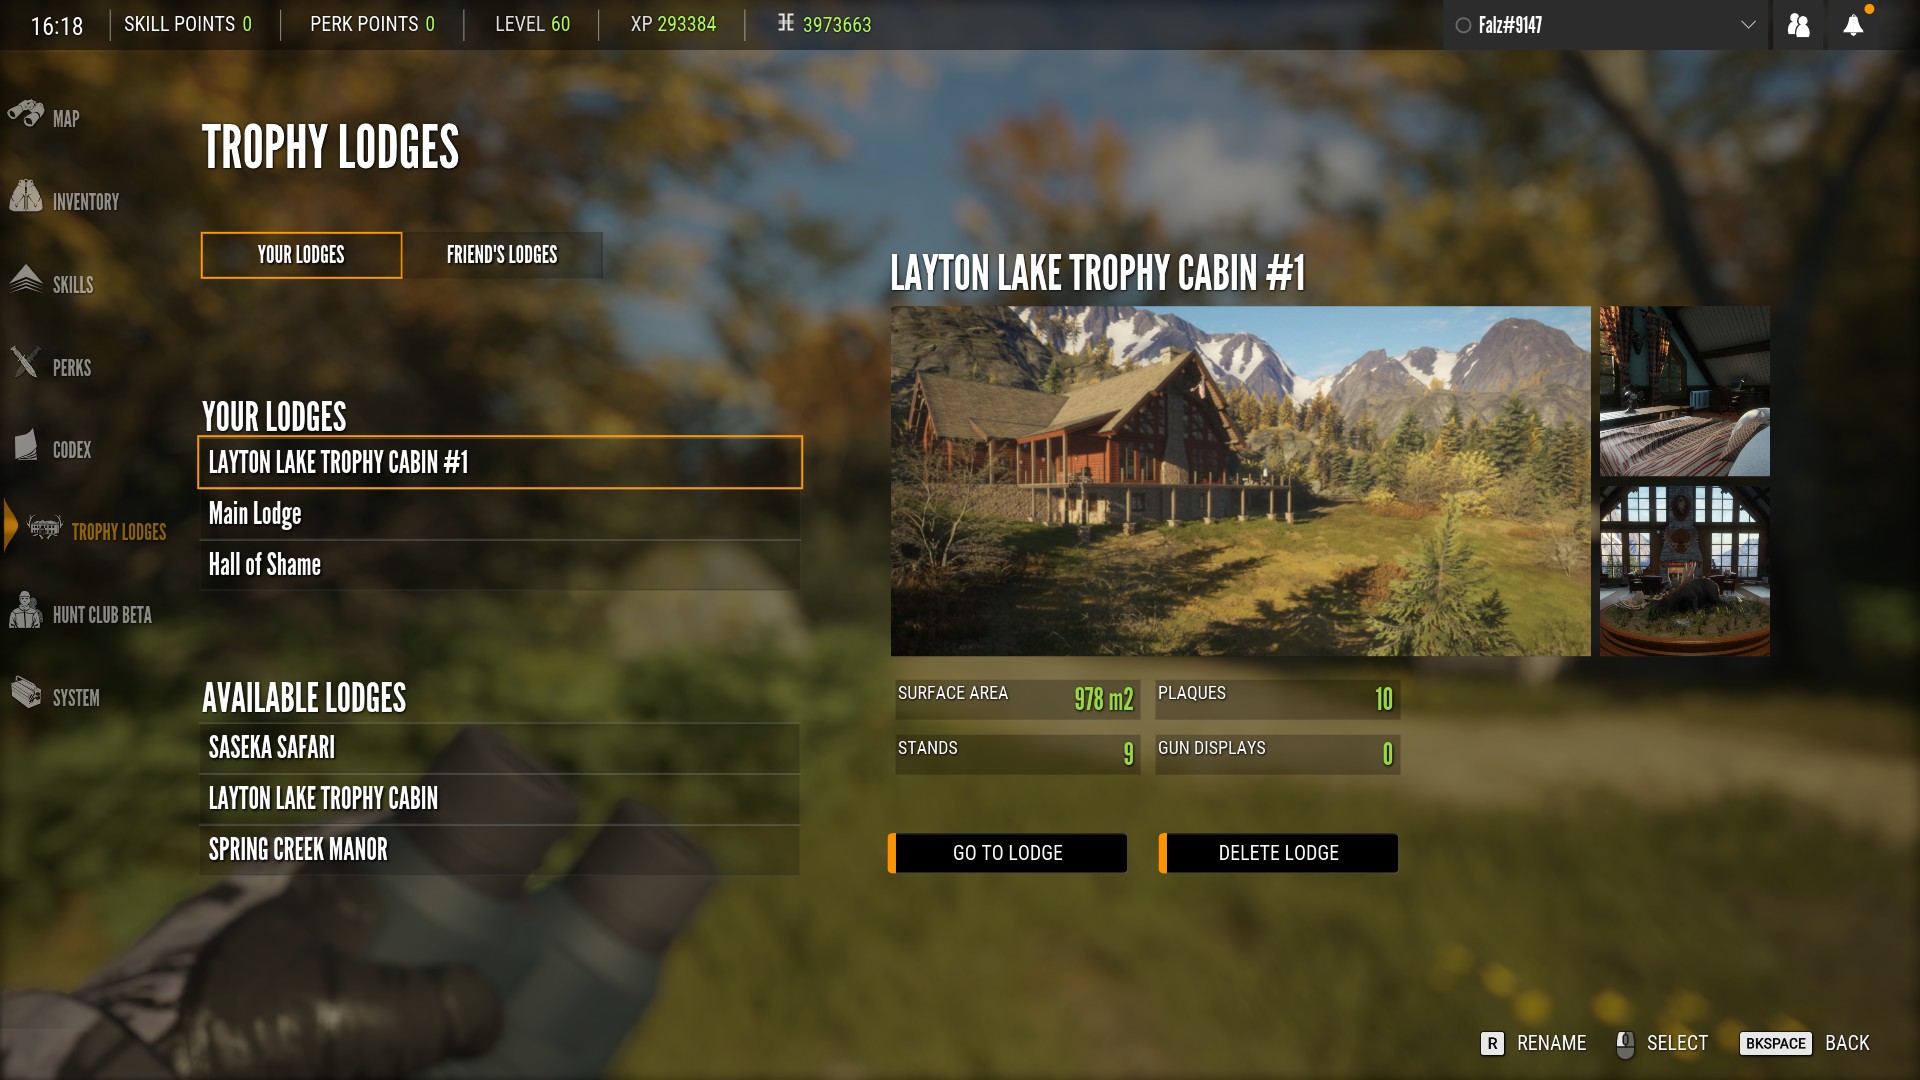
You can have a maximum on 10 trophy lodges in total.
The base game comes with the Layton Lake lodge which is intended mainly for the animals that you can find on the base game maps (Hirschfelden and Layton Lake):
The Parque Fernando map also comes with it’s own trophy lodge that can be unlocked by doing the missions. Once again, it is intended primarily for animals found on that particular map:

If you want a more flexible trophy lodge, then you’ll need to purchase either Spring Creek Manor or Saseka Safari:
Not only are these lodges larger, but they allow you to display any species from any map within them.
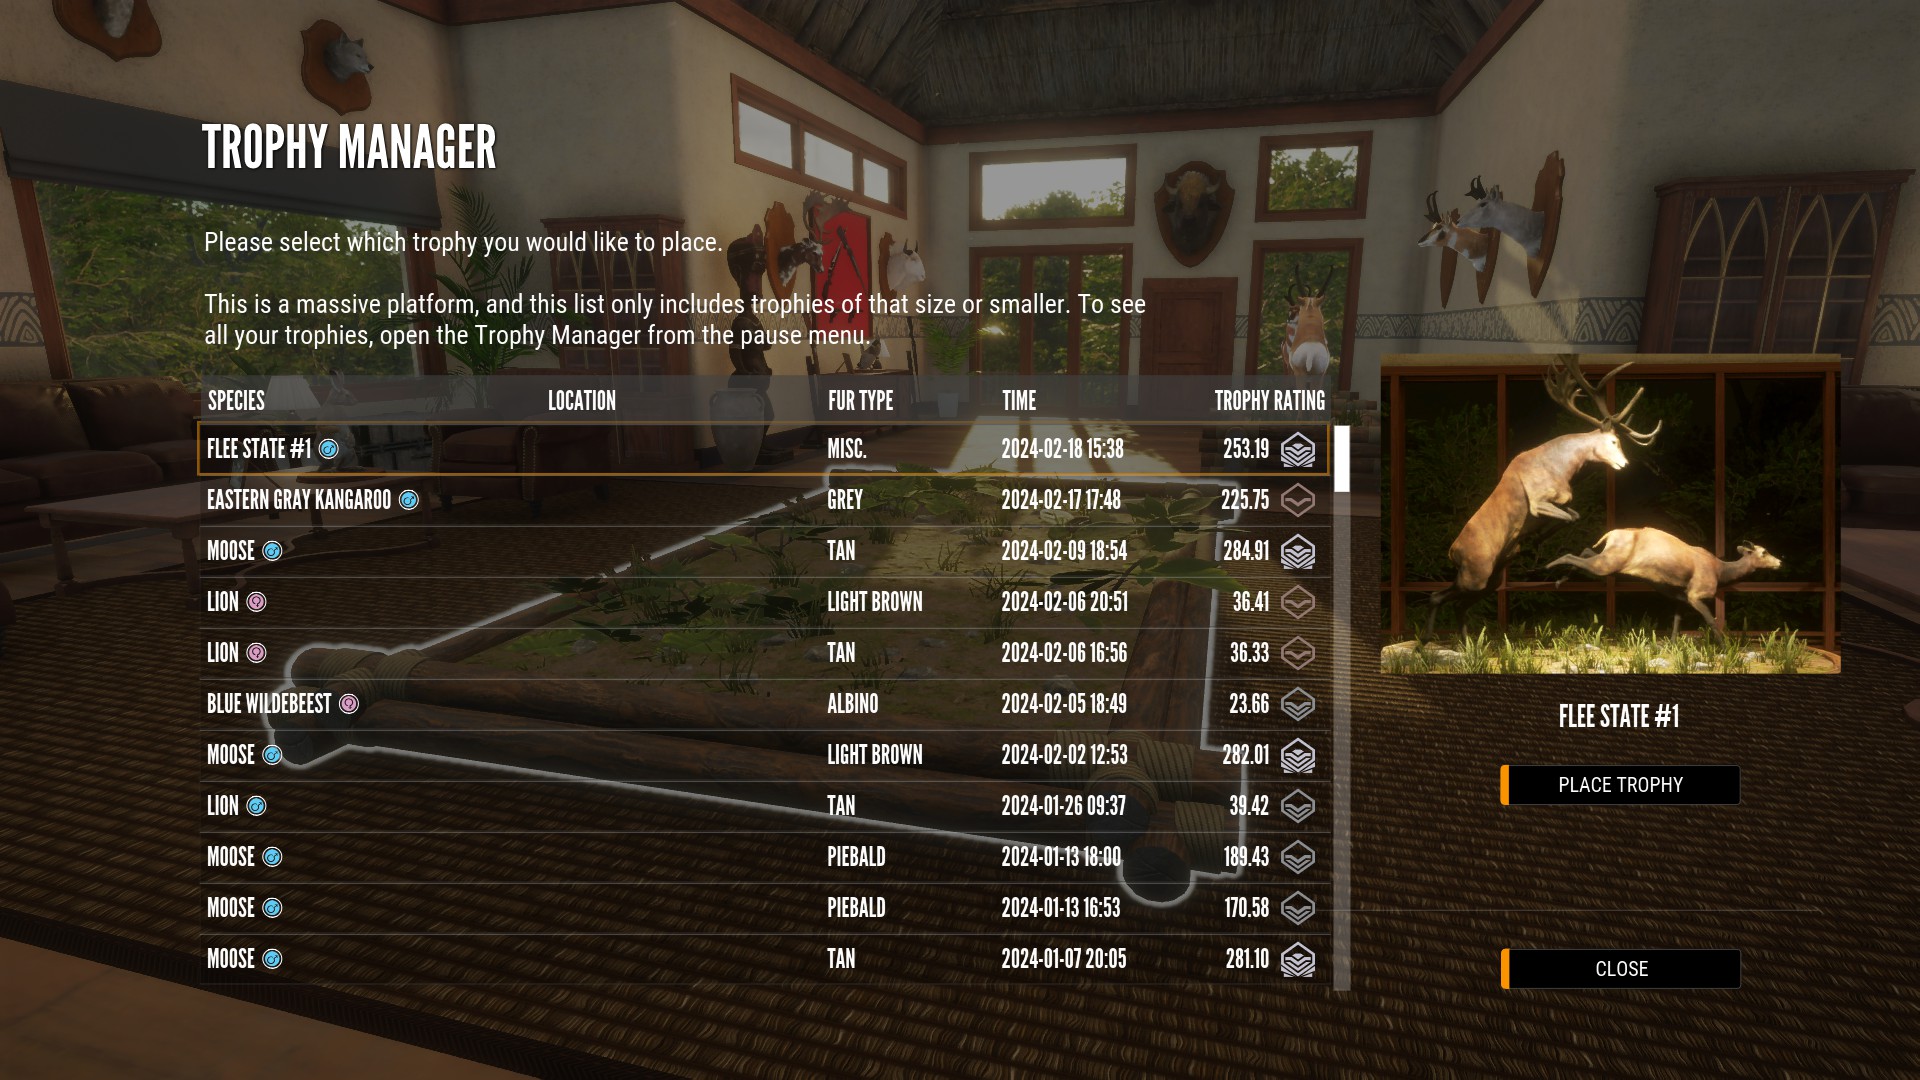
Placing Your Trophies
To place one your trophies, press V until you switch to edit mode, highlight the plaque or mount you want to use, and press E to open the trophy manager. Find the trophy you want to place and select it from the list to place it:

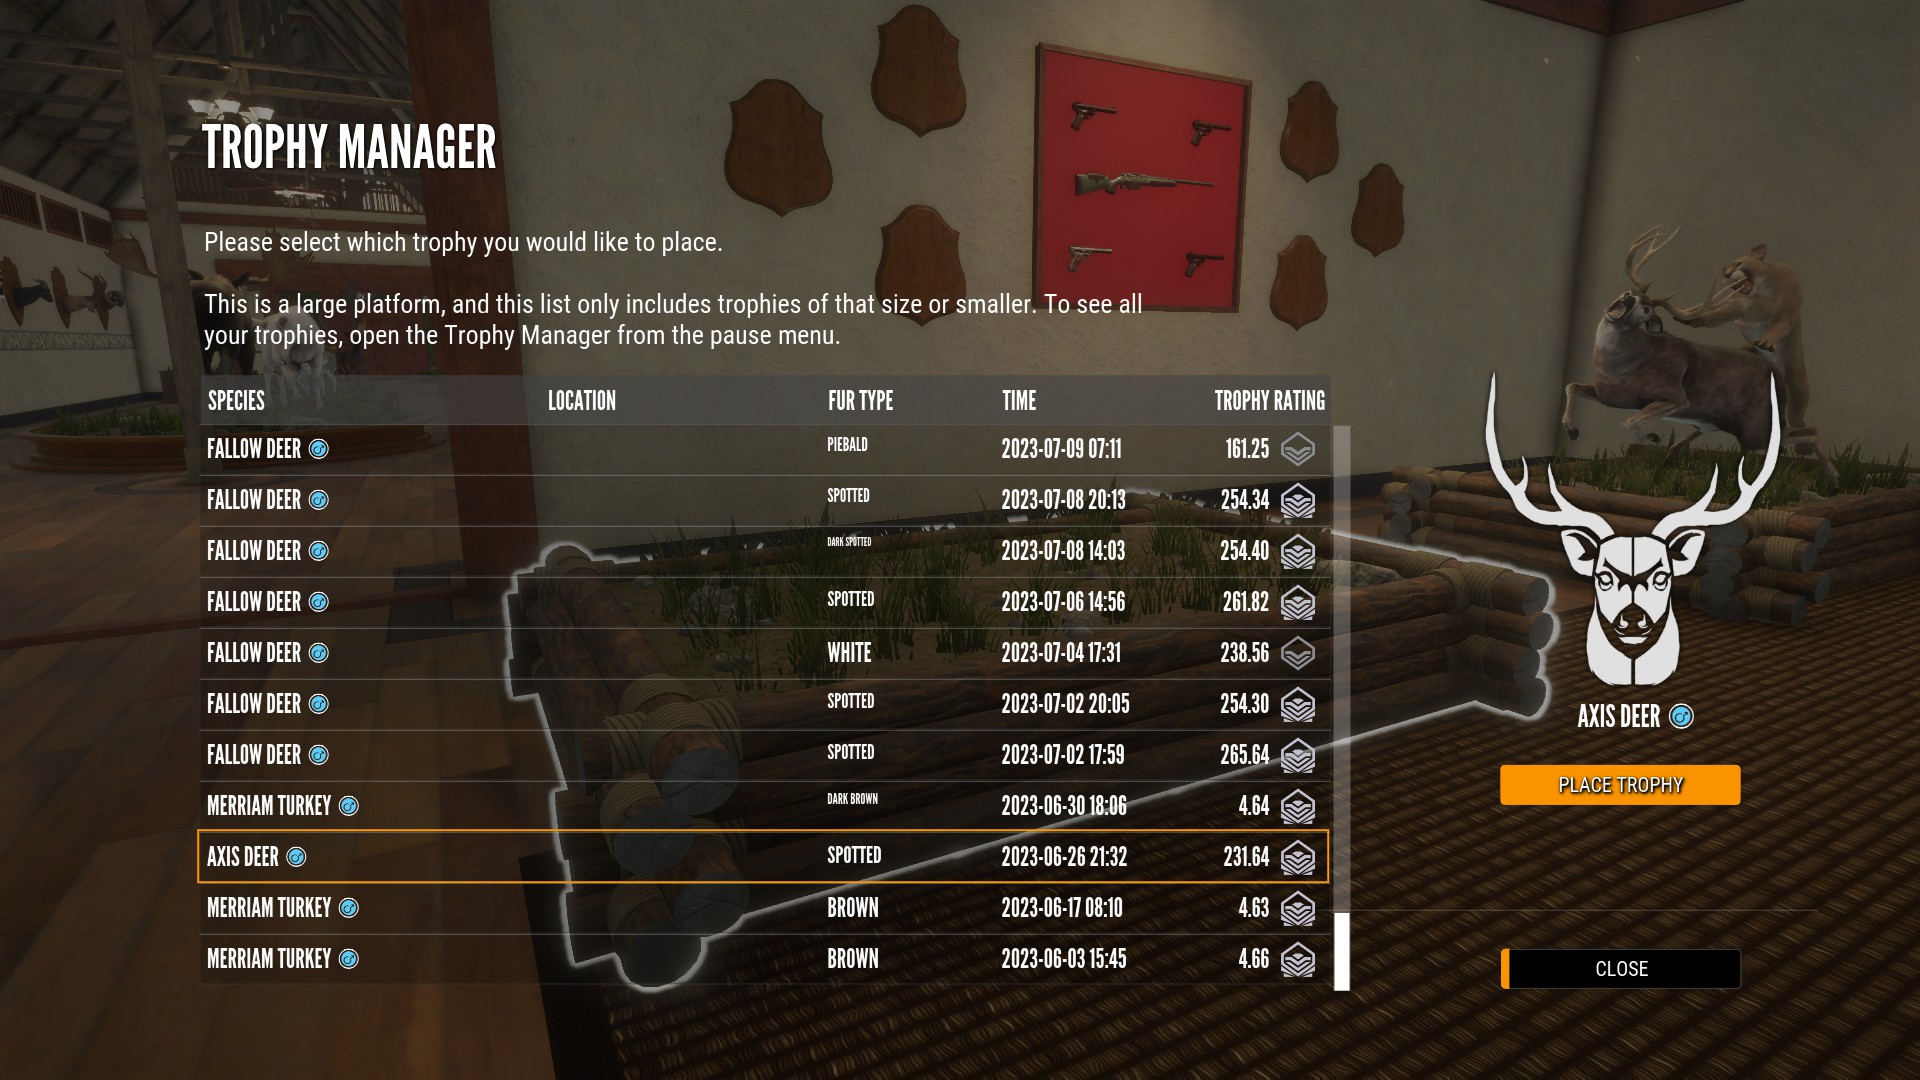
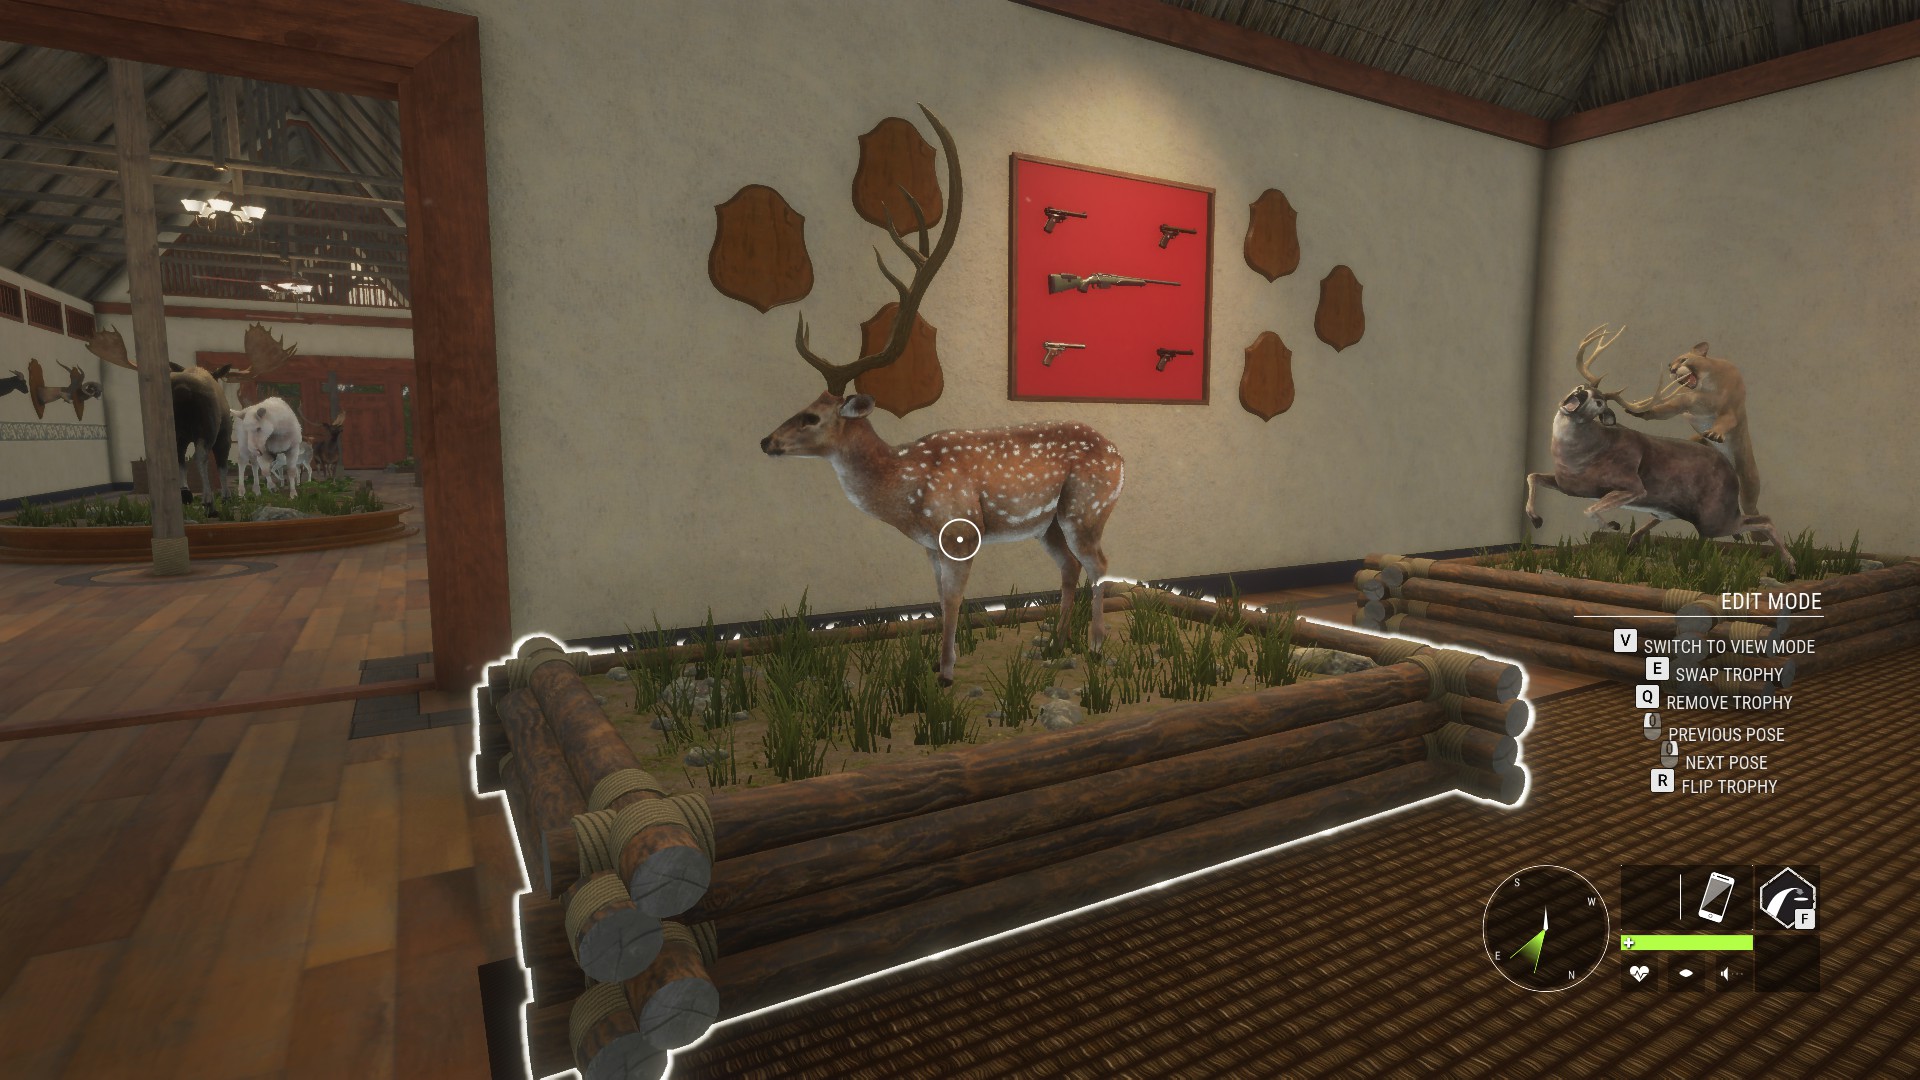
Not every animal will fit on every mount so if you don’t see the trophy you want showing up, then it’s probably because it’s too big for the mount.
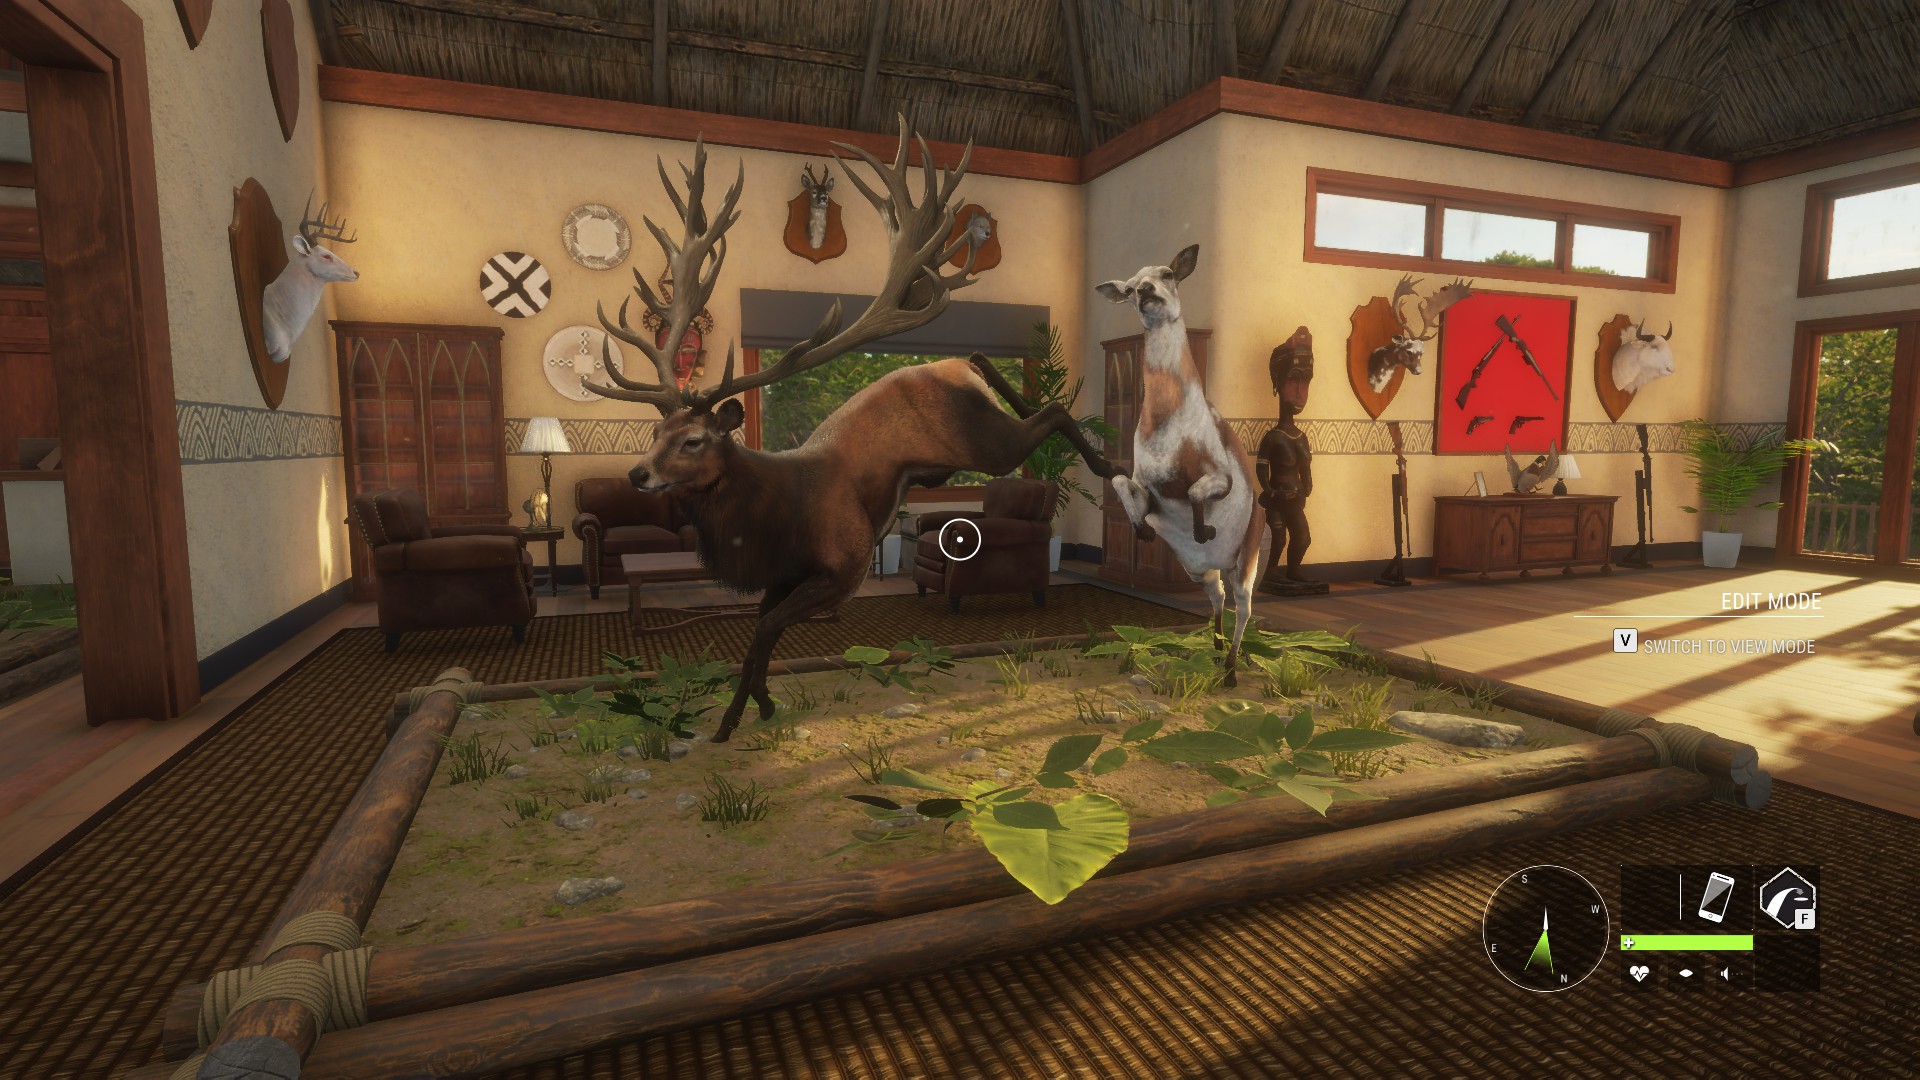
Multi-Mounts
If you want to make your lodge a bit more impressive, you can put several trophies together in a multi-mount. To do this, open the menu while in your lodge and select the multi-mounts option. You can now see all the available multi-mounts and if you have the necessary animals to construct them. Building a multi-mount will cost you a fee so make sure you have some money saved up first:
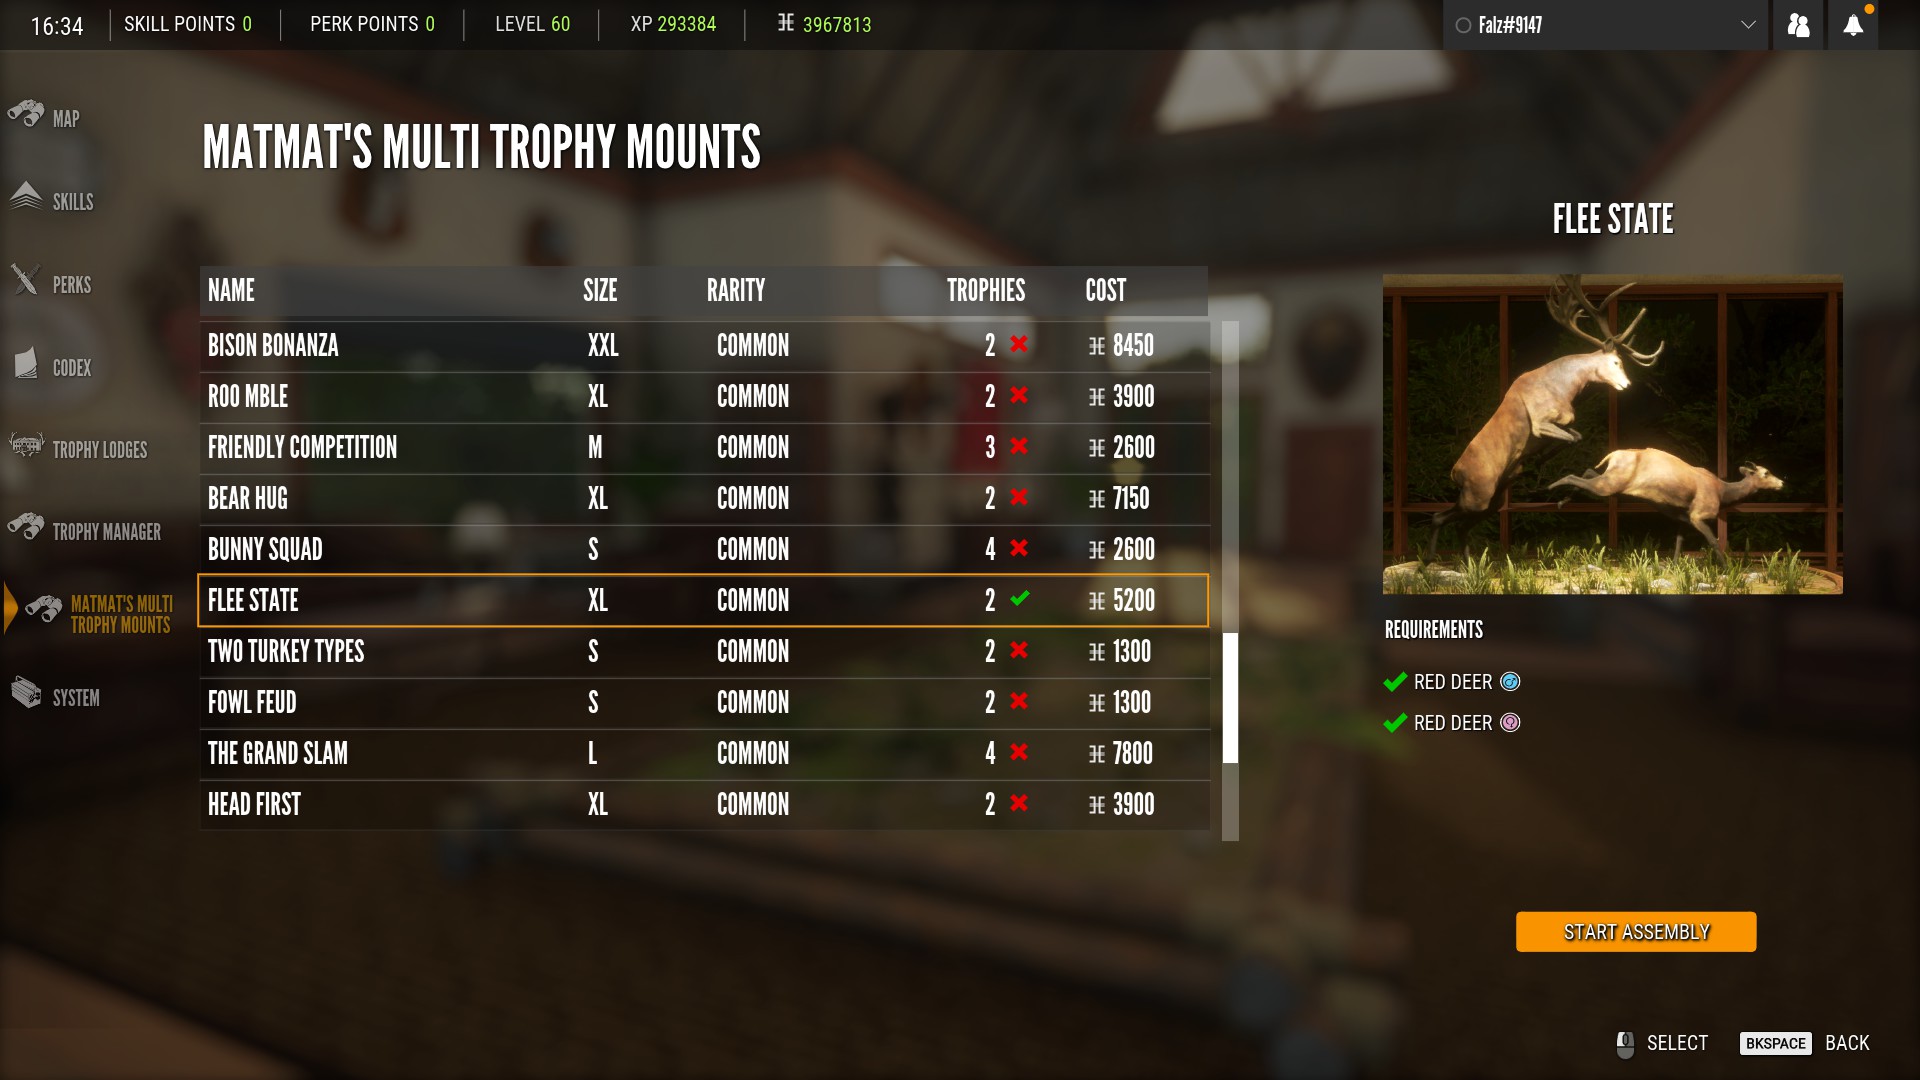
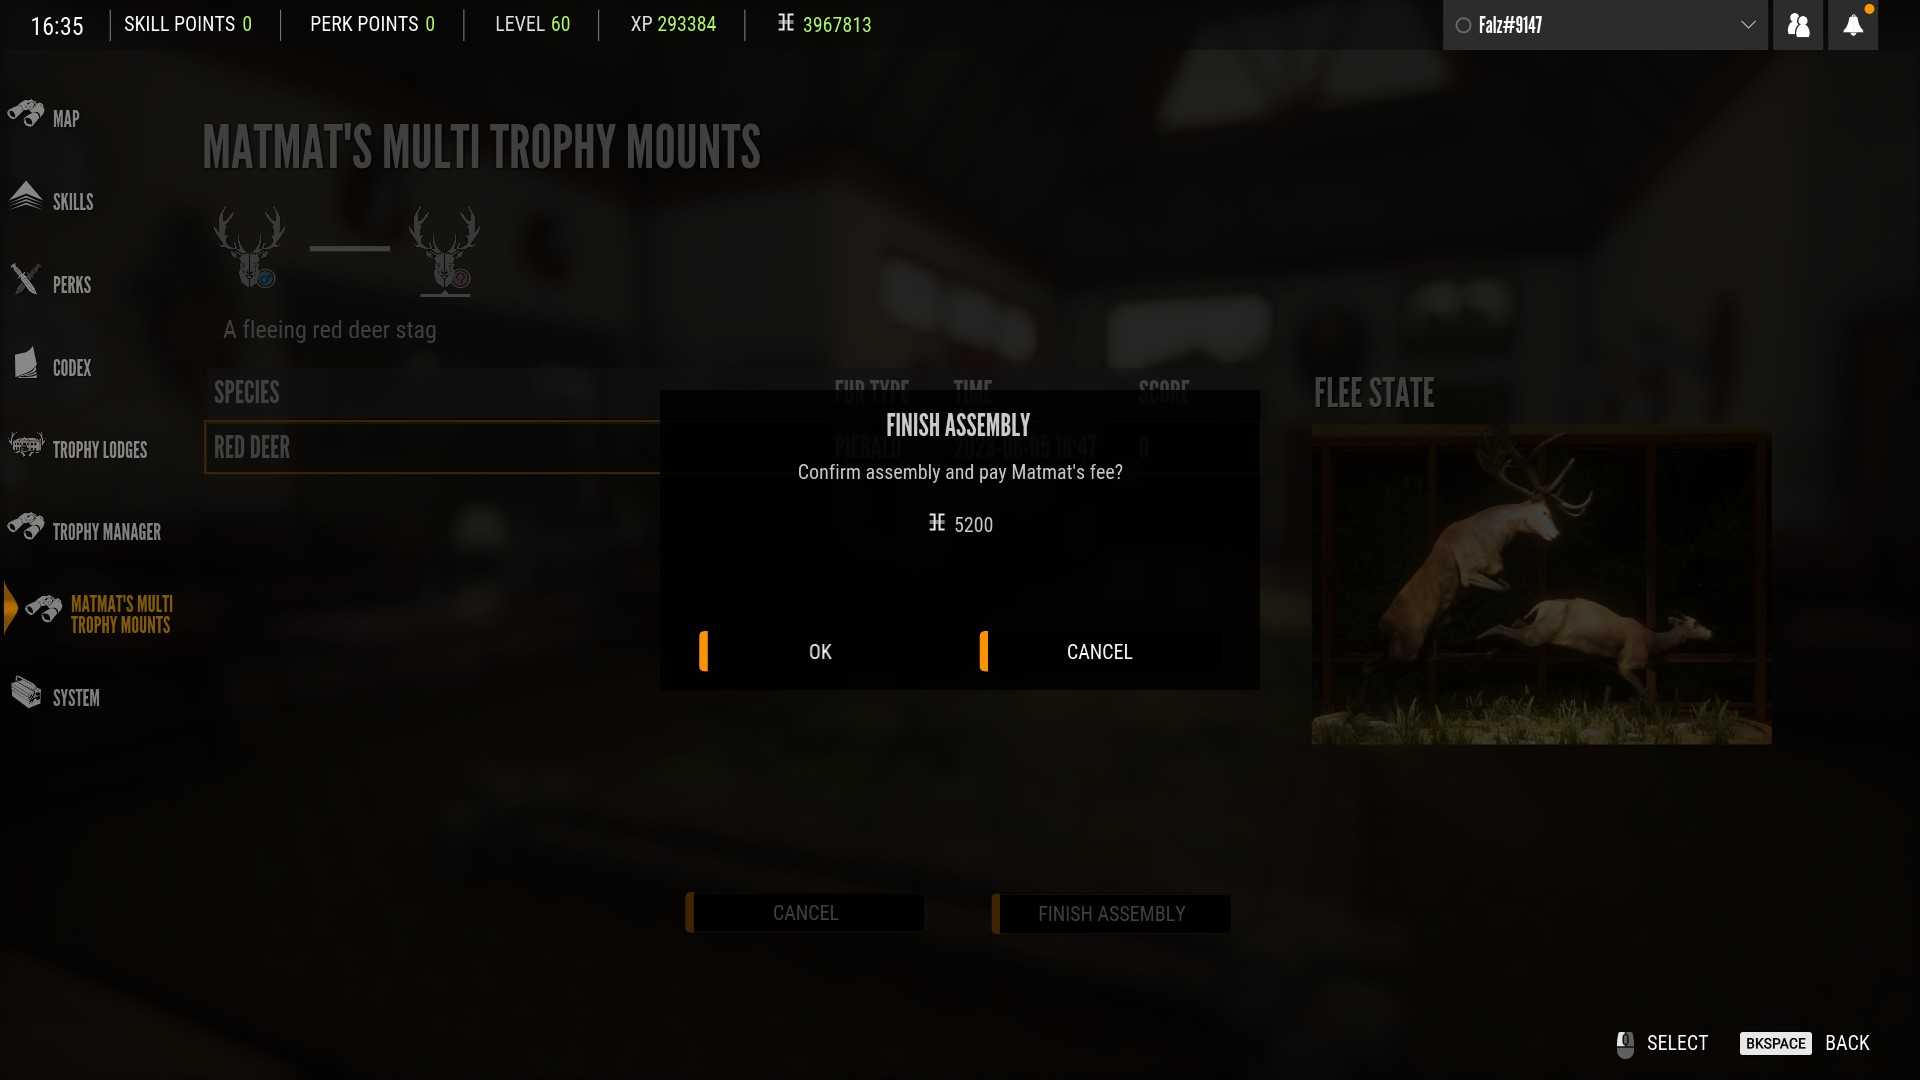
Once your multi-mount is finished, it will appear in your trophy manager and can be placed on any mount that is big enough: