
This guide will be covering the steps on how you can set up your own dedicated server for Valheim with uMod support.
Before we start with this server set up guide, you can also check some of our guides to setup a server using GSM and the traditional setup.
Local Server
Follow these steps to quickly and easily set up your own custom Valheim dedicated server:
Downloading Server Files
Open your Steam Library outside Valheim and search for “Valheim Dedicated Server” If you own Valheim, you also own the little tool that comes with it.
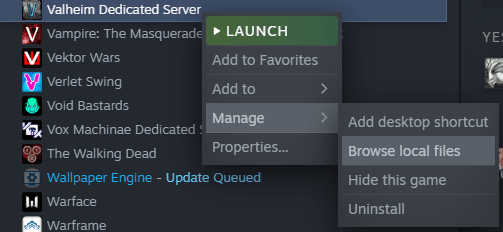
Download and install the Valheim Dedicated Server tool, just like any Steam game you install. But don’t open it yet! First, right-click the tool in your Steam Library to go to “Manage -> Browse Local Files”
Configuration
In the window that appears, find the file named “start headless server” make a copy of it, and save the copy to another location so that you have a backup if anything goes wrong.
Then go back to the first version of the file, right-click it, and click “Edit” Find a line in the file that starts with “valheim server” and change the following parts:

- name “My server” – Give your server a name inside the quotes.
- port 2456 – Change the port number to the number you’re using. Check Port Forwarding.
- world “Dedicated” – Give your world a name. It can’t contain any words used in the server name.
- password “Secret” – Give your server a password to make it private, or leave it blank to make it public.
- savedir “/worlds/” – Overrides the default save path where Worlds and permission-files are stored.
Now save the file, close it, and run the Valheim Dedicated Server tool on Steam. Wait for the window to finish up loading and printing the lines. Once you see the “Game Server Connected” line, you can go back to Valheim and see the world appear in your list of worlds so that you can join and start playing!
If you want to stop your Valheim dedicated server, check if there’s a server window that tells you to hit any key to stop the server. If there is one, then focus on that window and hit any key to shut down the server. If there is no such window, either click “X” on the main server window or click “Stop” on the Valheim Dedicated Server tool page on Steam.
Yes, you can run the dedicated server tool in the background while playing Valheim on the same computer. You don’t have to run it on separate machines.
Setting up uMod
Windows
In Powershell run the following command (copy & paste all)
&powershell -NoProfile -ExecutionPolicy unrestricted -Command "[Net.ServicePointManager]::SecurityProtocol = [Net.SecurityProtocolType]::Tls12;&([scriptblock]::Create((Invoke-WebRequest -UseBasicParsing 'https://umod.io/umod-develop.ps1')))"
Linux
In Terminal run the following commands
curl -sSL https://umod.io/umod-develop.sh | bash /dev/stdin
. ~/.profile
Regardless of OS
Whilst still in Terminal or Powershell run the following commands:
cd /path/to/server
umod install valheim -P
And that’s all of it. You now how the uMod support on your Valheim dedicated server.