In this guide, you will find content usually made after lvl 40, with videos, images, links, and others.
Eidolon of Destruction OMs
This boss is known as Shadow Destroyer and is considered a cosmic. Found in the Qliphothic Warzone map, it has some mechanics that require a lot of attention, cause something as simple as the lack of a threat wipe can lead to a failure.
To get to the battle against Eidolon, we first need to open the portal that takes us to him.
In the Qliphothic Warzone map [QWZ] there are 3 Open Missions [OMs] that need to be completed all 3 within 10 minutes.
These OMs are known as Slug, Oubliette [oub], and Portal Guardian [PG].
For this to happen, two teams are formed, one of them in Slug and the other in Oub.
- Recommended team for Slug = 1 Main Tank, 1 Off Tank, 1 Healer, 5 DPS
- Recommended team for Oub = 1 Main Tank, 1 Healer, 5 DPS
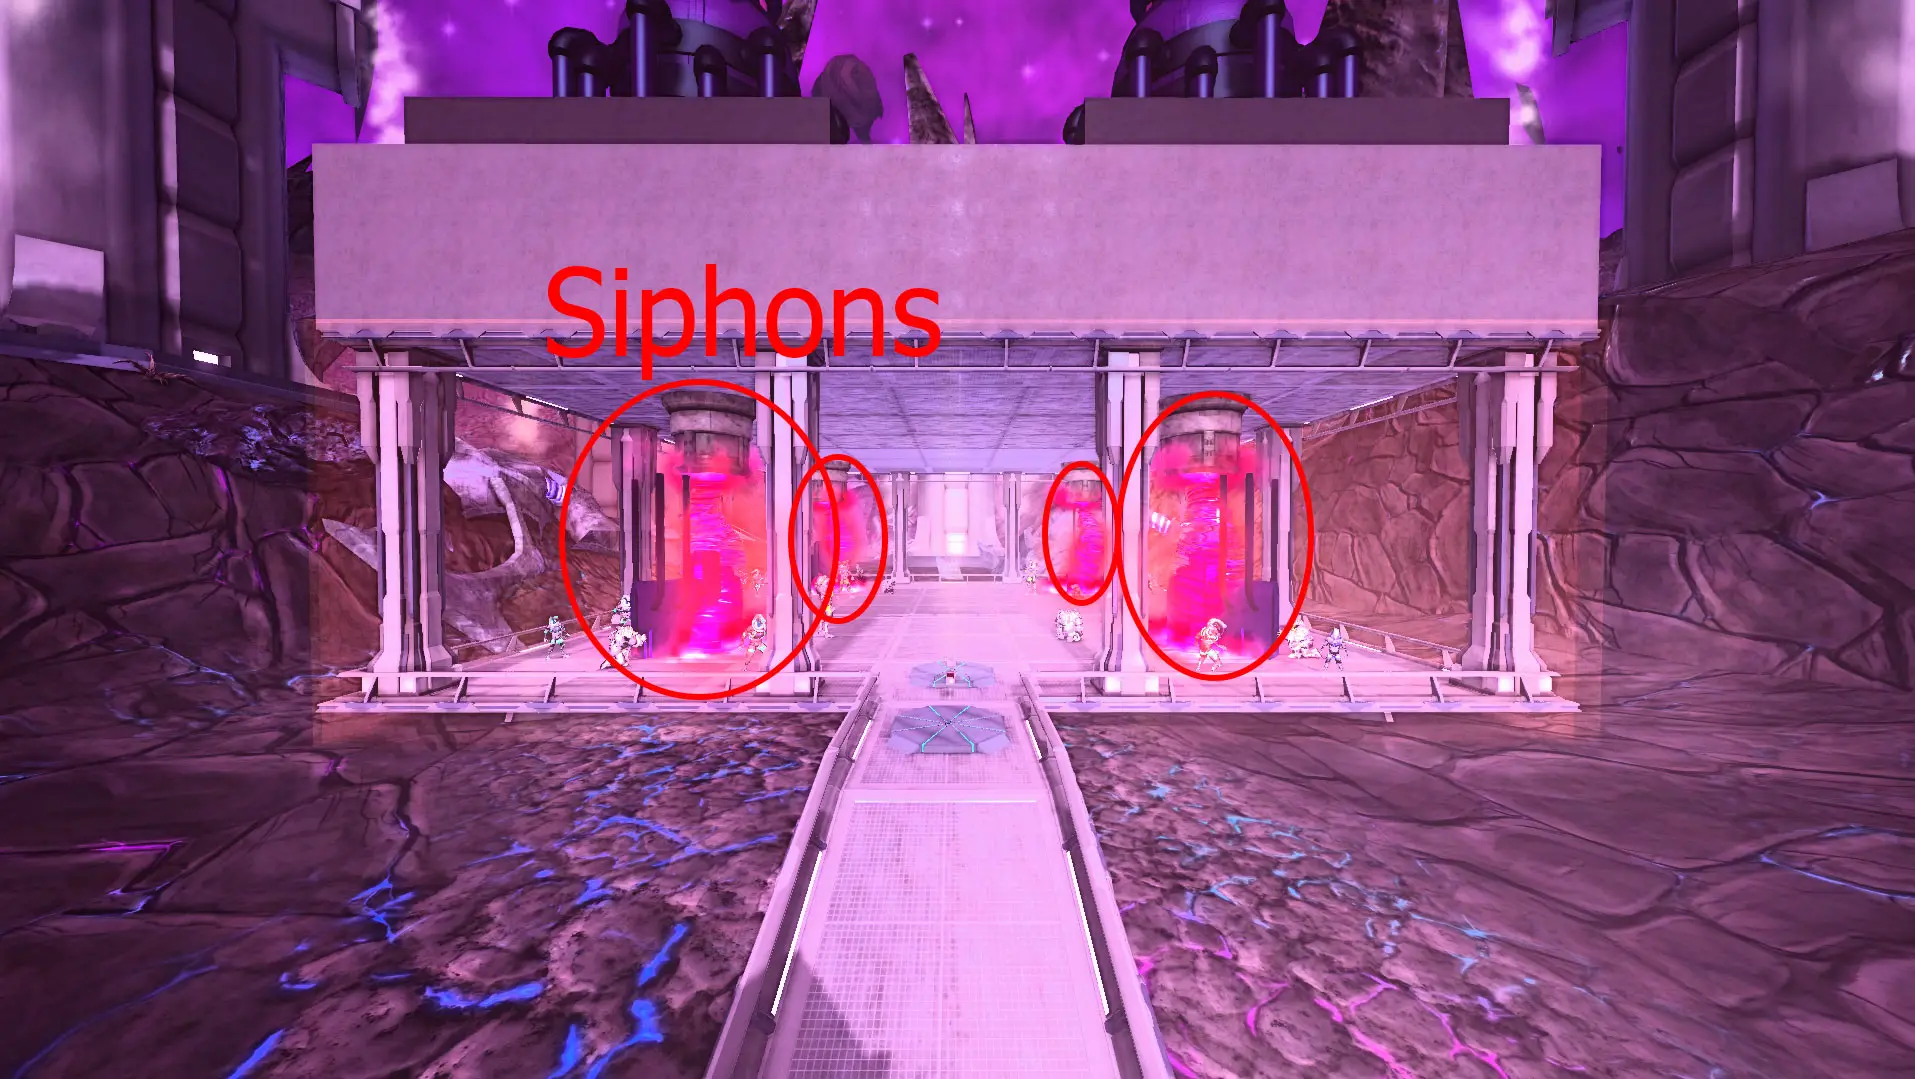
To start the battle against Slug, you need to destroy the 4 Siphons Located inside his base.
The slug should spawn in the center of the base, and after a few seconds, some mobs will spawn. That’s where Tank and Offtank must act corresponding to their functions.
There are no secrets in battling the slug, just dodge its cone attacks and block the “BOOM”. This is valid for all participants within the base.
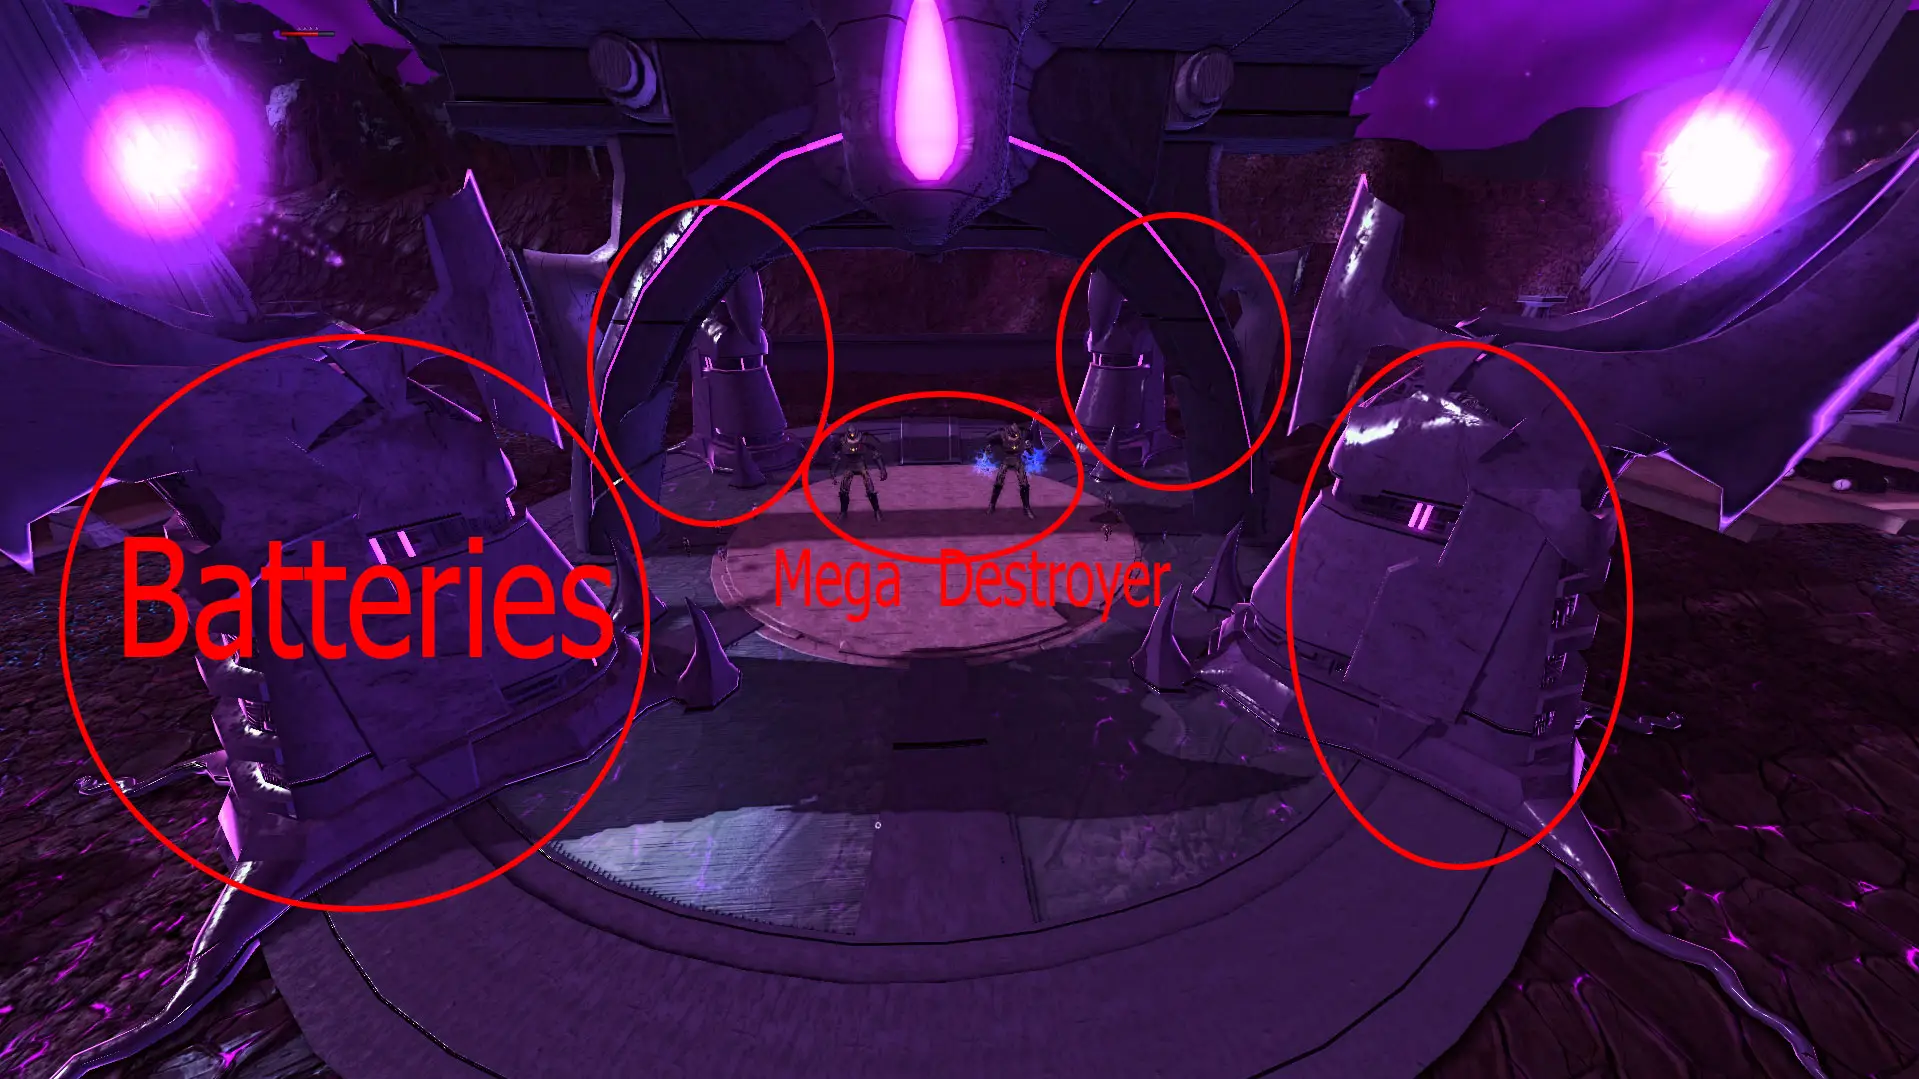
To start the battle against Oub it is necessary to destroy 4 batteries that are located around the ‘arena’ and also to destroy the 2 mega destroyers that are located in the center of the ‘arena’. After you have done this the Oub should appear in the center of the ‘arena’.
Initially, the tank needs to generate his aggro and bring the oub close to the edge of the arena, because some mobs will spawn in the center and these mobs steal energy from the DPS and the healer, causing confusion and delaying the battle.
During the battle against the Oub, some circles of darkness will appear on the ground, the participants of the battle must keep their distance, because they pull you in, slow you down and later on can kill you.
The Oub has most of the attacks very common, there is no difficulty in its battle. There is only one skill that participants should be aware of. When the Oub uses its Lunge causing root to some random participant, that person caught by the root needs to hold the block immediately because the Oub will heal while keeping the participant trapped. He must hold the block until she stops the attack.
The recommended team to do the battle against PG is the combination of the team that was in Slug and the team that was in Oub. When they finish, both will start the third OM against PG.
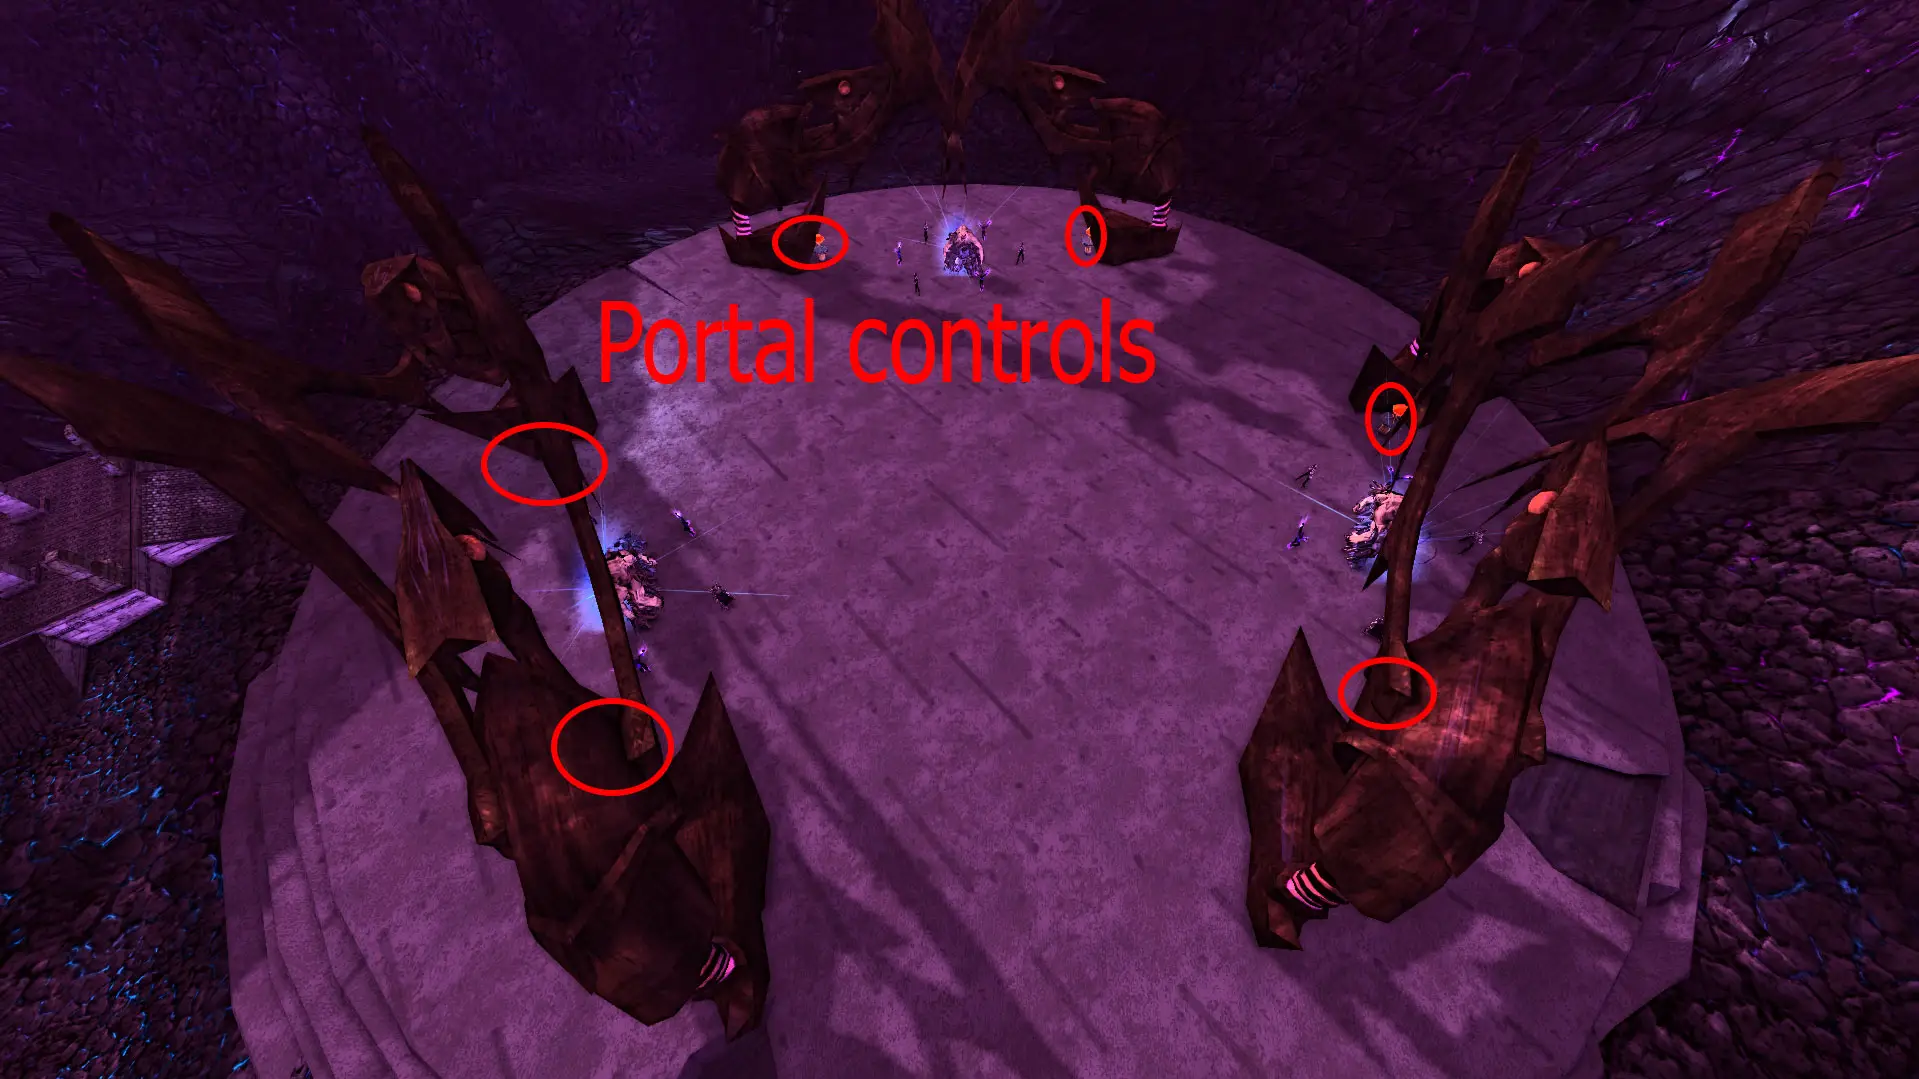
To start the battle against the PG, you need to deactivate 6 portal controls around the ‘arena’ so you can use some stealth skills to make it easier.
After the battle starts, the PG will spawn from the ground in the center of the arena, the MT should generate his aggro immediately. Soon after, some mobs will start to appear and Offtank must hold them without letting them disturb the DPSs and Healers during the battle.
During the battle against the PG, he will use a skill that is a breath more like Poison Breath on a random player, if the player is close to other players, all those players caught by the breath must block until the skill stops, this attack does a lot of damage and can kill easily.
During the battle around the PG, an orb may occasionally appear next to the PG. This orb needs to be destroyed. If not, it will explode and may cause a wipe.
The PG will also occasionally use his skill “Boom” which is a giant bubble that he explodes, just block it to survive.
THERAKIEL’S TEMPLE Prologue
Therakiel Temple is currently the ‘most difficult and time-consuming’ Lair in endgame. Can be found on the map of VIBORA BAY
- Your daily quest [Apocalypse Aversion! (Daily)] can be obtained from SOCRATES, whose NPC name is ROBERT CALIBURN.
- As soon as you enter the church, on the right side there will be a symbol on the wall, this symbol indicates the location for the SKIP CUTSCENE VOTING. It is recommended that you vote to skip, as there are many cutscenes that can take a lot of time out of the run.
- After voting, go on your way. There will be an NPC next to a statue, talking to this NPC you will obtain the device [Divine Mirror], this device will be useful throughout the map and especially in the last boss. You only need to get this item once, keep it with you in your backpack.
- When you break the statue next to the NPC, you will find a hole in the ground, and from there your journey will begin. Clearing the way for mobs will require strong area attacks.
- To get past the statue and its force field, you need to ENTER THE CIRCLE OF LIGHT ON THE FLOOR, SELECT THE STATUE, then ACTIVATE THE MIRROR. So that the mirror reflects the light against the statue, causing it to break when attacking you with the laser.
After clearing the path, you’ll quickly encounter the first boss.
Valerian Scarlet
The general flow of this fight is
- ELDRITCH BLAST Val’s basic attack (*bam*tell). Fairly high damage in a moderate radius around the main target causes knockback if unblocked. Used during the fight.
- SOUL SIGIL: At the start of the fight, and at intervals during the fight, Val summons five glowing yellow sigils. They do magic damage to people next to them, and after some time (the 30s) they explode killing everyone, so they must be killed quickly by dps. They have around 15k hp each and negligible damage resistance, but they can spawn anywhere in the combat area, so keep an eye out for hidden sigils in the back corners.
- SKARN BANE: used occasionally during the fight. The damage isn’t particularly high, but it takes away stacks from the buff form and eventually takes away stacks of defiant as well. At this point, the Tank needs to unblock up to 9 orange stacks and then block the last 4 stacks that will occasionally turn green.
- GLEAMING FIRE: used occasionally during the fight. Targets a random player. The visible clue is a sphere of fire around the target; after a few seconds, it collapses, dealing fire damage and paralysis in an area. If you are targeted, block and move away from other players.
- TELEPORT: At 2/3, Val teleports to the ground (if she isn’t already there). At 1/3, she teleports to the ledge (if she isn’t already there). Around 1/10 she teleports to the ground.
- SEETHING SOULSTRIKE: After her first two teleports, Val casts a magic circle, summons soul-bound ads, and uses a maintain ray. It applies a stacking debuff to the target. The ray ends when soul-bound adds are killed, so when that happens, dps should prioritize eliminating adds.
- EXPULSE: Before her second and third teleports, Val uses expulsion (large area, moderate damage, and hit).
- BLINDING LIGHT: After her third teleport, Val places golden star symbols under each character, which indicate a beam of golden light (resembling a meteor) arriving in a few seconds, dealing enough damage to kill instantly. Wait for it to form and come out of it. She will do this continuously until Val is defeated.
Black Fang
This fight has a lot of adds that are very dangerous and like to spam slams and grabs. The main mechanics of Black Fang are:
- BLOCK HATRED: Every time Black Fang’s certain attacks are blocked, he gains a buff stack and refreshes his original stacks (duration 15s). If this buff gets to 9 stacks, it starts doing massive damage and breaks the blocks, quickly taking out the group. The main tank should try to keep him at 0 stacks most of the time, as he is likely to acquire stacks when he switches targets.
- BLACK IRON CYCLONE: Black Fang spins a chain; all targets are pulled towards him, and targets within 50′ also take damage. Damage starts very low and increases with each tick. It only gets stacked if the main tank blocks the first hit.
- CLAWS: Black Fang mainly hits the main tank with a three-hit claw combo. The third strike is an area effect. Reportedly, the third strike can be blocked without stacking.
- HORN GORE: From time to time, Black Fang will root someone and then slam them. Blocking this increases your furious stacks, but most of the time it should be blocked anyway. He also announces, “Cull the Weak”.
- BAD DOG STOMP: At 2/3 and 1/3 health, Black Fang will become unassailable, jump, fall back (applying heavy area damage and a knock-to), roar (applying an area disorient) and clean the threat from the main tank, switching to a secondary target. Everyone should block when he jumps, and DPS should be prepared for the threat wipe.
- SUMMON ARMY: At about 1/6th of health, Black Fang begins to summon a large number of berserkers, who will roar (increasing damage for everyone, including Black Fang, possibly applying holds or knocks). You can either kill them (high damage AoE ultimates are good here) or have an off tank pull them while dps finish off Black Fang, but they do a lot of damage so killing tends to be preferable.
Baron Cimitiere
The main mechanics are:
- WITHOUT RIVIVING: Rez powers (whether self-res or other res) do not work in this fight.
- BLOCK EARLY: Baron Cimitiere tends to target a random character early on, which is enough to kill a non-tank. Starting the fight with a dps or healer is not good, so block during the first fight.
- CURSE: Baron Cimitiere waves his hands and curses a random target. This causes them to be disabled (cannot use powers and removes travel powers, but can move) and puts a green starburst type animation under the character. When the effect ends, it deals moderate damage (~3.5k) to the character, high damage (~20k) around the character, so a cursed character must move away from others.
- CURSE PIT: Baron Cimitiere waves his hands and places a green circle animation under a random character (it could be a different animation than the previous one, but if so, I can’t recognize the difference). This creates a lasting hurt zone that you must get out of. When he starts doing his curse animation, you should go to a place where you don’t mind a fire.
- BLOCK CLOSER/AWAY: Baron Cimitiere will tell you to stay away or move closer and start blocking, creating a zone of green fog around you. Do the opposite of what he tells you to do (or take massive amounts of unblockable ongoing damage) and stop attacking him (he still has his original reflective block).
- SERVITEURS: Serviteur zombies are continually summoned during the fight (one analysis I have shows 80 of them being killed in a single fight). They deal substantial damage and collide (which is an issue during their close/far phase), so they must be caught by an offtank and/or killed by DPS.
Vladic Dracul
- BATS: a large number of bats are summoned (directly on top of the characters) during the fight. Bats do moderate damage (helpless characters should be prepared to use active defense if alone), remove travel powers, and apply a stack of the perception debuff. They are resistant to single target damage and vulnerable to area damage and heal while attacking. DPS and OT must have tactics to kill them. PBAoEs are good because they are not affected by perception debuffs.
- BLOOD: The pool of blood below Vlad will heal him if you stay in it too long. It’s generally safe to run around while breaking cages, but don’t stop there.
- CAGE: Vladic says ‘away with you’ and banishes someone to a cage somewhere in the room. The cage (which appears as a glowing red thing under the cage itself) must be destroyed. Avoid getting too close, the cage object holds a nearby character that should be the cage character, but it’s possible for it to hit someone else. This can stall the tank, which will cause it to change targets. Dealing with cages is usually a DPS job.
- DARK BOLT: this is your ranged attack and spam; seems to be a three-hit combo doing up to 19k. Non-tanks must block.
- ETERNAL MAW/CONDEMN: Vladic uses Eternal Maw (bite animation) at close range or Condemn at range. Anyone will heal you for a bunch if not blocked. Condemné has an area effect and will heal you for each target hit (do not use pets). Everyone should be prepared to block, there are a number of ways the main tank can lose line of sight resulting in switching targets. DPS should use threat wipe frequently.
- RUNEBLADE STRIKE/ANNIHILATION: Mainly hits the main tank with a medium damage combo (and 180 spheres), occasionally mixing it with an attack with a very high damage load.
- SHADOW ERUPTION: PBAoE attack, moderate damage, disables travel. A poorly positioned tank can be thrown into blood (standing with your back to a pillar helps), and without travel powers, it takes a while to get back up, during which time you lose line of sight and Vlad switches targets.
Therakiel Final Boss
Therakiel’s basic attacks follow normal tanking patterns – don’t point him at dps, don’t get too close to others, and otherwise aren’t noticeable. After the first third of the fight, the scene changes from the cathedral to a kind of void or limbo, which can make it difficult to accurately judge distances. Specific mechanics to note:
- ANAKTALS: During its first third, Therakiel will summon ten Anaktals. Unlike most addons in this lair, they have a spawn cap and are reset if killed (and are deleted when it drops below 2/3), so it’s useful to just tank them.
- DARK/LIGHT EMPOWERED: At 2/3 health at first, and then at intervals, Therakiel assumes a blocking stance and glows with blue flames. He acquires two buff icons – one for Burning Aura of Glory, and one for Dark Empowered or Light Empowered. Therakiel emits an aura that attempts to kill anyone lacking the appropriate defensive aura. Damage is 50% health on the first tick, 100% health on the second tick, and irresistible. (Be careful with placement, if you walk into a statue with the wrong color aura, you’ll die before you can do anything to correct your mistake.) During this phase, he summons three Hellementals: one Colorless, one Dark, and one Light. Hellementals, when killed, create statues of an appropriate color (random for colorless ones), and you will need an aura of an opposite color to its effect, or you will die. Hellementals explode if not killed quickly enough, and this phase ends when all Hellementals are dead. Make sure you get the color you want on the first two, you don’t have enough time to get an aura if you kill the right color last.
- FIRE BEAMS: Therakiel uses beams of light on a target, who is held and takes increasing fire damage over 10s (starts at around 900, ends at around 3500) and then dies (200% irresistible health). To free a victim, he positions himself in a beam of light and points his mirror at the victim (this also causes Therakiel to take a trivial amount of damage).
- SHADOW LUNGE: Therakiel roots a random target, then lunges at it. Does about 6k (base) if locked; if unlocked it results in an extra 34k. It also knocks.
- THERAKIEL’S BLEAK GLORY Therakiel spins his sword like a giant propeller, at the end of which he deals damage and knocks. If you have a dark aura, you don’t need to block it. If you have the aura of light you will need to block it.