This guide features hints and walkthroughs for obtaining all of the Dragon Teeth found throughout Kit’s Quest!
Dragon Teeth are awarded for completing the game’s main challenges, with 12 in each main level and 10 in Greenwood & Skyreach Mountain. Unless you’re going for 100% completion, not all Dragon Teeth are required to complete the game. This guide lists all of their names (which are normally only revealed when they’re collected, or towards the end of the game even for uncollected Teeth).
It can be most rewarding to obtain the Dragon Teeth with as little assistance as possible, for example by revealing just one hint at a time. But, nothing wrong with using the guide as much as you’d like when you’re feeling stuck!
Greenwood & Skyreach Mountain
Kit’s First Dragon Tooth!
- Hint: There it is, right after you get out of Fennecton!
Catching Coney
- Hint: In Greenwood, just outside Flooded Ruins, chase Coney around the tree with repeated charges until you hit him!
Coney’s Magic Trick
- Hint: After you’ve caught Coney in Greenwood, he’s got a challenge for you above the lake at the foot of Skyreach Mountain.
Attack of the Phidips!
- Hint 1: At the foot of Skyreach Mountain, head through the left tunnel to find a meadow under attack by the Phidips!
- Hint 2: One strategy for dealing with the Phidips involves remaining on the Ice Mushroom in first-person view, and aiming at them as they approach.
Greenwood’s Underwater Alcove
- Hint 1: You’ll first need to learn about Metal Mushrooms in Luminous Caverns.
- Hint 2: Look for a Metal Mushroom in Greenwood (amongst the trees near the lake), and use it to explore underwater around the lake’s pillars.
Tall Tree Climbing
- Hint 1: This Tooth is high up on one of the huge trees in Greenwood, just outside Flooded Ruins.
- Hint 2: You’ll first need to learn about climbing in Great Oak Aerie.
- Hint 3: Use the upper Super Jump Mushroom in one of Greenwood’s huge trees (near Great Oak Aerie’s entrance) to leap over to the climbable wall on another of the trees, and then make your way up to the Tooth!
Tricky Piston Patterns
- Hint 1: Towards the right end of Skyreach Cliffs, past the second elevator, the Tooth can be seen behind a closed gate. To reach the switch which opens it, you’ll need to head further right and find a way across a walkway blocked by pistons moving in periodic patterns.
- Hint 2: The first group of 5 pistons has a pattern which repeats after every 4 slides.
- Hint 3: To get past the first group, wait until the last 4 pistons are all extended, and then keep walking to the right.
- Hint 4: The second group of 7 pistons has a pattern which repeats after every 6 slides.
- Hint 5: To get past the second group, only moving rightward won’t do.
- Hint 6: To get past the second group, wait until the first 2 pistons are both extended. When the 1st piston retracts, start walking to the right, and spend some time waiting in front of the 2nd piston until the 3rd piston finishes extending again. At that point, walk to the right until you’re in front of the 4th piston, and then walk back left to be in front of the 3rd piston. Finally, from there, keep walking to the right until you reach the switch!
Precarious Pistons
- Hint 1: Near the top of Skyreach Cliffs, just to the right of the tunnel to Skyreach Summit, jump your way up and across the pistons!
- Hint 2: On Challenger and Grandmaster difficulties, there’s a tricky section halfway through involving 5 pistons in a row which extend and retract at the same time. In this section, aim to jump off the pistons as late as possible before they retract into the wall, and then remain in the air as long as possible before landing on them once they extend back out.
Plugging the Geysers
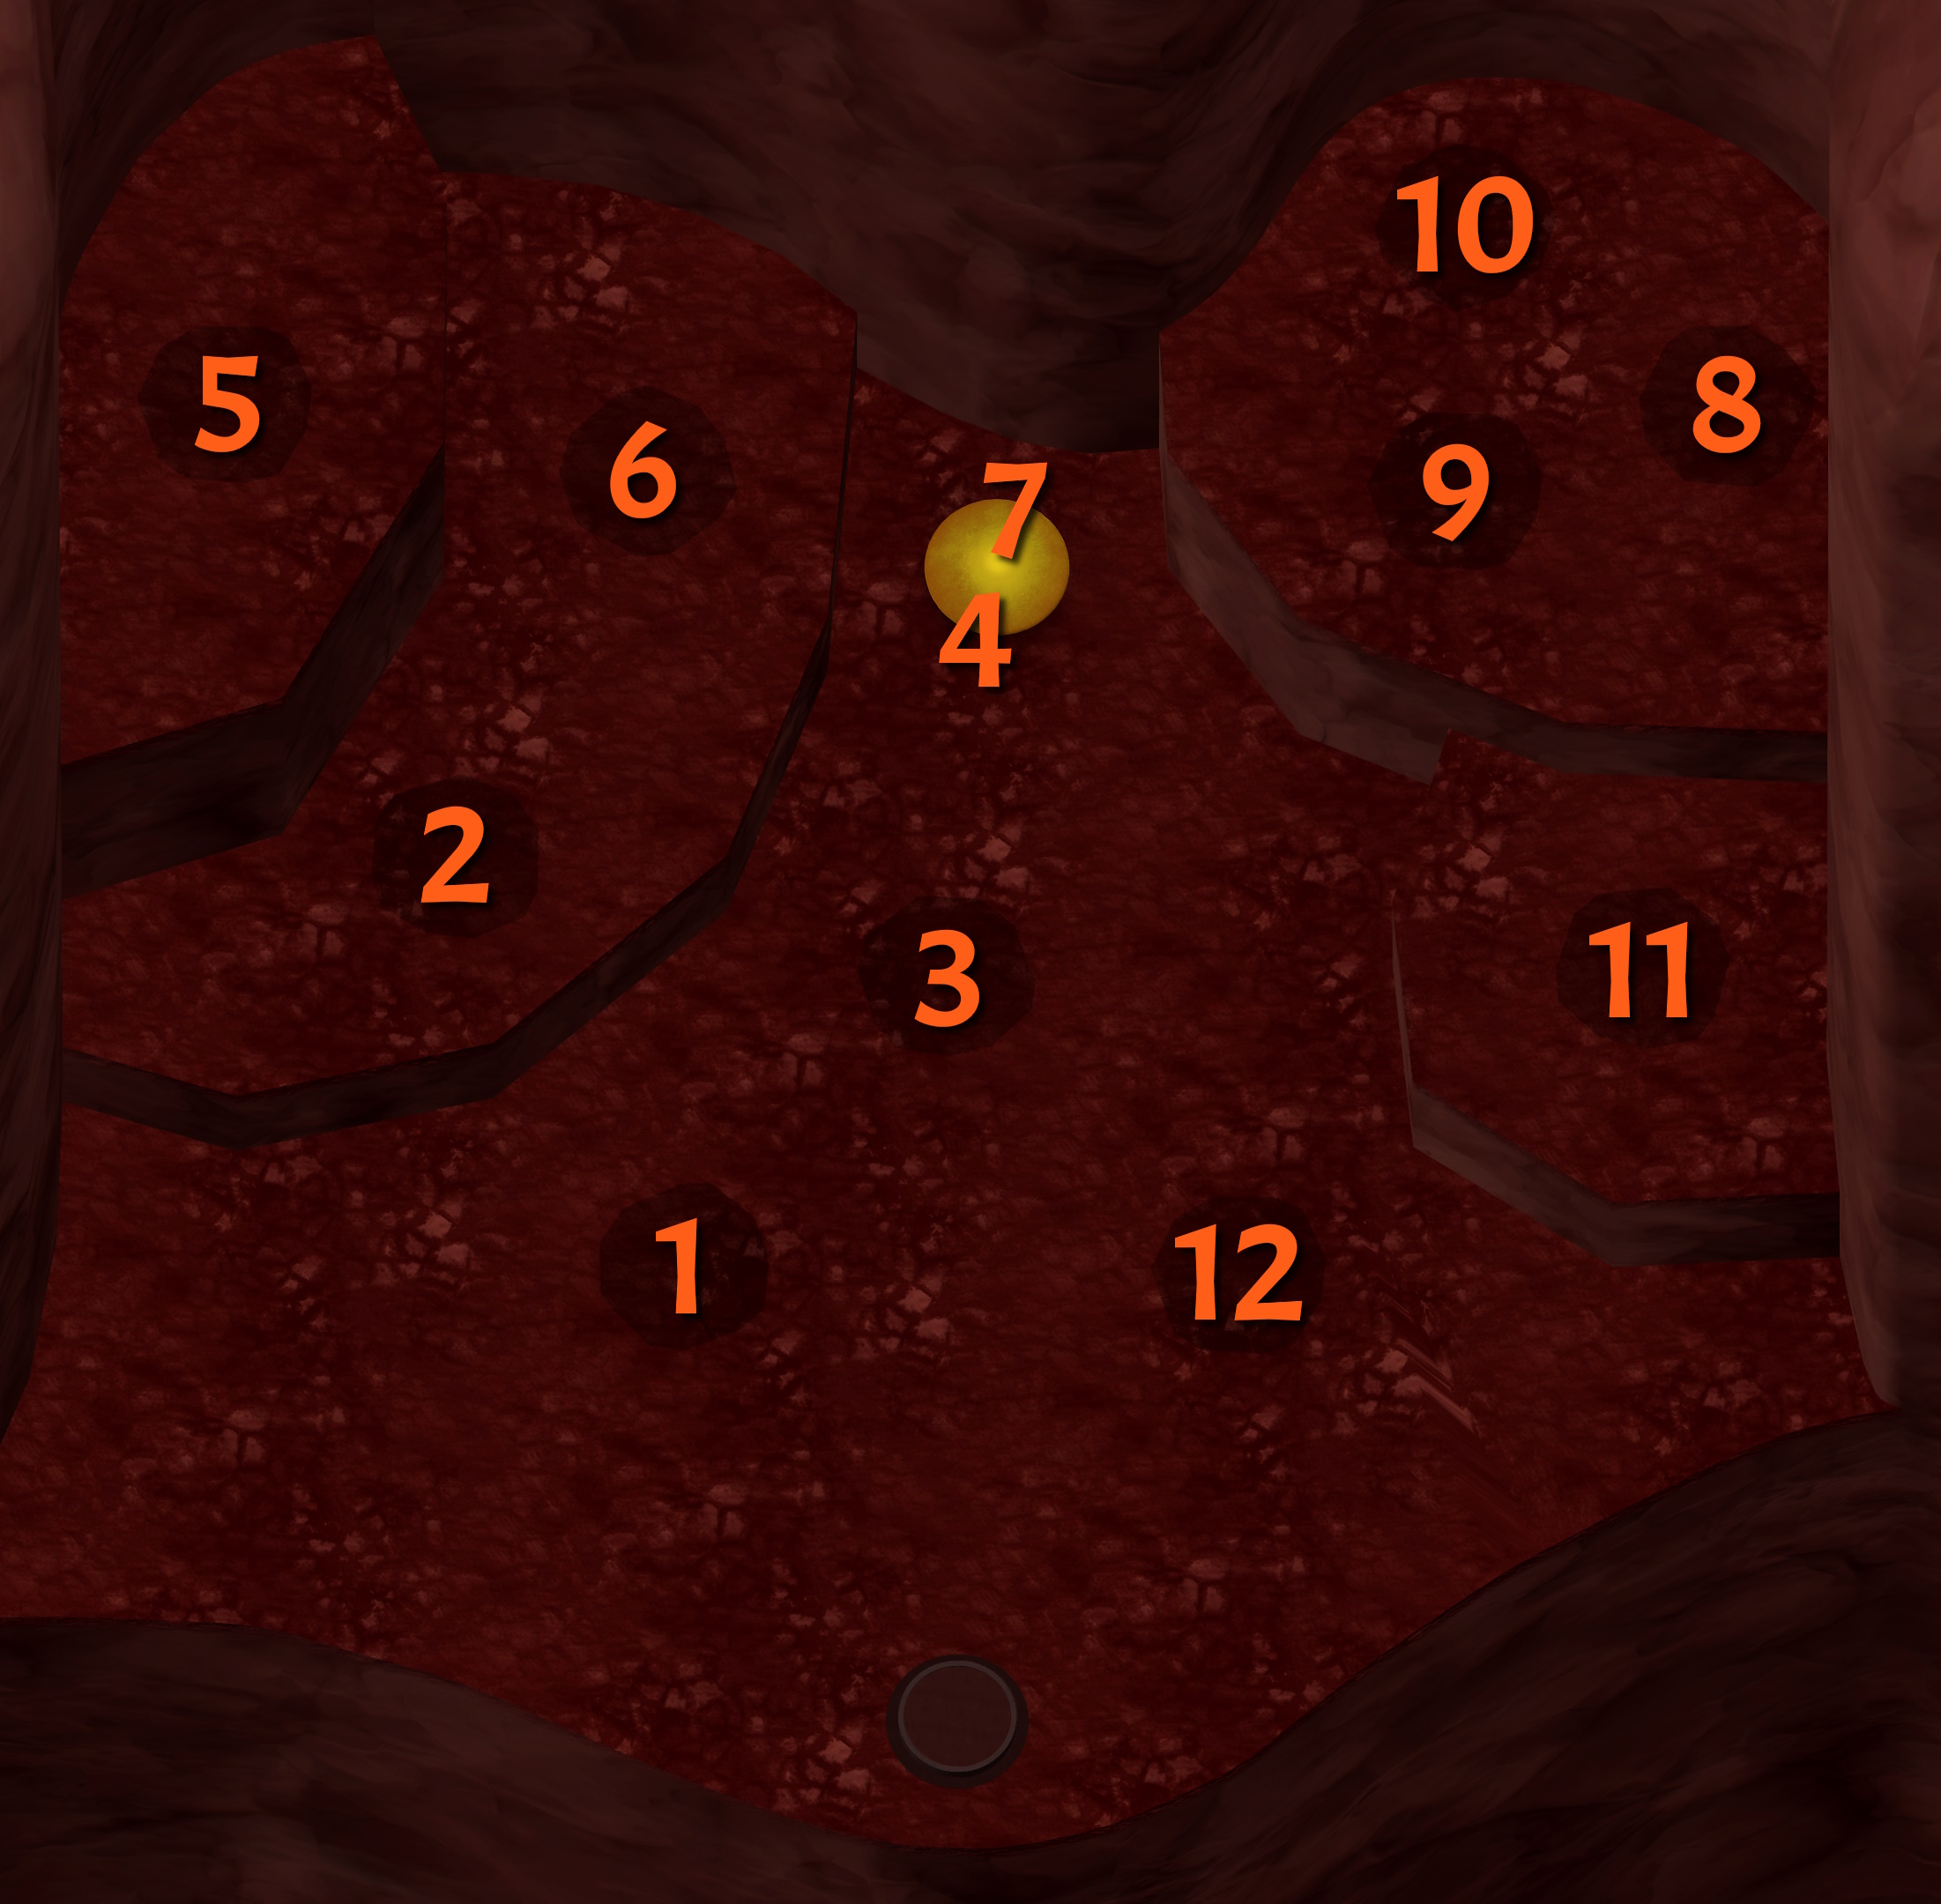
- Hint 1: In Skyreach Summit, head along the narrow winding path to reach an area with a round switch. After hitting the switch, you must slam down on all 10 floating pieces of rock within the time limit!
- Hint 2: The floating pieces of rock can be slammed in various orders to complete the challenge in time, but one efficient order is illustrated below. Using this order can help on Grandmaster difficulty in particular, which has a very tight time limit.
A Tyrant Vanquished
- Hint 1: After making your way to Dregnor’s castle and taking care of him, it’s yours!
- Hint 2: When battling against Dregnor, you can fire magical projectiles at Dregnor once you pick up Queen Nelli’s magic. The projectiles will home in towards him, making first-person aiming unnecessary, but they won’t find their mark if he’s too far off to the side or too close to directly above you!
Cascade Ravine
Through the Little Tunnel
- Hint: After climbing part of the way up the ravine, make your way to the little tunnel just above the start!
Counting to V
- Hint: In the area with 5 pillars (just past the 2nd waterfall), charge into the switches in the correct order (I → II → III → IV → V)!
A Scuttling Boulder?
- Hint: Just past the 1st waterfall, across the river from the eagle who teaches you about slamming, destroy the scuttling boulder with a slam! You might want to first charge into it to stun it.
Whack-A-Mole
- Hint 1: Just past the 1st waterfall, beyond the eagle who teaches you about slamming, ascend the platforms on the left-hand cliff to reach a farmer eagle with a favour to ask.
- Hint 2: On Grandmaster difficulty, the time limit is fairly tight, but the moles always emerge from the same sequence of holes.
Exploring the Waterfall Cavern
- Hint 1: Slam down on the switch near the bottom of the tallest waterfall to open the gate at the far end of the river, and then race down to it before it closes! Once inside the Waterfall Cavern, jump your way around to a platform above the entrance tunnel.
- Hint 2: The quickest way to reach the open gate is to simply teleport over to the Lower Riverside. This is necessary on Grandmaster difficulty, which has a fairly tight time limit.
The Precarious Rocky Bridge
- Hint: Starting near the bottom of the tallest waterfall, jump across the pillars and make your way up to the middle of the narrow rocky bridge which spans across the ravine.
Race Across the Rocky Bridge!
- Hint 1: Slam down on the switch next to the Rocky Bridge stump teleporter to open the gate at the far end of the narrow, winding path, and then race across to it before it closes!
- Hint 2: Jumping across some sections of the path can be faster and easier than walking along the entire thing. On Grandmaster difficulty, jumping across as much as possible is necessary due to the very tight time limit.
Stacking Ice Blocks
- Hint 1: In the Ancient Grotto (through a tunnel behind the tallest waterfall), learn about Ice Mushrooms and then use them to make your way up to the Tooth. Merlin (the wizard eagle) has some hints to share along the way if you talk to him again.
- Hint 2: After creating an Ice Block, you can still take another charge of magic from the Ice Mushroom with you — the first Ice Block won’t disappear until you create another one to replace it!
- Hint 3: On Challenger and Grandmaster difficulties, after reaching the green Ice Mushroom, you’ll need to create a green Ice Block down on the ground or on the first platform. You can then return to the blue Ice Mushroom and carry its magic all the way up to the second platform (near the green Ice Mushroom), where you can finally stack both Ice Blocks to proceed higher.
Top of the Ancient Grotto
- Hint 1: After reaching the Ancient Grotto’s upper area (which has a stump teleporter), use the white Ice Mushroom to ascend the moving platforms and find the Tooth!
- Hint 2: Ride on the first moving platform and enter first-person view. When it’s at its highest point, aim down at the second moving platform and create an Ice Block on it. You can then jump off the Ice Block to reach the next moving platform above, followed by the Tooth!
At the River’s Source
- Hint: After reaching the Ancient Grotto’s upper area (which has a stump teleporter), use the white Ice Mushroom to reach the highest exit tunnel. Once outside, jump your way up to the top of the waterfall, and then all the way upriver until you arrive at the Tooth!
The Waterfall Cavern’s Secret
- Hint 1: This Tooth is only accessible from Fennecton.
- Hint 2: In Fennecton, visit the Blanfords’ Den and enter the Fennecton Caves through a tunnel hidden behind a crate. Make your way through the caves until you reach Cascade Ravine’s Waterfall Cavern, which has a Tooth hidden within one of its boulders!
Invading Arachnor’s Lair!
- Hint 1: Slam down on the boulder near the rope bridge to reveal a tunnel to Arachnor’s Lair. Once inside, deal with the spider minions followed by Arachnor himself!
- Hint 2: Each time Arachnor lunges forward at you, his shield disappears for a little while. While he’s vulnerable, hit him with a charge or slam to knock him down, and then slam down on him to deal a real blow!
Flooded Ruins
An Ancient Stone Switch
- Hint 1: From the level’s entrance, make your way to the grassy platforms off to the right. Keep working your way upward and around the rocky island cliffs until you reach a bridge with the Tooth and a switch to slam!
- Hint 2: To get a big bounce off a red mushroom, either press jump as you land on it, or slam down onto it.
Diving Amongst the Willows
- Hint: Make your way to the top of the cliff just behind the beach, and find a stork past the willow trees to teach you about Diving. You can then dive into a nearby pool to reach the Tooth!
Atop the Grassy Island
- Hint: After finding the Ancient Stone Switch and raising the big tower, climb up it to reach the top of the nearby island.
Atop the Rocky Island
- Hint 1: After finding the Ancient Stone Switch and raising the big tower, get onto the high-up bridge near the tower, and make your way around the rocky island cliffs until you reach the Cliffside stump teleporter.
- Hint 2: From there, once you’ve learned about Hydrophobic Mushrooms elsewhere in Flooded Ruins, use them to bounce and climb your way up to the top of the rocky island!
Race Up the Huge Tower!
- Hint: Similarly to the Atop the Grassy Island Tooth, climb up the big tower… except within the stork’s time limit!
The Lilypad Game
- Hint: In the back left corner of the lake (when looking forward from the level’s entrance), look for a group of lilypads and a stork with a challenge for you!
Golden Skulls for a Good Cause
- Hint: In the back right corner of the lake (when looking forward from the level’s entrance), look for some ruins to climb onto and a stork with a… suspect request for you!
Floating Above the Huge Tower
- Hint 1: You’ll need to end up on top of the big tower while it’s fully raised.
- Hint 2: Start by ensuring the tower’s lowered. Then, start raising the tower, quickly teleport up to Atop the Island, and jump on top of the tower as it rises!
Illuminating the Fire Serpent’s Shrine
- Hint 1: The shrine is a red structure on the right side of the island behind the big tower. Dive underwater to enter it!
- Hint 2: To solve each puzzle, get all of the torches to be lit! When you hit a torch’s switch, it lights up. If it has a small red or blue side torch, then the next torch over also gets lit or put out, respectively.
Exploring the Water Serpent’s Shrine
- Hint: You can find the shrine through a tunnel on the left side of the lake (when looking forward from the level’s entrance). Once inside, learn about Hydrophobic Mushrooms and use them to make your way to the shrine’s top exit!
The Underwater Maze
- Hint 1: You’ll first need to learn about Metal Mushrooms in Luminous Caverns.
- Hint 2: Using the Metal Mushroom on the beach, explore underwater in the back right corner of the lake (when looking forward from the level’s entrance).
Argyros’s Secret Chamber!
- Hint 1: You’ll first need to learn about Metal Mushrooms in Luminous Caverns.
- Hint 2: You’ll need to find a way underneath the big tower.
- Hint 3: There are no gaps at the bottom of the big tower when it’s either fully lowered or fully raised.
- Hint 4: Start by ensuring the tower’s raised. Visit the Metal Mushroom on the beach, and warp to the Lake Center. Start lowering the tower, and quickly run over to it, sinking underwater and slipping inside as the tower descends!
- Hint 5: Once inside, you’ll need to take Argyros out, starting with diving and hitting him from below, and then dodging his attacks by jumping over them or diving under them as necessary!
Luminous Caverns
Super Jumping Amongst the Crystals
- Hint: From the level’s entrance, make your way along the left wall of the main cavern and enter the Crystalline Grotto. Once inside, learn about Super Jump Mushrooms, and use them to reach the grotto’s topmost crystal!
Draining More and More Toxic Gas
- Hint: Outside the Crystalline Grotto, continue making your way along the main cavern wall until you reach the second switch for draining the toxic gas.
Overlooking the Ice Cavern
- Hint 1: Once you’ve drained the toxic gas twice, you can find the Ice Cavern at the left end of the minecart bridge (when looking forward from the level’s entrance). The Tooth is high up in the cavern’s left area.
- Hint 2: You’ll need to have learned about Ice Mushrooms in Cascade Ravine.
- Hint 3: You’ll need to place Ice Blocks in 3 particular spots against the far wall, to help you reach platforms which would otherwise be too high up. The first spot is on the upper moving platform, the second is on the second pillar from the left, and the third is on the rightmost large pillar.
Lost in the Mine’s Water Supply
- Hint: Once you’ve drained the toxic gas twice, you can find the Abandoned Mine at the right end of the minecart bridge (when looking forward from the level’s entrance). Climb up the mine’s central tower to drain the gas further, and then look for a bird near one of the mine’s corners who can teach you about Metal Mushrooms. Finally, use the nearby one to sink to the bottom of the second water tank!
Explosive Excavation
- Hint: After draining the toxic gas in the Abandoned Mine, activate the machinery using the master switch at the bottom, and then drop down into the area with the bird who teaches you about Metal Mushrooms. Inside, press a switch to send out a minecart, which will destroy a boulder. Proceed through the resulting hole and continue until you destroy another boulder, revealing the Tooth!
Breaking Into the Mine’s Tower
- Hint: After getting the “Explosive Excavation” Tooth, continue with some trickier platforming, activating more minecarts and destroying more boulders until you bust your way into the mine’s central tower!
Guarded by Fast-Moving Machinery
- Hint 1: This Tooth is just past and above the “Explosive Excavation” one. However, it can’t be reached while the mine’s machinery is running!
- Hint 2: After destroying the second boulder in the mine, turn the machinery back off using the master switch at the bottom. Then, climb most of the way up the central tower, jump across to the minecart bridge near the Tooth, and finally jump your way up to collect it!
Scaling the Subterranean Well
- Hint 1: After draining the toxic gas in the Abandoned Mine, you can access the Subterranean Well through a tunnel from the main cavern, below the Crystalline Grotto.
- Hint 2: You’ll need to have learned about Hydrophobic Mushrooms in Flooded Ruins.
- Hint 3: The arrows painted on the walls serve as hints.
- Hint 4: To reach the highest set of platforms, you’ll need to perform 2 Super Jumps in a row from the platform with the upper Super Jump Mushroom. However, you will also need 1 Super Jump to reach that point from the lower Super Jump Mushroom in the first place…
- Hint 5: Start by using the lower Super Jump Mushroom to reach the upper one, and then drop back down and visit the lower one again. Next, go back up using a Super Jump (from the upper mushroom), at which point you’ll be at the upper mushroom with 2 Super Jumps in hand! Use them both to reach the next platform up, making sure to wait until the peak of each jump to maximize your height.
Luminous Mushroom Illumination
- Hint 1: After draining all of the toxic gas, there’s a Tooth to be earned from the mushrooms on the floor of the main cavern.
- Hint 2: You’ll need to jump on each mushroom to illuminate them all. However, if you ever set foot on the floor or another platform, or jump on the same mushroom twice, they’ll all turn back off!
Navigating the Depths
- Hint: After draining all of the toxic gas, go through the tunnel at the very bottom of the main cavern to reach the Depths, and then make your way across all of the dark platforms until you reach the Tooth!
Breaking the Ice
- Hint 1: This Tooth is only accessible after draining the toxic gas twice and then accomplishing something in Enchanted Metalworks.
- Hint 2: In Enchanted Metalworks, visit the Freight Elevator (located through a passageway to the right of the Generator Room). Ride the elevator all the way down to floor B6, destroying all of the enemies along the way. Then, go through the tunnel to access a previously locked section of the Abandoned Mine, and make sure the mine’s machinery is running. Finally, press the switch there to send out a minecart all the way to the Ice Cavern, and go collect your prize!
Mangora’s Ambush!
- Hint 1: After draining the toxic gas in the Abandoned Mine, the final switch for draining gas is accessible in the main cavern. However, upon pressing it, Mangora will reveal herself!
- Hint 2: At first, with the gas rising, you have no choice but to jump your way back to the left around the cavern until reaching the minecart bridge. At that point, you can’t ascend any higher, but you can fight back against Mangora — she’ll sometimes deposit glowing golden magic onto the bridge, which you can collect and shoot back at her!
Great Oak Aerie
Mid-Marathon Meal
- Hint: Visit the huge red tree with an elevator, make your way to the far right end of its 2nd floor, and Super Jump up to find a parrot flying around a tree. He can teach you about climbing, and then has a request for you.
Sunken in the Waterlogged Tree
- Hint 1: To reach the Waterlogged Tree, start on the 3rd floor of the huge red tree (just left of the elevator), jump across to the marble platform, and make your way over to the huge white tree with a waterfall.
- Hint 2: You’ll need to have learned about Metal Mushrooms in Luminous Caverns.
- Hint 3: Visit the Metal Mushroom, jump across to the ramp near the stump teleporter which leads underwater, and then make your way across the underwater platforms until you can drop down into the marble cage containing the Tooth!
The Marble Aerie
- Hint 1: You’ll need to start by finding a way to the upper platforms on the inside of the Waterlogged Tree.
- Hint 2: The nearby tunnel, which leads to a bridge in Flooded Ruins ending in a cracked wall, is helpful.
- Hint 3: Charge into the cracked wall at the end of the bridge in Flooded Ruins to open a new entrance into the Shrine to the Water Serpent. Once you’ve learned how to use Hydrophobic Mushrooms there, you can visit one in the shrine, quickly leave back through the hole to the bridge, and use it to bounce across to one of the spinning marble platforms in the Waterlogged Tree! From there, keep jumping and bouncing your way upward until you exit the Waterlogged Tree and come across the Tooth shortly after.
The Fungal Tree’s Surprise!
- Hint 1: Before visiting the Fungal Tree, you’ll first need to reach the 4th floor of the huge red tree with an elevator. The “4” switch can be found on the 3rd floor (accessible once you learn about climbing elsewhere in Great Oak Aerie), though if you’re not careful, you’ll miss catching a ride on the elevator yourself!
- Hint 2: To reach the 4th floor, make sure to press the nearby “1” switch before pressing the “4” switch. With the elevator starting on the 1st floor, you’ll have enough time to run over to it before it gets above the 3rd floor!
- Hint 3: Once you’re on the 4th floor, you can reach the Fungal Tree by crossing the spinning log and jumping across a series of mushrooms.
- Hint 4: Once inside the Fungal Tree, you’ll need to take care of the Agarics! Their electric projectiles are effective against both you and the Agarics’ own shields, so lure the projectiles around carefully and then strike when the Agarics are vulnerable!
Precarious Catwalk in the Golden Tree
- Hint: The Golden Tree is near the far end of the forest from the level’s entrance. To reach it from the huge red tree with an elevator, start on the 3rd floor (by the stump teleporter), take a ride on the “A” and “B” gondolas, and continue forward past the huge tree stump. Once inside, keep navigating your way past all of the obstacles on both the interior and exterior of the Golden Tree until you finally reach its stump teleporter and the nearby Tooth!
Pushing Pillars in the Golden Tree
- Hint 1: You’ll need to have learned about Ice Mushrooms in Cascade Ravine, and about climbing elsewhere in Great Oak Aerie.
- Hint 2: Continue ascending from the Golden Tree’s stump teleporter, until you see an arrangement of round, climbable platforms hanging in front of you. You’ll need to end up jumping across them, though that’s initially impossible, with the closest one already out of reach.
- Hint 3: If you exit through the nearby tunnel and climb further up the exterior of the Golden Tree, you can reach its highest level. There, you can charge into the pillars to move them around. Try arranging them such that you’ll be able to jump all the way across their hanging platforms back on the lower level, and watch out for the fact that you’ll then need to jump back across their tops to finally reach the Tooth at the top!
- Hint 4: One way of arranging the pillars is illustrated below, along with the path to take when first jumping across them (with a similar path in reverse when you jump back over on top). The two pillars near the bottom-right corner don’t matter.

Puzzling Out the Bamboo Terraces
- Hint 1: To reach the Bamboo Terraces, you’ll need to take a ride from the huge tree stump on the “D” gondola, off to the left (when looking forward at the Golden Tree from the Stump on a Stump teleporter). Though, there are no “D” switches right by the gondola’s station.
- Hint 2: You can find a “D” switch by jumping your way up and around the top of the huge stump, across a rope bridge to the left, and then across another rope bridge to the right.
- Hint 3: You’ll need to press the “D” switch and then jump down onto the gondola as it passes by, heading for the Bamboo Terraces!
- Hint 4: At the Bamboo Terraces, you’ll need to complete a challenging series of puzzles, split across 3 terraces. In each puzzle, you can press directional buttons to make all green and yellow squares in the grid slide in your chosen direction (until they hit a wall or another square), with the goal of making all green squares come to rest in green cells. On the 2nd and 3rd terraces, there are parrots who can give you hints.
Atop the Wooden House
- Hint 1: To reach the Wooden House, you’ll need to jump across the totem poles to the right of the huge tree stump (when looking forward at the Golden Tree from the Stump on a Stump teleporter). This includes some tricky jumps around the totem poles’ centers. Once you arrive there and learn about Sticky Spore Mushrooms, make your way through the house until you finally reach the Tooth on its highest roof! The eagle there has some hints to share along the way if you talk to him again.
- Hint 2: To open the 3rd gate, plant a spore on the wooden plank moving up and down in the house’s 2nd room, and detonate it when the plank is near the switch at the top.
- Hint 3: To open the 5th and final gate, plant a spore on one of the two switches, and detonate it around the same time as you charge into the other switch.
Synchronized Gondolas
- Hint 1: The Tooth is at one of the stations of the “C” gondola, which runs under the middle of the “B” gondola’s route.
- Hint 2: You’ll need to first learn about Sticky Spore Mushrooms elsewhere in Great Oak Aerie.
- Hint 3: You’ll need to start by planting a spore on the “C” switch, which is near the totem poles leading to the Wooden House. You can use the Sticky Spore Mushroom just outside the Wooden House (or, on Apprentice difficulty, alternatively the one on the huge red tree’s 4th floor).
- Hint 4: Once the spore’s in place, head over to the huge tree stump and start riding the “B” gondola, detonating the spore to press the “C” switch around the same time you slam the “B” switch. As the gondolas converge, hop over and ride the “C” gondola to the Tooth!
Electric Acrobatics
- Hint 1: You’ll first need to learn about Zip Mushrooms in Enchanted Metalworks, and about climbing elsewhere in Great Oak Aerie.
- Hint 2: On the side of the huge tree stump (which has the Stump on a Stump teleporter), look for a Zip Mushroom, and use it to enter the tree stump on the opposite side. Once inside, navigate the tricky obstacles until you reach the Tooth!
Gondola Teamwork
- Hint 1: You’ll first need to learn about Duplication Mushrooms in Enchanted Metalworks.
- Hint 2: You can then exit the Golden Tree through the tunnel at the back of its interior. Once outside, the Tooth is in sight, past the group of gondolas.
- Hint 3: You’ll need to use the Duplication Mushroom and then swap back and forth with your copy to advance through the gondolas, ultimately riding the “H” one to the Tooth. One copy of Kit will need to go to the right (on the “E” and “G” gondolas, ending up in position to hit the “H” switch), while the other should go left (on the “F” gondola) and then back over to the right (on the “F”, “E”, and “H” gondolas).
Duel Against Dardurus!
- Hint 1: To find Dardurus, you’ll need to reach the 5th floor of the huge red tree with an elevator.
- Hint 2: The “5” switch is on the 1st floor, but is so far from the elevator that you can’t press it and then catch the elevator before it leaves.
- Hint 3: You’ll first need to learn about Sticky Spore Mushrooms elsewhere in Great Oak Aerie.
- Hint 4: Start by getting to the 4th floor (as you would when going to the Fungal Tree). Visit the Sticky Spore Mushroom at the left end of the floor, drop down to the “5” switch (almost directly below the mushroom), and plant a spore on it. You can then take your time bringing the elevator down to floor 1 and boarding it, before finally detonating the spore and riding up to the 5th floor!
- Hint 5: When battling against Dardurus inside the Elevator Tree, plant spores on the red explosive panels on the walls, and then lure Dardurus over them, detonating them as he passes. 4 hits will do the job!
Enchanted Metalworks
Quality Control
- Hint: From the Iron Tower, exit through the tunnel at the back of the bottom floor to reach the inspection conveyor, where a pigeon has a job for you.
Zipping to Success
- Hint 1: You’ll first need to find the Generator Room. From the Iron Tower, exit through the large brown tunnel near the bottom, and head straight until you reach the Iron Casting Platform (the area with flowing molten metal), which has an entrance to the Generator Room.
- Hint 2: Once inside, you can learn about Zip Mushrooms and then complete the Zipping to Success training course, which will lead you to the Tooth!
Hot Hammers
- Hint 1: You’ll first need to activate the white hammers (in the Iron Tower) and find the Smelting Chamber. One path to it is from the Iron Casting Platform (accessible from the tops of the huge barrels of molten metal), while another path is from the Ventilation Room.
- Hint 2: Look for the series of white hammers and platforms on the left side of the Smelting Chamber, and ascend them to reach the high-up Tooth!
Fighting the Current
- Hint 1: Similarly to the Hot Hammers Tooth, you’ll first need to find the Smelting Chamber.
- Hint 2: Look for the series of huge pipes with flowing molten metal on the right side of the Smelting Chamber. Make your way to the end of each pipe, jumping from floating barrel to floating barrel against the current, until you reach the Tooth at the end of the fourth pipe!
- Hint 3: If you’re running low on health, look for a healing mushroom on the left side of the third pipe!
Harmless Furnace Inspection
- Hint 1: Similarly to the Hot Hammers Tooth, you’ll first need to find the Smelting Chamber.
- Hint 2: Look for the dark furnace straight ahead at the back of the Smelting Chamber, where a pigeon has a job for you.
Ascending the Iron Tower
- Hint: Keep making your way up the interior of the Iron Tower until you reach the Tooth!
A Team Effort in Lab 1
- Hint 1: You’ll first need to find the R&D Facility. After reaching the top of the Iron Tower’s interior, drop down and deactivate the white hammers (while leaving the red hammers active), teleport back to High Up in the Iron Tower, exit through the nearby large blue tunnel, and make your way forward to the crossroads platform with 4 signs. From there, you can ride the platform to the left to reach the R&D Facility! Once inside, you’ll learn to pay up and learn about Duplication Mushrooms before you can access the full facility.
- Hint 2: You’ll need to swap back and forth with your copy to both progress through Lab 1. Whenever you or your copy are standing on a pressure plate on the floor, it will transmit purple energy through any wires connected to it, causing sliding doors to stay open or platforms to move along their rails.
- Hint 3: At one point, you’ll need to leave your copy standing on the pressure plate in the middle of the room while you retrace your steps to near the entrance.
A Helping Hand in Lab 2
- Hint 1: Similarly to A Team Effort in Lab 1, you’ll first need to find the R&D Facility.
- Hint 2: You’ll need to start by shooting your duplication magic onto the raised platform at the far end of the room, and then swap back and forth with your copy to progress through Lab 2. One of the copies will remain by the yellow and purple switches, toggling them to help the other copy navigate through the room.
- Hint 3: You’ll sometimes need to deactivate hammers at specific times. You can get the right timings by looking up at certain platforms, by observing the shadows of platforms sliding directly overhead, or by noticing how the hammer hits line up with the music.
Staying Cool in the Storage Bay
- Hint 1: You’ll first need to find the Steel Storage Bay. After reaching the top of the Iron Tower’s interior, return to the Metalworks Entrance and deactivate the red hammers (while leaving the white hammers active), teleport back to High Up in the Iron Tower, exit through the nearby large blue tunnel, and make your way forward to the crossroads platform with 4 signs. From there, you can ride the platform to the right to reach the Steel Storage Bay!
- Hint 2: Once inside, use the Ice Mushrooms to shoot ice at the hammers, freezing them in place.
- Hint 3: Along the way, you’ll sometimes need use an Ice Mushroom to freeze a hammer, and then bring that Ice Mushroom’s magic with you to freeze yet another hammer later.
No Hammers Needed
- Hint 1: The Tooth can be seen past the crossroads platform with 4 signs (which branches off to the R&D Facility and Steel Storage Bay). However, to reach the Tooth, you’ll need to find your way to this area while both the red and white hammers are inactive.
- Hint 2: You’ll need to first learn about Zip Mushrooms elsewhere in Enchanted Metalworks.
- Hint 3: If you can reach the Iron Tower’s roof while both the red and white hammers are inactive, you can then drop down towards the crossroads platform and make your way over to the Tooth!
- Hint 4: After deactivating both the red and white hammers, visit the Generator Room and grab the first Zip Mushroom there. Teleport to High Up in the Iron Tower, and Zip and somersault across to the electric barrier, through which you can access the roof.
Ventilation Operation
- Hint 1: You’ll first need to learn about Sticky Spore Mushrooms in Great Oak Aerie.
- Hint 2: You’ll then need to reach the Ventilation Room. To do so, exit the Iron Tower through the brown pipe located a bit higher than the white switch, and make your way across the pipes and past the spinning flamethrowers on the exterior.
- Hint 3: Once in the Ventilation Room, you’ll need to navigate a series of 5 puzzles, each involving manipulating a system of vents until you’re able to jump up to the next level.
- Hint 4: There’s steam flowing through each system of vents. Certain junctions have switches on top — slamming them toggles which way the steam flows out of those junctions. There are platforms over some vents, which float up in the air when steam flows below them. Platforms have two possible heights, depending on whether they’re raised by a small amount of steam (coloured yellow) or a large amount (coloured red). When two small amounts of steam converge at a junction, a large amount of steam flows out of it. To get high enough to move on from each puzzle, you’ll need to get on top of a platform raised by a large amount of steam!
- Hint 5: To solve the fourth puzzle, plant a spore on the switch, stand on top of the platform while it’s lowered, and then detonate the spore to raise the platform (with you on it)!
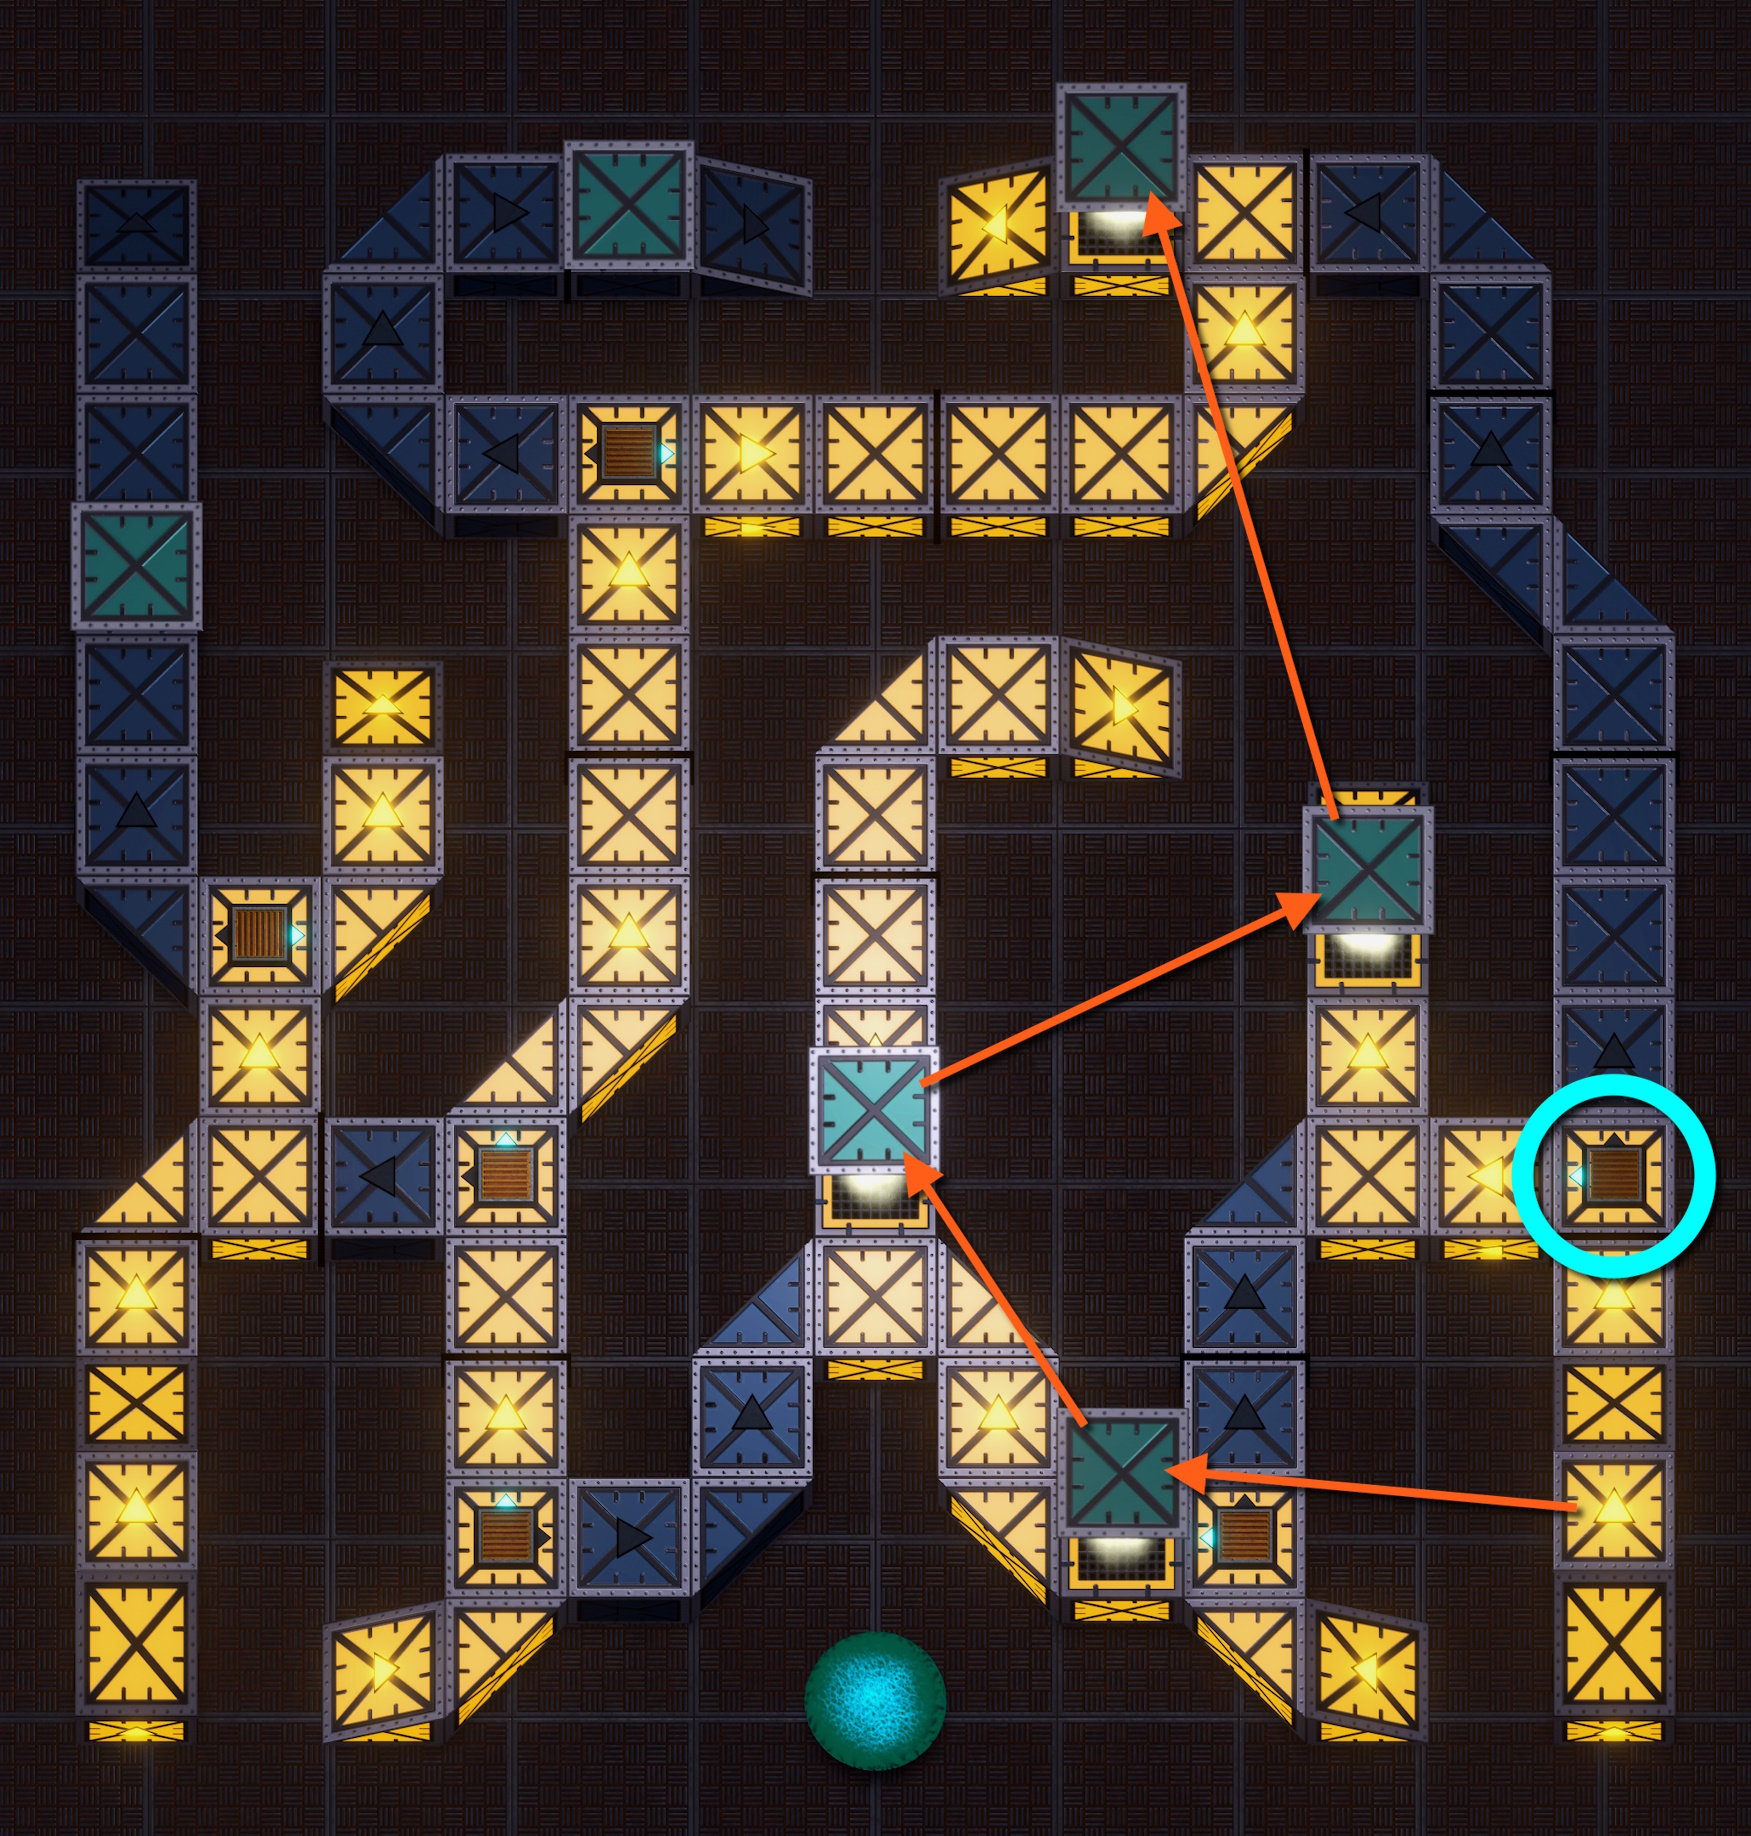
- Hint 6: One way of solving the fifth and final puzzle is illustrated below. After arranging the vents as shown and placing a spore on the circled switch, jump across the floating platforms (following the arrows) and then detonate the spore.
Mech-Arachnor’s Assault!
- Hint 1: You’ll need to find your way to the Iron Tower’s roof. It’s accessible from the top of the tower’s interior, though you’ll need to first learn about Zip Mushrooms elsewhere in Enchanted Metalworks.
- Hint 2: To fight back against Mech-Arachnor, you’ll need to charge into the 4 switches located on the pillars at the tower’s corners. When the switches are electrified, you’ll need Zip Charges instead!
- Hint 3: Whenever there’s a Zip Mushroom available, you can use plenty of Zips to quickly get from switch to switch, outrun Mech-Arachnor’s attacks, and even Zip straight through the electric shockwaves emitted by his hammers if you’re careful.