A detailed explanation of how to snipe with extreme ranges in BattleBit Remastered. Includes easy range guides for every Sniper Rifle.
Introduction
To start off, there are a lot of sniper rifles in BattleBit Remastered. With each rifle having their own unique statistics (bullet velocity, bullet drop, zeroing range), no two rifles are the same.
This is where this guide can help.
Universal Attachments
Ok, so you’re looking for the best attachments to help you get those satisfying long-range shots.
Let’s start with your main sight
PTR-40 Hunter
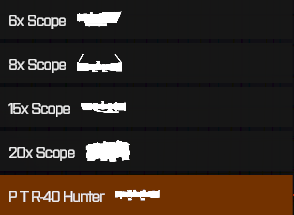
Without a doubt, the PTR-40 Hunter scope is going to be your best friend for those nasty 2km+ shots, regardless of the rifle you are using
The Hunter scope has the highest magnification out of every optic in the game, exceeding even the 20x scope’s zoom.
Plus, as an added bonus, you can attach a top sight to it, which is perfect for CQB! You wouldn’t want to try to quickscope with the Hunter scope after all, trust me.
Moving onto your barrel
Ranger
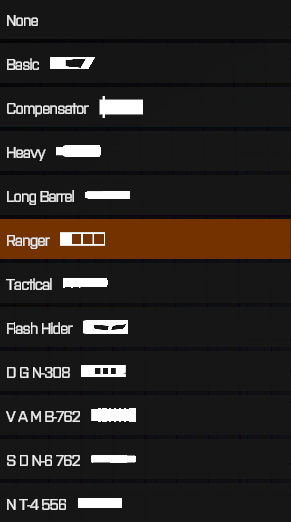
The Ranger barrel is universally the best barrel attachment for sniper rifles in the game due to its added damage and velocity
Depending on the gun, the Ranger barrel adds between 6-7 damage per shot and 90-140 muzzle velocity. In the case of this attachment, the positives far outweigh the negatives.
Yes, you will get a larger muzzle flash. Yes, you will get more sound spread. However, you are going to be so far out from the battlefield that these statistics shouldn’t matter.
Oh, and the added recoil? This is where the next attachment comes in.
Next up, the underbarrel rail.
Bipod
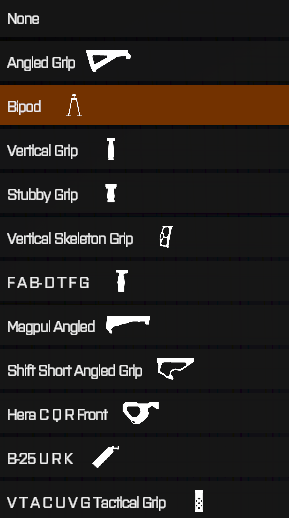
Usually a controversial attachment, this is a huge life-saver when dealing with extreme ranges
Ok, I get it. On paper, the Bipod adds negative statistics to pretty much everything, including recoil.
This means it’s horrible for distance shooting, right?
Wrong.
There’s one little thing the statistic page doesn’t mention: scope sway.
You probably get where I’m going with this.
Using the Bipod removes all scope sway
You’re not going to be wanting to constantly hold shift to steady your scope, you’re not going to be wanting to wait for your stamina to replenish just so you can get that satisfying shot. Having to do this is super frustrating, especially when you’re trying to aim for the 4 pixels you see peeking above a hill 2km away.
When you’re lying down on a flat surface, your Bipod will automatically deploy and eliminate all scope sway from your gun. I shouldn’t need to say anything more, just try it out yourself in the shooting range.
Oh, and don’t forget your bolt
Bolt Action E

This attachment might just save your life (and your sanity)
Yup, having to manually bolt your own round after each shot is annoying.
Yup, having an insanely slow bolt speed is annoying.
Yup, having to un-ADS to bolt a new round is annoying.
Yup, going crazy is anno-
Ok. Introducing Bolt Action E.
This attachment automatically bolts your own round, allows you to ADS while bolting a new round, and simply makes the whole process quicker.
Goodbye, sniper rifle!
Hello, sniper-rifle-that-is-pretty-much-a-better-DMR!
That being said, we’re still missing the most helpful attachment to camp tactically sit and destroy enemies who don’t know how to counter you.
Introducing our beloved side rail attachment
Rangefinder
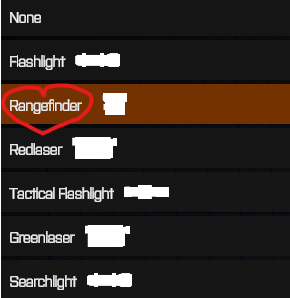
The Rangefinder… my beloved rang- Oh, hi. Sorry about that. This thing is good for shooting or something, I guess
Okay, the Rangefinder!
First, let’s list off the statistical downsides.
Ok, so draw speed. This thing takes off a whopping 0.04 draw speed.
And, well, that’s it.
Pretty much nothing is keeping you from using this.
The Rangefinder can be your saving grace when it comes to shooting bad guys over a distance even as little as 100m.
How do you use it, you might be asking?
Well, all it does is just pop up some numbers on your screen while you’re aiming.
Yeah, it just shows you the range, that’s it.
Well, if you’re going to want to use the range correctly, you’re going to have to learn how to zero your rifle. Don’t worry, that’s next.
Zeroing and the Art of Calculating Long-Range Shots
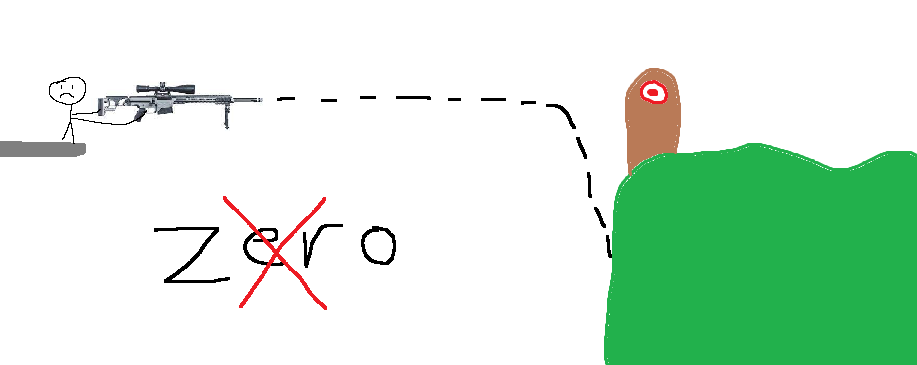
What is a rifle zero?
A rifle zero allows your gun to accurately shoot to a point of aim at a set distance.
For instance, shooting at a target 1000m (1km) away WITH a rifle zero of the same distance will account for the drop of the bullet, allowing it to hit your target.
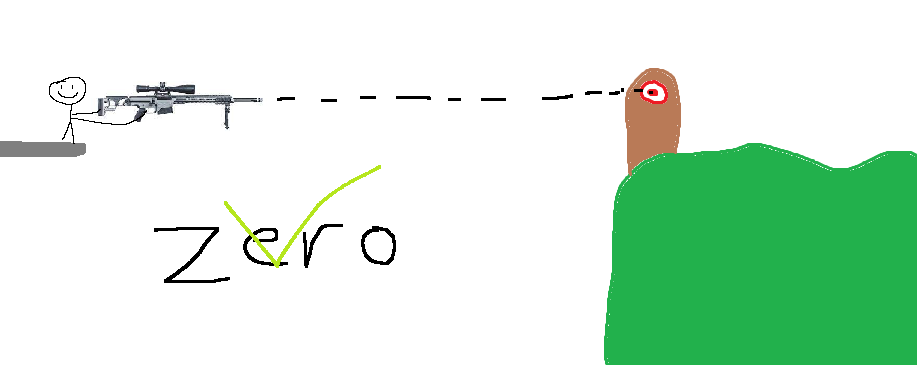
However, shooting at the same target WITHOUT a rifle zero will not account for the drop of the bullet, usually leading it to land nowhere even close to your target.
Luckily in this game, zeroing your rifle is ez-pz.
Well, until you get out of the range that your rifle can zero. That calls for another method.
Anyways, we’re getting ahead of ourselves here. Time to learn the basics of rifle zeroing!
Rifle Zeroing 101

Keybindings and how to use them!
Necessary Keybinds
- Your left alt key is known as the Zeroing Adjustment Hold Key.
- Used alongside your mouse scroll wheel
If you don’t want to use the above method of holding a key and to use your scroll wheel to select your range, there is another option.
Optional Keybinds
- Your [unbound] key is known as the Zeroing Increase Key.
- Your [unbound] key is known as the Zeroing Decrease Key.
If you would like to change any of these keybinds, you can find them inside the in-game settings under the section Keybindings>Weapon

To zero your rifle using the first method, hold left alt (or personal preference) and use your mouse scroll wheel to change the distance of the zero.
To zero your rifle using the second method (given that you have bound the keys), press your Zeroing Increase Key to increase the distance and your Zeroing Decrease Key to decrease your distance.
Perfect! You now know how to zero your rifle in BattleBit Remastered. Next up, time to learn how to aim with your zeroed rifle and what to do if the range is longer than your gun’s zeroing distance.
Shooting within a rifle’s zero
Ok, you’re going to need your trusty Rangefinder for this (or SOFLAM binoculars if you’re spotting for someone).
There are three steps to shooting at long distances. In order from first to last, they are:
1. Find the distance of your target (rangefinder/SOFLAM)
2. Zero your rifle to the found distance
3. Fire at your target and correct your shots if needed
If you have the exact target distance zeroed into your rifle, all you need to do is aim your center crosshair on the target and fire.
However, if your target exceeds your rifle’s zero, you’re going to have to use your scope range lines. This comes next in the guide!
Shooting outside a rifle’s zero
Fun fact, the range lines underneath your center scope crosshair are actually accurate (and usable!).
This surprised me, too, when I first learned about it.
Note: there is a fancy word for the distance marks but I’m going to keep it simple by calling them range lines.
Something worth noting, though; the range lines do not share the same distance with every gun. For instance, one line on one gun could equal a totally different distance on another gun.
It just takes a little bit of math.
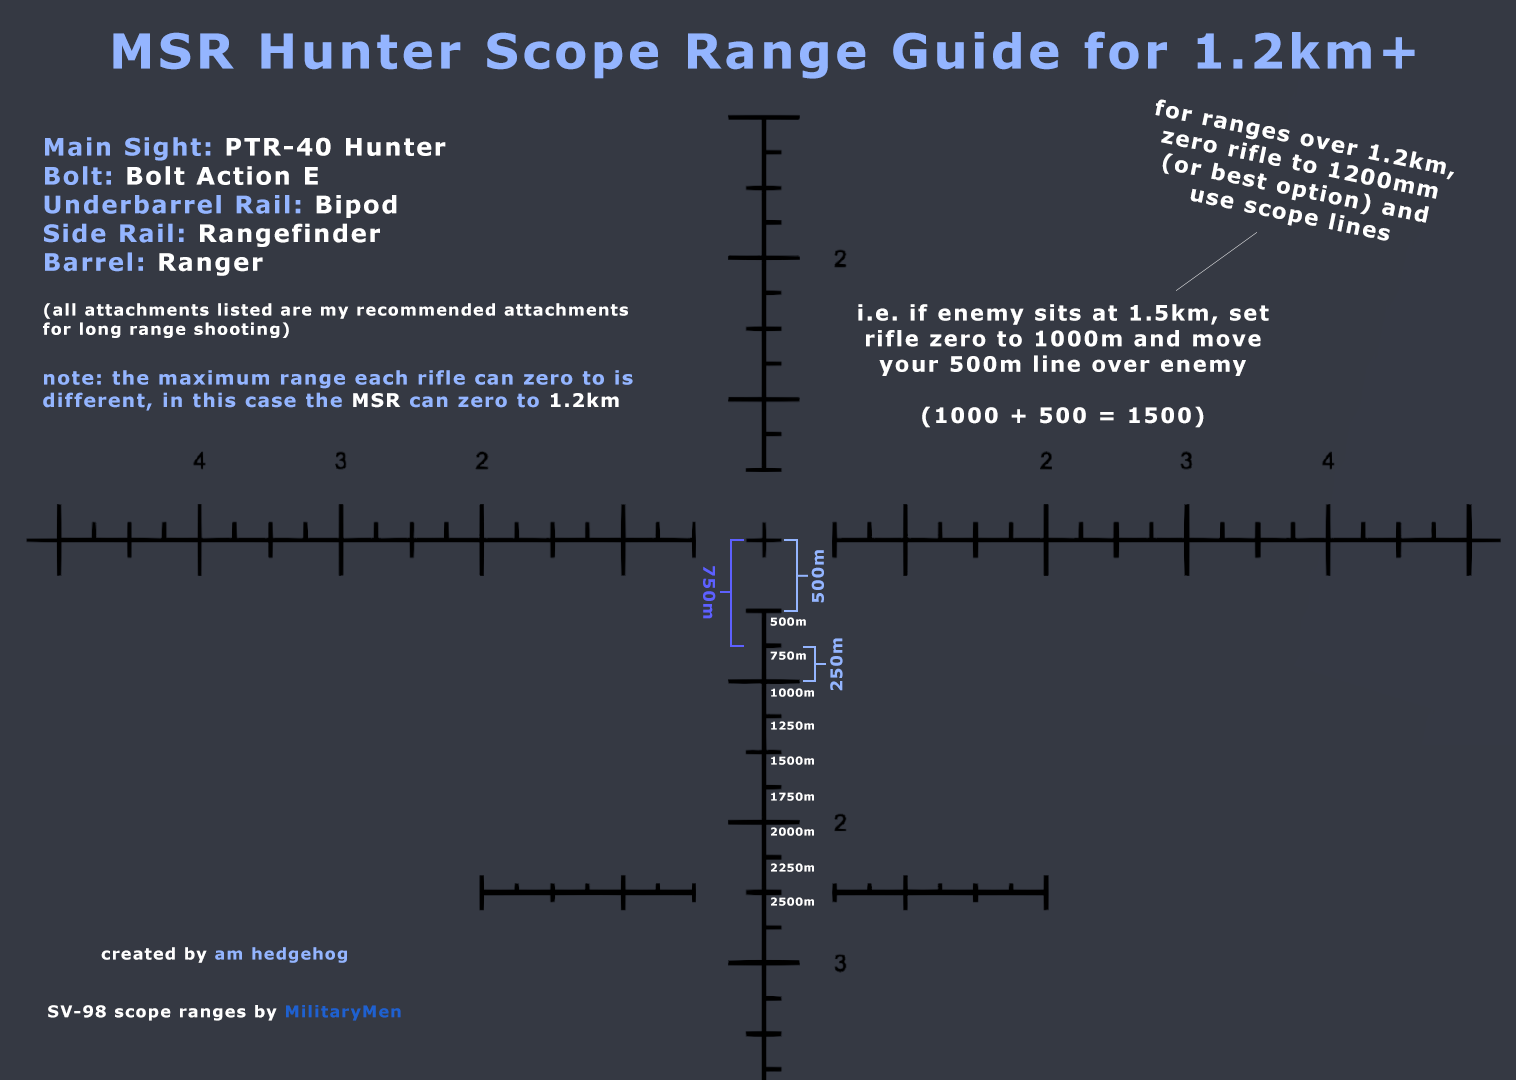
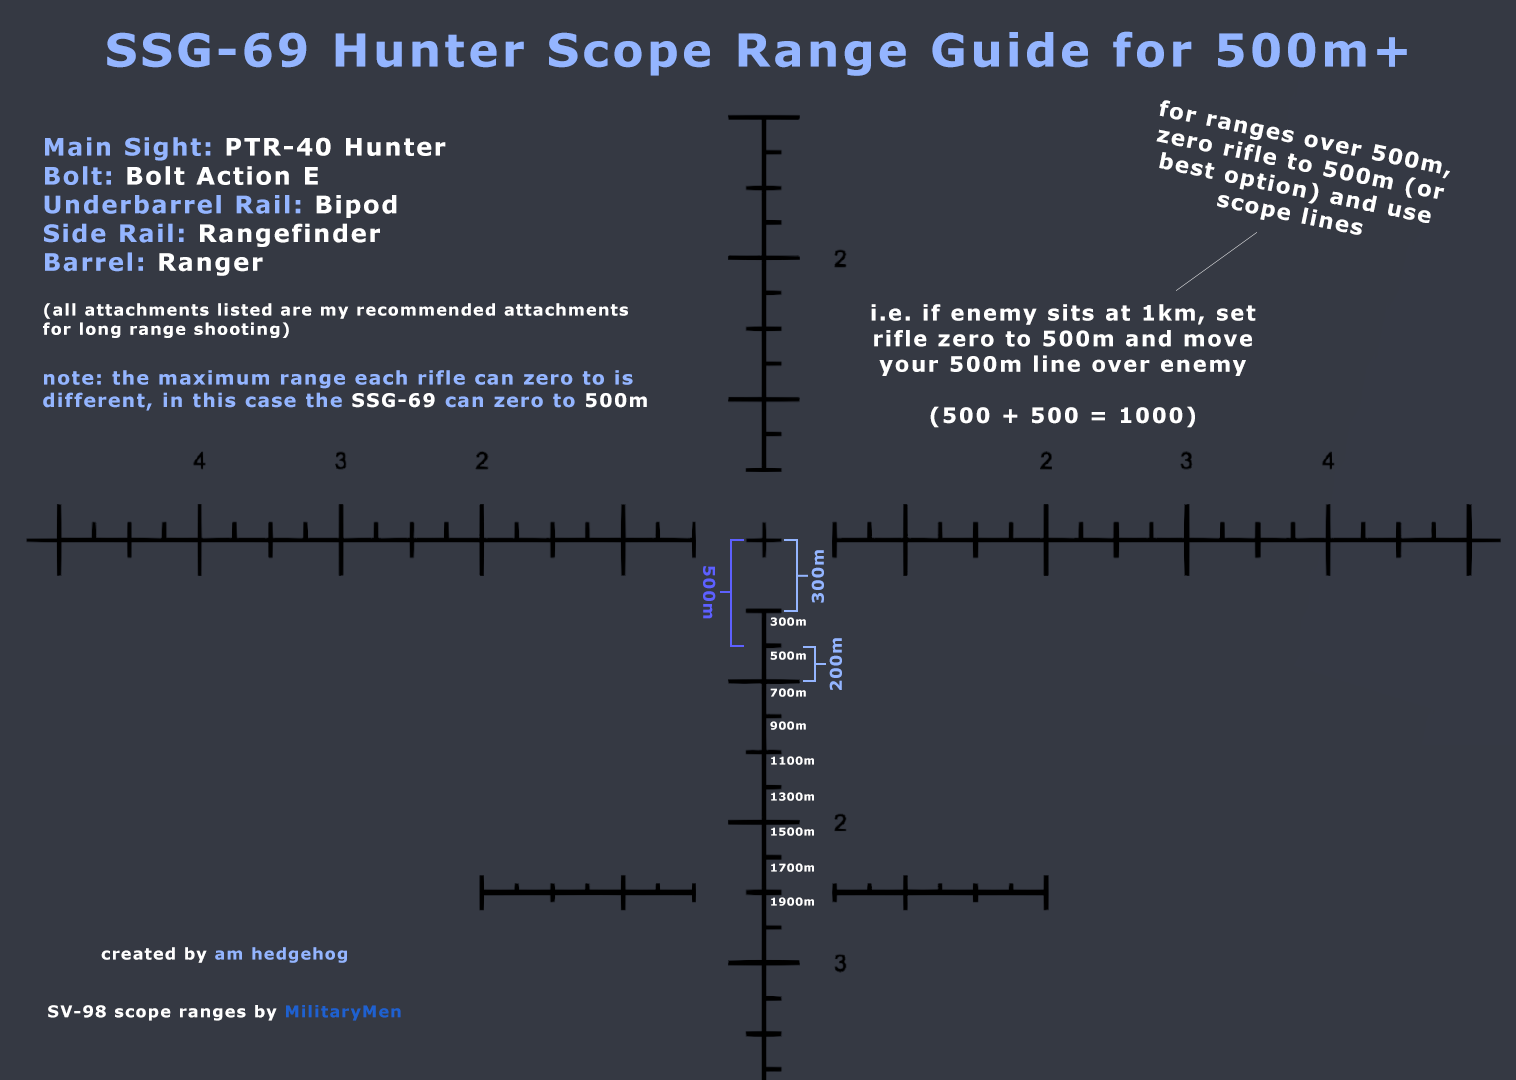
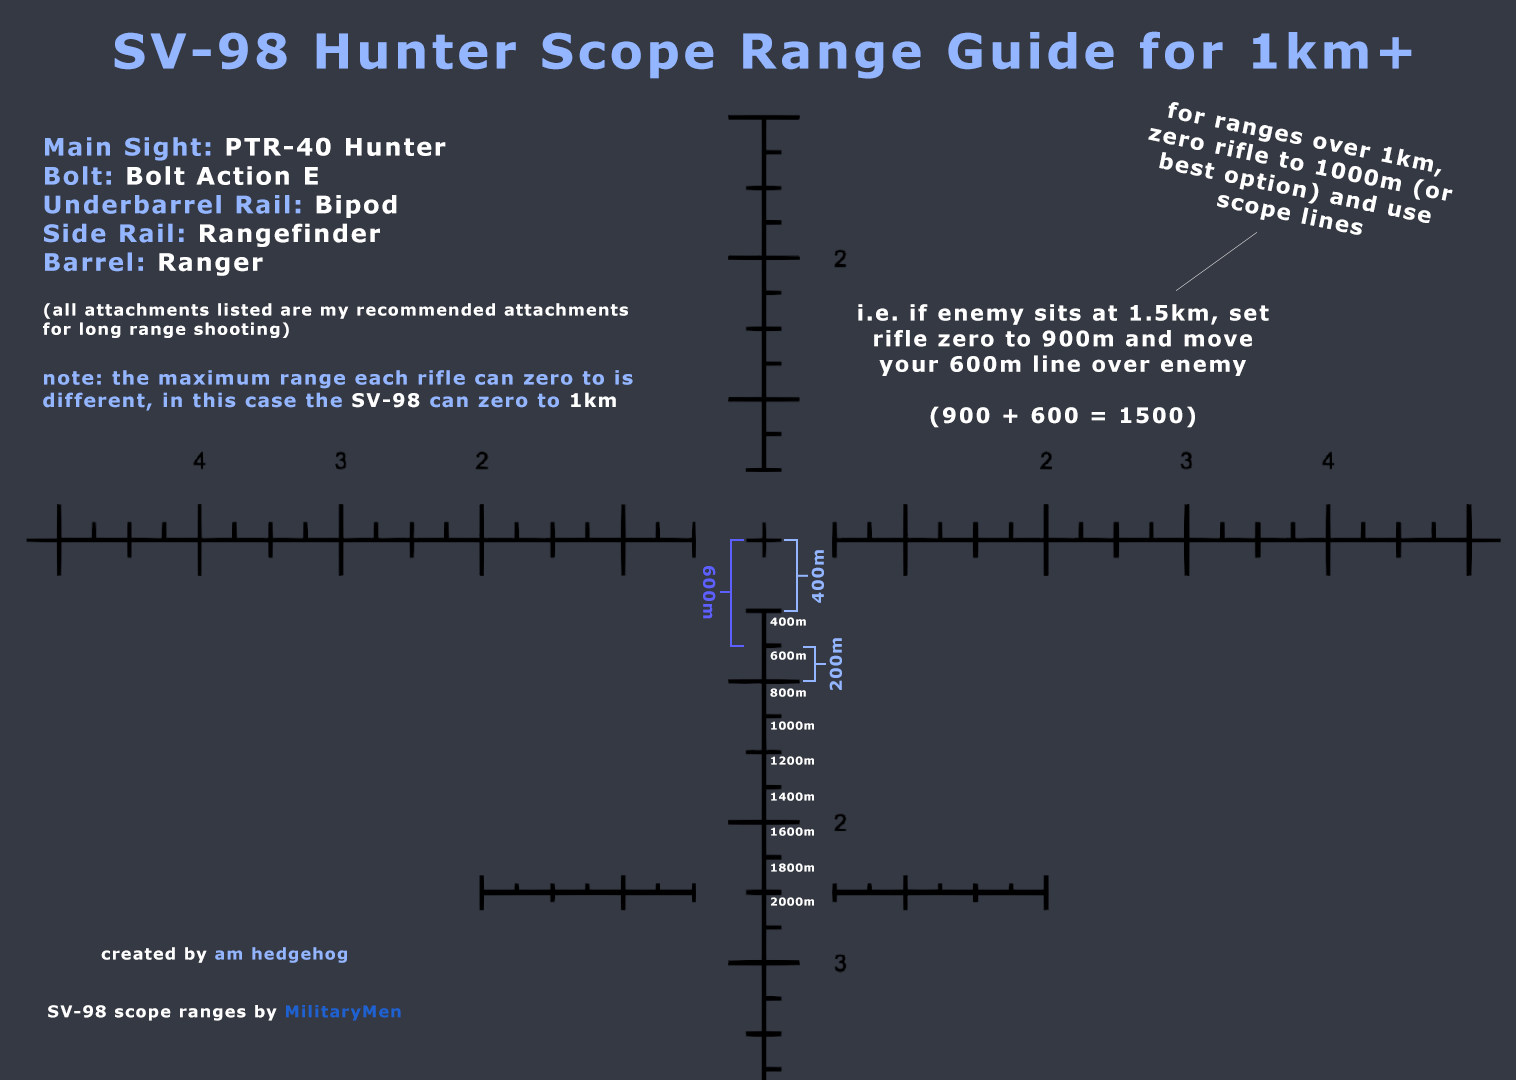
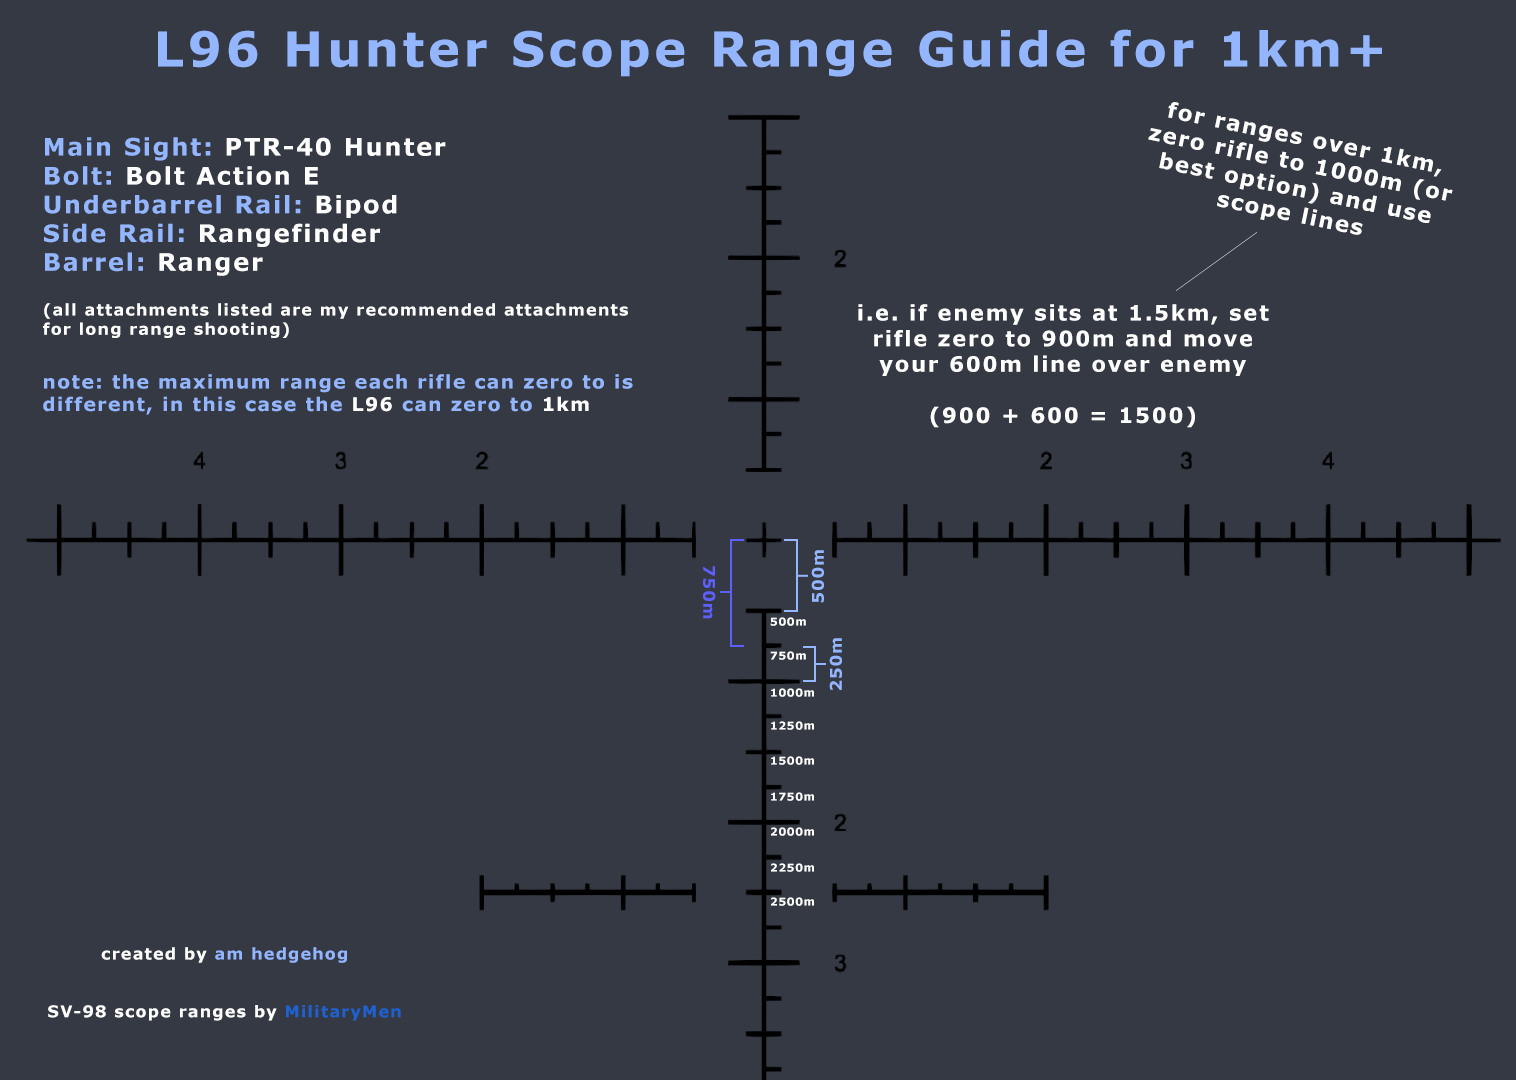
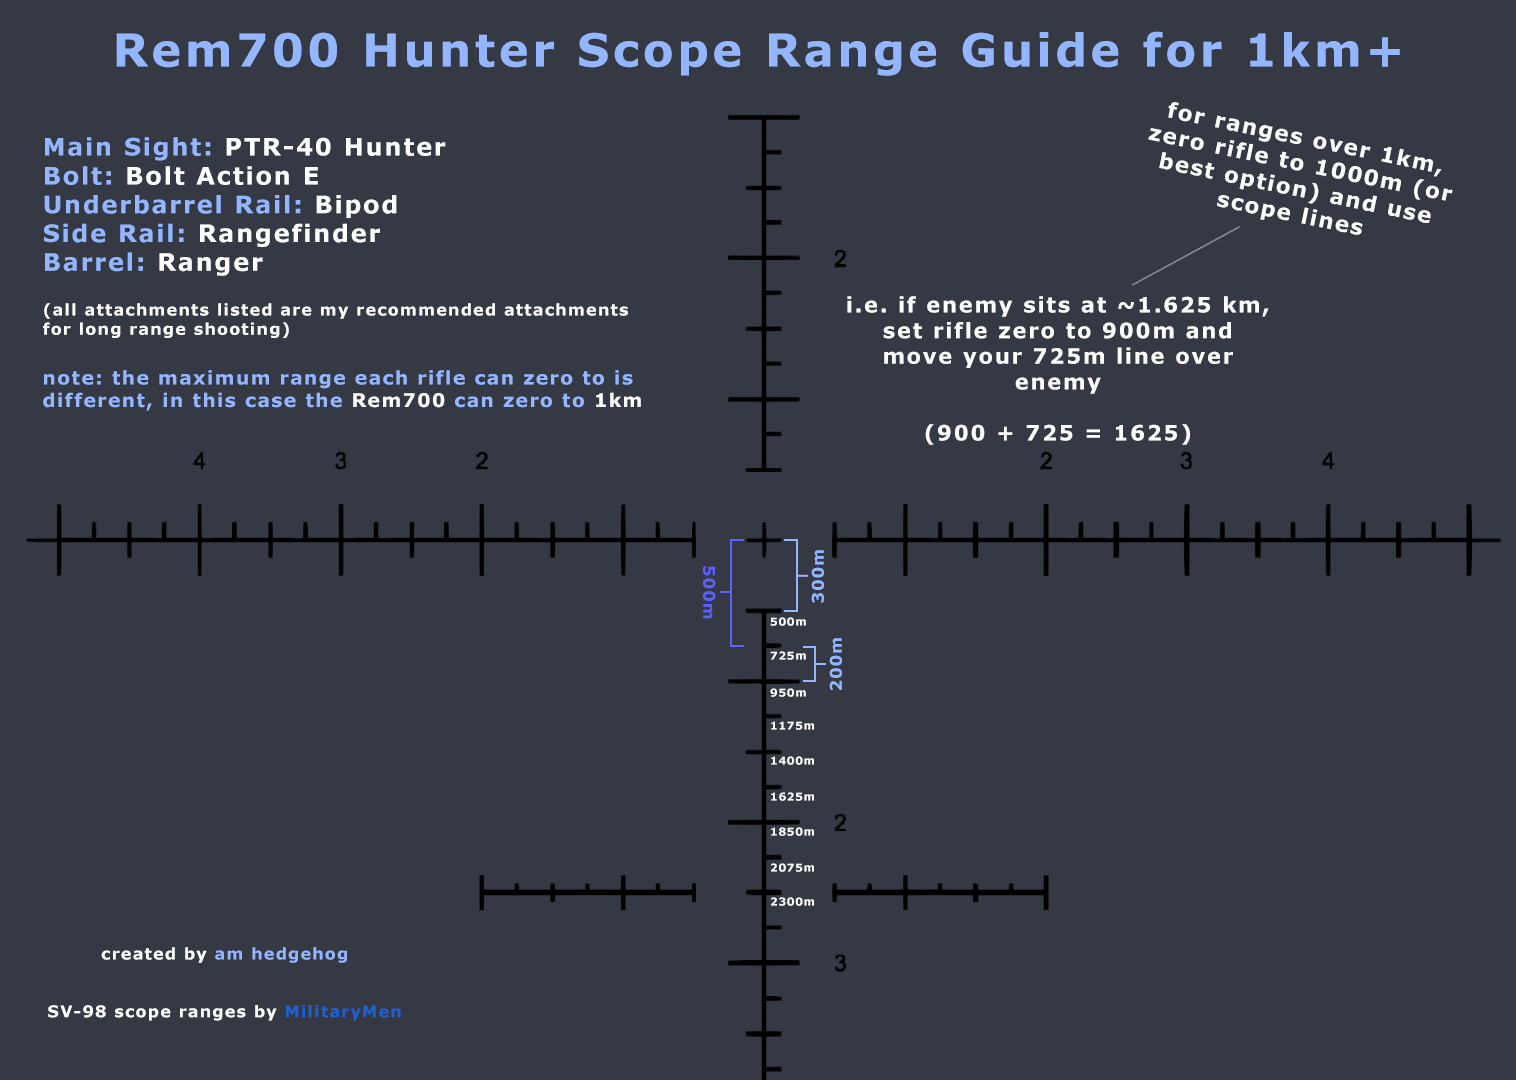
Ladies and gentlemen, after a good long couple days of work, I introduce to you, Hunter Scope Range Guides for EVERY sniper rifle currently in the game!
I’m going to leave this guide off here with these picture guides, but I need to add a few things first.
- These guides are only usable with the Hunter scope, as all other scopes have different, lower zoom levels (besides, this guide is meant for super long ranges after all)
- There is currently no tried and true method to calculating the exact range for each line. I had to manually test every single line with every single range on every single gun. Because of this, some ranges might not be 100% accurate
- I’m going slightly crazy after writing all of this
- Although he only showed me the SV-98 scope ranges, MilitaryMen’s name is purposely credited beside mine on every guide because I feel that he deserves some serious recognition for introducing the scope range concept to me in the first place
Hunter Scope Guides for Every Gun
SSG-69
SV-98
L96
Rem700
M200

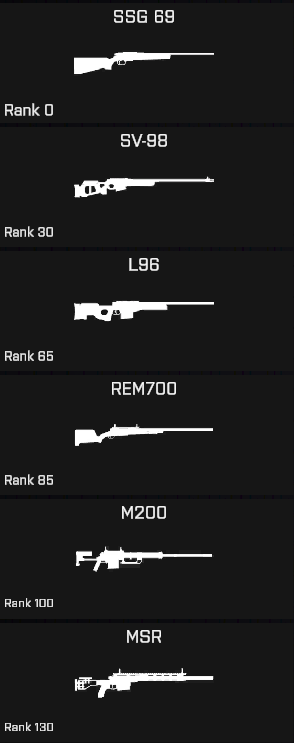
MSR