Here’s a comprehensive guide and walkthrough designed to help you achieve 100% completion in the game, with step-by-step instructions to make the process as quick and effortless as possible.
Roadmap:
- Estimated difficulty: 2.5/10
- Estimated time for 100% completion: To be determined (TBD)
- Offline/online achievements: 3 offline achievements, 0 online achievements
- Number of playthroughs required: At least 1
- Glitched achievement: 1. Sneaky Sneaky
- Missable achievements: All achievements are potentially missable
This guide will provide detailed instructions to ensure you don’t miss any achievements and reach your goal of completing the game with a perfect score.
Achievements

Lights Out
Beat Level 1 Without Using A Flashlight
Navigating through the dark and dimly lit halls can pose a challenge in this game. To overcome this, make use of the lamps scattered throughout the map. They can serve as guiding points to orient yourself and find your way. Additionally, pay attention to the faint outlines of the dimly lit halls, as they can provide some direction. If you’re having trouble locating a specific turn or path, try aligning your camera towards visible light sources or discernible hallways. Moving in the direction you need to go while keeping your focus on the light can help you gauge the distance and navigate more effectively.

YOU ARE GOLDEN
Find The Golden Corn In Level 2
During my thorough exploration of the entire level, utilizing both the in-game map and an image editing software to trace my route, I was unable to locate the golden corn. It’s possible that the corn doesn’t stand out as prominently as expected, or perhaps I was so fixated on finding it that I inadvertently overlooked it. If anyone has information regarding the whereabouts of the golden corn, I kindly request you to share your knowledge.

Sneaky Sneaky
Beat The Game Without Kukui Seeing You In Levels 1 Or 3
IMPORTANT: It appears that the achievement mentioned is currently bugged and cannot be earned. Please note this issue and be aware that the following information may not apply until the bug is resolved.
- The Kukui enemy in the game is completely blind and relies solely on sound. If you hear it gurgling nearby, it is crucial to immediately stop moving and refrain from pressing any keys on your keyboard. It’s important to note that even pressing the “E” key on thin air can cause your character to react and potentially result in your demise. However, you can freely move your camera to check the Kukui’s location without any issues. Once you no longer hear the gurgling sound, you can continue moving.
- Do not be alarmed if the Kukui is approaching you directly. In such cases, it will either pass right through you or become temporarily stuck. Simply rotate your camera, and the Kukui will slide past you. Remember, the Kukui can only harm you if it is actively hunting for you.
- Contrary to popular belief, there is no need to turn off your flashlight. In fact, if the Kukui is in close proximity, it can hear the sound of you turning the flashlight on or off.
Chapter 1 Map
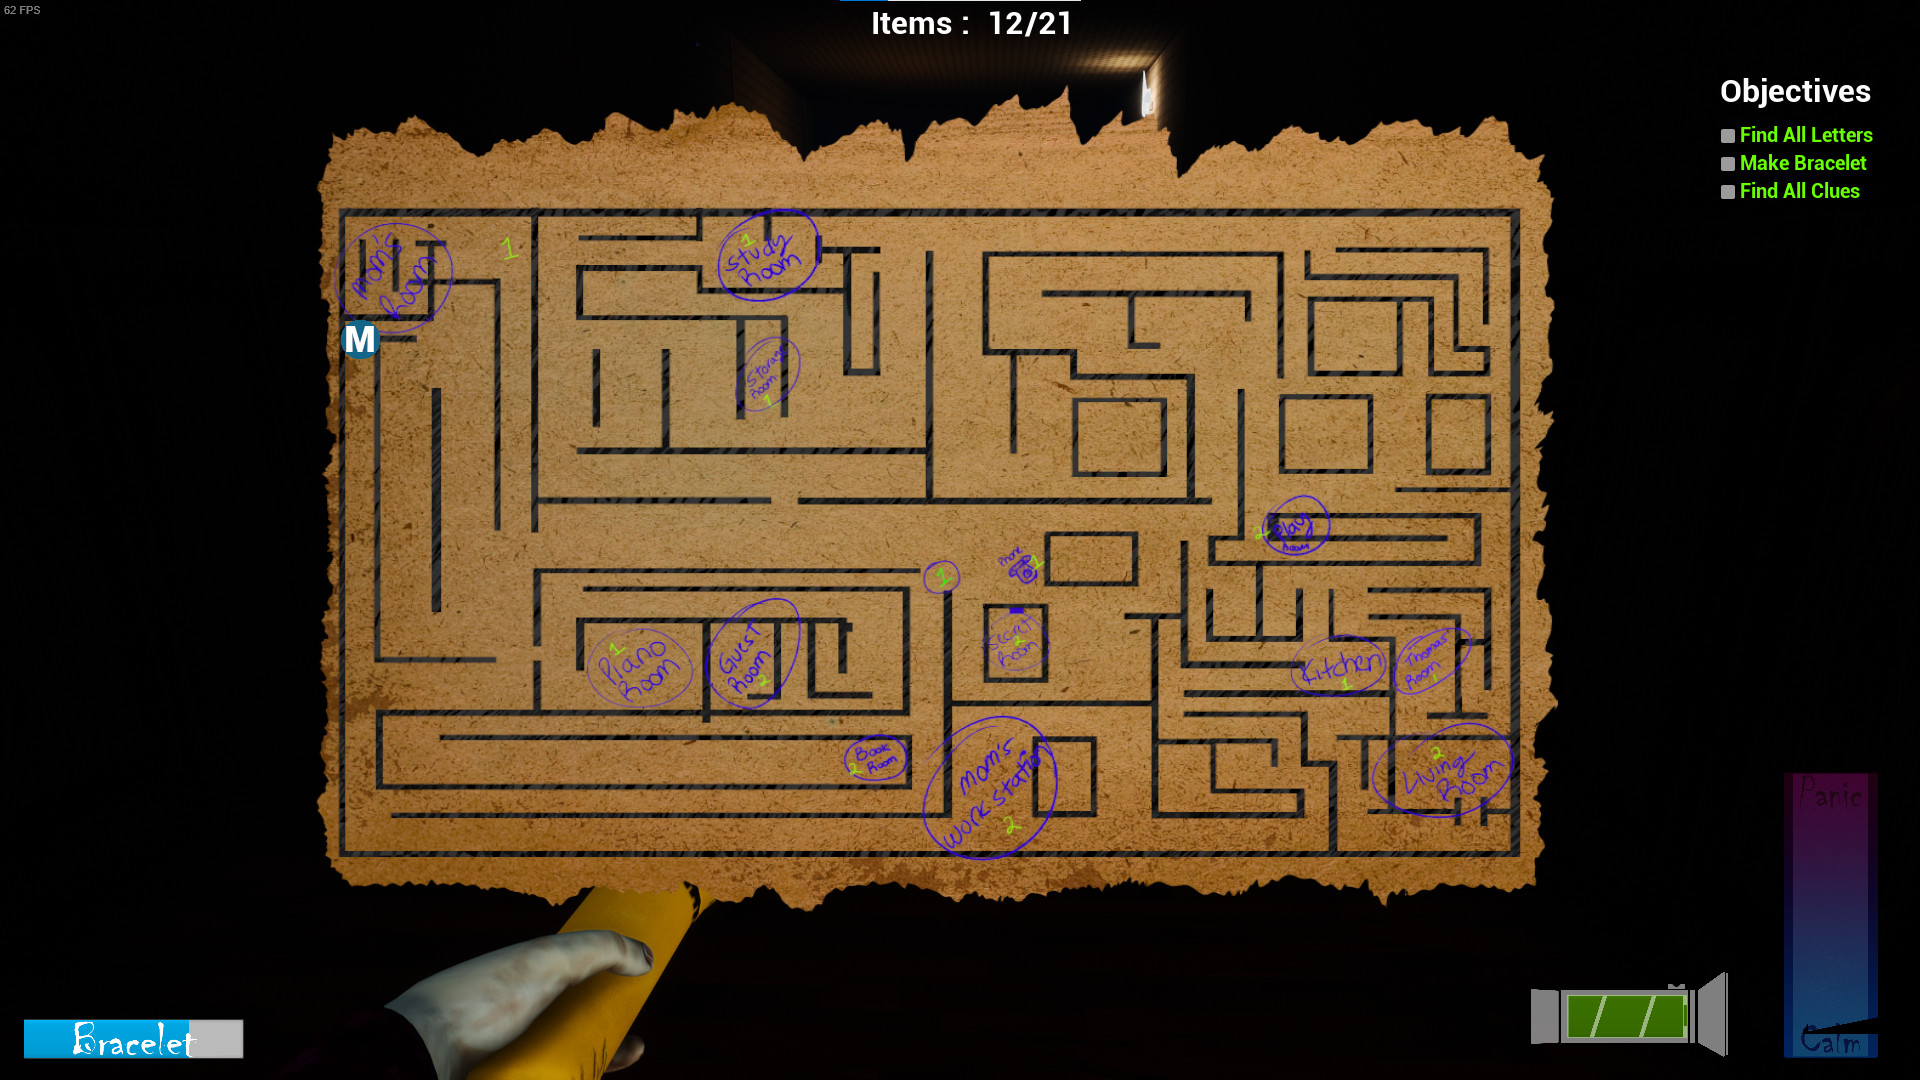
The in-game map for Chapter 1 can be found at the location marked by a blue dot with the letter “M.” However, it’s important to note that finding the map yourself is not necessary for progression in the game. The map provides valuable information such as the names of different rooms and the number of items present in each room. In case the text on the map is difficult to read, here are the room names and corresponding item counts:
- Living Room – 2
- Kitchen – 1 + 1 bracelet bead
- Thomas’ Room – 1
- Play Room – 2
- Phone – 1 + 1 bracelet bead
- Secret Room – 2
- Phone Hallway – 1
- Guest Room – 2 + 1 bracelet bead
- Piano Room – 1
- Book Room – 2
- Mom’s Work Station – 2
- Hallway to Mom’s Room – 1
- Study Room – 1 + 1 bracelet bead
- Storage Room – 1
Notes:
- The starting point of Chapter 1 is the Living Room.
- In the Play Room, there are two items. It may be slightly misleading as there is a note in front of the toy chest, but the other item is actually a pill bottle located on a tabletop before entering the Play Room.
- The item mentioned at the Phone is actually the phone itself. As for the stuffed bunny nearby, its significance or purpose is unclear at this time.
Chapter 2 Map
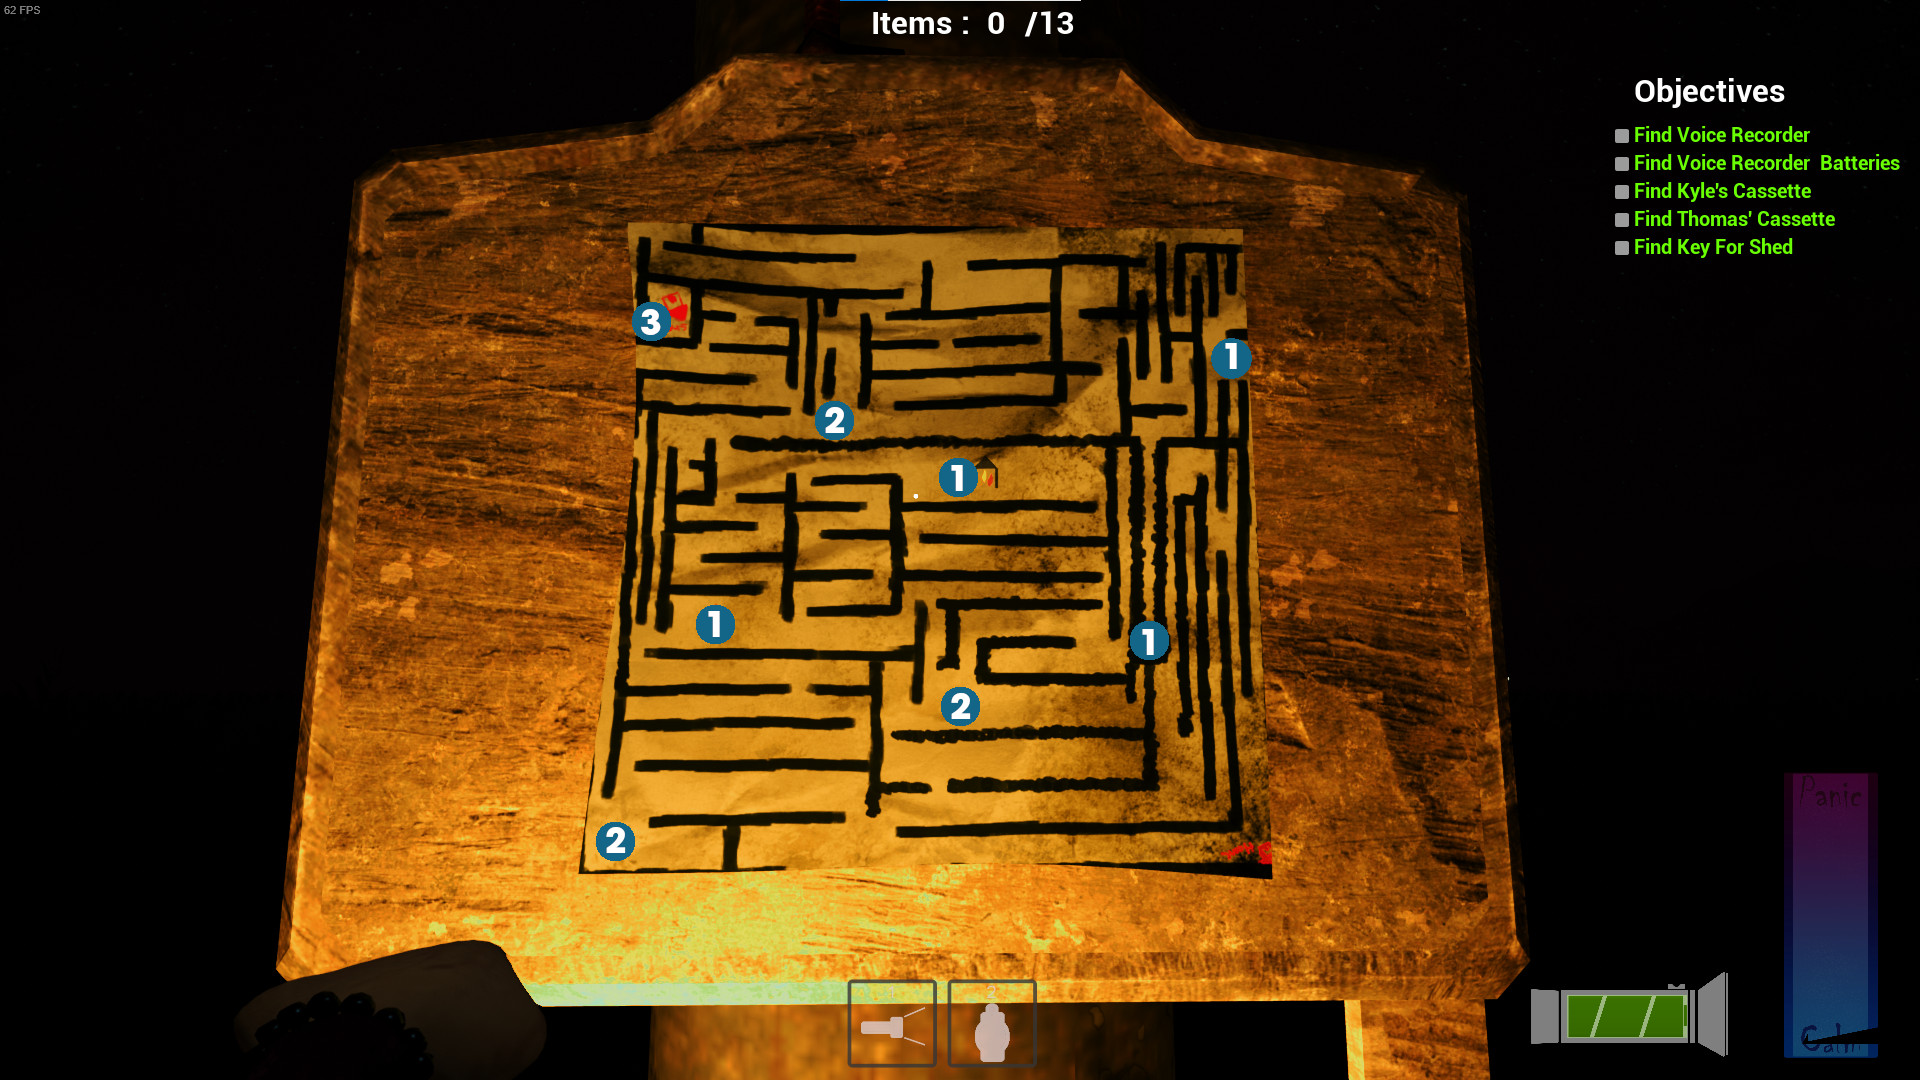
- Upon starting, you will find yourself near the fire pit, located close to the center of the map.
- The blue dots displayed on the map represent significant areas where you will discover the necessary items to advance in the game. The numbers accompanying the dots indicate the quantity of items present in each respective area.
- To obtain the item near the fire pit, you must check under the moped. However, in order to move the moped and access the item, you will require the fuel obtained from the shed.
- Outside the shed, you will find one item (the fuel), while an additional two items can be found inside the shed once you locate the key.
Chapter 3 Map
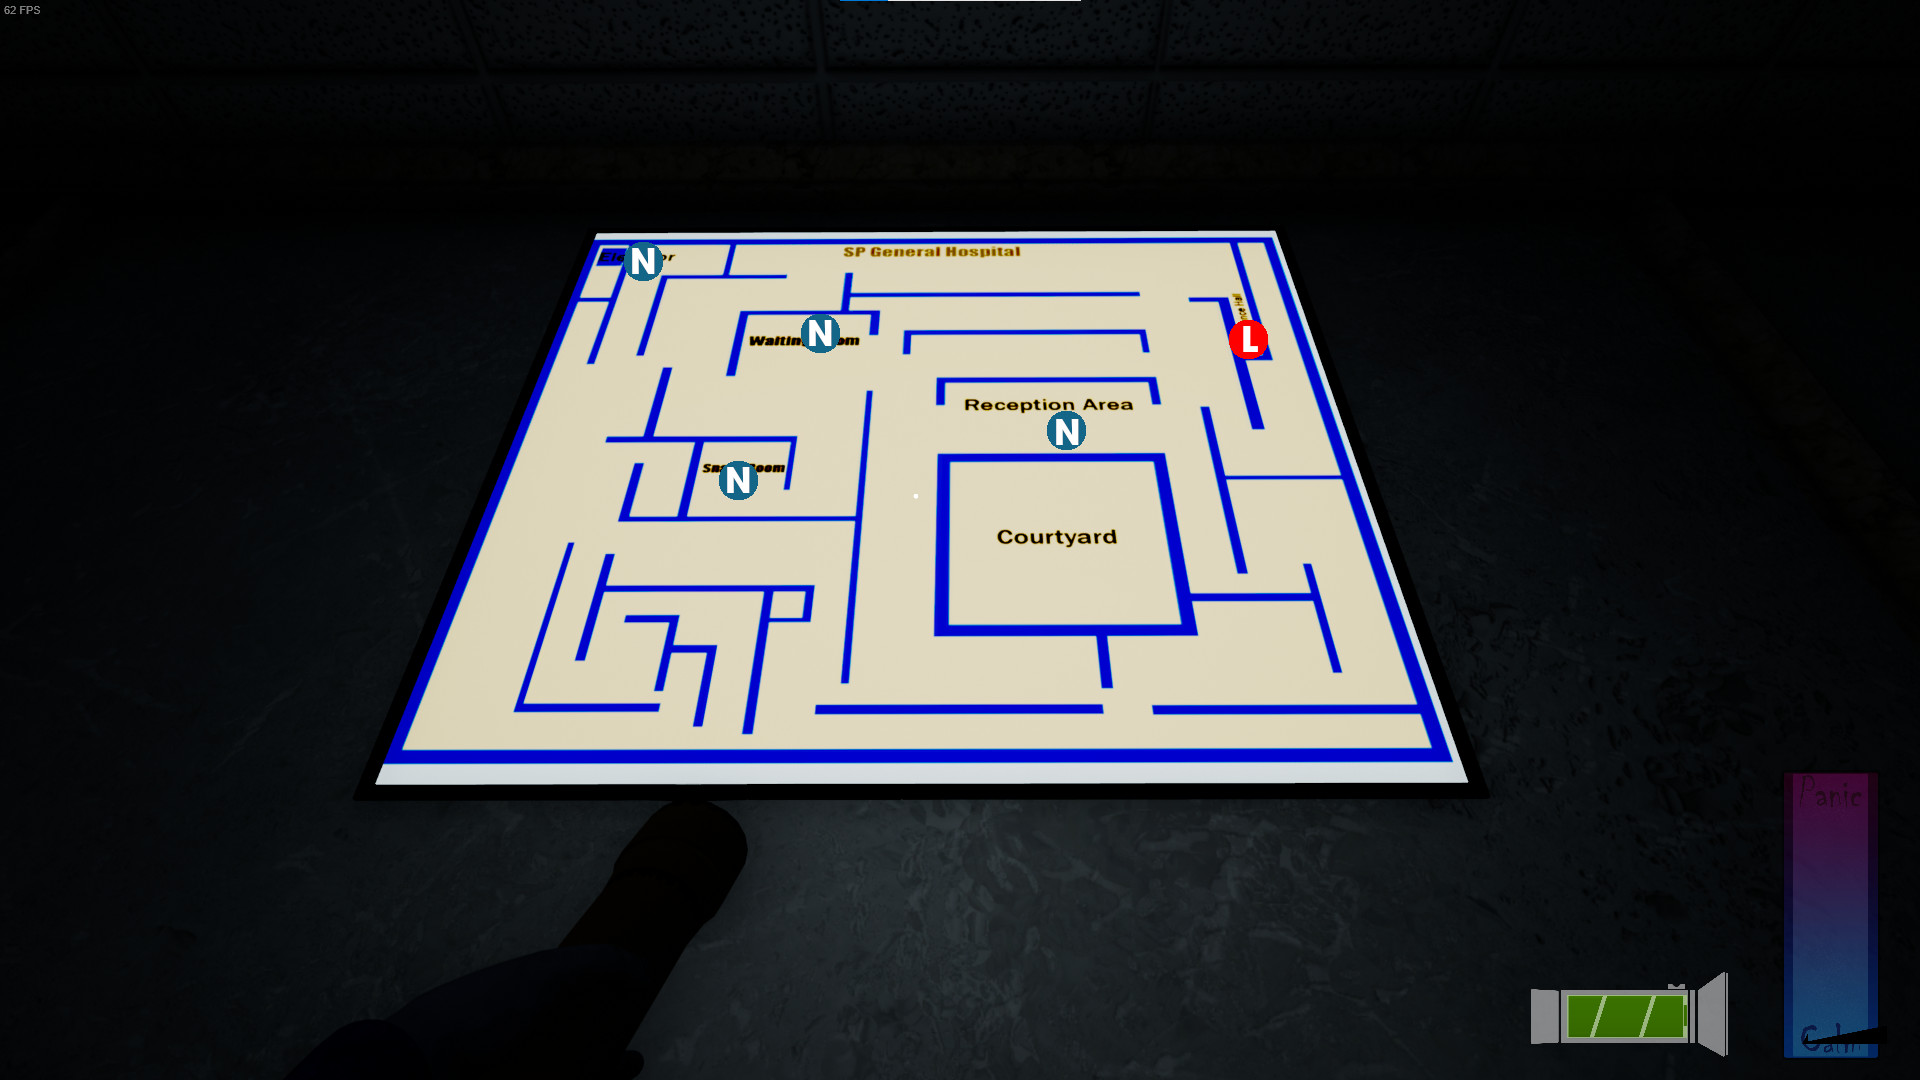
- Your initial spawn location is in the Reception Area.
- The blue dots on the map marked with an “N” represent notes that can be found throughout the area.
- There is a red dot marked with an “L” on the map, indicating the level that needs to be activated to operate the elevator.
- It is crucial to collect the notes and activate the elevator level in a specific order to progress. The correct sequence is as follows: Reception, Snack Room, Waiting Room, Elevator, and Lever.
