This guide will show you the full list of enemies that you will be encountering in PAYDAY 3.
Cameras, Guards, & Civs
In stealth, the main threats to blowing your cover are cameras, guards, and civilians. Each of these are described in more detail below.
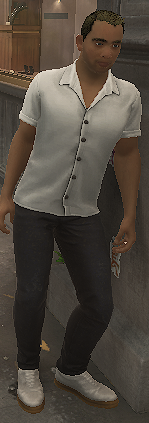
Civilians/Employees
1 HP, 0 Armor
~20m detection range
Civs are split into two types: civilians and employees. They are not visually distinguishable from one another, but can be told apart by the security level of the area they are in, with civilians being in public areas and employees being mostly in private or secure areas. When this guide refers to “civs”, it generally means both civilians and employees (unless employees are explicitly mentioned, in which case we are referring to them separately).
Civs will call security if they see something amiss, which takes them a full 10s, after which they will return to what they were doing. Civs are harmless to the player, but will panic at the sight of a masked heister. If a scared civ can make it outside of the map, they will call the cops, which instantly sounds the alarm.
Civs can be taken as hostages, traded for supplies, and used as human shields to deter cops from shooting at you. When holding a hostage as a human shield, you move slower, can only use your secondary weapon, and take longer to reload, but cops will only shoot at you if they are sure they won’t hit the civ, leading to you taking a lot less damage from the front. Common enemies who are close enough will run up to you and attempt to stun you with a melee attack, making you drop the civ you were holding as shield.
Killing a civilian (or other enemy that is taken as a hostage) incurs a cleaning cost to the person who killed them. This is a decent amount of money that is deducted from your payout at the end of the heist, and can pile up fast if you kill a lot of hostages. Killing a hostage will also increase the amount of time you spend in custody. You can pick up and relocate a civilian’s dead body to hide it in a better spot, but while carrying a body you cannot crouch or sprint.
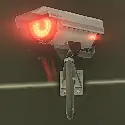
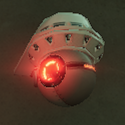
Camera
~10m detection range
Cameras are operated by a central CCTV system in each heist; Hacking into one camera will give you access to all other cameras. Cams will rotate between looking to either side every 10s, and have a fairly big blind spot underneath them.
All heists have a security room somewhere on the map that requires a blue keycard to enter. Inside you will find a stationary security guard at a computer which monitors the entire CCTV system for that heist. Interacting with this computer will give you to access the cameras, which can even be done while the guard is still at the computer by sneaking up behind him.
If the security room guard is killed, all cameras will no longer detect anything for the rest of the heist. when this happens, the red camera LED lights will go dark and they will stop rotating from side to side. Cameras can still be hacked even after the security room guard has been killed.
Regular cams (pictured on the top) can be destroyed by a gunshot, throwing knife, explosion, the overload from the Hacker Aced skill, or even a melee attack. Titan cams (pictured on the bottom) are completely indestructible. If a security cam is destroyed, it can no longer detect anything or be hacked by heisters, and will be treated as a sabotaged object (see the section Stealth – What Counts as Illegal?).
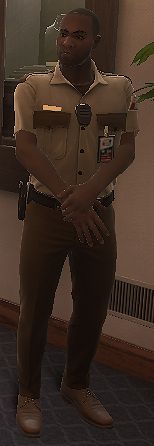
Guard
100 HP, 0 Armor
~20m detection range
There are a certain number of guards in each heist, each with their own unique patrol pattern. Higher difficulties may add more guards and change up certain patrol patterns to be less forgiving. Guards will regularly walk between certain spots on their patrol route, stopping for several dozen seconds at each spot. They will sometimes stand still, wander in circles, go on their phone, or smoke a cigarette while they wait at these spots, but each behavior is tied to each specific spot; If a guard smokes when he reaches a certain spot in his patrol, he will always stop to smoke there. Learning these waiting animations can give you a heads up to know when a guard is about to move on to the next spot in his patrol.
If a guard is unaware of you, you can sneak up behind him and grab him as a human shield, just like you can with a civ. Doing this will allow you to choke him for a silent kill, known as a “takedown”. If you kill or takedown a guard, hold one as a shield for long enough, or force a guard to surrender, their radio will go off after 10s. If a heister then interacts with the guard’s body, they will take several seconds to answer the pager. If you are carrying the guard’s body, you can answer the pager while you are holding the body.
You are only allowed to answer a limited number of radios in a heist. If you use up all your radios, the next radio you answer will instantly sound the alarm. If you instead let the next radio go unanswered, the heist will enter search mode, or if the heist was already in search mode the alarm will sound.
Failing to answer a radio, or starting to answer a radio but releasing F before you finish, will reduce the amount of radios you can answer by 2. It will also cause the closest guard to come investigate the spot where the pager was when you failed to answer it. If you move the body before the next guard arrives, he will simply look around before returning to his regular patrol.
If a guard spots something, it will only take him 3s to radio in to sound the alarm or initiate search mode.
After the alarm sounds, guards will continue to fire at the heisters until the assault indicator says “First Responders Incoming”, at which point all guards will surrender, obeying all the same rules as a civilian hostage for the rest of the heist (including the penalties for killing them).
100 HP, 0 Armor
~20m detection range
The lead guard is an extra troublesome guard that only spawns on a heist with the “Lead Guard” security modifier. Only one lead guard will spawn. The lead guard is identical to a regular guard in almost every way, having only two differences: An infinite radio & an extremely unforgiving patrol path.
If the lead guard is killed, his radio will go off after a short delay like a normal guard, but once it is answered or ignored, a new timer will start for 70s, after which his radio will go off again. This process repeats infinitely, draining your radio uses the longer the lead guard is dead. For this reason, it is generally recommended to leave the lead guard alive if attempting to stealth.
The only way to circumvent his infinite radio is to kill him via the skill Cover Up, which uses a single radio in exchange for stopping it from ever going off in the first place. Since it never goes off to begin with, his radio will never start the 70s timer to go off a second time, letting you kill him permanently without worrying about his radio.
In addition, the lead guard has a carefully crafted patrol path that is designed to screw over the player much more than a regular guard. He patrols across almost the entire heist, and will regularly enter rooms and paths that heisters are likely to hide in. Many of his patrol spots exist in rooms that no other guard ever visits, turning rooms that are usually safe into unsafe hiding spots.
Aside from killing him via Cover Up, another common way to deal with the lead guard is to stick a micro cam or a motion detector on his butt. The micro cam can be used to mark him at any time, and the motion detector will keep him marked permanently. This will let you know where he is at all times, helping you to avoid getting caught by his unusual patrol path.
Common & Uncommon SWAT
There are 3 types of police units you need to worry about once you go loud, each with their own spawning rules.
Common Enemies
Common enemies are simply the cannon fodder that you will find yourself up against for most of the heist. There is a limit to how many common enemies can be on the map at once (unknown amount, but it seems to scale with difficulty?).
First Responders
100 HP, 0 Armor
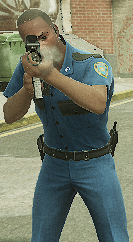
First Responders are the cops that pull up in police cars when you initially go loud. The negotiation period starts when they arrive, but if anyone in your crew gets too close to the cops, fires an unsilenced gun, or completes specific objectives (such as lighting the thermite in NRFTW), the negotiation period will be entirely skipped and the police assault will immediately start. The first responders will advance to attack with the first assault wave, but are fairly weak, and no more will spawn once they are killed.
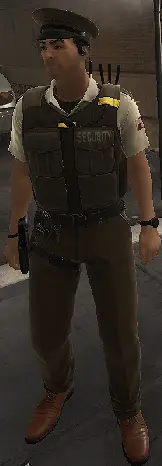
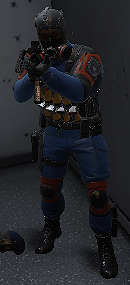
SWAT
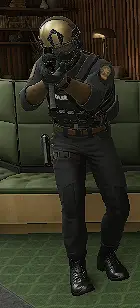
150 HP, 70 Armor
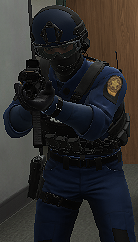
SWAT units are the armored cops that you will be fighting most of the time. They have set locations on each heist where they can spawn, but will always choose to spawn from spots that are nearby to the players. Some SWAT units wield an SMG (pictured on the left), others wield an AR, and others wield a shotgun. SWATs with different weapons can be differentiated by what is on their chestpiece and the badge on their shoulder; A white badge & red shotgun shells mean they have a shotgun, a white badge & smaller chestpiece with large magazines means they have an AR, and a yellow badge & larger black chestpiece with small magazines means they wield an SMG. Shotgun SWATs will switch to a much weaker pistol if there is a hostage nearby to their target.
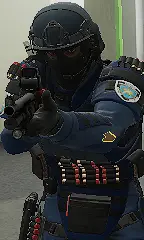
Heavy SWAT
150 HP, 170 Armor
Heavy SWAT units will replace regular SWAT units later in the heist, which will happen at the same time that bulldozers start spawning. The only difference between SWATs and Heavy SWATs is their increased armor; They deal the same damage and have the same health. Heavy SWATs can wield a shotgun (pictured on the left), an SMG, or an AR, just like regular SWATs. Note that Sabotage Specialists and Hostage Rescue Squads are also replaced by heavy SWAT variants.
Uncommon Enemies
Uncommon enemies spawn alongside common enemies, but spawn much less frequently and have specific roles to give the common enemies an easier time filling you full of lead. Each type of uncommon enemy can spawn in a squad of multiple copies of the enemy, up to the amount needed to fill the maximum amount allowed on the map at once. Uncommon enemies do not count as specials as far as challenges and skills are concerned.
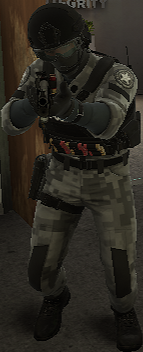
Hostage Rescue
150 HP, 70/170 Armor
Hostage Rescue units periodically spawn in groups of up to 3, and only 3 hostage rescue units can be on the map at once. They spawn as long as there are hostages on the map that are tied down, and Shade will announce when they spawn in, giving you time to react. Just like regular SWATs, they can equip an AR, SMG, or shotgun, and have Heavy SWAT variants.
Instead of pursuing the heisters, they will seek out cowering or tied up hostages on the map and set them free. When a hostage is being targeted by a hostage rescue unit, the hostage’s outline will be visible through walls. Upon reaching the hostage, they will begin to help them up, at which point the hostage rescue unit will also be visible through walls. If they are killed before they can finish freeing the hostage, the hostage will remain tied up/cowering, but if they are successfully freed, the hostage will flee while ignoring all attempts from heisters to intimidate them.
Sabotage Specialists
150 HP, 70/170 Armor
Sabotage Specialists periodically spawn in groups of up to 3, and only 3 sabotage specialists can be on the map at once. They spawn as long as the heisters are performing an objective that can be sabotaged, and Shade will announce when they spawn in, giving you time to react. Just like regular SWATs, they can equip an AR, SMG, or shotgun, and have Heavy SWAT variants.
Instead of pursuing the heisters, they will go out of their way to sabotage objectives by doing things like pulling fire alarms or disabling power boxes. When a sabotage specialist is mid-sabotage, they will have a glowing outline that can be seen through walls, and a waypoint is placed on the object that they are sabotaging. If they are killed quickly after this happens, their sabotage attempt will fail. Note that normal and heavy SWAT units can also sabotage some objectives, but they are less likely to do so.
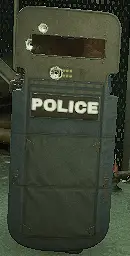
Shields
160 HP, 180 Armor
Shields regularly spawn in groups of up to 2, and only 2 shields can be on the map at once. Their primary role is to use their shield to protect common enemies from oncoming gunfire, but they do come equipped with a pistol to deal damage. Common enemies will line up behind the shield as he advances in order to take advantage of the mobile cover he provides. Shields will use a bash to stun you if you get too close. They have a small window on their shield that can be shot out in order to fire at the enemy directly, and tossing a flashbang or grenade will cause the shield to face the explosion to block it, giving you an easy opportunity to kill him.
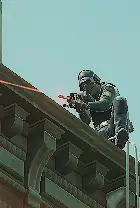
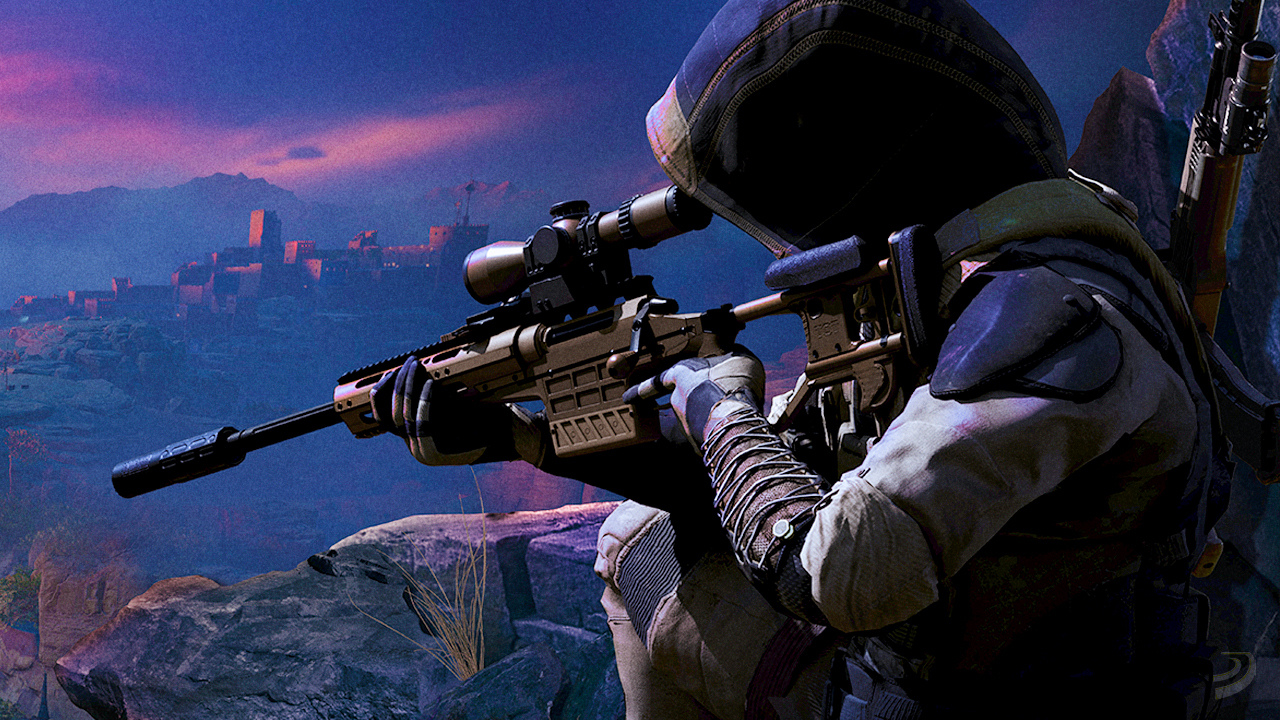
Snipers
40 HP, 0 Armor
Snipers regularly spawn far outside the playable area in groups of up to 2, and only 2 snipers can be on the map at once. They will pick a heister to aim at and point their laser at them, firing after a small delay to take out a massive chunk of armor or health. A single sniper shot will instantly down a player with no armor, or will destroy 1/1.5/2/3.5 armor chunks (depending on the difficulty). Snipers rarely miss, but by breaking line of sight just before they fire, the bullet can be blocked by the environment. If they lose sight of their target for too long, they will switch targets or simply stop aiming if they can’t find anyone to shoot.
Specials
Special enemies spawn one at a time, and only one of each type can exist on the map at once. As you progress throughout the heist, completing certain objectives will make more types of special enemies start to spawn. See the section Heists – The Basics for more details.
Any special can be marked by looking at them and clicking middle mouse.
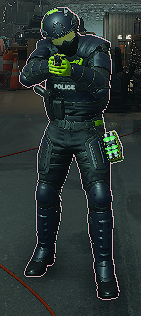
Zapper
150 HP, 140 Armor
Zappers are the only special enemy that starts spawning the moment the heist goes loud. If left alone, a zapper will sometimes lay down a single shock mine somewhere on the map that the heisters are likely to go. Shooting this mine or getting too close will tase any allies or enemies within a 3m radius, stunning them. Zappers also have a yellow battery pack on their hip which can be shot to stun the zapper and all NPCs and players in a 5m radius of him.
When a zapper gets within range of a player, they will make a high-pitched whine-like windup noise, then tase that player from a safe distance. Being tased makes the player unable to move, reload, use equipment, or switch weapons, and will restrict your ability to aim while making you fire your weapon at random. If the tased player or an ally shoots the zapper while this is happening, he will stumble and release his target. If you are tased for too long, you will immediately go down, regardless of health or armor. Note that zappers will never target bots.
Nader
150 HP, 140 Armor
Naders are the first type of special enemy that will start spawning after an objective is completed. This objective is usually extremely early in the heist, and will likely be done before the start of the first assault. In some cases, it can be wise to delay doing this objective until the first assault has started, in which case naders will not spawn for the entire first assault wave.
Naders carry a belt of grenades on their chest, which can be shot to cause an explosion that hurts and staggers nearby enemies. Upon coming into contact with heisters, the nader will attempt to throw gas grenades at them to flush them out of hiding. Standing in a gas cloud will disable your ability to sprint and gradually deplete your health, completely ignoring your armor. If there is a civilian or hostage nearby, the nader will instead switch to throwing flashbangs in order to avoid harming the bystander.
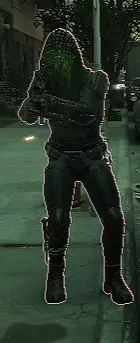
Cloaker
150 HP, 0 Armor
Cloakers will start spawning after a specific objective is completed. This objective is usually after the objective that spawns naders. Note that cloakers will never target bots.
Cloakers are unique in that they are the only special enemy that does not spawn in the same locations as regular SWATs; They can spawn basically anywhere. These ninja cops are extremely agile, as they can run across walls, make impossibly high jumps, and will frequently dodge your gunfire by sliding and doing flips as they charge. Cloakers will attempt to ambush a player by getting close without being seen, then charging at them at full speed. When a cloaker initiates a charge at you, you will hear their iconic “wulululu” noise, which will get louder as they approach. Players who are not being charged will not be able to hear the noise. (unconfirmed)
If the cloaker reaches their target they will dropkick them in the face, instantly knocking the player to the ground. At this point the cloaker will proceed to beat the everloving ♥♥♥♥ out of the subdued player, dealing damage directly to their health while completely ignoring armor. If they manage to fully down the player, they will then cuff the player before leaving, which reduces the amount of time their team has to revive them from 30s to just 15s.
Both the charge and police brutality can be interrupted by staggering or stunning the cloaker. If they are subduing a player, the player will immediately get back up, although the cloaker is likely to immediately kick them back down once they recover, so act fast! If a cloaker is stunned by a flashbang, they will flail their batons randomly, which not only looks hilarious, but it will actually still deal damage to a player’s health if they get too close!
Lastly, cloakers have the ability to pour acid on any non-sentry deployables that were placed by players or bots, destroying them in the process. They will usually only do this when they find an unattended deployable while very far away from all heisters, so it can be difficult to close the distance in time. The process of pouring the acid takes several seconds, and while it is happening both the cloaker and deployable will be visible through walls, giving you an opportunity to rush over and stop them. The cloaker must fully finish pouring the acid in order to actually destroy a deployable.
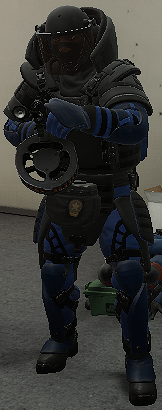
Bulldozer
200 HP, 3500 Armor
Bulldozers will start spawning along with heavy SWAT after a specific objective is completed. This objective is usually after the objective that spawns cloakers.
Bulldozers are the tankiest and deadliest special enemy. He will slowly walk at you, absorbing all your gunfire while shredding you to pieces with his auto-shotgun. If a dozer has a clear path to a player he’s targeting and is at least ?m away, he can perform a charge attack to quickly close the distance and stun his target for 3s. This stun will then give him more than enough time to unload tons of damage into the helpless heister. They can also achieve the same result by stunning any player that gets too close by kicking them in the face. This is especially brutal since in PAYDAY 2, the most effective way to deal damage to a dozer was to get up close and shoot him in his faceplate. Therefore, the most reliable way to safely eliminate a dozer in PAYDAY 3 is to use the HET-5 Red Fox overkill weapon to pick him off from a distance.
Bulldozers are completely immune to all forms of stuns and staggers, with one exception: The charge attack can be interrupted by shooting the dozer’s head mid-charge with enough damage, which will cause him to briefly recoil. Sometimes he will also taunt the heisters by pounding his chest after he deals significant damage, during which he will not retaliate and you can get some free hits on his faceplate.
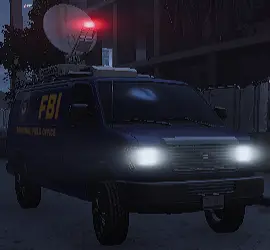
FBI Van
300 HP, 0 Armor
The FBI van can only spawn once per heist, and spawns at the beginning of the second(?) assault wave (it might be tied to an objective trigger like other specials?). It can spawn on any difficulty except Normal, and has a higher chance to spawn the higher the difficulty is. On Overkill difficulty, it is guaranteed(?) to spawn, but it is incapable of spawning on certain heists, even on Overkill. It will spawn in one of a few set locations near the outskirts of the playable area. Shade will announce when it spawns, and will regularly remind you to take out its antenna.
While the FBI van is on the map, the police assault indicator will read “FBI Assault”, and the assault will never end unless you destroy the antenna on top of the van. If the FBI assault lasts for longer than a regular assault, destroying the antenna will immediately end the wave. It is currently unconfirmed if the FBI van has any other effects.