This is a full achievement guide for Pamali: Indonesian Folklore Horror. I have included helpful information for each chapter, video walkthroughs & descriptions for how to unlock each ending. Please let me know if you need help with anything!
Introduction/Information
Welcome to my guide for Pamali: Indonesian Folklore Horror! This guide will be quite long, you can use CTRL + F to search for specific endings/achievements. I’ve added some info and tips for each chapter at the start of their sections in case you need it. Please don’t hesitate to reach out if you need any help and I’ll give you a hand if I can.
110 of the achievements are ending related, 6 achievements are unlocked while progressing through the Hungry Witch chapter, and the final achievement is for completing all endings.

The Conqueror of All Pamali Journeys
You have successfully finishing all the endings in Pamali. Kudos!
Chapter 1: The White Lady – 35 Endings
Chapter 2: The Tied Corpse – 30 Endings
Chapter 3: The Little Devil – 32 Endings
Chapter 4: The Hungry Witch – 13 Endings + 6 Progression Achievements
Please, don’t hesitate to ask for help with anything!
Chapter 1 – Tips & Video Walkthrough
– The gate keys can spawn in 3 different locations, on top of the TV, the key hanger to the left of the couch or under the mirror to the right of the hallway.
– You can open the storage room in the kitchen on night 2 onwards by using the axe found on the box near the dining table
– You can open the parents bedroom on night 3, there’s a picture of your sister at the end of the hallway, when the light beneath it starts flashing it will eventually become crooked, ‘fix’ the picture and the door will open. (If the light isn’t flashing, right click on the picture and comment on it then leave and come back and it should start flashing)
– You can open your sisters room by interacting with the green diary in the parents bedroom. You only need to pick it up for the door to open.
– Assembling the sale sign doesn’t do anything unless you write on it.
Chapter 1: The White Lady (1 – 13)

Get Out
Escaping at the very first chance.
Ending 1 – Get The F**k Out:
For Ending 1 you will need to unpack your luggage, collect the gate keys and leave immediately by interacting with the gate and selecting the ‘Get The F**K Out’ option.

Abort and Abandon
Leaving the house and all of the memory inside without a second glance.
Ending 2 – Abort and Abandon:
For Ending 2 you need to unpack your luggage, collect the gate keys then interact with the gate, and choose the ‘Sell the House’ option.

Financially Stable
Selling the house albeit with regrets of losing everything about his family.
Ending 3 – Financially Stable:
For Ending 3 you need to unpack your luggage, collect the gate keys, marker, death certificate, property deed & inheritance letter. Then assemble the sale sign outside and use the marker to write on it. Finally, interact with the gate and choose the ‘Sell the House’ option.

Escape Safely
Getting out from the house safely.
Ending 4 – Escape Safely:
For Ending 4 you need to unpack your luggage and collect the gate keys, sleep until night 2 then comment a few different negative things on items around the house.
As an example I did: “Will a ghost appear behind me?” on the mirror. “She looks scary.” on the painting near the front door. and “Disgusting.” on the hair on the floor in the bathroom.
Afterwards leave through the front gate via the ‘Get the F**k Out’ option.

Lingering Spirit
Leaving the house with the lingering spirit around.
Ending 5 – Lingering Spirit:
For Ending 5 you’ll need to unpack your luggage and collect the gate keys as normal. Sleep until night 2 then do anything you can to anger the spirit. listed below:
– Comment rudely on every item possible in the house. i.e. “Move the chair, ghost!”
– Throw out the 3 pairs of scissors (bathroom, desk near entrance area, windowsill near dining table)
– Throw out the razor blade (bathroom) and the nails (on top of TV)
– Use the comb in the kitchen
– Take a bath
– Push the rocking chair
**There are more actions you can do to anger the spirit however doing these ones specifically unlocked the ending for me.
After you’ve insulted the spirit enough, interact with the gate and choose the option to ‘Get the F**K Out’

Sold with Complaints
Selling the house with complaints about the supernatural entity that resides there.
Ending 6 – Sold With Complaints:
For Ending 6 unpack your luggage, grab the gate keys, death certificate, property deed & inheritance letter. Assemble the sign outside and write on it then sleep until night 3. On night 3 use the axe to open the storage room, grab the cleaning tools and clean everything. (Including the parents & sisters bedroom) Afterwards, do everything to insult the spirit like in the previous ending. i.e. make insulting comments, throw out talismans, scissors, take a bath etc. Finally, grab the doll in the sisters bedroom and choose the option to ‘Sell the House’

Hard Bargain
Having a hard bargain, but thankfully the house is finally sold.
Ending 7 – Hard Bargain:
For Ending 7, unpack your luggage, grab the gate keys, marker, death certificate, property deed & inheritance letter then assemble the sale sign and write on it. Sleep until night 3. On night 3 use the axe to open the storage room and grab the wash bucket. For this ending you need to clean EVERYTHING, make sure you get every stain on the floor, and cobweb, also:
– Reposition all crooked furniture and objects
– Throw away rubbish in fridge
**Don’t throw away anything else or upset the spirit in any way.
Afterwards, interact with the gate and choose the option to ‘Sell the House’

Commiting A Fraud
Telling lies to the buyer to have the highest bargain.
Ending 8 – Committing A Fraud:
For Ending 8, unpack your luggage and grab the gate keys. Sleep until night 3 then similar to the ending ‘Sold with Complaints’ you’ll need to clean every room (including parents & sisters rooms) afterwards speak negatively about every item in the house you have the option to. i.e. mirrors, paintings, hair, rocking chair, taking bath, drumming on bucket etc. Do not pick up / throw anything away. Once you’re done interact with the gate and ‘Sell the House’

Nostalgic Trip
Having a nostalgic trip by recalling the old moments in the house.
Ending 9 – Nostalgic Trip:
For Ending 9, unpack your luggage and grab the gate keys. Sleep until night 2, grab the cleaning tools and clean the house. (You don’t have access to the parents / sisters bedroom so don’t worry about cleaning them) after you’re finished cleaning interact with the gate and select the option to ‘Sell the House’

Living Together
Staying together with her as a family once more.
Ending 10 – Living Together:
For Ending 10, unpack your luggage and grab the gate keys then sleep until night 2. As soon as you wake up interact with the gate and ‘Sell the House’

Get Complaint
Getting complaint from the next residents of the house.
Ending 11 – Get Complaint:
For Ending 11 unpack your luggage and grab the gate keys, property deed, death certificate and inheritance letter. Assemble the sale sign and write on it then go to sleep. On night 2 make insulting comments about every object possible, throw away the 3 pairs of scissors, razor blade, nails, flower petals, garlic & talisman. Open the storage room and throw out the Jenglet doll and chicken bones, finally take a bath, then interact with the gate and ‘Sell the House’

Unlucky Jaka
Deciding to just live in the house because the house cannot be sold.
Ending 12 – Bad Luck Jaka:
For Ending 12 you’ll need to unpack your luggage and grab the gate keys, property deed, death certificate, inheritance letter and marker. Assemble the sale sign and write on it. Then sleep until night 2 and interact with the gate and ‘Sell the House’

Courage Test Site
Turning the house into a courage test site for a reality TV show.
Ending 13 – Courage Test Site:
For Ending 13 unpack your luggage, grab the gate keys, property deed, inheritance letter, death certificate and marker. Assemble the sale sign and write on it then sleep until night 3. On night 3, enter the sisters room first and throw away the garlic, talisman and prayer beads. Afterwards, insult the rest of the items around the house, including the wedding dress and photo album in a box outside of the storage closet. Throw away the benzori incense, jengelot doll, chicken bones, scissors, garlic, talisman, nails, razor, wilted flowers. Use the comb in the kitchen, push the chair, drum on the bucket & take a bath. Finally interact with the gate and choose the option to ‘Get the F**k Out.’
Chapter 1: The White Lady (13 – 25)

Finish What You’ve Started
Leaving the offering ritual unfinished and running away cowardly.
Ending 14 – Finish What You’ve Started:
For Ending 14 unpack your luggage and grab the gate keys then sleep until night 3. On night 3 gain access to your sisters room and grab the ritual list, collect all of the items listed, then interact with the front gate and choose the ‘Get The F**k Out’ option.

Escaping Her Wrath
Running away from her wrath when it is very close to just sell it away.
Ending 15 – Escaping Her Wrath:
For Ending 15 unpack your luggage and grab the gate keys, property deed, inheritance letter, death certificate and marker. Assemble the sale sign and write on it then sleep until night 3. On night 3 clean everything, including the parents & sisters bedroom. After you’ve cleaned everything, start throwing everything out. First throw out the garlic, talisman & prayer beads in the sisters room to avoid getting locked in there later on (Do
NOTthrow out the baby doll, just ignore it). Afterwards go around the house throwing everything else out, i.e. garlic, scissors, nails, talismans etc. Don’t throw out any items from the storage room, just leave them alone. After you’ve cleaned everything and thrown everything out interact with the gate and choose the ‘Get The F**k Out’ option.

Such a Waste
Ending up not selling the house, letting it be.
Ending 16 – Such a Waste:
For Ending 16 unpack your luggage and grab the gate keys, property deed, inheritance letter, death certificate and marker. Assemble the sale sign then sleep until night 3. On night 3 clean every room, make sure you get all stains & cobwebs. Once you’ve finished cleaning interact with the gate and ‘Get The F**k Out’

Realistic Way of Thinking
Thinking that selling the house is not possible in your current state.
Ending 17 – Realistic Way of Thinking:
For Ending 17 unpack your luggage and grab the gate keys and marker, assemble the sale sign and write on it then sleep until night 3. On night 3 clean every room. Once you’re done cleaning make insulting remarks about all possible objects in the house (excluding the baby doll). When you’ve insulted everything, interact with the gate and ‘Get the F**k Out’

Perhaps Not
Realizing that what matter the most is just cleaning the house up.
Ending 18 – Perhaps Not:
For Ending 18 unpack your luggage and grab the gate key then sleep until night 3. On night 3 clean the house entirely, including the parents & sisters rooms. Once you’ve finished cleaning interact with the gate and ‘Get the F**k Out’

Leaving a Mess Behind
Letting the house in a mess, dirty and haunted.
Ending 19 – Leaving a Mess Behind
For Ending 19 unpack your luggage and grab the gate key, property deed, inheritance letter, death certificate and marker. Assemble the sale sign and write on it then sleep until night 3. On night 3 clean everything including parents & sisters rooms. Then insult all of the items around the house, throw away the 4 pairs of scissors, 2 garlic pieces, razor, 2 sets of nails and 2 talismans. Afterwards interact with the gate and ‘Get the F**k Out’

Not Now
Selling the house hastily resulting nothing.
Ending 20 – Not Now:
For Ending 20 unpack your luggage and grab the gate key, then sleep until night 3. On night 3 interact with the gate and ‘Get the F**k Out’

Rest in Peace: The White Lady
Giving Nenden a chance to be at peace in the afterlife.
Ending 21 – Rest in Peace: The White Lady:
For Ending 21 you don’t need to unpack your luggage, just sleep until night 3. On night 3 enter your sisters room and grab the ritual ingredients list. Collect the ritual ingredients then go to your sisters room and on the table interact with the ingredients selecting the option to ‘Start Procedure’

Start a New Journey, but..
Getting maried using the family ring, even though it feels wrong.
Ending 22 – Start a New Journey, but..:
For Ending 22 unpack your luggage and grab the gate key, just sleep until night 3 then enter the parents bedroom and open the drawer across from the bed, next to the picture in the drawer is a small wedding ring, it can be hard to see. Pick it up and interact with the gate selecting the option to ‘Get the F**k Out’

Following Dad’s Path
Ending up working at Dad’s old plantation.
Ending 23 – Following Dad’s Path:
For Ending 23 unpack your luggage and grab the gate key, death certificate, property deed and inheritance letter. Go into Jaka’s room and collect the Plantation Deed in the cupboard. Once you’ve got all the documents interact with the gate and select the option to ‘Get the F**k Out’

Followed by Her
Getting followed by The White Lady for taking her beloved possession.
Ending 24 – Followed by Her:
For Ending 24 unpack your luggage and grab the gate key, sleep until night 3. On night 3 enter the sisters bedroom, grab the baby doll and interact with the gate selecting the option to ‘Get the F**k Out’

Seeking a Shaman
Seeking a help from a shaman to make Nenden rest in peace.
Ending 25 – Seeking a Shaman:
For Ending 25 you’ll need to unpack your luggage and grab the gate key then sleep until night 3. On night 3 enter the parents bedroom and grab the small note behind the radio, afterwards interact with the gate and select the option ‘Visit a Shaman’
Chapter 1: The White Lady (26 – 35)

Overdosed
Taking drugs to be together again, but it’s not your time yet.
Ending 26 – Overdosed:
For Ending 26 you don’t need to unpack your luggage. Sleep until night 3, then enter the parents bedroom and drink the medicine on the bedside table.

Destroyer!
Disrespecting the tree and those who live there.
Ending 27 – Destroyer!:
For Ending 27 you don’t need to unpack your luggage. Sleep until night 2 then grab the axe and attempt to chop down the tree in the front yard.

A Mistake Can’t be Undone
Giving rude remarks about her possession.
Ending 28 – A Mistake Can’t be Undone:
For Ending 28 unpack your luggage and grab the gate key then sleep until night 3. On night 3 enter your sisters bedroom and insult the baby doll. You’ll have to leave through the window then interact with the gate and choose ‘Get the F**k Out.’

Embracing New Power
Acquiring a new shamanic power.
Ending 29 – Embracing New Power:
For Ending 29 you don’t need to unpack your luggage. Sleep until night 3 then open the cupboard in the dining room and grab the piece of cloth. Then interact with either the knife in the kitchen or the razor in the bathroom and choose the option ‘Take my Blood.’ Then go into the storage room and interact with the Jenglot doll choosing the option ‘Drop Blood.’

Overslept
Sleeping and ruining the three day plan.
Ending 30 – Overslept:
For Ending 30 you don’t need to unpack your luggage, just keep going to sleep and you’ll unlock the ending.

Under Fire
Leaking gas ends up in great fire.
Ending 31 – Under Fire:
For Ending 31 unpack your luggage and grab the gate key. Sleep until night 3 then turn on the stove in the kitchen. Once the stove is on go around the house turning on all of the Petromak lamps. There are 10 in total. Including 1 in the parents bedroom and 2 outside. After you’ve turned them all on interact with the gate and choose the option to ‘Get the F**k Out.’

Hiding is Gold
Hiding until morning is probably better for health.
Ending 32 – Hiding is Gold:
For Ending 32 you don’t need to unpack your luggage, sleep until night 3 then hide under one of the beds or in the wardrobe in the sisters room.

Bolster of Doom
Calling something it’s not and triggering some other folks.
Ending 33 – Bolster of Doom:
For Ending 33 you don’t need to unpack your luggage, sleep until night 3 then comment on how your pillow looks like a ‘Pocong’ afterwards go into the parents bedroom and comment on how their pillow would like a ghost if it could jump then hide under the bed.

Badmouthing Baby
Getting shocked in the middle of hiding..
Ending 34 – Badmouthing Baby:
For Ending 34 you don’t need to unpack your luggage. Sleep until night 3 and enter the sisters room. Insult the baby doll then hide under the bed.

Disrespectful Mouth
Being locked in the wardrobe and can’t get out.
Ending 35 – Disrespectful Mouth:
For Ending 35 you don’t need to unpack your luggage, sleep until night 3 and enter the sisters room. Insult the baby doll then hide in the wardrobe.
Chapter 2 – Tips & Video Walkthrough
– If you sleep until the second night before unlocking the door sometimes the keys will move, you can find them on top of the kerosene stove or on the table in front of the radio.
– If you’re having trouble seeing at night take the flashlight. If you open your inventory and click on the button on the flashlight you can turn it on!
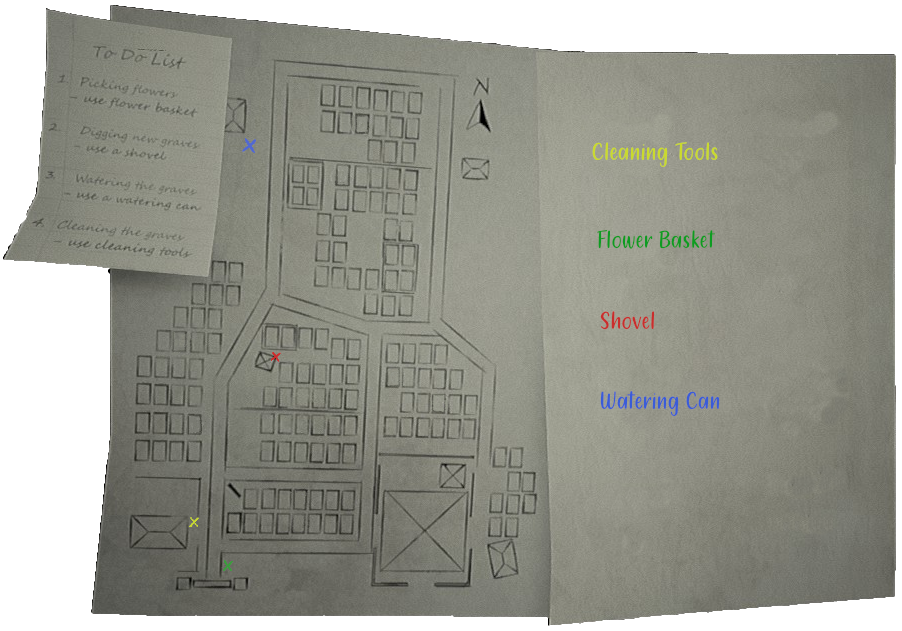
– The picture below shows the colour-coded locations of the Flower basket, Shovel, Watering Can & Cleaning Tools.
Chapter 2: The Tied Corpse (1 – 12)

Early Retirement
Retiring from the job and refusing a request to help someone.
Ending 1 – Early Retirement:
For Ending 1, turn around before you bury the body and interact with the door choosing the option to ‘Get the F**k Out’

Leaving Doesn’t Mean Escaping
Leaving the cemetery to escape from the madness.
Ending 2 – Doesn’t Mean Escaping:
For Ending 2 bury the body hastily, grab the gate keys and interact with the front gate choosing the option to ‘Get the F**k Out’

Quitting Irresponsibly
Being irresponssible by leaving the cemetery without a notification.
Ending 3 – Quitting Irresponsibly:
For Ending 3 bury the body properly, then grab the gate key, then interact with the gate and select the option to ‘Get the F**k Out’

Exemplary Gravekeeper Candidate
Giving up the possibly best job ever.
Ending 4 – Exemplary Gravekeeper Candidate:
For Ending 4 bury the body hastily, grab your gate keys and evening task notes. You’ll need to collect the cleaning tools, shovel and watering can, then finish the tasks by interacting with each of the marked graves and following the task notes. (They are randomized each time). Once you’ve completed them interact with the front gate and choose the option to ‘Get the F**k Out’

Another Job Seeker
Quitting to find another job available in the town.
Ending 5 – Another Job Seeker:
For Ending 5 bury the body hastily then sleep and grab the keys (on top of the kerosene stove) then interact with the gate and ‘Get the F**k Out’

Procrastinator
Procrastinating the tasks as if they will be finished by themselves in the next day.
Ending 6 – Procrastinator:
For Ending 6 bury the bodily hastily, then sleep twice.

A Hardworker, but..
Being responsible by finishing all the tasks, but a mistake ruins it all.
Ending 7 – A Hardworker, but…:
For Ending 7, bury the body hastily then grab the gate keys and your evening task notes, complete the tasks before nighttime, then sleep. Once you wake up grab the night patrol map, then patrol the cemetery, visiting each of the circled areas until they’re marked off with an X. Once you’ve finished this interact with the front gate and select the option to ‘Get the F**k Out’

Having a Nightmare
Having a bad dream. It seems sleeping is not a way to end everything.
Ending 8 – Having a Nightmare:
Ending 8 is very similar to the ending above, you’ll need to bury the body hastily, grab the gate keys and complete the evening tasks before nightfall then sleep and complete the night patrol tasks, however instead of leaving via the gate interact with the bed and select the option to ‘End the Day’

Reaching for a Dream
Leaving the village to pursue a dream job.
Ending 9 – Reaching for a Dream:
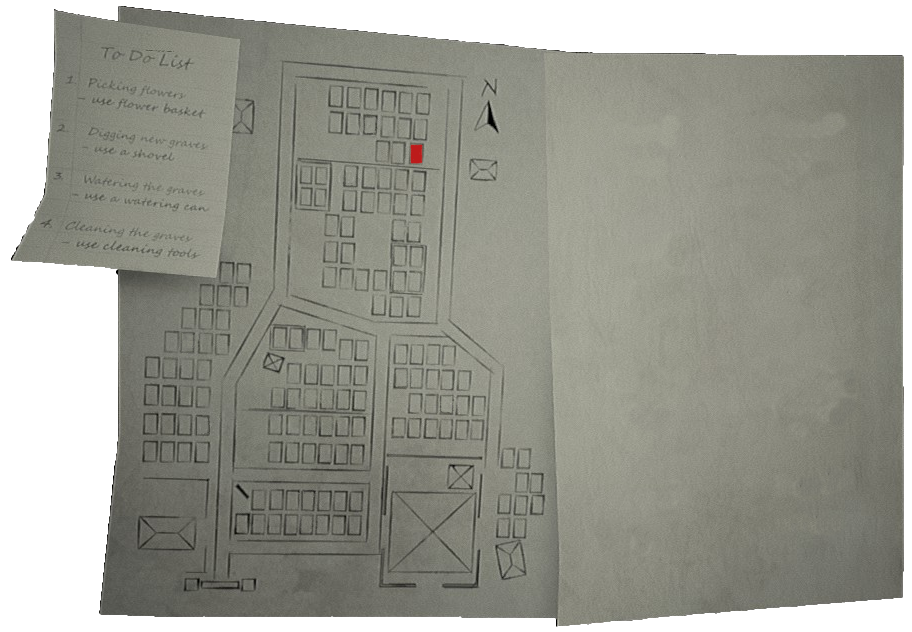
For Ending 9 you’ll need to bury the body hastily, then sleep. Once you’ve woken up grab the gate keys and grab the shovel then dig up the Pocongs grave. I’ve pictured the map below and colored the correct grave red! Once you’ve dug it up untie the knots on the corpse, then roll the body back in and replace the boards, then interact with the soil mound next to the grave to rebury the body. afterwards, complete your night patrol then interact with the front gate and ‘Get the F**k Out’
⠀⠀
⠀⠀⠀⠀

Should’ve Done Better
Ignoring the tasks given. Prepare to get scolded.
⠀
Ending 10 – Should’ve Done Better:
For Ending 10 you’ll need to bury the body properly, this means untying all the knots before rolling the body into the hole and placing the boards. Once you’ve completed the burial sleep twice.

Another Plan for Life
Having another plan. Life always needs challenges.
Ending 11 – Another Plan for Life:
For Ending 11 you’ll need to bury the body properly, then grab the gate keys and the evening tasks list, complete the evening tasks, then sleep and complete the night patrol. Once you’ve finished all of your tasks interact with the front gate and ‘Get the F**k Out’

Brave and Hardworking
Showing bravery and hardwork is a plus point to be a gravekeeper.
Ending 12 – Brave and Hardworking:
For Ending 12 you’ll need to bury the body properly. Then grab your gate keys and the evening tasks, complete the evening tasks, then sleep and complete the night patrol. Once finished interact with the bed and ‘End the Day’
Chapter 2: The Tied Corpse (13 – 20)

Disrespectful Thief
Picking someone’s favorite flower is rude, just prepare for the worst.
Ending 13 – Disrespectful Thief:
For Ending 13, bury the body hastily, then grab the gate keys and flower basket, then head towards the bathroom where you find the watering can. If you head behind the toilets you can find a single torch in the middle of a field, to the left of this torch in a corner you can find and pick one of the large flowers from the White Champaca tree.

Good Deed Erased by A Sin
Running away from the cemetery with someone else’s money.
Ending 14 – Good Deed Erased by A Sin:
For Ending 14 you’ll need to bury the body properly. Afterwards grab the gate keys then take the money from your wallet, money from the fee box in front of the toilets, money from the wallet in the DKM room and the money from the charity box in the mosque. To enter the mosque you’ll need to take the DKM room key from the open window, then unlock the door right next to it, and grab the charity box key and the storage room key, afterwards open the storage room and take the mosque key. Once you’ve entered and opened the charity box take the money then interact with the front gate and ‘Get the F**k Out’

Emergency Call
Calling the local authority for safety.
Ending 15 – Emergency Call:
For Ending 15, bury the body hastily. Afterwards pull out your phone and dial 110.

Under Fire
Doing a careless gravekeeping job resulted in a massive fire accident.
Ending 16 – Under Fire:
For Ending 16 you’ll need to bury the body properly, then grab the gate keys and the evening task list. Complete the evening tasks then sleep and complete the night patrol. Once you’ve finished the night patrol grab the lighter from beside the bed. Now you’ll need to walk around the cemetery acting rudely, you’ll also need to light all of the torches (10 in total). Starting from the grave keepers house these are the actions I took to get the ending: Sweep the floor inside, comb hair, clip nails, cut hair, throw away scissors, sew clothes, & dust. Out the front of the house I threw away the coffee on the bench and swept the porch. To the left of the grave keepers house is a tree you can pee on also. Go to the toilets and take a bath, insult the well, to the right of the torch in the field behind the bathrooms is a little doll in the grass you can throw away, then at the river, smoke a ‘cigar’, push the swing. Head over to the little hut with the radio and hit the slit drum, head down to the Pocong’s grave and throw away the shroud next to it. Next to the large tree in the middle of the map is a grave with an offering and a jug next to it, call the offering a ‘ritual’ and throw away the jug, kick the grave post next to it. Head over to the mosque and insult the well, the coffin & the sandals. Once you’re done head back to the grave keepers house and throw away the flower petals next to the flower basket. After this interact with the bed and ‘End the Day’. If you’re having any trouble locating any of the actions or unlocking the ending you should watch my walkthrough for help!

Destroyer of Peace
Destroying one grave and another unknowingly, or mercilessly?
Ending 17 – Destroyer of Peace:
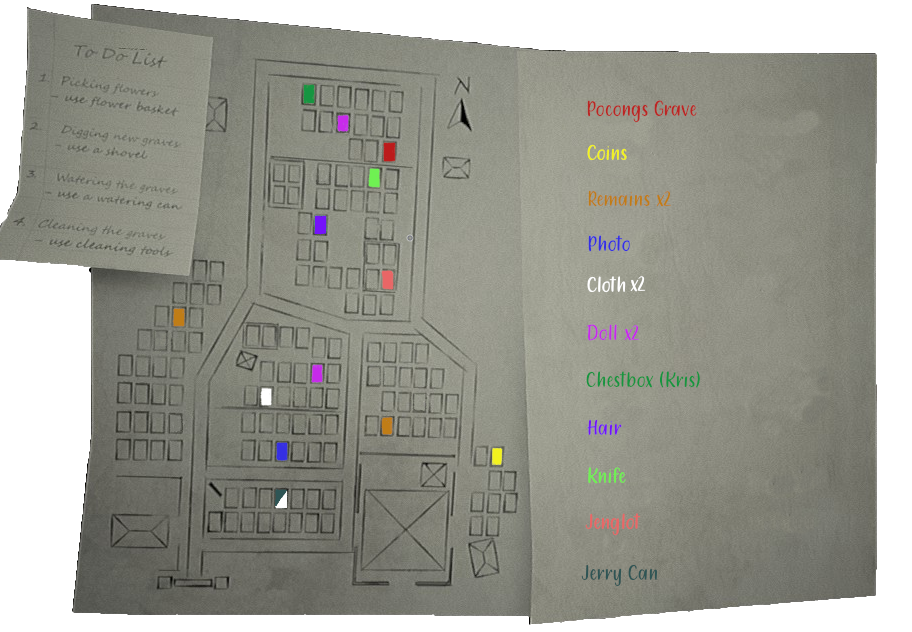
Ending 17 is the hardest ending of the second chapter. Start by burying the body hastily, afterwards you’ll need to start doing everything rude to upset the spirits like in the achievement above, sew at night, dust, sweep, bathe, pee on the tree, throw out items, make rude comments etc etc. Once you’ve finished annoying the spirits you’ll need to grab the shovel and start digging up EVERY grave. You’ll also need to throw away the items located in the graves, I’ve marked on the map below and color coded all of the items found within graves. At the time of writing this the game has been bugged for quite a while and you can only dig half of the grave, I’m not sure when this will be patched, so most of the items are almost impossible to see and you’ll have to move your crosshair over the grave until you locate the item. Once you’ve dug up all the graves and thrown out all the items end the day by sleeping.
**Be careful after digging up the Pocong’s grave as to not fall in any of the other ones or you’ll unlock a different ending.

Drowned
Forgetting a crucial fact can lead into a disaster, just like Cecep forgetting that he can’t swim.
Ending 18 – Drowned:
For Ending 18 you’ll need to bury the body hastily, then grab the gate key and go down to the river at the back of the graveyard. Walk out over the bridge and once you reach the broken section look at the water then interact with it and choose the option to ‘Jump Over’.

Can See It All
Trying to see more than our own ability, is it worth it?
Ending 19 – Can See It All:
For Ending 19 bury the body hastily, afterwards go to the toilets and inspect the ad to the left on the floor next to the bench, make sure you click on the left hand side of the paper where it talks about seeing ghosts. Afterwards head over to the small hut on the opposite side of the graveyard, with the radio in it, then head behind the hut into the wooded area, where you’ll find a ‘Sacred Grave’. Interact with the grave and choose the option to ‘Rub Eyes with Grave Soil’.

Becoming Instantly Rich
Making money fast and getting rich easily like flipping one’s hands.
Ending 20 – Becoming Instantly Rich:
For Ending 20 bury the body hastily, then grab the gate keys and the flower basket. Similar to the achievement above you’ll need to inspect the ad from next to the toilets, however instead of clicking the left side of the ad click the right side where it says ‘Ways become rich’. You’ll need to collect the items listed on the ad. The locations of the items are:
– Jasmine, Tuberose & Cananga flowers can be located all throughout the graveyard and shouldn’t be too hard to find
– The Kris can be found in the second drawer of the desk in the grave keepers house
– The Chicken Feet can be found in the pot next to the rice cooker. (You have to take the lid off to see them)
– The Comb of Bananas can be found straight to the left of the advertisement in between the trees near the fence.
– The Black Coffee can be found on the bench in front of the grave keepers hut.
Once you’ve collected everything you’ll get the ending.
Chapter 2: The Tied Corpse (21 – 30)

The Tied Corpse is in Peace
Helping Indra to reach the peace in his eternal sleep.
Ending 21 – The Tied Corpse is in Peace:
For Ending 21 bury the body properly, once you’re in the grave keepers house pick up the blue book on the table and turn it and click on the sticky note on the back, then go over to the mosque and grab the DKM key and open the door, inside grab the storeroom key and open the storeroom, inside the storeroom interact with the mung beans and choose the option ‘Take Some’ then take them back to the grave keepers house and fry them in the pan on the kerosene stove. Afterwards take the fried beans to the Pocong’s grave and interact with it choosing the option to ‘Plant Beans’

A Mistake Has Been Rectified
Getting every ritual steps right, but not that perfect.
Ending 22 – A Mistake Has Been Rectified:
For Ending 22 bury the body hastily then you’ll need to follow the same steps as the achievement above, read the book on the table and click on the sticky note on the back, take the DKM key from the mosque and open the door to access the storeroom key, open the storeroom and take some of the mung beans, then return to the grave keepers house and fry them. Afterwards you’ll need to dig up the Pocong’s grave and untie his knots then rebury him by looking at the soil mound then plant the seeds on top.

Unfinished Business
Leaving without finishing all steps of the ritual is a sign of imperfection.
Ending 23 – Unfinished Business:
For Ending 23 you’ll need to bury the body hastily, then grab the gate keys and the shovel and dig up the Pocong’s grave then jump in and jump out without touching the body.

A Decent Gravekeeper
Doing a good job as a gravekeeper, but missing one crucial item.
Ending 24 – One Step Closer:
The achievement for Ending 24 is named ‘A Decent Gravekeeper’ however the ending is actually called ‘One Step Closer’. For this ending you’ll need to bury the body hastily, then grab the gate keys and the evening tasks. Complete the evening tasks then sleep and complete the night patrol tasks. Once you’ve finished all of the tasks dig up the Pocong’s grave and untie his knots, rebury him then end the day by going to sleep.

Not Happily Ever After
Getting married with a long love girlfriend.
Ending 25 – Not Happily Ever After:
For Ending 25 bury the body hastily, then grab the gate keys and open the second drawer of the table with the radio on it, grab the ring inside, then interact with the front gate and ‘Get the F**k Out’

Got Fired
Being too coward to stay and do the job as a gravekeeper.
Ending 26 – Got Fired:
For Ending 26 bury the body hastily then open your phone and keep calling Mang Ujang until he fires you.

Joining a Cult
Joining a cult. Let’s hope it’s not a weird one.
Ending 27 – Joining a Cult:
For Ending 27 bury the body hastily, for this ending you don’t actually need to find the phone number you can just dial it straight away it’s; 08396664776 If you do want to find the number you’ll need to locate the pamphlet next to the grave with the photo buried in it. It only has part of the number on it, the rest of the number can be found on scraps of paper littered around the graveyard, one is behind the fee box at the toilets, and the other is under one of the benches near the river.

Buried Alive
Getting buried alive inside one of the graves.
Ending 28 – Buried Alive:
For Ending 28 bury the body hastily, then grab the gate keys and shovel, then head over to the small hut with the radio in it. Head behind the hut and walk into the woods where you can find the sacred grave, dig it up and interact with it choosing the option to ‘Sleep’.

Staring Too Long
Staring too long at the ghost is always a bad thing.
Ending 29 – Staring Too Long:
For Ending 29 you’ll need to bury the body hastily then sleep. Once you wake up grab the gate keys and head over to the mosque, to the right of the mosque along the fence line is a hole you can crawl through. If you walk through this small hallway you’ll come to another higher up hole in the fence, just stand still looking through this hole at the mosque until eventually the Pocong pops up and you’ll unlock this ending.
**It might take a couple of attempts before the ending unlocks.

Falling Into a Well
Falling into a deep well and eventually die.
Ending 30 – Falling Into a Well:
For Ending 30 you’ll need to bury the body hastily then grab the gate keys and head down to the toilets. ‘Draw Water’ from the well 4 times in a row.
Chapter 3 – Tips & Video Walkthrough
– When doing the ritual to take ownership of the Tuyul, I noticed during the part where you put some candies and marbles into a chest, if you stand too close to the chest you can get stuck in the animation. If you stand as far away as possible you shouldn’t get stuck.
– On some runs the doors to the backyard in the kitchen will be locked, this is just randomized and there’s no key for the doors, unfortunately you just have to take the long way around
– A few of the endings are bugged (I think). I’ve had a couple different endings where the audio will play over and over again and my cursor won’t appear so I have to alt+f4 to get out of it, the achievements still unlock perfectly fine, though!
The key locations are a bit convoluted to explain via text, I’ve linked a video in which I show the key locations for this chapter to make it a bit easier in case you’re lost.
Chapter 3: The Little Devil (1 – 14)

Continue Life without Father
Going on with life without having anything to do with her Father.
Ending 1 – Continue Life without Father
For Ending 1 as soon as you load in walk up the the door and interact with it, choosing the option to ‘Leave My Father’

Find Another Way
Having a second thought about taking the inheritance.
Ending 2 – Find Another Way
For Ending 2 travel to your grandfathers house but instead of entering, walk over to the car and open the door, interact with the wheel and choose the option ‘Get The F**k Out’

Manage to Get Money
Getting money solely from pawning grandfather’s items.
Ending 3 – Manage to Get Money
For Ending 3 you’ll need to travel to grandfathers house then collect enough valuables to sell at the pawn shop before it closes. It seems as though you need to make at least 50,000 Rupiah in order to get the correct ending. To unlock this ending, I took the gold from the safe, all of the jewellery from grandfathers bedroom, a tv, gramophone and radio from the secret room upstairs, as well as a gramophone, 2 radios and 4 swords from the downstairs area. After collecting everything go back to the car and head to the pawn shop where hopefully you’ve collected enough items to get the right ending. (Not sure if it’s just me but every time I unlocked this ending it would bug my game and cause me to have to alt+f4)
**Please refer to my video of the endings for help if you need it.

Need to Work Harder
Collecting the items for pawning but not get enough money.
Ending 4 – Need to Work Harder
Ending 4 just requires you to not make enough money, simply go to grandfathers house, grab one or two items then head to the pawn shop.

Unfortunately, Too Late
Arriving at the pawnshop too late.
Ending 5 – Unfortunately, Too Late
For Ending 5 all you need to do is grab an item then wait for the pawn shop to close, it actually takes quite a while. Once it gets foggy wait for about an extra 5-10 minutes then once you leave for the pawn shop it should hopefully be closed. If you wait too long you may accidentally unlock ending 32.

Problem Solved, Is It?
Becoming the master of the creature.
Ending 6 – Problem Solved, Is It?
For Ending 6 complete the Tuyul ritual as well as collect enough items to sell at the pawn shop to pay for your fathers bills, refer to the info section for this chapter if you need help with any of the ritual steps
**If you need help completing the ritual I have linked a video in the info section for this chapter which shows all of the steps for the ritual!

Crime of Stealing Started
Starting life as a criminal.
Ending 7 – Crime of Stealing Started
For Ending 7 you’ll need to complete the ritual and release Tuyul, afterwards collect only one valuable and take it to the pawn shop.

Committing Mass Theft
Stealing from houses to houses.
Ending 8 – Committing Mass Theft
For Ending 8 complete the ritual to release Tuyul then wait for the pawn shop to close before you travel there.

The Savior of the Family
Becoming the hero of the family.
Ending 9 – The Savior of the Family
For Ending 9 you’ll first need to complete the ritual to become Tuyuls mother, after you’ve finished feeding him, head into the first bedroom on the left, on the right wall there’s a painting, use Tuyuls help to unscrew the bolts then take the Wayang head into the room with the wooden bathtub, on the right side of this room there’s a large clock, use Tuyuls help to unscrew the glass cover again then use his help again to set the hands to the correct time, you’ll gain access to a secret room that has another puzzle on the wall, place the Wayang onto the right side of the puzzle, the three on the right need to face upwards and the three on the left need to face downwards, take the Kris. Head downstairs and use the Tuyul’s help to unlock the safe in grandfather’s bedroom and take the gold. Now that you’ve used Tuyul we’ll need to banish him, head to the office upstairs (its the room with the hatch on the floor), on the right side of the room grab the glass jar, as well as the book in the green file holder, open the book and inspect the page with instructions to banish Tuyul. Go back into the Tuyul’s room and interact with the kids clothes, after the cutscene pick up the bottle. Head into the backyard, on the right side of the house there’s a mango tree, interact with the soil and bury Tuyul, now collect enough items to cover your dads medical bills and travel to the pawn shop.

Work Hard For Nothing
Working hard but not enough.
Ending 10 – Work Hard For Nothing
Ending 10 is very similar to the one above, however it requires you don’t collect enough valuables to cover the medical bills, so complete the ritual to take ownership of the Tuyul, then use him to unlock the Kris and the safe, once you’ve done those things complete the second ritual to put him back in the jar and bury him under the mango tree. Now just grab one or two items like a radio or gramophone and go to the pawn shop.

A Little Too Late
Doing something helpful, but not to all.
Ending 11 – A Little Too Late
Ending 11 is the same as 9 and 10, take ownership of Tuyul, then use him to unlock the screws and complete the clock puzzle then go downstairs and use him again to open the safe, now complete the ritual to banish him then bury him under the tree, now wait for a while until the pawn shop closes then travel there.
**I wait until it gets foggy and dark, then I’ll wait another couple mins, by then it’s usually closed

A Girl From Heaven
Becoming a girl with a nice heart.
Ending 12 – A Girl From Heaven
For Ending 12 you need to banish Tuyul and bury him in the yard then collect enough valuables to cover your father’s medical bills. You don’t need to complete the ritual to become his mother, just go down to the bunker, release him, chant the spell, then grab all of the ingredients, as well as the jar and notes for banishing him upstairs, then after reading the notes and placing the ingredients you can just banish him straight away and bury him.

To Regret or Not To Regret
Regretting the decision to end everything.
Ending 13 – To Regret or Not To Regret
Ending 13 is similar to the achievement above, you just need to banish and bury the Tuyul, then afterwards only take 1 or 2 items to the pawn shop so you don’t make enough money.

Heroic but Gain Nothing
Gaining nothing because of the heroic act.
Ending 14: Heroic but Gain Nothing
For Ending 14 just like the 2 achievements above, banish and bury Tuyul, then wait until the pawn shop closes before travelling there.
Chapter 3: The Little Devil (15 – 25)

Masters of All
Keeping more than one creature.
Ending 15 – Masters of All
Ending 15 is nice and simple! Head into the secret office upstairs, in the back corner hidden in a file holder on top of the bench is a magazine page with a photo of the Kris, click on the bottom text to get the address, Putri should say a voice line. Now you’ll need the screwdriver and wrench, they’re on the floor next to the shoe rack near the kitchen doors. Use them to open the frame to take the Wayang piece as well as open the clock, the time on the clock needs to be set manually to 11:05, now as you’ve probably done before place the Wayang piece, left need to face up and right need to face down. After you’ve taken the Kris make your way back to the car and travel to the new address.

Smart Move
Killing two birds with one stone by selling it off.
Ending 16 – Smart Move
For Ending 16 you’ll first need to make sure you take the candle with you, open your inventory and click on it to light the flame then get all of the keys from the office, take the zafaron oil from beside the tv in the downstairs bedroom, then head up through the secret ladder into the upstairs office, in the top right drawer of the desk is the phone book click on the name Mpu Tirtayasa, Putri will comment on it, afterwards interact with the plain paper on top of the desk, if you spin it around a bit eventually the text will appear in the middle of the page for you to click on, Putri will comment on selling “it”, now as you’ve done before simply banish Tuyul however instead of burying him like normal, go back to the car and travel to the new address.

A Sign From the Ancestor
Taking kris without respecting the spiritual owner.
Ending 17 – A Sign From the Ancestor
For Ending 17 take the Kris, then go back to the car and ‘Get The F**k Out’

A Keeper of an Heirloom
Taking kris with permission from the kris’ spiritual owner.
Ending 18 – A Keeper of an Heirloom
For Ending 18 find the Kris again but this time you’ll need to cleanse it. The cleansing ritual needs a few ingredients, but the only one you’ll need to pick up is the lime, it can be found on the back balcony just outside the kitchen doors that lead to the backyard, you can pick the lime from the middle plant, afterwards head upstairs to the wooden bathtub. The ritual goes as follows:
- Fill the Bathtub
- Soak Kris
- Fill with Flowers
- Drop Lime Squeeze
- Scrub Kris
- Remove Water
- Wipe with Shroud
- Rub with Zafaron Oil
now go back to the car and choose the option to ‘Get the F**k Out

Posessed
Acting disrespectful and taking a sacred ring without permission.
Ending 19 – Posessed
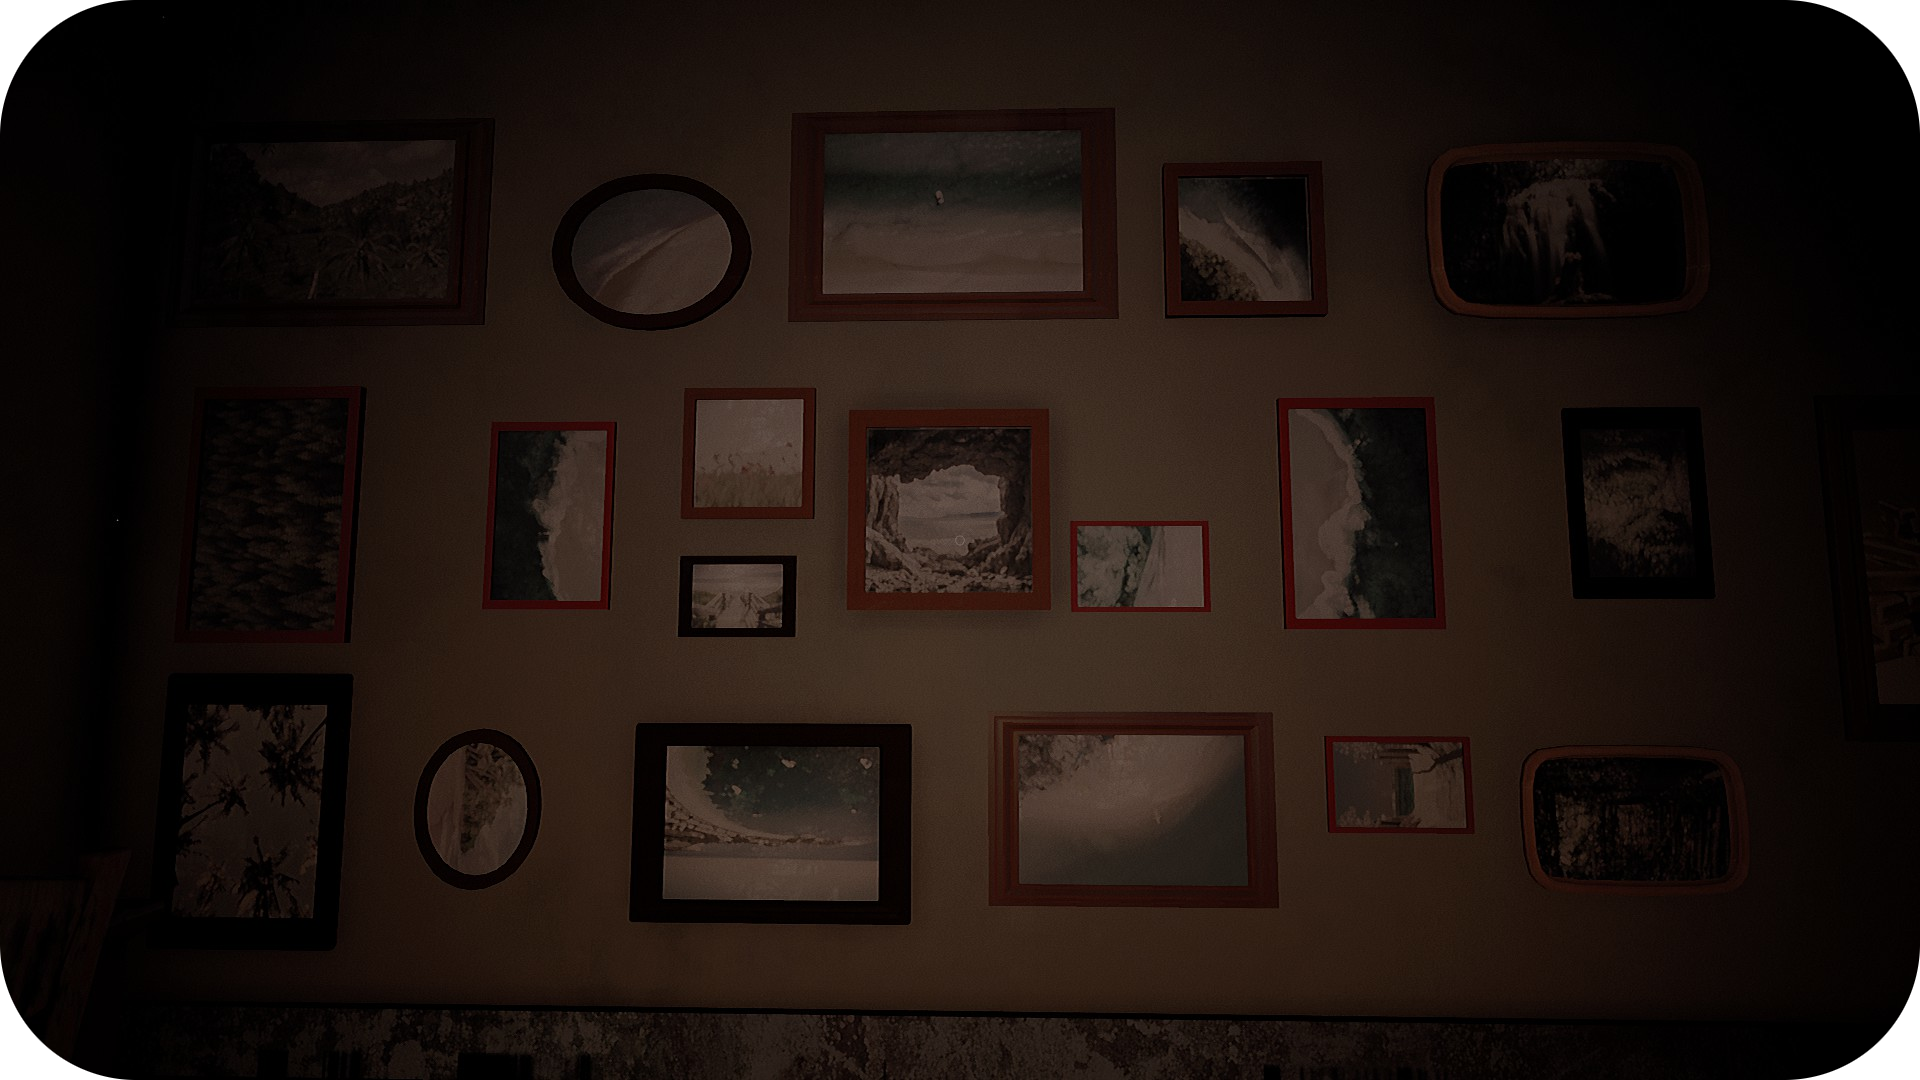
For Ending 19 you’ll need to find the hidden ring! It’s located behind the moving bookshelf in the study. Once you’ve opened the secret bookshelf, on the wall there are a bunch of picture frames, if you move the beach frames into a circular position you can interact with the middle painting to reveal a safe, use the puzzle key to open it, take the ring then go back to the car and ‘Get the F**k Out’

Artefact Owner
Taking the ring with a good intention.
Ending 20: Artefact Owner
For Ending 20 you’ll need to take the ring again, however this time take it to the wooden bathtub upstairs and complete the cleansing ritual for the ring, you’ll also need the lime from the backyard. The steps are:
- Fill the Bathtub
- Soak Ring
- Soak Black Sticky Rice
- Drop Lime Squeeze
- Remove Water
- Dry Ring
Now take the ring to the car and ‘Get the F**k Out’

Spear of Doom
Bringing a spear into your home carelessly.
Ending 21 – Spear of Doom
For Ending 21 you’ll need to find the Spear, first you’ll need to take the puzzle key from under the desk. Now head into the lounge room, near the tv underneath the carpet there’s a corner of a hatch just visible, you can interact with the carpet to pull it back, now open your inventory and interact with the key until it is in the shape needed to fit the locks. Once you’ve opened the hatch head downstairs to the back where you’ll enter the maze. You’ll need to take the first right where you’ll be met with a locked gate the combination can be found along the left wall, now take the first left and keep going straight until you reach the second padlock, same as before the combination is along the wall. Once you’ve opened it take the first left just behind the gate, now you’ll need to open the gate to access the spear! On the right wall is an instrument, you’ll have to look at it first before you’re able to play it. You’ll need to hit the bars in this order; 1, 3, 1, 3, 4, 5, 5. Once the gate opens take the spear and head back to the car then ‘Get the F**k Out’

A New Guardian
Having a cleansed spear that can protect you from evil.
Ending 22 – A New Guardian
For Ending 22 take the spear again however this time we’ll need to cleanse it, so head to the basement, find the spear then take it upstairs to the wooden bathtub you won’t need any extra ingredients for the ritual. Follow these steps:
- Fill the Bathtub
- Soak the Spear
- Fill with Flowers
- Scrub with Water
- Remove Water
- Wipe with Shroud
- Rub with Zafaron Oil
Afterwards to take the Spear to the car and ‘Get the F**k Out’

Disturber
Disturbing the peace by taking a sacred, uncleansed sculpture.
Ending 23 – Disturber
For Ending 23 you must find the hidden statue, you will need the puzzle key as well as the wrench. Head towards the far right bedroom, there is a hidden door in the right side of the wardrobe in this room, move the clothes across then interact with the wooden compartment. You’ll need to go into your inventory and interact with the puzzle key until it is the correct shape, now use it to open the door. The code for the pillar from to bottom is 1980, then use the wrench to unbolt the ropes attached to it. Finally you can press the button at the top of the pillar to release the statue now take it to the car and ‘Get the F**k Out’

Taking Care of an Antique
Getting an antique, cleansed, sacred sculpture.
Ending 24 – Taking Care of an Antique
For Ending 24 you’ll need to take the statue again however this we will cleanse it first. For the cleansing ritual you will need the lime from balcony just outside the kitchen, as well as the Bilimbi which can be found on the centre counter in the kitchen near the bananas. Now head to the wooden bathtub upstairs and follow this order:
- Fill the Bathtub
- Soak Sculpture
- Fill with Flowers
- Drop Lime Squeeze
- Rub with Bilimbi
- Remove Water
Now return to the car and ‘Get the F**k Out’

Taking Care of an Antique
Getting an antique, cleansed, sacred sculpture.
Ending 25 – Unable to Escape
For Ending 25 go to the bunker and release Tuyul then complete the ritual to become his mother, then simply head to the car and ‘Get the F**k Out’
Chapter 3: The Little Devil (26 – 32)

Money isn’t the Last Resort
Feeling so done with the money and the spiritual creature.
Ending 26 – Money isn’t the Last Resort
For Ending 26 you’ll need to banish and bury the Tuyul under the mango tree then head to the car and ‘Get the F**k Out’

Under Fire
Commiting an arson accidentally.
Ending 27 – Under Fire
For Ending 27, head into the study and open the secret bookcase head up the ladder to the Tuyul’s room then light all of the candles, 5 in the middle of the room and 2 on either side of the bed, then open the window. Now return to the car and ‘Get the F**k Out’

Get Lost
Wandering about and getting lost.
Ending 28 – Get lost
For Ending 28, as soon as you arrive at the house just turn around and walk back down the road, just keep walking forward.

Trapped in Another World
Getting trapped in another dimension. Watch out!
Ending 29 – Trapped in Another World
For Ending 29, head towards the bunker in the backyard but instead of going inside of the bunker, go behind it, into the sugar cane field, keep walking forward and eventually you’ll trigger the ending.

Greedy and Reckless
Being greedy and collecting all sacred items in the house.
Ending 30 – Greedy and Reckless
For Ending 30 you’ll need to collect all of the artefacts you’ve collected through previous endings, these are; the Kris (Ending 17), the Ring (Ending 19), the Spear (Ending 21) & the Statue (Ending 23). After you’ve located and taken them all just head to the car and ‘Get the F**k Out’

Respectful Opportunist
Being careful by asking for a permission before getting all items, especially the sacred ones.
Ending 31 – Respectful Opportunist
Ending 31 is the same as Ending 30, however you’ll need to cleanse every item before you leave the house. I’ll list the steps again so you don’t need to scroll up and down.
Kris:
- Fill the Bathtub
- Soak Kris
- Fill with Flowers
- Drop Lime Squeeze
- Scrub Kris
- Remove Water
- Wipe with Shroud
- Rub with Zafaron Oil
Ring:
- Fill the Bathtub
- Soak Ring
- Soak Black Sticky Rice
- Drop Lime Squeeze
- Remove Water
- Dry Ring
Spear:
- Fill the Bathtub
- Soak the Spear
- Fill with Flowers
- Scrub with Water
- Remove Water
- Wipe with Shroud
- Rub with Zafaron Oil
Statue:
- Fill the Bathtub
- Soak Sculpture
- Fill with Flowers
- Drop Lime Squeeze
- Rub with Bilimbi
- Remove Water
After cleansing them all return to the car and ‘Get the F**k Out’

Attacked
Attacked by an unknown being.
Ending 32 – Attacked
Ending 32 is simple but time consuming, once you get to grandfather’s house just stand afk eventually some hands will grab you and you’ll get this ending, the time it takes seems to be somewhat random, the first time I unlocked this it took around 30 minutes, but it can definitely be longer or shorter.
Chapter 4 – Tips & Video Walkthrough
– This chapter has achievements, both for progressing through the acts as well as for completing the 13 different endings. I’ve combined all the progression achievements as well as the endings together and sorted them by each act.
Chapter 4: The Hungry Witch (1 – 9)


Arriving Safely
Arriving safely back to home without any scratch.
Progression Achievement – Arriving Safely
This achievement is unlocked once you reach your house, it doesn’t matter whether you choose to go left or right.

Knowing True Self
Knowing the secret behind your identity with your own effort to survive.
Progression Achievement – Knowing True Self
After you’ve found the blocked path forward in Act 2, return to the kitchen and take the axe from under the sink. Use the axe to progress, after finding your mother, travel to her room and interact with the book, then after a cutscene interact with the Kris.

Being Irresponsible and Cowardly
Ending 1 – Being Irresponsible and Cowardly
For Ending 1, after you’ve found your mother, instead of going to the book head back to the entrance and interact with the gate then choose the option to ‘Get the F**k Out’

Too Careless, Too Late
Ending 2 – Too Careless, Too Late
For Ending 2, instead of going to the book just wait, after a while you’ll unlock this ending instead. It actually takes quite a while, around 10 minutes, then when you walk in front of where your bedroom is this ending will trigger.

Failing To Escape
Ending 3 – Failing To Escape
For Ending 3, after interacting with the book click on the phone and choose the option to call your husband.


Escaping from Attack
Managing to escape from the vicious attack.
Progression Achievement – Escaping from Attack
As soon as you start Act 3 start walking, if you wait too long you’ll get one of the endings. After walking for a while you’ll have to hide, then you’ll have to fight the witch! None of the options matter so choose what you want.

Duck, Duck, Goose
Looking for a hiding place too long and being too careful.
Ending 4 – Duck, Duck, Goose
For Ending 4, after walking for a short while you’ll hear the wolf howl, just stand still for a minute then once you walk forward the witch will attack you because you took too long.

Lost in Battle
Ending 5 – Lost in Battle
For Ending 5, when the game gives you the chance to hide just don’t select either option.

Too Coward to Go On
Asking for other’s help only for failling to survive.
Ending 6 – Too Coward to Go On
After you’ve successfully hidden from the witch, continue down the path and eventually you’ll get to an intersection where you can go left or right, choose the right path, it can be a bit hard to see so just stick to the right hand side. You’ll come across a small wooden structure, follow the path behind it until you reach a gate, interact with it and Kirana will make a comment about getting help, then interact with it again and you can choose the option to ‘Go To Village’


Unraveling the Truth
Knowing the real story behind the dreadful attack.
Progression Achievement – Unraveling the Truth
After progressing through the different rooms in Act 4, you’ll reach the graveyard. Use the torch on your left to light the coffins on fire. Once you’ve finished lighting them all interact with the Kris floating above the mannequin to finish the act and unlock this achievement.

Seeking For More Power
Forgetting the real reason and instead, trying to find another source of power for your own greed.
Ending 7 – Seeking For More Power
For Ending 7, after progressing through the first room you’ll enter a second room with 2 women, there’s a piece of paper on the table in front of the woman who is praying, interact with the paper then hover over the text until you get the option to click ‘Spell’. After Kirana makes a comment about it put the paper down then interact with it again and choose the option ‘Chant’

False Hope
Choosing an instant way to take your revenge.
Ending 8 – False Hope
For Ending 8, keep progressing until you reach the third room, interact with the piece of paper on the table on the right hand side of the room and click where it says ‘Chant’. Now go over to the large clock and look on top of it on the left side there’s a hard to see gemstone. Take the gemstone and put it in the Pelangkiran that’s sitting on the wall above the note.

Giving Up Everything
Falling into despair and giving up halfway of the journey.
Ending 9 – Giving Up Everything
For Ending 9 progress through all of the rooms until you’ve reached the graveyard. Once you enter the graveyard and the torches turn on, turn around and head back the way you came walk through the paper room and continue back down the hallway eventually this ending will unlock.
Chapter 4: The Hungry Witch (10 – 13)


Preparing for the Battle
Getting ready for the battle once and for all.
Progression Achievement – Preparing for the Battle
While you progress through Act 5 you’ll be attacked by the Witch, make sure you attack her with either the axe or the kris.

Staying Too Long
Staying too long in one place and does not immediately go towards the goal.
Ending 10 – Staying Too Long
To unlock Ending 10 just wait until the cutscene is over, the witch will attack you and you’ll need to pary her with the Kris, afterwards Kirana will say “Oh, does the spell work”, now just don’t move and eventually you’ll unlock this ending.


Defeated by Her
Failing to defeat the enemy who brings all the misery.
Ending 11 – Defeated by Her
For Ending 11 simply wait for the witch to attack you and don’t choose any of the options, after 2 attacks you’ll get this ending.

A Grave Mistake
Getting the last step wrong.
Ending 12 – A Grave Mistake
For Ending 12 you’ll need to find your Kris (If you have your back to the fire it’s next to the third coffin on the left) then once the fire is gone and you can progress you’ll find the body of the witch and the game will give you the option to stab one of the body parts, choose either the heart or the shoulder.

Successfully Defeating The Hungry Witch
Winning the journey in killing The Hungry Witch.
Ending 13 – Successfully Defeating The Hungry Witch
For Ending 13 you’ll need to kill the witch, to kill her successfully you’ll need to fight her off and make your way past the gate, then stab her original body in the neck.


Becoming More Mindful
Becoming more mindful now after going through everything.
Progression Achievement – Becoming More Mindful
After beating the Witch in Act 6, as soon as you start Act 7 you’ll unlock this achievement.