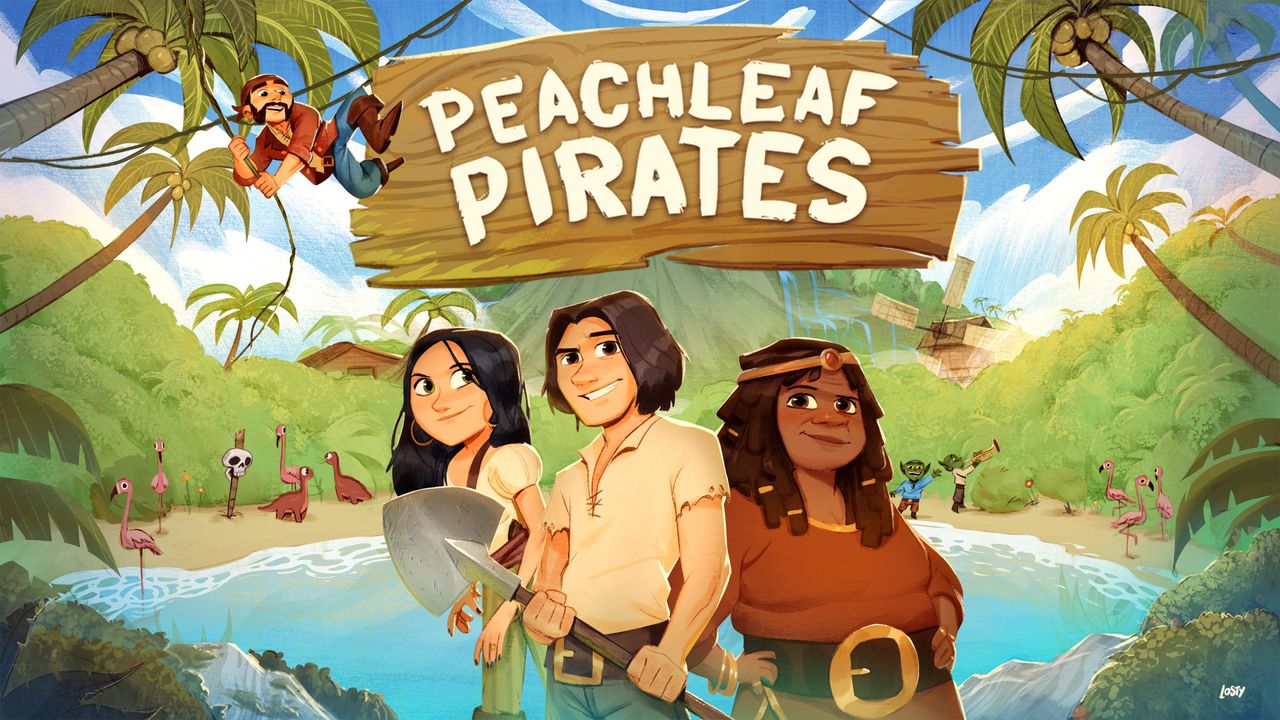
A guide going over how to complete the main story quest from clicking the new game button all the way to the end credits.
Introduction
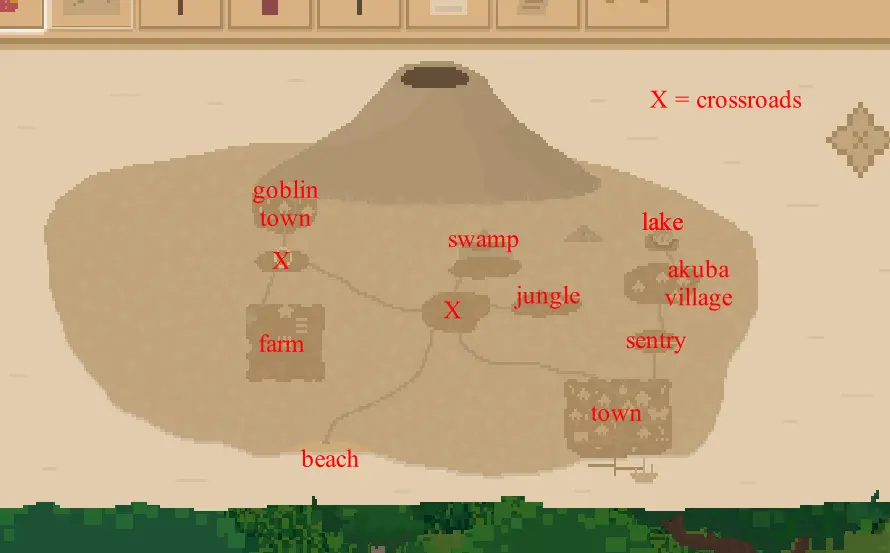
island map

town map
This is a walkthrough explicitly for the main quest of the game Peachleaf Pirates (at time of writing v1.0004) and does not cover side quests nor achievements. Since the game has a day timer (Joe falls asleep if you stay up too late) each block of quest steps are broken up to be completed over the course of an ingame day. Nightly sleeping also saves game progress. Given the open nature of the gameplay there is no mandatory limit on how long it takes to complete the main quest – feel free to take as many days as you wish and farm at your leisure.
Before we start keep in mind that you will need to collect 2,000 gold in order to buy certain items required to complete the main quest. While there is no rush (this is a farming sandbox after all) for the sake of this guide focusing solely on the main story we are assuming all items unless otherwise stated get sold in order to accumulate this monetary requirement as quickly as possible.
The game begins as Princess Lauretta Elizabeth Oriana the third (or Odie for short) is taking a stroll and haplessly finds Joe, the player character, washed up on the beach. A series of cutscenes commence as he’s taken taken to Doc Brumbleshaft’s clinic and it’s revealed Joe is suffering from amnesia before being formally conducted into citizenship of the town by Governor Harriet. Oh yeah, she also gives you a plot of farm land to the east of town.
Day 1 (Tutorial and Mel’s Garden Shop)
The first day begins after your stay at the clinic. Standing outside of your new farmhouse, Governor Harriet hands off your starter pack of tools before leaving you to play the game – just kidding, Rupert (the tutorial goblin) appears. There’s a bit of dialogue where he teaches you the basics. WASD movement, settings menu, harvesting, crafting, etc. This part is pretty straightforward but I will note you need to hold on to this short list of materials to craft a flamingo and a goblin scare;
– 35 bamboo
– 2 logs
– 30 grass
– 4 iron (this will be collected after unlocking the jungle on day 5)
At some point you’ll be prompted to visit Melanie’s Garden Shop in town and you’ll be asked to grow her a mango for compost, which begins a large side quest to grow every plant for her. Continue working the farm as you see fit until it gets dark and then go and use the bed in your farmhouse to save your progress and move on to the next day.
Day 2 (Mikey’s Emporium)
After waking up in the morning and exiting your farmhouse you might be surprised to see a letter in the mailbox. It’s from Mikey – hes a guy with a groovy set of lingo who runs the emporium or as I’d call it, the general store. Similar to Mel’s large side quest, this visit to Mikey’s triggers a lengthy one to find every forage item, but starts with a measly sweet carrot. These forage items appear around in the wild – I usually find them by accident while running through tall grass. Either I’ve been extra lucky or you can find the carrot you need right outside his shop. Continue working the farm to gather up 2,000 gold
Day 3 (Goblin Scare)
When you wakeup this morning instead of a letter in your mailbox you’ll discover that the goblins who live north of your farm decided to have a midnight snack on some of your plants. Rupert will suggest you level up and research the ability to craft a goblin scare. If you havn’t leveled yet don’t worry, you won’t be able to collect the iron to craft this until after day 5. Since you’ve already made the flamingo for Rupert the remaining materials you need to save to build the scare are;
– 30 bamboo
– 20 grass
– 4 iron (that we’ll collect a different day)
Continue working the farm.
Day 4 (Free Day)
Nothing happens today. It’s a free day. I’d suggest working on the farm to collect that 2,000 gold we’ll need later.
Day 5 (Nash Jungle)
Today Joe awakes to a letter in his mailbox from Nash. We’ll go pay him a visit at his house that’s in the section of map I’ve labeled ‘jungle.’ He’s a bit of an eccentric as he explains adventures and swords. During the conversation he’ll disappear and Joe will have to poke around the map to find him. Hint – he is not under the rock. After he’s done talking we’ll go through the newly opened path north of his house and harvest some iron so that we can craft the goblin scare for our farm.
Day 6 (Voodoo)
Now that the tutorial is over we can begin the main quest granted you’ve managed to hoard the 2,000 gold we need. If you haven’t reached this amount of cash yet feel free to take more time working the fields OR put effort toward it inbetween quest steps.
After you wake up in the morning head to the swamp. When you interact with the boat you’ll learn that it needs a bit of patching up before its sailable. Our first order of business is to visit the Savage Poodle Bar and ask Harry if he has any extra corks we can use to fix the boat. He’ll let you know that he does in fact have them but wont give them up unless you fix the mill so he can continue making the poodle bread his customers love so much.
After arriving at the mill climb to the top and interact with the the hole before visiting Ed the carpenter. Ed is very proud of his handiwork and is fully able to get the mill in working order again buuuuuuut he doesn’t have anything to use as a topscrew. Joe needs to find this.
From here you can look around and make some guesses but I’ll let you know that good ol’ Joe needs to visit the graveyard and checkout the locked coffin. He’ll wager the locking mechanism works as a topscrew but doesn’t have a key.
If we visit Governor Harriet and explain the situation she’ll hand over the key. After this we’ll head back to the casket and open our quest inventory to interact the key with the lock. From here we’ll return to each character, the lock goes to Ed the Carpenter who fixes the mill which makes Harry the bartender happy enough to give us a cork. Joe can now fix the boat in the swamp and pay Khalyla a visit. She doesn’t manage to fix amnesia but does teach Joe how to use voodoo magic as well as send him on a journey to thwart the evil Lord Rathmore from corrupting the Peachleaf tree. Onwards to Akuba village!
Day 7 (Akuba Village)
Today Joe needs to hunt for a certain L. Rathmore in the tribal village north of the town of Peachleaf. Unfortunately when you arrive here there is a seemingly mute sentry blocking the bridge. If we go to the open air marketplace and ask the tribal merchant Steve what is up with his village Joe finds out that it’s a tourist destination and Joe needs a day pass. Thankfully Steve has an unlimited pass he’s willing to sell – barter him down to the low low low price of 1,000 gold.
Return to the bridge and feed the sentry the pass to unlock Akuba. Joe can poke around a bit if he wants but his target is the hotel. After entering the hotel we can try to get the clerk at the front desk to give up information but he’s steadfast in his companies policies and Joe will have to check the guest book on his desk. Flip the page to reveal the signature of L. Rathmore designated to room 110.
If Joe tries to sneak the key to room 110 the clerk will notice so he’ll need to be distracted. Take a walk down the right hallway and pull the fire alarm. While the alarm is sounding the clerk will walk away from the desk to reset it – which gives us time to sneak off with the key. Use the key to get into room 110 and dig through the villains belongings until you find the golden winning ticket from Ray’s casino on his desk.
Day 8 (Upstanding Citizen)
Now that we have ‘borrowed’ the winning casino ticket lets head straight north of the farm to the Goblin City to visit their gambling hall. Oh no – the bouncer won’t let us in to the casino unless we are an upstanding citizen of Peachleaf.
Joe will take a short trip to town to visit Odie in the mansion. Ask her about this upstanding citizenship and she’ll give a sort of vague answer that you “need to help people.” Exit the mansion and run these next few errands around town.
First, stop at the weapon store to buy the cheapest gun available. This’ll spend the remaining 1,000 gold Joe has in his pockets. After purchase make a visit to the shipyard. Joe is a bit clumsy when placed behind the keg and can “accidentally” spill its contents. Marco panics and rushes away to find a mop to clean up the mess – this leaves the life preserver on the wall unattended…
Now lets take a stroll down the docks to visit a chap named Felix who happens to be sitting there fishing. If Joe stands behind him and plays with his pistol a bit too much Felix will become startled and fall into the water. Now we can use the life preserver to rescue the poor man. Odie appears and commences our crowning as an upstanding citizen for our assistance.
Day 9 (Goblin Casino)
Now that Joe bears the proper title he’s able to make his way past the casino bouncer. After you’re done playing the slots we need to use Lord Rathmore’s borrowed ticket at the bar. Now we’ll sit back and watch the cutscene as Ray Montgomery brings us to his office and lets us in on his secret – he’s a special PIE agent. Ray gives Joe explicit instructions to;
– Obtain a diving suit from Mr. Gunn
– Go to the lake north of Akuba Village
– Improvise, Adapt and Overcome
– Use a voodoo beacon to signal PIE once Rathmore is confronted
Day 10 (Diving Suit)
Joe can visit Mr. Gunn’s clothing store at 10am after it opens to rent a diving suit. Apparently Mr. Gunn is unaware of the PIE mission as he refuses to hand off the suit because it has already been rented to Captain Loogie. Now to visit the docks and hassle the captain until he gives up his ownership of the dive suit.
Captain Loogie stands at the walkway to his boat, greeting passengers. Explaining the situation to him, he agrees to pass off the diving suit on the condition that you find his navigator Riley B. Matterhorn and bring him back to the ship. Where could Mr. Matterhorn be? Well, Captain Loogie lets us know that one of his favorite passtimes is gambling.
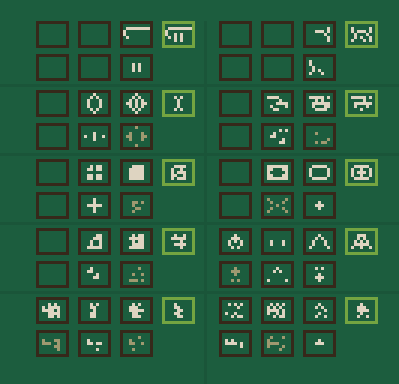
At the goblin casino Joe finds Riley spinning the slots. To no avail, words alone cannot convince him to leave as he is adamant to stay until his winning streak ends. Explore the casino until you come across a door behind the band. A goblin named Burt is running a machine that controls the win/lose ratios of the casino. Ask him to take the day off and then take over his controls. This is probably the hardest puzzle in the game and this picture (from the now defunct peachleaf wiki page) shows how to solve all possible puzzles.
After Riley ragequits the slot machines we can return to Captain Loogie who gives us his rental ticket. Take the rental ticket to Mr. Gunn at the clothing store to finally get the diving suit.
Day 11 (Meropolis and Finale)
Now that Joe has the diving suit it’s time for the second step of Ray’s plan – go to the lake north of Akuba. We’ll arrive and watch a startled mermaid hide in the pool from us. Use the diving suit on the water to start a cutscene where you arrive in Meropolis. A loudspeaker will let you know that you aren’t welcome without a visitors visa and the mermaid will swim up. She’ll let you know that their security is high because they captured a certain L. Rathmore but he’s escaped.
After she swims you back to the lake she’ll pass off an item of Rathmore’s that got left behind and Joe will automatically use it with a different item of the villains he obtained from Ray. This teleports our main character back to Akuba in front of a carved tiki pole that now mysteriously has a doorway.
Head through the doorway and down the tunnel to interact with a raft. The raft brings us to a volcano that serves as Lord Rathmore’s secret hideout. Joe turns on the beacon and pushes forward. The final confrontation with Lord Rathmore initiates as several PIE agents appear to arrest him.
You get to watch the rest of this. We’ll be prompted with cutscenes that set up DLC and/or a sequel as well as the end credits.
Day 12 (Sandbox)
Congratulations, you’ve completed the main storyline and now you’re free to farm at your hearts content! Seek out side quests, explore, farm – do whatever you want!