
Repentance added a new type of secret rooms, which can only be found via certain items that are able to create red rooms. Most ultra-secret rooms contain angel items, making them very rewarding to look for. This guide will teach you how to find them much more reliably.
Quick Note:
Due to a bug, as of the current version (v4.0.3), this method is flawed on and after the Womb floor. It seems like ultra-secret rooms are generated before the shops and treasure rooms are removed, which sometimes makes them impossible to find with this method. It still works there, but not always.
This can be circumvented if you have a trinket that allows those rooms to spawn on late-game floors, like the Wicked Crown or Silver Dollar.
[lwptoc title=”How to Find Ultra Secret Rooms”]
Prerequisites
In order to find an ultra-secret room, you will need an item/consumable capable of creating red rooms. Obviously, the most reliable one the Red Key, but you can also use Cracked Key or Soul of Cain. The Crystal Key trinket opens red rooms too, but you can’t control it so it won’t be very helpful here.
Since red rooms cannot be created in greed mode, ultra-secret rooms are limited to regular runs.
Generation Rules
Under normal circumstances, an ultra secret room will be generated between 2 (sometimes more) red rooms.
- At least one of these red rooms must be connected to any special room (treasure room, shop, arcade, regular or super-secret room, etc) besides a boss room.
- Both of these red rooms must be connected to at least one non-red room (but it cannot be the same one if it’s the only non-red room both red rooms border with).
The level usually has 3+ possible spots for an ultra secret room, but if there aren’t any valid spots for these rules to apply, the second rule will be disregarded.
If the level generation works as intended, you will only need to create one red room to find the ultra secret room, as it is revealed immediately after you open the neighboring red room.
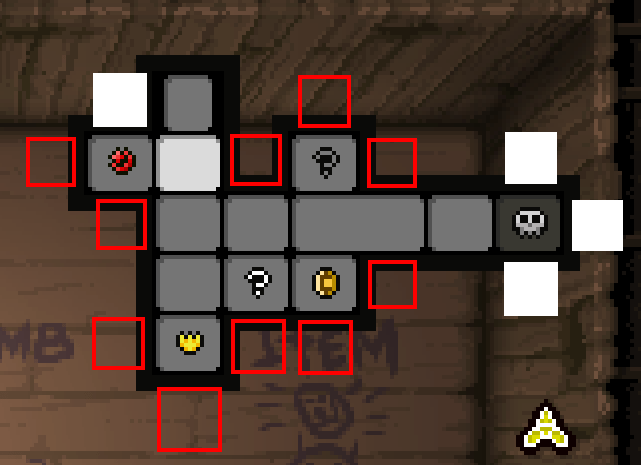
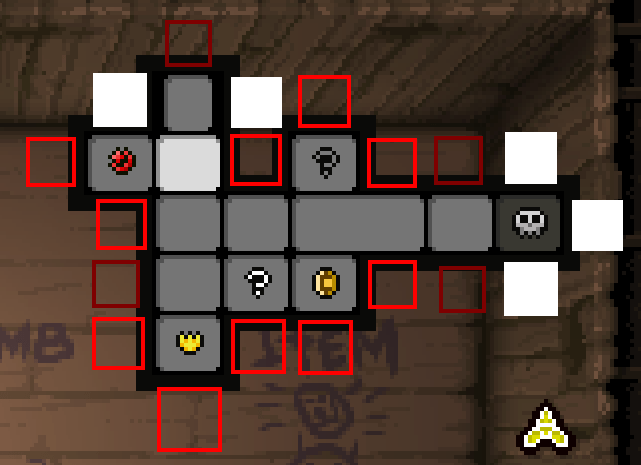
Here are some useful examples of valid and invalid locations of ultra secret rooms. Obviously, there are many more possibilities, but these are going to be the most common:

- Gray square = regular room
- Gray square with a star = special room
- Bright red square = red room near a special room
- Dark red square = red room near a regular room
- Question mark = possible ultra secret room location
Map Examination
Now that we know the rules abided by ultra secret rooms, we can start looking at the map of our floor. Having items/cards that reveal parts of the map will help immensely. If you don’t have any, just rely on your gut until you’ve fully cleared the floor. Make sure you have a good understanding of how to look for super secret rooms since they often act as the final piece of the puzzle when it comes to our task. Don’t collect any batteries you find until you’ve revealed the whole map.
First, printscreen your full map and paste it in paint.

Then, draw the possible neighboring red rooms for each of your special rooms (without looking at the rooms themselves, only look at the map!), besides the boss room. Place a white square in spots where a red room cannot be created.
Afterward, do the same for regular rooms, but in a darker color to make it more distinct.
Now, apply the rules mentioned above. Look at the empty spots on your map with 2 or more red neighbors, at least one of which is bright red. Don’t forget about the “it cannot be the same room if it’s the only non-red room both red rooms border with” part of the second rule.
If the spot you’re examining is in an invalid position, place a white square on it. If you find a possible spot for an ultra secret room, mark it.

That’s it. Return to the game and use your item to open a red room that neighbors with one of the marked spots. If you have red rooms that have multiple marked spots near them, opening those ones should be your priority.
Keep in mind that sometimes you won’t be able to open one of the red rooms leading to your marked spot. This does not mean that your spot is invalid, you will just need to find another way to get into the neighboring red room. In my example, I was forced to go through the cursed room because I couldn’t create a red room below it.

Other Examples

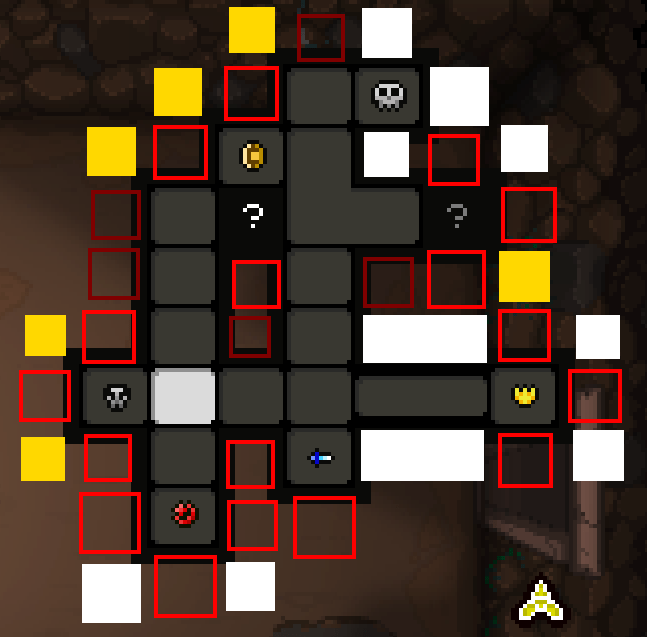

This is the map that I used for Sheol. Due to the bug, I was talking about at the beginning of the guide, it wasn’t correct.

However, it worked fine when I tried again with the Wicked Crown trinket!

Conclusion
And that’s how you can easily access the super secret rooms available in The Binding of Isaac: Rebirth. We would like to extend our gratitude to Danizk0 for making this detailed The Binding of Isaac: Rebirth secret rooms guide. Do you have any suggestions to improve this guide? Feel free to leave a comment down below.