A walkthrough and achievement guide for the game in English (based on my translation of the French guide written by Lutrinae Habilis, with subsequent editing and additions by me).
Achievements
Most of the achievements are missable, as they are not essential to the story (except two). It is possible to get all of them in a single playthrough. The guide is organised so you don’t miss any, but some depend on your actions:
– Sagacious: finish the game without asking for hints (don’t choose the dialogue optionss that give hints. Don’t panic, they are clearly marked.)
– Sharp-Eyed: Finish the game without using the highlight function of interactive objects, accessible by pressing the Space key.
– Incorruptible: Finish the game without asking for a solution. Again, don’t choose dialogues that explicitly state “Solution”.
– Finished! : finish the game. (Unmissable)
– Cheesebearer: In Chapter 1, DON’T TALK TO THE MOUSE. Don’t interact at all, and just go about your business and bring him the cheese from the safe.
– Making a mess: In Chapter 1, once the spigot is placed on the barrel in the cellar, you have to open it without using a bottle to pick up the oil.
– The will of a Ghost: In Chapter 2, when going to find the bear tamer in the forest, you must immediately start east, despite Tall’s (multiple) protests. Don’t listen to him, follow your instincts, insist. And place the amulet on the stele.
– Dirty Laundry: In Chapter 3, take the sheet from the chair in the abandoned hall, way over to the right of the room. It is not possible to miss it, the sheet is important for progression. (Unmissable)
– Diplomat: In Chapter 3, be humble in dialogue with the bearded warrior (specific dialogue options listed in the Chapter 3 walkthrough steps below).
Prologue
– Take the rod from the barrel of weapons and the bag of nails near the stairs.
– Pick up the sewing material upstairs.
– Throw the nails into the forge.
– Use the sewing material on the pincers.
– Put the melted nails in the trough of water.
– Use the metal picks on the closet.
– Take the hook in the cupboard door.
– In the inventory, use the hook on the rod.
– Use the long hook on the hammer hanging above Tall’s head.
– Pick up the hammer.
– Talk to Tall.
In this next scene, above all, you must not talk to the mouse in order to get the Cheesebearer achievement.
– Pick up the paper in the library, to the right of the mobile bookcase.
– Go down to the cellar.
– Take the charcoal and the bottle of grape juice.
– Go up to the workshop.
– Take the broom, use it on the sawdust.
– Pick up the glass-breaker hammer.
– In the drawer behind the pulley hook, take the spigot.
– Use the pulley and click on the suspicious high cabinet.
– Use the coal on the paper (in the inventory).
– Go back to the cellar.
– Put the spigot on the barrel.
– Use the spigot (Achievement).
– Use the safe combination on the safe.
– Use the glass-breaker hammer on the glass.
– Go up to Tall, give him the grape juice.
– Use the cheese on the mouse, without having spoken to it before
(Achievement: Cheesebearer).
– Pick up the wheel and place it on the mobile bookcase.
– Return to the cellar, use the empty bottle on the spigot.
– Use the oil on the mobile bookcase.
– Push it, use the hook on the grimoire.
– PUZZLE: find the letters on the right page (the cursor turns orange when you’re in the right spot), then write AQUARIUS on the left page.
Chapter 1
– Pick up the face cream on the dresser, and the mirror just above.
– Use the piece of mirror on the pillow under the hammock, and take the hay.
– Go up the ladder, take the aromatic plants in the planter and the bucket a little further to the left. On the right, take the shovel.
– Go back down near the entrance, take the vial from the dresser to the left of the stairs and put the hay on the candle just above. There will be a short dialogue with Tall and he will give you a key.
– Pick up the key on the ground, use it on the door, then enter.
– Take the butterfly net, the bottle of alcohol in the terrestrial globe and “The Shrewd Adventurer” in the bookcase (Little red book at the bottom right).
– Put the face cream on the sprig of thyme, in the inventory.
– Put the bottle of alcohol on the vial, in the inventory, then add the sprig of thyme with the soft skin.
– Go upstairs, use the mixture on the alchemy equipment
Chapter 2
– Throw everything you can at the bear: the Smart Adventurer’s book, the shovel, the bucket, the hook.
– During the chase, there is a tree a little more detailed than the others, with a branch sticking out and a yellow butterfly on this branch.
– Use the butterfly net on this tree.
– Take the berries from the bushes, give them to Tall.
– Near the entrance to the cave, pick up the stick then enter the cave.
– Take the adventurer’s bag near the skeleton. There will be a short dialogue, after which you will be able to pick up the bag’s contents.
– Use the piece of mirror on the stick.
– Give the flask to Tall.
– Use the Terrifying Edged Weapon on the hanging sign, and pick up the rope.
– Near the river, use the healing potion on the stump, then the rope on the new tree that has sprung up and on the tree on the far right, in the shade.
– Click on the rope.
– Try to exit to the right of the village.
– Talk to the charcoal makers in the camp, the first time to find out who sold the charcoal, then who served the charcoal (it seems to be randomly allocated each playthrough).
– Go back and talk to Tiny.
– Go east, and insist until it works.
– Place the amulet on the stele
(Achievement: The Will of a Ghost).
– In the maze, find your way around using the clues (scratches, carved stone markers, coal, etc.) and follow them until you reach another clue. Be careful, they are sometimes hard to spot.
– Pick up the mallet and the chisel on the stone table, then the nails on a board on the ground, in the grass.
– Go back to the coal camp, pick up the stick near the extinguished fire, as well as the strange object on a small table near the other extinguished fire.
– Go back to the cave.
– In the inventory, use the rag on the staff, then the oil.
– Enter the cave, use the lighter on the torch.
– Find your way in the maze (it’s fairly simple, but you want to be heading down and to the right in general).
– Enter the house. There will be a short cutscene.
– Head north to get to the bridge.
– At the bottom of the stairs, use the butterfly net on the foam.
– Read the sign near the closed door.
– Give the mallet and chisel to Tall.
– Switch to Tall, and go to the coal camp.
– Use the mallet on the small dresser, and take the cup.
– Return to the river, pick up the rope previously stretched between the trees.
– Go back to the bridge, put the cup on the door chain to the left of the sign.
– Switch to Tiny and use the nail on the cup.
– Talk to the “troll”. When he starts listing the required items, switch characters and undo the string holding the ladder the troll climbed up.
– Extend the rope to the ‘troll’ after he falls.
– Once he climbs up, he will give you the key and his fake nose
– Switch back to Tiny and use the key on the door.
– Pick up the soft plant next to the mystery hut.
– Enter the mysterious hut, take the firefly lantern at the bottom of the stairs.
– Go north. Pick up the floury fungus from the trunk and the nearby heather.
– Continue towards the clearing of the hunter.
– Go back to the bear cave, use the jar of fireflies to light it up.
– Look for which luminous lichen it is possible to pick up (over in the upper/middle right, after having advanced a little in the labyrinth by going from lichen to lichen).
– Go back to the mysterious hut, talk to the witch.
– Give the mushroom, the lichen, the smooth scum.
– Once the potion is in your pocket, return to the hunter’s clearing.
– Use the lighter on the tripwire
– Use the stealth potion on the hunter.
– Give the healing potion to Tall.
– Switching to Tall, climb on the solid mushroom and use the healing potion on the broken branch.
– Return the empty vial to Tiny.
– Switch to Tiny, go back to the witch.
– Give her the heather, the soft plant, the flask, and finally the empty vial.
– Once you have the potion in your pocket, return to the hunter’s clearing.
– Give the potion to Tall.
– Switch to Tall, and return to the solid mushroom and use the new potion on the pathetic twig.
– Climb the solid branch.
– With Tiny (the change is automatic), click on the bow.
Chapter 3
– Take the spear to the left of the skeleton.
– Dip the spear into the tar pit.
– Use the spear on the roof of the shed.
– Use the rope then the lighter on the shed.
– Place the board on the pit.
– In the next area, click on the beam.
– Take the iron bar in the destroyed mill, the saw leaning against the left wall, and the bucket on the ground a little further to the left.
– Use the iron bar on the beam.
– Use the bucket on the well.
– Throw the bucket of water on the fire.
– Search the ashes.
– Use the key on the hatch.
– At the river, collect the pebbles at the bottom of the steps at the edge of the water, hidden under the bushes in the foreground.
– Use the tar, the saw, the pebbles and the iron bar on the boat.
– Return to the open hatch by the destroyed mill and go inside.
– Take the comb from the right shelf, the fishing rod near the stairs and the papers from the left shelf.
– Look at the book. Observe the items on the wheel drawn on the wall and their placements.
– Return to the river.
– Click on the boat.
– Talk to Tall after the cutscene.
– Enter the lodge.
– Take the first cog from the Bard Statue (it’s one of the pegs on the head of the instrument)
– Take the second cog in the middle of the round shield on the ground.
– Take the third cog from the ranger statue, more precisely on the dog’s collar.
– Take the sheet from the chair
(Achievement: Dirty Laundry).
– Click on the spear of the warrior statue.
– Pick up the broken spear point and use it on the shield of the warrior statue.
– Once the mechanism is accessible, place the three cogs in it (line on line, cross on cross, circle on circle)
– Put the iron bar in the hand of the warrior and click on it to activate.
– Click on the hole that opens up in the middle of the room.
– In the next area, take a fuse from the chest on the left.
– Take powder from the powder keg.
– Use the powder and the fuse on the door, then the lighter on the fuse.
– Look at the cannon and the manual in the next room.
– Click on the skeleton near the bridge to pick up the mace.
– Use the saw on the mace.
– Take some powder from the barrel and a fuse from the trunk.
– In the inventory, assemble the fabric with the handle of the mace.
– On the cannon, use the powder, the head of the mace, the rod with the fabric, the fuse, and finally the lighter.
– Take a fragment of the broken pillar.
– On the cannon, use the powder, the stone, the rod with the cloth, the fuse, and finally the lighter.
– Cross the bridge.
– For the Diplomat achievement to be unlocked in the dialogue, it is necessary to speak with humility.
(Choose dialogues that begin with;
“It’s a misunderstanding…”
“It might be hard to believe…”
“It’s the truth.”
“Absolutely. We have already…”
“No, nothing!”)
(Achievement: Diplomat)
– Take the hot sauce on the table, and the paint to the far left of the area. Go outside via the door on the right.
– Talk to the ram (it doesn’t say much at the moment, but it’ll be important later).
– Exit to the right, towards the battlefield.
– Click on the suspicious flag.
– Continue on to the dark alley and go into the house.
– After you come back outside, talk to the guard on the right.
– Return to the destroyed mill.
– Take the ribbon from the mill.
– Return to the Abandoned Hall of Warriors.
– Go to the hidden floor.
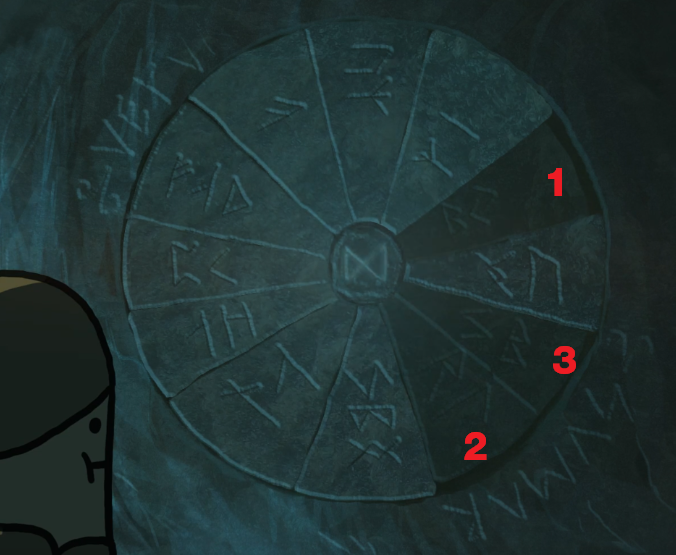
– When pressing the wheel sections, you have to start with the topmost slab, then the bottom one, and finally the middle one, otherwise it won’t work. See screenshot:
– Take the riches.
– Go back to the swamp.
– Use the hot sauce on the toad.
– Click on the unfortunate predecessor (he leaves us his axe and his hand).
– Back to the battlefield
– Use the axe on the suspicious flag.
– Pick up the pants.
– Go back to the stylist skeletons.
– Use the black sheet on Tiny then go to the crypt.
– Use the skeleton hand on the guard.
– Use paper & charcoal on fashion engraving.
– Go back to the bearded guardian.
– Give engraving.
– Go to the armoury, and click on the amulet near the stairs, hanging on a barrel on the left.
– Give the riches to the armourer.
– Take the socks, on a box to the right of the stairs.
– Use the socks on the fishing rod.
– Go back to the river via the destroyed mill, and fish in the river.
– Return to the Abandoned Hall of Warriors.
– Talk to the tall friendly gentleman.
– Return to the ram.
– Try to comb him, then talk to him and comb him again.
– Speak with subtlety and elegance, so as not to offend him. Imply that he doesn’t really need his crown as his regal aura is self-evident.
– Go back to the abandoned warrior hall and give the magic crown to the tall man.
– Use the red paint on the scarf.
– Open the fashion engraving and assemble the costume: false troll nose for the helmet slot, scarf in the scarf slot, newly acquired shoulder pads in the shoulder slot, amulet purchased from the armoury at the collar slot, pants picked up from the battlefield at the pants slot, and wet boots at the boots slot.
– For the dialogue with the fashionable skeleton, it is necessary to speak with confidence.
(Choose dialogues that begin with something like;
“Grotesque?”
“Oh, you know about it?”
“I mean, Peasants..”
“Oh really? Tragic”
“It’s a bit… provincial”
“Isn’t it obvious?”
“Ah, yes, the avant-garde..”
“A great influencer”
“Grandiloquent bombast”
“(only one dialogue choice)”
“(only one dialogue choice)”
“(only one dialogue choice)”
“An ignorant…”
“(only one dialogue choice)”
“(only one dialogue choice)”)
Then just watch the final cutscene and the post-credits. The last remaining achievements should unlock.
Achievement: Finished
Achievement: Incorruptible
Achievement: Sagacious
Achievement: Sharp-Eyed


