I hope to guide you in the direction of any collectibles you are missing, ending with an abstract map you can follow if needed. This is for those who don’t want everything handed to them but would like to know what stage they need, or what room on that stage.
Intro
SPOILER WARNING There is a collectible which unlocks after the game. If you don’t want that spoiled, do not scroll down as far as the map at the end.
Also there’s no way ingame to tell which of this collectible you have found/have left in terms of locations besides going there, but all the rest I will include ways to tell which you are missing and the stage to check.
At the end I will present an abstract map to follow or use as a checklist.
Students
There are a total of 32 students to be rescued. There are 3 achievements associated with finding them, and are all needed to unlock a further ending achievement.
After getting through the castle once, a base for the main characters will eventually open up with a door on the bottom right leading to the gym. The easiest way to tell which students you are missing is to go there and compare it to this shot of the completed gym.

The number above each student (and symbol) tells you which stage to search, which may be all you want or need. If you’d like further direction read below. If you’d just like to see the map, scroll to the end of the guide.
Roze – Behind the firey beast right at the start of Mysterious Cave. If you’re having trouble getting past it, think about cooling it off.
Rize – You can’t miss her on the second pass through Mysterious Cave. Use the demon platform that lifts you up to get over to her.
Megumi – She is with Saki in the secret room of Library. If you haven’t figured out you can destroy the cracked floors with explosives yet, you’ll need to take the bottom right corner exit from the hub room of many doors and start blowing stuff up. You can use bombs, TNT, houdai-kun doll or even Shinobu’s unlocked rockets.
Rion – She’s somewhat hidden early in the water areas of Mysterious Cave. You’ll either need to cross an expanse of water going right (umbrella dash, penguin, paper swans) or a couple rooms later, maintain height to go up a slope above you.
Anita – You can’t really miss her on the second pass of Library unless you end up taking the first pass route by mistake. From the hub room of many doors take the top right corner exit and keep going for about 5 rooms.
Otome – Take the absolute top route on Courtyard. If you hear her but can’t find her, make sure to hit every part of the tree until you find your way to her.
Tsukasa – On your first pass of Clock Tower this student is behind some spikes you’ll have to take damage from. Alternatively you can reach her safely from the second pass route by going through an optional door on the top left of a tall room later on. The strange thing about this is she won’t make any noise from the latter until you actually jump toward the door so she’s easy to miss.
Mihono – This student is on the first pass of Castle Peak. An alternate route makes her easy to miss but if you stick to the lowest, rightest way you can’t miss her.
Tsubasa – You can’t miss her on the second pass through Mysterious Cave.
Midori – You can’t really miss her on the first pass of Library. If you somehow avoided her, take the bottom right corner exit from the hub room of many doors and keep going until you find her. Megumi and Saki are found from the same room.
Neneko – On the first pass through Clock Tower in a hidden room behind a ceiling snail. If you’re on second pass, take a left at your first direction choice and at the far left of the next long room, go up not down. Goodluck!
Tsubomi – She’s the first student you will find. She’s near the start of Ceremony Hall and can only be missed if you’re trying hard to miss her. Incidentally, she’s also the first student you shoot in every Gal Gun game as far as I know.
Ringo – In a hidden room on the first pass of Library. If you missed her you’ll need to go through the facing bottom right door in the hub room of many doors. It will be locked and the switch to unlock that door can be found through the bottom right corner exit of that same hub room. Kill or pass every Mage enemy and hit walls and you should find her.
Asuka – You should hear her as leave the big fountain room in Courtyard. She’s through the facing door above the normal exit. You can use grappling hook or paper swans to reach the door but it can be tricky. Easier is on the second pass take the highest route until you find a firey beast, then take the exit down into the same big fountain room, from the very top of the slope you come in on; jump right with umbrella and land on a squarish platform, jump and umbrella along all the square platforms until you reach the door.
Saki – She is with Megumi in the secret room of Library. If you haven’t figured out you can destroy the cracked floors with explosives yet, you’ll need to take the bottom right corner exit from the hub room of many doors and start blowing stuff up. You can use bombs, TNT, houdai-kun doll or even Shinobu’s unlocked rockets.
Kasumi – You can’t really miss her on the first pass through Castle Peak. If you go through the facing door where you find her, you may also miss Mihono.
Uraraka – On Castle Gates take the highest route when able. When you find her do not go through the hidden door until you save her, or you’ll have to get there all over again. If you’re struggling to reach her, you could try getting on the chandelier demon (alive or frozen) but you don’t have to. You can use the grappling hook fired right and jumping fast. If these are all giving you trouble, throw a paper swan, jump onto it and switch to Shinobu’s oonusa (healing stick), hold down the sub weapon button (to wave the stick) and use directions to get where you want to go.
Yukina – At the very end of highest route in Ceremony Hall.
Yurina – Hidden in Castle Peak second pass. Take the highest route until you are on a slope with 2 wyverns. There will be a blue fan that can lift Maya’s umbrella. Take a risk and drop down there.
Ruriko – In all my viewing, this is the student most often missed because the wall she’s hidden behind doesn’t break when shot at. It’s just so easy to walk past it. So to find her, go to the room in Courtyard with the big fountain and check closely around the fountain.
Hibari – You can’t really miss her on second pass of the Library unless you take the first pass route. Take the top right corner exit from the hub room of many doors and a couple rooms on you’ll pass her in a room of ghosts. Just umbrella over to her or use grappling hook or paper swans.
Aya – On the highest route second pass of Castle Peak there’s a big room filled with ghosts. You can either grapple hook from the right to the top left corner or reveal a hidden floor fan to use to reach her.
Kumi – First student you’ll see in Courtyard. You can reach her immediately by throwing a swan from the slope to the right, or by freezing the knight and using it as a platform.
Kazami – You can’t really miss her on the second pass through Castle Peak. Just take the highest route and you’ll see her.
Madoka – At the end of Castle Gates through a facing door just out of reach. On second pass take the lowest route through the stage, or from Aoi’s shop it’s in the room just above you. Use grappling hook fired left/right and jumping, or paper swans fired again the wall, to make your way up.
Konomi – On a side route in Ceremony Hall. All routes converge on a room with a big facing door in the centre to continue. Rather than going through the door, go to the exit in the top right corner.
Mafuyu – Late on in Mysterious Cave second pass. You will need to cross a lake of fire to reach the room exit to find her. A timed umbrella dash can do it, or good use of a penguin, or grappling or paper swans…
Mirai – You can’t really miss her in your first pass through Courtyard. She’s a little out of reach but there are ways to get up or you can simply drop down to her after taking the longer way round ahead.
Shizuka – You can’t really miss her on first pass through Clock Tower. If you’re on second pass, take a left at your first direction choice and she’s at the far left of the next long room.
Rikiko – Take the lowest route on second pass through Castle Gates. In the room where your chandelier platforms fall, you will need to fall to find her.
Kanko – Take the highest route through Castle Gates.
Kirara – The only ‘student’ in Dimensional Rift. Head down when able and umbrella to the right.
Device Parts and Upgrades
All three Device Parts are required for two option/ending achievements. They tend to be a little hidden and can only be gotten on the second pass through the game.
All eight Upgrades are required for one achievement. They are usually a little hidden or hard to reach.
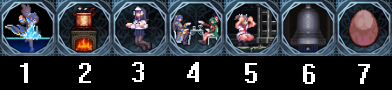
Going into the pause menu at any time will display which Device Parts and Upgrades you have found. If you’d like your search for a missing item narrowed to just the stage, compare your pause menu to this image and go to the stage written by it.

If you’d like further directions read on. If you’d prefer the abstract map, scroll to the end of the guide.
Device Parts
The first device part is located in Mysterious Cave. There is a long room of lava that as you enter, you may notice beneath the slope you are on is a space you can get to. The only way to get there is from this room using a sub weapon to negate the lava such that you can crawl through. Just think of it as one of those fiery beasts but less deadly.
The second Device Part is located in Library. Take the top right corner exit from the hub room of many doors. When you reach the room with slime falls, make sure to hit the switch there. In the next room, exit by the facing top right one-way door. Finally look for a shelf that has a flame above it. This flame is your clue and is actually the sign that you’ve opened a door there with that switch earlier. Destroy the cracked ground beneath the shelf there to reveal the door.
The third Device Part is on the highest route of Castle Peak. It is at the top left of the sloped space with two wyverns and some ghouls. You can use Maya’s umbrella with the floor fan to reach a moving platform that will help you across.
Upgrades
There is approximately one upgrade per stage to be found. These are 2x Max Hearts Up, 2x Max Weapon Points Up, Maya Attack Up, Defence Up, and 2x Shinobu Max Bullets Up. Since there’s one per stage I will describe them in stage order.
Castle Gates / Shinobu Max Bullets Up – Located below the drawbridge before you enter the castle. If you’ve not figured out how to open it yet, you’ve been trying to hard. Just blow it up with Grenade, TNT or Doll.
Ceremony Hall / Max Weapon Points Up – From the start keep going up until you reach seemingly a dead end with a fall to the right. From second pass onward this gap is actually a shortcut and the upgrade is floating in the air. There is a moving platform halfway to help you across. Use paper swans and umbrella to get to the upgrade.
Mysterious Cave / Shinobu Max Bullets Up – In the room that opens with 3 floor flames there’s a door immediately above you. You can grapple to it from the right or freeze the flames to use as platforms.
Courtyard / Max Hearts Up – You will pass it every time two rooms before the shop and boss. Just use the platforms to get to it from the left using the umbrella to shield you from the blood sprinklers. Alternatively you can just use the grapple hook or, if you want to get this one on your first pass through, freeze the spear lizard enemy and use it as a platform.
Library / Defence Up – Taking the top right corner exit from the hub room of many doors, keep going until the room after all the slime falls. If you break all the cracked ground here with Grenade, TNT, Doll or Shinobu Rockets, you will find the hidden door that leads to the Upgrade.
Clock Tower / Max Hearts Up – You will have seen this Upgrade whenever you play through Clock Tower and been frustrated at not reaching it. From that room head right on second pass and keep going until you see spikes low to the ground where you could otherwise crawl. Use Maya’s Doll, crawl through and keep going. You can get it sooner if you really want to but it’s a lot of backtracking.
Castle Peak / Maya Attack Up – This one is a platformer challenge. Once you know the course it’s not bad on Casual but the knockback on Veteran makes it a little harder. To get there head upwards on your second pass until you reach the room with high up platforms crossing a gap. Cross that gap and the next will be low with floor fans. Use the umbrella on the floor fans to enter the secret course. Once you reach the end of the course do not enter the facing lower door as it is one-way. Instead head up to get the Upgrade.
G is for Gym / Max Weapon Points Up – Some way into your second pass through the game, a base of operations will open up with a door to the Gym on the bottom right. You will see the Upgrade above you as you walk into the Gym. You can get up to it by grappling left and jumping quickly. If you are finding this hard, head right and through the facing door at the end to get upstairs. Head right again to where a pile of boxes stop you and grapple right while jumping until you make it over. Go through the facing door on the other side of the boxes to reach the area with the Upgrade.
Secrets
While not a collectible, there’s one secret to be found on each full stage that unlocks an achievement. On the map they’ll be marked in purple since that’s how the teleport pillar maps indicate them. You can check your achievements to see which you’re missing from the following.
Castle Gates – Blow up the drawbridge.
Ceremony Hall – Take the lower route and break the wall behind the steps. Inside the room use Umbrella Dash to solve the puzzle.
Mysterious Cave – Where the first pass and second pass splits, make it to the facing door in the top left. Use oonusa to solve the puzzle.
Courtyard – There are four shelters with table and two chairs. Press up, change character, press up again; at any one of them to solve the puzzle.
Library – Find the hidden door behind a bookshelf by exploding cracked floors. This one specifically is on the first pass route. From the hub room of many doors take the bottom right corner exit.
Clock Tower – On the first pass route when you get the lift to the top of the tall room, jump left and go up even more. Use an attack to ring the bell.
Castle Peak – On a second pass or later, take the highest route until you reach where high platforms cross a gap. Cross the gap and in the next room use Umbrella to enter the secret challenge. Once you make it go up and into the nest then leave the room without breaking any eggs. You can jump on the edge of the nest then walk left without jumping and not break any eggs.
Final Collectible and Map
There may be better maps out there, and better guides with screenshots, and videos. But if you can follow it, I hope you can find and check off everything you’re still missing.
I still haven’t mentioned the final collectible by name to not spoil since it’s after-game content. There are 40 in total and collecting them all is required for an achievement; delivering them all is only its own reward. Due to some randomisation, there’s no way in the game to know which you are missing except going there so using the map as a checklist might be your best bet. The first will always be Tsubomi’s, the rest will be randomised until the last two which will be randomly Maya’s or Shinobu’s. You can use this knowledge to know if you’ve reached the 39 mark and close to completion.
If you’ve kept track of how many you’ve found in each stage, you might be able to use the following list to know where to look next.
Castle Gates – 4
Ceremony Hall – 7
Mysterious Cave – 6
Courtyard – 6
Library – 6
Clock Tower – 5
Castle Peak – 5
Dimensional Rift – 1
Here are directions for gathering every Final Collectible in one go per stage
Castle Gates – Drop down at the drawbridge, the next room will have One. In the next room leave by the top right exit. In the next room crawl with Maya to go through the facing door to find One. Continue onward until you reach a mantis with a crawl space behind it. Crawl as Maya, hit the wall and enter to find One. Finally when you reach the shop, head up. In the next room go through the facing door for One.
Ceremony Hall – At the first split point go down to pick up One then go back up and continue normally. At the tall room leave by the facing top left door. There will be One before a stack of snake walls. You can actually let a snake wall live and use it as a platform. Continue onward until the room with trapdoors. Let the first trapdoor drop you, run left for One then up and continue. At the room with the big door in the centre, first head top left then up for One then continue on. After the chandelier demon room drop to the bottom of the tall hall for One. Now get to the top right exit. In the next room, do not fall through any trapdoors. At the end of the room there will be One. In the next tall hall exit top right again and there will be One before a load of snake walls.
Mysterious Cave – Start by going right. When you reach the first room where you can drown by going right at the bottom, cross that water. Or alternatively continue on and use the demon platforms to get to the slope. There will be One on the right of this room. Go down and continue onward. Where the first and second pass splits, get to and go through the facing top left door for One. Continue on the second pass route and there will be One immediately. Continue onward until the three floor flames. Get to and go through the facing door above you for One. Continue onward to the long room with lava. There’s One if you cross the lava to the right, and there’s One if you freeze and break the lava and crawl to the left. Do it in this order unless you are confident in other abilities to cross the gap you make on the right by destroying the lava, or die and freeze it again.
Courtyard – Run immediately left and destroy the wall to find One. Continue onward until the stairs going upward. Reach those steps to find One behind a stack of snake walls. Continue onward on the lower route and get the One in the room after the big fountain. Backtrack to take the higher route to find One before the scythe door. Continue onward and upward and you will find One in the tall room full of cells containing enemies. Be careful not to end up below the second moving platform or you’ll have to go do the whole area again. Finally head out right and down and backtrack left. Use Umbrella Dash as a shortcut and in the next room to the left you will find One.
Library – Get to the hub room of many doors and exit bottom right corner. In the room with spikes to the right find One in the bottom left corner. Continue to the hub room of many doors and exit top left corner for One immediately. Continue until past the slime falls. There will be One high up in the next room. Also destroy cracked floors here to reveal a hidden door to find One. Continue on to the hub room of many doors and exit the facing top right door. There will immediately be One. Head right but drop down twice and go through the facing door for One.
Clock Tower – At the first split exit right. Continue on to the room full of ghosts and find One on the left side. Continue onward top right and get through the first facing door you see. Drop down through the next two rooms until you reach the white and gold pillar that lifts. There will be One in the top left corner of the room. Continue down then left and go up where the path splits. Continue up and there will be One behind a dog. When you reach the elevator room do the following in either order: Exit bottom left and use Paper Swans and Umbrella to reach One then return to the elevator room. Exit top left toward the bell tower where you’ll find One.
Castle Peak – If you came here by teleport, drop to the lower level of the first main room. If you came here from Clock Tower, continue on and stay on the bottom route. When you reach a room with a tiny platform and a ceiling snail, get up to where the platform leads for One. Go through the facing top right door, then the facing top centre door, then the first facing door. Exit through the facing door high on the left and continue left until you reach floor fans. Use the fans with Umbrella to enter a challenging area. Get through to find One. Exit through the facing bottom left door and continue left across the gap with high platforms. Continue upwards and right until you reach thr big room with ghosts. Geto to and go through the facing top left door and find One at the top of the room. Continue down and right to the next area with the slope and wyverns/ghouls. There will be One on the top left. Finally drop down the floor fan and through the hidden facing door. There will be One through the middle of three facing doors.
Dimensional Rift – Head right and go down at the first opportunity. Umbrella to the right and you will find One.