The Chaos Space Marines are a bit of a strategy puzzle, with their unusual “economics” of sacrifice and your direct god-like intervention in each of your units’ little lives. They take a long time to master, and I’m hoping this guide will help you use this fascinating faction to its best when playing Impossible difficulty.
Introduction
At first, I didn’t care much for the Space Marines’ evil cousins. The faction seemed to easily get bogged down in infrastructure, and the units required too much management and hassle to improve. Then, suddenly, I discovered the “secret”…use all the unit abilities, marks, icons, and sacrificial offerings. A whole different game…
Here’s my attempt to flatten your learning curve so you can take on the Impossible AI, and quite possibly, win!
“My children understand that they are part of something greater, and if that means sacrifice, then so be it.”—Apothecary Fabius
Faction Traits
The Chaos Marines aren’t easy to learn or play, but they ultimately have some of the most robust production engines in the game, able to easily support up to four gigantic, productive cities with extremely high loyalty.
Advantages
- Start with two city-builders. Because you begin with two Chaos cultists, and the ability to build more right away, you can have your second city built by turn 8, and your third by the early 20s.
- Citizens as currency. Chaos effectively has an additional currency…population. Once you learn to manage city growth, you have the potential leapfrog all other factions in production of all resources.
- Excellent heroes. Chaos is the uncommon faction with four heroes, and all are very useful. In long games, you’re even likely to get at least one Daemon Prince for free, keeping all the levels of the “promoted” unit.
- The best top-tier unit. Brass Scorpions are massive, regenerating, fast, stompy units with deep hit point pools. Personally, I think they edge out all other great top tier units, even the previous champs like Knight Crusaders (I still love you too, Squiggy).
- Units stay useful. Because of the huge number of upgrades, entry-level units are worthwhile even in the late game. Even the lowly Chaos cultist can add value to an army in the end-game.
- Infantry use food. Unlike the Space Marines, all Chaos infantry use food. Although this may seem like a disadvantage, food is relatively easy to produce. Now your growing infantry army doesn’t sap the resources needed to make war machines.
“Perhaps we are little more than psychopathic apes, driven to fashion clubs and smash out the brains of our closest neighbours.” – Fabius Bile (from the 40K Omnibus).
Disadvantages
- No inherent building boosts. Unlike many other factions, no technologies directly improve production output. If you can’t spare the population, your cities will languish trying to keep up with infrastructure at the expense of unit building.
“Building is not an end unto itself. Through our creations, we strive to improve the builders themselves, and use the bones of the imperfect as our foundations for the future.” - Best top-tier unit…if you own the DLC. Unfortunately, the Greater Brass Scorpion is so good that *not* owning the Firepower DLC which supplies it makes the Chaos faction much less effective in the end game. Even their second-best unit, the Chaos Land Raider, is locked behind the Assault Pack DLC. I’d go so far as to not recommend playing this faction at all if you don’t own at least one of the add-ons. Since the Chaos Space Marines faction is a DLC already…well, shame on you, Proxy Studios.
- Melee oriented. Although not as melee dependent as Orks or Tyranids, you’ll only get the best out of your units if you strike from melee range. This makes you more vulnerable to overwatch and counterattacks.
- No rapid transport. Although Chaos units can be extremely fast individually, there’s no quick way to bridge large distances as with Webway Gates, or Orky teleportation, or even air transport vehicles.
- Limited air and anti-air. Although the Heldrake is a hardy critter, it can only attack adjacent targets and it’s the only air unit available. There’s also no dedicated anti-air ground batteries, so you’re left making do with sheer volumes of firepower to bring down enemy air.
Setup & Cooperative Play
Starting settings
We’ll use the settings mentioned in the general guide, with a couple of comments. Make sure there’s plenty of “Tropical” environments, as food will be a significant limiting factor otherwise.
Maximum neutral creeps will slow down the AI; for Chaos, neutral units are how you’ll build up your collection of boons of Chaos, which will transform a middling Khorne Berzerker unit into a squad of killing machines.
Extra Jokero camps mean that you can buy items reliably (and you’ll being doing this more than any other faction), and increased arctic and temperate terrain will assist with research and food production, respectively.
Co-operative Play
Perhaps unsurprisingly, Chaos Marines do not make the best partners. As mentioned above, they don’t have any rapid transport options to reach out to help allies under siege. Most of their support powers won’t affect units from other factions (but they do work on allied Chaos Marines). The Warpsmith’s and Master of Possession’s healing abilities will work, however.
If playing co-op, make a beeline for your ally’s territory so that you can have a corridor to transport units for mutual defense, and consider building cities towards your ally to close the gap. Once you have a clear path, the Chaos units’ relatively high ground speed can make a pipeline of reserve forces to aid a colleague under siege. Chaos Spawns in particular can rapidly cross the map to bolster your ally’s numbers. Alternately, pair up with an ally with mass transport capability such as the Tyranids, Eldar, or Orks.
Should I play the story quest?
Unequivocally, yes! The Chaos Marines have the most rewarding story line, granting very powerful artifacts and a great early game unit (the Chaos Spawn). Like for all story quests, you’ll need an “off ramp” so that you don’t complete it before you beat the AI. I recommend stopping at the point where you need to perform the Sacrifice to Khorne (or, to avoid the Tyranid swarm, you can stop at the earlier point where you bestow a Mark of Nurgle).
Starting Cities
Not one, but two starting cities
As always, this is one of the most important decisions in the game…with a twist. For the Chaos faction, it’s actually *two* of the most important decisions.
The ideal starting city will be similar to most other factions…research and food, with eventual energy and ore capabilities. I have found that a city can be reasonably expected to have early access to two substantial resource boons, or up to four moderate ones. For Chaos, it’s best to go deep on research for the first city.
Here’s where things get a little unique for Chaos. When you’re picking your starting city location, you should also choose a site for a second city, preferably one that can meet unfilled needs (such as energy or ore). The city centers have to be five tiles apart, and that’s plenty. In most cases, it’s better to have the cities close together so they can support each other and don’t draw the ire of too many neutrals.
Example Start
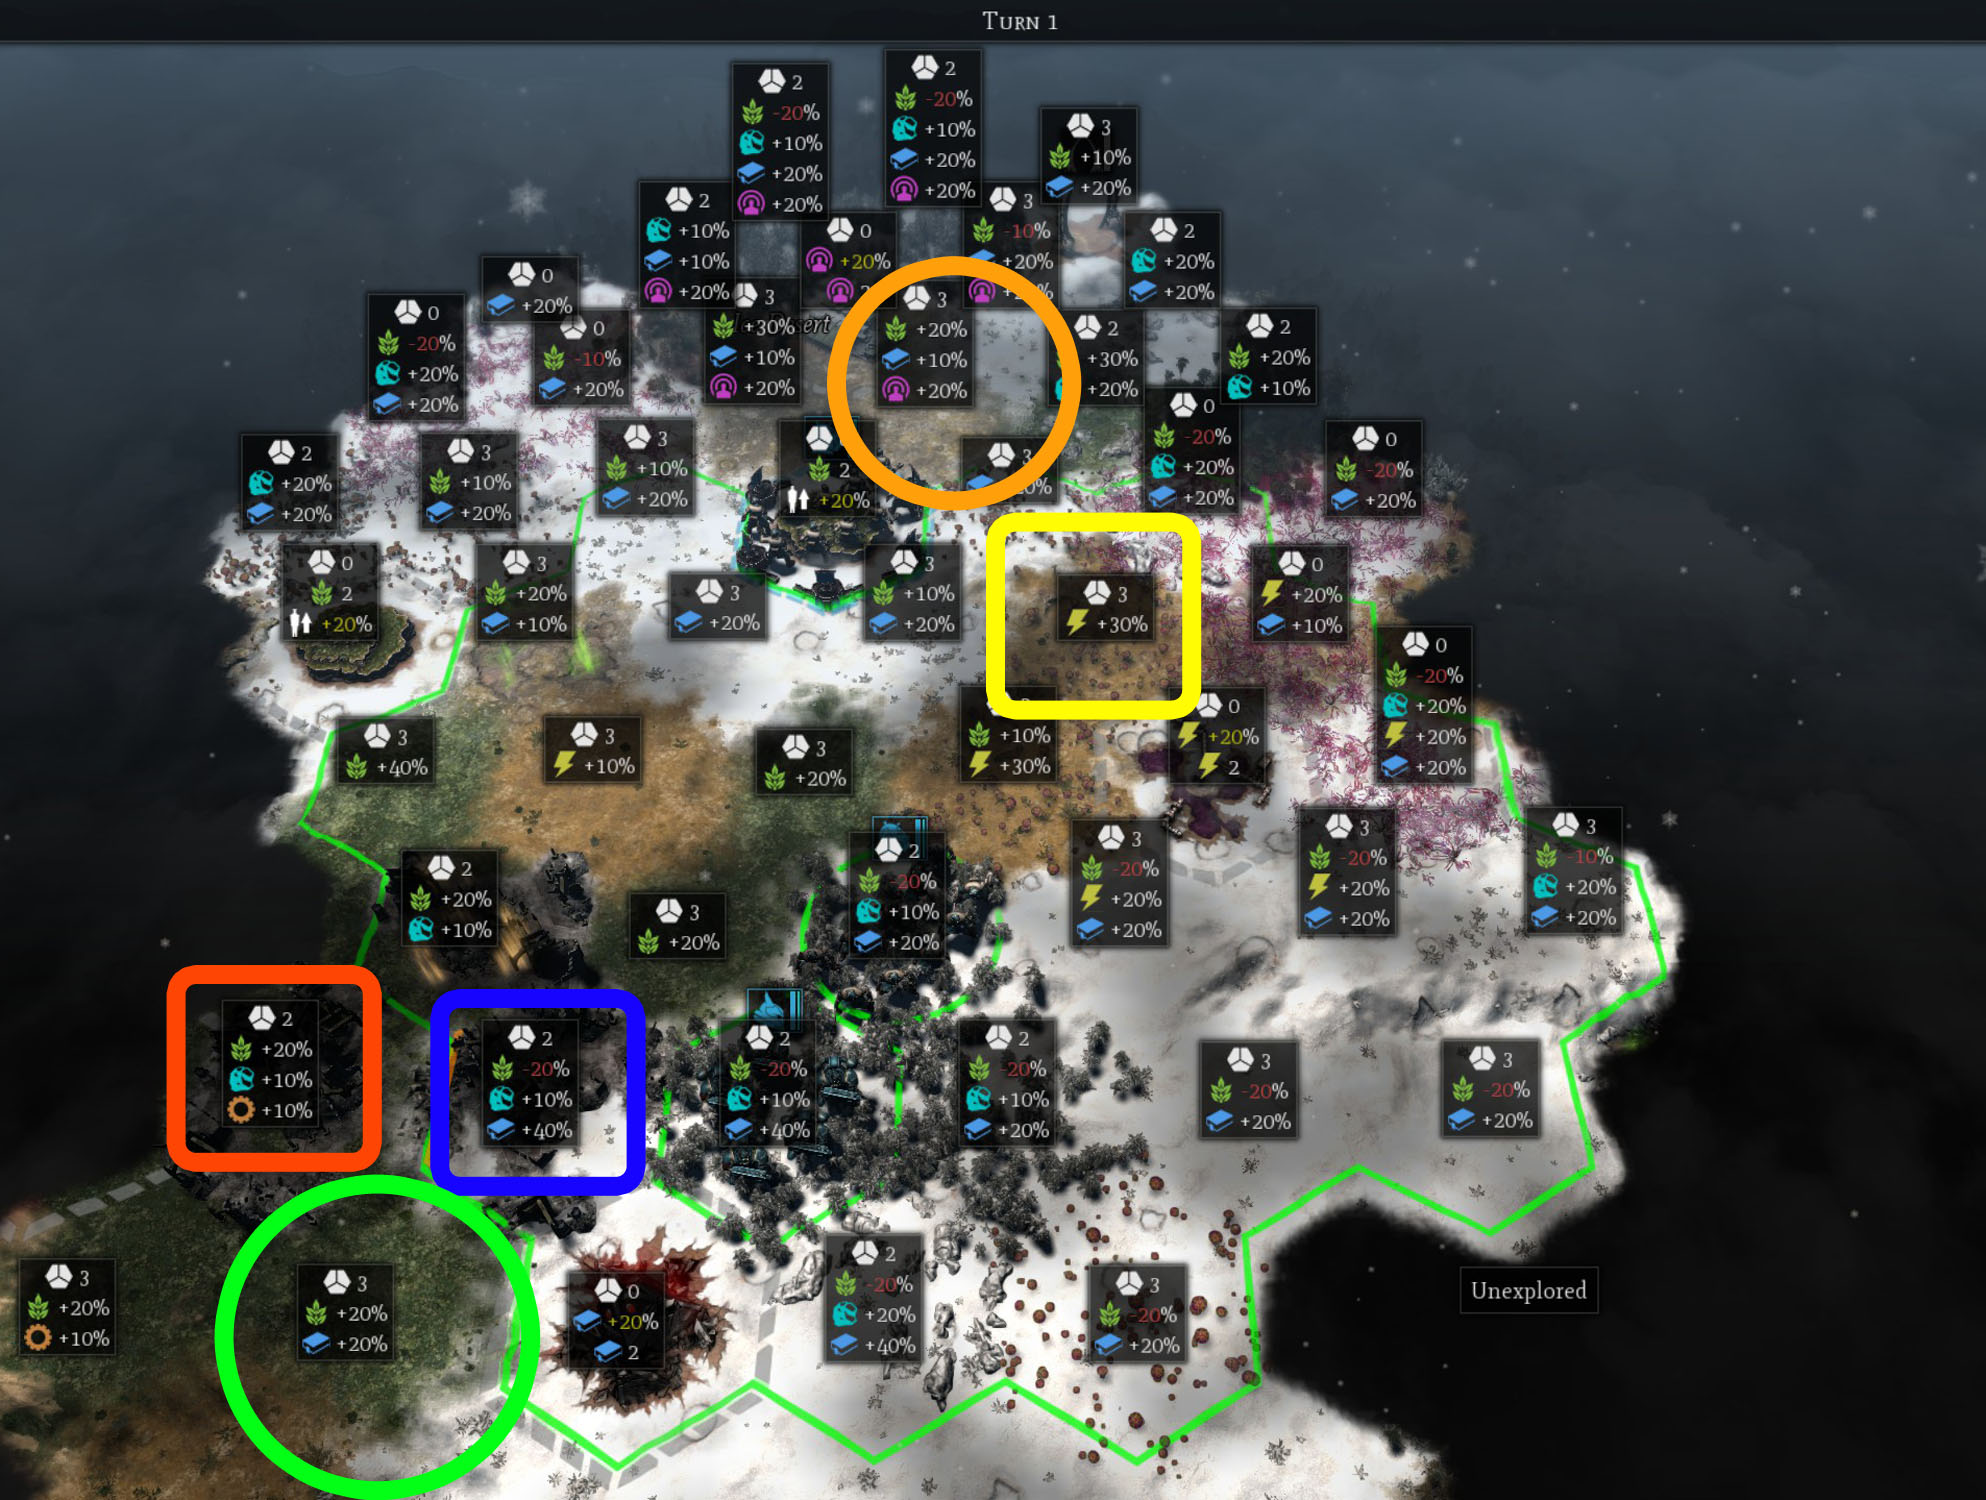
In this example, on turn 1 I’ve selected two spots for starting cities. City #1 will be in the green circle, and #2 in the orange circle. Why did I select these?
City #1
- Starts with a small research bonus, but has access to a tile with +40% (the blue square) and a Ruin of Vaul which will boost that to +60%.
- Because it’s on a grassland, it avoids the tundra food penalty and even has a moderate bonus.
- It’s next to two tiles with production bonuses (red square), perfect for unit buildings.
- The city itself has an extra building space, which saves valuable turns for your first building.
City #2
- This city site has the uncommon good fortune of two adjacent compounds, which will give bonuses to influence and food (up to +40% each).
- The city can provide electricity after expanding the radius once (yellow square) and after full expansion can increase that to a total of +50% by acquiring the Promethium pipes.
- It’s next to a fermentation pool, which will allow it a significant growth rate increase. The city should quickly catch up to its cousin in size, and will thrive in the peculiar economy of population sacrifice.
In order to make sure you build these as soon as possible, make sure you accumulate the 60 influence and ore needed for the second city, and don’t accidentally spend it.
[The seed for this world is 2923997959, although I have no idea if you’ll start at this position.]
Early game
Early goals are to save up for the second city by turn 10, and begin producing units. Once both cities are built, you’ll only have the lone Marine, and that’s just not enough.
Build order
Generally, it’s safe to follow the build order suggested in the “General” strategy guide, but there’s a few tweaks. I usually take a more aggressive path toward unit production, and I’m less inclined to build early heroes.
First, acquire the best research tile you can, and build the research building on it. For most factions, having your research output equal to the turn number is “par.” This won’t be a problem early on because you’ll have two cities contributing. I typically start with an infantry building (Abominator’s Genelab), preferably on a tile with a production boost (a gear symbol), and then build another one.
The second city can build a Cult of Chaos as its first building (and maybe second also). These building provide much-needed units to bolster your lone Chaos Marine, and you get research, loyalty, and food as well.
You’ll quickly run into population caps and loyalty issues, so research those technologies. If you have extra population, *sacrifice it to Tzeentch! * This bolsters your central production building and speeds research along.
“Gods and daemons? Nonsense. These are but fears and failings given flesh by the fevered imaginings of a humanity desperate to externalize its own weakness.” – Fabius Bile
“Manflayer, you may be the only agnostic in all of the Maelstrom. I have to respect that.” – Malfallax, Greater Daemon of Tzeentch
Unit management
You start with just one Chaos Marine squad. Do *not* lose it. If you need to save scum, then do it! Use the Marine to defend your cities against incursions and do some very limited scouting. Fortunately, Chaos cities are quite good at defending themselves.
Keep the Marine unit near your cities. You can capture any local compounds, but don’t die trying to hold them until you have reinforcements. Your main goal in those first dozen terms is just to survive to found those two cities…the story quest line will send some Astra guard units after you, and your Chaos Marine can help pick off these squads easily.
Once you have some cultists, a Chaos Spawn (from the story), and another Marine, you’re ready to carefully expand. I recommend expanding towards the nearest map corner via the map’s edge. This minimizes the number of “surprise neutrals” which can be hiding, and provides a solid base of clear territory.
Be looking for a third city site and found it as soon as you can afford it…in the above example, I’d be looking for a city next to an ore field, preferably with some recaf leaf to ease the loyalty penalties. Don’t spend too long looking for perfect; accept the “good enough.” Cities need time to develop; obsessive searching will cost you more than you gain.
Technology (Tiers 1 through 4)
“They won’t kill me, because they would lose my knowledge of their precious geneseeds, and therefore forfeit their own futures.”
“My Lord, wouldn’t that require your enemies to employ reason and planning? Qualities not in surplus in the madness of the Eye.”
Tier 1
The first priority is the Genelab, so you can build your army. Follow the story and research Bloated (which is a great healing tool, if a bit random). Rite of Change will let you use excess population to fuel further research. You’ll be back later for the other technologies.
Tier 2
I’ve vacillated on whether to bring in Khorne Berzerkers, and I’ve decided just to build lots of Chaos Marines early on, so I usually delay researching any other infantry until I get to Warp Talons. Captive Pens are necessary to expand your population, and Frag Grenades will help your Space Marines become immediately more powerful.
“Quantity has a quality all its own.” — Ancient Terran Warlord
Tier 3
This gives you Meadows of Sorrow, another highly necessary building. Your first persistent boon is now available…take Crystalline Body so your troops can begin to benefit from their kills. Skip Krak Grenades; they are rarely better than your regular attack, and we’re on a tight timeline here!
Tier 4
Here’s a place you’ll want to spend some time. Finally, you can build Warp Forges (the “building building building” that looks like a crane). Research this first, and then build it as soon as possible in all cities. In new cities this should be the first building you create. It is the ultimate investment, cutting production times in half for all other buildings. The only reason to delay is if you’re out of ore or power.
After that, research and recruit your first hero, the Daemon Prince. You’ll probably have plenty of influence, so research the Mark of Slaanesh…this will be the default Mark for all my units because that extra speed allows me to much better coordinate my armies against new threats, and it sets me up to place the Icon later, which makes them more survivable. Dip in to Tier 5 for Call of the Dark Gods (city expansion is very late in the technology tree for Chaos, and you’ll be really needing it by now), and then back to Tier 4 for Rite of Pestilence and Warpborne Bolts.
Middle Game
Let the sacrifices begin!
Up until now, your early empire is much like any other: expansion, exploring, exploiting, and… infrastructure. However, it’s time to behave like an aspiring Daemon Prince. You have to generate the fuel for sacrifices, and this is a difficult transition from other factions. I didn’t figure out the “trick” to Chaos for months after I starting playing them (and got advice). But allow me to shortcut the learning curve for you.
Chaos Growth Cycle
Build Chaos Cultists continuously. If your first city doesn’t have at least two Cults of Chaos, make sure it does. Then continuously create Cultists to send to other cities, and start sacrificing them. This boosts your growth rate substantially, so have a Cultist waiting by each city center so that the boost never runs out. Extra cultists can go the front to clear brush and support the troops.
Sacrifice population to Nurgle using Rite of Pestilence. Growth rate will now further increase. This will also increase food production (don’t think too hard about that 😊 ) which supports the new population and your growing infantry armies. City growth is now pushing 20 per turn.
Use this new population to sacrifice to Tzeench via Rite of Change (and eventually Slaanesh with Rite of Unholy Pleasure) to boost research, loyalty, influence, and building production. This produces a positive feedback loop; you can now produce new housing and loyalty buildings rapidly to accommodate your growing population.
And this is the big secret…by raising growth rate, you can have the largest and most productive cities of all the factions. In a recent game, I had four cities with a total population of over 150, and a peak loyalty in one city of 140. These cities are amazingly productive because even though there’s no specific ore or power boosters, the high loyalty increases production of everything by 1% per point, which eventually turns into a massive bonus.
Build order
You’ll have three cities, and might consider a fourth if you find a perfect spot (probably for ore production). Build the required infrastructure (loyalty buildings, population expansion buildings, and a second building constructor) in all cities, while starting to diversify your army with mid-level units such as Warp Talons and Venomcrawlers. You’ll be in a brief period of stagnation as your tech level rises; you need to research and build all these necessary infrastructure buildings. To rapidly build and resupply your army, make sure you have *three* unit production buildings of each type (two is probably enough for Lord’s Quarters and Cults of Chaos.)
Your unit production at this point should be leaning toward mechanical units, assuming you’ve got a decent number of infantry already. The Forgefiend is the best mid-tier unit, but it’s really spendy. Venomcrawlers are cheaper, tough, and assist your Masters of Possession.
Unit management
Mark all new units with the Mark of Slaanesh, with two exceptions. Khorne Berserkers start with the Mark of Khorne (naturally), and I think the Mark of Nurgle is better for Chaos Spawns.
Expand your empire! Strategically stay to the edges of the map to avoid meeting the AI too early, and clear any corners behind your cities so that you have some compounds adding to your economy even during the invasion.
Tactically, lead with your summoned units (or units with Daemonic damage resistance) to absorb overwatch, and follow with weaker units to kill slivered enemies or take unguarded compounds.
Allow your Champion of Chaos units (most infantry) to land the killing blows, which will give them a chance to gain a boon of Chaos. Given the whims of Chaos, you may turn your prized Warp Talons into a Daemon Prince, or twisted into a Chaos Spawn. Although the individual odds are low, I made 7 Daemon Princes and a similar number of Spawns in a recent long game with a huge number of neutral units.
Artifacts are like gold, and should be prioritized, particularly the Siren Caster. This little gem adds two loyalty in all cities, and thus makes expansion a lot less painful in the early game.
When you have to choose, it’s usually better to finish a slivered (nearly dead) neutral unit, rather than damage a different unit. By destroying the unit, you’ll get the chance at a boon, and the little creep won’t run off to heal.
Technology (Tiers 5 through 10)
Here’s my suggestions for the expensive and powerful technologies of the middle and late game.
Tier 5
This one isn’t rich in great technology, assuming you’ve already gotten Call of the Dark Gods to expand your cities. Take Warp Frenzy, and move up the ladder. { Maulerfiends are limited by circumstance, as are Melta Bombs (unless you have a serious Kastelan problem)}.
Tier 6
Researching these technologies will change your ground game with Forgefiends and Warp Talons (see Unit Summary), and Conjoined Weaponry really helps in a game with so much melee activity. Veterans of the Long War is either useless or incredibly useful depending on your opponent. Havoc Launchers are a great improvement to Chaos Rhinos; if you’ve built a couple you should take these. Finally, the Icon of Vengeance can be applied to all units with *any* mark. Essentially, morale becomes a non-issue for your infantry.
Tier 7
Finally, the Venomcrawler, one of my favorites. Not only does it look cool, it can heal itself effectively, and support your summoners. It’s also much better priced than the Forgefiend, and I often build this one first of the two. Get some Extra Vehicle Armor for your war machines, and then on to Tier 8. You will eventually need Heldrakes, but for now I’d reach for the next tier with its strong units.
Tier 8
This tier brings your first end-game units. Obliterators are essentially free give your giant food surplus, and they are viciously powerful (again, see the Unit Guide). The Chaos Land Raider used to be my go-to endgame fighter, and it’s still a main backup to Greater Brass Scorpions. Temporal Distortion is one of the best boons…combined with the Mark of Slaanesh, you finally have real mobility with your infantry.
Tier 9
Almost all of these technologies are useful. Start with Mechanoid so your infantry and heroes can better resist the heavy attacks you’re undoubtedly facing from the AI at this point. Our Lives for the Gods pushes growth rates so high that you can now build new buildings every turn and still have plenty left for sacrifices. Icon of Excess can be applied to all of those units you gifted with the Mark of Slaanesh earlier. Now your Chaos Marines have a chance of surviving an encounter with a Knight Crusader! (Well, a small chance, at least.) The Defiler doesn’t really have enough health to be the front-line machine it needs to be, but it has its place. It can wait until after you have Scorpions.
Tier 10
At last, we get the Greater Brass Scorpion. Expensive and unstoppable, these are your winning units if you can afford them. Rite of Unholy Pleasure will finally unlock the true potential of your cities, and you’ll be able to power the economics of the late game.
Late Game
“I abhor destruction for its own sake. Any brute with a stick can destroy a priceless artifact, but true genius is in creating the artifact. Or the brute itself, for that matter.”
This section is relatively brief, as most of the strategy lies in getting ready for the big fight.
Eventually the dreaded moment arrives when you’ve found the enemy. Typically, you’ll spot a weak-looking scout unit and the introductory message will flash up. Tempting as it may be, don’t send your units haring off after the AI. Right behind that lone Necron warrior is a huge mass of enemy units ready to surround you, cut off your retreat, and destroy you.
Instead, pull back from the visible range. You now have two or three turns to begin consolidating and preparing for the huge wave of air units which is about to arrive. The T’au are probably the worst, with punishing overwatch, long-range attacks, and strong air units. If it’s the Tyranids, then you’re fighting on the best ground, because they rely mostly on short range melee and their air units are similar to Heldrakes, so they can cancel each other out. No Impossible opponent is easy, obviously.
Begin pushing your army forward, keeping them tightly grouped behind your Brass Scorpions and Land Raiders. Rotate out wounded units. One “noob trap” is to leave your Scorpions at the front for too long. They have enormous health pools, which is great, but it means that they take a long time to heal. It’s easy to let their health drop to 60 out of 200, and then you lose it on the next round when the Baneblades appear out of the fog of war, and suddenly your whole flank collapses.
Keep at least one Warpsmith in the rear, ready to heal wounded machines.
Eventually, you’ll reach the first enemy city, which you’ll pound to dust with tanks and demon machines.
Hero Guide
“This is our Imperium. Built across the worlds we burned, over bones we broke, with the blood we shed. You see it too. You feel it now, don’t you? A new war. One not born of bitterness nor founded on revenge.
The Long War, Khayon.” — Abbadon (from the novel The Black Legion)
Heroes are less important to Chaos than for other factions, and they mostly act as support units (yes, even the mighty Chaos Lord).
General Tips for Heroes
Heroes really shine when they are kitted out properly from the Jokero encampment. I send each new hero to a Jokero encampment immediately to purchase a Tantalizing Icon. This chaotic object will add 8 influence per turn, which will more than offset the maintenance of each hero, and will act as an investment to buy future items.
Demon Prince
To save those precious early game turns, I usually build the Demon Prince as my first hero. Although he’s a fair melee fighter, he has trouble healing (he can’t get the Bloated boon), so I usually use his ranged attacks, his passive boost to other units, and his Boon of Mutation power which guarantees a Boon of Chaos. The last one is particularly important for support units that won’t be earning boons in combat.
From the Encampment, buy the Tantalizing Icon. If I can afford it, I usually add a Scroll of Magnus at the earliest opportunity. The Adamantium Vest helps with his low armor, and the Zoat Jerkin boosts his healing, which he really needs. An Endurance Implant gives him movement range to attack, and to run away if needed. Later, an Axe of Blind Fury will make him more of a threat in melee.
Chaos Lord
Because he is a melee champ, he benefits from the best attack items…buy the Mourning Blade, the Axe of Blind Fury, and the Dusk Blade (when you can afford them). He’s not as tough as you might think, and the AI really likes to target your heroes, so don’t send him in deep. Make use of his Worthy Offering to get boons for nearby infantry units.
Master of Possession
This is your only healing unit, and he’s a good one…with a catch. He can heal any unit in the game except himself, including allied units, and he can do it every turn. This makes him Gladius’ best healer, but he loses 2 hit points every time he uses the power. A Zoat Jerkin is not optional 😊 In pairs, these heroes can heal each other, which offsets this disadvantage somewhat, but you’ll be probably using them for their other powers.
With Possession, any kill produces a Chaos Spawn. Sounds great, but the Master’s damage is so low that it’s hard to activate in a practice. A Jokero Digital Weapon makes this much more practical.
With Incursion, the Master of Possession can pull in a mid-level demonic unit to assist in the fight; you’ll get Warp Talons, a Heldrake, or a Maulerfiend. These are *wonderful* at absorbing overwatch attacks, as they are all quite hard to kill. To make the most of this every Master needs a pet Venomcrawler to reduce the cooldown from five to three turns. If used correctly, you can always have a summoned demonic unit available.
Warpsmith
If any of the Chaos heroes are essential to winning, it’s probably the Warpsmith. He’s the only way to heal your machine units, and he’s great at it, fixing up to 24 points per turn. He also has a passive boost of 12 energy and 12 ore production (at level 6) which is like having four free buildings. These boosts are particularly nice, because Chaos doesn’t have a way of increasing production of these two resource like it does for the others. If you’re feeling generous, give him an Uncreator Gauntlet to add a bit more repair to his repertoire.
Unit Guide – Infantry
Here’s my individual breakdown of unit available to you as Chaos Space Marines. (Note that heroes have their own section above.) The screenshot shows the units I built over the course of an Impossible game. These numbers include summoned and transformed units.
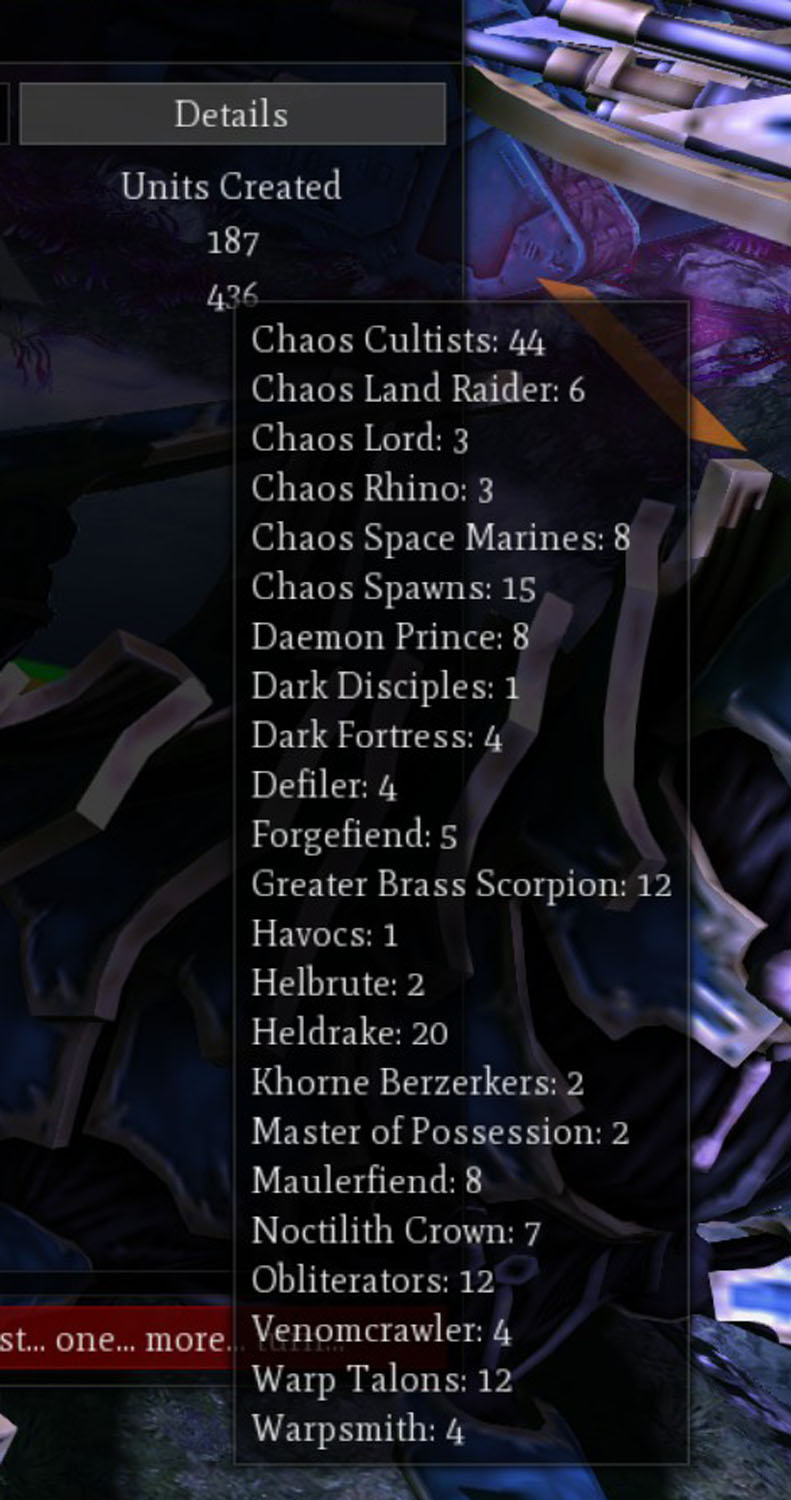
Infantry
- Chaos Cultists. Build these continuously. You need them to build cities and for sacrifices, of course. However, once they acquire all the boons, they eventually become solid fighters in their own right, and they can absorb large amounts of damage. In the end game, they can clear wire weed, which can greatly impede your ground-based army. If that’s not enough, they can put down Noctilith Crowns to create defense points. And they are really, really, really cheap to build and maintain.
- Chaos Spawns. I don’t usually build these, but I like having them. You get one for free if you follow the story, and Masters of Possession can create them regularly. They are so fast! You can scout, or bolster vulnerable units, or pick off wounded enemies. These are the one unit I like to grant the Mark of Nurgle, as it boosts their already large hit point pool, and the corresponding Icon is perfect for a unit which creates fear in adjacent enemies. In the end game, I use them to rescue important units which are trapped. Because of their low armor, the enemy will favor them as targets, and they can absorb a lot of hits before dying, buying time for the more valuable unit to get away.
- Dark Disciples. Their aura is nice, but the Disciples themselves are so vulnerable (they aren’t protected by their own aura) that the enemy kills them quickly. Best used in the rear to protect support units against surprise attacks.
- Chaos Space Marines. Heavily armored, relatively cheap, and available early. Keep it simple and build an army of these guys to defend and expand your early empire. With all the grenades, boons, and Icons, they’re still somewhat useful at all stages of the game.
- Khorne Berzerkers. Less versatile than Marines, these guys are best mixed in with other units to one-shot groups of Kroot Hounds and neutral Cultists. Because they have to get in close, they are much less useful against late-game enemies. I usually use them late game for killing neutrals away from the main fight with the AI.
- Havocs. They have one characteristic worth pursuing…they can shoot at range three. This is quite rare in the armies of Chaos, so if you have the time, building one can bolster a group of Marines.
- Warp Talons. Warp Talons are tough and very mobile. They can get all the boons, so they become melee maniacs after they’ve gotten some kills. However, the complete lack of ranged capacity means they are helpless against a group of psychneueins, for example. Note that their Hammer of Wrath doesn’t trigger manually like for all other units…it happens when you use their jump ability.
- Obliterators. I love these guys. They can’t benefit from boons, but you can still give them Marks and Icons. They are very inexpensive for their power, requiring only food maintenance which is typically in huge supply when you research them. Don’t forget that they have a cyclable ranged weapon, and a melee attack. This means that for groups of infantry, if you switch to the flamer and close in, you’ll do devastating damage. For single targets, the ranged autocannon is very hurtful. Keep them healed…they lose a lot of capability as their numbers dwindle.
Unit Guide – Mechanized
Mechanized Units
“Too much time in the Warp has given our vessel a mind of its own, I fear. I find it best to persuade it rather than attempt raw control.”
- Chaos Rhino. If you’re giving out Marks of Slaanesh, then transporting your troops in one of these isn’t really useful. However, they are quite cheap, and once upgraded have some great properties. Unlike most units with stealth who can avoid overwatch (like Kroots), Chaos Rhinos with Dirge Casters can *cancel* overwatch for adjacent units. This means that other Chaos units can approach safely. Unless/until you have Havoc Launchers, think of these as melee fighters (and only against infantry!) or you’ll be very disappointed in their damage.
- Helbrute. Interesting to look at, but underwhelming in battle. They are reasonable at single target damage, but because they lack a self-heal, they tend to spend a lot of time recovering. Also, they’re notably slow moving in a generally fast faction.
- Maulerfiend. These can be good to have *near* an enemy because of their Fear effect, and their lasher tendrils which reduce melee attacks. I use these a lot, but only because they are one of the summoned units from Masters of Possession.
- Forgefiend. Finally, a good demon engine. The twin guns do great damage at a two-hex range; they have fairly high health, regeneration, and good movement. When killing neutrals, these are your answer to Umbra and Kastelans. Originally, these were the same price as Venomcrawlers but they were too good, which is why they are now more expensive than their cousins in the next tier.
- Venomcrawler. Among my favorites. They are relatively low-cost, but have a lot of the advantages of Forgefiends except with more of a melee twist. Because of this, they are far better killing infantry groups than Forgefiends, but still capable at range. Let’s not forget the Well of Daemonic Energy, which reduces the cooldown of Masters of Possession’s summons by two turns. This is hugely important; make sure every Master has a pet Venomcrawler.
- Heldrake. Your lone flyer, the Heldrake is one of the better air units, with good health, damage reduction, and regeneration. Its big drawback is the short range, which pulls you in next to enemies and risks being cut off from your main army. Pro tip: Don’t forget to jink *before* you move to reduce overwatch from previously unseen enemies.
- Chaos Land Raider. Tough, fast, and even transports other units. I think they’re better than their Space Marine counterparts, but remember that they have a big melee component due to their destroyer blades (like most Chaos units). It’s got its own Dirge Caster, so it’s the perfect unit to lead a charge into unknown territory (until you’ve got Scorpions, at least).
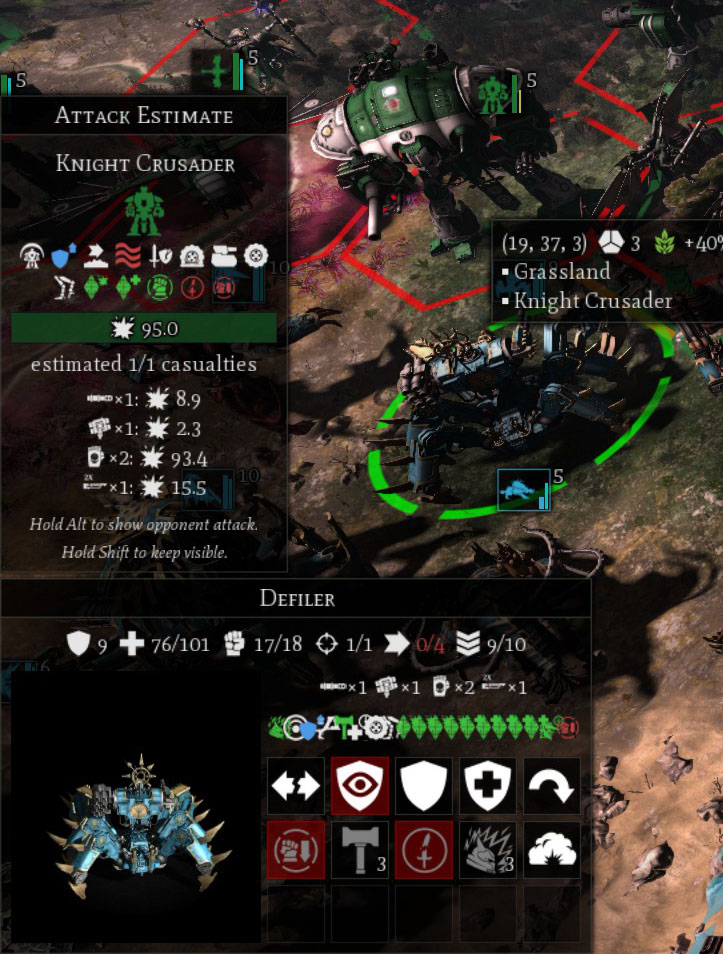
- Defiler. What a machine! A big, evil stompy crab covered in weapons and bitey bits. For a top-tier endgame unit, it’s unfortunately a little low on health. I have found that they are often ambushed and killed when they try to close with the enemy, which is ironically where they’re best.However, as a flanking unit following a Scorpion into battle, they can do some of the highest damage in the game. In this picture, the Defiler will one-shot the Knight Crusader! As you can see, this high number shows the synergies between the Defiler’s Daemonforge & Hammer of Wrath buffs, plus the Shaken morale of the Crusader, and the numerous bonuses from captured artifacts.
- Greater Brass Scorpion. If you haven’t figured it out by now, I consider these guys to be the cornerstone of my counterattack on the Impossible AI. They have over twice the health of a Defiler, demonic damage resistance, regeneration, fast movement (for a superheavy), and three separate powerful attacks. They are expensive to build and maintain, so you can’t build only Scorpions, but they can anchor the line and prevent weaker units from being isolated and overrun. Don’t forget to move them close to infantry units, as the Stomp attack will kill most such units in one strike. It works on tanks too! For any enemy group, remember to use the cannon attack before other weapons as the cannon does more damage the larger the group size. The tail guns have a range of two hexes, and will do strong damage even to air units.
Summary
- Build your first city to focus on research and food.
- Research and build infantry buildings.
- Build a second city focused on production, food, and/or energy, depending on shortages.
- Build a small army of Chaos Cultists and Chaos Marines.
- Move up the tech tree focusing on infrastructure improvements, and then techs which improve your infantry. Find a third city site.
- Create a Daemon Prince as your first hero, then start the process of building the mechanical portion of your army.
- Begin stoking population growth with Chaos Cultists and the Rite of Pestilence.
- Stay in constant combat with neutrals to earn boons and level up your units.
- Use that excess population to boost research and building efficiency.
- Meet the enemy and do not engage initially.
- Build Chaos Land Raiders as a stopgap while waiting for Greater Brass Scorpions.
- Advance to victory by rotating wounded units and moving steadily forward.
Quick tips
- Negative loyalty is twice as bad as positive loyalty is good (-2% versus +1% per point). Therefore, *stay out of negative loyalty situations.*
- Assume every forest and ruin is full of enemies until you’ve scouted it. Avoid overwatch traps!
- Attack units you can destroy, because this will simultaneously raise your morale and lower theirs. For this reason, carefully consider the order of your attacks to maximize these advantages.
- Move rear-echelon units forward *before* landing the killing blow with a different unit. Any unit within three tiles will gain experience.
- Try to get kills with Champion of Chaos units to earn boons.
- Outfit all heroes with items from the shop to make them more survivable.
- Chaos units generally have a melee component to their attacks, so don’t be afraid to move in close in mass.
- Building a lot of good early-game units (such as Chaos Space Marines) is a good substitute for building a few mid-game units, and lets you focus research elsewhere.
- Brass Scorpions are amazing units, but you can lose them if you don’t pull them back to heal at around half health.