In this guide, we will explore the process of unlocking the Hunter Class’s Amazon Subclass in Card Quest. This comprehensive guide provides valuable insights on character customization to successfully achieve the unlock, along with effective strategies for defeating various encountered monsters.
Setup for Unlocking the Amazon Subclass
Unlocking the Amazon Subclass of the Hunter Class in Card Quest is a relatively straightforward process. All you need to do is complete any dungeon within the game. For the purpose of this guide, I highly recommend focusing on the Enchanted Forest as your dungeon of choice. One of the advantages of this particular location is that the monsters there are unable to launch attacks when you maintain a certain distance. By utilizing this strategy, it becomes significantly more challenging for them to approach and engage you in combat for extended periods of time. Assuming you are already familiar with the mechanics of the game’s cards, I won’t delve into them in great detail, as I did in my separate guide for the Dark Elf build of the Hunter Class. Once we have covered all the essential cards, we will then shift our focus to the monsters and the most effective strategies to employ in the Beast Trail, which serves as the final level within the Enchanted Forest.
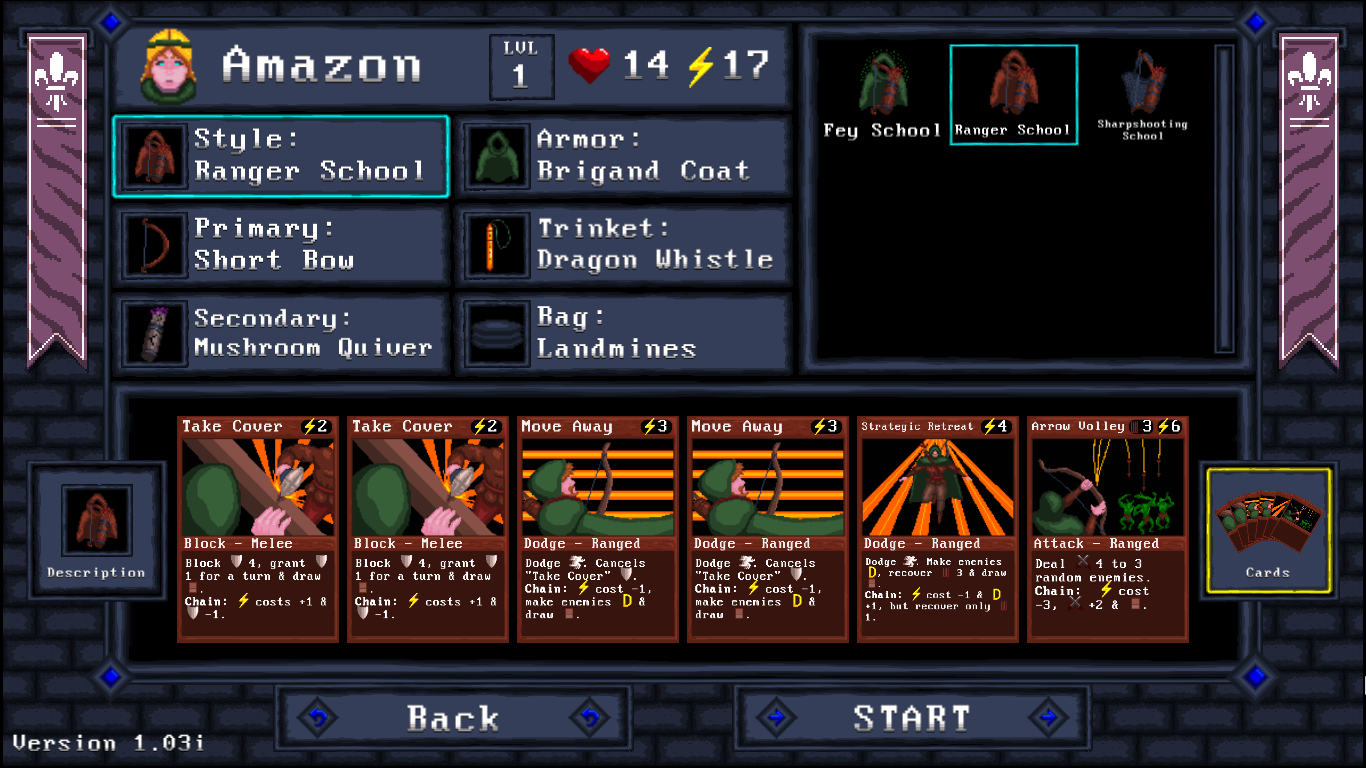
Style: Ranger School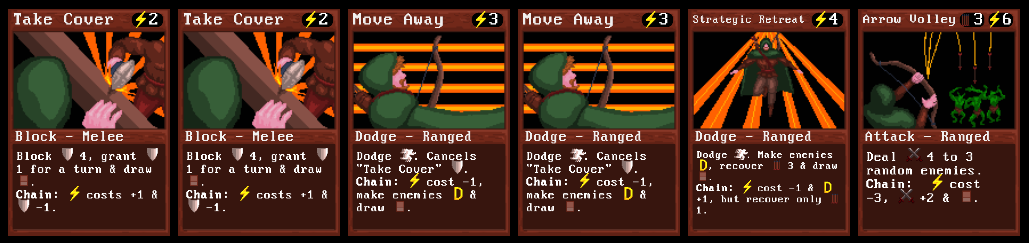
The unlocking process for this subclass requires a specific style. Unlike the challenging mastery of the Sharpshooting School, the Ranger School offers excellent cards. In my opinion, only one card is not as useful. Take Cover proves to be a reliable defense against most attacks, as it blocks up to 4 damage. However, it’s important to note that its defensive capabilities decrease by 1 in a chain. On the other hand, Move Away allows you to dodge any attack and completely nullify damage. Chaining Move Away with Take Cover places all monsters in the distant status, creating a beneficial stacking effect against a line of monsters. In the Beast Trail, you’ll encounter several monsters that charge, leap, or possess Fury (attacking twice per turn). To counter these threats effectively, initiating with Take Cover and following up with Move Away prolongs the distant status. Strategic Retreat is an exceptionally valuable card in this build.
When used outside of a chain, it grants you 3 arrows in return and shifts the status to distant by 1. However, when used in a chain, it provides 1 arrow and extends the distant status for 2 turns. This versatile card can be utilized defensively or offensively, making it extremely useful for maintaining arrow count and keeping monsters at a distance. It also frequently appears in your draws; there was even an instance where I drew this card three times consecutively in a single battle. On the other hand, Arrow Volley is a card I generally avoided. It has a relatively high stamina cost outside of a chain and consumes 3 arrows. Considering that some enemies in the Beast Trail have Dodge, it often proves to be a wasted effort since the targets are chosen randomly. Additionally, it only provides 1 card in a chain, further diminishing its value. Strategic Retreat, in comparison, holds far greater worth since the primary attack cards in this build possess lower damage when compared to other Hunter Class builds.
Primary: Short Bow
To successfully unlock this subclass, you will need to utilize the Short Bow. This weapon offers both advantages and disadvantages. On the positive side, the Stamina cost for its cards is relatively low. When used in a chain, you’ll expend minimal Stamina and be able to sustain continuous fire for an extended duration, thanks to the frequent draws of Strategic Retreat and your Recover Arrows card (covered in the next section). However, the Short Bow’s drawback lies in its comparatively low damage output. This becomes particularly noticeable when using it in a chain.
Quick Shot is a card that draws another card, regardless of whether it is used in a chain or not, but its damage is reduced. Similarly, Shot only draws a card in a chain, but its damage is halved from 8 to 4 (without factoring in armor). In this build, Quick Shot will be your primary choice due to the poison effects of the Mushroom Quiver (explained in the next section). The poison effect is applied regardless of the damage dealt. One of the key strategies of this build is to maintain the distant status and allow monsters to gradually perish from the poison effects over time, rather than solely relying on direct damage from your shots.
Secondary: Mushroom Quiver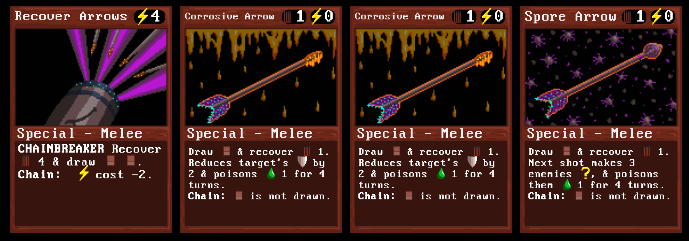
While you have the flexibility to choose any quiver you prefer, the Mushroom Quiver offers the greatest benefits for this build. It played a crucial role in my Dark Elf build (refer to the separate guide). Firstly, the Recover Arrows card of the Mushroom Quiver surpasses any other quiver in terms of effectiveness. With this build, it only costs 4 Stamina to use, or even better, an incredibly low 2 Stamina when used in a chain. This grants you 4 arrows and a 2-card draw. In contrast, other quivers typically draw only a single card and come with higher costs depending on different builds.
Additionally, the arrow cards provided by the Mushroom Quiver are perfect for inflicting gradual damage in the Beast Trail. Corrosive Arrow diminishes a target’s armor by 2 and applies 1 poison effect for 4 turns. It’s worth noting that this effect can be stacked. Furthermore, Spore Arrow is even more remarkable as it applies the same poison effect for 4 turns to a total of 3 targets. These targets include the one in the middle and two on the sides, or one on the far left or right along with the immediately adjacent target. This ability not only helps eliminate dodge but also ensures the poison effect remains active on multiple targets simultaneously. In addition, when Spore Arrow hits its 3 targets, they become unaware. By maintaining your distant status, you can sustain this strategy for an extended period. This aspect is crucial for the success of this build.
Armor: Brigand Coat
While the Mountaineer’s Coat is a viable option, I recommend choosing the Brigand Coat for its greater benefits. The Mountaineer’s Coat offers decent health boosts and necessary defense, but the Brigand Coat provides an increase of 2 to your maximum health and grants a single arrow draw when used. This additional benefit is particularly valuable as it serves as a chainbreaker, allowing you to swiftly recover by obtaining an arrow when needed, while setting up another chain with your subsequent card. Considering the typical draw rate of this build, this scenario is highly likely to occur. Furthermore, it only takes a single battle to recharge the effect, making it a practical and reliable choice.
Trinket: Dragon Whistle
Here is an important consideration when it comes to completing this unlock. The Wind Charm (refer to my other Hunter Subclass guides) is an incredible item that significantly enhances this build’s effectiveness. However, obtaining the Wind Charm requires traversing through earlier levels to reach the final boss. It’s worth noting that it is much easier to directly proceed to the Beast Trail and skip the earlier levels altogether. Although this decision adds some level of difficulty to the unlock process, as you become skilled in maintaining the distant status while gradually whittling away at monsters, the challenge becomes more manageable. If you prefer, you can opt for an easier run by equipping the Wind Charm in your Trinket slot. However, it’s important to recognize that this does not guarantee victory against the final boss by any means. Instead, it provides an additional advantage that can potentially tip the scales in your favor.
Bag: Landmines

For this unlock, you have the option to use any Bag item. I have personally experimented with all of them and have found that the Landmines offer the most significant benefits. When a monster attacks, the Landmines can inflict up to 10 damage, nullify any damage directed at you, and even apply the STUN effect if the monster is susceptible to it. Although they require two battles to recharge a single use, you have a total of three uses at your disposal. Additionally, when triggered, the Landmines initiate a chain, which proves advantageous in conserving the cost of your defensive arrow cards when the time comes. While the Beartraps and the Net are also viable options, the Net is particularly useful as it bypasses dodge and applies STUN to three targets that can be affected by it.
Max Level Perks
Selecting the appropriate perks for this build can be challenging, but it’s important to prioritize damage capabilities over defense. Considering that you may still get hit frequently, your total health won’t make a significant difference. As you level up, I recommend choosing the following perks in the specified order:
- Wilderness Training: This perk grants an additional point to Stamina, enhancing your overall stamina pool.
- Quick Shots: This perk reduces the stamina cost of the next three shots by 1, allowing for more efficient use of your stamina.
- Modified Quiver: This perk increases your arrow capacity by 1, ensuring a greater supply of arrows during battles.
- Wilderness Training (second time): Another point in Stamina will further bolster your stamina reserves.
- Modified Quiver (second time): Another increase in arrow capacity will provide an even greater arsenal for your attacks.
- Heightened Senses: This perk enables you to detect hidden enemies, allowing for better preparedness in battles.
- Quick Reflexes: This perk reduces the stamina cost of defense cards by 1 for a duration of 2 turns, enhancing your defensive capabilities.
- Positioning Expert: This perk ensures that you start battles in the distant position, granting you an advantageous starting point.
- Wilderness Training (third time): The final point in Stamina will further enhance your stamina pool.
It’s worth noting that if you have another subclass unlocked, particularly the Arbalist subclass, you can utilize its perks as well. This may require adjustments to the recommended perk setup outlined above. Now that you have a grasp of the basic setup, I will proceed to provide information on the enemies you’ll encounter in the Beast Trail to assist you in completing the unlock for the Amazon subclass.
The Beast Trail
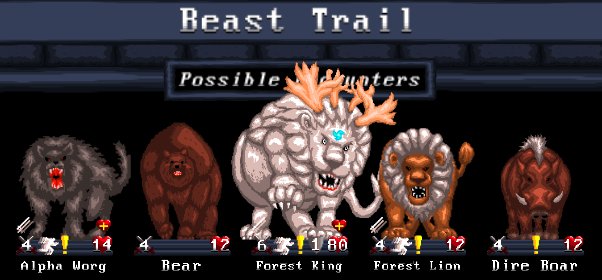
Navigating the Beast Trail with this build can present its challenges, but by utilizing your cards strategically and knowing when to attack instead of maintaining DISTANT status, you can achieve success within a few attempts. While the variety of monsters you will encounter is limited, the difficulty arises from their abilities such as DODGE, FURY (attacking twice per turn), and the capability to remove 1 or 2 DISTANT in a single turn. Therefore, it is crucial to prioritize keeping DISTANT status as much as possible to secure victory. I have provided a detailed breakdown of all possible monsters in the Beast Trail and how to approach them. Conquering the Beast Trail with the build you are utilizing will truly push your abilities to their maximum.
Alpha Worg
The Alpha Worg poses a greater threat compared to a regular Worg (refer to separate entry below). It boasts higher ARMOR and HEALTH, and possesses both DODGE and FURY abilities. Fortunately, unlike certain other monsters in the Beast Trail, the Alpha Worg cannot remove DISTANT status in a single turn. To tackle this formidable opponent, utilize your DISTANT strategies to keep them at bay while prioritizing the elimination of stronger monsters. Once you have dealt with the more powerful foes, focus on taking down the Alpha Worg.
Bear
Dealing with the Bear is relatively straightforward. While it possesses considerable damage and high HEALTH, it lacks initiative at the start of a battle. By consistently maintaining DISTANT status and applying poison effects, you can easily dispatch the Bear. Its lack of initiative gives you the opportunity to weaken and eventually defeat it before it poses a significant threat.
Bush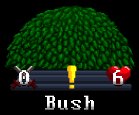
That’s correct! The Bush is a neutral target that doesn’t pose a threat but can contain other creatures. If there are any Bushes left after all active monsters are defeated, they will simply disappear. However, if a Fairy is contained within a Bush, it will disappear along with the Bush. Sprites, on the other hand, will attack if left alone, so it’s best to deal with them before they cause any trouble.
Cave Bear
The Berserk Bear is an enhanced version of the regular Bear (refer to separate entry above), possessing 1 ARMOR and a significant amount of HEALTH. Despite its increased strength, you can employ the same approach to deal with it. Maintain DISTANT status to prevent it from getting too close, as it has the ability to RAGE and increase its damage output. It’s worth noting that Berserk Bears are not as commonly encountered as regular Bears, but when you do come across them, prioritize keeping your distance and follow the same strategy as before.
Dire Boar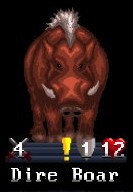
The Rampaging Boar is a stronger iteration of the Wild Boar (refer to separate entry below). Despite its increased damage and higher HEALTH, the approach to dealing with it remains the same. Similar to the Wild Boar, the Rampaging Boar takes initiative and charges when it appears. If you don’t have a means of gaining DISTANT status when it shows up, you may consider using the Mulligan option until you obtain the desired cards. Taking this risk is necessary to avoid sustaining any damage from its charge attack. Stay vigilant and prioritize maintaining DISTANT status to effectively handle the Rampaging Boar.
Fairy
The Fairy may not possess an offensive attack, but it can be quite bothersome as it has the ability to restore HEALTH to other monsters. Additionally, its DODGE ability can make it challenging to eliminate. If you are faced with multiple monsters and find yourself overwhelmed, it may be beneficial to prioritize dealing with the Fairies first. By maintaining DISTANT status and focusing your attacks on the Fairies, you can prevent them from healing other creatures and disrupt their restorative effects. It’s important to note that Fairies can either emerge from a Bush (refer to separate entry above) or be summoned by a Fairy Treant (refer to separate entry below). Stay vigilant and consider the impact of Fairies in your strategy to effectively neutralize their healing abilities.
Fairy Treant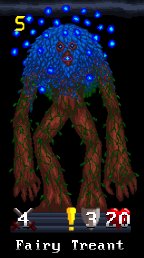
The Fairy Treant does not appear as often as other monsters on the Beast Trail. They start SLOW and do not attack at first, but they can summon Fairies (see separate entry above) so it’s best to kill them as soon as possible to reduce the healing effects that can occur. One good thing is if you have a Fairy Treant in STUN from a Spore Arrow, its summoned Fairies will also be in STUN, making them easy to kill.
The Forest King
Please note that the Forest King has two different appearances: randomly in some Rounds and as a boss. When he appears randomly, he will flee after sustaining approximately 1/4 of his total HEALTH in damage. It’s important to be prepared and gain DISTANT status as soon as he shows up. Utilize the Mulligan option if necessary to ensure you have the appropriate cards. Since the Forest King possesses FURY and is immune to STUN, your strategy should focus on evading and temporarily ignoring him.
However, when the Forest King appears as a boss, the situation becomes more challenging. As mentioned before, he takes initiative and attacks immediately, so maintaining DISTANT status remains crucial. In addition, there are two Forest Lions positioned on either side of him. It is advisable to prioritize dealing with these Forest Lions first, attacking the Forest King only when possible. As the Forest Lions are positioned in a row, utilizing a Spore Arrow after removing their DODGE will STUN all of them simultaneously. If you are unable to do so, keep them at a DISTANT range and gradually eliminate the Forest Lions one by one.
It’s important to note that the Forest King will summon additional creatures when his HEALTH reaches certain thresholds. At 60 HEALTH, he summons 4 Bears and 2 Cave Bears (refer to separate entries above). The Cave Bears begin at a DISTANT range. At 40 HEALTH, he summons 4 Worgs and 2 Alpha Worgs (refer to separate entries above and below). Finally, at 20 HEALTH, he summons 6 Dire Boars (refer to separate entry above). Deal with these summoned creatures using the strategies you have employed thus far, while prioritizing the maintenance of DISTANT status.
By staying focused and maintaining the necessary DISTANT approach, you will eventually overcome the challenges and unlock the Amazon Subclass. Congratulations on your achievement!
Forest Lion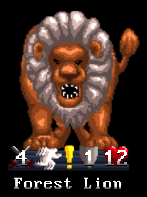
The Forest Lion is indeed one of the most dangerous basic monsters in the Beast Trail. It possesses strong stats, including DODGE, and its ability to remove 1 DISTANT status in a single turn, combined with its FURY, makes it a formidable foe. It is crucial to keep them at a DISTANT range, allowing you to gradually wear them down over time.
One important aspect to note is that Forest Lions frequently appear as HIDDEN ENEMIES, sometimes in groups of four or more. To handle these situations, it is recommended to have at least one Move Away and Strategic Retreat card in your deck. Take Cover can initiate a chain to improve DISTANT status, but be aware that when a Forest Lion leaps, it adds one attack and you’ll lose one HEALTH. However, if you have additional Forest Lions appearing, it can provide an opportunity to stack DISTANT if the right cards are available, which is often the case.
Since Forest Lions do not possess regeneration abilities, they will eventually succumb to the poison effects you apply. It’s important to be patient and avoid unnecessary attacks that may waste your ARROWS and STAMINA. Focus on maintaining DISTANT status and allowing the poison to gradually weaken and defeat the Forest Lions over time.
Giant Boar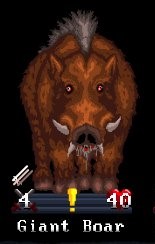
Like the Dire Boar and Wild Boar (see separate entries above and below), the Giant Boar can charge at the start of a battle. It’s a rare encounter in the Beast Trail and is like a mini-boss. If it appears, it will have 2 Dire Boars next to it. Keep it DISTANT at first while you deal with the Dire Boars because it has way more HEALTH than its kin and can RAGE to do more damage. Strategic Retreat is extremely necessary to avoid damage when this monster appears, so use it as much as possible.
Sprite
The Sprite has DODGE like the Fairy (see separate entry above), but they can also attack. They’re extremely weak, however, and if one remains after appearing from a Bush (see separate entry above), remove their DODGE with Quick Shot and then another attack of your choosing will kill them instantly.
Wild Boar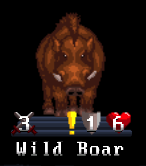
The Wild Boar gets initiative whenever a battle begins and charges immediately. The best approach is to make certain you. When a Wild Boar attacks make sure you place them in DISTANT status. Use Mulligan until you can. Damaging the Wild Boar is easy, you just need to avoid its initial attack.
Worg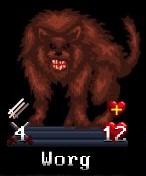
The Worg in the Beast Trail may have FURY and decent HEALTH, but the absence of DODGE makes them easier to handle compared to the Alpha Worg (see separate entry). You can utilize Spore Arrow to stun them or Corrosive Arrow to poison them while you prioritize dealing with more threatening monsters. It’s worth noting that Worgs possess a regeneration ability, but it shouldn’t pose a significant problem if you manage to maintain DISTANT status and apply consistent damage through poison effects or other means.