This guide will cover the most effective PC tweaks and tips to boost your overall Skye Tales performance, reduce unwanted stuttering, and crashing. Without further ado, let’s get started.
Restart Your PC Regularly
This is the very first and standard recommendation that we can give. With the nature of the Windows operating system, you may sometimes notice that your computer will become slow as you use it. This is because of several background services and programs that are running unnoticed. With the memory requirement of Skye Tales, freeing some memory of your computer by simply restarting it will help your machine to properly run the game.
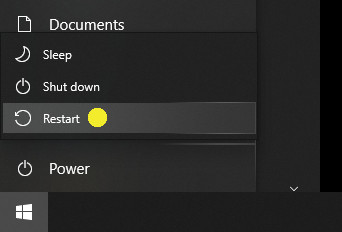
For a proper restart of your personal computer, make sure to select the right restart option in the Windows system. Sometimes, just turning off your computer isn’t sufficient. This is because some Windows configurations keep certain parts ready for a faster startup, instead of fully refreshing them. It’s important to give your PC a complete restart every now and then. This helps ensure that services and drivers can function and update correctly.
Verify Integrity of Game Files
Verifying the integrity of game files for Skye Tales should be done regularly, especially if developer Puny Astronaut releases a new update. But why you should frequently perform the verification of the integrity of the game files?
This is a regular thing that usually happens on its own after you get a game from Steam, and you don’t really notice it unless you’re really paying attention. Sometimes this automatic process doesn’t work as it should, and that’s when you start seeing issues when you try to play the game.
The reason behind this is that games often come in big files that need to be unpacked. Whenever you copy, or in this situation, download something, there’s a chance that things might not go as planned. The bigger the file sizes of a game, the more likely it is that something will go wrong during the download and mess up the game. This happens especially when there are updates, which are meant to replace the current files.
Usually, when you get a patch for Skye Tales, Steam will automatically look at the files and try to download them again. But, similar to how your computer’s services can sometimes freeze, Steam’s services might also get stuck. If the automatic thing doesn’t work, you’ll have to start this checking process on your own.
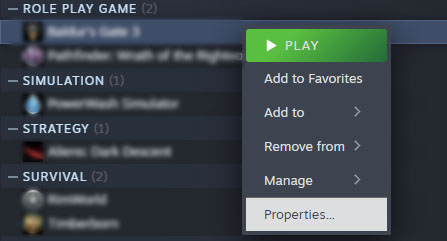
To do that, you can right-click on the game in your Steam Library and then choose Properties.
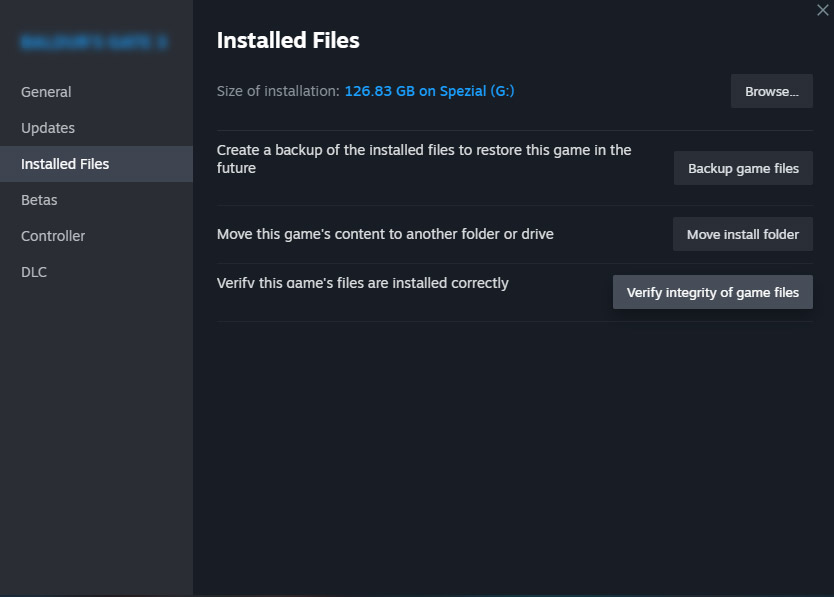
Head over to the Local Files section and choose the option that says Verify integrity of game files.
Repair Steam Library
Sometimes it can be a bit trickier than just making sure the game’s files are okay. Let’s say your storage thingy has some wonky parts that you didn’t even realize were wonky. But don’t freak out – it’s usually not a big deal. Nowadays, these storage thingies are built so that their parts can get a bit old and worn out, but they don’t totally give up and become useless. Think of it like a notebook you use in school. You’ve got lots of pages, and if you mess up, you can just erase and start over. But even the sturdiest page gets weaker with time. So, if you’ve got one bad page in your notebook, it’s no sweat. You just move on to the next one, just like how Windows switches to another good spot on your storage thingy.
What we can do to make sure that Skye Tales don’t end up on those wonky parts of your storage thingy and fix things up while we’re at it is to give your Steam Library Folder(s) a nudge to repair themselves. This makes Steam check if your games can be read properly as they should in your collection, and it sorts out any messed-up data that the basic game file check wouldn’t catch.
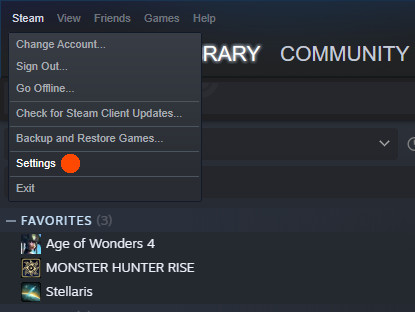
Launch Steam then open the Settings option from the main menu.
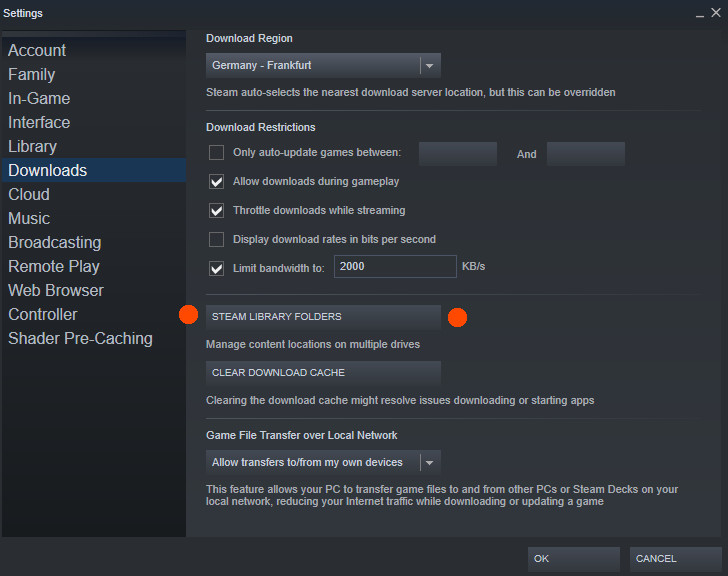
Next, go to the Downloads section and select Steam Library Folders.
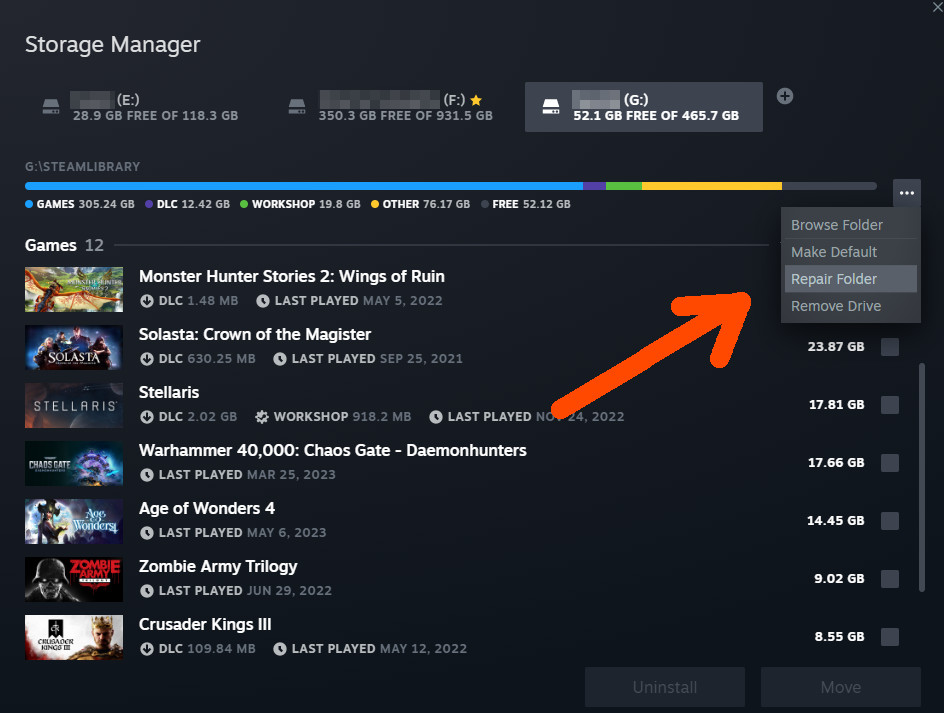
Choose the drive where your game’s Steam Library Folder is placed, and then opt for the Repair Folder choice.
Use Revo Uninstaller to Reinstall
When people try to fix issues by removing and then installing a game again, they often miss some hidden files. The problem is that the regular uninstaller doesn’t see these hidden files of Skye Tales as part of the game since they weren’t there when the game was first installed. So, if you skip these files when you uninstall Skye Tales, and it turns out that a bad setting was causing your problems from the start, the problem will stick around no matter how many times you uninstall and then reinstall the game. That’s why we suggest using Revo Uninstaller to delete all files related to Skye Tales.
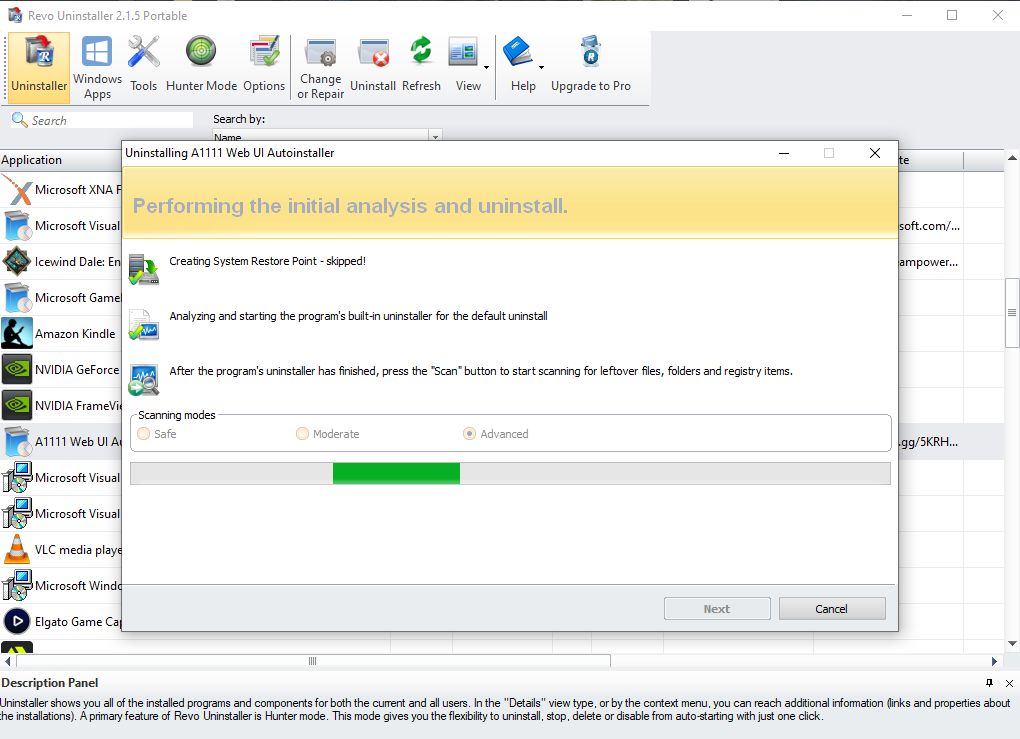
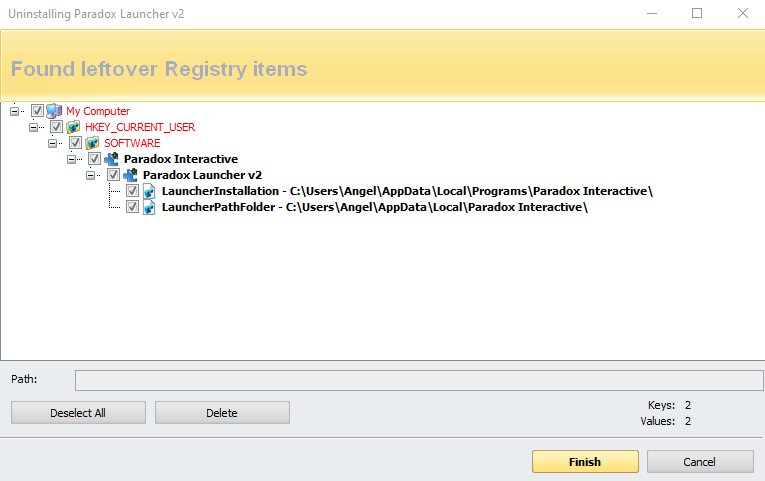
The image screenshot above is just the example interface of how the Revo Uninstaller works perfectly. This tool will scan your PC for any residual files that are created by Skye Tales. If you’re interested to use this program, you can download it from this link.
Cleanup Windows Registry
We highly recommend using the free version of CCleaner. Many people who use computers can really gain from tidying up their registry and effectively handling apps that start automatically and run in the background. You might find the outcomes quite astonishing!
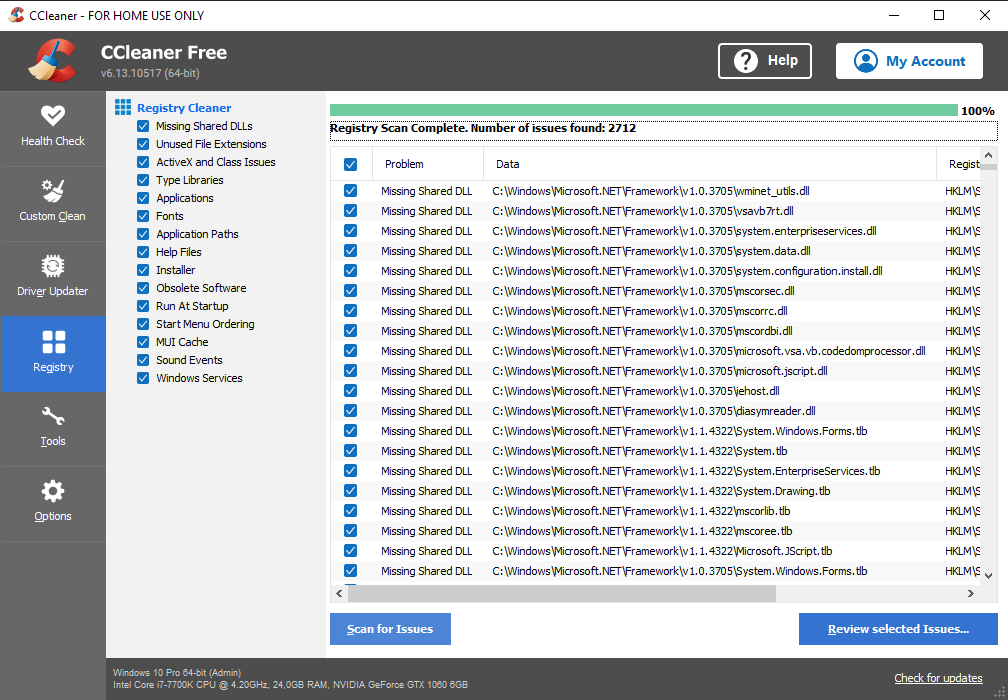
A convenient free version of CCleaner (portable) that does not require installation can be found here.
Get the Latest GPU and Other Driver Updates
The components inside your computer are like its core, but if you don’t keep them up to date, you’ll definitely run into problems when playing Skye Tales. It’s a certainty that you won’t be able to enjoy Skye Tales if you don’t update the necessary drivers on your PC. Some of the key drivers needed for a smooth Skye Tales experience are the GPU, DirectX, and others. However, updating all these drivers manually can be a bit tricky, especially if you’re not familiar with the process.
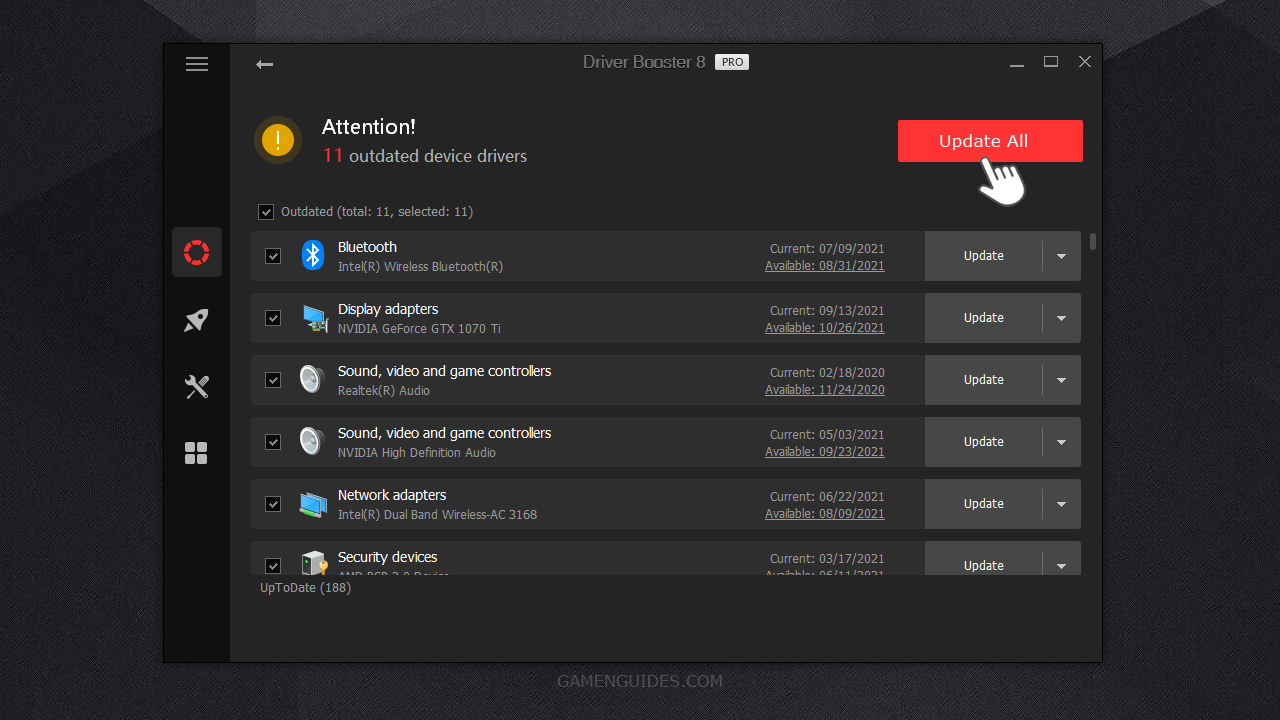
To simplify things a bit, we suggest using Driver Booster. With this program, you can update everything with just one click. All you have to do is click the Scan and Update button, and then wait for the updates to finish.
If you know your stuff and can handle it, it’s actually better to manually get the right drivers for your PC. For your graphics card (GPU), just go to the website of the company that made your GPU and find the newest driver. You can also update other important drivers for your computer by going to the manufacturer’s website.
Prepare Your Graphics Card
Modern graphics card software is really handy. They even include companion apps that offer simple instructions to assist you in maximizing your GPU’s performance for gaming. However, there are two situations that the software can’t manage on its own:
- In case your computer has multiple graphics controllers.
- If you’ve overclocked your graphics card.
By the first scenario, I mean that many up-to-date motherboards, particularly laptops, have a built-in GPU that shares memory with the main system and video rendering. These coexist with a separate graphics card that lets your computer or laptop switch between integrated and dedicated graphics. This might seem confusing when you’d expect a single GPU to handle everything. But it’s an effective way to save resources, especially in terms of power usage and heat generation.
In an ideal situation, when your computer is handling basic tasks that don’t demand heavy graphics rendering, it will utilize the integrated GPU. Then, it’ll switch to the dedicated graphics card’s GPU, which requires more power and generates more heat, when you’re doing something like playing a game.
However, as promising as this approach is, it’s not without its downsides. The main issue arises if an application mistakenly uses the integrated GPU when it should be using the dedicated one. Alternatively, the graphics controller might incorrectly decide to switch to the integrated GPU assuming the application is idle. This can lead to noticeable drops in frames per second (FPS) and unexpected crashes since the integrated GPU is significantly less powerful due to its lack of dedicated resources.
To prevent your computer from using the integrated GPU in such cases, you can instruct it to solely use the performance mode when you’re gaming. This will disable power-saving features that would typically switch the GPU to save battery life.
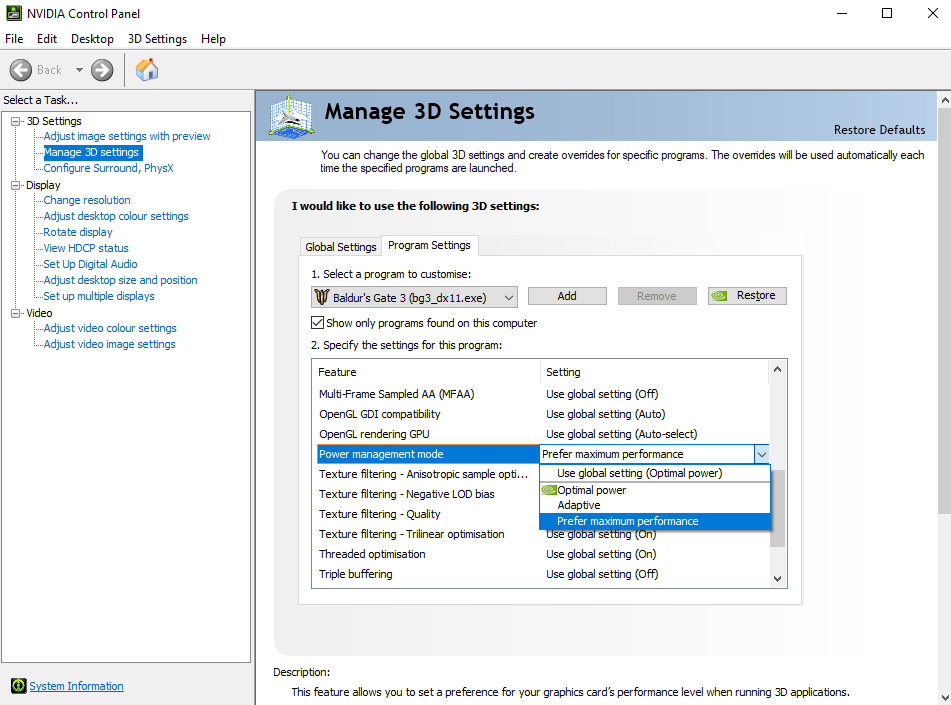
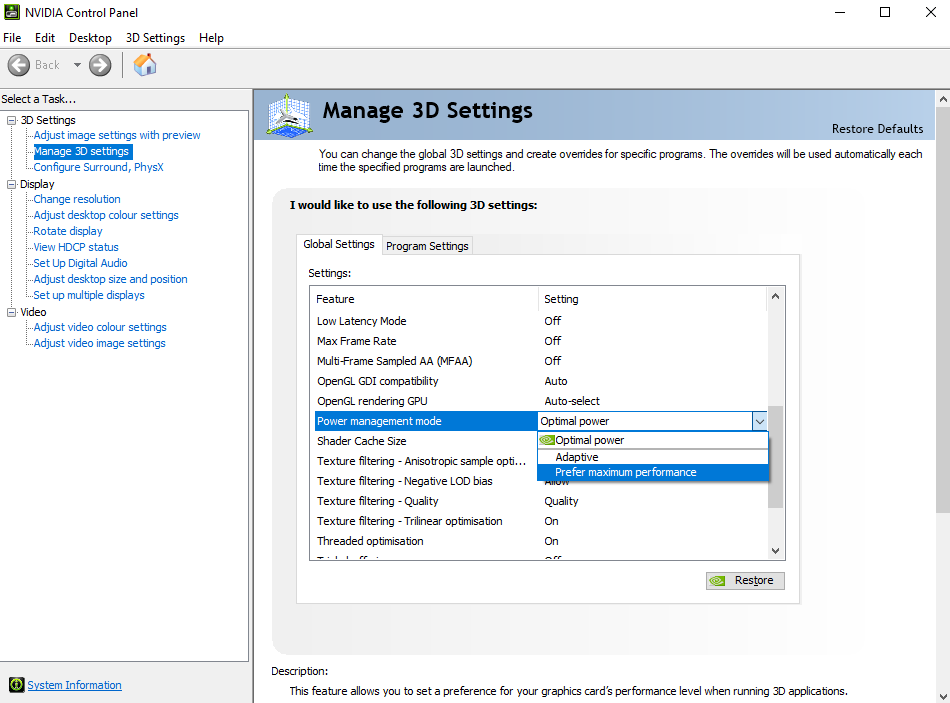
You have the option to configure this either for a specific game or apply it as a general setting for your GPU usage. The pictures provided display the choices through Nvidia Control Panel, though the appearance might vary for AMD software.
If your system utilizes a dual AMD Switchable Graphics GPU, follow these instructions:
- Launch AMD Catalyst Control Center.
- Navigate to Switchable Graphics.
- Choose the High-Performance section and pick the game (if not listed, manually add it by clicking Browse).
- Click Apply. Furthermore, it’s advisable to verify your PC’s power settings.
If you’re using a laptop, make sure the charger is connected.
- Access Control Panel.
- Select Power Options.
- Click on Change Plan Settings.
- Opt for Change advanced power settings.
- From the drop-down menu, select High Performance and confirm with Apply.
Subsequently, we move on to setting a cap for frames per second (FPS). This is done to address potential issues related to overclocking.
To accomplish this, adjust the specific graphics settings for Skye Tales. Once again, the provided images depict the process using Nvidia Control Panel. The approach might differ for AMD setups.
Open Nvidia Control Panel and proceed with “Add program” in the Manage 3D Settings section.
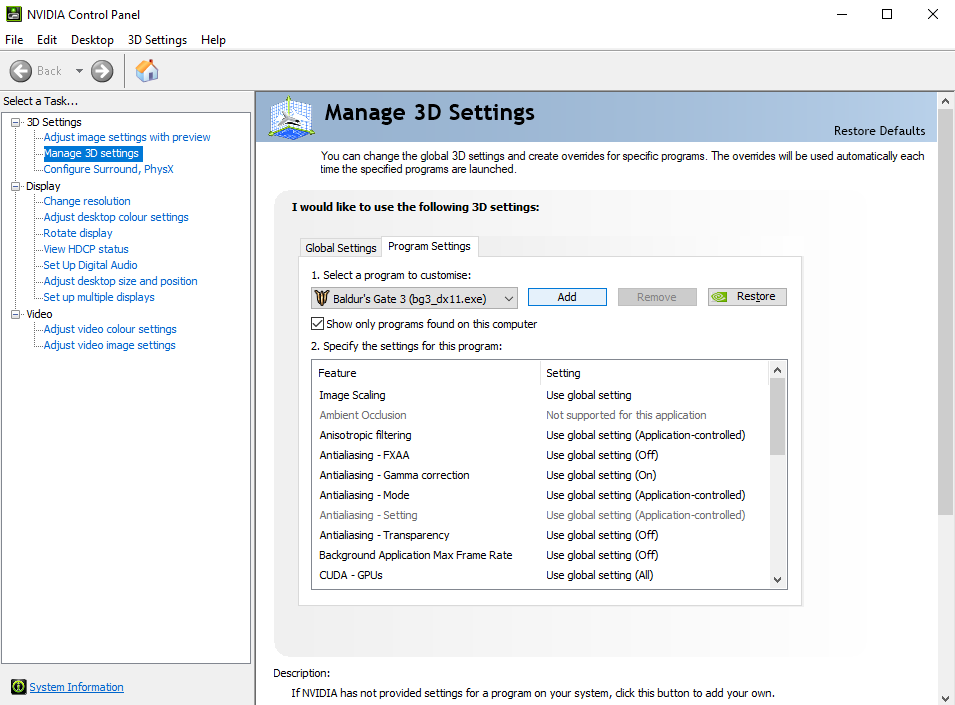
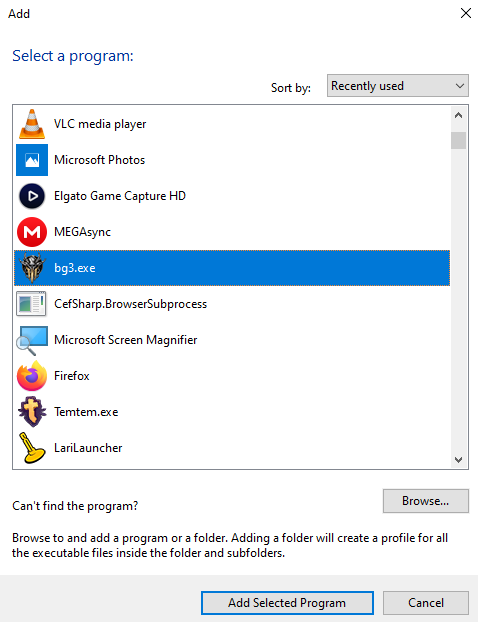
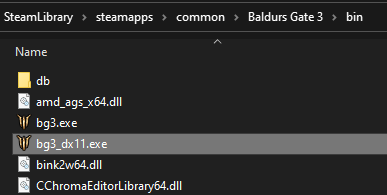
Select the exe file of Skye Tales from the list to add.
You have the option to adjust the frame rate limit. I suggest beginning with 60 FPS and raising it later once you’re confident that your graphics card can manage the workload effectively.
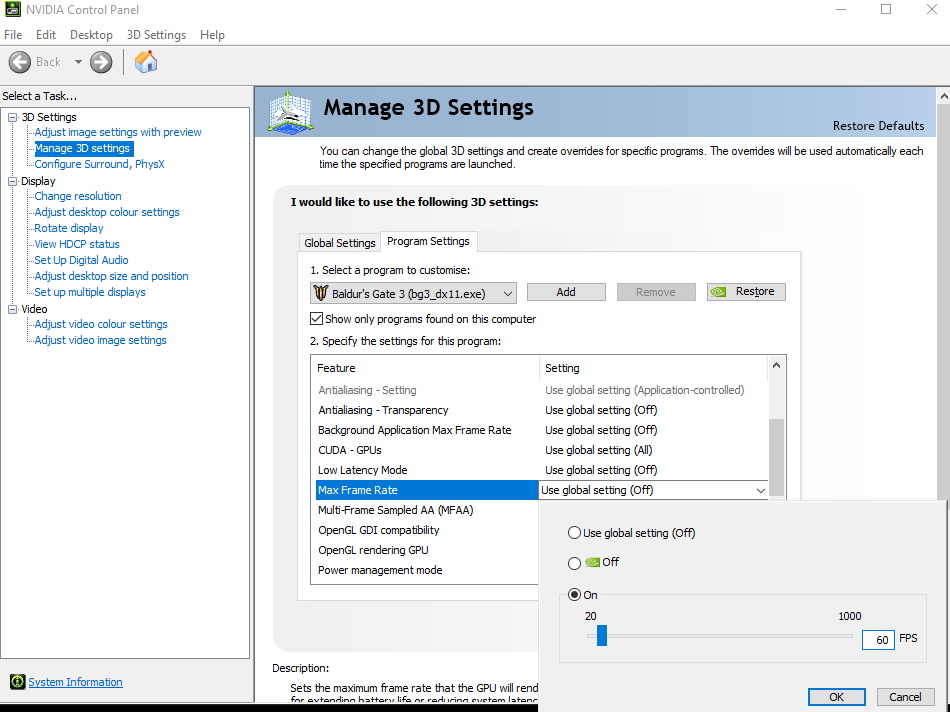
Just remember, we’re using a different game as an example in this case. However, the steps involved are the same, so there’s no need for any confusion.
Use MSI Afterburner
In order to avoid sudden increases in temperature due to abrupt boosts in performance, using a fan curve that responds faster can be beneficial.
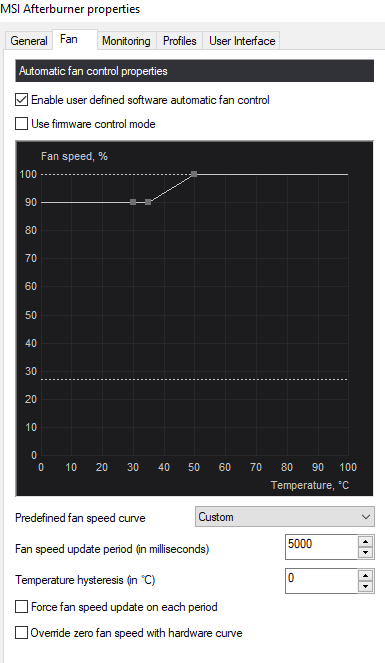
This is the response pattern I personally use for my system.
The outcomes can differ based on your room temperature, the design of your case, how well you maintain your case (keeping it clean from dust and arranging your cables to not disrupt internal airflow), and any additional cooling equipment you have.
How does this make a difference?
Whenever your computer shuts down, either completely or partially, it’s because protective measures kick in to prevent potential hardware damage. This usually happens when certain components get too hot and cross a specific temperature limit.
This is a widespread issue, and it’s not solely caused by the game itself, as many factors contribute to it. In simpler terms, during specific rendering processes, only a portion of what you see gets rendered, and the cooling system of your graphics card adjusts automatically. Nonetheless, there are situations where, for instance, the demand on your graphics card suddenly spikes when transitioning between scenes. This can overwhelm graphics cards with weaker cooling systems, making it hard for them to handle the sudden cooling requirements.
To tackle this problem, adjusting how your fans respond can offer a quick and simple solution.
You can download MSI Afterburner for free from this link.
This tool is also useful to check if any of your hardware components are overclocked and to what extent. Reducing the output of overclocked parts to around 90% to 85%, rather than pushing them beyond 100%, can enhance the game’s stability. This adjustment involves a small sacrifice in performance that’s not very significant.
Use Borderless Gaming
If you’ve got a specific setup for your personal computer, you might find Borderless Gaming to be really useful. It’s a free tool that can do some extra things to help your games work better on your computer.
To get the tool, you can go to this website. This tool doesn’t cost anything to use – it’s free. But if you want to support the person who made it, there’s also a version you can get on Steam.
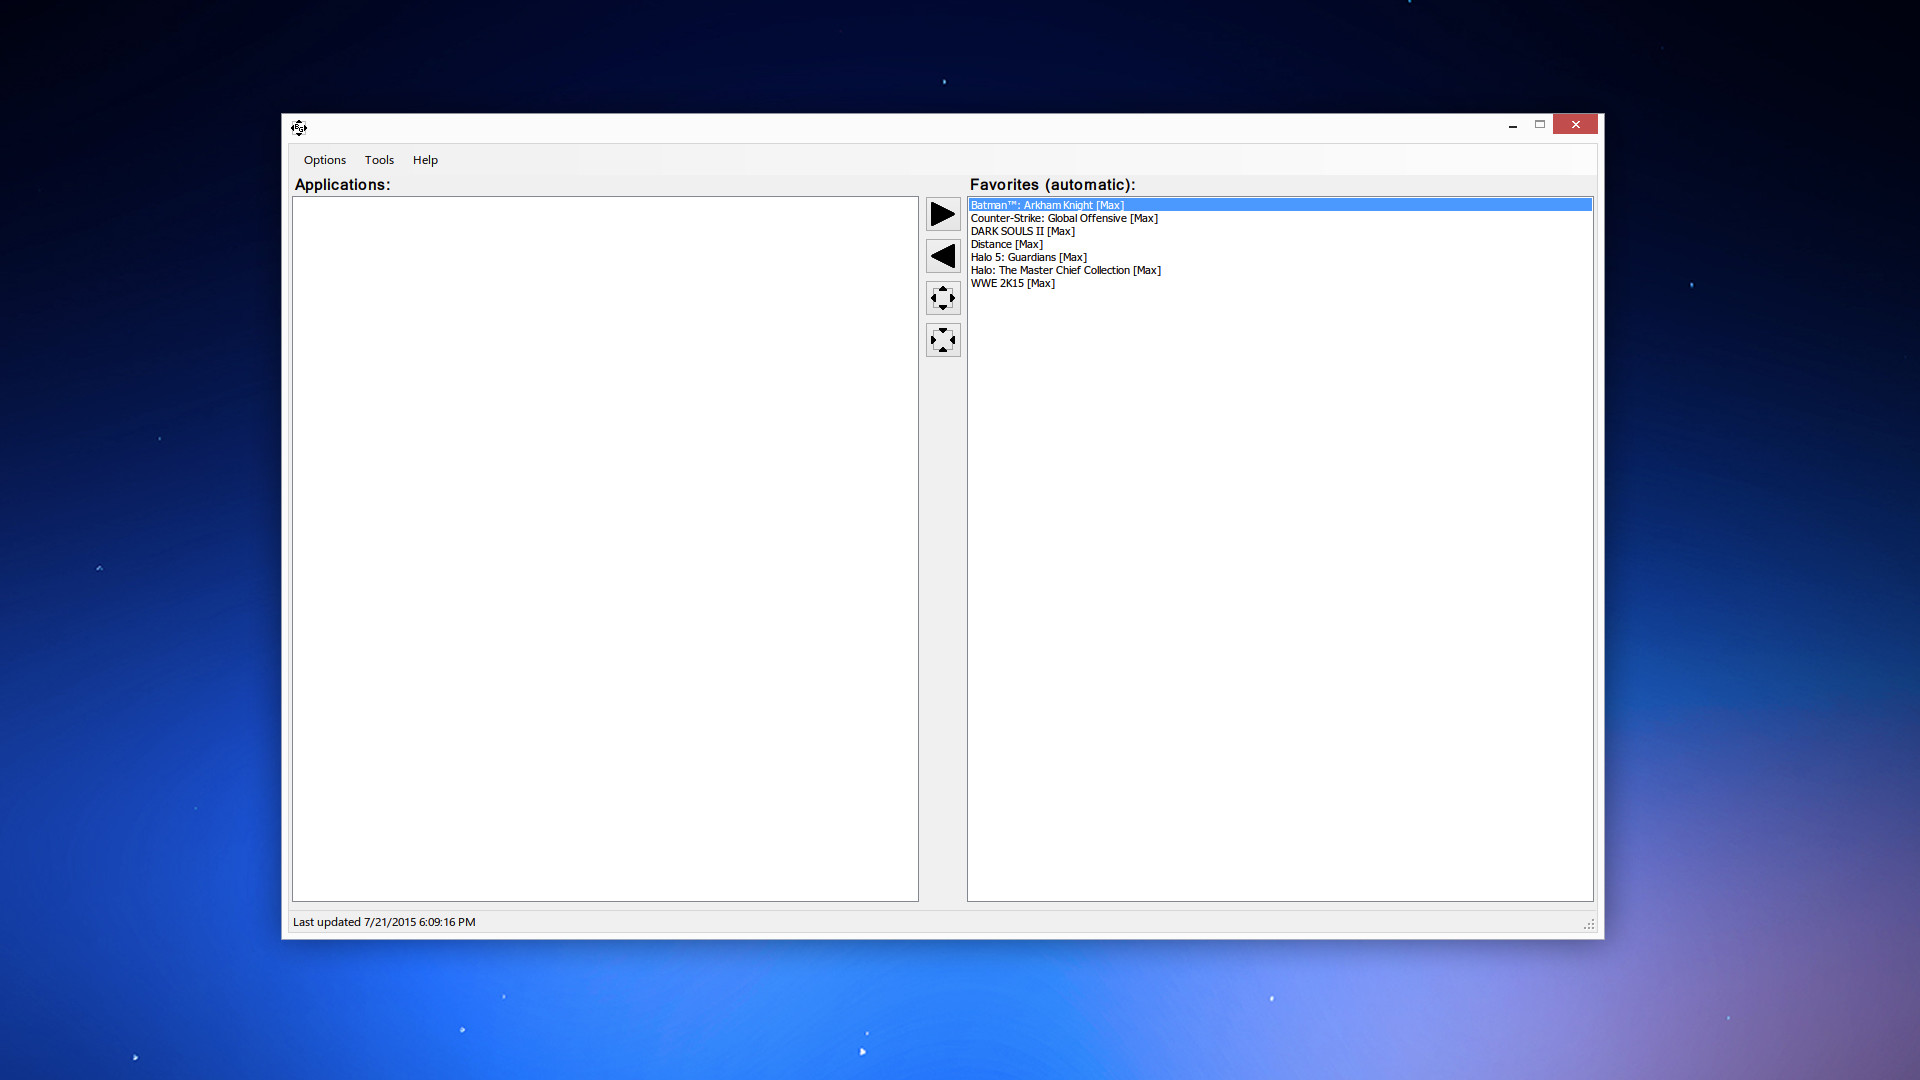
People have found that Borderless Gaming works really well, especially if you’re playing games on multiple screens. It’s known for being really good at fixing problems and making things run smoothly.
If you’re playing Skye Tales and want it to look like it’s fullscreen but still works like a window, you can use this extra tool. It’s even better if you’re using Windows 11.
Increase Shader Cache
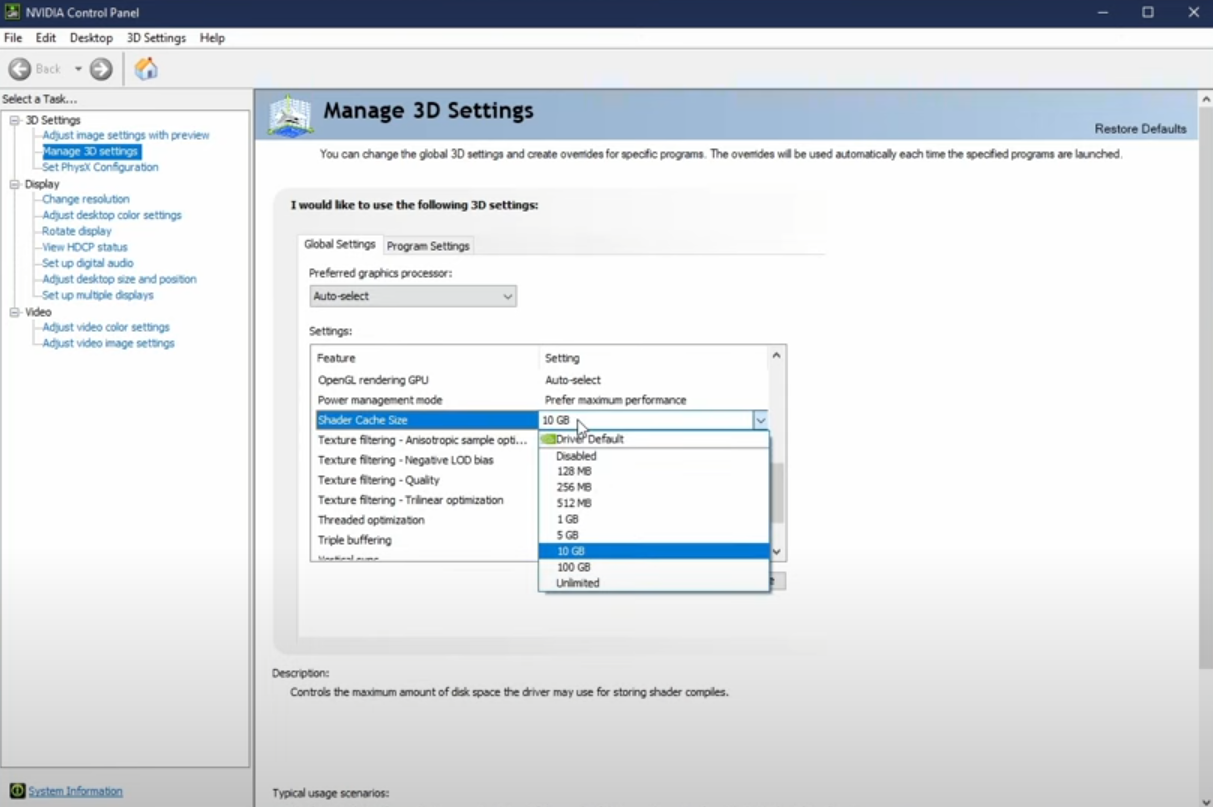
If a game has to generate shaders frequently or if it’s taking a while to do that, consider increasing the shader cache on your graphics card. This can be particularly helpful for computers with lower capabilities!
Increase Virtual Memory
Increasing your computer’s virtual memory will also enhance the stability of Skye Tales.
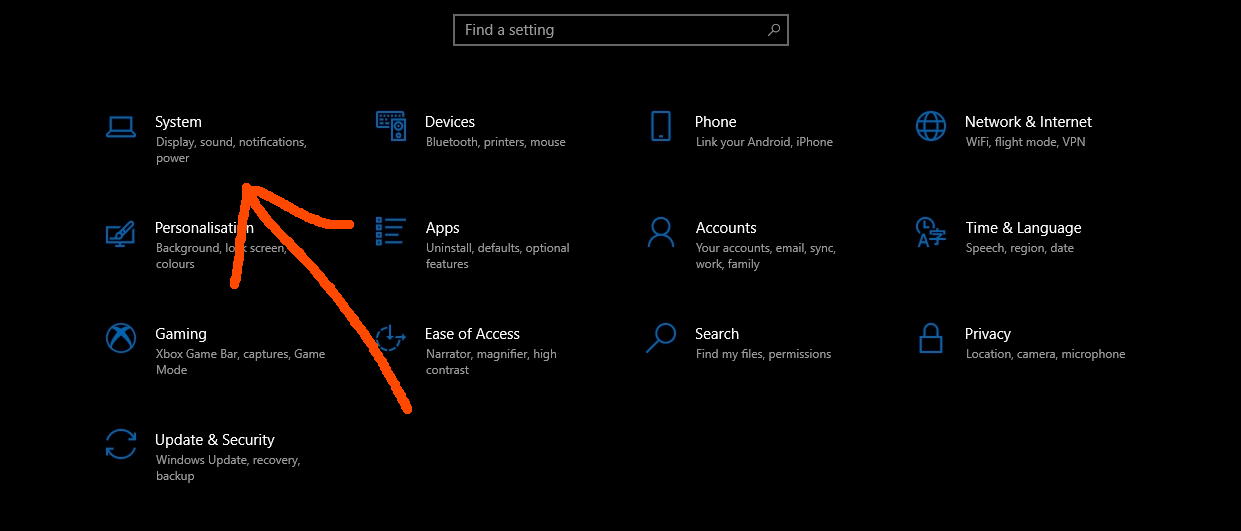
Step 1: Go to the Windows Settings and select the System category
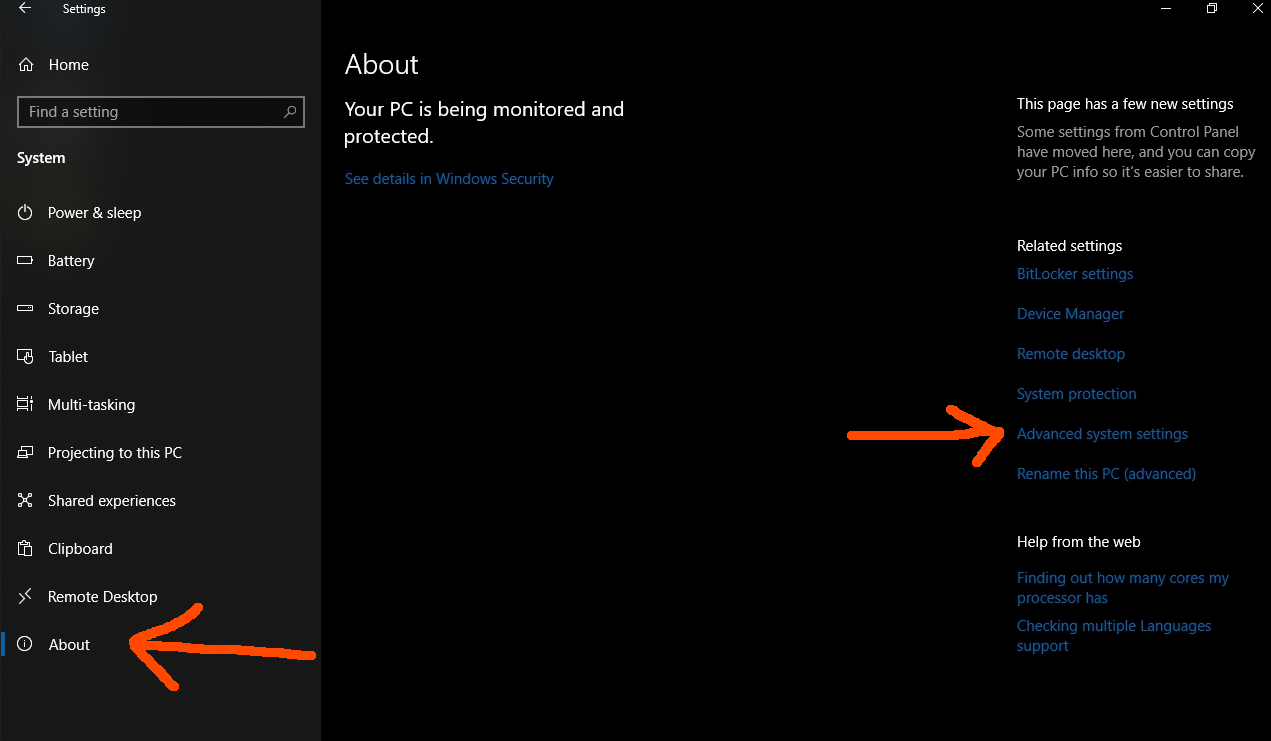
Step 2: Upon opening the System section, click the Advanced system settings located on the right side of the screen.
Step 3: A new window will open showing you more options. Click Performance Options then click the Advanced tab. Under the Virtual memory section, click the Change… button to modify the allocated virtual memory.
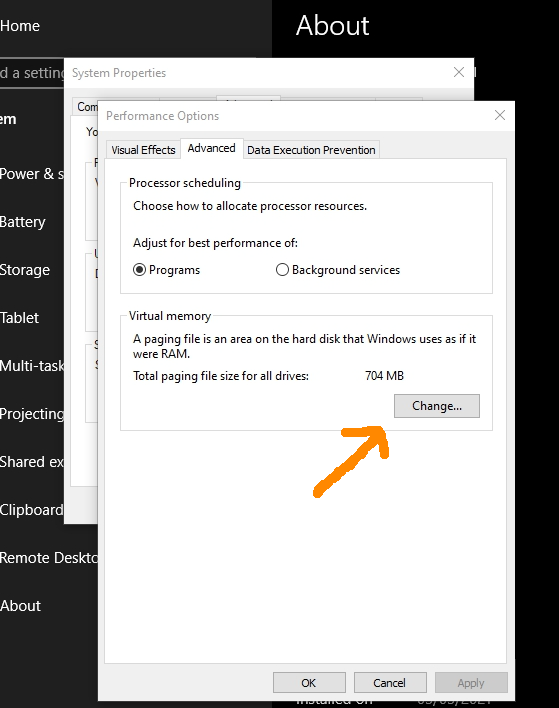
In the example screenshot provided, it’s clear that the amount of memory allocated is quite low. We suggest considering an upgrade to at least 6 GB of memory or higher, though the specific amount should be based on your hardware capabilities. Make sure your device has sufficient memory before making any changes.
Disable Steam Cloud Services
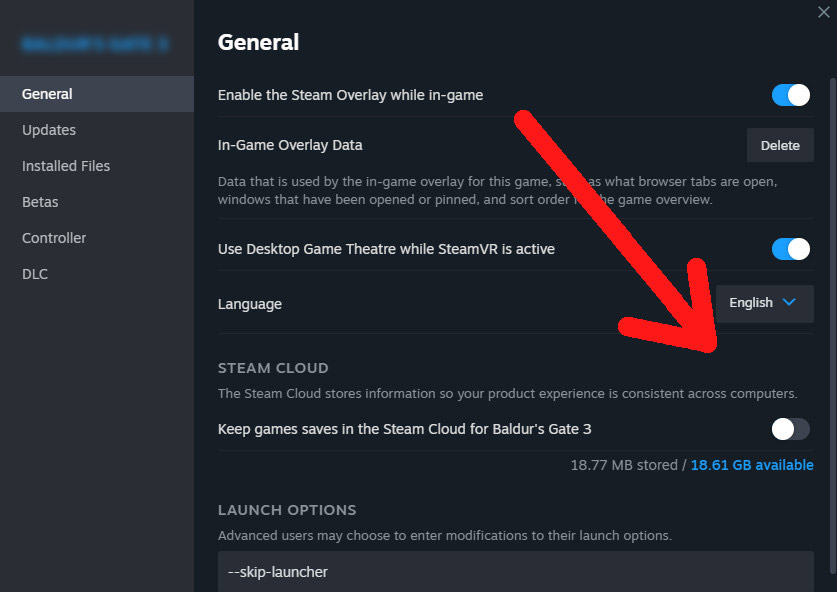
Unless you absolutely require it for the game, like for syncing your game progress with your Steam Deck, or if you simply want occasional backups, my suggestion is to turn off the Steam Cloud Service for the game. This is because it’s a major cause of problems with game saves. To do this, just right-click on the game in your Library, go to Properties, and disable the Steam Cloud for that specific game.
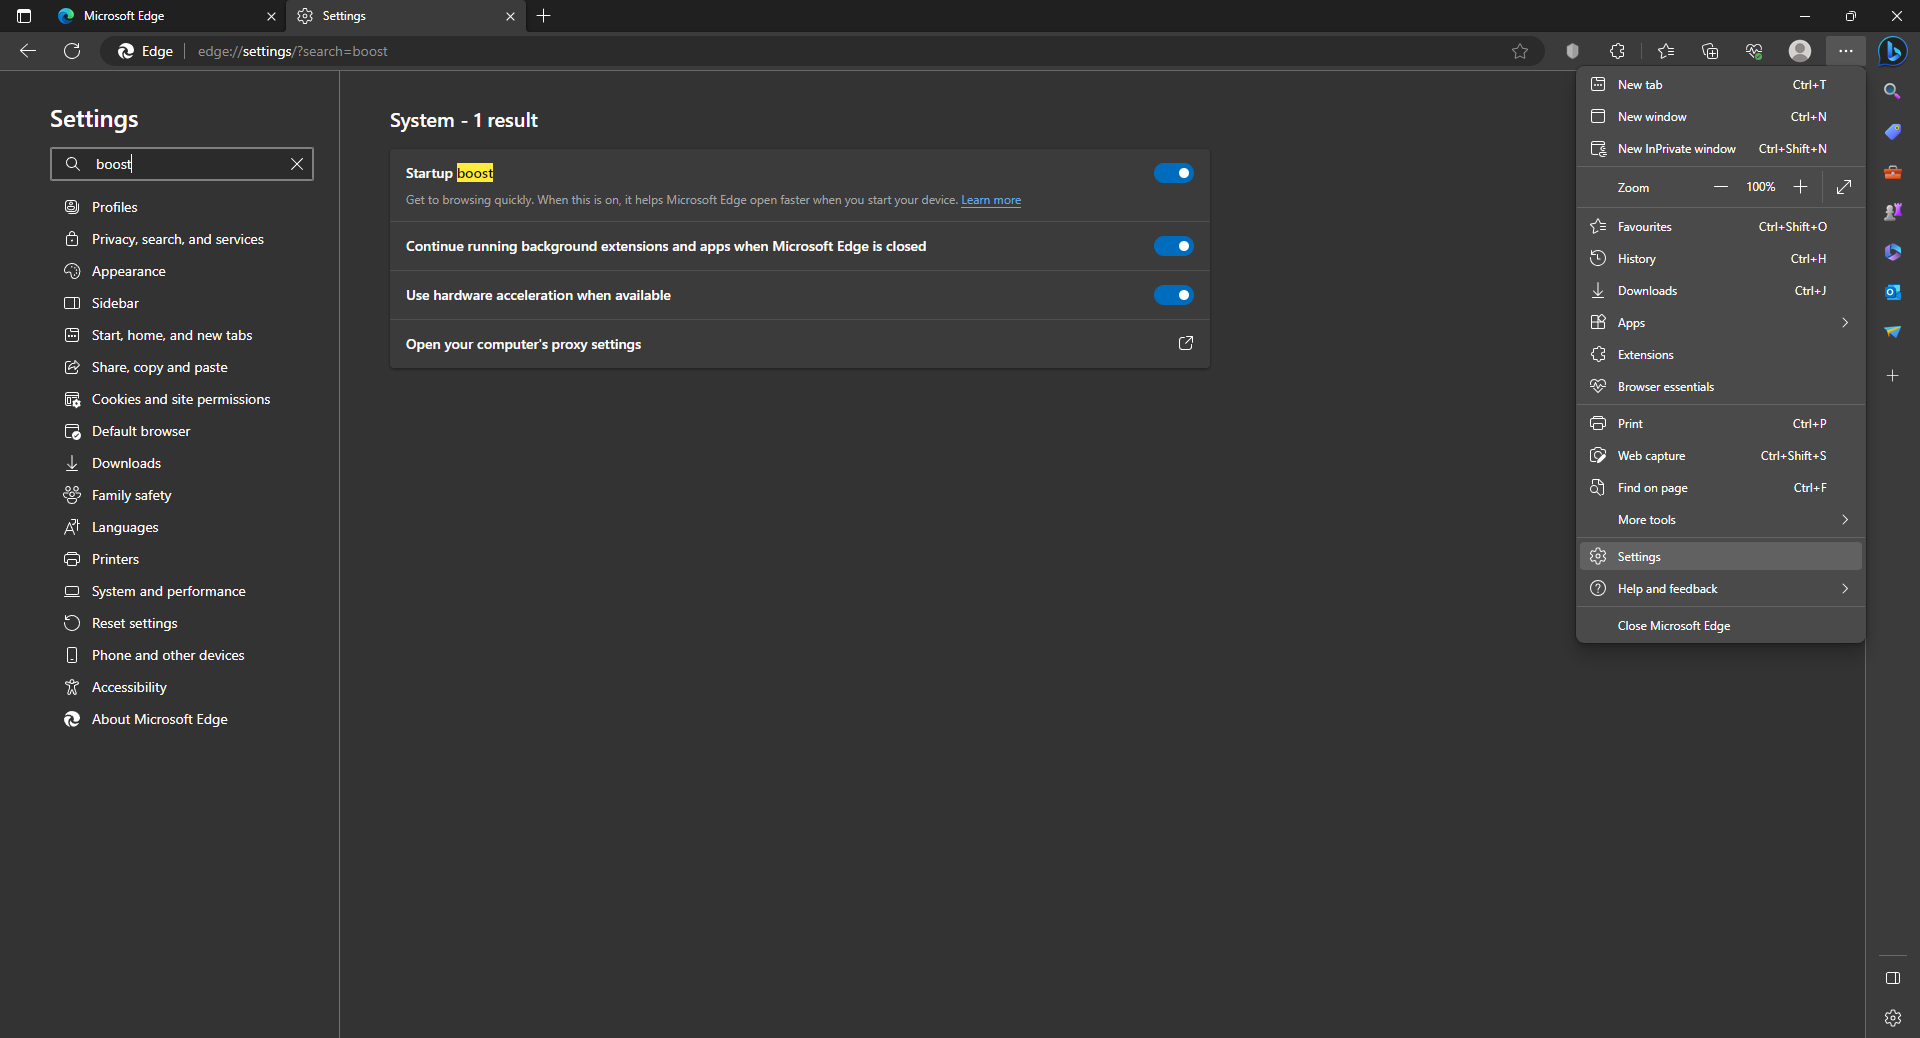
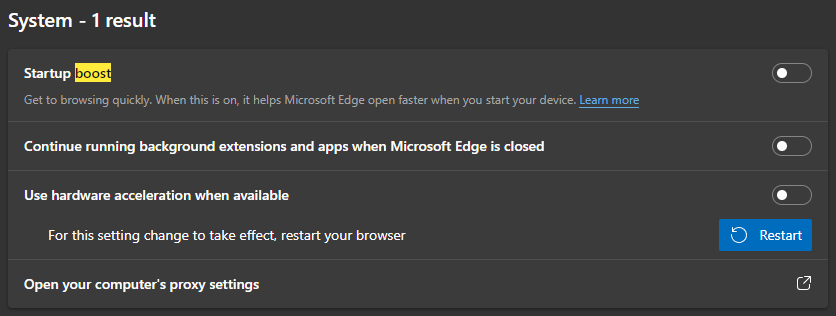
Disable Microsoft Edge Startup boost
Trying to totally get rid of Microsoft Edge is a lost cause, since its features are tightly woven into the heart of the operating system. However, if you go for another browser instead of Microsoft Edge, it’s a good idea to turn off its Startup Boost feature. This way, you can release system resources that would otherwise be given to the app without actually being used.
Contact the Official Skye Tales Support
If everything else doesn’t work, our suggestion is to get in touch with the official support team of Skye Tales directly. There are various methods to do this, but we suggest attempting to contact them through Skye Tales’s official community page on Steam. Developers who are active usually respond to reports posted in the community. Additionally, fellow players might offer their advice if they’ve encountered the same problem. If you haven’t received a response from the developer via the community page, then try reaching out to them through their official website.
